
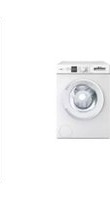
3FE-7414IT - Washing machine FAGOR - Free user manual and instructions
Find the device manual for free 3FE-7414IT FAGOR in PDF.


| Product Type | Freestanding Washing Machine |
| Brand | Fagor |
| Model | 3FE-7414IT |
| Capacity | 7 kg |
| Maximum Spin Speed | 1400 rpm |
| Energy Class | A+++ |
| Dimensions (H x W x D) | 85 cm x 60 cm x 55 cm |
| Weight | Approx. 70 kg |
| Power Supply | 220-240 V, 50 Hz, 10 A |
| Water Consumption (per cycle) | Approx. 49 L |
| Annual Energy Consumption | Approx. 175 kWh |
| Noise Level (Wash/Spin) | 56 dB / 76 dB |
| Number of Programs | 15 wash programs |
| Key Programs | Cotton, Synthetics, Delicates, Wool, Quick 30', Eco, Rinse & Spin, Drum Clean |
| Special Features | Delay timer, Child lock, Overflow protection, Unbalanced load control |
| Display Type | LED digital display |
| Door Type | Front loading, 40 cm diameter, 180° opening |
| Cleaning and Maintenance | Clean detergent drawer, drain filter, and door seal regularly; run drum clean cycle monthly |
| Safety Features | Child lock, door lock during operation, anti-flood system, overheating protection |
| Spare Parts Availability | Available from authorized service centers; order via model number |
| Repairability Index | 7.5/10 |
| Manual Languages | EN, ES, PT (multi-language download) |
| General Information | Freestanding, front load, 112-page manual, user rating 7.5/10 |
Frequently Asked Questions - 3FE-7414IT FAGOR
User questions about 3FE-7414IT FAGOR
0 question about this device. Answer the ones you know or ask your own.
Ask a new question about this device
Download the instructions for your Washing machine in PDF format for free! Find your manual 3FE-7414IT - FAGOR and take your electronic device back in hand. On this page are published all the documents necessary for the use of your device. 3FE-7414IT by FAGOR.
USER MANUAL 3FE-7414IT FAGOR
DISPOSAL OF OLD APPLIANCE
BASIC INFORMATION
MANUFACTURER'S DECLARATION
INSTALL THE APPLIANCE
FEATURES AND COMPONENTS 91
TROUBLESHOOTING
PRACTICAL TIPS ON WASHING
BUILT-IN INSTALLATION
76
77
77
78
78
88
98
02
106
ECOLOGÍA EN PRÁCTICA
natural_image
Abstract graphic of a circular water tank with green leaves emerging from its surface, surrounded by splashes (no text or symbols)DESEMBALAJE

natural_image
Simple line drawing of a three chasing recycling symbol (no text or labels)natural_image
Simple line drawing of a trash bin with crossed lines indicating no waste or discharge (no text or symbols)
natural_image
Line drawing of a server rack with a wrench icon indicating rotation (no text or symbols)natural_image
Line drawing of a mechanical device with a button and mounting bracket (no text or symbols)natural_image
Three diagrams showing a container with a cross mark placed on a surface, with no text or symbols present.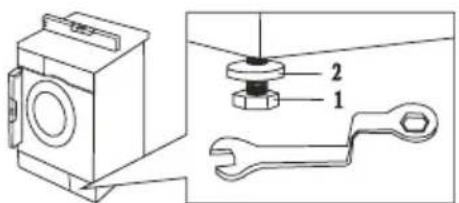

natural_image
Illustration of three different plumbing fixtures: a hose, a faucet, and a pipe fitting (no text or symbols present)natural_image
Illustration of a hand using a power tool to switch an electrical socket, with a magnified view showing three pins and a terminal symbol (no text or labels present)natural_image
Illustration of a hand holding a bulb above a plate with a small object, next to a screen (no text or symbols)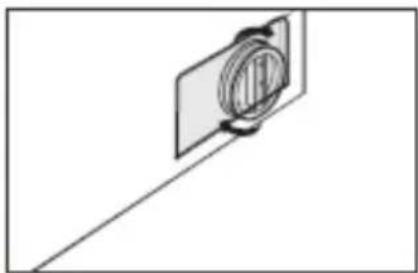
natural_image
Pure diagram of a circular object mounted on a rectangular plate with diagonal lines (no text or symbols)natural_image
Diagram of a pipe fitting with a valve, showing mechanical components and directional arrow (no text or symbols)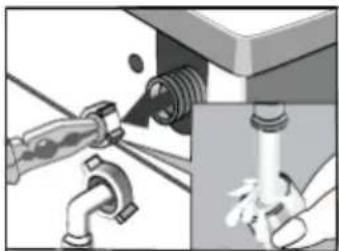
natural_image
Illustration of plumbing fixtures including a pipe fitting and a drain valve (no text or symbols)natural_image
Diagram of a mechanical device with internal components and directional arrows indicating movement (no text or symbols)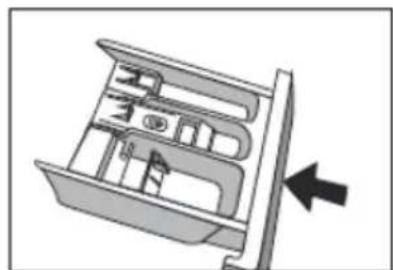
natural_image
Diagram of a drawer with internal compartments and an arrow indicating direction (no text or symbols)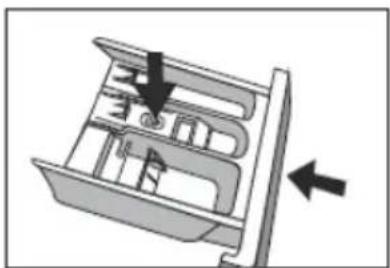
natural_image
Diagram of a mechanical device with internal compartments and directional arrows indicating movement (no text or symbols)2
Preparados para aclarar
AVISO
natural_image
Line drawing of a washing machine with door and side panel, showing internal mechanism (no text or symbols)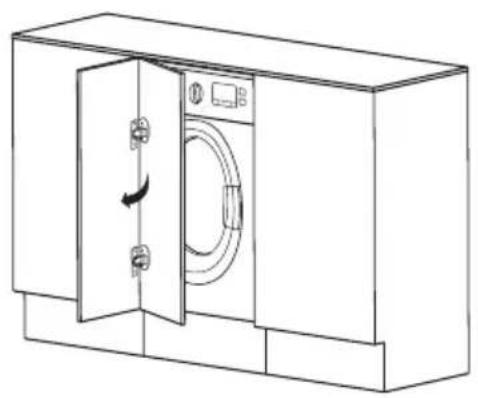
natural_image
Line drawing of a cabinet with an open door and a washing machine, showing internal components and directional arrows (no text or symbols)1
natural_image
Simple line drawing of a symmetrical shape with vertical bars and circular markers (no text or symbols)3
4
Instalación de imán
natural_image
Line drawing of a washing machine with attached screwdriver and switch components (no text or symbols)5
natural_image
Line drawing of a washing machine with a close-up view showing the door and buttons (no text or symbols)6
natural_image
Digital illustration of a circular water tank with green leaves emerging from its side, symbolizing environmental protection (no text or symbols present)DESEMPACOTAMENTO

natural_image
Simple line drawing of a three chasing recycling symbol (no text or labels)natural_image
Symbol of a trash bin crossed with a diagonal line, representing waste sorting or restriction (no text present)natural_image
Line drawing of a washing machine casing with a wrench icon pointing to the side panel (no text or symbols present)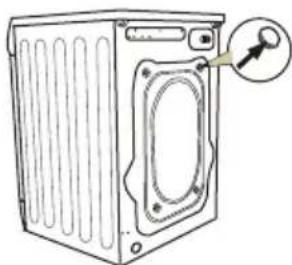
natural_image
Line drawing of a mechanical device with a button and mounting bracket (no text or symbols)natural_image
Three diagrams showing a container with cross marks on a surface, one with a circular hole and another marked with an X (no text or symbols)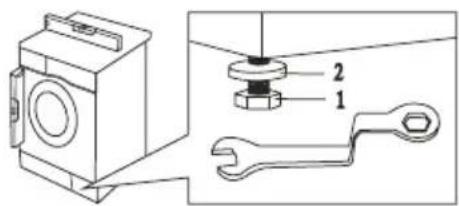

natural_image
Illustration of four different household water pumps and a hose, showing different installation methods (no text or labels)natural_image
Illustration of a hand holding an electrical plug next to a wall socket with three pins, plus a power symbol (no text or labels)Conexão à corrente eléctrica
- Gaveta de detergente
- Cilindro
- Painel de comando
- Pega da porta
- Tampa do filtro da bomba
Acessórios:
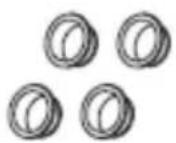
Tampões de
buracos de
transporte
natural_image
Illustration of a hand holding a bulb above a plate with food items, no text or symbols present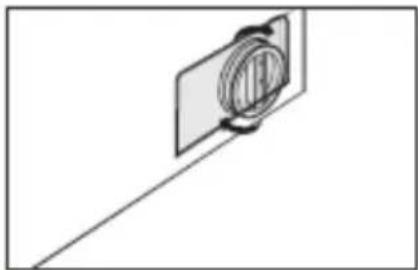
natural_image
Simple line drawing of a camera lens mounted on a flat surface (no text or symbols)natural_image
Pure diagram of a pipe fitting with a valve, no text or symbols present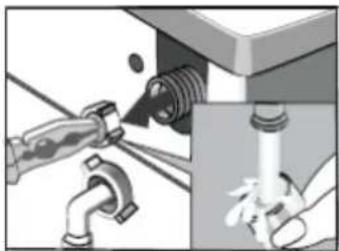
natural_image
Illustration of a pipe repair or installation procedure with hands operating the valve (no text or symbols visible)natural_image
Diagram of a mechanical device with internal compartments and directional arrows indicating movement (no text or symbols)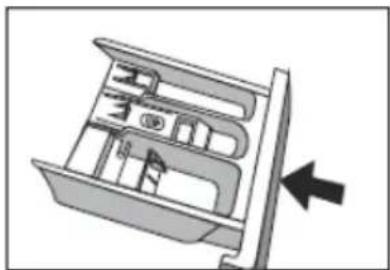
natural_image
Diagram of a drawer with internal compartments and an arrow indicating direction (no text or symbols)
natural_image
Diagram of a mechanical device with internal compartments and directional arrows indicating movement (no text or symbols)AVISO
natural_image
Line drawing of a washing machine with door and side door, showing internal components and airflow direction (no text or symbols)natural_image
Line drawing of a cabinet with an open door and a washing machine (no text or symbols)natural_image
Four technical illustrations of different tools: screwdriver, tool, ruler, and pencil (no text or symbols present)■ Modelo na porta.
natural_image
Simple line drawing of a symmetrical shape with vertical and horizontal boundaries, no text or symbols present.Cola na porta (porta à esquerda)
Faça furos na porta
3
4
Instalação do ímã
natural_image
Line drawing of a washing machine with attached switch and lock components (no text or symbols)5
Instalação da porta
natural_image
Line drawing of a washing machine with a screw inserted, showing internal components and no text or symbols6
For many years, Fagor has consistently pursued pro-ecological policy.
Concern for the environment is as important for us as the use of modern technology.
The development of technology has enabled our factories to become more environmentally friendly – we use less and less water, electricity and less waste water and solid waste is generated in the production.
A lot of attention is paid to materials used in production. We strive to use only those that do not contain harmful substances and make recycling and safe disposal possible after use.

natural_image
Abstract graphic of a circular water tank with green leaf splashing around it, symbolizing environmental protection (no text or symbols)UNPACKING

natural_image
Simple line drawing of a three chasing recycling symbol (no text or labels)During transportation, protective packaging was used to protect the appliance against any damage. After unpacking, please dispose of all elements of packaging in a way that will not cause damage to the environment.
All materials used for packaging the appliance are environmentally friendly; they are 100% recyclable and are marked with the appropriate symbol.
Important! Packaging materials (bags, polyethylene, polystyrene, etc.) should be kept away from children during unpacking.
DISPOSAL OF OLD APPLIANCE

natural_image
Simple line drawing of a trash bin with crossed lines indicating no waste or prohibition (no text or symbols)
In accordance with European Directive 2012/19/EU and local legislation regarding used electrical and electronic goods, this appliance is marked with the symbol of the crossed-out waste container. This marking indicates that the appliance must not be disposed of together with other household waste after it has been used.
The user is obliged to hand it over to waste collection centre collecting used electrical and electronic goods. The collectors, including local collection points, shops and local authority departments provide recycling schemes.
Proper handling of used electrical and electronic goods helps avoid environmental and health hazards resulting from the presence of dangerous components and the inappropriate storage and processing of such goods.
BASIC INFORMATION

This washing machine is intended for domestic use only to wash textiles and clothes designed to be machine washed in a detergent bath.
Before plugging the washing machine into the mains, remove the safety packaging and ensure the machine is level. The manufacturer reserves the right to introduce changes, which do not affect operation of the appliance.
USAGE
Carefully read the instructions below before using the appliance.
- Never use the appliance outdoors or anywhere the temperature may fall below freezing.
The machine should not be operated by children or anyone who has not read the instructions.

Temperatures below 0^ C can damage the washing machine! In the event of the machine being stored or transported in sub-zero temperatures, it should be left to acclimatise in a temperature above 0^ C for 8 hours before being used.
MANUFACTURER'S DECLARATION
Manufacturer's Declaration
The manufacturer hereby declares that this product meets the requirements of the following European directives:
• Low Voltage Directive 2014/35/EC
• Electromagnetic Compatibility (EMC) Directive 2014/30/EC
• ErP Directive 2009/125/EC
• Directive RoHS 2011/65/EC
and has thus been marked with the C€ symbol and been issued with a declaration of compliance made available to market regulators.
SAFETY AND GERMENT CARE LABELS
| The risk of death! | This appliance should not be used by children under 8 years of age, persons with reduced physical or mental capabilities, and persons who do not have sufficient skills to use this type of appliance. Such persons should be offered proper supervision or instructions on safe handling of appliance and related risks. Children must not play with the appliance or perform any maintenance-related activities. Children under 3 years of age must be kept away from the appliance unless continuously supervised. |
| Children could get caught inside the appliance and get into a life-threatening situation. | |
| Risk of suffocation! | If you allow children to play with the packaging/film or parts of the package, they can get entangled or put packaging over their head and risk suffocation. Keep packaging/plastic film or parts of packaging out of reach of children. |
| Risk of poisoning! | Washing detergents and fabric softeners can cause poisoning if ingested. In the event of accidental ingestion, consult your doctor. Washing detergents and fabric softeners should be stored out of the reach of children. |
| Risk of burns! | If laundry is washed at high temperature, door glass becomes hot.Prevent children from touching the hot door. |
| Eye/skin irritation! | Contact with detergents and softeners may cause eye or skin irritation. In case of eye/skin contact, thoroughly rinse eyes/skin to remove fabric detergent/softener. Washing detergents and fabric softeners should be stored out of the reach of children. |
| Risk of electric shock.Risk of fire/damage to property/appliance! | If the appliance is not correctly installed, it may be dangerous. Make sure that:Mains voltage corresponds to the voltage indicated on the appliance nameplate (identification plate)The current load and required fuse protection are specified on the nameplate.The appliance is connected to AC source only through a properly installed and grounded wall socket in accordance with national standards. |
| Risk of electric shock.Risk of fire/damage to property/appliance! | The power cord and the grounded wall socket fit together and the grounding system has been properly installed. |
| Power cord cross section is sufficient. | |
| Power plug is always accessible. | |
If a miniature circuit-breaker is used, always use a circuit-breaker with the following designation: This symbol is the only way to make sure that all the necessary requirements have been met. This symbol is the only way to make sure that all the necessary requirements have been met. | |
| Risk of fire/damage to property/appliance! | The use of extension cords or splitters may result in fire due to overheating or short circuit. Connect the appliance directly to a properly grounded wall socket. Do not use extension cords, splitters or power strips. |
| Health risk / risk of damage to property/appliance! | The appliance may vibrate or displace while in use, potentially causing injury or property damage. Set the appliance on a clean, level and hard surface using a level spirit.If any protruding items are caught by the appliance (e.g. doors) when trying to lift or move it, the item may come off and cause injury.Do not grasp any protruding parts of the appliance to move it. |
| Risk of injury! | The appliance is very heavy. Lifting may cause injury. Do not lift this appliance by yourself. |
| This appliance has sharp edges that can cause a hand injury. Do not hold the appliance by sharp edges. Only lift the appliance after you put on the gloves. | |
| If the hoses or electrical cables are not routed properly, you can trip and sustain an injury. Rout hoses and cables so that they do not constitute a tripping hazard. | |
| Important!Damage to property/appliance | If the water level is too high or too low, the appliance may not work properly, which can cause damage to property/appliance.Make sure that water is supplied under pressure of minimum 100 kPa (1 bar) and not exceeding 1000 kPa (10 bar). |
| If the water supplying hoses have been modified or damaged, this can cause damage to property/appliance. The water supply hoses must not be kinked, crushed, modified or cut. | |
| The use of third-party hoses to connect the appliance to water supply can cause damage to property or the appliance. | |
| Important!Damage to property/appliance | Use only hoses supplied with the appliance, or the original hoses up designed for the appliance. |
| The appliance is secured for transport with transit bolts. If you don’t remove transit bolts before using the appliance, the appliance may be damaged. Remove all transit bolts before using the appliance for the first time.Make sure you keep transit bolts in a safe place for future use. If the appliance will be transported, to avoid any damage, you must reinstall the transit bolts. | |
| Risk of explosion/fire hazard! | Laundry washed with detergents that contain solvents and thinners pose a risk of explosion in the drum.Thoroughly rinse laundry with water before washing in the washing machine. |
| Risk of poisoning! | Cleaning agents containing solvents may give off poisonous vapours.Do not use cleaning agents containing solvents. |
| Risk of injury! | Do not lean against/sit on open appliance door as this can lead to the appliance tipping over.Do not lean against the open door of the appliance. |
| Climbing on the appliance may cause the worktop to break or collapse and lead to an injuryDo not climb on the appliance. | |
| Reaching into the drum while is still rotates could injure your hand.Wait until the drum has come to a standstill. | |
| Risk of scalding! | When washing at high temperature, there is a risk of scalding as a result of contact with hot water and detergent (e.g. when you drain the water into the sink).Do not put your hands in hot water with detergent solution. |
| Eye/skin irritation! | Fabric detergents and softeners may splash, if the detergent drawer remains open during operation.In case of eye/skin contact, thoroughly rinse eyes/skin to remove fabric detergent/softener. In the event of accidental ingestion, consult your doctor. |
| Important! Damage to property/appliance | If the amount of laundry in the washing machine exceeds the maximum load, it may not operate properly or cause damage to property or the appliance.Do not exceed the maximum load capacity of dry laundry.Do not exceed the maximum load capacity for individual wash programmes. |
| Adding too much detergent or fabric softener may cause damage to property or the appliance.Use fabric detergent/softener according to the manufacturer's instructions. | |
| The risk of death!! | The appliance is powered by electricity. Touching live elements poses a risk of electric shock. Therefore, remember: |
| Turn off the appliance:Unplug the appliance from the wall outlet. | |
| We never grab the plug with wet hands. | |
| When pulling the plug, always hold the plug, not the power cord, because this can damage the power cord. | |
| Do not make any technical modifications to the appliance or its components. | |
| Any repairs or other work on the appliance must only be performed by our service facility or by an electrician. The same applies to replacing the power cord (if necessary). | |
| You can order a spare power cord in our service centres. | |
| Risk of poisoning! | Cleaning agents containing solvents may give off poisonous vapours.Do not use cleaning agents containing solvents. |
| Risk of electric shock / damage to property / appliance! | If water penetrates into the appliance, it may cause a short circuit.Never use pressure washer or steam cleaner to clean the appliance. |
| Health risk / risk of damage to property/appliance! | The use of third-party spare parts and accessories is dangerous and may cause injury, damage to property or appliance.For safety reasons, use original spare parts only. |
| Important! Damage to property/appliance | Fabric cleaners, impregnating agents, stain removers, pre-wash agents, etc. may damage the appliance outer surface.Therefore, remember: |
| Important! Damage to property/appliance | Make sure there is no contact with the appliance surface.Clean the appliance with a damp cloth only. |
UNDERSTANDING THE SYMBOLS ON CLOTHES LABELS
| Washing |  |  |  |  |
| boil at 90°C normal wash at 60°C | normal wash at 40°C | Do NOT wash! | ||
 |  |  | ||
| delicate handwash | ||||
| Chemical cleaning |  |  |  |  |
| all solvents all except TRI petrol only NO | Dry clean! | |||
| Tumble dryer |  |  |  |  |
| normal low high Do NOT dry! | ||||
| Ironing |  |  |  |  |
| 110°C 150°C 200°C Do NOT Iron | ||||
INSTALL THE APPLIANCE
1
Remove the transit bolts
(keep the bolts for future use, e.g. when moving house).
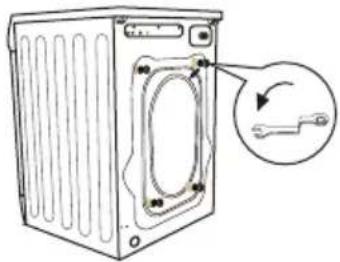
■ unscrew the 4 transit bolts with a spanner,
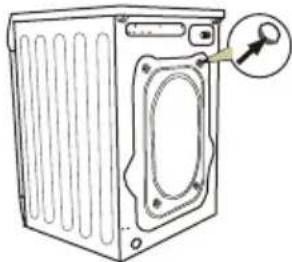
■ remove the rubber and plastic transport brackets from the sockets along with the washers and bolts.
natural_image
Line drawing of a mechanical device with a button and mounting bracket (no text or symbols)- stop up the holes with the stoppers enclosed in the accessories bag.

Caution: the transit bolts MUST be removed before the washing machine is used!
2
Position and level the washing machine
- place the washing machine on a solid, level surface,
■ loosen the plastic washer (2)
Level the appliance by adjusting the legs (1)
■ lock with washers (2)
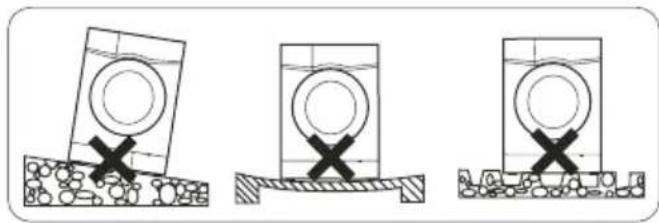
natural_image
Three diagrams showing a washing machine on a surface with cross marks indicating the weight, and two containers partially submerged in liquid (no text or symbols present)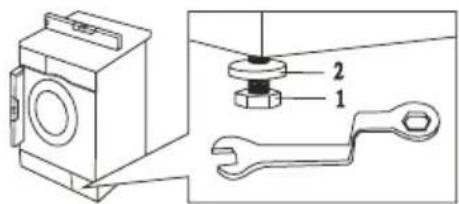

After positioning and levelling the appliance, check that it is stable by pressing down each corner and ensuring it does not move!
3
Connect the water supply
Use only the new hoses supplied with the machine. Do not re-use hoses.
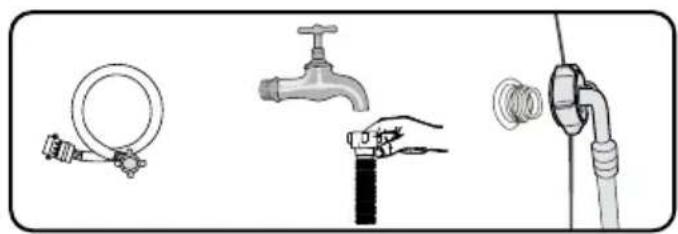
natural_image
Illustration of three different hand tools: a ring device, a faucet, and a hose with a coiled hose (no text or symbols present)A supply hose with seals is inside the drum of the machine. Water pressure min 0.05 MPa (0.5 bar), max 1 MPa (10 bar).
1). after connecting, make sure the hose is not twisted
2) after connecting the hose and the valve, check they are sealed tight
3). regularly check the condition of the hose.

Supply the machine with cold water only.
4
Water drain
The drain hose is at the back of the machine. Fix the drain hose so that it does not move while the washing machine is in operation. If necessary, use the elbow (1).
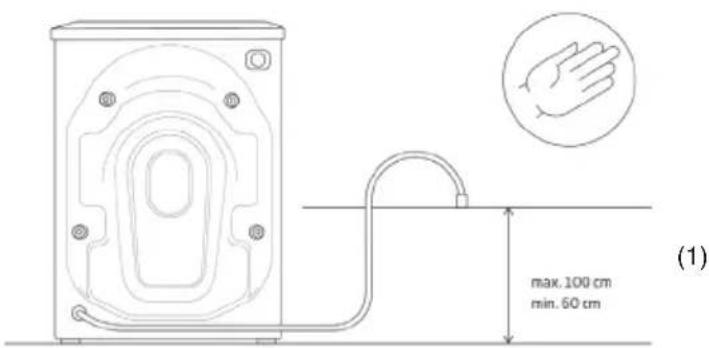
Connection on the left Connection on the right
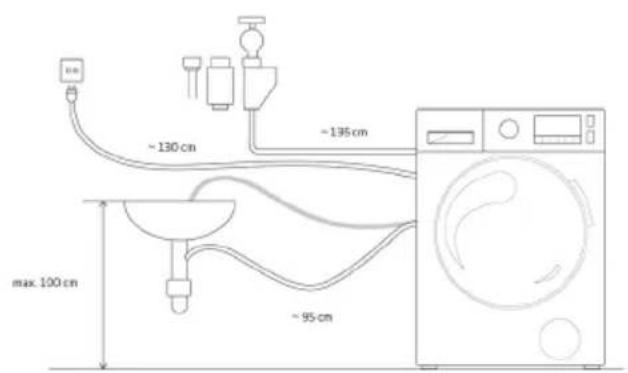

5
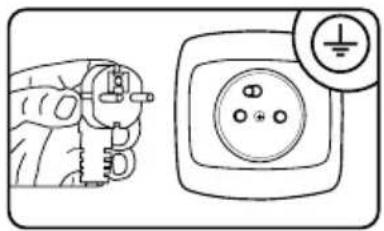
natural_image
Illustration of a hand using a tool to install an electrical socket, with a magnified inset showing the socket's terminal (no text or symbols present)Connect to power supply
Electrical wall outlet where the appliance is connects must be in a visible and accessible place,
■ Only plug the appliance into a properly installed socket with an earthing pin,
- Do not use an extension cord to connect the appliance,
in the event of the power cord being damaged, it must be replaced by an authorised service technician,
the electrical system to which the appliance is to be connected must be protected with a 10 A fuse.
Prepare to wash:
Small items such as coins, paper clips, needles, etc., may damage the laundry and the washing machine, you should therefore follow a few important recommendations:
1). Empty pockets
2). Remove all metal items
3.) Delicate items such as bras or stockings should be washed in protective mesh laundry bag
4). Close zippers and fasten buttons
5). Removal of foreign bodies from the appliance.
FEATURES AND COMPONENTS
DESCRIPTION OF THE APPLIANCE

- Detergent drawer
- Drum
- Control Panel
- Door handle
- Pump filter cover
Accessories:
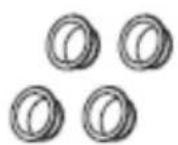
Transport hole plug
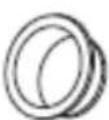
Hole plug (optional)

Inlet pipe C

Inlet pipe H (optional)
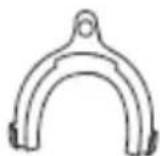
Outlet hose support (optional)
DISPLAY AND CONTROL PANEL
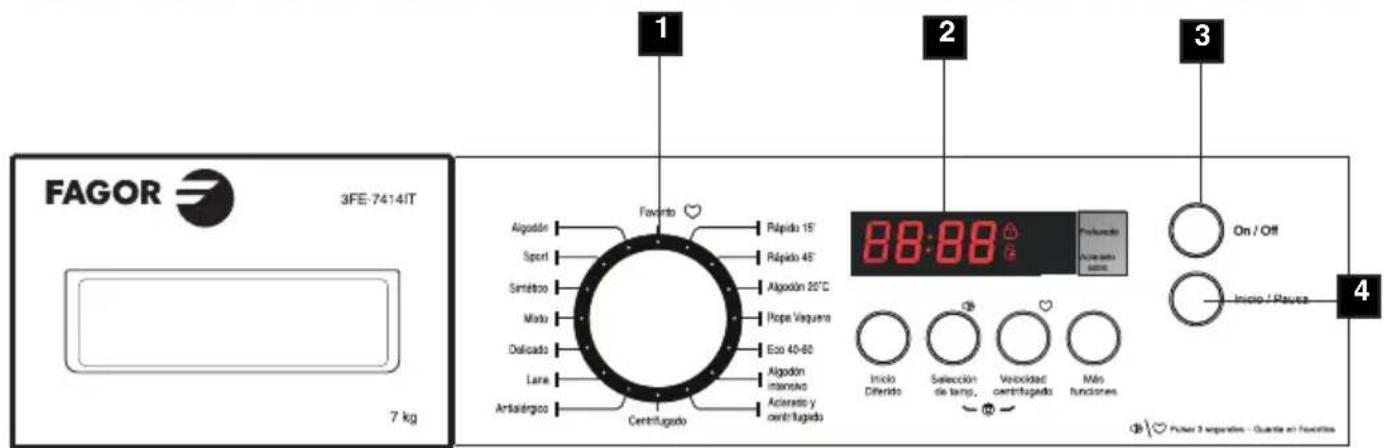
- Programme button
- Display
- On/Off button
- START/PAUSE
- Button for the additional function Start delay
- Button for the selection of the Temperature
- Button for the selection of the Spin speed
- Button for the selection of the Function
6+7. Child safety lock
1
Programme selector dial
The user can select an appropriate wash programme according to the degree of soiling, the type and amount of the laundry in order to ensure a better and more efficient result. Once the programme has started, the parameters of the selected wash programme can no longer be changed by setting the programme button in a different position.
2
Display
When the washing machine is in operation, the display shows the time remaining until the end of the wash programme. The display also shows the following symbols: Locking of the door of the washing machine and activated Child Lock function
The indicated time is an estimated value and can differ from the actual washing duration depending on the temperature, the water pressure, the load, the amount of detergent etc. The time is automatically updated during the washing cycle, intermittent freezing and time leaps are possible.
When the Time delay function is selected, the display shows the time remaining until the start of the programme.
When setting the spin speed, the display shows the following values:
0 (no spin) - 400 - 600 - 800 - 1000 - 1200 - 1400.
When setting the temperature, the display shows the following values:
- - ^oC (cold) -20^ - 30^ - 40^ - 60^ - 90^.
3
Standby button
- Switch the washing on/off and abort the wash programme.
4
Start/Pause button
Use the 4 Start/Pause button to start or interrupt the wash programme.
When the washing machine is in operation, the symbols “■” on the display blink. In the pause mode, the symbols “■” do not blink but are lit continuously.
The pause function can be used to soak the laundry.
After starting the selected programme, wait about 10 minutes and then push the Start/Pause button. After the laundry has soaked for the required time, again push the Start/Pause button and the washing machine will continue the wash programme.
Soaking improves the washing results when the laundry is very soiled.
5
Start delay button
This button serves to delay the start of the wash programme. The delay can be set from 0 to 24 hours.
Note! In case of a power outage during the countdown of the delay time, the function will resume the countdown as soon as the power supply is restored.
6
Temperature selection button
The button 6 serves to set the temperature for the respective washing programmes.
When pushing the button 6, the display shows the available water temperature settings or cold water options (without preheating) for the relevant wash programme. Depending on the selected wash programme, the display shows the following setting options: - -°C (cold) - 20°C - 30°C - 40°C - 60°C - 90°C.
7
Spin speed button
Button 7 serves to set the spin speed during the pumping cycle. Push the button in order to change the setting. Depending on the selected wash programme, the display shows the following values - 0 (no spin) - 400 - 600 - 800 - 1000 - 1200 - 1400.
8
Function selection button
The multifunction button can be one of two functions (extra rinse or pre-wash) or both functions can be selected simultaneously. If this function is started, the LED above the symbol of the selected function lights up.
Attention! The functions Extra Rinse/Prewash and are not available for all washing programs (see: Program table).
Pre-wash
The pre-wash function prolongs the washing time by about 20 min. The main wash is then preceded by an additional wash cycle at a temperature of 30^ C.
With the pre-wash function very good washing results can be achieved without previously soaking the laundry. This function is recommended for heavily soiled laundry.
Attention! Before starting the pre-wash function, you have to put detergent in the detergent dispenser with the symbol “☐”.
Extra Rinse
The Extra Rinse function is especially recommended for underwear and for clothes of people with sensitive skin. This function consists in an additional rinse of the laundry.
6+7
6+7 Child lock
The child lock blocks the function buttons, so that children cannot inadvertently change the settings. In order to activate the child lock during the washing, push the buttons 6 (Temperature selection) and 7 (Spin speed) simultaneously and hold them for about 3 seconds. In order to deactivate this function during the wash cycle, again push the same buttons and hold them for about 3 seconds.
Note 1: When the child lock is activated, the display shows the symbol. Note 2: The lock is not automatically deactivated at the end of the wash programme.
Switching the sound signal on/off
In order to activate this function, keep the button 6 pressed for about 3 seconds. The sound signal confirms the activation of this function. In order to re-enable the function, push the button 6 and hold it for about 3 seconds. This setting remains saved until the next change.
Setting of the programme Individual
In order to set the programme Individual, turn the selector dial to any of the wash programmes and select the temperature, spin speed and additional functions. Keep the button 7 pressed for about 3 seconds to confirm the settings of the programme Individual. The default wash programme is cotton.
SPECIAL PROGRAMMES
Wash programme Anti-Allergy:
This wash programme is intended for children and persons with sensitive skin. The main wash is always at 60°C (possible temperatur settings are 90/60/40/30/20—“cold”).
Wash programme Mixed laundry:
Standard wash programme at a standard temperature of 40^ C with a standard spin speed of 1000 rotations/minute. This wash programme can be used to wash coloureds, cotton, synthetics and linen at the same time.
Wash programme Quick wash 15':
These wash programmes serve to refreshen clothes. They include all the wash cycles:
- main wash
- rinse
- spin
Cotton 20:
This wash programme serves for washing at the temperature of 20^ C.
Eco 40-60:
The “eco 40-60” program is used to wash normally soiled cotton fabrics together, which can be washed at 40 °C or 60 °C on the same cycle.
USING THE APPLIANCE
1
Select Programme
■ Set the programme selector turning it left or right.
- Customize the programme to your needs – you can change the temperature, spin speed, or enable additional features.
■ Press the Start/ Pause button
2
Time Remaining
To set the Time Remaining:
■ Close the appliance door.
- Set the programme selector dial to the desired programme (see table).
- Select additional functions or wash cycle parameters as required – depending on the needs,
■ Press the Time Remaining button.
- Select time remaining ranging from 0 to 24 hours.
Press the Start/ Pause button The appliance will be set in delay mode.
The wash programme will be automatically terminated.

When you set the Time Remaining option, the display will show the time remaining to the end of the programme.
3
End of the wash cycle
The end of the wash programme is indicated by "End" in the display and a sound signal (if this function is active).
- Close the water valve.
■ Switch the washing machine off with the Standby button.
■ Disconnect the washing machine from the power supply.
- Open the door and remove laundry.
4
Aborting and changing the wash programme
In order to abort a wash programme, push the Standby button. Then switch the washing machine on again, select the required wash programme and push the Start/Pause button.
4
Display energy-saving mode
About 10 minutes after the end of the wash programme, the display switches to the energy-saving mode (instead of "End", "■" now blink in the display). The energy-saving mode remains active also, if within 10 minutes after the washing machine was switched on with the Standby button, the selector dial is not turned and no button is pushed.
TROUBLESHOOTING
| Problem Probable cause/Solution | |
| The washing machine is not working Open the water supply tap. - clean the mesh filter on the supply hose - close the door - press the Start/ Pause button | |
| Water Leakage - Properly connect the water supply hose. | |
| The load in the appliance has not been spun | - Replace the load evenly in the drum, clean the pump filter. |
| Unpleasant smell in the drum - Run the drum | autoclean programme |
| No water in the drum - Open the water supply tap. | |
| There is water left in the fabric softener container. | - Press down on the plastic tab located in the central compartment of the detergent tank. |
| Washing not properly rinsed | - Add correct amount of detergent, depending on the soiling level and water hardness (see the instructions on the detergent packaging). |
| The appliance does not fill with water - Open the water valve, - check programme settings, - check water pressure, - reconnect the water supply hose. - close the door - check that water intake hose is not bent or blocked | |
| Simultaneous water intake and draining. Check that the end of the drain hose is higher than the level of the water in the appliance (the hose should be at a height of 0–100 cm). | |
| Water does not drain properly - check the pump filter, - check the drain hose, - check the placement of the drain hose — is should be at a height of 0.6 to 1 m from the floor. | |
| Appliance vibrating - Check if transit bolts are removed- level the washing machine,- lock the washing machine feet by tightening the nuts. | |
| Foam leaks from the detergent drawer. - Reduce the amount of detergent used- Check the water hardness and the amount of detergent used,- Use detergent according to manufacturer instruction on the box indicated for your water hardness. | |
| The operation of the appliance is interrupted before the programme has finished | - Check electric power supply, water supply and water outlet. |
| Noise caused by operation of the outlet pump after water is removed | - There is no reason for concern. The water has been removed from the drum, but small amounts remain in the pump and outlet lead.Constant operation of the outlet pump causes air to be sucked in leading to the characteristic noise, which does not mean that anything is wrong. |
| Short breaks during the wash cycle - Water in the appliance is being automatically refilled- Pause caused by removal of excess foam | |
THE FAULT INDICATOR LIGHTS
The washing machine has an alarm system, which helps solving minor problems connected with incorrect operation by means of "ERROR CODES" indicated in the display. With the ERROR CODES you can locate the defect and establish the cause.
If an error is found, the display shows information in accordance with the following table:
| Display indication | Reason Explanation | |
| E10 Low water pressure, no water in the washing machine. | Open the water valve, check the water inlet hose and filter, check water pressure | |
| E21 Water does not drain properly | Check water drain pump and filter. | |
| E30 The door is not closed. | Check, if the door of the washing machine is closed. Check, if no clothing is stuck in the door of the washing machine. | |
| Others Try to restart or contact the SERVICE CENTRE. | ||

While signaling an error washing machine also beeps (if active).
MAINTENANCE AND CLEANING

Never clean the appliance body or plastic parts using solvents or harsh, abrasive detergents (e.g. washing powders or creams)! Use mild liquid detergents and soft cloths only. Do not use sponges.
Clean the pump filter
1
- Clean the pump filter every 20 washes or so. Neglecting to clean the filter may result in problems with draining water from the appliance!

natural_image
Illustration of a hand holding a bulb above a plate with a small object, no text or symbols present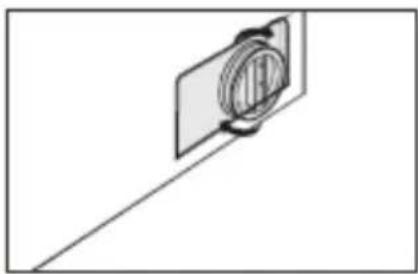
natural_image
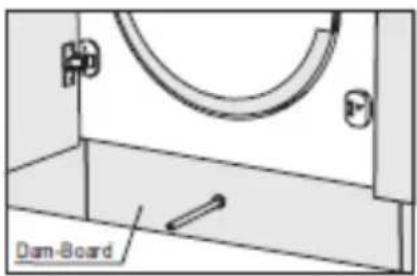
Simple line drawing of a circular object mounted on a rectangular plate, with no text or symbols present.1). after the power is disconnected, pull out the dam-board.
2). turn the filter down as shown in the figure and remove any material caught in the filter.
3). reinstall each part after cleaning the filter.
2
Clean the water supply valve
- Replace the filter following the procedure in reverse order.
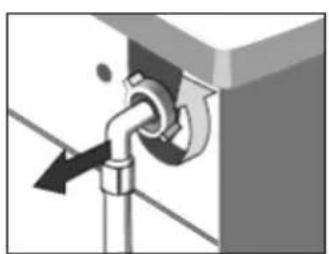
natural_image
Diagram of a pipe fitting with a valve, showing mechanical components and a directional arrow (no text or symbols)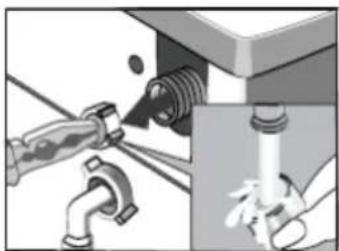
natural_image
Illustration of a faucet and screw installation with hands performing maintenance (no text or symbols)1). unscrew on the water supply hose,
2). use forceps to grasp the filter mesh pin,
3). remove and clean the filter, preferably using a brush.
3
Clean the detergent drawer
■ Should be cleaned at least once a month.

natural_image
Diagram of a mechanical device with internal components and directional arrows (no text or symbols)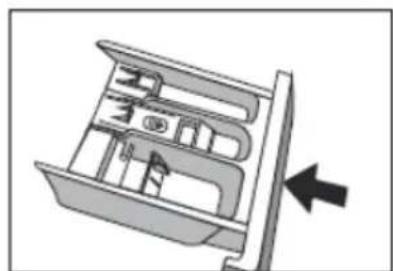
natural_image
Diagram of a mechanical drawer with internal compartments and an arrow indicating direction (no text or symbols)
natural_image
Diagram of a mechanical device with internal compartments and directional arrows indicating movement (no text or symbols)1). pull out the dispenser drawer (by simultaneously pressing the slide stop).
2). clean under running water (if necessary, with a brush or cloth).
3). re-insert the dispenser drawer.
PRACTICAL TIPS ON WASHING
DETERGENTS AND LAUNDRY ADDITIVES

It is recommended to use a general-purpose laundry detergent powder or liquid for the full range of temperatures according to the manufacturer's instructions on the detergent packaging.
1
Detergents
Pour the detergent into the drawer compartment marked
Pour the pre-wash detergent into the drawer compartment marked
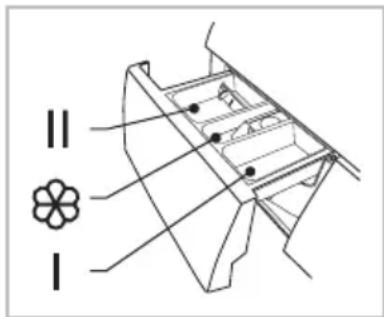
2
Fabric softeners added to the rinse
Pour the fabric softener into the drawer compartment marked ✿
Do not exceed the maximum level marked on the drawer compartment. This detergent will be used for the final rinse.

For washing whites it is recommended to use the washing powder. Liquid detergents do not contain bleach. Do not use rinse aid with white laundry, as this may cause yellowing of laundry.
FIRST WASH
Before washing for the first time, put the appliance through one high temperature cycle without a load, according to the following procedure:
1). connect the washing machine to the power supply,
2). open the water valve,
3). set the programme selector dial to washing at high temperature, add a suitable detergent and press Start/Pause.
SOIL
1
Stubborn stains
Before washing underwear, apply an additional stain remover according to the instructions for use.
Heavy soil
2
in order to achieve a better result, wash less laundry,
■ add more detergent.
- Rinse the washing machine after washing heavily soiled garments (e.g. work clothes) or clothing that loses fibres. To do this, run the wash cycle at 60°C, for example coloureds or easy-care.
3
Light soil
See Conservation.
CONSERVATION
Reduce energy and water consumption
Garments which are only lightly soiled should be washed on the Rapid Wash setting.
For most programmes, the washing machine detects load.
For partial load, when using the QUICK WASH programme, the appliance will reduce water and energy consumption and shorten the wash cycle.
The most energy and water efficient wash programmes are generally those that run at lower temperature and for a long time.
- Loading the washing machine to the full capacity indicated by the manufacturer for the respective wash programmes will save energy and water.
WATER HARDNESS
- Hard water causes scale deposition. Information about water hardness is available from the nearest water works. We recommend that you use water softener for each washing.
POWER OUTAGE (PROGRAMME MEMORY)
Power outage or unplugging the appliance does not cancel the set programme. The programme is memorised and resumes when power is restored. Do not open the appliance doors during a power outage.
LOAD
■ Maximum drum capacity 7 kg.
- Load the laundry into the drum according to the following instructions:
1). cotton, denim, children's clothes – max full drum (do not force clothes into the drum as this will reduce the quality of the wash),
2). Synthetics - max 12 of the drum,
3). wool, silk, delicate fabrics - 1/3 of the drum.

Do not overload the appliance. Overloading the appliance may damage the clothes being washed! If you overload the appliance the OVL is shown appears on the display — remove excess laundry from the drum and restart the washing machine. The maximum load amounts depending on the programme are given in table of programmes.
LOAD DISTRIBUTION CONTROL
The appliance features load distribution control system.
Before spinning, this checks the distribution of clothes inside the drum. In the event that too great an imbalance is detected, the system makes several attempts to rearrange the clothes inside the appliance. Sometimes these attempts to distribute the load are not successful. Problems may be caused by terrycloth robes washed together with other types of laundry, such as bed sheets that formed a bundle around other items of laundry.
The system may then respond in two ways:
1). accept the uneven distribution of garments and reduce spin speed,
2). cancel the spinning.
In either case, after washing cycle is finished open the appliance door, remove the laundry by hand, close the door and select the spin setting again.
DOOR LOCK
The washing machine is equipped with a lock which prevents the door from being opened during wash cycle. Once a wash cycle is complete, the door lock is automatically released. In order to open the door during the wash program, press PAUSE button and wait to unlock the door.

If the temperature inside the drum is high, the door may remain blocked until the water temperature has dropped below 60^ C.

Before opening the door of the washing machine check whether there is water in the drum.
DELICATE FABRICS
1
Select Programme
- Select the appropriate wash programme: Synthetics, Wool.
2
Load
- Avoid overloading the washing machine — the maximum load is 1/3 kg for delicate fabrics, see "Loading."
ADD DETERGENT
1
Not enough detergent
the laundry turns grey, lumps of fat form, lime scale is deposited.
2
Too much detergent
A lot of foam, ineffective washing, detergent incompletely rinsed from fabrics.
BUILT-IN INSTALLATION
Overview
Before you install the washing machine, please read these instructions carefully and keep them for future reference. This appliance has been designed to be built into the kitchen furniture. The recess should have the dimensions shown in Fig.

WARNING
When installing the appliance into the kitchen furniture, ensure that the hoses are placed in either of the two recesses on the back of the appliance. This will help prevent the hoses from becoming kinked or trapped.
■ Preparation and assembly of the door
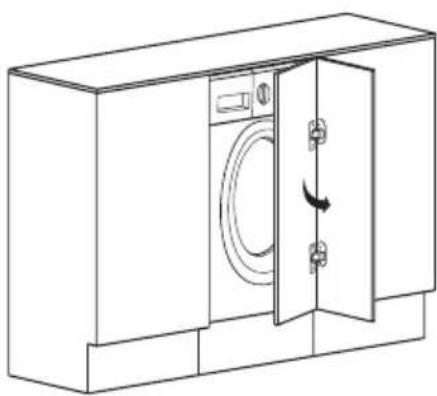
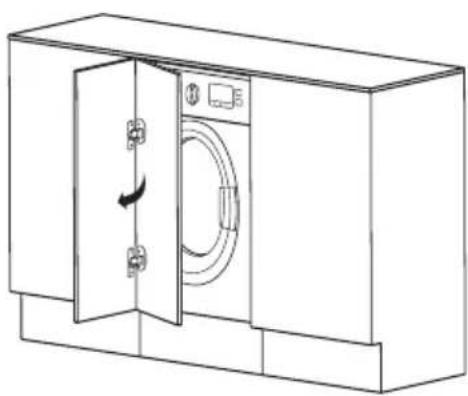
The appliance is originally prearranged for the assembly of a door opening from right to left or from left to right.
natural_image
Line drawing of a washing machine with door and side panels, showing internal airflow direction (no text or symbols)The door is open from left to right
natural_image
Line drawing of a washing machine cabinet with door and side panels, showing internal components and directional arrow (no text or symbols)The door is open from right to left
Appendix
- Self-tapping screws
2.Hinges - Counter magnet
4.Spacer
5.Fixed position paper

natural_image
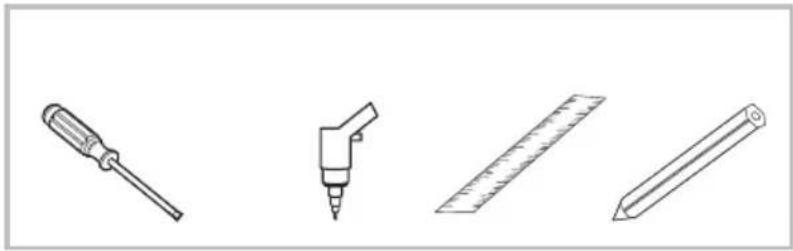
Technical line drawings of various mechanical components and fasteners, including screws, switches, and brackets (no text or symbols present)Tools
- Screw Driver
- Automatic Driver
3.Ruler
4.Pencil
natural_image
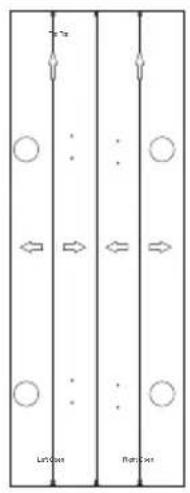
Four technical illustrations: screwdriver, tool, ruler, and pencil (no text or symbols)■ Preparation the Fixed position paper
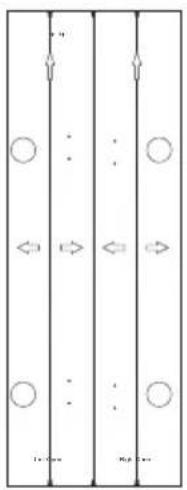
Make the mark on the door according to the cupboard and washing machine height.
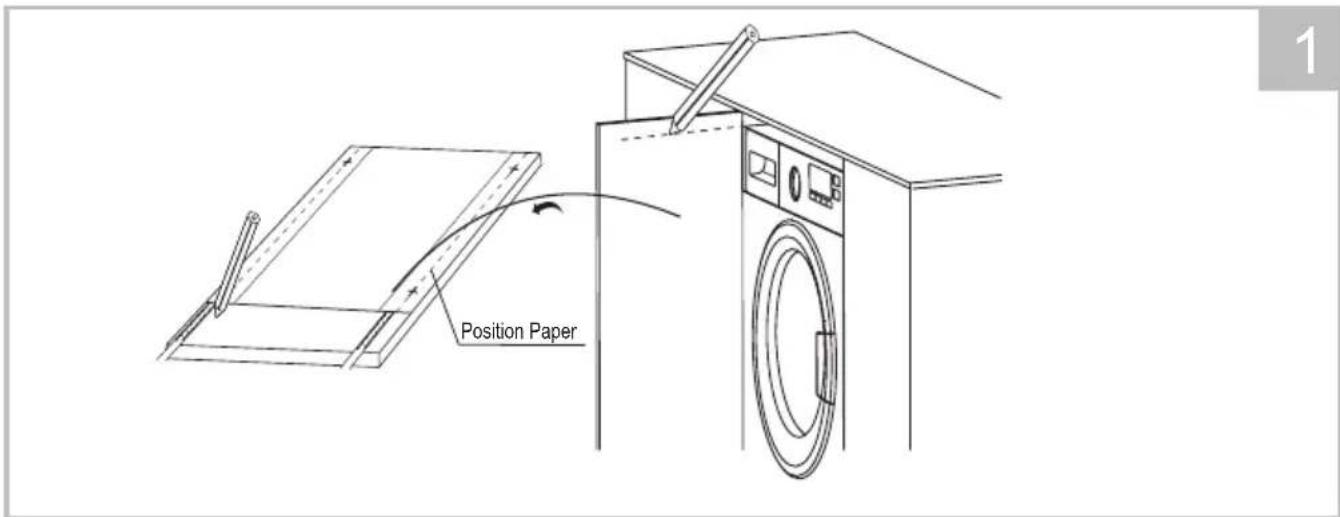
■ Fixed position paper on the door.
natural_image
Pure electrical circuit lines without any symbolsShear fixed position paper
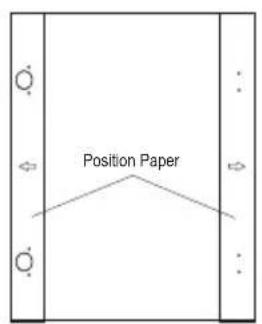
Paste on the Door(The door on the right)
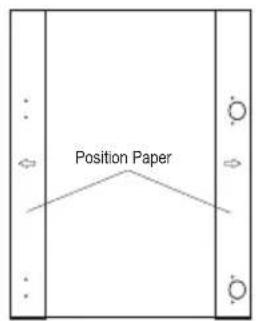
Paste on the Door(The door on the left)
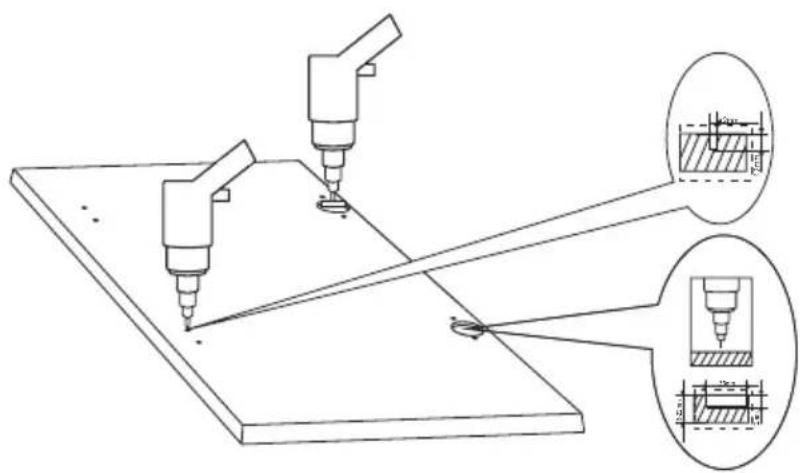
Drill hole on the door
Drill the hole on the door according to the fixed position paper.
3
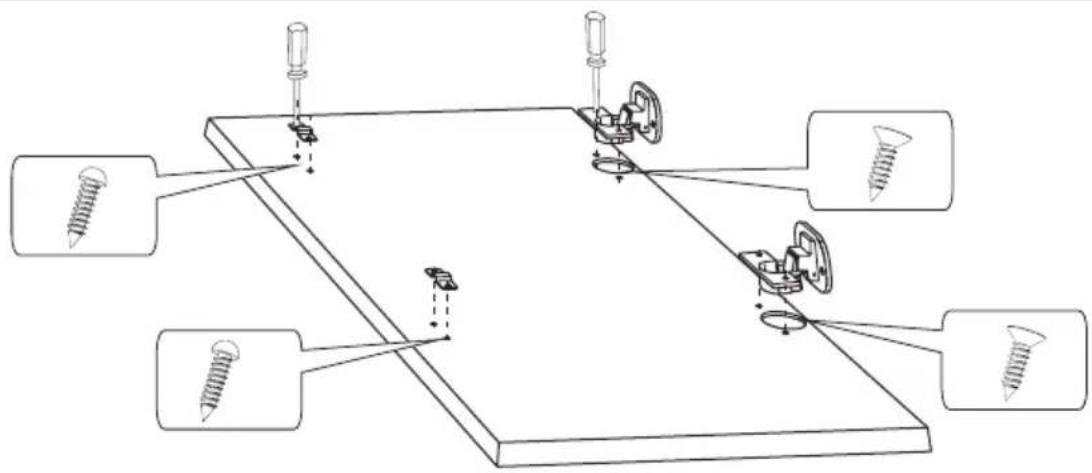
■ Installation the hinges and spacer
Fix the hinges to the machine by means of the screws. The hinges can be adjusted to compensate for possible uneven thickness of the door.
4
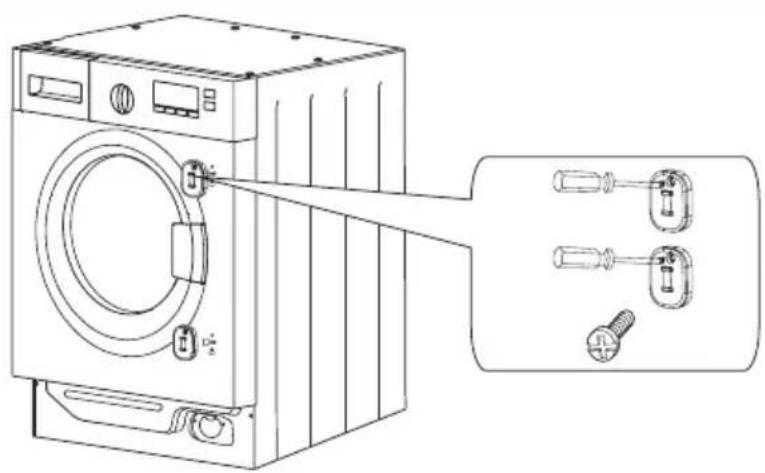
■ Installation the counter magnet
The appliance is prearranged for a magnetic closure of the door. To enable a correct operation of this device, it is necessary to screw the counter-magnet into the inner side of the door.
natural_image
Line drawing of a washing machine with attached screw and nut components (no text or symbols)5
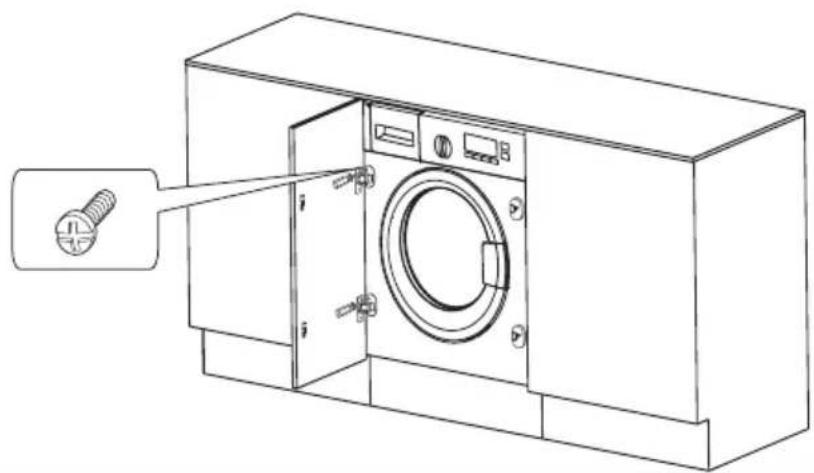
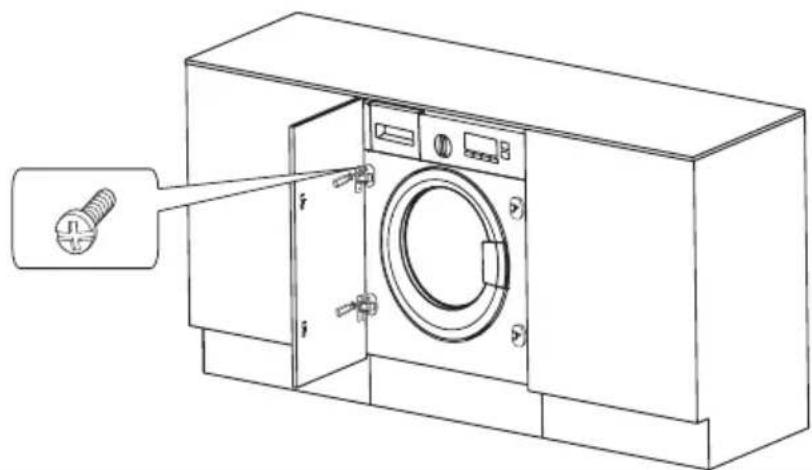
Installation the door
natural_image
Line drawing of a washing machine with a screw inserted, showing internal components and no text or symbols6
Maxiumim allowed mass of fornt furniture front panel is 7,5 kg.
For more information about the product, please refer to the EU EPREL Product Database at https://eprel.ec.europa.eu. For more information, please use your mobile device to scan the QR code on the energy label or enter the product model listed on the energy label in the EPREL search engine https://eprel.ec.europa.eu/
WARRANTY AND AFTER SALES SERVICE
Warranty
Warranty service as stated on the warranty card. The manufacturer shall not be held liable for any damage caused by improper use of the product.
Service
- The manufacturer recommends that all repairs and adjustments be carried out by the Factory Service Technician or the Manufacturer's Authorized Service Point. For safety reasons, repairs should be referred to professionals.
- Repairs carried out by unqualified persons may seriously endanger the appliance user.
- Pursuant to Commission Regulation (EU) 2019/2023, the minimum availability period for spare parts necessary to repair the appliance is 7 or 10 years depending on the type and purpose of the spare part.
- The list of spare parts and the ordering procedure are available on the websites of the manufacturer, importer or an authorized representative.
- The minimum warranty period for the appliance offered by the manufacturer, importer or authorized representative is given in the warranty card.
- The warranty shall be void if you make any independent adaptations or alterations, tamper with seals or other appliance safety devices or its parts or interfere with the appliance contrary to operating instructions.
In the event of appliance malfunction, request assistance or repair.
If your appliance needs repair, please contact the service centre. Please see warranty card for address and contact details of our service centre. Before contacting us, please have ready the appliance serial number, which can be found on the identification sticker: For your convenience, please write it down below:
FAGOR
ELECTRODOMÉSTICO



- ECOLOGÍA EN PRÁCTICA
- DESEMBALAJE
- Preparados para aclarar
- AVISO
- Instalación de imán
- DESEMPACOTAMENTO
- Conexão à corrente eléctrica
- Acessórios:
- Faça furos na porta
- Instalação do ímã
- Instalação da porta
- UNPACKING
- DISPOSAL OF OLD APPLIANCE
- BASIC INFORMATION
- USAGE
- MANUFACTURER'S DECLARATION
- SAFETY AND GERMENT CARE LABELS
- UNDERSTANDING THE SYMBOLS ON CLOTHES LABELS
- INSTALL THE APPLIANCE
- Remove the transit bolts
- Position and level the washing machine
- Connect the water supply
- Water drain
- Connection on the left Connection on the right
- Connect to power supply
- Prepare to wash:
- FEATURES AND COMPONENTS
- DESCRIPTION OF THE APPLIANCE
- Accessories:
- Programme selector dial
- Display
- Standby button
- Start/Pause button
- Start delay button
- Temperature selection button
- Spin speed button
- Function selection button
- Pre-wash
- Extra Rinse
- 6+7 Child lock
- Switching the sound signal on/off
- Setting of the programme Individual
- SPECIAL PROGRAMMES
- Wash programme Anti-Allergy:
- Wash programme Mixed laundry:
- Wash programme Quick wash 15':
- Cotton 20:
- Eco 40-60:
- USING THE APPLIANCE
- 1
- Select Programme
- 2
- Time Remaining
- 3
- End of the wash cycle
- 4
- Aborting and changing the wash programme
- Display energy-saving mode
- TROUBLESHOOTING
- THE FAULT INDICATOR LIGHTS
- MAINTENANCE AND CLEANING
- Clean the pump filter
- Clean the water supply valve
- Clean the detergent drawer
- PRACTICAL TIPS ON WASHING
- DETERGENTS AND LAUNDRY ADDITIVES
- Detergents
- Fabric softeners added to the rinse
- FIRST WASH
- SOIL
- Stubborn stains
- Heavy soil
- Light soil
- CONSERVATION
- Reduce energy and water consumption
- WATER HARDNESS
- POWER OUTAGE (PROGRAMME MEMORY)
- LOAD
- LOAD DISTRIBUTION CONTROL
- DOOR LOCK
- DELICATE FABRICS
- ADD DETERGENT
- Not enough detergent
- Too much detergent
- BUILT-IN INSTALLATION
- Overview
- WARNING
- ■ Preparation and assembly of the door
- Appendix
- Tools
- ■ Preparation the Fixed position paper
- Drill hole on the door
- ■ Installation the hinges and spacer
- ■ Installation the counter magnet
- Installation the door
- WARRANTY AND AFTER SALES SERVICE
- Warranty
- Service
- In the event of appliance malfunction, request assistance or repair.
Brand : FAGOR
Model : 3FE-7414IT
Category : Washing machine