TP58 - Telephone Oricom - Free user manual and instructions
Find the device manual for free TP58 Oricom in PDF.


| Product Type | Landline Telephone |
| Brand | Oricom |
| Model | TP58 |
| Dimensions (approx) | 22 x 20 x 8 cm |
| Weight (approx) | 0.5 kg |
| Power Source | Telephone line (no external power required) |
| Display | None (no LCD screen) |
| Memory Buttons | 6 one-touch (M1-M6) |
| Last Number Redial | Up to 32 digits |
| Recall | 100ms (Australia) / 600ms (New Zealand) adjustable |
| Mute Function | Yes (press and hold during call) |
| Speakerphone | Yes (with LED indicator) |
| Ringer Volume | Off / Low / High (side switch) |
| Receiver Volume Control | Low / Mid / High (on handset) |
| Visual Ringer Indicator | Flashing light on incoming call |
| Wall Mountable | Yes (two methods: screws or wall plate) |
| Operating Temperature | -10°C to 50°C (indoor use) |
| Cleaning | Dry soft lint-free cloth; no solvents |
| Safety Warning | Do not use during thunderstorms; avoid damp locations |
| Warranty (Australia) | 12 months express warranty |
| Customer Support (Australia) | 1300 889 785, Monday-Friday 8am-6pm AEST |
Frequently Asked Questions - TP58 Oricom
User questions about TP58 Oricom
0 question about this device. Answer the ones you know or ask your own.
Ask a new question about this device
Download the instructions for your Telephone in PDF format for free! Find your manual TP58 - Oricom and take your electronic device back in hand. On this page are published all the documents necessary for the use of your device. TP58 by Oricom.
USER MANUAL TP58 Oricom
-
Press the STORE button
-
Now press one of the six one touch dial buttons (M1-M6).
-
Replace the handset.
Tips on storing numbers:
Storage locations that have already been used cannot be erased. Simply save a new number in the storage location that you want to erase.
The storage locations can be written on the index card so that you do not forget where the numbers have been stored. You can remove the protective transparent cover using the tip of a ballpoint pen or a small pin.
5.2 Making a call using the one touch dial buttons
-
Lift the handset or press SPEAKER button
-
Now press the required one touch dial button (M1-M6). The
stored number will now be dialled automatically.
- To end the call, replace the handset or press SPEAKER
button.
6 Important information
Troubleshooting
If you feel this product is not working correctly please consult the user guide and ensure that you are using the product in accordance with the instructions.
Remove all extra telephone equipment and connect telephone directly to the telephone socket.
If the fault is still present, connect another telephone (if available) to the telephone socket. The results will show you whether the fault lies with this product or with the telephone line. If this product is working correctly the fault is on the telephone line. Please contact your network operator for assistance
In the case of technical problems with this product please consult our website for further information or send us an email for a prompt response to your enquiry.
Temperature and ambient conditions
The telephone is designed for indoor use (temperature range of -10^ to 50^ ). Do not install the telephone in areas where there is the risk of an explosion, excessive exposure to smoke,
dust, vibrations, chemicals, moisture, and heat. The unit must not be installed in damp locations such as a bathroom or laundry, do not expose the unit to direct sunlight.
Cleaning and care
The surface of the case can be cleaned with a dry, soft, lint-free cloth. Never use cleaning agents, particularly aggressive solvents. Apart from occasional cleaning of the case, no other care is necessary. The rubber feet of the base station are not resistant to all cleaning agents. The telephone feet do not normally leave any marks on the surface. However, on account of the multitude of varnishes and surface finishes used, surface marks caused by the feet of the unit cannot be ruled out.
Important
Please retain your purchase receipt and attach to the back page of this user guide as you will need to produce this if warranty service is required.
Express Warranty (Australia)
This Express Warranty is provided by Oricom International Pty Ltd ABN 46 086 116 369, Unit 1, 4 Sovereign Place, South Windsor NSW 2756, herein after referred to as "Oricom".
Oricom products come with guarantees that cannot be excluded under the Australian Consumer Law. You are entitled to a replacement or refund for a major failure and compensation for any other reasonably foreseeable loss or damage. You are also entitled to have the goods repaired or replaced if the goods fail to be of acceptable quality and the failure does not amount to a major failure.
Oricom warrants that the product is free from defects in materials or workmanship during the Express Warranty Period. This Express Warranty does not extend to any product from which the serial number has been removed or was purchased outside of Australia.
Nothing in this Express Warranty excludes, restricts or modifies any condition, warranty, guarantee, implied term, right or remedy pursuant to the Australian Consumer Law and which
may not be so excluded, restricted or modified. For such conditions, terms, guarantees and warranties that cannot be excluded, restricted or modified, Oricom limits the remedies available to extent permitted in the relevant legislation.
The Express Warranty Period will be 12 months from the date of purchase of the product evidenced by your dated sales receipt. You are required to provide proof of purchase as a condition of receiving Express Warranty services.
You are entitled to a replacement product or repair of the product at our discretion according to the terms and conditions of this document if your product is found to be faulty within the Express Warranty Period. This Express Warranty extends to the original purchaser only and is not transferable.
Products distributed by Oricom are manufactured using new materials or new and used materials equivalent to new in performance and reliability. Spare parts may be new or equivalent to new. Spare parts are warranted to be free from defects in material or workmanship for thirty (30) days or for the remainder of the Express Warranty Period of the Oricom branded product in which they are installed, whichever is longer. During the Express Warranty Period, Oricom will where possible repair and if not replace the faulty product or part thereof. All component parts are necessary to become the property of Oricom. In the unlikely event that your Oricom product has a recurring failure, Oricom may always, subject to the Competition and Consumer Act 2010, at its discretion, elect to provide you with a replacement product of its choosing that is at least equivalent to your product in performance.
No change to the conditions of this Express Warranty is valid unless it is made in writing and signed by an authorised representative of Oricom.
Oricom will not be liable under this Express Warranty, and to the extent permitted by law will not be liable for any defect, loss, damage or injury arising out of or in connection with a:
-
Failure by you to adhere to the warnings and follow the instructions set out in this user guide for the proper installation and use of the product;
-
Wilful misconduct or deliberate misuse by you of the product; 3. Any external cause beyond our control, including but not limited to power failure, lightning or over voltage; or
-
Modification to the product or services carried out on the product by anyone other than Oricom or Oricom's authorised service provider.
How to make a claim under your Express Warranty in Australia
Oricom has a simple warranty process for you to follow:
- Please call or email our Customer Support Team, 1300 889 785 or support@oricom.com.au
- A Customer Support Team member will verify after troubleshooting with you if your product qualifies under warranty. If so, they will give you a Product Return Authorisation number.
- We will then email or fax a Return Authorisation form and a Repair Notice (if necessary), together with instructions on how to return the goods for warranty service.
Please note that if a Customer Support Team member advises that your product does not qualify for return, this warranty does not apply to your product. Products that are authorised to be returned to Oricom in Australia must include all of the following: A completed Return Authorisation form
- A copy of your Proof of Purchase (please keep your original copy)
• The faulty product, including all accessories
Send the approved returns to Oricom International Pty Ltd.
Locked Bag 658
South Windsor NSW 2756 Australia
Please note that this Express Warranty excludes expenses incurred by you in returning any faulty product to us. You must arrange and pay any expenses incurred (including postage,

Big button phone TP58
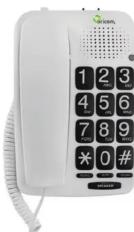
User Guide
delivery, freight, transportation or insurance of the product) to return the faulty product to us, however, we will arrange delivery of the repaired or replaced faulty product to you.
Important Information
Please be aware that the repair of your goods may result in the loss of any usergenerated data (such as stored telephone numbers, text messages and contact information). Please ensure that you have made a copy of any data saved on your goods before sending for repair. Please also be aware that goods presented for repair may be replaced by refurbished goods or parts of the same type rather than being repaired.
ORICOM CUSTOMER SUPPORT
Oricom have a trained and dedicated team of Customer Support Representatives, each with the knowledge and resources to assist in answering your questions quickly and efficiently.
Oricom Support – Australia
For all product enquiries, troubleshooting or to discuss the range of Oricom products, feel free to contact Oricom or visit our website for answers to frequently asked questions.
1300 889 785
Monday - Friday 8am – 6pm AEST
Email: support@oricom.com.au www.oricom.com.au
Ref: 23012018
1 General Information
Warnings
Do not use your telephone during an electrical storm thunderstorm as it is possible to get an electric shock. Refer to information contained in Telstra White pages directory.
The earpiece of the handset may attract small metal objects such as staples and pins. Care should be taken when placing the handset near these items.
2 Location of controls
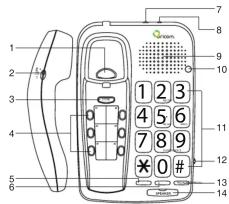
- Hook switch
- Receiver volume control
- Store button
- 6 one touch memory buttons
- Recall button
- Mute button
- Ringer Hi/Lo/Off switch
- Recall setting switch
- Speaker
- Visual ringer light
- Keypac
- Speaker volume control
- Redial button
- Speaker button with LED
3 Installation
3.1 Check contents of pack
The following items are supplied in this pack:
| one telephone base one telephone handset | |
| one short telephone cable | one curly cord |
| one long telephone cable | one operating Manual |
| one warranty card | |
3.2 Connect the handset and line cord
Connect the telephone handset to the base unit. Plug one end of the curly cord into the socket on the handset. Locate the socket on the base of the phone and plug the other end of the curly cord into this. Plug one end of the telephone cable (long for desk installation) into the wall socket. Plug the other end into the socket located in the indentation on the base of the telephone. Then feed the cable through the cable guide.
3.3 Wall mounting
Method A. Use two screws for fixing. At the desired location drill two holes one above the other, 83mm apart, and leave the screws protruding 5mm from the wall. Now place the telephone base over the screws and gently push forwards and then downwards.
Method B. If you wish to fit to an existing telephone wall plate with modular connector. Plug the short telephone line cord supplied into the base of the phone; plug the other end into the telephone wall plate socket. Position the mounting holes on the base of the phone over the two protruding screws on the wall plate. Gently push the phone flush against the wall plate then slide the phone downwards locking it into place.
There is a small hanging device in the handset rest to prevent the handset from falling from the rest when the telephone is mounted on the wall.
You can hang the handset on the telephone without hanging up. Use the small hanging device for this purpose at the upper end of the handset rest.
3.4 Adjustable ringer volume
You can use the RINGER OFF/LO/HI slide switch located on the back of the telephone to select the incoming ring volume. Should you not want to be disturbed, use select OFF position.
3.5 Receiver volume control
The receiver volume control is located on the handset of your phone. This enables you to adjust the receiver volume from low (LO), middle (MID) to high (HI) for a better listening level.
3.6 Speaker Volume Control
Under Speaker phone mode, slide the SPEAKER VOL to adjust the speaker phone volume.
4 Operation
4.1 Using the telephone
The TP58 telephone is used like any conventional telephone and works with all modern telephone exchanges using the tone dialling system. Use can make or receive a call using handset or speakerphone.
Dialing a call
- Lift the handset or press SPEAKER button (SPEAKER LED turns on) and wait until your hear dial tone.
- Now dial the required telephone number.
- To end the call, replace the handset or press SPEAKER button (SPEAKER LED turns off).
Receiving a Call
When you receive a call, the phone rings and the Visual ringer light flashes.
To answer the call, lift the handset or press SPEAKER button (SPEAKER LED turns on). Replace the handset or press SPEAKER button (SPEAKER LED turns off) to end the call.
NOTE!
If you want to change during a call from the handset to the speakerphone, press the SPEAKER button and replace the handset.
If you want to change from the speakerphone to the handset, simply lift the handset.
4.2 Last number redial
If the number you have dialed is engaged or you were unable to get through to anybody, simply replace the handset. The last number (up to 32 digits) dialled will be saved in the telephone memory. To use the redial facility, proceed as follows:
1. Lift the handset.
2. Press the REDIAL button the last saved redial number will now be dialled.
You will use the RECALL button when using your network operator's services such as call waiting etc. If this feature is not working check the position of the Recall switch on the side of the phone. In Australia it should be set at 100ms and in New Zealand 600ms.
4.4 Muting the microphone
You can switch off the microphone during a call using the MOTE button. It is then possible to speak without the other party hearing you. You can still hear the other party.
To mute the microphone, press and hold the MUTE button during a call. Release the MUTE button and you can continue the call as normal.
5 Storing telephone numbers
You can store 6 numbers under the one touch buttons (M1-M6).
5.1 Saving numbers
- Lift the handset listen for dial tone
- Press the STORE button.
- Enter the required telephone number using the number pad.
- Tips on storing numbers:
- Making a call using the one touch dial buttons
- Important information
- Troubleshooting
- Temperature and ambient conditions
- Cleaning and care
- Important
- Express Warranty (Australia)
- How to make a claim under your Express Warranty in Australia
- Important Information
- ORICOM CUSTOMER SUPPORT
- Oricom Support – Australia
- 889 785
- General Information
- Warnings
- Installation
- Check contents of pack
- Connect the handset and line cord
- Wall mounting
- Receiver volume control
- Speaker Volume Control
- Operation
- Using the telephone
- Dialing a call
- Receiving a Call
- NOTE!
- Muting the microphone
- Storing telephone numbers
- Saving numbers
Brand : Oricom
Model : TP58
Category : Telephone