PRO610 - Telephone Oricom - Free user manual and instructions
Find the device manual for free PRO610 Oricom in PDF.


| Product Type | DECT Cordless Telephone |
| Model | PRO610 |
| Brand | Oricom |
| Standard | DECT (Digital Enhanced Cordless Telecommunications), GAP (Generic Access Profile) |
| Frequency Band | DECT 1.88-1.90 GHz |
| Range | Up to 300 meters outdoors (ideal conditions) |
| Talk Time | Up to 10 hours |
| Standby Time | Up to 100 hours |
| Power Supply (Base) | Input: 100-240V AC 50/60Hz 150mA, Output: 6V DC 800mA |
| Battery Type | 3 x AAA 1.2V 750mAh NiMH rechargeable batteries (included) |
| Handset Dimensions (approx) | 160 x 50 x 30 mm |
| Handset Weight (approx) | 150 g (including batteries) |
| Base Dimensions (approx) | 120 x 100 x 60 mm |
| Base Weight (approx) | 200 g |
| Phonebook Capacity | 50 entries (name and number) |
| Caller ID | Yes (requires network subscription), stores last 30 calls |
| Redial Memory | Last 10 dialed numbers |
| Quick Dial Memory | 3 direct memory buttons (M1, M2, M3) |
| User Profiles | 2 profiles with customizable volume, boost, and equalizer settings |
| Handsfree | Yes (speakerphone) |
| Boost Volume | Yes (dedicated button for enhanced earpiece volume) |
| Headset Jack | Yes (2.5mm on handset) |
| Ringer Melodies | 10 melodies for external calls, plus internal call melody |
| Ringer Volume Levels | 5 levels plus Off |
| Keypad Lock | Yes (press and hold # for 3 seconds) |
| Backlight | Adjustable (10, 20, 30, 40 seconds) |
| Contrast Adjustable | 5 levels |
| Intercom | Yes (between registered handsets) |
| Conference Call | Yes (external with internal handset) |
| Call Transfer | Yes |
| Paging (Find Handset) | Yes (from base) |
| Alarm Clock | Yes (set once, daily, or weekdays) |
| Appointment Reminder | Up to 5 appointments |
| Stopwatch | Yes |
| Voice Prompts | Optional (simple or full mode) for talking keys and menu navigation |
| Compatible with Hearing Aids | Yes (may cause humming, but compatible with most) |
| Care Instructions | Clean with dry, soft, lint-free cloth; do not use solvents |
| Safety | Unplug during storms; keep away from moisture; not for use near medical equipment |
Frequently Asked Questions - PRO610 Oricom
User questions about PRO610 Oricom
0 question about this device. Answer the ones you know or ask your own.
Ask a new question about this device
Download the instructions for your Telephone in PDF format for free! Find your manual PRO610 - Oricom and take your electronic device back in hand. On this page are published all the documents necessary for the use of your device. PRO610 by Oricom.
USER MANUAL PRO610 Oricom
natural_image
Color gradient bar transitioning from dark to light gray, no text or symbols present

Professional Series
Oricom®
natural_image
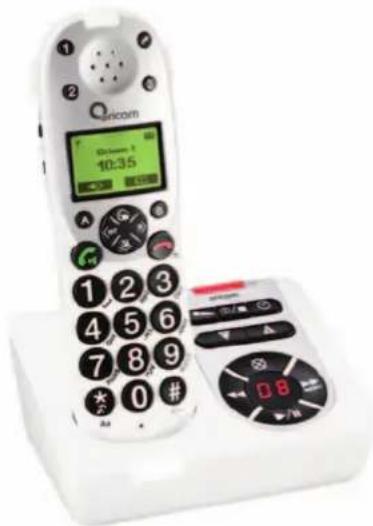
White remote phone with digital keypad and control panel (no visible text or symbols)Pro810 DECT Digital Cordless Telephone with Answering System
natural_image
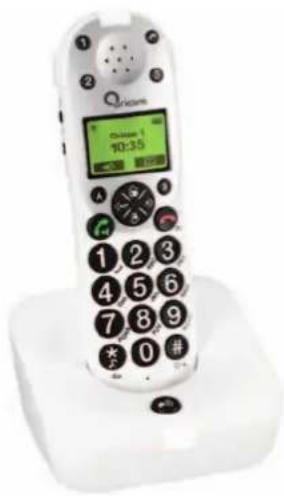
White QF24 phone with rotary keypad and digital display (no visible text or symbols on body)Pro610 DECT Digital Cordless Telephone

User Guide
Keep this user guide for future reference. Always retain your proof of purchase in case of warranty service and register your product online at: AUSTRALIA: www.oricom.com.au Oricom Customer Support - 1300 889 785 or (02) 4574 8888
natural_image
Color gradient bar transitioning from dark to light gray, with no text or symbols

Table of contents
Important Information....1
Getting Started 5
Handset display icons explained....11
Phone menu guide....13
Making and receiving calls 14
Using your menu....20
Base Settings 30
Using your phone book....33
Using your quick dial memory buttons 37
Using your calls list 39
Operations of voice menu 42
Using your answering machine (Only for Pro810) 45
Use on a private branch exchange 52
Help and support 54
Safety information 57
Maintenance and guarantee 60
Warranty information (Australia) 61
Need Help?
If you need assistance setting up or using your Oricom product now or in the future, call Oricom Support.
Australia 1300 889 785 or (02) 4574 8888
www.oricom.com.au
Mon-Fri 8am – 6pm AEST
New Zealand 0800 67 42 66
www.oricom.co.nz
Mon-Fri 10am – 8pm NZST
natural_image
Color gradient bar transitioning from dark to light gray, with no text or symbols

Important Information
Important:
- Persons with pacemakers should seek advice from their doctor before using this product.
- Avoid exposure of this telephone to moisture or liquid.
• To prevent electric shock, do not open the handset or base cabinet. - Avoid metallic contact (e.g. metal clips, keys) between the battery contacts and charging conductors.
- There is a slight chance that the telephone could be damaged by an electrical storm. It is recommended that users unplug the phone from the mains supply and telephone socket during a storm.
- Do not use the handset in an explosive hazard area such as where there is gas leaking.
- Follow the local regulations regarding the disposal of your packing materials, exhausted batteries and used phone. Wherever possible, recycle those materials.
• We advise that this phone should not be used near intensive care medical equipment. - Clean with a dry, soft, lint-free cloth. Never use cleaning agents, particularly aggressive solvents.
- Because the phone works by sending radio signals between base station and handset, wearers of hearing aids may experience interference in the form of a humming noise. The telephone is compatible with most popular hearing aids on the market. However, due to the wide range of hearing aids available, there is no guarantee that the telephone will function "problem free" with every model.
- Your phone can interfere with electrical equipment such as answering machines, TV and radios, clock radios and computers if placed too close. It is recommended that you position the base unit at least one metre from such appliances.
- This telephone complies with applicable safety requirements for exposure to radio waves (EMR). The mean power of this telephone does not exceed 20mW limit at which point testing is required.
natural_image
Color gradient bar transitioning from dark to light gray, with no text or symbols

Important Information
- The earpiece of the handset may attract small metal objects such as staples and pins. Care should be taken when placing the handset near these items.
- This telephone is not designed for making emergency telephone calls when the mains power fails. Always have a corded phone available to be able to make and receive calls to emergency services if the mains power fails.
- Do not use your telephone during electrical storms it is possible to get an electric shock. Refer to information contained in White pages directory.
- This phone is designed for connection to a PSTN telephone line or an analogue extension port of a PBX system. If you connect this device to a digital extension of a PBX, damage may result to the PBX.
- Your phone works with most popular hearing aids. However, given the wide range of hearing aids available, we can't guarantee that your phone will function fully with every hearing aid.
Telecom NZ
The grant of a Telepermit for any item of terminal equipment indicates only that Telecom has accepted that the item complies with the minimum conditions for connection to its network. It indicates no endorsement of the product by Telecom, nor does it provide any sort of warranty. Above all, it provides no assurance that any item will work correctly in all respects with another item of Telepermitted equipment of a different make or model, nor does it imply that any product is compatible with all of Telecom's network services."
"This equipment may not provide for the effective hand-over of a call to or from a telephone connected to the same line."
"Under power fail conditions, this telephone may not operate. Please ensure that a separate telephone, not dependent on local power, is available for emergency use."
"NZ Caller Display - Dialling back from the Caller's List."
natural_image
Color gradient bar transitioning from dark to light gray, with no text or symbols

Important Information
If a charge for local calls is unacceptable, the "Dial Button" should NOT be used for local calls. Only the 7-digits of the local number should be dialled from your telephone. DO NOT dial the area code digit or the "0" prefix."
CAUTION

Use only the mains adaptors supplied with this product. Incorrect adaptor polarity or voltage can seriously damage the unit.
Adaptor for base unit:
Input: 100\~240VAC 50/60Hz 150mA
Output: 6VDC 800mA
This telephone is capable of producing very high volume levels when the "Boost" is switched on and the volume control is set to maximum. Extreme caution should be taken if the handset is to be shared between users with normal hearing and those who are hard of hearing.
natural_image
Color gradient bar transitioning from black to white, no text or symbols present

Cordless handset and Base menu
Cordless handset menu
Answer machine Phone book Profile Handset Base Settings Time Tools
| Answer phone | Edit Entry | profile 1 | Ring Tone | Ring Tone | Set Alarm | Appointment |
| Play new Msgs External/Internal | ||||||
| Play all Msgs | New Entry | profile2 | Ring Vol | Ringer Volume | Date and Time | Stop Watch |
| Answer off | ||||||
| Show Details | Equalizer Recall1, 2, 3 | Set Time Voice PromptFormat | onoffsimple | |||
| Delete Entry | Booston/off | System PIN | ||||
| Delete All | Handset Name | |||||
| Copy Entry | Keypad BeepOn/off | |||||
| Copy Append | Contrast | |||||
| Copy All | Auto talkOn/off | |||||
| Backlight time10s 20s 30s 40s | ||||||
| Confirm beepOn/off | ||||||
| Select Base | ||||||
| Auto | ||||||
| Manual | ||||||
| Registration | ||||||
| Register | ||||||
| De register | ||||||
| NZ Caller ID | ||||||
| On/off | ||||||
natural_image
Color gradient bar transitioning from dark to light gray, with no text or symbols

Getting Started
Getting Started
Important:
Please make sure you've read the safety information on Page 1 before you set up your phone system.
Check box contents
If you have purchased a Pro610/810 pack you should have:
- 1 base
• 1 cordless handset - 1 battery cover
• 1 belt clip
• 1 power adaptor
• 1 telephone line cord
• 3 x AAA 1.2V 750mAh NiMH batteries
Important:
Use only the power adaptor, telephone line cord and batteries supplied with your Pro610/810 otherwise your phone may not work.
natural_image
Color gradient bar transitioning from dark gray to white, with no text or symbols

Getting started
Set up your phone system in four simple steps
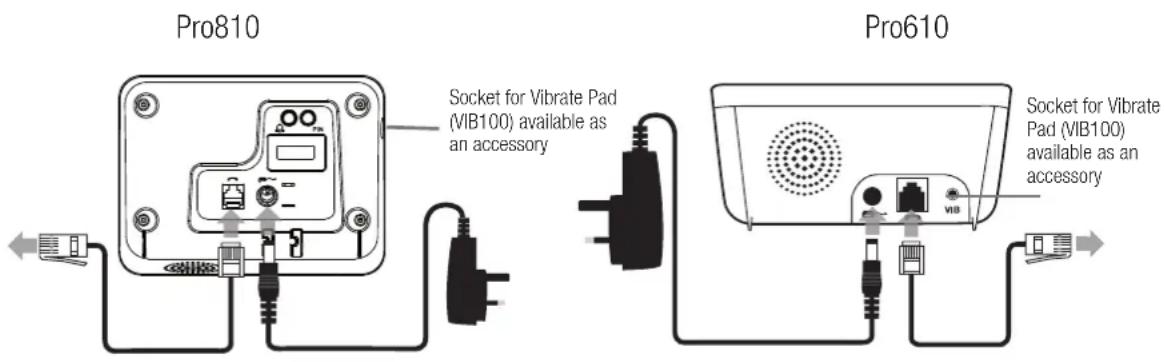
Connect your base
- Plug the power adaptor into the socket marked on the underside of your phone base and the other end into the mains power wall socket and switch the power on.
- Plug the telephone cable into the socket marked 📋 on the underside of your phone base but don't plug the other end into the phone wall socket yet.
Important:
Use only the power adaptor, telephone line cord and batteries supplied with your Pro610/810 otherwise your phone may not work. You should ensure access to the power adaptor plug is not obstructed by furniture or such.
natural_image
Color gradient bar transitioning from dark to light gray, no text or symbols present

Getting started
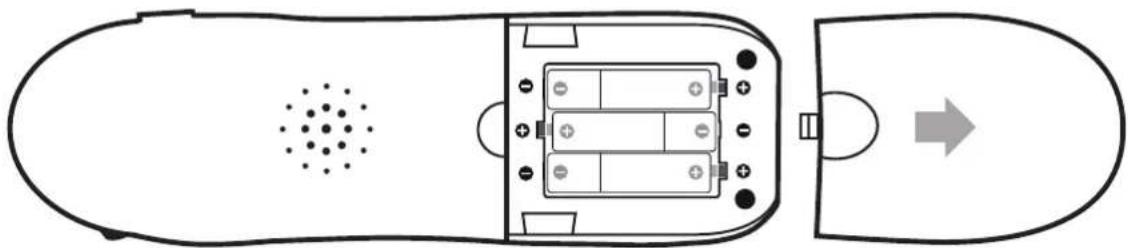
Install your batteries
- Insert your rechargeable batteries into your handset. Make sure they're the right way round so '+' lines up with '+'.
- Replace your handset's battery compartment cover.
natural_image
Top-down schematic of a vehicle or car interior layout with no visible text, numbers, or symbols.Charge your handset
So it can charge fully, place your handset on its base to charge for at least 16 hours (make sure the power socket is switched on!).
Important:
Only use the rechargeable 750mAh NiMH batteries supplied. Over time if you need to replace the batteries make sure they are of the same type as those supplied. NEVER use Alkaline batteries.
natural_image
Color gradient bar transitioning from dark to light gray, with no text or symbols

Getting started
Connect the telephone cable
When the batteries are fully charged, plug the end of the telephone cable into your telephone wall socket.
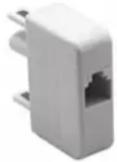
In Australia some phone wall sockets are the old "non modular" style. If you have this type of wall socket you will need to purchase a modular convertor plug (not supplied).
These can be obtained from most electronic stores.
Attach the belt clip
There is a belt clip included in the box that you can attach to the back of your handset if required. Simply turn the handset over and slot the belt clip securely into the two recesses located on either side of the handset.
Your Pro610/810 is now ready for use!
Private exchanges: if your phone is going to use a private exchange (for example, if you have to dial '0' to get an outside line, please follow the steps on page 52).
Phone location
Make sure your phone:
• is on a dry, flat and stable surface
- isn't a trip hazard with its power cable
- isn't obstructed by furniture
• is at least one metre from other electrical appliances
- isn't exposed to smoke, dust, vibration, chemicals, moisture, heat and direct sunlight.
natural_image
Color gradient bar transitioning from dark to light gray, no text or symbols present

Getting started
Handset Key
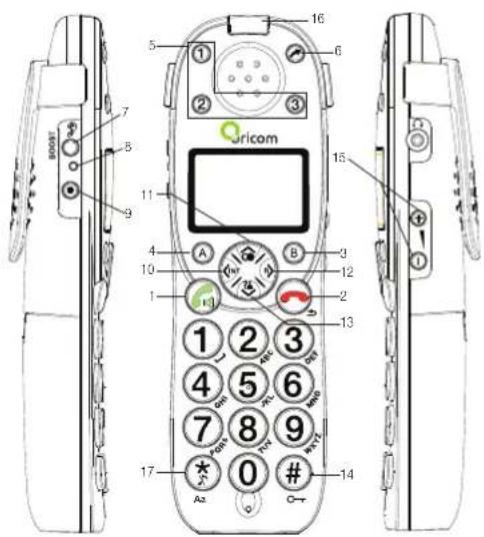
1 Talk On (Hands free)
2 Talk Off (Escape in menu)
3 B button (Phone book in standby mode)
4 A button (Menu in standby mode)
5 Direct Memory M1, M2 and M3
6 \$BMM 5SBOTGFS BOE 7PJDF .FOV154XPMVNF VQ 7PMVNF %PXO
7 #PPTU 0O 0GG
8 Boost On LED
9 Profile
10 Navigation Left (INT)
11 Navigation Up (Redial)
12 Navigation Right (Recall)
13 Navigation Down (Calls)
14 Keypad Lock
154XPMVNF VQ 7PMVNF %PXO
16 Ringer LED
17 3JOHFS 0O 0GG 6QQFS
0GG 6QQFS
-PXFS DB7
natural_image
Color gradient bar transitioning from dark to light gray, with no text or symbols

Getting started
Base Station Key (PRO810 Base Unit)
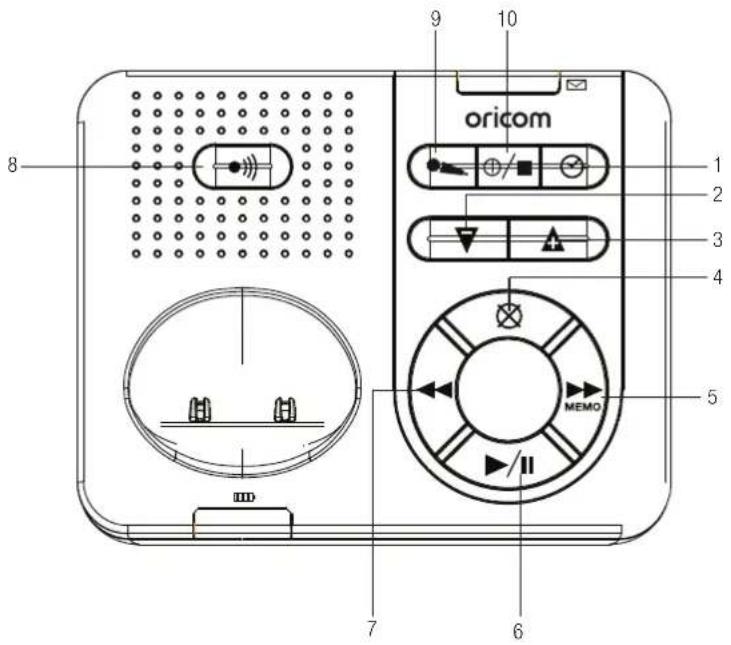
1 Check/Record OGM
2 Volume Up
3 Volume Down
4 Mute / Delete
5 Fast Forward / Memo
6 Play / Pause
7 Rewind
8 Page / Internal
90GM
10 Stop / Esc / Ans on off
natural_image
Color gradient bar transitioning from dark gray to white, with no text or symbols

Handset display icons explained
Handset display icons explained
The following icons appear in your handset display to indicate:

Menu

Confirm / OK

Back

Phonebook mode

There is more information to view on the left

There is more information to view on the right

Battery status

Ringer off

An alarm is activated
natural_image
Color gradient bar transitioning from dark to light gray, with no text or symbols

Handset display icons explained
Keylock is on
Handsfree mode
Call in progress
Boost receiver volume is on (Icon will flash)
Mute handset microphone
You have new calls
When steady, the handset is in range of the base
When flashing, the handset is out of range of the base
Internal call in progress
Answering machine is on
Answering machine is off
Indicates you have a message bank message


natural_image
Color gradient bar transitioning from dark gray to white, with no text or symbols

Phone menu guide
Phone menu guide
Use this section to find your way around the menu display on your phone.
How to use your phone menu display
When you've set up your phone and everything's connected, use your menu display to do things with your phone – from changing the ringer sound to setting up user profiles and saving phone numbers.
Basic guide
Open main menu: press Ⓐ
Browse sub menu: open your main menu and then press 📄 or 🌐
Select sub menu item: scroll using 🔒 or ? until the item you're looking for is shown and then press Ⓑ.
Browse a function: open your sub menu and then press 🔒 or ?
Select a function: scroll using ⏻ or ⚡ until the function you're looking for is shown and then press Ⓑ.
Enter digits or letters: use your keypad.
Confirm or save an entry or action: press Ⓑ.
Cancel and return to standby: press ⏰.
Note:
If you don't do anything, your phone will automatically go on standby after 30 seconds.
natural_image
Color gradient bar transitioning from dark to light gray, with no text or symbols

Making and receiving calls
Making and receiving calls
Make a call
- Enter the number you wish to call using your handset's keypad.
- If you make a mistake, press Ⓐ to delete it.
- Dial the number by pressing Ⓞ.
- End your call by pressing ⏰.
End a call
Press
Take a call
Simply lift the handset off the base (if "Auto Talk" is set to ON, see page 26) and speak into the phone or, if the handset is off the base (or "Auto Talk" is set to OFF, see page 26), press 🔒 and then speak into the phone.
Redial a number
Your handset stores the last ten numbers you've dialled (max. 24 digits each).
- Open the redial list by pressing ⬤.
- Scroll through the redial list using 🔒 or 🔒 until the number you wish to redial is displayed and then press 🔒 to dial the number.
natural_image
Color gradient bar transitioning from dark to light gray, with no text or symbols

Making and receiving calls
Call back a previous caller (only if you have subscribed to Caller ID from your service provider)
Your phone stores the last 30 incoming calls.
- Open the incoming calls list by pressing ?
- Scroll to find the number you want to call back using 📄 or 🌐 then press .
Dial a number in your phone book
To store a phone number in your phone book, see page 33.
- Open your phone book by pressing Ⓑ.
- Scroll to find your number using 📄 or ? then press or enter the first letter of the desired entry using the keypad (e.g. “m” for “Miller”. If there are more than one entry beginning with “m” scroll to find your number using 📄 or ? then press .
Dial a number using the quick dial buttons
To store phone numbers under your quick dial memory buttons, see page 37.
- Choose your quick dial number by pressing ①, ②n . ③
- Press Ⓤ to dial the number.
Adjust the handset earpiece volume
Your handset earpiece volume is louder than a standard phone. But you can still increase or decrease the volume to suit you.
To adjust the volume during a call, press the buttons + and ☑ on the right of the handset.
natural_image
Color gradient bar transitioning from dark gray to white, with no text or symbols

Making and receiving calls
Boost the handset earpiece volume
To boost the handset earpiece volume during a call, press the 📄 key on the top left side of the handset.
An image of an ear will flash in the display to show that boost is on.
Handsfree feature
Use the handsfree feature to talk to your caller without holding the handset or to let other people in the room listen to the conversation.
Use handsfree calling
- Switch on handsfree mode by pressing the ⓚ key twice.
- Exit handsfree mode by pressing Ⓞ.
- To adjust the handsfree volume, press the buttons and on the right of the handset.
Note:
You can't boost volume when using handsfree calling.
See call length
During a call the display shows the duration of the call.
Use a headset (not included)
Simply plug your headset into the headset socket marked on the right side of the handset. This socket can also be used with an Induction Neck Loop (Oricom Part No. CLILOOP) (not supplied).
natural_image
Color gradient bar transitioning from dark to light gray, with no text or symbols

Making and receiving calls
Mute
During a call you can mute the microphone so your caller cannot hear you.
To switch off the microphone, simply press Ⓐ. Mute On will be displayed. To switch it ON again, simply press Ⓐ again.
Switch the handset ringer on and off
To switch the ringer on and off, simply press and hold ⚙ or a couple of seconds.
Lock and unlock the handset keypad
You can still answer calls as usual when your keypad is locked.
To lock the keypad, press and hold # for 3 seconds. The icon will be displayed. To unlock, press and hold # again for 3 seconds.
Make an internal call
Note:
The following features: Make an internal call, transfer an external call internally and make a conference call are only available if you have registered an additional handset(s) to your phone system.
If you have two or more handsets registered to the base you can make internal calls between handsets. Each handset will have been allocated a handset number when registered, e.g. HS1, HS2 etc. These calls are free of charge.
natural_image
Color gradient bar transitioning from dark to light gray, no text or symbols present

Making and receiving calls
- Press
. The display will show Internal -. Enter the internal call number of the handset you want to call, e.g. 2 (to call Handset 2). - To accept the call on the receiving handset, press 📞.
- End your call by pressing ⏰.
Transfer an external call internally
- During your external call, press out. There enter the internal call number of the handset you want to transfer the call to e.g. 2 (to transfer the call to Handset 2).
- To accept the call on the receiving handset, press ⓗ.
- You can now speak to the person answering the receiving handset and tell them you are going to transfer a call. The call will be transferred when you press ⏻.
Note:
If no one picks up the call you're trying to transfer, you can take the call back on your phone by pressing Ⓐ.
natural_image
Color gradient bar transitioning from dark to light gray, no text or symbols present

Making and receiving calls
Make a conference call
- During your external call, press ONT. The enter the internal call number of the handset you want to transfer the call to e.g. 2 (to call Handset 2).
- To accept the call on the receiving handset, press 🔒.
- Once the call has been received on the other handset that you've dialled, activate your conference call by pressing Ⓑ briefly.
- The conference call will end when you press ⏻.
Find handset
You can locate a missing handset or alert a handset user that they are wanted by causing the handset to beep from the base.
- Press ⬙ on the base. The handset(s) will beep.
- Press any button on the handset to stop the handset(s) beeping.
Power failure – What to do
The telephone cannot be used to make calls in the event of a power failure. Always keep a corded telephone available which operates available without an external power supply in case of emergency situations.
natural_image
Color gradient bar transitioning from dark to light gray, with no text or symbols

Using your menu
Using your menu
For information on your phonebook, please go to page 33. For information on your answering machine, please go to page 45.
Priority/Default Setting
If you are the main user of this telephone you should change the settings in the menu so that they are just right for you. These settings will be memorised automatically whenever you wish to make or answer a call.
The user profile feature can be used by others in the household whose preferences for volume, boost and equaliser will also be memorised and applied as indicated below.
User Profiles
You can store 2 different user profiles, each with different settings for the 'Volume', 'Boost' and 'Equaliser' features. You can also personalise each Profile by naming it (Max. 11 letters).
Change a profile name
- Open your menu by pressing Ⓐ, then scroll using 🔊 or 🔒 until Profile is displayed and press Ⓑ.
- Scroll using or until Profile 1 or 2 is displayed and press. B
- Scroll using or until Name is displayed and press. Ⓑ
- Delete the current name by pressing Ⓐ until all characters are deleted.
- Enter a new name (up to 11 letters) and press Ⓑ.
natural_image
Color gradient bar transitioning from dark to light gray, with no text or symbols

Using your menu
Change a profile's handset volume
You have a choice of five volume levels.
-
Open your menu by pressing Ⓐ, then scroll using 🔊 until Profile is displayed and press . Ⓑ
-
Scroll using or until Profile 1 or 2 is displayed and press. B
-
Scroll using or until Volume is displayed and press. B
-
You'll see the current volume level (e.g. 1).
-
Change the volume level using ⚙ or ⚗ and press . Ⓑ
Change a profile's boost setting
-
Open your menu by pressing Ⓐ, then scroll using 🔊 or 🚙 until Profile is displayed and press Ⓑ.
-
Scroll using or until Profile 1 or 2 is displayed and press. Ⓑ
-
Scroll using or until Boost is displayed and press. Ⓑ
-
You'll see the current boost setting (i.e. On or Off).
-
Change the boost setting using ⚙ or ⚗ and press . Ⓑ
Change a profile's tone ('equaliser') setting
-
Open your menu by pressing Athen scroll using or until profile is displayed and press B.
-
Scroll using 📋 or 🚗 until Profile 1 or 2 is displayed and press . Ⓑ
-
Scroll using or until Equaliser is displayed and press. B
natural_image
Color gradient bar transitioning from dark to light gray, no text or symbols present

Using your menu
- You'll see the current tone setting.
- Change the tone setting using ⏻ or ⚡ and press . Ⓑ
Note:
Press ⏻ to put the handset back to standby.
Copy a profile
You can easily copy a profile to another registered and compatible handset.
- Open your menu by pressing Ⓐ, then scroll using ⚫ until Profile is displayed and press . Ⓑ
- Scroll using or until Profile 1 or 2 is displayed and press. B
- Scroll using 📄 or ? until Copy is displayed and press . Ⓑ
- Scroll using INT or until the handset (e.g. 2, 3, 4 or 5) you want to copy the profile to, and press Ⓑ.
- On the handset you're copying the profile to: to confirm, press Ⓑ.
Or to cancel, press Ⓐ.
Choosing which profile to use
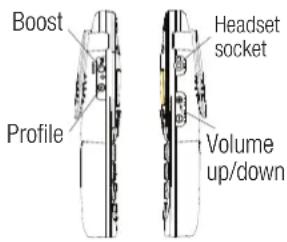
You need to use a handset to choose a profile to use for a call – you can't choose a profile using handsfree. Before answering or making a call select your profile by pressing the profile button on the left side of the handset.
natural_image
Color gradient bar transitioning from dark gray to white, with no text or symbols

Using your menu
Note:
Once you've selected a profile to use when making a call, you have about 30 seconds to dial the call under that profile before the system will return to its default settings.
Change the handset ringer melody
You have a choice of ten ringer melodies.
- Open your menu by pressing Ⓐ, then scroll using 🔍 or 📋 until Handset is displayed and press Ⓑ.
- Ring tone is shown, press Ⓑ.
- Scroll using 🔊 or 🔒 until External or Internal is displayed and press . Ⓑ
- You'll see the melody setting (e.g. 7 [External], 9 [Internal]).
- Change the melody using ⏻ or ⚠ and press . Ⓑ
Change the handset ringer volume
You have a choice of five volume levels plus Off.
- Open your menu by pressing Ⓐ, then scroll using 🔊️ until Handset is displayed and press Ⓑ.
- Scroll using ⚠️ until Ringer volume is displayed and press Ⓑ
- You'll see the current volume level (e.g. 5).
- Change the ringer volume using ⏻ or ⚠ and press . Ⓑ
natural_image
Color gradient bar transitioning from dark to light gray, with no text or symbols

Using your menu
Change the tone ('equalizer') setting
- Open your menu by pressing Ⓐ, then scroll using 🔍 or 🚙 until Handset is displayed and press Ⓑ.
- Scroll using 🔒 or ? until Equalizer is displayed and press . Ⓑ
- You'll see the setting.
- Change the tone setting using ⚙ or ⚠ and press . Ⓑ
Note:
To adjust tone while you're making a call, press the 🔊 button to access the equalizer setting. Then press the 🔊 or 🔊 button to adjust the setting as shown on the bar-graph on the handset screen.
Boost on
When this feature is set to On the boost function is always activated. The Boost-LED on the top left side of the handset is on and the display shows "BOOST IS ON".
You can use the ⏻ key to switch it off for the recent call. For the next call it will be on again. If the Boost on-function is set to Off, you will have to switch it on manually by pressing the ⏻ key. For each call.
- Open your menu by pressing Ⓐ, then scroll using 🔊 or unti Handset is displayed and press . Ⓑ
- Scroll using 🔒 or ? until Boost on is displayed and press . Ⓑ
- You'll see the current boost memory setting (e.g. Off).
- Change the setting using ⏻ or ⚠ On or Off and press . Ⓑ
natural_image
Color gradient bar transitioning from dark to light gray, no text or symbols present

Using your menu
Change handset name
- Open your menu by pressing Ⓐ, then scroll using 🔊 or 🚙 until Handset is displayed and press Ⓑ.
- Scroll using or until Handset name is displayed and press. B
- Delete the current name by pressing Ⓐ Repeat until all Characters are deleted.
- Enter a new name (up to 10 letters) and press Ⓑ.
Switch keypad beep on or off
- Open your menu by pressing Ⓐ, then scroll using ⏻ or ? until Handset is displayed and press Ⓑ.
- Scroll using 📄 or 🚱 until Keypad Beep is displayed and press . Ⓑ
- You'll see the keypad setting (i.e. On or Off).
- Change the keypad beep on or off using ⏻ or ⚠ and press . Ⓑ
Change contrast
You have a choice of five screen contrast levels so you can set the contrast to how you find it most easy to read.
- Open your menu by pressing Ⓐ, then scroll using 🔊 until Handset is displayed and press . Ⓑ
- Scroll using or until Contrast is displayed and press. B
- You'll see the current contrast setting (e.g. 3).
- Change the contrast setting using ⚙ or ⚡ and press . Ⓑ
natural_image
Color gradient bar transitioning from dark to light gray, with no text or symbols

Using your menu
Switch auto talk on or off
When auto talk's switched on your handset will automatically answer the call when you pick up the handset from its base. Default setting is OFF.
If you set it to off you will need to press the Ⓤ button to answer any calls.
- Open your menu by pressing Ⓐ, then scroll using 🔊 until Handset is displayed and press Ⓑ.
- Scroll using or until Auto talk is displayed and press. Ⓑ
- You'll see the current auto talk setting (e.g. Off).
- Change the auto talk setting using ⏻ or ⚡ and press . Ⓑ
Change backlight time
You have a choice of 10, 20, 30 or 40 seconds before the backlight time switches off.
- Open your menu by pressing Ⓐ, then scroll using 🔊 or 📋 until Handset is displayed and press Ⓑ.
- Scroll using or until Backlight time is displayed and press. B
- You'll see the current backlight timing (e.g. 10S).
- Change the backlight timer setting using ⏻ or ⚠ and press . Ⓑ
natural_image
Color gradient bar transitioning from dark to light gray, no text or symbols present

Using your menu
Switch confirmation beep on or off
This is the beep you hear when you change a setting. You can switch the beep on or off.
- Open your menu by pressing Ⓐ, then scroll using 📄 or 🙏 until Handset is displayed and press Ⓑ.
- Scroll using or until Confirm beep is displayed and press. B
- You'll see the current confirmation beep setting (e.g. On).
- Change the confirmation beep setting using 📄 or 🟢 and press . Ⓑ
Select base
You can use this feature if your handset is registered to more than one base.
- Open your menu by pressing Ⓐ, then scroll using 🔊 until Handset is displayed and press Ⓑ.
- Scroll using 🔒 or ? until Select base is displayed and press . Ⓑ
- You'll see the current base setting (e.g. Auto or Manual). If Manual is selected then you can choose which of 4 possible bases you wish to log on to.
- Change the base setting using ⏻ or ⚡ and press . Ⓑ
natural_image
Color gradient bar transitioning from dark to light gray, no text or symbols present

Using your menu
Change date/time
- Open your menu by pressing Ⓐ, then scroll using 🔊 or 🚗 until Time is displayed and press Ⓑ.
- Scroll using or until Date and Time is displayed and press. B
- Using the keypad enter Enter the year, month, day, hours and minutes (your handset has a 24-hour clock) and press Ⓑ.
Change clock hours to 12 or 24hour format
- Open your menu by pressing Ⓐ, then scroll using 🔊 or ⚠️ until Time is displayed and press Ⓑ.
- Scroll using 📄 or 🐃 until Set time format is displayed and press . Ⓑ
- You'll see the current time format setting (e.g. 24 hour).
- Change the time format using 🔒 or 🔒 highlight either 12 hour or 24 hour and press . Ⓑ
natural_image
Color gradient bar transitioning from dark to light gray, with no text or symbols

Using your menu
Set alarm
- Open your menu by pressing Athen scroll using or until time is displayed and press B.
- Scroll using 🔒 or ?& until Set alarm is displayed (your alarm uses a 24-hour clock) and press Ⓑ.
- Select Once, Every Day, Mon to Fri or Off and press Ⓑ.
- Enter the time you want your alarm to go off and press Ⓑ.
- Choose your alarm melody and press Ⓑ.
To cancel the alarm signal, press A Pressing activates the snooze function. With this function the alarm is repeated up to five times after every 5 minutes before it is switched off completely.
natural_image
Color gradient bar transitioning from dark to light gray, with no text or symbols

Base Settings
Base Settings
Change base ringer melody
You have a choice of 9 base ringer melodies.
- Open your menu by pressing Ⓐ, then scroll 🔍 until Base settings is displayed and press Ⓑ.
- Ring tone is displayed, press Ⓑ.
- You'll see the ringer melody setting (e.g. 8).
- Change the ringer melody using ⏻ or ⚠ and press . Ⓑ
Change base ringer volume
You have a choice of five volume levels plus Off.
- Open your menu by pressing Ⓐ, then scroll using 🔍 or 📋 until Base settings is displayed and press Ⓑ.
- Scroll 🚙️ until Ringer volume is displayed and press Ⓑ
- You'll see the current base ringer volume level (e.g. 5).
- Change the base ringer volume using ⏻ or ⚠ and press . Ⓑ
natural_image
Color gradient bar transitioning from dark gray to white, with no text or symbols

Base Settings
Change system PIN code
- Open your menu by pressing Ⓐ, then scroll using 🔊 or 🔔 until Base settings is displayed and press Ⓑ.
- Scroll using 📄 or ⚠️ until System PIN is displayed and press . Ⓑ
- Enter your old PIN code (default PIN is 0000) and press Ⓑ.
- You will be prompted to enter your new 4 digit PIN code twice, then press.
Appointment
You can enter up to five appointments your telephone should remind you at.
- Open your menu by pressing Ⓐ, then scroll 🔍️ until Tools is displayed and press . Ⓑ
- Scroll using or until Appointment is displayed and press. B
- Scroll using 🔒 or ⚙ until 1, 2, 3, 4 or 5 is displayed and press Ⓑ.
- Scroll using 📄 or 🚗 until Edit is displayed and press . Ⓑ
- Delete characters with Ⓐ, enter a name for the appointment using the keypad and press Ⓑ
- Enter the date using the keypad and press Ⓑ.
- Enter the time using the keypad and press Ⓑ.
- Select a melody with ⚙ or ⚡ and press . Ⓑ
If you want to edit or delete an appointment select it as described above and make your changes (Edit) or delete the entry (Delete).
natural_image
Color gradient bar transitioning from dark gray to white, with no text or symbols

Base Settings
Stop watch
The stop watch shows minutes and seconds.
- Open your menu by pressing Ⓐ, then scroll 🔍 until Tools is displayed and press . Ⓑ
- Scroll using or until Stop watch is displayed and press. B
- Press Ⓑ to start the stop watch.
- Press Ⓐ to stop the stop watch.
Voice prompt
- Open your menu by pressing Ⓐ, then scroll 🔊 or ? until Tools is displayed and press Ⓑ.
- Scroll using 📄 or ?util voice prompt is displayed and press . Ⓑ
- Scroll to select ON OFF or Simple
- Press Ⓑ to select and save setting
Reset to default settings
Important:
If you reset to default settings all entries in your phone book, calls list and redial list are deleted.
To reset to default settings
- Press volume⊕ (cordless handset) or (base unit) button for 10 seconds.
- Confirm the reset to default settings by pressing Ⓑ for Yes or Ⓐ No.
natural_image
Color gradient bar transitioning from dark gray to white, with no text or symbols

Using your phone book
Using your phone book
You can store, alphabetically, up to 50 names and their phone numbers in your phonebook. To quickly find a phone book entry, simply enter the first letter of the name you've stored.
Note:
Each phone book entry allows for up to 16 letters for any name and up to 24 digits for any phone number.
Important:
Please remember to also enter the area code for each phone number you enter in your phone book.
How to use the keypad when using your phone book
You'll see that the keys on your keypad have letters as well as numbers. If you press a chosen key a number of times it'll show you all the numbers and letters it represents.
Here are some keys you may find useful when entering phone numbers in your phone book:
- press① for a space
• enter special characters with① or ② - pressA to delete a number or letter you've entered
- press the★ key to change from upper case (e.g. ABC) to lower case (e.g. abc)
Note:
To enter the same letter twice, simply enter the letter and then wait until the cursor moves to after the letter you've entered, before entering it again.
natural_image
Color gradient bar transitioning from dark to light gray, with no text or symbols

Using your phone book
Enter a name and number in your phone book
- Open your phone book by pressing Ⓑ
- Press Ⓑ. The display will show New entry, press 📋 again.
- Enter the name you want to store and press Ⓑ.
- Enter the phone number you want to store and press Ⓑ.
- Scroll using 🙏 or 📞 choose a ringer melody for this name and number and press . Ⓑ
Edit a phone book entry
- Open your phone book by pressing Ⓑ
- Scroll using 📄 or 📋 to find the entry you want to edit and press . Ⓑ
- The display will show Edit entry, press Ⓑ again.
- Press Ⓐ to delete characters and use the keypad to enter new ones, then press Ⓑ
- Press Ⓐ to delete digits and use the keypad to enter new ones, then press Ⓑ
- Scroll using 📄 or 🐃 to choose a ringer melody for this entry and press . Ⓑ
natural_image
Color gradient bar transitioning from dark to light gray, no text or symbols present

Using your phone book
Delete a phone book entry or all entries
- Open your phone book by pressing Ⓑ
- Scroll using 📄 or 🔍 to find the entry you want to delete or if you want to delete all entries press Ⓑ.
- Press 🔍 to display either Delete entry or Delete all and press Ⓑ
- Press Ⓑ to confirm or Ⓐ cancel.
Copy phone book entries to another registered handset
Note:
You can only copy the phone book to another handset if that handset is registered on your base unit. See page 18.
It's easy to copy:
• a single entry (Copy entry)
- entries not already on the handset you're copying to (Copy append)
• all entries (Copy all)
Important:
When you copy all entries to a handset, all existing entries will be deleted. To prevent this from happening you can use the "Copy append mode".
natural_image
Color gradient bar transitioning from dark to light gray, with no text or symbols

Using your phone book
- Open your phonebook by pressing Ⓑ
- Scroll using or to find the entry or entries you want to copy and press. B
- Scroll 🔒 to either Copy entry, Copy append or Copy all and press Ⓑ.
- Scroll INT or R to the handset number you want to copy to (e.g. 2 for Handset 2) and press to confirm.
- Pick up the handset you're copying entries to and press Ⓑ.
natural_image
Color gradient bar transitioning from dark to light gray, with no text or symbols

Using your quick dial memory buttons
Using your quick dial memory buttons
You can store a name (max. 16 characters) and a telephone number (max. 24 digits) under each of the quick dial memory buttons: ①, ② and . ③
Store a quick dial name and number
- Choose the quick dial button under which you want to store a name and number by pressing either ①, ②r. ③
- Press Ⓑ. The display will show Edit entry, press 📋 again.
- Enter the name you want to store using the keypad and press Ⓑ.
- Enter the phone number you want to store and press Ⓑ.
- Scroll using 📄 or 🌐 to choose a ringer melody for this entry and press . The display will show Entry saved.
Edit a quick dial entry
- Choose the quick dial entry to edit by pressing either ① or ② ③
- Press Ⓑ. The display will show Edit entry, press 📋 again.
- Press Ⓐ to delete characters and use the keypad to enter new ones, then press Ⓑ
- Press Ⓐ to delete digits and use the keypad to enter new ones, then press Ⓑ
- Scroll using 📄 or 📋 to choose a ringer melody for this entry and press . The display will show Entry saved.
natural_image
Color gradient bar transitioning from dark to light gray, with no text or symbols

Using your quick dial memory buttons
Delete a quick dial entry
- Choose the quick dial entry to delete by pressing either ① or ② ③
- Press Ⓑ. Scroll 🔍 Delete Entry and press . Ⓑ
- Display will show Delete Entry? Press Ⓑ to confirm or Ⓐ cancel.
natural_image
Color gradient bar transitioning from dark to light gray, with no text or symbols

Using your calls list
Using your calls list
Note:
You must subscribe to your network provider's /Caller ID service for this feature to work. A Subscription charges apply.
Telephone numbers of incoming calls should appear in your calls list. If you have the caller's number stored in your phone book the name will be displayed instead. A total of 30 incoming calls can be stored in the calls list (16 letters per name and 23 digits per number). The number of new calls received will be shown in the display with the flashing 📁 icon. If the number doesn't appear, this is because either the caller's identification (Caller ID) has been withheld by the caller, or it is unavailable due to network restrictions.
You can open your calls list by pressing the 🔊 button. To scroll through your calls list simply press

or ? to display more information including the date and time of the call, press . R
Here are some things you may see on your calls list display:
- WITHHELD NUMBER – caller has withheld their number, or this information isn't available
- INTERNATIONAL – caller is calling from another country or using an internet service
- UNAVAILABLE – number is not available
natural_image
Color gradient bar transitioning from dark gray to white, with no text or symbols

Using your calls list
Store numbers from your calls list to the phone book
It's easy to store incoming call numbers to your phone book.
- Press 🔔 to open your calls list at the most recent entry.
-
Scroll using 📄 or 🔍 to find the entry you want to store and press . Ⓑ
-
The display will show Save number, press Ⓑ.
-
Using your keypad, enter a name for this stored number and press Ⓑ.
-
Edit the number for this name, if needed, and press Ⓑ.
-
Scroll using 🎨 or 📞 to choose the ringer melody for this name and number and press . Ⓑ
Store numbers from your calls list to a quick dial memory
It's easy to store incoming call numbers to one of the three quick dial memory buttons.
- Press 🔔 to open your calls list at the most recent entry.
-
Scroll using 📄 or 🔍 to find the entry you want to store and press . Ⓑ
-
Scroll using? to Save to M1 / M2 / M3 and press Ⓑ
-
Proceed as described above "Store numbers from your calls list to the phone book".
natural_image
Color gradient bar transitioning from dark gray to white, with no text or symbols

Using your calls list
Delete a single calls list entry
- Press 🔒 to open your calls list at the most recent entry.
- Scroll using 📄 or 🔍 to find the listed call you want to delete and press . Ⓑ
- Scroll 🔒 until you highlight Delete.
- Press Ⓑ to confirm or Ⓐo cancel.
Delete all calls list entries
- Press ⚙️ to open your calls list at the most recent entry and press . Ⓑ
- Scroll 🔒 until Delete all is displayed and press Ⓑ
- The display will show Delete all? Press Ⓑ to confirm or Ⓐ cancel.
natural_image
Color gradient bar transitioning from dark to light gray, with no text or symbols

Operations of Voice Menu
Operations of Voice Menu
Talking Caller ID
If the incoming call is listed as a VIP in the phone book and has a custom recorded ring tone then that ring tone will replace the spelt name
Phone book search and edit
When searching the phone book using alpha characters each character will be announced when pushing the keypad buttons, i.e. when entering 'S' the phone will announce 7, P, Q, R and then S The (UP) and (down) buttons can also be used to search the phone book in order, when selected entry is reached, after 2 seconds delay the phone will announce the name by announcing each character in the name
Voice menu options
There are 2 levels of voice mode full and simple in simple mode only the top levels of the menu will be announced in full mode all levels actions and results will be announced
Talking Keys
When the handset is in standby mode, most of the keys will announce the its function to remind the user what function is being accessed. Including:
- Boost On / Off key
- Profile Select key
- Ringer On / Off key
- Keypad Lock / Unlock
natural_image
Color gradient bar transitioning from black to white, no text or symbols present

Operations of Voice Menu
- Intercom Key
- Flash Key
- Transfer Key
There are some keys that will directly announce stored numbers instead of its functions:
- Memory 1, 2 and 3 Keys
- Right soft key (Phonebook)
- Last Number Redial Key
- Call Log Key
To Select the Voice Menu mode
- Open the menu by pressing (A) then scroll using or until Tools is displayed and press .
- Scroll using 📄 or ⚫ to select "Voice Prompts" and press Ⓑ
- Scroll using or to select "Simple", ON or OFF.
Quick Access
In Standby mode ONLY press and hold "transfer" key for 10 seconds.
Display will show "Voice Prompt". Use buttons Ⓐ or Ⓑ select option required.
natural_image
Color gradient bar transitioning from dark gray to white, with no text or symbols

Operations of Voice Menu
Register a handset
You only need to register a handset if it has become de-registered from the base or if you've purchased a new handset separately. You can register up to 5 handsets.
Important:
Make sure any handset you're registering is fully charged before you try to register it.
At the handset:
- Press and hold Ⓐ for approx 10 seconds until the display shows Press & Hold Base Page Key.
At the base:
- Press and hold ⬙ for at least 10 seconds until the indicator light on the base flashes.
Deregister a handset
You may need to deregister a handset if you've too many registered on your phone system, or if the handset develops a fault and needs to be replaced.
Important:
You can only cancel subscription of another handset, not the handset you are using to do the remove procedure.
- Open your menu by pressing Ⓐ, then scroll using 🔊 until Handset is displayed and press . Ⓑ
- Scroll using 📄 or 🚗 until Registration is displayed and press . Ⓑ
Then scroll to De-register is displayed and press Ⓑ
- Enter the PIN code (default PIN 0000) and press Ⓑ.
- Enter the handset's internal number (e.g. 1) and press Ⓑ to confirm.
natural_image
Color gradient bar transitioning from dark gray to white, with no text or symbolsUsing your answering machine (Only for Pro810)
Using your answering machine (Only for Pro810)
After you've set up your phone system, follow these easy steps to set up and use your answering machine.
Switch answering machine on or off
To switch your answering machine on and off, simply press on the base. The current answer mode will be announced. When new messages are received, the message counter on the base and the base indicator light will flash. The message counter also indicates the number of messages you have.
Adjust the base loudspeaker volume
You can increase or decrease the base loudspeaker volume using the ▼Buttons on the base. The volume level will be shown on the base message counter, e.g. L1 ... L5.
Set the answer mode
There are three answer modes to choose from: Answer & Record, Answer only or Answer off. If you set the answer mode to Answer only your callers will not be able to leave a message.
- Switch your answering machine on by pressing Ⓓ/■ on the base.
- To change the mode between Answer & Record, Answer Only or Answer Off press and hold ①/■ for a couple of seconds.
natural_image
Color gradient bar transitioning from dark to light gray, no text or symbols present

Using your answering machine (Only for Pro810)
Record your outgoing message
You can change the default answering message to your own. Your outgoing message needs to be under two minutes.
- Press and hold 📄 on the base for a couple of seconds and then record your message after the beep. The base message counter will show oG during recording.
- To stop recording, press Ⓞ/■. Your outgoing message will be played back to you, the base message counter will show o1.
Note:
To return your outgoing message to the default message, simply press and hold ☒ while the outgoing message is playing.
Check your outgoing message
- Press □ and your current outgoing message is announced.
natural_image
Color gradient bar transitioning from dark to light gray, no text or symbols presentUsing your answering machine (Only for Pro810)
Set the answer delay
You either choose the number of rings you want before your answering machine answers any incoming call (2-9 rings) or you can choose Time Saver. Time Saver saves you the cost of the call if you're calling in from elsewhere to pick up any messages: if your answering machine answers after 2 rings you have new messages, if it answers after 5 rings you have no new messages. Therefore, you can hang up after 3 rings knowing you have no new messages and you won't be charged for the call.
- Press and hold the button (located underneath the base) for a couple of seconds. The current ring delay setting will be announced and you will also see it displayed on the base message counter e.g. r3 or tS (for time saver).
- Choose the number of rings you want (2–9) or Time Saver using ◀◀◀ or ▶ and then press 🔔 to confirm.
Set the day and time
- Press and hold the button for a couple of seconds.
- Choose a day of the week using the ◀◀ or □MEMO and press to confirm.
- Choose the hour using the ◀ or 🔍 buttons, the digits will also be shown on the base message counter. Press ⏻ to confirm.
- Choose the minutes using the ◀ or 🔍 buttons, the digits will also be shown on the base message counter. Press ⏰ to confirm.
Check the day and time
- Press ☑ The current day and time is announced.
natural_image
Color gradient bar transitioning from dark to light gray, no text or symbols present

Using your answering machine (Only for Pro810)
Record a memo
You can record memo messages for yourself or other members of the household which can be played back like normal messages.
- Press and hold MEMO for a couple of seconds.
- After the beep record your memo. The message counter will show -r while recording.
- Press ①/■ to finish recording. The base indicator light and the message counter will flash and the counter will increase by one digit, e.g. 01.
Listen to messages or memos using the base buttons
Playback is in the order messages or memos were received. New messages are played before old ones. The time and date of each message or memo is announced before playback.
Here are some functions you may find useful:
• to play or pause, press▶/II
• to stop, press①/■
• to rewind, press
• to fast forward, press MEMO
Delete a single message or memo using the base
- Play the message or memo you want to delete by pressing ▶/□
- Press and hold ☒ for a couple of seconds during playback of the message or memo to delete it.
natural_image
Color gradient bar transitioning from dark to light gray, no text or symbols presentUsing your answering machine (Only for Pro810)
Delete all old messages and memos using the base
- Press and hold foka couple of seconds when no messages are being played.
- To confirm, press ☒. The message counter will show dL to indicate that deletion is taking place.
Listen to messages or memos using your handset
- Open the answering machine menu by pressing Ⓐ
- Ans Machine is displayed, press Ⓑ.
- Scroll using 📊 or 🌿 to display either Play New Msgs or Play All Msgs and press Ⓑ.
- Press ⬇ to return to standby.
Memory full
Your answering machine will announce if it's full and automatically stop taking any more messages and switch itself to Answer Only. You'll need to delete some of your messages or memos before any new messages can be recorded.
Remote access to your answering machine
You can call your answering machine to hear your messages when you're away from home using most modern phones, including mobile phones.
You need to use a PIN code to access your answering machine. The default code is 000. We suggest you change this for security reasons.
natural_image
Color gradient bar transitioning from dark to light gray, no text or symbols present

Using your answering machine (Only for Pro810)
Change PIN
- Press and hold the button (located underneath the base) for a couple of seconds. The current 3 digit PIN will be announced and you will be prompted to enter your first new digit. You can select digits between 0 and 9.
- Select the new first digit using the ◀ or ▶ buttons, the digits will also be shown on the base message counter. Press PIN to confirm.
- Repeat the above procedure for your new 2nd and 3rd digits.
- After you've confirmed your 3rd digit your new security PIN will be announced.
Press the Key at any time to exit changing the PIN code mode and return to standby. The PIN code will remain unchanged.
Call in to check messages
- Dial your own phone number from the remote phone and wait until the answering machine picks up the call.
- Press ✕ three times, then enter your 3 digit PIN after the voice prompt.
- You can manage your messages using your keypad (see remote instructions below)
Note:
If you make a mistake entering your PIN three times, your answering machine will hang up and you'll need to call and try again.
natural_image
Color gradient bar transitioning from dark to light gray, with no text or symbolsUsing your answering machine (Only for Pro810)
Remote access instructions guide
While listening to your messages from a remote location, enter these numbers to manage your messages.
To...
Rewind messages, press 1.
Play or pause your messages, press 2.
Fast Forward through your messages, press 3.
Hear outgoing message (OGM), press 4.
Record outgoing message (OGM), press 5. To end your message, press 6.
Stop messages, press 6.
Delete current message, press 7.
Switch answering machine off, press 8.
Switch answering machine on to take messages, press 9.
Delete all old messages, press 0.
Record a memo, press #. To end your message, press 6.

natural_image
Color gradient bar transitioning from dark to light gray, no text or symbols present

Use on a private branch exchange
Use on a private branch exchange (PABX)
If your phone's on an exchange (e.g. you need to dial 0 to get an outside line), you can transfer calls and use call back by using the R button. You'll need to check your private exchange manual to find out which timing to use for your exchange. You can choose two recall timings: 100ms (Short) and 600ms (Long).
To set the recall time
- Open your menu by pressing Athen scroll using or until Base settings is displayed and press B.
- Scroll using or until Recall is displayed and press. Ⓑ
- You'll see the current recall timing setting (e.g. Short).
- Choose the recall timing setting you want (Short or Long) using 📐 or 🚗 and press . Ⓑ
Insert a dialling pause
If you have to dial a number for an outside line and it takes a while to connect, you can insert a pause so you don't have to wait to hear the dialling tone. To insert a dialling pause, simply enter the number you usually dial for an outside line and then press Ⓞ for two seconds. A P on your display will show dialling pause is active.
Note:
You can also insert a dialling pause with a phone number in your phonebook. by pressing the "O" button for two seconds and 'P" will display.
natural_image
Color gradient bar transitioning from dark to light gray, no text or symbols present

Use on a private branch exchange
Using additional services
Your phone should be able to support services such as call waiting and conference calls. You'll need to check with your telephone network provider for further information on these services.



Pro610 810 User Guide-.indd 53 2012-7-16 14:08:08

natural_image
Color gradient bar transitioning from dark to light gray, with no text or symbols

Help and support
Help and support
Troubleshooting guide
Some issues may simply be resolved by disconnecting the power to the unit. In such instances the power to the main base station should be switched off and batteries in the handset should also be removed for about 20 minutes. After which reconnect everything to determine if this has resolved the issue.
I can't make phone calls
- Make sure the phone cable is connected properly. If it is, there may be a fault. Please make sure you're using the phone cable that came with your phone.
- Check power's plugged in, switched on and working.
- Make sure you are not too far from the base.
- Test the phone line and socket by using another phone.
natural_image
Color gradient bar transitioning from dark to light gray, with no text or symbols

Help and support
I keep losing my connection
- Make sure you are not too far from the base (in ideal condition).
- The base may not be in an ideal location – consider moving it.
My handset keeps switching off
- It may need recharging. So it can charge fully, place your handset on its charger base for at least 16 hours (make sure the power socket is switched on!).
- Replace the rechargeable batteries. Any replacement batteries should be the same type as those provided.
Caller's identification (Caller ID) isn't working
- Check you have this service on your phone line. Please call your network provider.
- The caller may have withheld their phone number.
My handset or base doesn't ring
Check that the ringer is on. See pages 14,21,30 and 32.
I've got a buzzing noise on my radio, TV or computer
We suggest you use your cordless handset at least one metre away from electrical equipment and mobile phones.
There is interference in the earpiece and/or internet connection is very slow when using the phone
You must plug the phone into the wall socket via an ADSL filter if you have broadband internet on your phone line.
natural_image
Color gradient bar transitioning from dark to light gray, with no text or symbols

Help and support
My answering machine won't record messages or memos
- Check that your answering machine is switched on.
- Answering memory may be full. See page 49.
My remote access isn't working
- Check you're using the correct PIN. See page 50.
- Make sure you're using a touchtone phone.
The red light on the base is constantly flashing
You have a new message(s). Press the ▶/□ button to listen to them and the flashing will stop.
natural_image
Color gradient bar transitioning from dark gray to white, with no text or symbols

Safety information
Technical details
| Standard DECT ^1 GAP ^2 | |
| Power supply (base station) Input: 100 | -240V 50/60HzOutput: 6VDC 800mA |
| Range Approx 300m in ideal conditions | |
| Standby Up to 100hrs | |
| Maximum Talk Time Up to 10hrs | |
| Rechargeable batteries 3 x AAA 1.2V | 750mAh NiMH |
| Recall time Short (100 ms) / Long (600 ms) | |
| Optimum ambient temperature 0°C to | 45°C |
| Optimum relative humidity 20% to 80% | |
| Recall 100, 300 ms | |
^1 DECT: Digital Enhanced Cordless Telecommunication = standard for cordless phones.
^2 GAP: Generic Access Profile = standard for the operation of handsets and base stations from different manufacturers.
natural_image
Color gradient bar transitioning from dark to light gray, with no text or symbols

Safety information
Default settings
To reset to default settings, please see page 32.
Cordless handset default settings
| Handset name ORICOM | |
| Handset ringing melody (external) 7 | |
| Handset ringing melody (internal) 9 | |
| Handset ringing volume 4 | |
| Base ringing melody 3 | |
| Base ringing volume 3 | |
| Keypad beep On | |
| Auto talk Off | |
| Contrast 3 | |
| Backlight time 10s | |
| Boost on Off | |
| Recall time Short | |
| Dialling mode Tone | |
| PIN code 0000 | |
| Voice prompts Off |
natural_image
Color gradient bar transitioning from dark to light gray, with no text or symbols

Safety information
Answering machine (will not be reset)
| Answer mode Answer and record | |
| PIN code for remote access 000 | |
| Answer delay 9 | |
| Time format 12 hours |



natural_image
Color gradient bar transitioning from dark to light gray, with no text or symbols

Maintenance and guarantee
Maintenance and guarantee
Maintenance
- Please clean your equipment's surfaces with a soft, fluff-free cloth.
• Never use cleaning agents or solvents.
Customer Support
If you have any problems setting up or using this product you will find useful tips and information in the Troubleshooting section of this user guide as well as “Frequently Asked Questions” on our website www.oricom.com.au.
If you have further questions about using the product after reviewing the resources above or would like to purchase replacement parts or accessories please call our Customer Support Team. Our dedicated local support team are more likely to be able to help you than the retailer where you made your purchase.
Important
Please retain your purchase receipt and attach to the back page of this user guide as you will need to produce this if warranty service is required. Take a few moments to register your product online: www.oricom.com.au
natural_image
Color gradient bar transitioning from dark to light gray, with no text or symbols

Warranty information (Australia)
How to make a claim under Warranty in Australia
Oricom has a simple warranty process for you to follow:
- Please call or email our Customer Support Team, contact details follow.
- A Customer Support Team member will verify after troubleshooting with you if your product qualifies under warranty. If so, they will give you a Product Return Authorisation number.
- We will then email or fax a Return Authorisation form and a Repair Notice (if necessary), together with instructions on how to return the goods for warranty service.
Please note that if a Customer Support Team member advises that your product does not qualify for return, this warranty does not apply to your product.
Products that are authorised to be returned to Oricom in Australia must include all of the following:
• A completed Return Authorisation form
• A copy of your Proof of Purchase (please keep your original copy)
• The faulty product, including all accessories.
Send the approved returns to:
Oricom International Pty Ltd
Locked Bag 658
South Windsor NSW 2756 Australia
Please note that this warranty excludes expenses incurred by you in returning any faulty product to us. You must arrange and pay any expenses incurred (including postage, delivery, freight, transportation or insurance of the product) to return the faulty product to us, however, we will arrange delivery of the repaired or replaced faulty product to you.
natural_image
Color gradient bar transitioning from dark to light gray, with no text or symbols

Warranty information (Australia)
Important Information
Repair Notice
Please be aware that the repair of your goods may result in the loss of any user-generated data (such as stored telephone numbers, text messages and contact information). Please ensure that you have made a copy of any data saved on your goods before sending for repair.
Please also be aware that goods presented for repair may be replaced by refurbished goods or parts of the same type rather than being repaired.
Warranty information (Australia)
This Warranty is provided by Oricom International Pty Ltd ABN 46 086 116 369, Unit 1, 4 Sovereign Place, South Windsor NSW 2756, herein after referred to as “Oricom”.
Oricom makes no other warranties or conditions, express or implied, including as to acceptable quality and fitness for a particular purpose, except as stated in this Warranty.
Any implied warranties that may be imposed by law are limited in duration to the Warranty Period.
Oricom warrants that the product is free from defects in materials or workmanship during the Warranty Period. This Warranty does not extend to any product from which the serial number has been removed or was purchased outside of Australia.
This warranty in no way affects your statutory warranty rights under the Competition and Consumer Act 2010 or any other similar legislation.
The Warranty Period will be 1 year from the date of purchase of the product evidenced by your dated sales receipt. You are required to provide proof of purchase as a condition of receiving warranty services.
natural_image
Color gradient bar transitioning from dark to light gray, with no text or symbols

Warranty information (Australia)
You are entitled to a replacement product or repair of the product according to the terms and conditions of this document if your product is found to be faulty within the Warranty Period. This Warranty extends to the original purchaser only and is not transferable.
Products distributed by Oricom are manufactured using new materials or new and used materials equivalent to new in performance and reliability. Spare parts may be new or equivalent to new. Spare parts are warranted to be free from defects in material or workmanship for thirty (30) days or for the remainder of the Warranty Period of the Oricom branded product in which they are installed, whichever is longer. During the Warranty Period, Oricom will where possible repair and if not replace the faulty product or part thereof. All component parts removed under this Warranty become the property of Oricom. In the unlikely event that your Oricom product has a recurring failure, Oricom may, subject to the Competition and Consumer Act 2010, at its discretion, elect to provide you with a replacement product of its choosing that is at least equivalent to your product in performance.
Oricom does not warrant that the operation of the product will be uninterrupted or error free.
Oricom is not responsible for damage that occurs as a result of your failure to follow the instructions that came with the product. These terms and conditions together with any specific terms and conditions contained in the user guide to the product purchased constitute the complete and exclusive agreement between you and Oricom regarding the product.
No change to the conditions of this Warranty is valid unless it is made in writing and signed by an authorised representative of Oricom.
Oricom will not be in breach of a warranty expressly set out in this User Guide or under the Competition and Consumer Act 2010 and excludes any liability for damages or any other remedy arising under any other legislation or the common law if the damage occurs as a result of:
- failure by you to adhere to the warnings and follow the instructions set out in this user guide for the proper installation and use of the product;
- negligence on your part or misuse by you of the product;
natural_image
Color gradient bar transitioning from dark to light gray, with no text or symbols

Warranty information (Australia)
- an uncontrollable external cause which results in the product not functioning including but not limited to power failure, lightning or over voltage; and
- modification to the product or services carried out on the product by anyone other than Oricom or Oricom's authorised service provider.
Oricom will not be liable for any damages caused by the product or the failure of the product to perform, including any lost profits or savings or special, incidental or consequential damages.
Oricom is not liable for any claim made by a third party or made by you on behalf of a third party.
This limitation of liability applies whether damages are sought, or a claim made, under this Warranty or as a tort claim (including negligence and strict product liability), a contract claim or any other claim. However, this limitation of liability will not apply to claims for personal injury. Nothing in this Warranty excludes, restricts or modifies any condition, warranty, right or remedy which pursuant to the Competition and Consumer Act 2010 applies to this Warranty and which may not be so excluded, restricted or modified. For warranties that cannot be excluded, restricted or modified, Oricom limits the remedies available to those specified in the relevant legislation.
Oricom products come with guarantees that cannot be excluded under the Australian Consumer Law. You are entitled to a replacement or refund for a major failure and compensation for any other reasonably foreseeable loss or damage. You are also entitled to have the goods repaired or replaced if the goods fail to be of acceptable quality and the failure does not amount to a major failure.
natural_image
Color gradient bar transitioning from dark to light gray, no text or symbols present

Contact details for Oricom support and warranty claims in Australia
Oricom International Pty Ltd
Locked Bag 658
South Windsor, NSW 2756
Australia
Email: support@oricom.com.au
Phone: 1300 889 785 or (02) 4574 8888
(Monday to Friday 8am to 6pm AEST)
Web: www.oricom.com.au
Fax: (02) 4574 8898

Contact details for Oricom support and warranty claims in New Zealand
Email: support@oricom.co.nz
Phone: 0800 674 266
(Monday to Friday 10am to 8pm NZST)
Web: www.oricom.co.nz

Ref: 16072012
- Table of contents
- Need Help?
- Important Information
- Important:
- Telecom NZ
- CAUTION
- Getting Started
- Check box contents
- Set up your phone system in four simple steps
- Connect your base
- Install your batteries
- Charge your handset
- Connect the telephone cable
- Attach the belt clip
- Phone location
- Handset Key
- Handset display icons explained
- Phone menu guide
- How to use your phone menu display
- Basic guide
- Note:
- Making and receiving calls
- Make a call
- End a call
- Take a call
- Redial a number
- Call back a previous caller (only if you have subscribed to Caller ID from your service provider)
- Dial a number in your phone book
- Dial a number using the quick dial buttons
- Adjust the handset earpiece volume
- Boost the handset earpiece volume
- Handsfree feature
- Use handsfree calling
- See call length
- Use a headset (not included)
- Mute
- Switch the handset ringer on and off
- Lock and unlock the handset keypad
- Make an internal call
- Transfer an external call internally
- Make a conference call
- Find handset
- Power failure – What to do
- Using your menu
- Priority/Default Setting
- User Profiles
- Change a profile name
- Change a profile's handset volume
- Change a profile's boost setting
- Change a profile's tone ('equaliser') setting
- Copy a profile
- Choosing which profile to use
- Change the handset ringer melody
- Change the handset ringer volume
- Change the tone ('equalizer') setting
- Boost on
- Change handset name
- Switch keypad beep on or off
- Change contrast
- Switch auto talk on or off
- Change backlight time
- Switch confirmation beep on or off
- Select base
- Change date/time
- Change clock hours to 12 or 24hour format
- Set alarm
- Base Settings
- Change base ringer melody
- Change base ringer volume
- Change system PIN code
- Appointment
- Stop watch
- Voice prompt
- Reset to default settings
- To reset to default settings
- Using your phone book
- How to use the keypad when using your phone book
- Enter a name and number in your phone book
- Edit a phone book entry
- Delete a phone book entry or all entries
- Copy phone book entries to another registered handset
- Using your quick dial memory buttons
- Store a quick dial name and number
- Edit a quick dial entry
- Delete a quick dial entry
- Using your calls list
- Store numbers from your calls list to the phone book
- Store numbers from your calls list to a quick dial memory
- Delete a single calls list entry
- Delete all calls list entries
- Operations of Voice Menu
- Talking Caller ID
- Voice menu options
- Talking Keys
- To Select the Voice Menu mode
- Quick Access
- Register a handset
- At the handset:
- At the base:
- Deregister a handset
- Using your answering machine (Only for Pro810)
- Switch answering machine on or off
- Adjust the base loudspeaker volume
- Set the answer mode
- Record your outgoing message
- Check your outgoing message
- Set the answer delay
- Set the day and time
- Check the day and time
- Record a memo
- Listen to messages or memos using the base buttons
- Delete a single message or memo using the base
- Delete all old messages and memos using the base
- Listen to messages or memos using your handset
- Memory full
- Remote access to your answering machine
- Change PIN
- Call in to check messages
- Remote access instructions guide
- Use on a private branch exchange
- Use on a private branch exchange (PABX)
- To set the recall time
- Insert a dialling pause
- Using additional services
- Help and support
- Troubleshooting guide
- I can't make phone calls
- I keep losing my connection
- My handset keeps switching off
- Caller's identification (Caller ID) isn't working
- My handset or base doesn't ring
- I've got a buzzing noise on my radio, TV or computer
- There is interference in the earpiece and/or internet connection is very slow when using the phone
- My answering machine won't record messages or memos
- My remote access isn't working
- The red light on the base is constantly flashing
- Safety information
- Default settings
- Maintenance and guarantee
- Maintenance
- Customer Support
- Important
- Warranty information (Australia)
- How to make a claim under Warranty in Australia
- Repair Notice
- Contact details for Oricom support and warranty claims in Australia
- Contact details for Oricom support and warranty claims in New Zealand
Brand : Oricom
Model : PRO610
Category : Telephone