TV7400 - Telephone Oricom - Free user manual and instructions
Find the device manual for free TV7400 Oricom in PDF.


| Product Type | 2.4GHz Amplified Wireless TV Headset |
| Brand | Oricom |
| Model | TV7400 |
| Weight (Headset) | 50 grams |
| Battery Type | 3.7V, 380mAh Lithium Polymer (built-in rechargeable) |
| Operating Time | Up to 6 hours |
| Charging Time | Approximately 3 hours for full charge |
| Range | Up to 25 meters (open area) |
| Frequency Response | 30 Hz – 10 kHz |
| Signal-to-Noise Ratio | >65 dB |
| Distortion | <2% |
| Transmission Mode | FHSS (Frequency Hopping Spread Spectrum) |
| Carrier Frequency | 31 channels between 2406-2472 MHz |
| Audio Inputs | 3.5mm stereo jack and optical (Toslink) |
| Power Input (Cradle) | 5V DC, 0.55A |
| Charging Indicator | Red (charging), Green (fully charged) |
| Volume Control | Yes, on headset |
| Sound Balance Control | Yes, left/right adjustment |
| Tone Control | Adjustable treble and bass via button on cradle |
| Microphone | Built-in for conversation mode |
| Automatic Power Off | RF transmission auto off after ~5 minutes of no audio signal |
| Warranty | 12 months (Australia) |
| Included Accessories | Charging cradle/transmitter, power supply, optical cable, audio cable (3.5mm), RCA adapter cable |
| Cleaning Instructions | Wipe with damp cloth; do not use alcohol or chemical solvents |
Frequently Asked Questions - TV7400 Oricom
User questions about TV7400 Oricom
0 question about this device. Answer the ones you know or ask your own.
Ask a new question about this device
Download the instructions for your Telephone in PDF format for free! Find your manual TV7400 - Oricom and take your electronic device back in hand. On this page are published all the documents necessary for the use of your device. TV7400 by Oricom.
USER MANUAL TV7400 Oricom
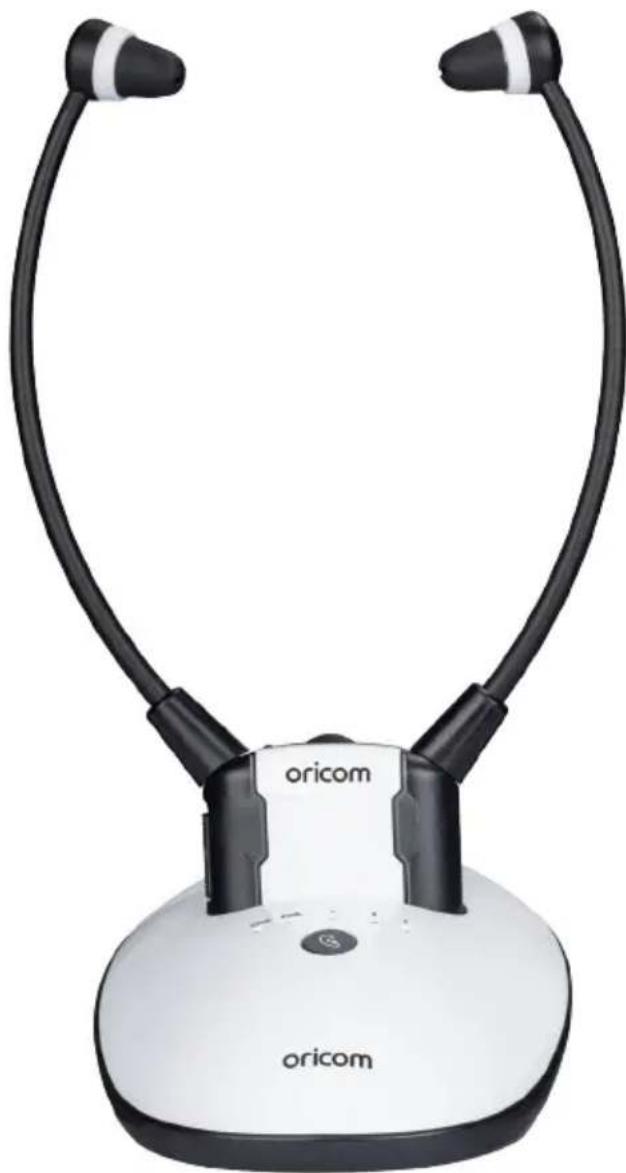
2.4GHz Amplified Wireless TV Headset
natural_image
White oricom desk lamp with black adjustable necks and a white base (no text or symbols visible)User Guide
Keep this user guide for future reference. Always retain your proof of purchase in case of warranty service.
Features 3
Getting to know your product
Components .... 5
Function identification: headset receiver....6
Function identification: transmitter 7
Charging the Battery 8
Installation
Transmitter 9
Headset receiver....10
Operation
Initial Operation 11
Routine Operation....11
Improving Sound by Switching Channels....12
Adjusting the Sound Balance (left-right)....13
Using the Mic Button and Microphone for Conversation....13
Controlling the Tone (Bass & Treble)....14
Technical specifications....15
Troubleshooting 15
Cleaning & Maintenance 16
Need Help?
If you need assistance setting up or using your Oricom product now or in the future, call Oricom Support.
Australia 02 4574 8888
www.oricom.com.au
Mon-Fri 8am – 6pm AEST
New Zealand 0800 67 42 66
Mon-Fri 10am – 8pm NZST
Welcome...
to your TV7400 2.4GHz Amplified Wireless TV Headset
The Oricom Wireless TV Headset is an audio amplification system specifically designed for people with hearing difficulties.
The Oricom Wireless TV Headset can be used with all kinds of audio systems for free listening enjoyment. This product can be used on all audio devices with a 3.5mm/optical audio output, including all TV's, Smartphones, and Hi-Fi systems. Audio output from a TV or audio device is transmitted by the Charging Cradle, and the wireless receiver receives the signal and amplifies the audio sound for the listener.
Features
• Comfortable, lightweight and easy to use
- Works with all TV's and audio devices with a 3.5mm/optical audio output
- Integrated microphone on headset to switch to conversation mode and increase the ambient sound at the touch of a button
• Volume control
- Fast charging cradle
• RF Transmission auto off (when no audio signal)
• Audio balancing (Left/Right)
• Adjustable treble and tone clarity
• Continuous in use time: Up to 6 hours
- Stereo audio input on the base (3.5mm or optical audio cables)
- Operating distance of up to 25 metres (in open area)
• 12 month warranty
Note: Follow the local regulations regarding the disposal of your packing materials. Wherever possible, recycle those materials.
This User Guide provides you with all the information you need to get the most from your product.
Need help?
If you have any problems setting up or using your TV7400 TV headset, please find answers to Frequently Asked Questions, available at oricom.com.au
WARNINGS:
- Never attempt to recharge conventional dry cells.
- Batteries (battery pack or batteries installed) shall not be exposed to excessive heat from sources including: sunshine, fire or similar.
- Never use another type of battery or non-rechargeable batteries to replace the rechargeable batteries supplied.
- When the headsets are not in use, move the switch to the OFF position to avoid damaging the batteries.
- The batteries must always be fully charged before first use. An initial 3 hours charge is required to guarantee an acceptable service life for the rechargeable batteries. Always ensure that the headset Receiver is switched to OFF position while the batteries are charging.
- Excessive sound pressure from earphones and headsets can cause hearing loss.
Getting to know your product
Components
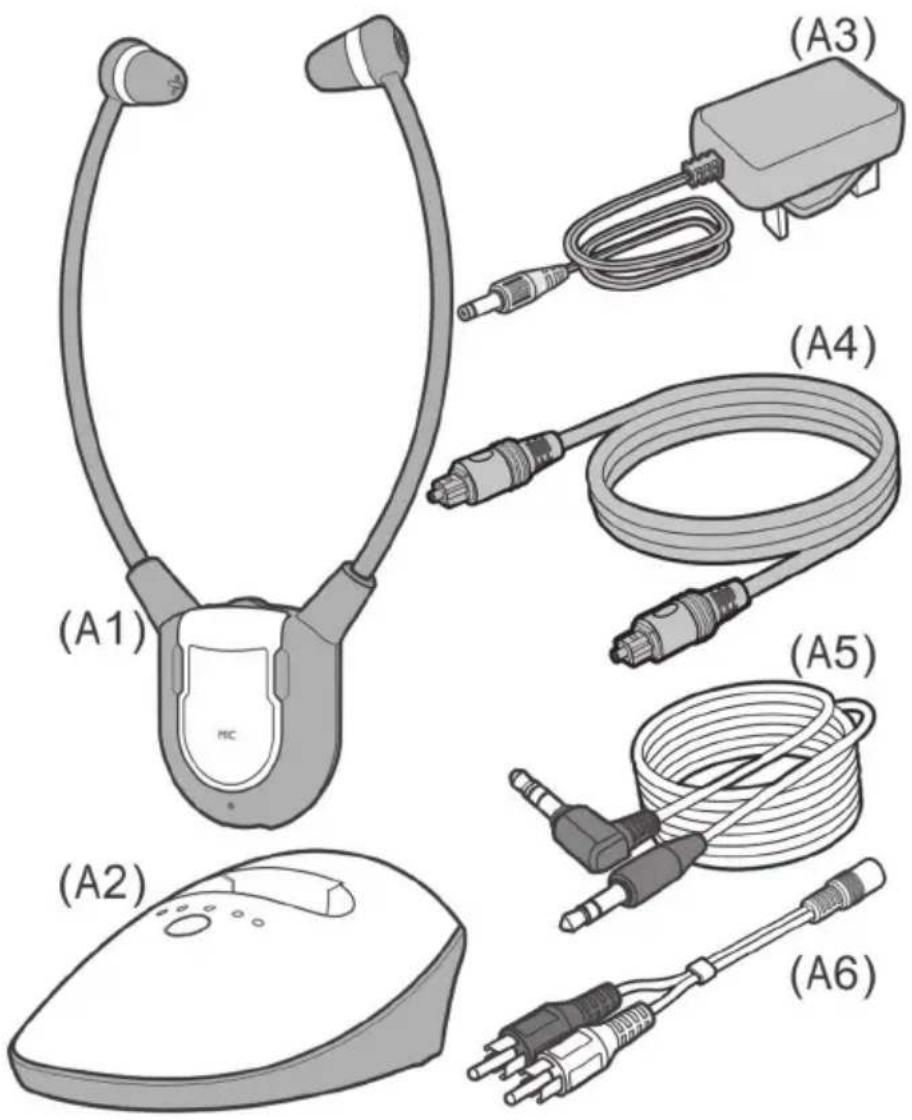
(A1) TV Headset Receiver
(A2) Charging Cradle and Transmitter
(A3) Power Supply
(A4) Optical Cable
(A5) Audio Cable (both ends with 3.5mm stereo plug)
(A6) RCA Adapter Cable
Function identification: Headset receiver
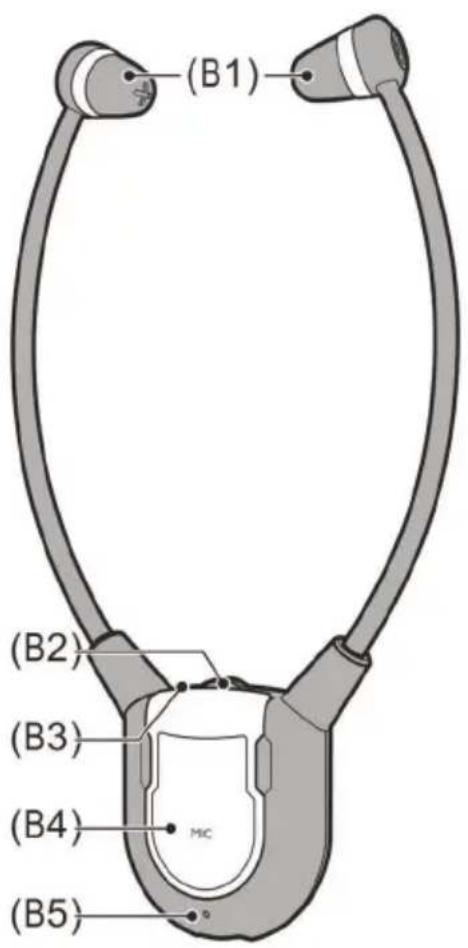
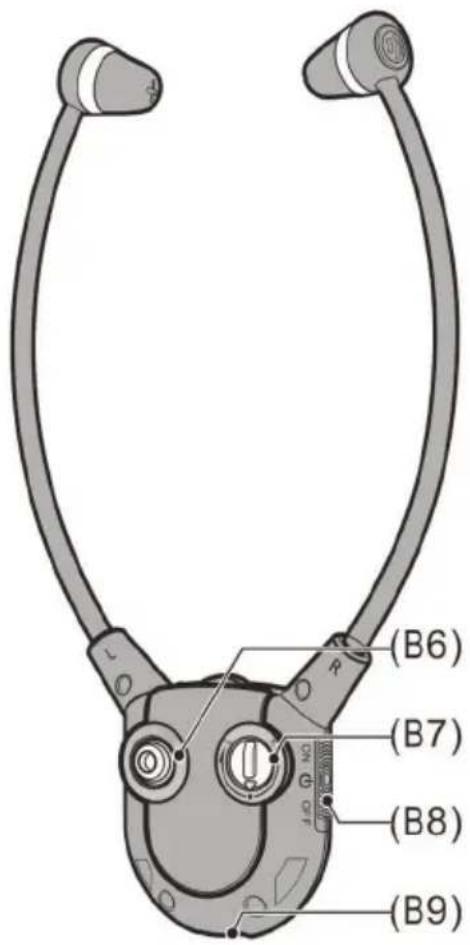
FRONT REAR
(B1) Earbuds
(B2) Volume Control
(B3) Power/Signal LED Indicator
(B4) Mute Button for Verbal Communications
(B5) Microphone
(B6) Pair Button for Frequency Channel
(B7) Sound Balance Control
(B8) Power On/Off Switch
(B9) Battery Contact
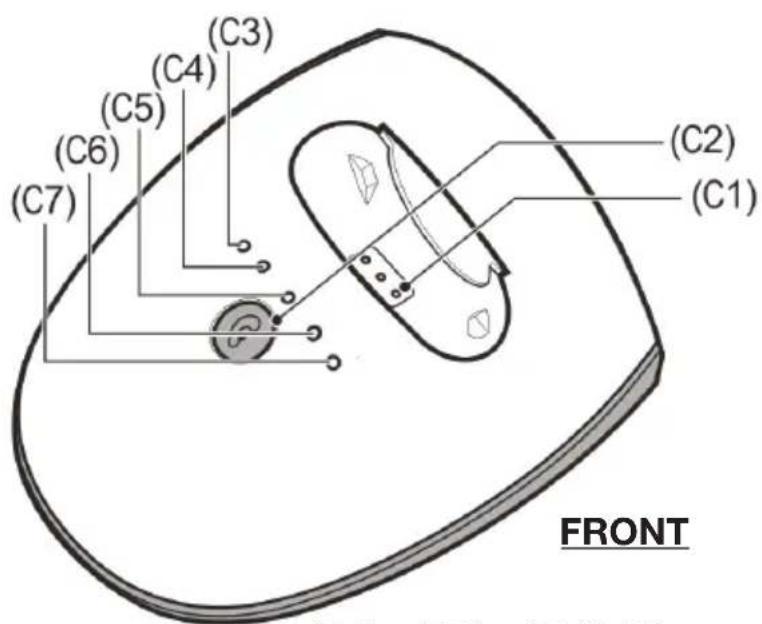
Function identification: transmitter
REAR
(C1) Charging Pins
(C2) Tone Adjustment
(C3) LED Indicator: Battery Charge (Red = charging, Green = fully charged)
(C4) LED Indicator (Green): Power
(C5) LED Indicator (Yellow): Bass enhanced + Treble enhanced
(C6) LED Indicator (Yellow): Treble enhanced
(C7) LED Indicator (Yellow): Bass enhanced
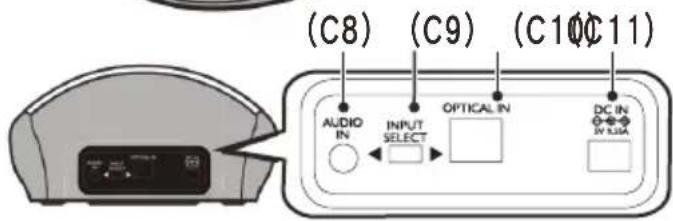
(C8) Audio In
(C9) Input Selection (Audio IN or Optical IN)
(C10) Optical In Socket
(C11) DC In Socket
Please note that only one input (either audio input or optical input) must be connected.
Charging the Battery
- The signal LED Indicator on the Headset Receiver will blink slowly when the battery level is low. At this stage there are about 20 minutes of operating time before the Headset will switch off. Recharge the battery.
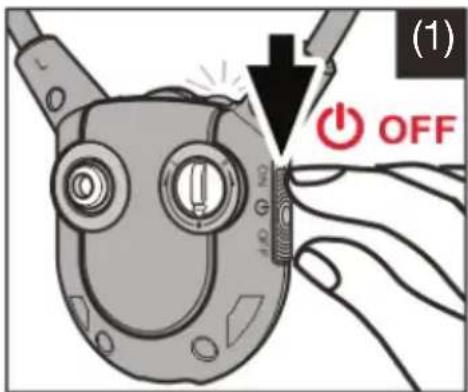
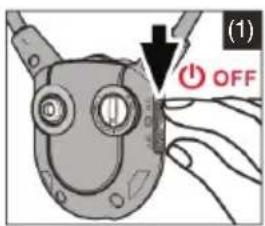
- Switch OFF the On/Off Switch on the Headset (see figure (1)). The green LED on the Headset should turn off.
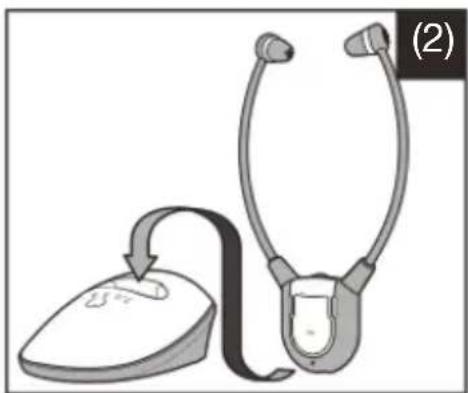
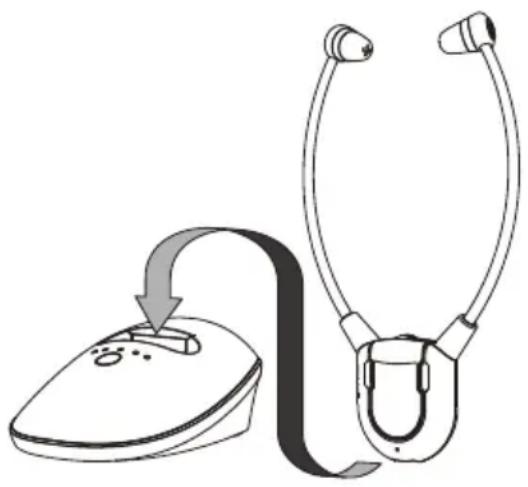
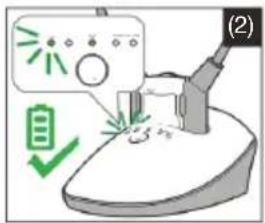
- Place the headset on the Charging Cradle (see figure (2)). Make sure the charge contact touches the charge pins on the Charging Cradle.
- The Charging process starts automatically.
- The LED Indicator glows red during charging.
- It will glow green after the battery is fully charged.
natural_image
Illustration of a stethoscope and a computer mouse with a curved arrow indicating motion (no text or symbols)WARNING:
- The battery must not be exposed to excessive heat such as sunshine, fire etc.
- Do not attempt to replace the original rechargeable battery.
- When the headsets are not in use, move the switch to the OFF position to avoid damaging the batteries.
- The battery must always be fully charged before first use. An initial 3 hours charge is required to guarantee an acceptable service life for the rechargeable battery. Always ensure that the Receiver is switched to OFF position while the battery is charging.
- Excessive sound pressure from earphones and headsets can cause hearing loss.
IMPORTANT:
This unit should be operated with built-in rechargeable battery only. When disposing of the unit, always comply with applicable laws relating to the disposal of battery. Please place them in a proper disposal container to ensure that they are eliminated safely and in an environmentally friendly way.
Installation
Transmitter
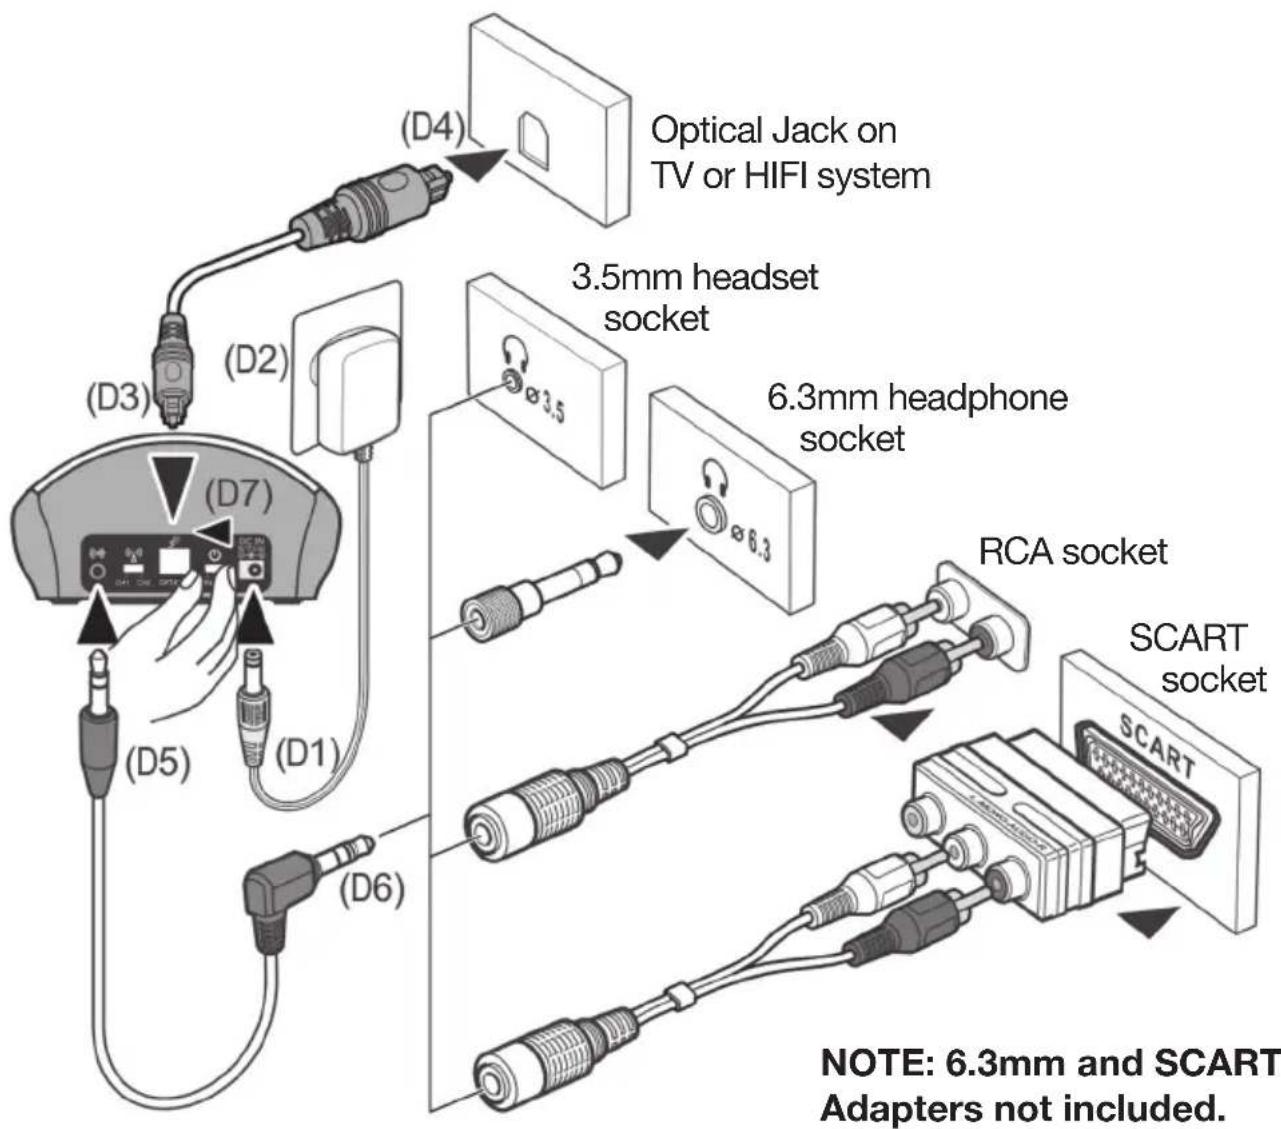
(D1) Connect the Power Supply to the DC IN Socket located on the Charge Cradle rear panel.
(D2) Connect the Power Supply to mains power outlet (100-240V\~50/60Hz).
(D3) Connect one end of the Optical Cable to the rear panel of the Charge Cradle.
(D4) Connect the other end of the Optical Cable to your Audio Source (e.g. TV or audio device) with Optical Output.
(D5) Accessories (6.3mm and SCART Adaptor) in above drawing are NOT PROVIDED in the pack components.
(D6) If your Audio Source does not have an optical socket, then use one of the following Adapters that connects to the Audio In of the Transmitter.
• 3.5mm to 6.3mm Adapter Plug (Not included)
• SCART Adapter (Not included)
(D7) When connected to the mains power, the green Power Indicator LED will glow immediately.
When the audio signal is detected from the Audio Source, the Green LED Power Indicator will glow constantly.
Note: When using Optical Cable connection, please set your audio devices/systems to PCM Two-Channel (support 32KHZ—196KHZ). For details, please refer to the operation manual of your audio devices/systems for the proper setting.
Headset receiver
Make sure the built-in Battery inside the Headset Receiver is fully charged for the first use.
natural_image
Illustration of a computer mouse with an open lid and a stethoscope inserted into it (no text or symbols)Operation
Initial Operation
- Make sure the TV7400 is plugged into the mains supply.
- Place the TV Headset in the Charging Cradle for at least three hours to allow it to fully charge.
• Make sure the TV Headset is switched OFF (see figure (1)).
- The LED Indicator glows red during charging.
- It will glow green after the battery is fully charged (see figure (2)).
- After three hours have passed and the charging LED has turned green, you can proceed to use the device.
Routine Operation
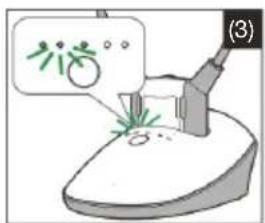
- Switch on the Audio Source (TV set or other audio device) that the Transmitter is connected to. The Power LED Indicator will glow continuously (see figure (3)).
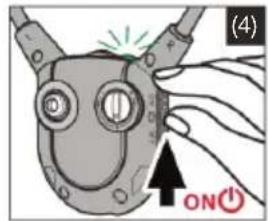
- Put the Ear Phone plug into the 3.5mm phone jack of TV Receiver. On the TV Receiver, switch ON the On/Off Switch (see figure (4)). The green Power LED Indicator will glow continuously.
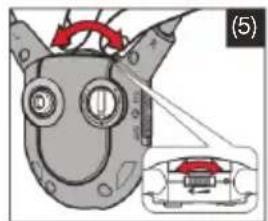
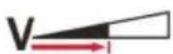
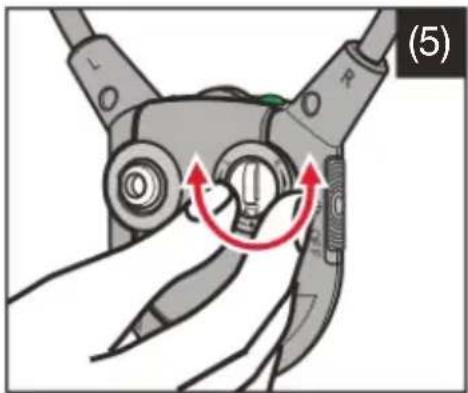
- Adjust the Volume to the desired sound level (see figure (5)), then fit the earbuds in your ears.
NOTE: Make sure the volume on your Audio Source (TV set or other audio device) is turned up to at least half of its full volume to get good sound quality in your Earbuds.
Note: Make sure the battery is fully charged before first use. Charge the battery for about 3 hours before first use.
RF Transmission of the Transmitter will automatically switch OFF in approximately 5 minutes if there is no Audio Signal, or the Signal that it receives from the Audio Source is too weak for proper reception. However, if the Signal returns to an acceptable level, the Transmitter will automatically switch ON again.
Adjusting the Sound Balance (left-right)
You can adjust the sound to suit your hearing in each ear.
With the Receiver on, rotate the Sound Balance button (see figure (5)) to adjust the sound – you will notice that the sound seems to “drift” from one side to the other. Adjust this button until you find your most pleasant sound balance.
Using the Mic Button and Microphone for Conversation
You can switch from Listening mode to Conversation mode without having to take off the Receiver.
To talk or listen to someone:
natural_image
Close-up of a hand holding a mechanical clamp or tool, with red arrows indicating rotation around the handle (no text or symbols visible)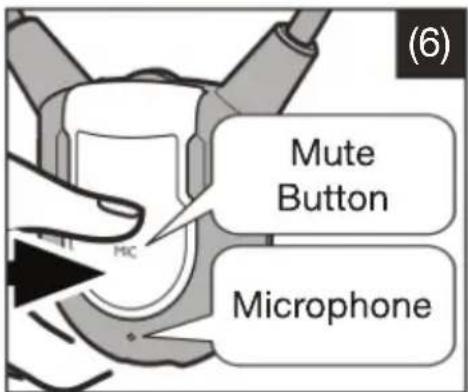
-
Press the Mic button (see figure (6)). This will shut off the Audio Source and the Receiver will become an amplifier by activating the Microphone.
-
To resume listening to your audio device, press the Mic button again. The microphone will be shut off and the audio will resume.
Controlling the Tone (Bass & Treble)
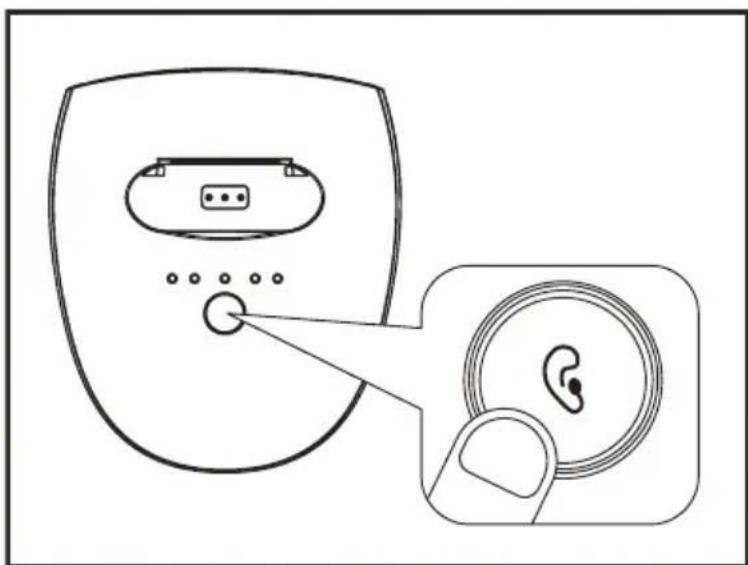
When necessary, Treble or Bass in the Headset Receiver can be adjusted on the Transmitter by the Tone Clarity Button. Simply press the Tone Clarity Button to select Treble or Bass, and match to your level of hearing aid capability.
Technical specifications
| Battery operating Time | Up to 6 Hours |
| Range Up to 25 meters (open area) | |
| Frequency response 30 Hz – 10K Hz | |
| Signal-to-noise ratio >65 dB | |
| Distortion <2% | |
| Headset weight 50 grams | |
| Operating voltage | Charging Cradle: 5V 0.55AHeadset: 3.7V, 380mAh Lithium Polymer Battery |
| Transmission mode FHSS in 2 groups of channels | |
| Carrier frequency 31 channels 2406 to 2472MHz | |
Troubleshooting
No Sound
- Ensure the power supply is properly plugged into the electricity socket and that its cable is properly connected to the DC IN connector on the Charge Cradle.
- Ensure that the Headset Power ON/OFF switch is switched ON.
- Check the state of the Battery charging in the Headset – place it in the Charge Cradle and recharge the battery until the Battery Charge LED turns green.
- Ensure that the TV set, Hi-Fi system or audio component is switched ON and set to a channel that broadcasts an audio signal.
- Ensure that the volume on the connected audio component is turned up to at least half its full volume.
- The connected audio/video equipment may not be in playback mode. Start playback on by the equipment.
-
Use the Volume Control on the Headset to turn up the volume.
-
Check whether the Headset volume level is set too low. Adjust the volume to a suitable level.
- If the sound is not clear and distorted, change the frequency Channel selection on the back of the Charge Cradle, and then press the Auto Tune Button on the Headset Receiver for better reception.
Distortion
- The battery inside Headset may need charging. Recharge the battery.
- The Headset may be too far away from the transmitter inside the Charge Cradle. Bring them closer together.
- The audio signal input level from the audio source is too low. Increase the volume at the audio source.
- If the sound is not clear and distorted, change the frequency Channel on the back of the Charge Cradle, and then press the Auto Tune Button on the Headset for better reception.
Cleaning & Maintenance
Note: DO NOT use alcohol, chemical or spirit based cleaning agents.
Wipe Base and Headset clean with a damp cloth.
In case the receiver cannot be linked with the transmitter. Please follow the following procedure for Pairing:
- Disconnect the power adaptor of the transmitter to the electrical outlet.
- Turn ON the receiver.
- Press and hold the MIC button for about 5 seconds, the green LED flash fast in the receiver, then plug in the power adaptor of the transmitter to socket.
- The receiver and the transmitter is then paired automatically, and the green LED on the receiver lights steadily.
Express Warranty (Australia)
This Express Warranty is provided by Oricom International Pty Ltd ABN 46086 116 369, Unit 1, 4 Sovereign Place, South Windsor NSW 2756, herein after referred to as “Oricom”.
Oricom warrants that the product is free from defects in materials or workmanship during the Express Warranty Period. This Express Warranty does not extend to any product from which the serial number has been removed or was purchased outside of Australia.
The benefits of this Express Warranty are in addition to other rights and remedies you may have under the Australian Consumer Law. Our goods come with guarantees that cannot be excluded under the Australian Consumer Law. You are entitled to a replacement or refund for a major failure and compensation for any other reasonably foreseeable loss or damage. You are also entitled to have the goods repaired or replaced if the goods fail to be of acceptable quality and the failure does not amount to a major failure. In the event of a minor failure, Oricom reserves the right to choose to repair or replace the product.
The Express Warranty Period will be a period of 12 months beginning on the date of purchase of the product evidenced by your dated sales receipt. You are required to provide proof of purchase as a condition of receiving Express Warranty services.
You are entitled to a replacement product or repair of the product at our discretion according to the terms and conditions of this document if your product is found to be faulty within the Express Warranty Period. This Express Warranty extends to the original purchaser only and is not transferable.
Products distributed by Oricom are manufactured using new materials or new and used materials equivalent to new in performance and reliability. Spare parts may be new or equivalent to new. Spare parts are warranted to be free from defects in material or workmanship for thirty (30) days or for the remainder of the Express Warranty Period of the Oricom branded product in which they are installed, whichever is longer. During the Express Warranty Period, Oricom will where possible repair and if not replace the faulty product or part thereof. All component parts removed under this Express Warranty become the property of Oricom. In the unlikely event that your Oricom product has a recurring failure, Oricom may always, subject to the Competition and Consumer Act 2010, at its discretion, elect to provide you with a replacement product of its choosing that is at least equivalent to your product in performance.
No change to the conditions of this Express Warranty is valid unless it is made in writing and signed by an authorised representative of Oricom.
Oricom will not be liable under this Express Warranty, and to the extent permitted by law will not be liable for any defect, loss, damage or injury arising out of or in connection with a:
- Failure by you to adhere to the warnings and follow the instructions set out in this user guide for the proper installation and use of the product;
- Willful misconduct or deliberate misuse by you of the product;
- Any external cause beyond our control, including but not limited to power failure, lightning or over voltage; or
- Modification to the product or services carried out on the product by anyone other than Oricom or Oricom's authorised service provider.
How to make a claim under your Express Warranty in Australia
Oricom has a simple warranty process for you to follow:
- Please call or email our Customer Support Team, 02 4574 8888 or support@oricom.com.au.
- A Customer Support Team member will verify after troubleshooting with you if your product qualifies under warranty. If so, they will give you a Product Return Authorisation number.
- We will then email a Return Authorisation form and a Repair Notice (if necessary), together with instructions on how to return the product for warranty service.
Please note that if a Customer Support Team member advises that your product does not qualify for return, this warranty does not apply to your product. Products that are authorised to be returned to Oricom in Australia must include all of the following:
• A completed Return Authorisation form
• A copy of your Proof of Purchase (please keep your original copy)
• The faulty product, including all accessories.
Send the approved returns to:
Oricom International Pty Ltd
Locked Bag 658
South Windsor NSW 2756 Australia
Please note that this Express Warranty excludes expenses incurred by you in returning any faulty product to us. You must arrange and pay any expenses incurred (including postage, delivery, freight, transportation or insurance of the product) to return the faulty product to us, however, we will arrange delivery of the repaired or replaced faulty product to you.
Important Information
Repair Notice
Please be aware that the repair of your products may result in the loss of any user-generated data (such as stored telephone numbers, text messages and contact information). Please ensure that you have made a copy of any data saved on your product before sending for repair. Please also be aware that products presented for repair may be replaced by refurbished products or parts of the same type rather than being repaired.
ORICOM CUSTOMER SUPPORT
Oricom have a trained and dedicated team of Customer Support Representatives, each with the knowledge and resources to assist in answering your questions quickly and efficiently.
Oricom Support - Australia
For all product enquiries, troubleshooting or to discuss the range of Oricom products, feel free to contact Oricom or visit our website for answers to frequently asked questions.
(02) 4574 8888
Monday - Friday 8am – 6pm AEST
Email: support@oricom.com.au
www.oricom.com.au
- 2.4GHz Amplified Wireless TV Headset
- Getting to know your product
- Installation
- Operation
- Need Help?
- Welcome...
- to your TV7400 2.4GHz Amplified Wireless TV Headset
- Features
- WARNINGS:
- Components
- Function identification: Headset receiver
- Function identification: transmitter
- Charging the Battery
- WARNING:
- IMPORTANT:
- Transmitter
- Headset receiver
- Initial Operation
- Routine Operation
- Adjusting the Sound Balance (left-right)
- Using the Mic Button and Microphone for Conversation
- Controlling the Tone (Bass & Treble)
- Technical specifications
- Troubleshooting
- No Sound
- Distortion
- Cleaning & Maintenance
- In case the receiver cannot be linked with the transmitter. Please follow the following procedure for Pairing:
- Express Warranty (Australia)
- How to make a claim under your Express Warranty in Australia
- Important Information
- Repair Notice
- ORICOM CUSTOMER SUPPORT
- Oricom Support - Australia
- 4574 8888
Brand : Oricom
Model : TV7400
Category : Telephone