ADWH-011 - Welding machine Ozito - Free user manual and instructions
Find the device manual for free ADWH-011 Ozito in PDF.


| Product Type | Arc Welding Machine (MMA) |
| Model | ADWH-011 |
| Brand | Ozito |
| Input Voltage | 230 V ~ 50 Hz |
| Rated Input Current | 16 A |
| No-Load Voltage | 48 V |
| Welding Current Range | 20 - 200 A |
| Duty Cycle (at 200 A) | 20% |
| Electrode Diameter | 1.6 - 4.0 mm |
| Dimensions (L x W x H) | 400 x 250 x 300 mm |
| Weight | 10.5 kg |
| Cooling Method | Fan forced air |
| Protection Class | IP21 |
| Insulation Class | F |
| Cable Length (Primary) | 2.5 m |
| Welding Cable Length | 3 m each (electrode & work) |
| Functions | Adjustable current, hot start, anti-stick, arc force |
| Maintenance | Clean dust from vents; check cables for damage; replace worn parts |
| Safety Features | Thermal overload protection, over-current protection, insulated handles |
| Spare Parts Availability | Electrode holder, work clamp, cables, switch, fan |
| Included Accessories | Electrode holder, work clamp, welding shield, chipping hammer, brush |
| Compliance Standards | CE, RoHS |
Frequently Asked Questions - ADWH-011 Ozito
User questions about ADWH-011 Ozito
0 question about this device. Answer the ones you know or ask your own.
Ask a new question about this device
Download the instructions for your Welding machine in PDF format for free! Find your manual ADWH-011 - Ozito and take your electronic device back in hand. On this page are published all the documents necessary for the use of your device. ADWH-011 by Ozito.
USER MANUAL ADWH-011 Ozito
WELDING HELMET WARNINGS
ozito
the filter.
Before welding, adjust the auto-darkening lens sensitivity setting to meet the
application. Ensure the correct shade is used for the application
Year approved safety glasses with side shields and ear protection under v
helmet.
lse protective screens or barriers to protect others from flash, glare, and
sparks: warn others not to watch the arc.
Near body protection made from durable flame resistant materi
Your body protection made from durable, name tools heavy cotton wool).
Do not weld in the overhead position while using this helmet.
Inspect the auto-lens frequently. Immediately replace any scr
or pitted cover lenses or auto-lenses
or pitted cover lenses or auto lenses. Also only genuine replacement parts from the manufacturer
Use only genuine replacement parts from the manufacturer.
velding produces fumes and gases. Breathing these fumes and gases can
be hazardous to your health. Keep your head out of the fumes. Do not break the fumes.
the fumes.
only work in a well-ventilated environment.
read and understand the Safety Data Sheets (SDS) and the manufacturer's
Instructions for adhesives, coat
degreasers, fluxes, and metals.
Do not weld in locations near degreasing, cleaning, or spraying operations.
The heat and rays of the arc can react with vapours to form highly toxic air
irritating gases.
Do not weld on coated metals, such as galvanized, lead, or cadmium plated
steel. The coatings and any metals containing these elements can give off
toxic fumes if welded.
Button batteries pose a serious hazard to children. If swallowed, in addition to
presenting a choking hazard, a button battery can get stuck in a child's throat
and cause a chemical reaction that burns through tissue causing catastrophic
bleeding. Keep Auto Darkening Welding Helmet and button batteries out
of sight and out of reach of small children. Dispose of old or spent button batteries you have removed from a product immediately. Flat batteries can still
Battery you have removed from a product immediately. That battery can be he dangerous
If you think a child has swallowed or inserted a button battery, contact the
I you think a child has swallowed or inserted a button battery, contact the Poisons Information Centre on 13.11.26 (Australia) or 0800.764.766 (N7) for
Polisons Information Centre on 10-11-26 (Australia) of 0000-704-708 (NZ) for 24/7 export advips
24/7 export advice. Do not store long cartridge in a location near a host course or in a high
so hot store lens cartridge in a location near a heat source moisture environment
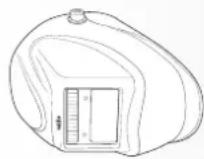
Auto Darkening Welding
Helmet & CB2450 Battery
Helmot & ONE 100 Battery (Fill)
(Fitted)
[Non-Text]
[Non-Text]
The Ground Truth image displays a single, solid horizontal line. According to Rule 2 (UNDERSCORE & LINE RULES), this is a stylistic or background line, not a placeholder underscore. Therefore, the OCR result must ignore it and output nothing or only meaningful text. The provided OCR content is "____", which consists of four underscores. This is an incorrect interpretation of the line as a placeholder, violating the rule that stylistic lines must be ignored. The OCR has hallucinated placeholder underscores where none exist in the GT. Hence, the result is inconsistent with the Ground Truth.
Theorem 1.2. (Theorem of [10, Theorem 1.1]) Let be a finite field and let (x) be the set of all elements of such that
[Non-Text]
The Ground Truth image displays a single, solid horizontal line. According to Rule 2 (UNDERSCORE & LINE RULES), this is a stylistic or background line, not a placeholder underscore. Therefore, the OCR result must ignore it and output nothing or only meaningful text. The provided OCR content is "____", which consists of four underscores. This is an incorrect interpretation of the line as a placeholder, violating the rule that stylistic lines must be ignored. The OCR has hallucinated placeholder underscores where none should exist in the GT. Hence, the OCR result is inconsistent with the Ground Truth.
The Ground Truth image displays a single, solid horizontal line. According to Rule 2 (UNDERSCORE & LINE RULES), this is a stylistic or background line, not a placeholder underscore. Therefore, the OCR result must ignore it and output nothing or only meaningful text. The provided OCR content is "____", which consists of four underscores. This is an incorrect interpretation of the line as a placeholder, violating the rule that stylistic lines must be ignored. The OCR has hallucinated placeholder underscores where none should exist in the GT. Hence, the OCR result is inconsistent with the Ground Truth.
[Non-Text]
The Ground Truth image displays a single, solid horizontal line. According to Rule 2 (UNDERSCORE & LINE RULES), this is a stylistic or background line, not a placeholder underscore. Therefore, the OCR result must ignore it and output nothing or only meaningful text. The provided OCR content is "____", which consists of four underscores. This is an incorrect interpretation of the line as a placeholder, violating the rule that stylistic lines must be ignored. The OCR has hallucinated placeholder underscores where none should exist in the GT. Hence, the OCR result is inconsistent with the Ground Truth.
The Ground Truth image displays a single, solid horizontal line. According to Rule 2 (UNDERSCORE & LINE RULES), this is a stylistic or background line, not a placeholder underscore. Therefore, the OCR result must ignore it and output nothing or only meaningful text. The provided OCR content is "____", which consists of four underscores. This is an incorrect interpretation of the line as a placeholder, violating the rule that stylistic lines must be ignored. The OCR has hallucinated placeholder underscores where none should exist in the GT. Hence, the OCR result is inconsistent with the Ground Truth.
-
The Ground Truth image displays a single, solid horizontal line. According to Rule 2 (UNDERSCORE & LINE RULES), this is a stylistic or background line, not a placeholder underscore. Therefore, the OCR result must ignore it and output nothing or only meaningful text. The provided OCR content is "____", which consists of four underscores. This is an incorrect interpretation of the line as a placeholder, violating the rule that stylistic lines must be ignored. The OCR has hallucinated placeholder underscores where none should exist in the GT. Hence, the OCR result is inconsistent with the Ground Truth.
-
Theorem 1.2. (Theorem of [10, Theorem 1.1]) Let be a finite field and let (x) be the set of all elements of such that
The Ground Truth image displays a single, solid horizontal line. According to Rule 2 (UNDERSCORE & LINE RULES), this is a stylistic or background line, not a placeholder underscore. Therefore, the OCR result must ignore it and output nothing or only meaningful text. The provided OCR content is "____", which consists of four underscores. This is an incorrect interpretation of the line as a placeholder, violating the rule that stylistic lines must be ignored. The OCR has hallucinated placeholder underscores where none exist in the GT. Hence, the OCR result is inconsistent with the Ground Truth.
ADWH-0
ADAM
-
(No text)
m = 311
Theorem 1.2. (Theorem of [10, Theorem 1.1]) Let be a finite field and let (x) be the set of all elements of such that
m = 311
other rights and remedies
2015年4月28日星期二
at law. You are entitled to a
at law. You are obliged to a ation for any other reasonably
ation for any other reasonably to needs required or replaced
he goods repaired or replaced
does not amount to a major
ith a claim under this warranty
s as a result of a defective
ting our customer service
The Ground Truth image displays a single, solid horizontal line. According to Rule 2 (UNDERSCORE & LINE RULES), if the GT contains lines used for stylistic emphasis or as background elements (like ruled paper), the OCR result must ignore them. The line in the GT is clearly a stylistic/background line, not a placeholder for text. Therefore, the OCR should not have output any underscores. Outputting `____` constitutes an error under Rule 2, as it hallucinates placeholder symbols where none are semantically intended. Hence, the OCR result is inconsistent with the Ground Truth.
[Non-Text]
[Non-Text]
the bubble of
in the original date of
cordance with the terms of
ample; valve adapters and
warranty covers domestic use
Warranty severe automatic dev
2.5
void.
n that specified on the tool
in that specified on the tool. resulting from abuse, accident
resulting from abuse, accident
- 1
iction manual.
[Non-Text]
[Non-Text]
AUTO DARKENING WELDING HELMET
SHADE 11
INSTRUCTION MANUAL
Viewing Window: 92.5 x 42.5mm
Switching Time: <2/10.000s / Light
Switching Time: ≤ 5/10,000s (Eigh Power Source: 2V Lithium Battery
Power Supply: 3V Lithium Battery
& Solar Power
Light State: Shade 4
Dark State: Shade 11
Dark State. Shade 11 2024. T. 51, 5509
Operating Temp.: -5 to 55°C
No. of Sensors: 2
Weight: 0.94kg
Weighted by mg
ozito com au
0210.00m.du
1 YEAR REPLACEMENT WARRANTY\*
WARRANTY
IN ORDER TO MAKE A CLAIM UNDER THIS
WARRANTY YOU MUST RETURN THE PRODUCT
TO YOUR NEAREST RUNNINGS WAREHOUSE
TO YOUR NEAREST BONNINGS WAREHOUSE WITH YOUR BUNNINGS REGISTERED RECEPT
WITH YOUR BONNINGS REGISTER RECEIPT.
PRIOR TO RETURNING YOUR PRODUCT
FOR WARRANTY PLEASE TELEPHONE OUR
FOR WARRANTY PLEASE TELEPHONE OUT CUSTOMER SERVICE HELDLINE:
CUSTOMER SERVICE HELFLINE.
Australia: 1800 060 486
Australia. 1000 005 400
New Zealand: 0508 069 486
TO ENSURE A SPEEDY RESPONSE PLEASE
TO ENSURE A SPEED RESPONSE LEASE HAVE THE MODEL NUMBER AND DATE OF
HAVE THE MODEL NUMBER AND DATE OF
PURCHASE AVAILABLE. A CUSTOMER SERVICE
REPRESENTATIVE WILL TAKE YOUR CALL AND
ANSWER ANY QUESTIONS YOU MAY HAVE
ANSWERANT QUESTIONS YOU MAY HAVE RELATING TO THE WARDEN TENDER
RELATING TO THE WARRANTY POLICY OR
PROCEDURE.
[Non-Text]
[Non-Text]
[Non-Text]
[Non-Text]
[Non-Text]
[Non-Text]
[Non-Text]
[Non-Text]
WARNING! The appliance is not to be used by persons (including children) with reduced physical, sensory or mental capabilities, or lack of experience and knowledge, unless they have been given supervision or instruction.
Young children should be supervised to ensure that they do not play with the appliance.
THIS MANUAL CONTAINS IMPORTANT SAFETY AND OPERATING INSTRUCTIONS FOR YOUR WELDING HELMET. Serious personal injury may occur if these warnings are
ignored.
- The auto darkening welding helmet is not suitable for laser welding and
oxygen acetylene welding.
- Do not put the helmet near flames or in damp places.
- Before operation, please confirm that the welding or grinding function is
correctly selected.
- Before operation, tear off the protective film from the lens.
- Cease using the helmet immediately if the filter does not darken on expc
to UV/IR light. Contact Ozito customer service for further instructions. A
from the welding process produce intense visible and invisible (ultravio
Infrared) rays that can burn eyes and skin. Sparks fly off from the weld
- Do not attempt to replace or modify parts of the helmet.
- Do not remove the filter protective plate or the filter.
- Do not use alcohol, petrol, or thinners to clean the filter.
- Do not immerse the helmet in water
- Optimum operating temperature is between -5 to 55°C (23 to 131°F). Th
darkening function may react slower outside of this range.
- Contact Ozito customer service for further instructions if the protective fi
- Contact OZHO customer service for further instructions if the protective is are broken or scratched.
- Contact Ozite customer service for further if the filter protective plate is h
- contact Ozno customer service for further in the filter protective plate is b or scratched. To prevent damage to the filter, do not use hard objects r
of perforated. To prevent damage to the filter, do not use hard objects I or clean the filter surface, sensors, and color cells regularly.
- Clean the filter surface, sensors, and solar cells regularly.
- This welding helmet does not provide protection against serious impact,
explosives, or corrosive liquid damage.
• The Auto darkening filter must have outside protective lens installed to p
potential irreparable damage. Do not use auto darkening welding helmet
any of the lenses removed.
- Change scratched or broken lens that reduces visual field and protection
- Frequently clean the sweatband.
- Do not remove the auto darkening filter from the helmet. Never try to open
[Non-Text]
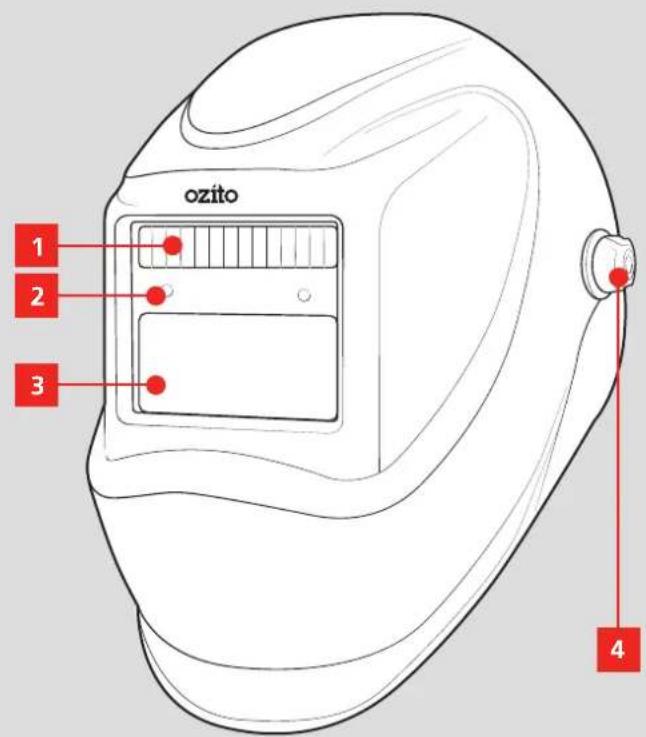
KNOW YOUR PRODUCT
AUTO DARKENING WELDING HELMET
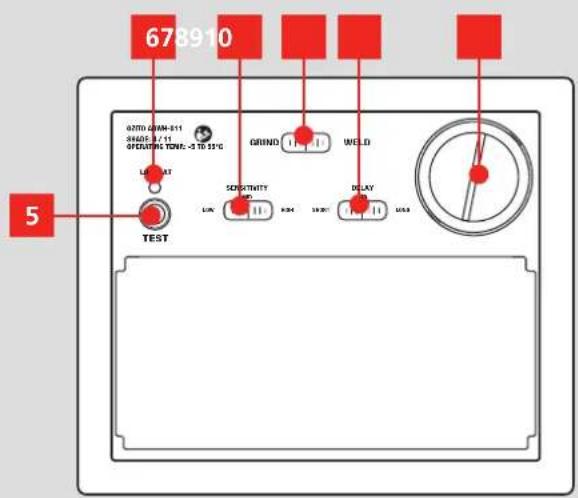
- Solar Panel
- Low Battery Indicator
- Arc Sensor
- Sensitivity Selector
- UV/IR Filter
- Mode Selector
- Locking Knob
- Delay Time Selector
- Auto Darkening Test Button
- Lithium Battery Cover
ONLINE MANUAL
Scan this QR Code with your mobile device to take you to the online manual.

YEAR REPLACEMENT WARRANTY*

SETUP & PREPARATION
1. UV/IR FILTER
Checking The Battery
Before first use, pull and remove the plastic tab to engage the battery contact.

WARNING! ALWAYS CHECK THAT THE AUTO DARKENING FEATURE IS FUNCTIONING AS NORMAL BEFORE ATTEMPTING TO WELD. FAILURE TO DO SO MAY RESULT IN INJURY TO YOUR CORNEAS.
- Set the mode selector to 'WELD'.
Note: The test function will not work if the slider is set to 'GRIND'.
- Press the 'TEST' button. The viewing window should darken briefly before returning to normal.
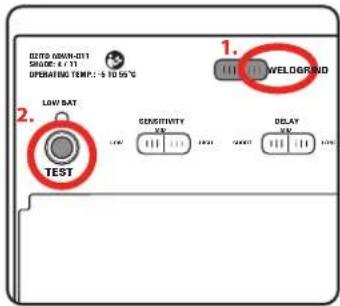
Note: The timing between dark state to light state will correspond with the delay setting. Refer to Delay time in 3. Controls section.
Note: Remove the protective film from the lenses before use.
Solar Panel

WARNING! ENSURE THAT ALL OPERATING PARTS ARE CLEAN & UNDAMAGED BEFORE USE. SCRATCHED OR BROKEN PARTS SHOULD BE REPLACED IMMEDIATELY.

WARNING! DO NOT USE AUTO DARKENING WELDING HELMET IF THE SOLAR PANEL IS DAMAGED OR COVERED.
The solar panel works in conjunction with the battery to provide power to the welding helmet. The helmet will not work with the solar panel blocked.
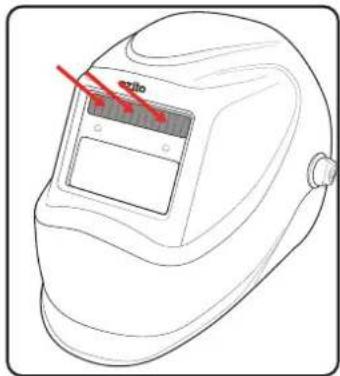
2. ADJUSTING THE HEADBAND
Changing The Distance & Tilt Angle
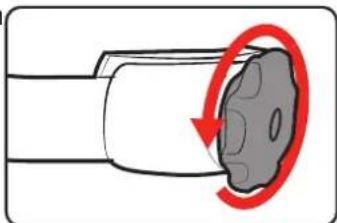
- Loosen the locking knobs on both sides of the helmet by turning it anti clockwise.
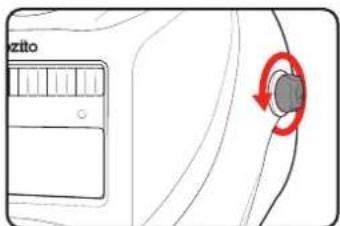
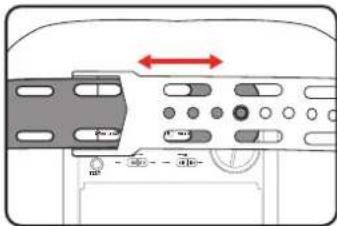
- To change the helmet distance from your face, slide the cross pin forward or backwards in relation to the headband slots.
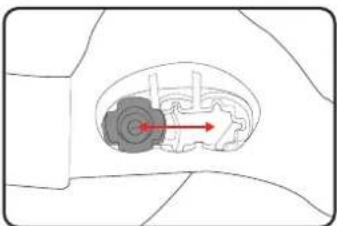
natural_image
Diagram of a mechanical or biological structure with a central gear-like component and directional arrows (no text or symbols)- To change the tilt angle of the helmet, hook the tab onto one of the 5 pin options.
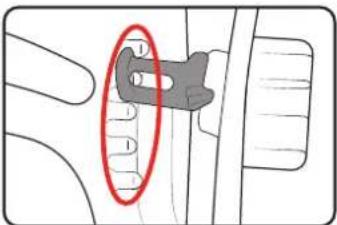
Note: Ensure the cross pins and tilt angle on both sides of the helmet match.
- Retighten the locking knobs. Set the screw tightness so that the mask can be flipped up or down easily when nudged, but remains in position otherwise.
Note: When properly adjusted, your line of sight and the locking knobs should be connected by a straight line perpendicular to the viewing window.
Adjusting The Tightness
- To loosen the headband, turn the band adjuster counterclockwise.
natural_image
Diagram of a mechanical component with a red circular arrow indicating rotation or movement (no text or symbols)-
To tighten the headband, turn the knob clockwise.
-
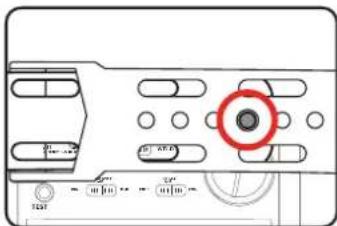
Disengage the tab from the top strap of the headband.
natural_image
Technical diagram of a device rear panel with labeled ports and a red circle highlighting a central component (no text or symbols present)- Loosen or tighten the band as required, then press the tab back into one of the holes to lock the setting in place.
3. CONTROLS

WARNING! ENSURE THE LOW BATTERY INDICATOR LIGHT IS OFF & YOU HAVE VERIFIED THE WELDING HELMET IS WORKING PROPERLY WITH THE "TEST" FUNCTION BEFORE PROCEEDING TO WELD.

WARNING! WELDING HELMETS DO NO PROVIDE UNLIMITED EYE, EAR AND FACE PROTECTION.

WARNING! NEVER WELD WITH ANY OF THE LENS OR FILTERS REMOVED.

WARNING! BEFORE WELDING, ADJUST THE AUTO-DARKENING LENS SENSITIVITY SETTING TO MEET THE APPLICATION. ENSURE THE CORRECT SHADE IS USED FOR THE APPLICATION.
Sensitivity
Adjust this to suit ambient and welding light levels.
Low sensitivity is best for high current welding, whilst the high setting is suited for welding with small currents. The medium setting is suitable for the majority of indoor and outdoor welding activities.
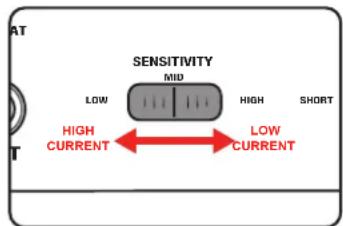
- To adjust, turn the dial to the lowest setting and face the helmet in the direction of use, exposing it to the surrounding light levels.
- Gradually increase the sensitivity until the lens darkens.
- Then lower the sensitivity just slightly below the setting in step 2.
Note: Slight re-adjustment may be necessary for certain applications or if the lens is flashing on and off.
Delay Time
The delay time controls the time taken for the helmet to switch between full dark and full light.
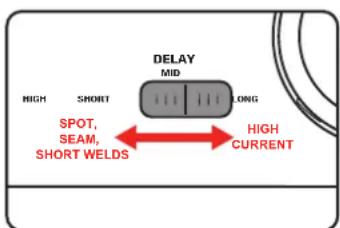
The short delay time (0.1s) is suitable for spot, seam or short welding sessions. The medium setting (0.4s) is suitable for the majority of indoor and outdoor welding. Use the long delay time (0.8s) for high current welding or to prevent eye fatigue during long welding sessions.
Mode Selection
Before use, peel off the protective film from the front and inner lens.
Set the slider to 'WELD' or 'GRIND' depending on the application.
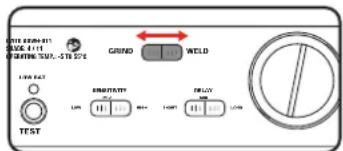
This welding helmet has a fixed dark mode of Shade
- Refer to the label on the inside of the mask for appropriate welding currents and processes.

WARNING! ALWAYS ENSURE THE CORRECT MODE AND SHADE IS SELECTED BEFORE WELDING.
Note: Shade level should be based on the welding process and arc current being used. Refer to the lens shade level guide on the inside of the mask for guidance.
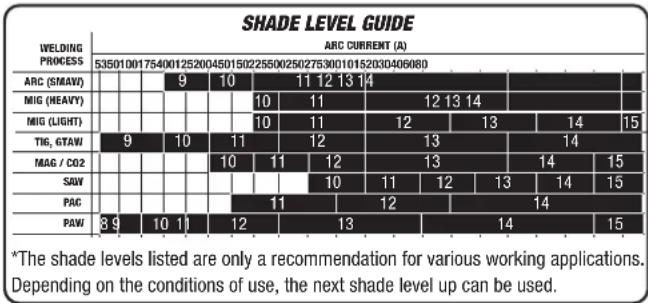
Note: Set the mode to 'GRIND' if using the helmet while grinding. The auto darkening function does not activate in GRIND mode.

WARNING! DO NOT WELD IN GRIND MODE, THE LENS WILL NOT DARKEN.

WARNING! ARC RAYS FROM THE WELDING PROCESS PRODUCE INTENSE VISIBLE AND INVISIBLE (ULTRAVIOLET & INFRARED) RAYS THAT CAN BURN EYES AND SKIN. SPARKS CAN ALSO FLY OFF FROM THE WELD, CAUSING BURNS.
MAINTENANCE
4. TROUBLESHOOTING

WARNING! THE AUTO DARKENING WELDING HELMET SHOULD NOT BE USED IF THE PROBLEMS MENTIONED BELOW ARE NOT CORRECTED.
Filter does not darken or flickers
- Check that the filter protector & filter is not scratched or dirty.
- Check that the arc sensors are clear and unobstructed.
- Welding current may be too low, adjust the sensitivity level to higher setting.
- Check that the low battery indicator light is not lit.
- Check that the battery is in good condition and installed properly. Try installing a new battery.
Filter reacts slowly
- Check that the ambient temperature is within the operating range.
- Check that the sensitivity is not set to minimum.
- Review the sensitivity recommendations and adjust the sensitivity.
- Clean the lens cover and sensors of any obstructions.
- Make sure the sensors are facing the arc; angles of 45^ or more may not allow the arc light to reach the sensors.
Filter is not clear
- Check that the filter protector is not stained.
- Check that the protective film has been removed.
- Check that there is enough ambient light in the work space.
- Check front and inner lens is clear.
Helmet is slipping
- Check that the headband is adjusted correctly.
- Check that the locking knobs have been tightened sufficiently.


WARNING! KEEP COIN CELL BATTERIES OUT OF REACH OF CHILDREN.
Coin cell batteries pose a serious hazard to children. If ingested, a coin cell battery can lead to chemical burns, perforation of soft tissue and death. Severe burns can occur within 2 hours of ingestion. If you suspect a child has ingested a coin cell battery, seek medical attention immediately. The Poisons Information Centre can be contacted for expert advice 24/7 on 13 11 26 (Australia) or 0800 764 766 (New Zealand)
Flat batteries can still be hazardous. When replacing coin cell batteries, it is recommended to sticky tape both sides of used batteries, keep them out of reach of children and take them to your nearest recycling facility or dispose of them immediately.
Regularly examine the product and battery compartment to ensure the batteries are securely assembled. If the battery compartment is damaged or not secure, keep the product out of reach of children and contact Ozito customer service immediately.
Changing The Battery
The low battery indicator will light up red when the battery charge gets too low and indicates that the battery should be changed.
- Place a flat head screwdriver (not supplied) into the battery cap slot and turn it counter-clockwise to unlock it. Remove the cap.
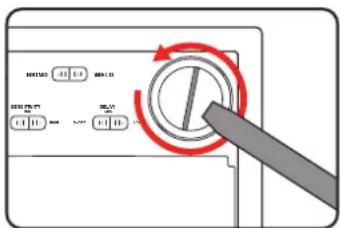
- Replace the battery with a new CR2450 battery.
Note: The auto darkening helmet will not work if the battery is installed in the wrong orientation. The positive side of the battery should be facing out.
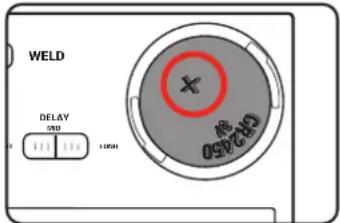
- Fit the cap back into place and turn clockwise to secure it.

WARNING! DO NOT IMMERSE THE LENS ASSEMBLY OR THE HELMET IN WATER.

WARNING! DO NOT USE SOLVENTS OR ABRASIVE CLEANING DETERGENTS.
Cleaning The Sweatbands
- Unhook the sweatband from the head strap.
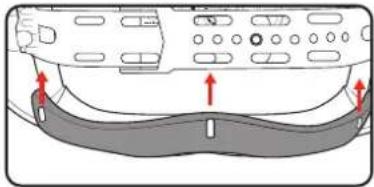
natural_image
Diagram of a device's internal structure with red arrows indicating movement or force, no text or symbols present- Use a neutral detergent to clean the helmet shell, outer lens and sweat bands.
- Allow the sweatband to air dry fully before re-attaching it to the head strap.
Cleaning The Lens Assembly
- Push the tab down to un-clip the filter compartment.
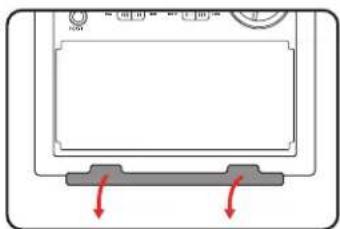
- Lift out the filter compartment from the bottom edge.
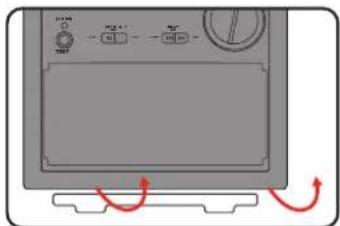
- Clean the filter lens and sensors regularly by gently wiping with lens paper or a soft cloth.
- The clear lens cover can also be removed for cleaning and/or replacement. Push inwards from the outside of the helmet to remove it.
Storage
Store it in a dry location which is not accessible to unauthorised persons.

WARNING! KEEP OUT OF REACH OF CHILDREN. THE BUTTON CELL BATTERY IS HARMFUL IF INGESTED.
DESCRIPTION OF SYMBOLS
| V | Volts | Hz | Hertz | |
| ~ | Alternating Current | Wear eye, ear & breathing protection | ||
| [3A0C] | Regulatory Compliance Mark (RCM) | Warning | ||
 | Read Instruction Manual | |||
SPARE PARTS
Spare parts can be ordered from the Special Orders Desk at your local Bunnings Warehouse.
For further information, or any parts not listed here, visit www.ozito.com.au or contact Ozito Customer Service:
Australia 1800 069 486
New Zealand 0508 069 486
E-mail: enquiries@ozito.com.au
CARING FOR THE ENVIRONMENT
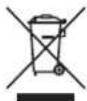
Power tools that are no longer usable should not be disposed of with household waste but in an environmentally friendly way. Please recycle where facilities exist. Check with your local council authority for recycling advice.

Recycling packaging reduces the need for landfill and raw materials. Reuse of recycled material decreases pollution in the environment. Please recycle packaging where facilities exist. Check with your local council authority for recycling advice.
- WELDING HELMET WARNINGS
- ozito
- the filter.
- AUTO DARKENING WELDING HELMET
- SHADE 11
- INSTRUCTION MANUAL
- YEAR REPLACEMENT WARRANTY\*
- WARRANTY
- KNOW YOUR PRODUCT
- ONLINE MANUAL
- SETUP & PREPARATION
- UV/IR FILTER
- Checking The Battery
- Solar Panel
- ADJUSTING THE HEADBAND
- Changing The Distance & Tilt Angle
- Adjusting The Tightness
- CONTROLS
- Sensitivity
- Delay Time
- Mode Selection
- This welding helmet has a fixed dark mode of Shade
- MAINTENANCE
- TROUBLESHOOTING
- WARNING! THE AUTO DARKENING WELDING HELMET SHOULD NOT BE USED IF THE PROBLEMS MENTIONED BELOW ARE NOT CORRECTED.
- Filter does not darken or flickers
- Filter reacts slowly
- Filter is not clear
- Helmet is slipping
- WARNING! KEEP COIN CELL BATTERIES OUT OF REACH OF CHILDREN.
- Changing The Battery
- Cleaning The Sweatbands
- Cleaning The Lens Assembly
- Storage
- DESCRIPTION OF SYMBOLS
- SPARE PARTS
- CARING FOR THE ENVIRONMENT
Brand : Ozito
Model : ADWH-011
Category : Welding machine