LAP-4100 - Pump Ozito - Free user manual and instructions
Find the device manual for free LAP-4100 Ozito in PDF.


| Product Type | Cordless Air Pump |
| Brand | Ozito |
| Model | LAP-4100 |
| Max Air Pressure | 160 psi |
| Flow Rate | 14 L/min |
| Battery Type | 12V Li-Ion |
| Battery Capacity | 1.3 Ah |
| Charge Time | 3–5 hours |
| Weight (with battery) | 1.7 kg |
| Power Source | Rechargeable battery |
| Charger Input | 240V AC, 50 Hz |
| Lock-off Button | Yes, prevents accidental start |
| Pressure Gauge | Analog dial |
| Accessories Included | 3 valve adaptors, flexible extension hose, charging adaptor, charging cradle |
| Recommended Duty Cycle | 10 minutes on / 10 minutes off |
| Warranty | 3 years replacement (DIY use), battery 12 months |
| Safety Features | Thermal cut-out, double insulation, lock-off button |
| Maintenance | Keep ventilation slots clean, store in dry frost-free location |
| Country of Origin | Australia (designed), manufactured in China |
| Intended Use | DIY (Do It Yourself) only |
Frequently Asked Questions - LAP-4100 Ozito
User questions about LAP-4100 Ozito
0 question about this device. Answer the ones you know or ask your own.
Ask a new question about this device
Download the instructions for your Pump in PDF format for free! Find your manual LAP-4100 - Ozito and take your electronic device back in hand. On this page are published all the documents necessary for the use of your device. LAP-4100 by Ozito.
USER MANUAL LAP-4100 Ozito
Max Air Pressure: 160psi
Flow Rate: 14L/min
Battery: 1.3Ah Li-Ion
Charge time: 3 - 5 hours
Weight with Battery: 1.7kg
ozito.com.au
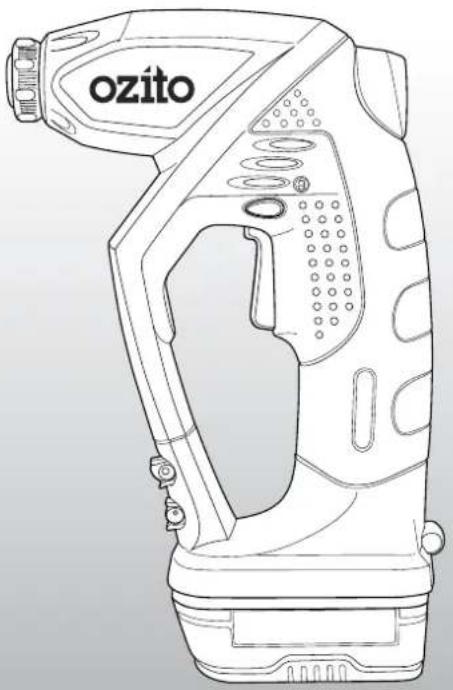
natural_image
Line drawing of a ozito water purifier device (no text or symbols on body)WHAT'S IN THE BOX
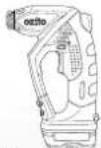
Cordless Air Pump
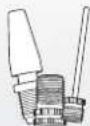
Valve Adaptor x 3
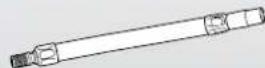
Flexible Extension Hose
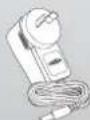
Charging Adaptor
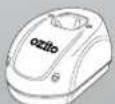
Charging Cradle
3
YEAR REPLACEMENT WARRANTY
LAP-4100
KNOW YOUR PRODUCT SETUP &
PREPARATION
CORDLESS AIR PUMP
1 Locking Collar
5 Lock-off Button
2 Accessory Holder
6 12V Battery
3 Battery Release Button
7 Air Pressure Gauge
4 On/off Trigger
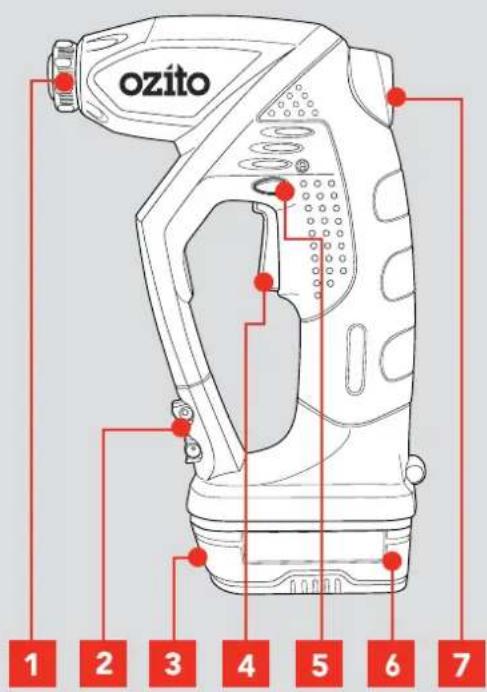
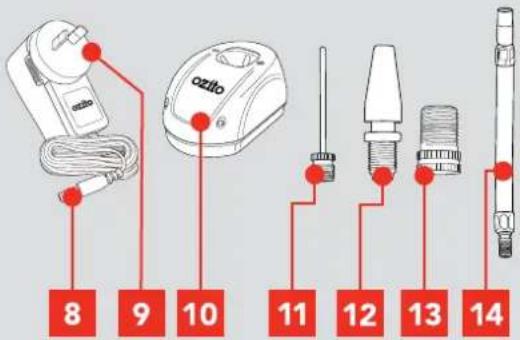
8 Charging Jack
12 General Inflating Adaptor
9 Charging Adaptor
13 Bicycle Adaptor
10 Charging Cradle
14 Flexible Extension Hose
11 Ball Adaptor
ONLINE MANUAL
Scan this QR Code with your mobile device to take you to the online manual.

1. BATTERY
This charger is recommended for use with a residual current device with a rated residual current of 30mA or less.
Charging
-
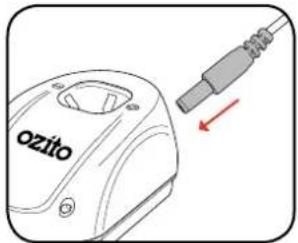
Plug charging jack into charging cradle. The green light will illuminate when connected.
-
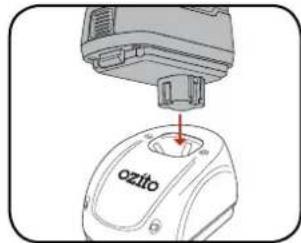
Insert battery into the charging cradle. Both lights will illuminate when properly connected and charging.
natural_image
Diagram of a 3D printer with a labeled base (oztio) and a red arrow pointing to the tip, no text or symbols present.- Once fully charged, the green light only will illuminate.

Installing and Removing
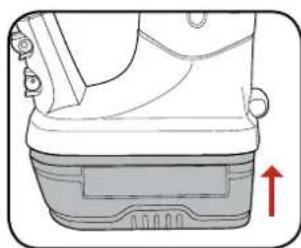
Insert the battery into the base of the air pump until it clicks into place.
natural_image
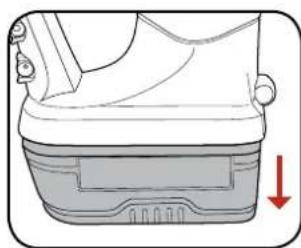
Technical illustration of a shoe sole with a red arrow indicating upward motion (no text or symbols)Depress the battery release button and pull the battery out.
natural_image
Diagram of a mechanical component with a red arrow indicating downward motion (no text or symbols present)2. ATTACHING ACCESSORIES 3. CONTR
Installing Flexible Extension Hose
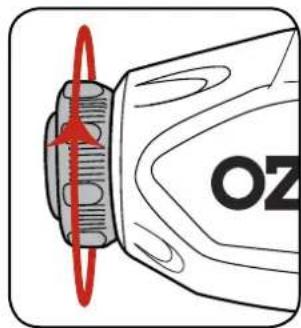
- Open the locking collar by turning anti-clockwise.
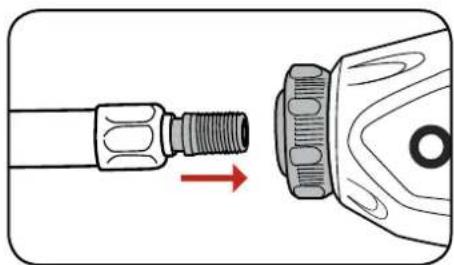
- Insert the threaded end of flexible hose into locking collar.
natural_image
Diagram showing a mechanical component with threaded shaft and bolted head, connected to a cylindrical device with a red arrow indicating direction (no text or symbols)-
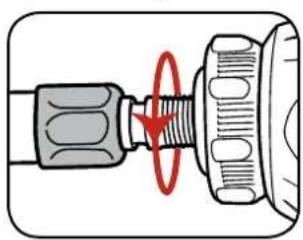
Screw in the flexible hose until silver collar on hose touches locking collar.
-
Turn locking collar clockwise to secure.
natural_image
Diagram of a mechanical connector with a red circular arrow indicating rotation (no text or symbols)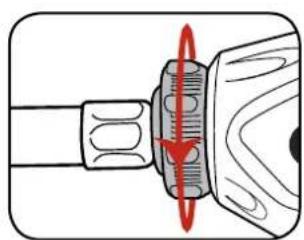
natural_image
Diagram of a mechanical component with a red circular arrow indicating rotational motion (no text or symbols)Installing Valve Adaptors
-
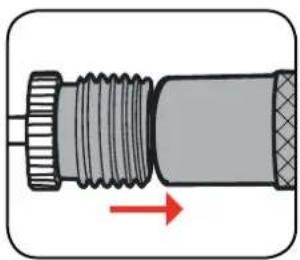
Hold the threaded end of adaptor against the flexible hose end.
-
Turn the hose locking collar anti-clockwise to secure.
natural_image
Diagram of a mechanical component with threaded shaft and housing, showing directional arrow (no text or symbols)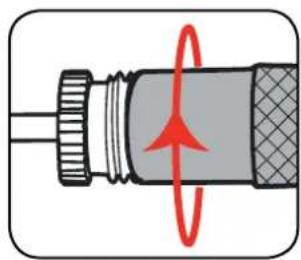
natural_image
Diagram of a mechanical component with a red circular motion indicator (no text or symbols)s
Turning On/Off
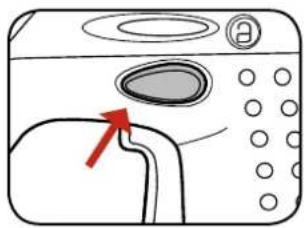
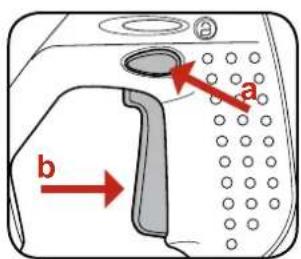
- Push the lock-off button hard left.
natural_image
Diagram of a microwave oven with a red arrow pointing to the lid area (no text or symbols present)-
To start the air pump, squeeze the on/off trigger.
-
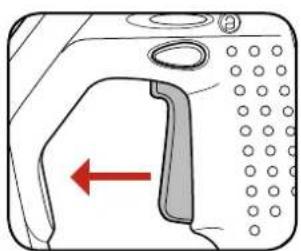
To stop the air pump, release the trigger.
natural_image
Diagram of a device interior with a red arrow pointing to a specific area (no text or symbols present)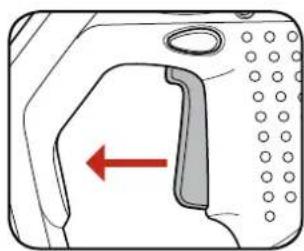
natural_image
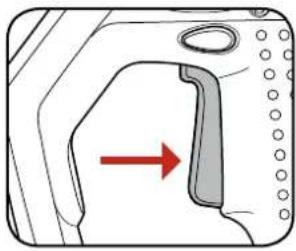
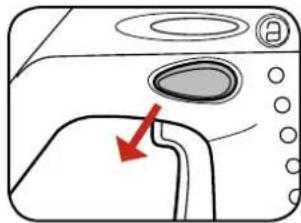
Diagram of a device interior with a red arrow indicating direction (no text or symbols)- When finished using the air pump, push the lock-off button hard right to prevent accidental start-up.
natural_image
Line drawing of a kitchen appliance with a red arrow pointing to a handle (no text or symbols)4. INFLATING
CAUTION: The air pump should not be operated for extended periods of time without being allowed to cool. Use for 10 minutes, then rest for 10 minutes.
-
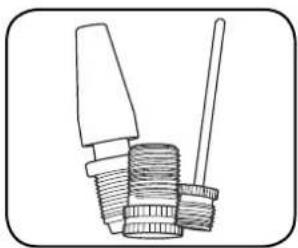
Attach the correct valve adaptor for the object to be inflated.
-
Insert valve adaptor into the valve on the object. Ensure the connection is air tight.
natural_image
Simple line drawing of a mechanical component with two protrusions (no text or symbols)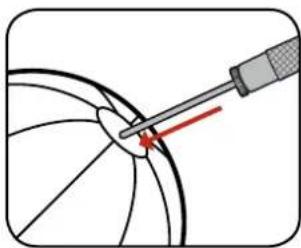
natural_image
Diagram of a mechanical tool interacting with a circular component, showing a red arrow indicating direction (no text or symbols present)- Turn the air pump on.
- Periodically, release on/off trigger and look squarely at the pressure gauge to obtain pressure reading.
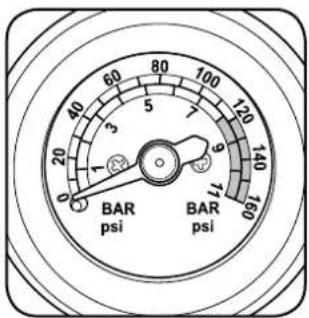
NOTE: Looking at the gauge dial at an angle will give a false pressure reading. Readings taken with the air pump turned on will not be accurate.
- Once desired inflation is reached, release on/off trigger and remove valve adaptor.
natural_image
Diagram of a device interior showing a door and vent with a red arrow indicating direction (no text or symbols)MAINTENANCE
- When not in use, the air pump should be stored in a dry, frost free location, keep out of children's reach.
- Keep ventilation slots of the air pump clean at all times and prevent anything from entering.
- If the housing of the air pump requires cleaning, do not use solvents. Use of a cloth only is recommended.
- Blow out the ventilation slots with compressed air periodically.
- If the supply cord is damaged, it must be replaced by the manufacturer, its service agent or similarly qualified persons in order to avoid a hazard.
Note: Ozito Industries will not be responsible for any damage or injuries caused by repair of the air pump by an unauthorised person or by mishandling.
SPARE PARTS
| 12V Li-ion Battery Pack | SPLAP4100-17 |
| Charging Adaptor & Stand | SPLAP4100-18A |
| Locking Collar | SPLAP4100-02 |
| Flexible Hose Accessory Kit | SPLAP4100-14K |
Spare parts can be ordered from the Special Orders Desk at your local Bunnings Warehouse.
For further information, or any parts not listed here, visit www.ozito.com.au or contact Ozito Customer Service:
Australia 1800 069 486
New Zealand 0508 069 486
E-mail: enquires@ozito.com.au
DESCRIPTION OF SYMBOLS
| V | Volts | Hz | Hertz | |
| ac/~ | Alternating current | W | Watts | |
| dc/--- | Direct current | No | No load speed | |
| mA | Milliamperes | Ah | Amp hour | |
| Nm | Newton Meters bar | Pressure rating | ||
| l/min | Litres per minute | psi | Pounds per square inch | |
| Electrical Emissions Conformity (EMC) | Transformer Energy Rating (MEPS) | |||
| Warning | Read instruction manual | |||
| Double insulated | Indoor use only | |||
| Thermal cut-out protection | Polarity | |||
| Lithium lon battery | Do not use or store battery in temperatures exceeding 50°C | |||
| Recycle battery Do not put in the rubbish | ||||
| Do not incinerate Do not get battery wet | ||||
| Regulatory Compliance Mark (RCM) | ||||
| Electrical Emissions Conformity (EMC) | Transformer Energy Rating (MEPS) | |||
| Warning | Read instruction manual | |||
| Double insulated | Indoor use only | |||
| Thermal cut-out protection | Polarity | |||
| Lithium Ion battery | MAX.50°C | Do not use or store battery in temperatures exceeding 50°C | |
| Recycle battery Do not put in the rubbish | |||
| Do not incinerate Do not get battery wet | |||
| Regulatory Compliance Mark (RCM) | |||
TROUBLESHOOTING
LED lights do not illuminate on charger
Check the charging adaptor is securely plugged into the wall out let.
Check the battery is firmly connected to the charging cradle.
Check that the charging jack is securely connected to the charging cradle.
The battery has a short run time
Ensure the battery is properly charged. It will take 4-5 charging cycles before the battery reaches optimum charge and run time. On the initial charge, the battery requires 5 hours of charging. Subsequent charging only requires 3-5 hours.
Sparking visible through the housing air vents
A small amount of sparking may be visible through the housing vents. This is normal and does not indicate a problem.
On/off trigger will not depress
The lock-off button may be activated. Move to unlocked position and try again.
The air pump body gets hot after extensive use
The air pump should not be operated for periods longer than 10 minutes. Allow the air pump to rest for 10 minutes then resume operation.

BATTERY AND CHARGER SAFETY WARNINGS
THIS MANUAL CONTAINS IMPORTANT SAFETY AND OPERATING INSTRUCTIONS FOR YOUR BATTERY CHARGER.
- Before using the charger read all instructions and cautionary markings on the charger, battery pack and the product using the battery pack.
- This charger is not intended for any uses other than charging rechargeable batteries. Any other use may result in risk of fire, electric shock or electrocution.
- Do not place any object on top of the charger or place the charger on a soft surface that may result in excessive internal heat. Place the charger in a position away from any heat source.
- To reduce risk of damage to the electric plug and cord, pull by the plug rather than the cord when disconnecting the charger.
- Make sure the cord is located so that it will not be stepped on, tripped over, or otherwise subjected to damage or stress.
- An extension cord should not be used unless absolutely necessary. Use of an improper extension cord could result in the risk of fire, electric shock or electrocution.
- Do not operate the charger if it has received a sharp blow, been dropped or otherwise damaged in any way. Have it checked by an electrician or power tool repairer.
- Do not disassemble charger. Take it to an electrician or power tool repairer when service or repair is required. Incorrect reassembly may result in a risk of electric shock, electrocution or fire.
- To reduce risk of electric shock, unplug the charger from the outlet before attempting any cleaning. Removing the battery pack will not reduce this risk.
- Never attempt to connect 2 chargers together.
- DO NOT store or use the tool and battery pack in locations where the temperature may reach or exceed 40^ C (such as inside sheds or metal buildings in summer).
- The charger is designed to operate on standard household electrical power (240 volts). Do not attempt to use it on any other voltage!
- The battery pack is not fully charged out of the carton. First read the safety instructions and then follow the charging notes and procedures.
- The longest life and best performance can be obtained if the battery pack is charged when the air temperature is between 18 - 24°C. Do not charge the battery pack in an air temperature below 10°C or above 40°C. This is important and will prevent damage to the battery pack.
- Do not incinerate the battery pack even if it is seriously damaged or is completely worn out. The battery can explode in a fire.
- Never attempt to open the battery pack for any reason. If the plastic housing of the battery pack breaks or cracks, immediately discontinue use and do not recharge.
- During charging, the battery must be placed in a well ventilated area.
CARING FOR THE ENVIRONMENT

Power tools that are no longer usable should not be disposed of with household waste but in an environmentally friendly way. Please recycle where facilities exist. Check with your local council authority for recycling advice.

Recycling packaging reduces the need for landfill and raw materials. Reuse of recycled material decreases pollution in the environment. Please recycle packaging where facilities exist. Check with your local council authority for recycling advice.
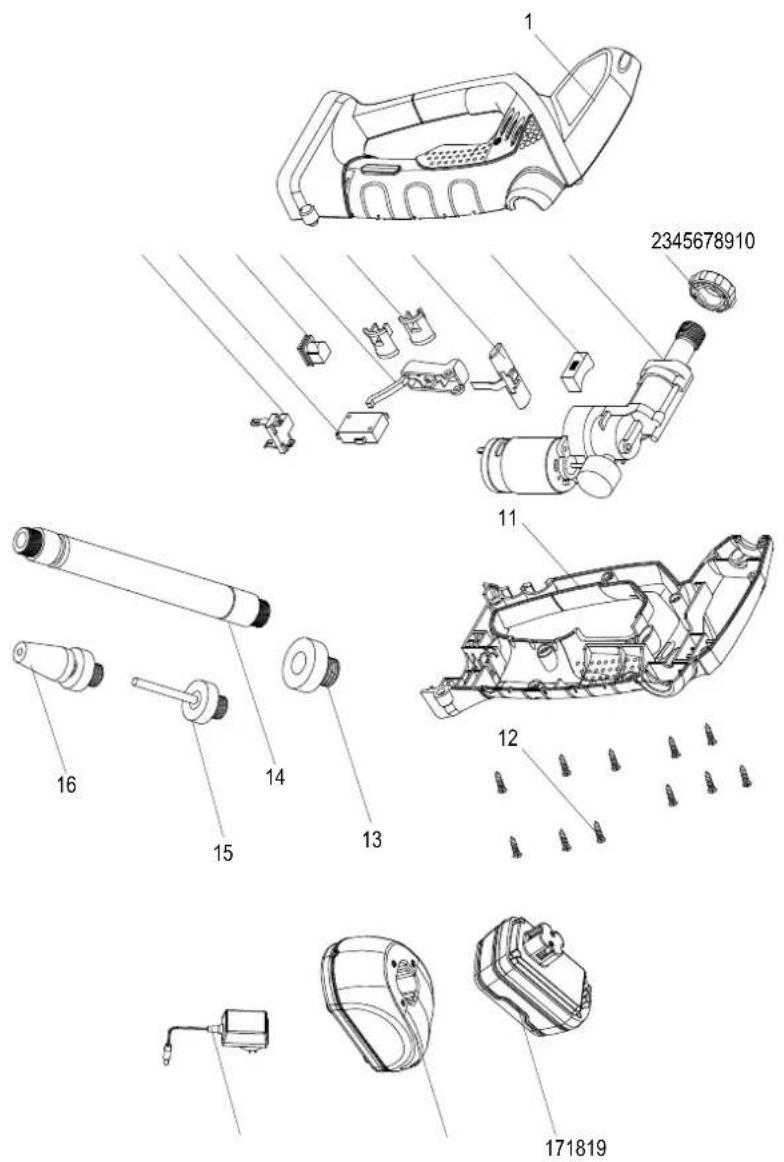
The following is a list of spare parts carried by Ozito. Please contact Customer Service for any parts not listed.
| Item No. | Description Part No. | |
| 2 | Locking Collar | SPLAP4100-02 |
| 13-16 | Accessory Kit | SPLAP4100-14K |
| 17 | 12V Li-ion Battery | SPLAP4100-17 |
| 18-19 | Charger Adaptor and Stand | SPLAP4100-18A |
| Item No. | Description Part No. |
How To Order
Available spare parts can be ordered through the Special Orders Desk at any Bunnings Warehouse. If you have any further questions, please contact Ozito Customer Service on:
Australia: 1800 069 486
New Zealand: 0508 069 486
enquiries@ozito.com.au
GENERAL POWER TOOL SAFETY WARNINGS

WARNING! Read all safety warnings and all instructions. Failure to follow the warnings and instructions may result in electric shock, fire and/or serious injury.
Save all warnings and instructions for future reference. The term "power tool" in the
warnings refers to your mains-operated (corded) power tool or battery-operated (cordless) power tool. 1. Work area safety
a. Keep work area clean and well lit. Cluttered or dark areas invite accidents.
b. Do not operate power tools in explosive atmospheres, such as in the presence of flammable liquids, gases or dust. Power tools create sparks which may ignite the dust or fumes.
c. Keep children and bystanders away while operating a power tool. Distractions can cause you to lose control.
2. Electrical safety
a. Power tool plugs must match the outlet. Never modify the plug in any way.
Do not use any adapter plugs with earthed (grounded) power tools. Unmodified plugs and matching outlets will reduce risk of electric shock.
b. Avoid body contact with earthed or grounded surfaces, such as pipes, radiators, ranges and refrigerators. There is an increased risk of electric shock if your body is earthed or grounded.
c. Do not expose power tools to rain or wet conditions. Water entering a power tool will increase the risk of electric shock.
d. Do not abuse the cord. Never use the cord for carrying, pulling or unplugging the power tool. Keep cord away from heat, oil, sharp edges or moving parts. Damaged or entangled cords increase the risk of electric shock.
c. When operating a power tool outdoors, use an extension cord suitable for outdoor use. Use of a cord suitable for outdoor use reduces the risk of electric shock.
f. If operating a power tool in a damp location is unavoidable, use a residual current device (RCD) protected supply. Use of an RCD reduces the risk of electric shock.
3. Personal safety
a. Stay alert, watch what you are doing and use common sense when operating a power tool. Do not use a power tool while you are tired or under the influence of drugs, alcohol or medication. A moment of inattention while operating power tools may result in serious personal injury.
b. Use personal protective equipment. Always wear eye protection. Protective equipment such as dust mask, non-skid safety shoes, hard hat, or hearing protection used for appropriate conditions will reduce personal injuries.
c. Prevent unintentional starting. Ensure the switch is in the off-position before connecting to power source and/or battery pack, picking up or carrying the tool. Carrying power tools with your finger on the switch or energising power tools that have the switch on invites accidents.
d. Remove any adjusting key or wrench before turning the power tool on. A wrench or a key left attached to a rotating part of the power tool may result in personal injury.
e. Do not overreach. Keep proper footing and balance at all times. This enables better control of the power tool in unexpected situations.
f. Dress properly. Do not wear loose clothing or jewellery. Keep your hair, clothing and gloves away from moving parts. Loose clothes, jewellery or long hair can be caught in moving parts.
g. If devices are provided for the connection of dust extraction and collection facilities, ensure these are connected and properly used. Use of dust collection can reduce dust-related hazards.
4. Power tool use and care
a. Do not force the power tool. Use the correct power tool for your application. The correct power tool will do the job better and safer at the rate for which it was designed.
b. Do not use the power tool if the switch does not turn it on and off. Any power tool that cannot be controlled with the switch is dangerous and must be repaired.
c. Disconnect the plug from the power source and/or the battery pack from the power tool before making any adjustments, changing accessories, or storing power tools. Such preventive safety measures reduce the risk of starting the power tool accidentally.
d. Store idle power tools out of the reach of children and do not allow persons unfamiliar with the power tool or these instructions to operate the power tool. Power tools are dangerous in the hands of untrained users.
e. Maintain power tools. Check for misalignment or binding of moving parts, breakage of parts and any other condition that may affect the power tool's operation. If damaged, have the power tool repaired before use. Many accidents are caused by poorly maintained power tools.
f. Keep cutting tools sharp and clean. Properly maintained cutting tools with sharp cutting edges are less likely to bind and are easier to control.
g. Use the power tool, accessories and tool bits etc. in accordance with these instructions, taking into account the working conditions and the work to be performed. Use of the power tool for operations different from those intended could result in a hazardous situation.
- Battery tool use and care
a. Recharge only with the charger specified by the manufacturer. A charger that is suitable for one type of battery pack may create a risk of fire when used with another battery pack.
b. Use power tools only with specifically designated battery packs. Use of any other battery packs may create a risk of injury and fire.
c. When battery pack is not in use, keep it away from other metal objects, like paper clips, coins, keys, nails, screws or other small metal objects, that can make a connection from one terminal to another. Shorting the battery terminals together may cause burns or a fire.
d. Under abusive conditions, liquid may be ejected from the battery; avoid contact. If contact accidentally occurs, flush with water. If liquid contacts eyes, additionally seek medical help. Liquid ejected from the battery may cause irritation or burns.
- Service
a. Have your power tool serviced by a qualified repair person using only identical replacement parts. This will ensure that the safety of the power tool is maintained.
AIR PUMP SAFETY WARNINGS

WARNING! This appliance is not intended for use by persons (including
children) with reduced physical, sensory or mental capabilities, or lack or experience and knowledge, unless they have been given supervision or instruction concerning use of the appliance by a person responsible for their safety.
Recommendations for the use of a residual current device with a rated residual current of 30mA or less.
WARRANTY
IN ORDER TO MAKE A CLAIM UNDER THIS WARRANTY YOU MUST RETURN THE PRODUCT TO YOUR NEAREST BUNNINGS WAREHOUSE WITH YOUR BUNNINGS REGISTER RECEIPT. PRIOR TO RETURNING YOUR PRODUCT FOR WARRANTY PLEASE TELEPHONE OUR CUSTOMER SERVICE HELPLINE:
Australia 1800 069 486
New Zealand 0508 069 486
TO ENSURE A SPEEDY RESPONSE PLEASE HAVE THE MODEL NUMBER AND DATE OF PURCHASE AVAILABLE. A CUSTOMER SERVICE REPRESENTATIVE WILL TAKE YOUR CALL AND ANSWER ANY QUESTIONS YOU MAY HAVE RELATING TO THE WARRANTY POLICY OR PROCEDURE.
The benefits provided under this warranty are in addition to other rights and remedies which are available to you at law.
Our goods come with guarantees that cannot be excluded at law. You are entitled to a replacement or refund for a major failure and for compensation for any other reasonably foreseeable loss or damage. You are also entitled to have the goods repaired or replaced if the goods fail to be of acceptable quality and the failure does not amount to a major failure.
Generally you will be responsible for all costs associated with a claim under this warranty, however, where you have suffered any additional direct loss as a result of a defective product you may be able to claim such expenses by contacting our customer service helpline above.
3 YEAR REPLACEMENT WARRANTY
Your product is guaranteed for a period of 36 months from the original date of purchase and is intended for DIY (Do It Yourself) use only. If a product is defective it will be replaced in accordance with the terms of this warranty. Lithium Ion batteries are covered by a 12 month warranty. Warranty excludes consumable parts, for example: valve adaptors, etc.
WARNING
The following actions will result in the warranty being void.
- If the tool has been operated on a supply voltage other than that specified on the tool.
- If the tool shows signs of damage or defects caused by or resulting from abuse, accidents or alterations.
- Failure to perform maintenance as set out within the instruction manual.
• If the tool is disassembled or tampered with in any way.
- KNOW YOUR PRODUCT SETUP &
- PREPARATION
- CORDLESS AIR PUMP
- BATTERY
- Charging
- Installing and Removing
- ATTACHING ACCESSORIES 3. CONTR
- Installing Flexible Extension Hose
- Installing Valve Adaptors
- s
- Turning On/Off
- INFLATING
- MAINTENANCE
- SPARE PARTS
- TROUBLESHOOTING
- LED lights do not illuminate on charger
- The battery has a short run time
- Sparking visible through the housing air vents
- On/off trigger will not depress
- The air pump body gets hot after extensive use
- BATTERY AND CHARGER SAFETY WARNINGS
- CARING FOR THE ENVIRONMENT
- How To Order
- GENERAL POWER TOOL SAFETY WARNINGS
- AIR PUMP SAFETY WARNINGS
- WARRANTY
- YEAR REPLACEMENT WARRANTY
- WARNING
Brand : Ozito
Model : LAP-4100
Category : Pump