
Stadium UB4100 - Soundbar JBL - Free user manual and instructions
Find the device manual for free Stadium UB4100 JBL in PDF.
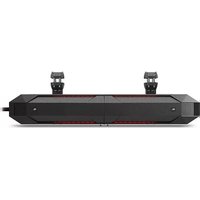


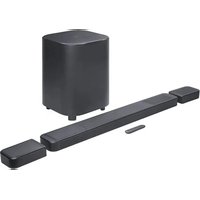
| Product Type | Soundbar |
| Brand | JBL |
| Model | Stadium UB4100 |
| Dimensions (W x H x D) | 950 x 60 x 100 mm |
| Weight (Soundbar) | 2.5 kg |
| Total Power Output | 300 W |
| Channels | 2.1 (stereo + wireless subwoofer) |
| Drivers | 2 tweeters, 2 woofers, 1 subwoofer |
| Connectivity | Bluetooth 4.2, HDMI ARC, Optical, USB |
| Audio Modes | Cinema, Music, Dialogue |
| Power Supply | 100-240 V AC, 50/60 Hz |
| Power Consumption (Max) | 30 W |
| Standby Power | < 0.5 W |
| Included Accessories | Remote control, HDMI cable, Optical cable, Wall mount kit |
| Maintenance | Clean with a soft, dry cloth |
| Safety | Do not expose to moisture or open the device |
| Repairability | Spare parts available through JBL authorized service centers |
Frequently Asked Questions - Stadium UB4100 JBL
User questions about Stadium UB4100 JBL
0 question about this device. Answer the ones you know or ask your own.
Ask a new question about this device
Download the instructions for your Soundbar in PDF format for free! Find your manual Stadium UB4100 - JBL and take your electronic device back in hand. On this page are published all the documents necessary for the use of your device. Stadium UB4100 by JBL.
USER MANUAL Stadium UB4100 JBL
Amplified Powersports Soundbar
ENSOLID
JBL
by HARMAN
OWNER'S MANUAL

by HARMAN
THANK YOU FOR YOUR PURCHASE ...
Your JBL product has been designed to provide you with the performance and ease of operation you would expect from JBL.
- Please take time to read your owner's manual in its entirety before operating or installing your soundbar.
- Keep the owner's manual for your Soundbar in your glove compartment along with the owner's manual for your car.
- Put your Soundbar sales receipt with other important documents in order to expedite warranty service if needed.
Legendary JBL pro and home audio performance is now available for the great outdoors. The new JBL STADIUM UB4100 AMPLIFIED Powersports Soundbar is designed for UTVs, boats and other personal and family vehicles built for fun and recreation. Take the wheel or helm and experience the sound of powerful JBL rollicking sound. (Try 100dB at fifteen feet!) It's also equipped with a super flexible mounting system that fits any size roll cage and will take a 10G shock and stay put. You can also separate the soundbar into two speaker towers to optimize sound quality for any installation. Bluetooth, 3.5mm and RCA output jacks allow you and your friends to take turns streaming playlists. There's a GoPro shoe for an action camera to share your finest moments – like how you look when you hit your first hole in one. With a glowing red LED output display and ambient lighting, you're in the cockpit ready to do things you've never done before – be it on land, sea or a long green fairway.
ABOUT THE MANUAL
This manual describes general installation guidelines and operation instructions. However, please note that proper installation of mobile audio and video components requires qualified experience with mechanical and electrical procedures. If you do not have the knowledge and tools to successfully perform this installation, we strongly recommend consulting an authorized JBL dealer about your installation options. Keep all instructions and sales receipts for reference. Consider this manual as an indispensable feature of your soundbar.
INCLUDED ITEMS

- Hand-tighten the threaded rod into the soundbar's left speaker section (with the cable attached). Apply the supplied FVA gasket to the end panel of one of the speakers before assembling the Soundbar.

- Screw the soundbar's right speaker section onto the portion of the threaded rod that is protruding from the left speaker. When the speaker is threaded all the way onto the rod and tightened securely, the fronts of both speakers should be properly aligned.

- Attach the bottom bridge plate to the two speakers, using the small hex wrench and 4 of the bridge plate screws.

- Connect the umbilical cables between the two speakers.

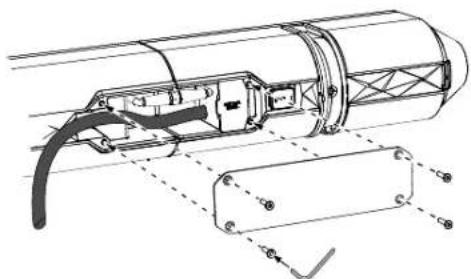
- Before attaching the rear bridge plate, you will need to set the Input Level switch, Auto Turn-On switch, and Gain control:
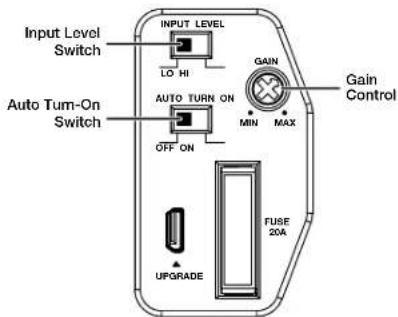
a. If you will be connecting the soundbar's audio inputs to the pre-outs of a car stereo head unit or other line-level source, set the Input Level switch in the "Lo" position. If you will be connecting the soundbar to the speaker-level outputs of a car stereo head unit, set the Input Level switch in the "Hi" position. b. If you set the Input Level switch to "Hi" and want the soundbar to automatically turn on when it receives an audio signal, set the Auto Turn-On switch in the "On" position. If not, set the switch in the "Off" position. (The Auto Turn-On switch has no effect if the Input Level switch is set to "Lo.") c. Set the Gain control at the 12 o'clock position. You can fine-tune this control to maximize the soundbar's performance once you have completed the installation and can play music through the soundbar.
- Attach the rear bridge plate to the two speakers, using the small hex wrench and the remaining 4 bridge plate screws.
MOUNTING
1a. Insert the 2 mounting bracket base assemblies into the 2 mounting track openings on the bottom of the soundbar. 1b. Slide the mounting bracket bases inside the tracks all the way around to the top of the soundbar.
a.
b.
- Position the soundbar in the desired location against the vehicle mounting bar. Use 4 of the supplied mounting bracket bolts to secure each bracket top to a bracket base. Two sets of bolts are supplied, allowing the soundbar to be mounted to pipes from 1" (25mm) to 3-1/2" (89mm) in diameter.
a. When the soundbar is in the correct position, tighten the mounting bracket adjustment screws as tight as possible using your fingers, then insert the supplied small hex wrench into the holes on the adjustment screws and use it as a lever to secure the screws as firmly as possible.

3a. Run one end of one safety harness wire through one of the soundbar's harness attachment loops, and use the supplied clamp to secure the wire.
IMPORTANT: Be sure to tighten the bolts on the clamp as far as they will go and test the connection to be sure that the safety harness wire is secure in the clamp.

3b. Run the other end of the safety harness wire around the vehicle mounting bar and use the supplied clamp to secure the wire.
IMPORTANT: Be sure to tighten the bolts on the clamp as far as they will go and test the connection to be sure that the safety harness wire is secure in the clamp.
3c. Repeat Steps 3a and 3b with the other safety harness wire, using the other soundbar harness attachment loop and the vehicle mounting bar.
IMPORTANT: Be sure to tighten the bolts on the clamp as far as they will go and test the connection to be sure that the safety harness wires are secure in the clamps.
GROUND, POWER, ILLUMINATION AND REMOTE CONNECTIONS
IMPORTANT: Disconnect the vehicle's negative (−) battery terminal before beginning the installation.
Connect the soundbar's +12V power (red), ground (black), illumination (orange/white) and remote turn-on (blue/white) wires as shown below.
- Use sandpaper to clear the paint from the metal surface at the ground connection. Use a star-type lock washer to secure the connection.
- Install a fuse holder for a 40A fuse on the power (12V) wire within 18" (46cm) of the (+) battery terminal. Do not install the fuse in the holder at this time.

AUDIO INPUT CONNECTIONS
Connecting to an audio system head unit
Connect the source unit's RCA line outputs to the soundbar's (black) RCA audio input cable, as shown in the illustration below.
![graph LR A["Audio System Head Unit"] --> B["Front L/R Audio Out"] B --> C["Black RCA Audio Cable"] C --> D["Audio Input"] D --> E["Soundbar Wiring Harness"]](/content/2026/05/927889/images/5adb6bdc9f7823103ce84353cbcd5eb88d447abd13b2f1c19216b1f0f59ad5a6.jpg)
If your source unit does not have RCA outputs use the supplied bare wire-to-RCA adapters to connect the source unit's speaker wires to the soundbar's audio input cable, as shown in the illustration below.

When you're finished connecting the source unit's speaker outputs to the adapters, plug the adapters into the amplifier's input connectors as shown in the previous illustrations.
Connecting to a mobile phone or portable audio device
Connect the mobile phone's or portable device's headphone port to the soundbar's black 3.5mm audio cable, as shown in the illustration below.

Connecting to a subwoofer or secondary amplifier
Connect the subwoofer or a secondary amplifier to the soundbar's (gray) audio output cable, as shown in the illustration below.
![graph TD A["Audio Output"] --> B["Gray RCA Audio Cable"] B --> C["Soundbar Wiring Harness"] D["To subwoofer or secondary amplifier"] --> E["Radio Cable"] E --> F["Radio Cable to Subwoofer or Secondary Amplifier"]](/content/2026/05/927889/images/dec0b4d7c45cb17289dda5710c098f3dad5c2749608af7b89dccede31a405fbf.jpg)
WHEN YOU HAVE COMPLETED ALL OF THE SOUNDBAR CONNECTIONS:
- Insert the 40A fuse into the fuse holder you installed on the soundbar power wire.
- Re-connect the vehicle's negative (-) battery terminal.
- Pair the supplied Bluetooth remote control with the soundbar:
a. Set the soundbar's rear-panel power switch to On.

b. Insert the supplied battery into the remote's battery compartment with its "+" side UP.
c. Press the remote's "+" button.
Turning the Soundbar On and Off
Set the soundbar's rear-panel power switch to On. This will put the soundbar in the standby mode. To turn the soundbar on, press the Standby button on the soundbar's end panel:

If you have connected the soundbar's remote (blue/white) to the vehicle audio system's remote wire, the soundbar will automatically turn on whenever the audio system is turned on.
When the soundbar is in Standby, making a connection to the 3.5mm audio cable will automatically turn on the soundbar and switch it to the 3.5mm input. If there is no connection to the 3.5mm audio cable, pressing "Play" on a connected Bluetooth device will automatically turn on the soundbar and the device will play through the soundbar.
To put the soundbar in standby, press the Standby button.
The soundbar will automatically revert to standby when the vehicle's audio system is turned off and no audio is detected for five minutes from a connected Bluetooth device, and the high-level and 3.5mm audio inputs.
Selecting an Input
The soundbar automatically selects the audio input based on the following priorities:
Priority 1: 3.5mm audio cable. Whenever there is a physical connection to this cable it will have priority over the other inputs, even if no audio is playing through it. To listen to another input, disconnect this cable.
Priority 2: Bluetooth. When there is no connection to the soundbar's 3.5mm cable, a connected Bluetooth device has priority and will play through the soundbar whenever its "play" button is pressed.
Bluetooth Pairing
To pair a Bluetooth device with the soundbar, press the soundbar's Bluetooth button (the Bluetooth indicator will flash), go to the device's Bluetooth menu and pair it with the soundbar. The soundbar's Bluetooth indicator will remain lit when it is connected to a Bluetooth device.
Bluetooth Party Mode
The soundbar can maintain connection with up to 3 paired Bluetooth devices at the same time. The last connected device to enter the "play" mode will have its audio play through the soundbar, placing any other connected devices in "pause." This allows up to 3 people to share the soundbar, playing songs in turn. Pairing a 4th device will disconnect the first paired device from the soundbar (although it will remain paired).
Making a connection to the soundbar's 3.5mm audio cable will override a Bluetooth device, even if it is playing through the soundbar at the time.
Priority 3: Audio system head unit. When there is no connection to the soundbar's 3.5mm cable and all connected Bluetooth devices are paused, the audio system connected to the soundbar's black RCA audio cable will play through the soundbar.
Making a connection to the soundbar's 3.5mm audio cable or pressing "play" on a connected Bluetooth device will override the black RCA audio input, even if it is playing through the soundbar at the time.
Controlling the Soundbar's Volume
The soundbar's volume is controlled by the volume of the source device playing through it.
CONTROLS AND INDICATORS
Bluetooth Remote
This remote controls the Bluetooth source that is playing through the soundbar.

Volume Up/Down Buttons: Press to raise and lower the volume of the Bluetooth source.
Play/Pause Button: Press to play or pause the Bluetooth source.
Track Up/Down Buttons: Press to skip ahead or skip back the track playing on the Bluetooth source. Press-and-hold to fast-forward or fast-reverse through the currently-playing track.
The remote can be inserted into the soundbar's end panel for storage. Press the remote into the panel as shown below to store it; press the "Release" button to lift out the remote.
a.
b.
Soundbar Illumination Controls
These buttons control the soundbar's illumination.

Ext: The lights are controlled by the vehicle circuit the soundbar's (orange/white) illumination wire is connected to.
Auto: The lights will turn on when the soundbar is on, and will turn off when the soundbar is in the standby mode.
Off: Turns off the lights.
Illumination Level Buttons: Sets the illumination level to high or low.
Control Panel
This panel is located on the soundbar behind the rear bridge plate and is not readily accessible after you have mounted the soundbar in the vehicle. To access the panel, remove the soundbar's rear bridge plate. See the Assembly section (above) for details.

Input Level Switch: Set to "Lo" if you've connected the soundbar's audio inputs to the pre-outs of a car stereo head unit or other line-level source. Set to "Hi" if you've connected the soundbar to the speaker-level outputs of a car stereo head unit.
Auto Turn-On Switch: If you set the Input Level switch to "Hi" and want the soundbar to automatically turn on when it receives an audio signal from the vehicle's audio system, set the Auto Turn-On switch in the "On" position. If not, set the switch in the "Off" position. (The Auto turn-On switch has no effect if the Input Level switch is set to "Lo.")
Micro USB Port: Used for future software upgrades.
Gain Control: This control lets you maximize the soundbar's audio output performance.
- Turn the soundbar Gain control fully counter-clockwise (all the way down).
- Play some dynamic music through your source unit and turn its volume up to 3/4 volume.
- Slowly turn the soundbar Gain control clockwise until the music begins to sound distorted.
- Turn the Gain Control counter-clockwise slightly until the music no longer sounds distorted. Leave the Gain control in this position.
20A Fuse: Replace only with a fuse of identical rating (20A).
IMPORTANT: Replace the soundbar's rear bridge plate before operating the vehicle. DO NOT operate the vehicle with the soundbar's rear bridge plate removed.
Standby Indicator
The Standby indicator is located on the Standby button, and changes color to indicate the soundbar's current operating state.

Amber: The soundbar is in standby mode.
White: The soundbar is on.
Off: The soundbar is off.
Flashing: The soundbar is in protection mode due to overcurrent, overvoltage, undervoltage, overtemperature or DC offset. See the Troubleshooting section (below) for details.
GOPRO MOUNT
The soundbar's bottom bridge plate includes a mount that lets you easily attach a GoPro™ camera. Slide the camera's foot into the mount clip as shown in the illustration below. (You can insert the camera into the mount from either direction.)

SPECIFICATION
Product Type: Stereo amplified mobile soundbar
Frequency Response: 50Hz-20kHz
Maximum SPL: 100dB
Total Amplifier Power: 120Wx2
Power handling: N/A
Driver Complement: 4x 4" Long excursion woofers;
2x 2" Edge-Driven Dome Tweeters
Soundbar Dimension (L x W x H): 31.5" x 6.12" x 5" (800 x 155.5 x 128mm)
Soundbar Weight: 22.7 lbs (10.3 kg)
Low input level sensitivity: 0.35V - 2V
Hi level input sensitivity: 1.75V - 10V
Aux sensitivity: 0.35V - 1V
BT sensitivity: -9dBFS
BT version: 4.0
BT Transmitter power: 0 - 4dBm
BT transmitter frequency range: 2.402 - 2.480 GHz
Profile support: A2DP V1.3, AVRCP V1.5
SNR @ 1W: >75 dB
Channel separation: >60 dB
TROUBLESHOOTING
| Problem Causes and Solutions | |
| No sound (Standby indicator is off) | Check that the soundbar's +12V and GND connections have been properly made.Check if the fuse on the +12V wire located near the battery is blown; if so, replace it with an identical fuse.Check the fuse located on the soundbar's control panel. If it's blown, replace it with an identical fuse.If you are using the soundbar's remote wire for turn-on, check that the wire is properly connected to the audio system's remote turn-on wire. |
| No sound (Standby indicator is on) | Check that the source device's volume control is not turned all the way down.If you're trying to listen to a Bluetooth device or your vehicle's audio system, make sure that there is no connection to the soundbar's 3.5mm audio cable. (A connection to this cable will override all other audio inputs.)If you're trying to listen to a Bluetooth device, make sure it is paired and connected to the soundbar.Check that the soundbar's Gain control is not turned all the way down (counter-clockwise). See Gain Control, on page 3, for information about setting the Gain control. |
| No sound (Standby indicator is flashing) | Confirm that the vehicle's electrical system is supplying between 9V and 16V DC to the soundbar. If the supply voltage is outside of this range, correct the condition before attempting to use the soundbar.If the soundbar has overheated, wait until it has cooled down before attempting to use it again.If you have corrected the two above conditions and the soundbar's Standby indicator is still flashing, contact your authorized JBL dealer for assistance. |
| Sound is too quiet when listening to the vehicle's audio system, even with the vehicle audio system's source unit volume turned all the way up. | Check that the soundbar's Gain control is not turned too low. See Gain Control, on page 3, for information about setting the Gain control. |
| Sound is distorted | Check that the distortion is not originating from the source device.Check that the soundbar's Gain control is not turned too high. See Gain Control, on page 3, for information about setting the Gain control. |
Trademark: JBL
Product purpose
The Bluetooth® word mark and logos are registered trademarks owned by Bluetooth SIG, Inc. and any use of such marks by HARMAN International Industries, Incorporated is under license. Other trademarks and trade names are those of their respective owners.

HARMAN International Industries, Incorporated 8500 Balboa Boulevard, Northridge, CA 91329 USA www.jbl.com
© 2017 HARMAN International Industries, Incorporated. All rights reserved. JBL is a trademark of HARMAN International Industries, Incorporated, registered in the United States and/or other countries. Features, specifications and appearance are subject to change without notice.
GOPRO, HERO, the GOPRO logo, and the GoPro Be a Hero logo are trademarks or registered trademarks of GoPro, Inc.


- AMPLIFIED POWERSPORTS SOUNDBAR
- THANK YOU FOR YOUR PURCHASE
- ABOUT THE MANUAL
- INCLUDED ITEMS
- MOUNTING
- GROUND, POWER, ILLUMINATION AND REMOTE CONNECTIONS
- AUDIO INPUT CONNECTIONS
- CONNECTING TO A MOBILE PHONE OR PORTABLE AUDIO DEVICE
- CONNECTING TO A SUBWOOFER OR SECONDARY AMPLIFIER
- WHEN YOU HAVE COMPLETED ALL OF THE SOUNDBAR CONNECTIONS
- TURNING THE SOUNDBAR ON AND OFF
- SELECTING AN INPUT
- BLUETOOTH PAIRING
- BLUETOOTH PARTY MODE
- CONTROLLING THE SOUNDBAR'S VOLUME
- CONTROLS AND INDICATORS
- BLUETOOTH REMOTE
- SOUNDBAR ILLUMINATION CONTROLS
- CONTROL PANEL
- STANDBY INDICATOR
- GOPRO MOUNT
- SPECIFICATION
Brand : JBL
Model : Stadium UB4100
Category : Soundbar