000-137 - Drill Meec Tools - Free user manual and instructions
Find the device manual for free 000-137 Meec Tools in PDF.


| Product Type | Cordless Drill |
| Brand | Meec Tools |
| Model | 000-137 |
| Voltage | 18 V |
| Battery Type | Li-Ion |
| Chuck Type | 10 mm Keyless |
| Max Torque | 30 Nm |
| Speed Settings | 2 speeds (0-400 / 0-1500 rpm) |
| Reverse Function | Yes |
| LED Light | Yes |
| Weight (with battery) | 1.5 kg |
| Dimensions | 200 x 70 x 250 mm |
| Power Supply | 18 V Li-Ion battery (not included) |
| Charging Time | 1 hour (approx.) |
| Main Functions | Drilling and screwdriving |
| Variable Speed Trigger | Yes |
| Belt Clip | Included |
| Accessories Included | Charger, dual bit holder, 10 bits |
| Maintenance | Keep vents clean; wipe with dry cloth |
| Safety Features | Safety lock, overload protection |
Frequently Asked Questions - 000-137 Meec Tools
User questions about 000-137 Meec Tools
0 question about this device. Answer the ones you know or ask your own.
Ask a new question about this device
Download the instructions for your Drill in PDF format for free! Find your manual 000-137 - Meec Tools and take your electronic device back in hand. On this page are published all the documents necessary for the use of your device. 000-137 by Meec Tools.
USER MANUAL 000-137 Meec Tools
natural_image
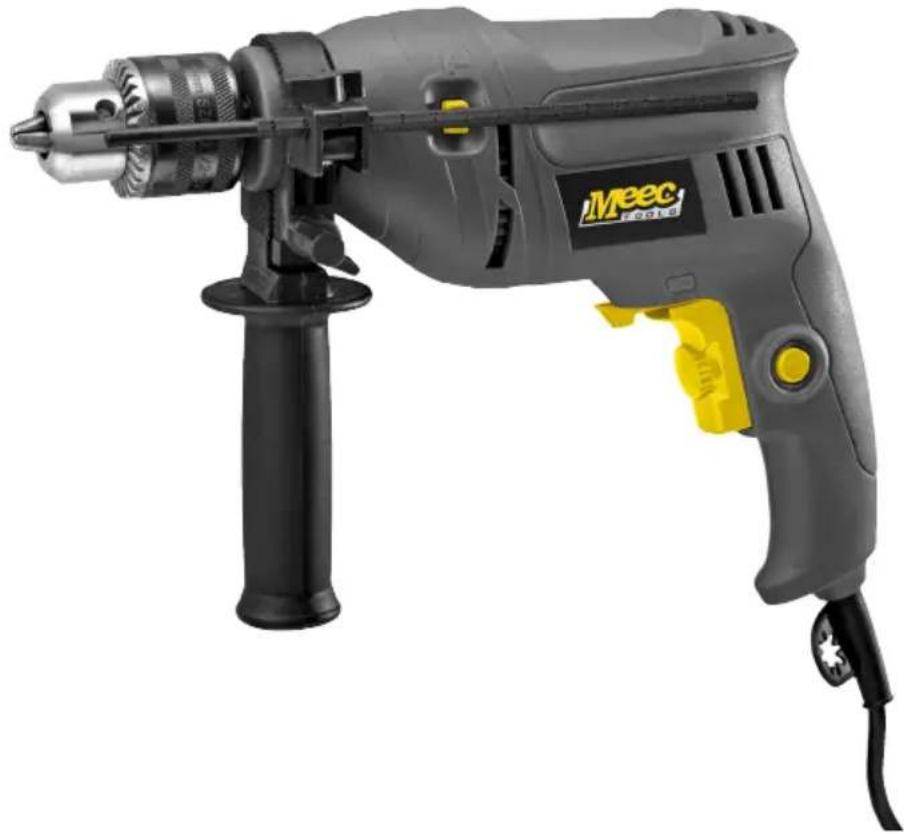
Exterior view of a Meec F8016 electric drill putter (no text or symbols visible on body)SE Bruksanvisning för slagborrmaskin
NO Bruksanvisning for slagboremaskin
PL Instrukcja obsługi wiertarki udarowej
EN Operating instructions for hammer drill
SE - Bruksanvisning i original
EN - Operating instructions (Translation of the original instructions)
Jula reserves the right to make changes. In the event of problems, please contact our service department.
www.jula.com
Tillverkare/ Produsent / Produenci/ Manufacturer
Jula AB, Box 363, 532 24 SKARA
Importör/ Importør/ Importer/ Importer
Care for the environment!
Must not be discarded with household waste! This product contains electrical or electronic components that should be recycled. Leave the product for recycling at the designated station e.g. the local authority's recycling station.
SVENSKA....5
SÄKERHETSANVISNINGAR....5
TEKNISKA DATA....10
BESKRIVNING 11
MONTERING....11
HANDHAVANDE 12
UNDERHÅLL 16
FELSÖKNING 17
NORSK 18
SIKKERHETSANVISNINGER 18
TEKNISKE DATA 23
BESKRIVELSE....24
MONTERING 24
BRUK....25
VEDLIKEHOLD 29
FEILS∅KING....30
POLSKI 31
ZASADY BEZPIECZEŃSTWA 31
DANE TECHNICZNE 37
OPIS 38
MONTAŻ 38
OBSŁUGA 39
KONSERWACJA 43
WYKRYWANIE USTEREK 44
ENGLISH 45
SAFETY INSTRUCTIONS 45
TECHNICAL DATA 50
DESCRIPTION 51
ASSEMBLY....51
USE....52
MAINTENANCE 56
TROUBLESHOOTING 57
SÄKERHETSANVISNINGAR
natural_image
Close-up of a mechanical component with a magnified circular detail highlighting a specific part (no text or symbols visible)natural_image
Close-up of a mechanical drill bit with a magnified inset showing internal components (no text or symbols visible)natural_image
Close-up of a mechanical component with a circular button and arrow indicator (no text or symbols)Varvtalsreglering
Borning
natural_image
Close-up of a precision rifle with a magnified inset showing a mechanical component (no visible text or symbols)natural_image
Close-up of a mechanical drill bit with a magnified inset showing internal components (no text or symbols visible)natural_image
Close-up of a mechanical component with a circular button and arrow indicator (no text or symbols)Turtallsregulering
Boring
natural_image
Close-up of a precision rifle with a magnified inset showing the hand holding a small object (no visible text or symbols)natural_image
Close-up of a mechanical drill bit with a magnified inset showing internal components (no text or symbols visible)natural_image
Close-up of a mechanical component with a circular button and arrow indicator (no text or symbols)Wiercenie
Read the operating instructions carefully before use.
Save these instructions for future reference.
General safety regulations for power tools
- The term "power tool" in the safety instructions refers to your mains-powered (corded) or battery-powered (cordless) power tool.
Safety in the work area
- Keep the work area clean and well lit. Dark and cluttered work areas increase the risk of accidents and injuries.
- Do not use power tools in explosive environments, such as in the vicinity of flammable liquids, gases or dust. Power tools produce sparks that can ignite dust and fumes.
- Keep children and onlookers at a safe distance when working with a power tool. You can lose control of the tool if you are distracted.
Electrical safety
- The mains plug on the power tool must match the mains socket. Never modify the plug in any way. Never use adapters with earthed power tools. Intact plugs and matching outlets reduce the risk of electric shock.
- Avoid body contact with earthed surfaces such as pipes, radiators, cookers and refrigerators.
- There is an increased risk of electric shock if your body is earthed.
- Do not expose power tools to rain or moisture. There is a greater risk of electric shock if water gets into a power tool.
- Be careful with the power cord. Never use the power cord to carry or pull the power tool, or to pull out the plug from the mains. Keep the power cord away from heat, oil, sharp edges and moving parts. Damaged or tangled power cords increase the risk of electric shock.
- When you use a power tool outdoors, use an extension cord intended for outdoor use. Using cords intended for outdoor use reduces the risk of electric shock.
- If you have to use a power tool in damp conditions, use a mains connection protected by a residual current device RCD. Using an RCD reduces the risk of
electric shock.
Personal safety
- Stay alert, pay attention to what you are doing, and use your common sense when working with power tools. Never use power tools if you are tired or under the influence of drugs, alcohol or medication. A moment of inattention when using a power tool can result in serious personal injury.
- Use safety equipment. Always wear safety glasses. The correct use of safety equipment such as a dust filter mask, non-slip safety shoes, helmets and ear protection, reduces the risk of personal injury.
- Avoid accidental starting. Check that the power switch is in the OFF position before connecting to the mains and/or the battery, or lifting/carrying the tool. Carrying a power tool with your finger on the switch, or connecting a tool to the mains supply when the switch is in the ON position, increases the risk of accidents and injuries.
- Remove all Allan keys/spanners etc. before switching on the power tool. A forgotten spanner in a rotating part of the power tool can result in personal injury.
- Do not overreach. Always maintain a firm footing and good balance. This will ensure you have better control over the tool in unexpected situations.
- Wear suitable clothing. Do not wear loose-fitting clothing or jewellery. Keep your hair, clothing and gloves away from moving parts. Loose-fitting clothing, jewellery and long hair can get caught in moving parts.
- If dust extraction and dust collection equipment is available, this should be connected and used correctly. The use of such devices can reduce the risk of dust-related problems.
Using and looking after power tools
- Do not force the power tool. Use the correct power tool for the planned work. The correct power tool functions better and more safely when used with the load for which it was designed.
- Do not use the power tool if it cannot be switched on and off with the power switch.
- Power tools that cannot be controlled with the power switch are dangerous and must be repaired.
- Unplug the plug from the mains and/or remove the battery from the power tool before making any adjustments, replacing accessories or putting the tool
away.
• These safety precautions reduce the risk of accidentally starting the power tool.
- Store power tools out of the reach of children when not in use. Never allow anyone who is unfamiliar with the power tool and these instructions to use the tool. Power tools are dangerous in the hands of inexperienced users.
- Keep the power tool properly maintained. Check that moving parts are not misaligned, jammed or loose, and that there are no other factors that could affect the safe use of the tool. If the power tool is damaged, it must be repaired before being used again. Many accidents are caused by poorly maintained power tools.
- Make sure that cutting tools are sharp and clean. Properly maintained cutting tools with sharp cutting edges are less likely to jam and are easier to control.
- Use the power tool, accessories and drills etc., in accordance with these instructions, taking into account the working conditions and the work that is to be done. Using the power tool for anything other than its intended purpose can lead to dangerous situations.
Service
- Make sure that the power tool is serviced by qualified technicians that only use identical spare parts. This will ensure that the power tool remains safe to use.
Safety regulations for drilling
- Wear ear protection when percussion drilling. Exposure to loud noise can cause hearing impairment.
- Use the support handle, if the tool is supplied with one. You could be injured if you lose control of the tool.
- Hold the power tool by the insulated grips when working in areas where the drill accessory can come into contact with concealed electrical cables or its own power cord. When cutting accessories come into contact with a live wire, unprotected metal parts on the tool may become charged and give the user an electric shock.
Vibration and noise attenuation
- To reduce the effects of noise and vibrations, you should limit the time in use, use the low-vibration and low-noise modes and wear personal protective equipment.
- Observe the following to minimise the risk of exposure to vibrations and loud
noise:
- Only use the product for the purpose it was designed for and according to these instructions.
— Make sure that the product is in good condition and well maintained. - Use the right accessories for the product and make sure they are in good condition.
- Keep a firm hold on the handle/grip.
- Maintain the product according to these instructions and ensure that it is well lubricated (where applicable).
- Plan the work schedule to spread the use of tools with strong vibrations over a longer period.
Emergency mode
- Familiarise yourself with the use of this product with the aid of these operating instructions. Commit the safety instructions to memory and follow them to the letter. That way you can avoid risks and hazards.
- Always pay attention when using this product, so you can detect and manage risks at an early stage. Prompt action can prevent serious injury and damage to property.
- Switch off the tool and disconnect it from the power supply in the event of a fault. Ensure that the product is checked by a qualified professional and if necessary repaired before you use it again.
Other risks
Even if you use this product in line with all safety requirements,
there is still a risk of injury and other damage. The following hazards related to the design and construction of this product may arise:
- Effects on health from vibration if the product is used for long periods, or is not handled and maintained correctly.
– Injury and damage to property from defective cutting accessories or sudden contact with hidden objects when using the tool.
– Risk of injury and damage to property caused by ejected objects.
WARNING: This product produces an electromagnetic field when in use! This field can in some circumstances affect active or passive medical implants. In order to reduce the risk of serious or fatal injury, we recommend that persons with medical implants consult their doctor and the manufacturer of the medical implant before using this product!
Symbols
You will find the following symbols and abbreviations on the product, the rating plate and in these instructions. Familiarise yourself with them to reduce the risk of personal injury and damage to property.
| [d7yc] | Lock – to tighten or secure. |  | Use eye protection. |
| [dzyc] | Unlock – to release. |  | Wear a dust filter mask. |
 | WARNING: Wear safety glove |  | |
 | Read the instructions. |  | Wear slip-resistant safety shoes. |
 | Switch off the product and unplug it from the power source before assembling, cleaning, adjustment, maintenance, storage and transport. |  | The product complies with the relevant EU Directives, and an evaluation method to verify compliance with these directives has been applied. |
 | This product is in safety class II. That means it is equipped with enhanced or double insulation. |  | Recycle discarded product. |
 | Wear ear protection. | ||
TECHNICAL DATA
| Rated voltage 230 V | ~ 50 Hz |
| Output 500 W | |
| Safety class II | |
| Speed, no load 0–2900 rpm | |
| Drill chuck 13 mm | |
| Drill capacity Wood: 16 mm | |
| Metal: 10 mm | |
| Masonry: 13 mm | |
| Weight 2.2 kg | |
| Sound pressure level LpA 93 dB(A), K=3 dB | |
| Sound power level, LwA 104 dB(A), K=3 dB | |
| Vibration Drilling in metal – Main handle: 5.510 m/s ^2 , K=1.5 m/s ^2 | |
| Support handle: 6.663 m/s ^2 , K=1.5 m/s ^2 | |
| Percussion drilling in concrete – Main handle: 13.768 m/s ^2 , K=1.5 m/s ^2 | |
| Support handle: 12.555 m/s ^2 , K=1.5 m/s ^2 |
Always wear ear protection!
The declared vibration value, which has been measured by a standardised test method, can be used to compare different tools with each other and for a preliminary assessment of exposure.
WARNING: The actual vibration level when using power tools may differ from the specified maximum value, depending on how the tool is used. It is therefore necessary to determine which safety precautions are required to protect the user, based on an estimate of exposure in actual operating conditions (taking into account all stages of the work cycle, e.g. the time when the tool is switched off and when it is idling, in addition to the start-up time).
DESCRIPTION
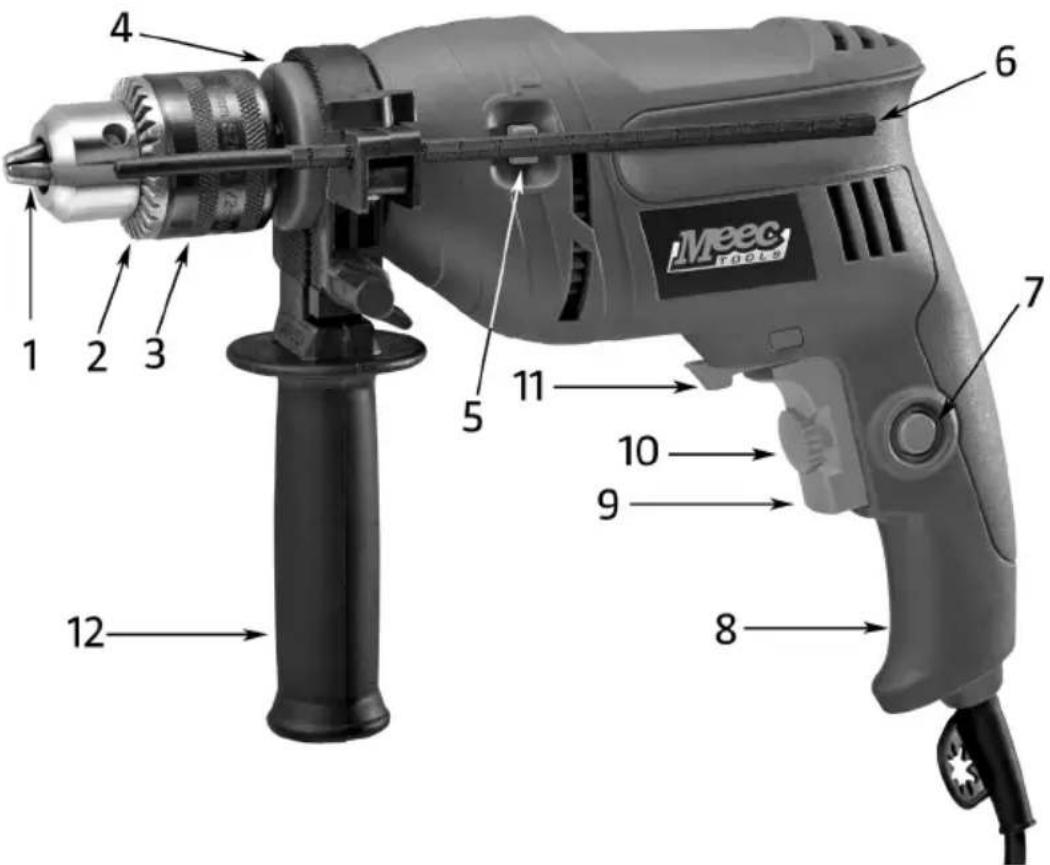
- Tool holder
- Chuck ring
- Key chuck
- Collar
- Mode selector
-
Depth stop
-
Lock button
- Handle
- Power switch
- Speed control
- Control for forward/backward rotation
- Support handle
ASSEMBLY
Unpacking
- Unpack all the parts and place them on a flat and stable surface.
- If necessary, remove all packaging material and transportation devices.
- Check that the delivery is complete and undamaged. If you discover any parts are missing or damaged, the product should not be used, and you should contact your dealer. Using an incomplete or damaged product constitutes a danger to persons and property.
- Ensure that all accessories and tools needed for assembly and use. This also includes appropriate personal safety equipment.
WARNING: The product and packaging are not toys. Do not allow children to play with plastic bags, papers or small parts. There is a risk of suffocation.
IMPORTANT: The product must be completely assembled before use! Do not use a product that is only partially assembled or fitted with damaged parts! Do not connect the product to a power source before it is completely assembled!
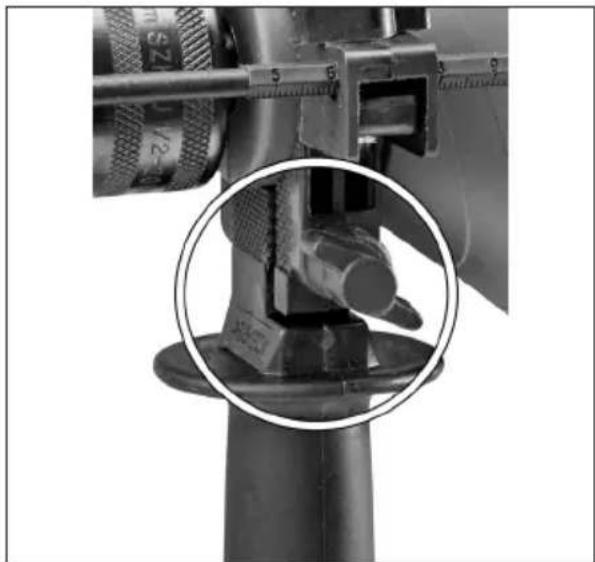
Fitting the support handle
Set the support handle, depending on the desired application. It improves control when the product is used.
- Turn the thumbscrew anticlockwise to loosen the clamp.
- Place the clamp on the collar.
- Set the support handle into the desired position so that you can hold the product in a safe manner while using it.
- Turn the thumbscrew clockwise to tighten the clamp.
natural_image
Close-up of a mechanical tool with a magnified inset showing a circular detail (no text or symbols visible)WARNING: Never use the product without the support handle, to avoid accidents and personal injury! Always ensure that the support handle is securely fastened and secured before use! The support handle provides better control of the product in the event of a sudden stop during use when large forces are released!
USE
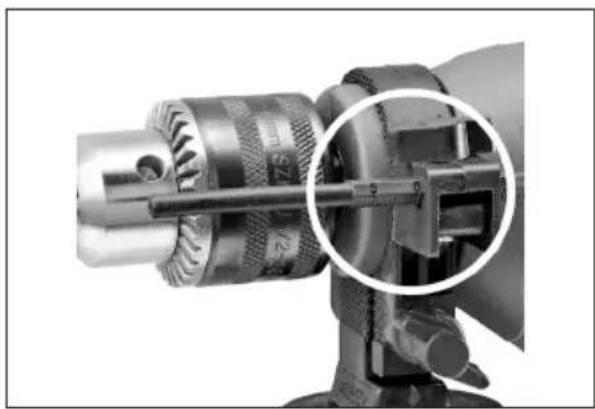
Depth stop
Limit the drilling depth with the depth stop.
-
Insert the depth stop through the hole as shown in the figure. Make sure that no rule markings are visible.
-
Make sure the end of the depth stop is level with the drill bit. Now pull back the depth stop to the desired drilling depth.
natural_image
Close-up of a mechanical drill bit with a magnified inset showing the internal structure (no text or symbols visible)Inserting and replacing the drill bit
Different drill bits can be used with this product, depending on the material you are working with.
WARNING:
- Always use drill bits designed for the intended use! For example, never use a drill bit intended for wood to drill metal, and vice versa! Observe the technical requirements for this product into consideration (see section on Technical data) when buying and using drill bits.
-
Some drill bits are very sharp and get hot when used! Handle them with care. Wear safety gloves when handling drill bits to avoid burning or cutting yourself.
-
Hold the chuck tightly and turn the chuck ring anticlockwise until the tool holder opens sufficiently to insert the drill bit.
- Remove the drill bit (if already fitted) from the tool holder. Insert the new drill bit as far as possible in the tool holder.
- Hold the chuck tightly and turn the chuck ring clockwise until the drill bit sits firmly in the tool holder.
Connect to the power source.
- Make sure the power switch is in the OFF position.
- Connect the plug to a suitable socket. WARNING: Check the voltage! The voltage must correspond with the information on the rating plate!
- The product is now ready to use.
General use
- Always check that the product, its power cord and plug, and its accessories are not damaged before using it. Do not use the product if it is damaged or shows signs of wear.
- Check once more that the accessory is properly positioned.
- Always hold the product by its handles. Keep the handles dry so that they provide good support.
- Ensure that the air vents are clear and not blocked. Clean them with a soft brush if necessary. Blocked air vents can cause the product to overheat and become damaged.
- Switch the product off immediately if your work is disrupted by other people entering the work area. Always allow the product to stop completely before adjusting it.
- Do not over-exert or yourself. Take regular breaks to maintain your concentration on the work and full control of the product.
WARNING: Remember that there are hidden objects concealed within each household. Ensure before use that there are no hidden gas, water or electricity lines in the work area - risk of electric shock and serious personal injury and damage to property! Use an appropriate detector to detect such objects in advance!
Adjustments
WARNING: The settings can be changed only when the product is switched off and has stopped completely! Always make sure that each switch is set in the correct position, depending on the intended use! Do not use the product with a switch set in another mode!
Mode selector
Select the mode before starting work. This product can be used for percussion drilling or normal drilling.
| Function Symbol display Application | ||
| Percussion drilling | 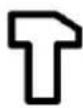 | Percussion drilling and drilling (brick, concrete and masonry). |
| Drilling | (SOWA) | Drilling (wood, metal and plastic). |
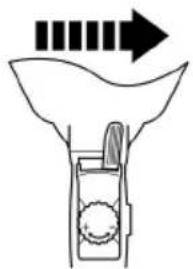
Rotation control forward/backward
Change the direction of rotation from forward to backward by pressing the switch for forward/backward rotation.
| Position Direction of rotation Application | ||
 | 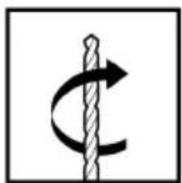 | 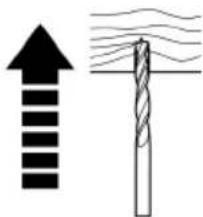 |
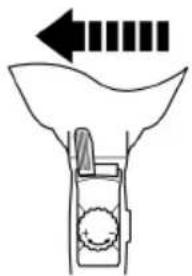 | 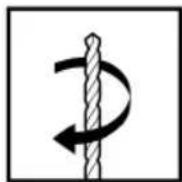 |  |
Quick mode
- Start the product by pressing the power switch.
- Switch off the product by releasing the power switch.
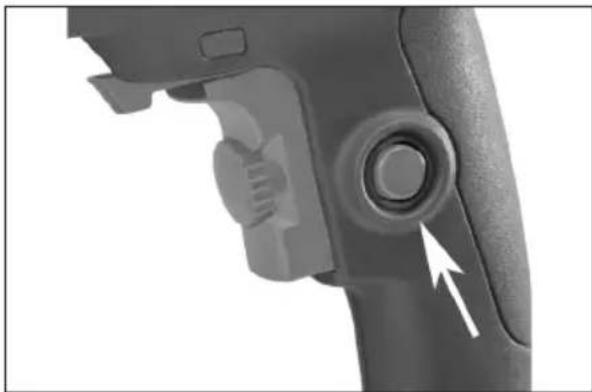
Continuous mode
- Start the product by pressing in the power switch.
- Press the lock button to lock the power switch.
- Release both buttons. The switch is now locked for continuous use.
- Press and release the power switch to switch off the product
natural_image
Close-up of a mechanical component with a circular button and arrow indicator (no text or symbols)Speed control
Adjust the speed directly when working with the integrated speed control. This product's power switch is combined with speed control. The speed is controlled by how far the trigger is pressed in.
Speed control
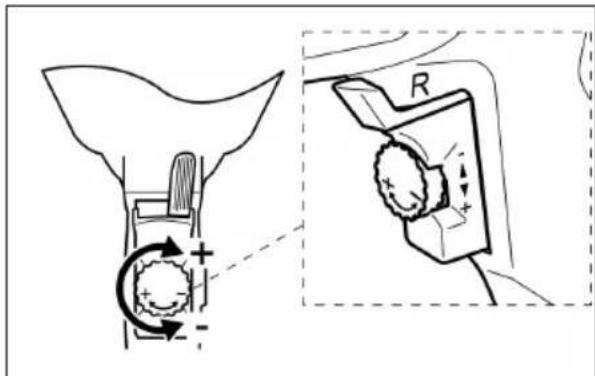
Limit the maximum speed with the speed control. You can choose the best speed for a particular application using the variable speed control.
- Turn the speed control towards "+" to increase the maximum speed.
- Turn the speed control towards "-" to reduce the maximum speed.
Drilling
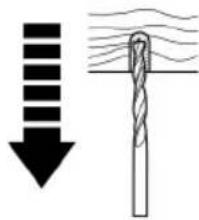
- Always hold the product at right angles to the point where you are going to start drilling. If you hold it at an angle the drill can slip or jam.
- Always place the drill point directly at the point where you must drill before switching on the product.
- Pre-drill large holes first with a drill bit with a small diameter. This makes it easier to drill with drill bits with a large diameter.
- Insert an appropriate drill bit. Press the drill point before starting the drill so that the drill does not slip.
- Used drill bits for metal to drill plastic and metal. If necessary, use a cooling lubricant, which can be purchased from specialist hardware stores.
WARNING:
- Switch off the product, allow it to stop completely and unplug it from the power source if the drill bit jams in the work piece. Only then can you loosen a drill bit that has jammed.
- When you run the product at low speed for long periods the motor may overheat. Therefore, you should regularly take about 15 minute breaks to allow the motor to cool.
After use
- Switch off the product, disconnect it from the power source and allow it to cool.
- Check, clean and store the product as described in the Maintenance section.
MAINTENANCE
NOTE: Switch off the product, disconnect it from the power source and allow it to cool before you inspect, maintain or clean it.
IMPORTANT: Only carry out repairs and maintenance according to these instructions. Any other work must be carried out by an authorised specialist.
Cleaning
- Keep the product clean. Always remove waste from it after use and before putting it away.
- Clean the product with a dry cloth. Use a brush on areas that are hard to reach.
- In particular, always clean the air vents on the product with a cloth and brush after use.
- Remove heavy dirt with compressed air (max. 3 bar).
NOTE: Do not use chemical, alkaline, abrasive or other strong cleaning or disinfecting agents to clean the product because these may damage its surfaces.
Control
- Check that the products and its accessories are not worn or damaged before and after use.
- Check that there are no worn or damaged parts.
- If necessary, replace worn parts, or allow an authorised workshop to repair the product before using it again. Observe the technical requirements.
Power cord
If the power cord on the power tool is damaged, it must be replaced by an authorised service workshop.
Repairs
This product does not contain any parts that can be repaired by the consumer. Have an authorised service workshop or qualified person examine and repair the product.
Storage
- Switch off the product and unplug it from the power source.
- Clean the product as described above.
- Store the product and its accessories in a dark, dry, frost-free and well ventilated area.
-
Always store the product out of the reach of children. The ideal storage temperature is between -10 and 30°C.
-
We recommend using the original packaging for storage, or covering the product with a suitable cloth or similar to protect it against dust.
Transport
- Switch off the product and unplug it from the power source.
- Always carry the product by its handles.
- Protect the product against heavy impacts and strong vibrations that it may be exposed to when transported in a van.
- Secure the product to stop it slipping or falling over.
TROUBLESHOOTING
| Problem Possible cause Action | ||
| The product does not start. Not connected to a power source. Connect to the power source. | ||
| The product does not reach full power. | The extension cable used is not suitable for use with this product. | Use a suitable extension cable. |
| The power source (e.g. generator) has a too low voltage. | Connect to another power source. | |
| The air vents are blocked. Clean the air vents. | ||
| Unsatisfactory result. The drill bit is blunt/damaged. Replace with a new one. | ||
| Heavy vibrations or loud noise. The drill bit is blunt/damaged. Replace with a new one. | ||
CE
EC DECLARATION OF CONFORMITY
EG FÖRSÄKRAN OM ÖVERENSSTÄMMELSE
EF SAMSVARSERKLÆRING
DEKLARACJA ZGODNOŚCI WE

Jula AB, Box 363, SE-532 24 SKARA, SWEDEN
Machinery Directive 2006/42/EC
EN 60745-1:2009+A11, EN 60745-2-1:2010
Electromagnetic Compatibility Directive 2014/30/EU
EN 55014-1:2006+A1+A2, EN 55014-2:1997+A1+A2
EN 61000-3-2:2006+A1+A2, EN 61000-3-3:2013
RoHS Directive 2011/65/EU
IEC 62321
This product was CE marked in year -16
- Care for the environment!
- SVENSKA....5
- SÄKERHETSANVISNINGAR....5
- TEKNISKA DATA....10
- BESKRIVNING 11
- MONTERING....11
- HANDHAVANDE 12
- UNDERHÅLL 16
- FELSÖKNING 17
- NORSK 18
- SIKKERHETSANVISNINGER 18
- TEKNISKE DATA 23
- BESKRIVELSE....24
- MONTERING 24
- BRUK....25
- VEDLIKEHOLD 29
- FEILS∅KING....30
- POLSKI 31
- ZASADY BEZPIECZEŃSTWA 31
- DANE TECHNICZNE 37
- OPIS 38
- MONTAŻ 38
- OBSŁUGA 39
- KONSERWACJA 43
- WYKRYWANIE USTEREK 44
- ENGLISH 45
- SAFETY INSTRUCTIONS 45
- TECHNICAL DATA 50
- DESCRIPTION 51
- ASSEMBLY....51
- USE....52
- MAINTENANCE 56
- TROUBLESHOOTING 57
- SÄKERHETSANVISNINGAR
- Varvtalsreglering
- Borning
- Turtallsregulering
- Boring
- Wiercenie
- Read the operating instructions carefully before use.
- General safety regulations for power tools
- Safety in the work area
- Electrical safety
- Personal safety
- Using and looking after power tools
- Service
- Safety regulations for drilling
- Vibration and noise attenuation
- noise:
- Emergency mode
- Other risks
- Symbols
- Always wear ear protection!
- DESCRIPTION
- ASSEMBLY
- Unpacking
- Fitting the support handle
- USE
- Depth stop
- Inserting and replacing the drill bit
- WARNING:
- Connect to the power source.
- General use
- Adjustments
- Mode selector
- Rotation control forward/backward
- Quick mode
- Continuous mode
- Speed control
- Drilling
- After use
- MAINTENANCE
- Cleaning
- Control
- Power cord
- Repairs
- Storage
- Transport
- CE
- EC DECLARATION OF CONFORMITY
- EG FÖRSÄKRAN OM ÖVERENSSTÄMMELSE
- EF SAMSVARSERKLÆRING
- DEKLARACJA ZGODNOŚCI WE
Brand : Meec Tools
Model : 000-137
Category : Drill