000-792 - Hedge trimmers Meec Tools - Free user manual and instructions
Find the device manual for free 000-792 Meec Tools in PDF.


| Product Type | Hedge Trimmer |
| Brand | Meec Tools |
| Model | 000-792 |
| Power Source | Electric Corded |
| Voltage | 230 V |
| Power Rating | 500 W |
| Blade Length | 50 cm / 20 inches |
| Cutting Capacity | Up to 20 mm diameter |
| Tooth Gap | 20 mm |
| Blade Material | Carbon Steel |
| Weight | 2.8 kg |
| Product Dimensions (L x W x H) | 900 x 200 x 180 mm |
| Handle Type | Ergonomic Soft Grip |
| Safety Features | Two-hand operation, blade guard, safety switch |
| Noise Level | 88 dB(A) |
| Vibration Level | 2.5 m/s² |
| Maintenance | Clean after use, oil blades regularly |
| Warranty | 2 years |
| Included Accessories | Manual, blade cover |
Frequently Asked Questions - 000-792 Meec Tools
User questions about 000-792 Meec Tools
0 question about this device. Answer the ones you know or ask your own.
Ask a new question about this device
Download the instructions for your Hedge trimmers in PDF format for free! Find your manual 000-792 - Meec Tools and take your electronic device back in hand. On this page are published all the documents necessary for the use of your device. 000-792 by Meec Tools.
USER MANUAL 000-792 Meec Tools
natural_image
Red and black utility pole shaver tool with lever mechanism (no text or symbols visible)

HÄCKSAX
Care for the environment!
Must be discarded with household waste. This
product contains electrical or electronic components that should be recycled. Leave the product for recycling at the designated station, e.g., the local autonomy's recycling
desieta
..ula reserves the right to make changes. In the event of
problems, please contact our service department.
www.jnlal.com

Tilverkare/ Produsert/ Produzendi/ Manufacturer
Jula AB, Box 163, 512-24 SKARA
Distribuō/ Distribuō/ Oyārpludān/ Dūnliān
Jula Pelanc Sp. 2010, u
Walborska 41, 08-28: Warsawa, Polska
Jula Marge 75, so hemserien 6–8.
147112K-RSKDJ.
natural_image
Mechanical assembly diagram showing a lever mechanism with labeled parts A and B, including an inset magnified view of the lever component (no text or symbols present)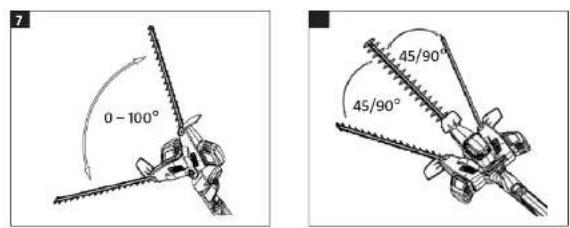
SÄKERHETSANVISNINGAR
Read the operating instructions carefully before use.
Save them for future reference.
- Failure to follow all the instructions and safety instructions can result in the risk of electric shock, fire and/or serious personal injury.
- Save these instructions and safely instructions for future reference.
- The term "power tool" in the warnings below refers to your mains-powered (corded) or battery-powered (cordless) power tool.
Work area
- Keep the work area clean and well lit. Dark and cluttered work areas increase the risk of accidents and injuries.
- Do not use power tools in explosive environments, such as in the vicinity of flammable liquids, gases or dust. Power tools produce sparks that can ignite dust and fumes.
- Keep children and on lockers at a safe distance when using power tools. You can lose control of the tool if you are distracted.
Electrical safety
- The plug on the power tool must match the power point. Never modify the plug in any way. Never use an adapter with earthed power tools. Unmodified plugs and matching outlets reduce the risk of electric shock
- Do not expose power tools to rain or moisture. There is a greater risk of electric shock if water gets into a power tool.
- Be careful with the power cord. Never use the power cord to carry or pull the tool, or to pull out the plug from the mains socket. Keep the power cord away from heat, oil, sharp edges and moving parts. Damaged or tangled power cords increase the risk of electric shock.
- If using the tool outdoors, only use an extension cord approved for outdoor use. Cords intended for outdoor use reduce the risk of electric shock.
- If it is absolutely necessary to use the power tool in damp conditions, use a residual current device RDC. Using an RCD reduces the risk of electric shock.
Personal safety
- Stay alert. Pay attention to what you are doing, and use your common sense when working with power tools. Never use power tools if you are tried or under the influence of drugs, alcohol or medication. A moment of attention when using a power tool can result in serious personal injury.
- Use personal safety equipment. Wear safety glasses. Depending on the type of tool and how it is used, safety equipment such as dust masks, non-slip safety shoes, safety helmets and ear protection reduce the risk of personal injury.
- Avoid accidental starting. Make sure the power switch is in the OFF position before inserting the power cord and/or battery or lifting/carrying the tool.
EN
- Remove adjuster keys/spanners before switching on the power tool. Spanners or the like that are left in a rotating part of the tool can cause personal injury.
- Do not overreach. Always maintain a firm footing and good balance. This ensures better control over the power tool in unexpected situations.
- Wear suitable clothing. Do not wear loose-fitting clothing or jewellery. Keep your hair, clothing and gloves away from moving parts. Loose-fitting clothing, jewellery and long hair can get caught in moving parts.
- If dust extraction and dust collection equipment is available, this should be connected and used correctly. The use of such devices can reduce the risk of dust-related problems.
Use and care
- Do not force the power tool. Use the correct power tool for the planned work. The tool does the job better and safer when used at the rate for which it was designed.
- Do not use the tool if it cannot be switched on and off with the power switch. Power tools that cannot be controlled with the power switch are dangerous and must be repaired.
- Unplug the power cord and/or remove the battery before making any adjustments, changing accessories or putting the power tool away. These safety precautions reduce the risk of accidentally starting the tool.
- Store power tools out of the reach of children when not in use. Never allow children, or anyone who is unfamiliar with the power tool and these instructions, to
other factors that could affect functionality. If the power tool is damaged, it must be repaired before being used again. Many accidents are caused by poorly maintained power tools.
- Keep cutting tools sharp and clean. Properly maintained cutting tools with sharp cutting edges are less likely to jam and are easier to control.
- Use the power tool, accessories and bits etc., in accordance with these instructions, taking into account the actual working conditions and the work that is to be done. It can be dangerous to use power tools for purposes other than those they are intended to be used for.
Service
- The power tool must only be serviced by qualified personnel using identical spare parts. This will ensure that the power tool remains safe to use.
Special safety instructions
- Keep your hands and the rest of your body away from the blades. Never attempt to clean the blades when the appliance is running. Do not try to hold material to be triggered with your hands or your body.
- Check that the power switch is in the OFF position before trying to remove material that has fastened. A moment of inattention can result in serious personal injury.
-
Switch off the appliance and wait until it all moving parts have completely stopped before moving it. Hold and carry the appliance with the handles. Transport and
-
Keep the power cord away from the work area. The power cord can fasten in the branches and be damaged by the blades.
- Hold the appliance by the insulated grips when working where it could come into contact with concealed cables or its own power cord. Contact with a live cable will cause the metal parts on the appliance to also become live - risk of electric shock.
- Use ear protection.
- The appliance must be connected to the mains supply with a residual current device with a maximum tripping current of 30 mA.
- Be careful not to let the bar or the blades come into contact with a fence or plant supports etc, as this could damage the bar and/or the blades.
- Hold the appliance firmly with one hand on the front handle and the other on the rear handle.
Remaining risks
- Even if the appliance is used in accordance with the instructions it is impossible to rule out all risk factors. The following are potential risks that may be incurred as a result of the type and design of the tool.
- Damage to lungs (if an effective face mask is not worn).
- Damage to ears (if effective ear protection is not worn).
Vibration injuries (if the tool is used for long periods, or is not handled and maintained correctly).
WARNING!
The power tool produces an electromagnetic field during operation. This field can in some
Symbols
| Read the operating instructions before use. | |
| Use ear protection. | |
| Wear safety glasses. | |
| Wear safety gloves. | |
| Do not expose to rain. | |
| Disconnected immediately from the mains if the power cord is damaged or cut. | |
| Do not use the machine closer than 10 m to power lines. | |
| Watch out for falling objects. | |
| Keep at a safe distance. | |
| Indicates value for sound power level. | |
| CE | Approved as per applicable directives. |
TECHNICAL DATA
| Rated voltage: 230 V | ~50 Hz |
| Output | 600 W |
| Safely class II | |
| Protection rating IP20 | |
| Cutting capacity 20 mm | |
| Bar length 460 mm | |
| Telescopic handle Max 240 cm | |
| Weight: 4.4 kg | |
| Sound pressure level, LPa: 84.7 dB(A), K = 3 dB | |
| Sound power level, IwA: 95.0 dB(A), K = 3 dB | |
| Visitation | |
| Front handle: 2.84 m/s ^2 , K = 1.5 m/s ^2 | |
| Rear handle: 2.74 m/s ^2 , K = 1.5 m/s ^2 | |
Wear ear protection.
Declared total vibration values are measured in accordance with a standard test method, and can be used for comparisons between tools. The value may also be used for a preliminary assessment of exposure
WARNING!
Vibration levels can deviate from the declared value, depending on how the tool is used. Suitable precautions for users must be based on the actual conditions, taking into account all parts of the operating cycle, such as the time when the tool is switched off and the idling time, in addition to the time when the power switch is pressed.
DESCRIPTION
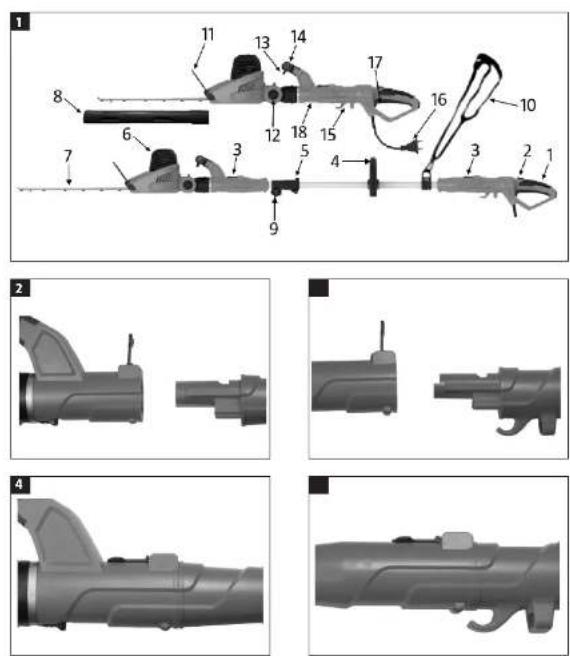
FIG. 1
- Rearbondie
- Power switch lock
- Lock for telescopic handle
4 Supporthandle - Hex key
- Motor
/ Bar - Borguord
- Locking knob for telescopic adjustment
- Shoulderstop
- Guard
- Catch for angling cutter head
- Power switch, front handle
- Fronthandole
- Cordretainer
- Power cord and plug
- Power switch
- Catch for angling cutter head
ASSEMBLY
NOTE:
Switch off with the hedge trimmer and pull out the plug before cleaning or adjusting.
FIG. 2
- Release the catch that holes the cutter
head head and rear handle together.
FIG. 3
-
Fit the telescopic handle in the cutter head and the rear handle.
-
Fasten the telescopic handle in the cutter head and the rear handle by locking the catches (3).
Fitting the support handle
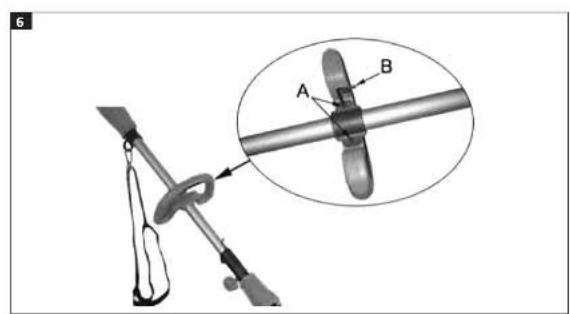
FIG. 6
Put the support handle on the telescopic handle, near the rear handle, and adjust the support handle to a convenient working position. Tighten the screw (A) firmly with the hex key (B).
Fitting the shoulder strap
- Press in the catch and hook the shoulder strap on the fastener.
- Adjust the strap to the required length with the clasp. Swing the switched off hedge trimmer a few times to check the balance.
- Put the shoulder strap over your shoulder and carry the hedge trimmer by the side of your body.
NOTE:
Never use the shoulder strap diagonally over your chest, only on one shoulder. This makes it easier to move the hedge trimmer away from your body in a dangerous situation.
USE
Adjusting the length of the telescopic handle
NOTE:
Switch off the hedge trimmer, pull out the plug, and wait until all moving parts have completely stopped.
- Tighten the locking knob.
Starting/stopping with telescopic handle
- Starting – Push the power switch lock (2) forward and then press the power switch (17). Release the power switch lock when the motor starts.
- Stopping - Release the power switch.
Starting/stopping without telescopic handle
- Starting – Hold the front handle (14) in one hand and press the power switch (13) on the front handle. Hold the rear handle in the other hand, push the power switch lock (2) forward and then press the power switch (17). Release the power switch lock when the motor starts.
- Shopping - Release one of the power switches (17) or (13).
Adjusting the cutter head
FIG. 7
FIG. 8
NOTE:
- Switch off the hedge trimmer, pull out the plug, and wait until all moving parts have completely stopped.
- Check that the catches have returned to their original positions after adjusting, otherwise the hedge trimmer will not start.
Tip
EN
- Start at the bottom, so that the cuttings do not fall down onto the parts to be trimmed
- Move the bar smoothly through the outer parts of the hedge. Do not attempt to trim too much at once.
- Trim the top of the hedge
- Thicker branches should be cut with serateurs first. Trim off with the hedge trimmer.
• Always check how thick the branches are before using the hedge trimmer.
MAINTENANCE
NOTE
Switch off with the hedge trimmer and pull out the plug before cleaning or adjusting.
• Always check the condition of the hedge trimmer before using it.
- Damaged blades must be replaced by an authorised service centre before using the hedge trimmer again.
• Always clean the bar with a soft brush after use.
- Apply a thin layer of protective oil or silicone spray on the bar.
- Keep the ventilation openings on the hedge trimmer clean.
- Never clean the hedge trimmer with water.
- Clean the motor casing with a damp cloth. Never use detergents or solvents. This can damage the plastic parts on the hedge trimmer.
- Store the hedge trimmer with the supplied bar guard fitted.
- Only use accessories and spare parts recommended by the manufacturer.

EC DECLARATION OF CONFORMITY
EG FÖRSÄKRAN OM ÖVERENSSTÄMMELSE
EF SAMSVARSERKLÆRING
DEKLARACJA ZGODNOŚCI WE

Jula AB, Box 363, SE-532 24 SKARA, SWEDEN
Machinery Directive 2006/42/EC
EN 60745-1:2009+A11, EN 60745-2-15:2009+A1
EN ISO 10517:2009+A1
Electromagnetic Compatibility Directive 2014/30/EU
- HÄCKSAX
- SÄKERHETSANVISNINGAR
- Read the operating instructions carefully before use.
- Work area
- Electrical safety
- Personal safety
- EN
- Use and care
- Service
- Special safety instructions
- Remaining risks
- WARNING!
- Wear ear protection.
- DESCRIPTION
- 1
- ASSEMBLY
- NOTE:
- 3
- Fitting the support handle
- 6
- Fitting the shoulder strap
- USE
- Starting/stopping with telescopic handle
- Starting/stopping without telescopic handle
- Adjusting the cutter head
- MAINTENANCE
- NOTE
- Switch off with the hedge trimmer and pull out the plug before cleaning or adjusting.
Brand : Meec Tools
Model : 000-792
Category : Hedge trimmers