
ROG Claymore Core - Keyboard ASUS - Free user manual and instructions
Find the device manual for free ROG Claymore Core ASUS in PDF.


| Product Type | Mechanical Gaming Keyboard |
| Brand | ASUS |
| Model | ROG Claymore Core |
| Connectivity | USB 2.0 |
| Switch Type | Cherry MX (RGB variants) |
| Backlighting | Per-key RGB, Aura Sync compatible |
| Key Rollover | N-Key Rollover (NKRO) |
| Polling Rate | 1000 Hz |
| Onboard Memory | Yes (store up to 6 profiles) |
| Media Keys | Dedicated media controls |
| Wrist Rest | Detachable, magnetic |
| Dimensions (L x W x H) | 440 x 130 x 40 mm (without wrist rest) |
| Weight | 1.2 kg (approx) |
| Power Source | USB bus-powered (5V, 500mA) |
| Operating Systems Supported | Windows 10/11, macOS |
| Software | Armoury Crate / ROG Armoury |
| Warranty | 2 years limited (varies by region) |
| Maintenance | Clean with soft dry cloth; avoid liquids |
| Safety | CE, FCC, RoHS compliant |
| Spare Parts | Keycaps, USB cable (detachable) |
| Repairability | Moderate (switches replaceable with soldering) |
Frequently Asked Questions - ROG Claymore Core ASUS
User questions about ROG Claymore Core ASUS
0 question about this device. Answer the ones you know or ask your own.
Ask a new question about this device
Download the instructions for your Keyboard in PDF format for free! Find your manual ROG Claymore Core - ASUS and take your electronic device back in hand. On this page are published all the documents necessary for the use of your device. ROG Claymore Core by ASUS.
USER MANUAL ROG Claymore Core ASUS
Copyright © 2016 ASUSTeK COMPUTER INC. All Rights Reserved.
No part of this manual, including the products and software described in it, may be reproduced, transmitted, transcribed, stored in a retrieval system, or translated into any language in any form or by any means, except documentation kept by the purchaser for backup purposes, without the express written permission of ASUSTeK COMPUTER INC. ("ASUS").
Product warranty or service will not be extended if: (1) the product is repaired, modified or altered, unless such repair, modification of alteration is authorized in writing by ASUS; or (2) the serial number of the product is defaced or missing.
ASUS PROVIDES THIS MANUAL 'AS IS WITHOUT WARRANTY OF ANY KIND. EITHER EXPRESS OR IMPLIED, INCLUDING BUT NOT LIMITED TO THE IMPLIED WARRANTIES OR CONDITIONS OF MERCHANTABILITY OR FITNESS FOR A PARTICULAR PURPOSE. IN NO EVENT SHALL ASUS, ITS DIRECTORS, OFFICERS, EMPLOYEES OR AGENTS BE LIABLE FOR ANY INDIRECT, SPECIAL, INCIDENTAL, OR CONSEQUENTIAL DAMAGES (INCLUDING DAMAGES FOR LOSS OF PROFITS, LOSS OF BUSINESS, LOSS OF USE OR DATA, INTERRUPTION OF BUSINESS AND THE LIKE), EVEN IF ASUS HAS BEEN ADVISED OF THE POSSIBILITY OF SUCH DAMAGES ARISING FROM ANY DEFECT OR ERROR IN THIS MANUAL OR PRODUCT.
SPECIFICATIONS AND INFORMATION CONTAINED IN THIS MANUAL ARE FURNISHED FOR INFORMATIONAL USE ONLY, AND ARE SUBJECT TO CHANGE AT ANY TIME WITHOUT NOTICE AND SHOULD NOT BE CONSTRUED AS A COMMITMENT BY ASUS. ASUS ASSUMES NO RESPONSIBILITY OR LIABILITY FOR ANY ERRORS OR INACCURACIES THAT MAY APPEAR IN THIS MANUAL, INCLUDING THE PRODUCTS AND SOFTWARE DESCRIBED IN IT.
Products and corporate names appearing in this manual may or may not be registered trademarks or copyrights of their respective companies, and are used only for identification or explanation and to the owners' benefit, without intent to infringe.
Offer to Provide Source Code of Certain Software
This product contains copyrighted software that is licensed under the General Public License ("GPL"), under the Lesser General Public License Version ("LGPL") and/or other Free Open Source Software Licenses. Such software in this product is distributed without any warranty to the extent permitted by the applicable law. Copies of these licenses are included in this product.
Where the applicable license entitles you to the source code of such software and/or other additional data, you may obtain it for a period of three years after our last shipment of the product, either
,
(2) for the cost of reproduction and shipment, which is dependent on the preferred carrier and the location where you want to have it shipped to, by sending a request to:
ASUSTeK Computer Inc.
Legal Compliance Dept
15 Li Te Rd.,
Beitou, Taipei 112
Taiwan
In your request please provide the name, model number and version, as stated in the About Box of the product for which you wish to obtain the corresponding source code and your contact details so that we can coordinate the terms and cost of shipment with you.
The source code will be distributed WITHOUT ANY WARRANTY and licensed under the same license as the corresponding binary/object code.
This offer is valid to anyone in receipt of this information.
ASUSTeK is eager to duly provide complete source code as required under various Free Open Source Software licenses. If however you encounter any problems in obtaining the full corresponding source code we would be much obliged if you give us a notification to the email address apple@asus.com, stating the product and describing the problem (please DO NOT send large attachments such as source code archives, etc. to this email address).
Contents
Getting Started
Downloading ROG Armoury Software 4
ROG Armoury Software main menu 4
ROG Armoury settings 5
Macro menu 6
Stats menu 8
Gaming Keyboard
Keyboard menu 9
Customize 9
Lighting 11
Gaming Mouse
Mouse menu 14
Buttons 14
Performance....16
Lighting 17
Calibration 18
Power 19
Getting Started
Downloading ROG Armoury Software
Visit https://www.asus.com/support/ to download the ROG Armoury Software for your ROG product.

Ensure the firmware and drivers are updated for your POG product. Visit https://www.asus.com/support/ for the latest updates.
ROG Armoury Software main menu

The following screenshots are for reference only. The menu bar may vary according to RDG product connected:

Renaming a profile
- Double click on the profile you want to rename.
- Type in the new profile name and press
.
Linking your profile to a program
You may link your profiles to different programs. When the linked program is the active window, the profile is automatically loaded. Follow the steps below to link a profile to a program:
- Select a profile to link to a program.
- Click on the button next to the profile name.
- Locate the program you wish to link the profile to, then click OK.
ROG Armoury settings
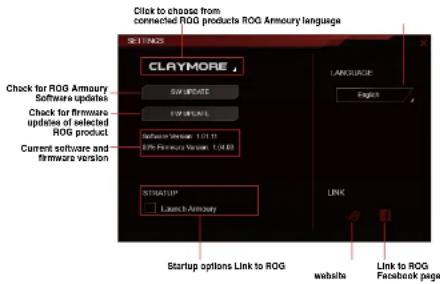
Macro menu
The macro menu lets you create and configure macros allowing you to perform specific or several tasks at the same time.
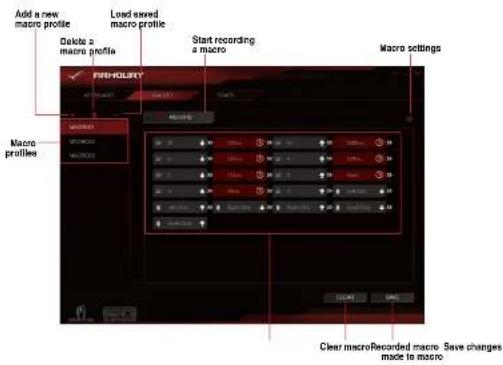
Creating and naming a macro
- Click + to create a new macro profile.
- Right click or left click on the macro name to rename the macro profile.
Deleting a macro
- Select the macro profile you wish to delete.
- Click to delete the selected macro profile.
Loading a macro
- Click ⋯ to load a macro profile.
- Locate the macro profile and click Open to load the macro profile.
Recording a macro
- Select a macro profile.
- Click the RECORD button to start recording the macro.
- Click the STOP button when you have finished recording the macro.
- You may adjust the settings of your recorded macro by clicking on the button located in the top right corner.
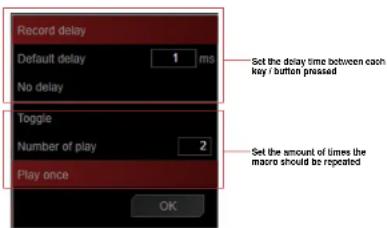
- Click OK once you have finished adjusting your macro, then click SAVE to save the changes made.
Stats menu
The stats menu lets you keep track of your keystrokes for certain keys.

Start recording the keystroke for certain keys
Recording the keystrokes
-
Click on RECORD to begin recording the KPM.
-
Click STOP once you have finished recording.
Gaming Keyboard
Keyboard menu
The keyboard menu lets you set different lighting effects for your ROG keyboard, and customize or assign different functions, keys, or programs to different keyboard profiles of your ROG keyboard. You may also disable certain function keys whilst in gaming mode for an optimal gaming experience.

The screenshots in this section are for reference only and may vary according to RCG product connected.
Customize
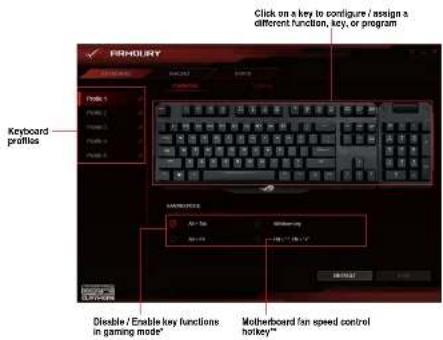
* The Windows key may be locked using the hotkey, FN + Windows key. ** The hotkeys are only available when motherboard Fan Xperl software and Armoury software are activated. This function is only supported on Intel 297 or newer chipsets.
ASUS ROG Armour 9
Assigning keys
- Select a profile you wish to assign different keys.
- Click on the Customize submenu.
- Select a key from the on-screen keyboard.
- Click on and select a function, key, or program from the list, then click OK. See the list below for details on each option.

Select a function, key, or program from the list
Option Description
| Default Load the default settings for the selected key |
| Keyboard Function Assign an entered keyboard key to the key |
| Mouse Function Assign a selected mouse button to the key |
| Macro Assign a macro to the key |
| Launch Program Assign a program or website to the key |
| Multi-media Assign a multimedia control function to the key |
| Windows Shortcuts Assign a Windows shortcut function to the key |
| Disable Disable the key |
- Click on SAVE to save the changes made to the selected profile.
Lighting

- In Lighting Sync mode the following Lighting related FN hotkeys will be disabled:
- FN = up/down/left/right arrow
- FN = 1/2/3/4/5/8 to change profiles
- FN - R-G-B (Delete, End, and PageDown) to change lighting color
• FN + ROC SYNC will not be disabled. Pressing this hockey whilst in Lighting Sync
Keyboard profiles

Syno lighting effect with other Aura
compatible keyboards and mice
* Hotkey: FN + PrintScreen is the alternative to enable lighting synchronization between Aura keyboard and mouse. When using hotkey, make sure Armoury software is working in the background. It will take about 10 seconds to start the synchronization.
* To sync lighting effect between Aura compatible motherboards, keyboard and mouse. Install the Aura software from motherboard's support site.
* More information about Aura Sync, please visit: https://www.issus.com/microsite/AURA/Sync.html
Adding a custom lighting effect
- Select a profile you wish to apply a custom lighting effect.
- In the Lighting submenu, select Custom Effect from the effects list.

- Click on to figure Custom Effect.
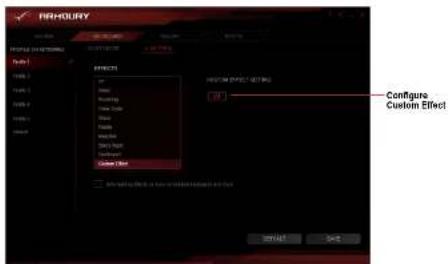
- Click + then select from the list to add a new lighting effect.
- Select the keys on the keyboard or from the gaming presets you wish to apply lighting effects.
- Adjust the settings for the selected lighting effect then click SAVE to save the changes made on all effects.
- To add more effects to different keys, repeat steps 4-6.
- Once you have finished configuring your custom effects, click on BACK to return to the Lighting submenu.


• Each key may only be assigned a single lighting effect.
- Only the Static lighting effect may be assigned more than once, all other lighting effects may only be assigned once.
Deleting a custom lighting effect
- In the Custom Effect screen, select the custom effect you wish to delete.
- Click ☐ to delete the effect.
- Once you have finished configuring your custom effects, click on BACK to return to the Lighting submenu.
ASUS ROG Armour 13
Gaming Mouse
Mouse menu
The mouse menu lets you set different lighting effect, assign different functions for each button, and tweak your ROG mouse to your own gaming needs.

The screenshots in this section are for reference only and may vary according to ROC product connected.
Buttons
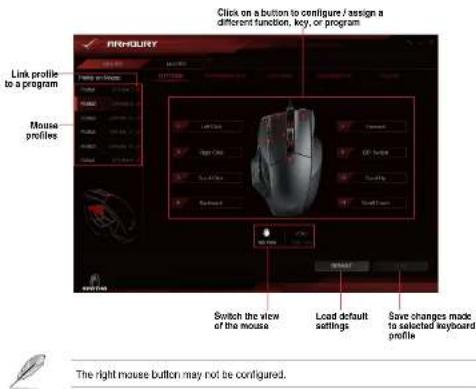
Assigning a button
- Select a profile you wish to assign different buttons.
- Click on the BUTTONS submenu.
- Switch between Top View and Side View to locate the button you wish to configure.
- Select a button from the on-screen mouse.
- Click on and select a function, key, or program from the list, then click OK. See the list below for details on each option.

Select a function, key, or program from the list
Option Description
| Mouse Function Assign a mouse function to the button |
| Windows Shortcuts Assign a Windows shortcut function to the button |
| Multimedia Assign a multimedia control function to the button |
| Macro Assign a macro to the button |
| Keyboard Function Assign an entered keyboard key combination to the button |
| * Keyboard Function supports up to three (3) keys. |
- Click on SAVE to save the changes made to the selected profile.
Performance

SENSITIVITY (LIGHT ON / OFF)
Set two different DPIs, then toggle between them by pressing the DPI button. When the light of the DPI button is on, the SENSITIVITY (LIGHT ON) option is enabled, when the light is off, the SENSITIVITY (LIGHT OFF) option is enabled.
2 ANGLE SNAPPING
This function allows you to adjust the mouse correction - a method which artificially smoothens out your mouse signal allowing you to draw straight lines. Drag the bar to the right for higher mouse correction, or drag the bar to the left for less mouse correction.
3 ACCELERATION / DECELERATION
This function allows you to adjust the speed your cursor accelerates / decelerates from one point to another.
4 POLLING RATE
This function controls the rate at which your mouse communicates with your processor in wired mode 0, or wireless mode 1, higher polling rate (Hz) may increase the accuracy of your mouse movements, and also increase the amount of processing power required to communicate with your mouse.
5 BUTTON RESPONSE This function allows you to adjust the button response time for the buttons on your mouse.
Lighting

Calibration

Using Preset Surfaces
- Select Preset Surfaces, then select a surface material from the list.
- Click on SAVE to save the changes made.
Using Manual Calibration
- Select Manual Calibrations, then click START.
- Move your mouse across the surface for a few seconds until the cursor starts to move on your screen.

For more accurate calibrations, use large movements when moving your mouse across the surface.
- Once the manual calibration is completed, click on OK.
- Click on SAVE to save the changes made.
Power
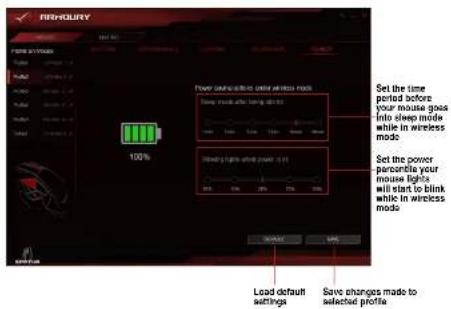



- Copyright © 2016 ASUSTeK COMPUTER INC. All Rights Reserved.
- Offer to Provide Source Code of Certain Software
- Contents
- Getting Started
- Downloading ROG Armoury Software
- ROG Armoury Software main menu
- Renaming a profile
- Linking your profile to a program
- Macro menu
- Creating and naming a macro
- Deleting a macro
- Loading a macro
- Recording a macro
- Stats menu
- Recording the keystrokes
- Gaming Keyboard
- Keyboard menu
- Assigning keys
- Lighting
- Adding a custom lighting effect
- Deleting a custom lighting effect
- Gaming Mouse
- Mouse menu
- Buttons
- Assigning a button
- Performance
- Calibration
- Using Preset Surfaces
- Using Manual Calibration
Brand : ASUS
Model : ROG Claymore Core
Category : Keyboard