USER MANUAL LCPCKX13 Logik
Built-in Electric Ceramic Hob
LCPCKX13
[Non-Text]
[Non-Text]
[Non-Text]
[Non-Text]
[Non-Text]
[Non-Text]
[Non-Text]
[Non-Text]
[Non-Text]
[Non-Text]
[Non-Text]
[Non-Text]
[Non-Text]
[Non-Text]
[Non-Text]
[Non-Text]
[Non-Text]
[Non-Text]
[Non-Text]
[Non-Text]
[Non-Text]
[Non-Text]
[Non-Text]
[Non-Text]
[Non-Text]
[Non-Text]
[Non-Text]
[Non-Text]
[Non-Text]
[Non-Text]
[Non-Text]
[Non-Text]
[Non-Text]
[Non-Text]
[Non-Text]
[Non-Text]
[Non-Text]
[Non-Text]
[Non-Text]
[Non-Text]
[Non-Text]
[Non-Text]
[Non-Text]
[Non-Text]
[Non-Text]
Contents
Safety Warnings....4
Unpacking 6
Installation....7
Location 7
Preparing the Worktop 8
Fitting the Hob into the Worktop 8
Connecting the Hob to the Mains Power Supply 9
Product Overview....10
The Main Unit....10
Control Panel....10
Before Use 11
Using the Hob 11
Residual heat functions....11
Choosing the Right Cookware....12
Cookware Guidelines 12
Cleaning and Maintenance....13
Specifications....14
Energy Saving Tips 14
Safety Warnings
IMPORTANT SAFETY INSTRUCTIONS READ CAREFULLY AND KEEP FOR FUTURE REFERENCE
- It is recommended that this appliance is installed by a qualified electrical engineer. The manufacturer is not responsible for any damage caused by incorrect installation.
- Check whether there is any damage to the appliance after you have unpacked it. If any damage is found, do not use the appliance and contact the store where you purchased it. • This appliance is for Domestic Use only.
- For disconnection from the mains supply you must have a switch with a contact separation of at least 3.0 mm in all poles and rated 32 Amp that provides full disconnection. This must be incorporated in the fixed wiring in accordance with the local wiring rules.
- If your mains cable gets damaged, it should be replaced by an authorized service agent or qualified electrician in order to avoid danger or electric shock. • Only operate your appliance in a dry atmosphere.
- Keep the electrical cables of your other appliances away from hot areas; do not let them touch the appliance.
- Ensure that the appliance is switched off at the mains supply switch and allowed to completely cool down before cleaning or performing any maintenance to avoid the possibility of an electric shock. • Use of your appliance creates moisture in the room in which it is placed.
• Children should be supervised to ensure that they do not play with the appliance. - The appliance and its accessible parts become hot during use. Young children should be kept away. - During use the appliance becomes hot. Care should be taken to avoid touching the cooking zones. - Unattended cooking on a hob with fat or oil can be dangerous and may result in fire. NEVER try to extinguish a fire with water, but switch off the appliance and then cover the flame e.g. with a lid or a fire blanket. • Danger of fire: Do not store items on the cooking surfaces. - Do not use harsh abrasive cleaners to clean the glass since they can scratch the surface. - Glass ceramic hobs should not be used as a worktop. Sharp objects may cause scratches. - Before starting to use your appliance, keep curtains, tulle, paper or flammable materials away from your appliance. Do not keep combustible or flammable things in or on the appliance. - This appliance is for cooking purposes only. It must not be used for other purposes, for example room heating. - Do not use steam cleaners for cleaning the appliance. - If the hob surface is cracked, switch off the appliance to avoid possibility of electric shock. • Take care when handling parts with glass, knocks, chips, heavy handling and dropping could cause the glass to shatter.
Thank you for purchasing your new Logik Built-in Electric Ceramic Hob.
You must read this manual in order to fully understand how to operate it correctly.
This unit MUST be installed by a competent and registered engineer. Please allow the
installer to view the installation section of this manual.
Read all the safety warnings carefully before use and keep this manual for future reference.

Unpacking
Remove all packaging from the unit. Retain the packaging. If you dispose of it, please do so according to local regulations.
The following items are included:
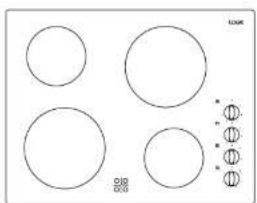
Main Unit Screw × 4

Mounting Bracket × 4
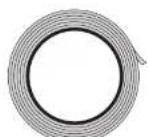

If items are missing or damaged, please contact Partmaster (UK only).
Tel: 0244800-3456 for assistance.

Installation

The electrical connection of this hob should be carried out by an authorized service personnel or a qualified electrician, according to the instructions in this guide and in compliance with the current regulations.
- Before connecting your appliance to the mains at home, make sure to check the conformity of voltage settings, which are specified on the information sticker attached to the appliance and/or packaging, with the usage conditions available.
- The laws, ordinances, directives and standards in force in the country of use are to be followed (safety regulations, proper recycling in accordance with the regulations, etc.)
Location
After removing the packaging material from the appliance and its accessories, ensure that the hob is not damaged. If you suspect any damage, do not use the appliance and contact an authorized service person or a qualified electrician immediately.
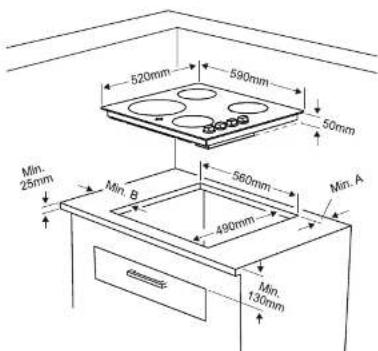
See the diagram below for positioning dimensions.
Preparing the Worktop
Cut out the work surface following the dimensions shown in the drawing below.
- For the purpose of installation and use, a minimum distance of 5cm space must be left around the cut out.
- Be sure the thickness of the work surface is at least 20mm. Use a heat-resistant work surface material to avoid deformation caused by the heat from the hob. The minimum distance between the hob and the cupboard should be at least 65cm.
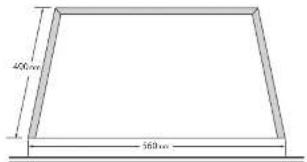
Cut-out Dimensions
The dimensions of the cut-out are shown in the diagram.

All measurements given in millimetres (mm) and cutout dimensions are given as: 'nominal measurement'
Product Overall Dimensions
Width: 590mm Depth: 520mm
Fitting the Hob into the Worktop
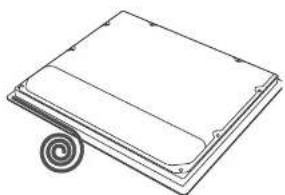
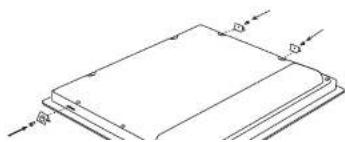
- Turn the hob upside down and place it on a soft surface.
- Apply the single-sided self-adhesive sealing tape (supplied) to the underside of the outer edge of the glass ceramic panel. Ensure the sealing tape is not stretched.
- Screw the worktop mounting brackets into the side walls of the panel as shown.
- Insert the appliance into the aperture.

Connecting the Hob to the Mains Power Supply

- If the mains cable is damaged and needs to be replaced, this should be done by a qualified person using the proper tools, so as to avoid any accidents.
- If the ceramic hob is being connected directly to the mains supply, an all-pole circuit breaker must be installed with a minimum gap of 3mm between the contacts.
- The installer must ensure that the correct electrical connection has been made and that it complies with safety regulations. • The mains cable must not be bent or compressed. • The mains cable must be checked regularly and only replaced by a qualified person.
- Before proceeding with the electrical connection, verify that the current carrying capacity of the system and the socket is adequate for the maximum power rating of the hob.
- Electrical installation of the residence and the electrical current plug in use must be earthed and conform with safety regulations.
- If there is no dedicated hob circuit and fused switch, they must be installed by a qualified electrician before the hob is connected.
- Fused switch must be easily accessible once the hob has been installed.
- Do not use adaptors, multiple sockets and/or extension leads.
- A circuit breaker with a contact opening of at least 3mm, rated 32A must be in the supply circuit.
- For the vitroceramic hob, the cable must be H05VV-F (PVC cable) 3 x 4 mm².
- During installation, please ensure that isolated cables are used. An incorrect connection might damage your appliance. The guarantee will not cover such damages.
- All repairs must be carried out by authorised service personnel or a qualified electrician. • Disconnect your appliance before maintenance. • Cooking hobs are not provided with a supply cord.
Neutral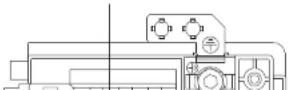

Product Overview
The Main Unit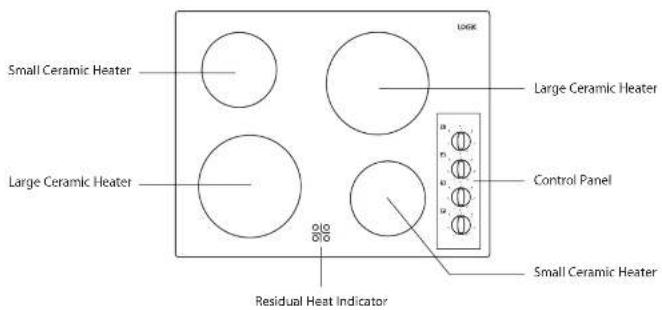
Control Panel - To select upper right heater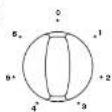
Control Panel - To select upper left heater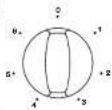

Before Use
Before using your new hob, please:
- Read this manual fully, taking special note of the 'Safety Warnings' section.
- Remove any protective film that may still be on your ceramic hob.
- Ensure the appliance is installed correctly before turning it on.
- Heat the appliance on maximum, making sure the room is well ventilated as there may be a little smoke and odour. This is normal, and is due to the protective substance on the appliance which protects it during shipping from the factory. Switch the appliance off once the smoke and odour has stopped. This can take up to 30 minutes.

Using the Hob
Each of the cooking zones has a separate controller with 6 heat settings:
Choose the control for the burner you want to use.
| Heat Setting Suitability |
| 1 Keeping food warm |
| 2 - 3 Cooking at low heat |
| 4 - 6 Cooking and boiling |
![graph TD A["Off"] --> B["Warm"] B --> C["Low level heat"] C --> D["Cooking/boiling"] D --> E["6°"] E --> F["5°"] F --> G["4°"] G --> H["3°"] H --> I["2°"] I --> J["1°"] J --> K["0°"]](/content/2026/05/925937/images/b871365c397c9d987986f38095ac891cf7c98924669cc57d864a1e4963af104e.jpg)
- Turn the required zone control clockwise to increase the temperature to the desired level.
- When turning the hob off, turn the control in a clockwise direction to the off mark 'O'.

This appliance is for cooking purposes only. It must not be used for other purposes, e.g. room heating.
Residual heat functions
After using the hob there will be heat stored in the vitroceramic glass. This is called residual heat. If the residual heat level is greater than 60°C a warning lamp will show for the cooking zone above this temperature. There are separate warning lights for each cooking zone.

- If the power supply to the hob is disconnected while a residual temperature warning light is on, the warning light will flash when the power is reconnected. The display will stop flashing once the

Choosing the Right Cookware
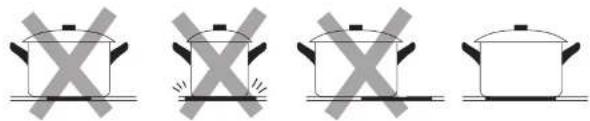
Do not use cookware with jagged edges or a curved base.
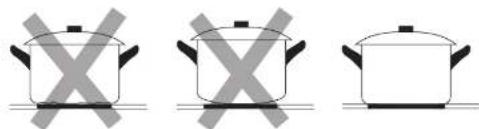
Make sure that the base of your pan is smooth, slits flat against the glass, and is the same size as the cooking zone. Always centre your pan on the cooking zone.
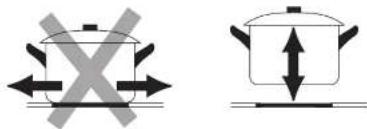
Always lift pans off the ceramic hob - do not slide, or they may scratch the glass.

Cookware Guidelines
To get the best out of your hob, follow these simple suggestions:
- Use saucepans with thick flat bottoms. Food in a saucepan with an uneven bottom will take longer to cook.

Cleaning and Maintenance
| What? How? Important! | |
| Everyday soiling on glass (fingerprints, marks, stains left by food or non-sugary spillovers on the glass) | 1. Switch the power to the ceramic hob off.2. Apply a ceramic hob cleaner while the glass is still warm (but not hot!)3. Rinse and wipe dry with a clean cloth or paper towel. | When the power to the ceramic hob is switched off, there will be no 'hot surface' indication but the cooking zone may still be hot!Take extreme care.Heavy-duty scourers, some nylon scourers and harsh/abrasive cleaning agents may scratch the glass. Always read the label to check if your cleaner or scourer is suitable.Never leave cleaning residue on the ceramic hob: the glass may become stained. |
| Boilovers, melts, and hot sugary spills on the glassMelted aluminium foil or plastic | Remove these immediately with a fish slice, palette knife or razor blade scraper suitable for ceramic glass ceramic hobs, but beware of hot cooking zone surfaces:1. Switch the power to the ceramic hob off.2. Hold the blade or utensil at a 30° angle and scrape the soiling or spill to a cool area of the ceramic hob.3. Clean the soiling or spill up with a dish cloth or paper towel.4. Follow steps 2 to 3 for 'Everyday soiling on glass' above. | Remove stains left by melts and sugary food or spillovers as soon as possible. If left to cool on the glass, they may be difficult to remove or even permanently damage the glass surface.Cut hazard: when the safety cover is retracted, the blade in a scraper is razor sharp. Use with extreme care and always store safely and out of reach of children. |

To avoid shock hazard, always disconnect the hob from the electrical supply.
Specifications
| Brand Loglk | |
| Model LCPCKX13 (Hob) | |
| Type of Hob Electric | |
| Number of Cooking Zones 4 | |
| Heating Zone(s) Small |
| Heating Technology Radiant | |
| Size 14.5 cm diameter | |
| Energy Consumption 192 Wh/Kg | |
| Heating Zone(s) Large |
| Heating Technology Radiant | |
| Size 18 cm diameter | |
| Energy Consumption 192 Wh/Kg | |
| Energy Consumption of Hob 192 Wh/Kg |
| The Hob complies with EN 60350-2 | |
| Rated Voltage 230 - 240 V~ | |
| Rated Frequency | 50 Hz |
| Power Consumption | 6000-6500 W |
| Net Weight | 7.5 kg |
| Product Dimensions |
| External Width | 59 cm |
| External Depth | 52 cm |
| Product Dimensions |
| Internal Width | 56 cm |
| Internal Depth | 49 cm |
[Non-Text]
[Non-Text]
[Non-Text]
[Non-Text]
[Non-Text]
[Non-Text]
[Non-Text]
[Non-Text]
[Non-Text]
[Non-Text]
[Non-Text]
[Non-Text]
[Non-Text]
[Non-Text]
[Non-Text]
[Non-Text]
[Non-Text]
[Non-Text]
[Non-Text]
[Non-Text]
[Non-Text]
[Non-Text]
[Non-Text]
[Non-Text]
[Non-Text]
[Non-Text]
[Non-Text]
[Non-Text]
[Non-Text]
[Non-Text]
[Non-Text]
[Non-Text]
[Non-Text]
[Non-Text]
[Non-Text]
[Non-Text]
[Non-Text]
[Non-Text]
[Non-Text]
[Non-Text]
[Non-Text]
[Non-Text]
[Non-Text]
[Non-Text]
[Non-Text]

KNOWHOW
Support for Qurno PC Word customer
For general information about this appliance
and handy hints and tips, please visit
www.knowhow.com/knowledgebank or call 0344 5611234.
Partmaster
.co.uk
Visit Partmaster.co.uk today for the easiest way to buy electrical spares and accessories. With over 1 million spares
and accessories available we can deliver direct to your door the very next day. Visit www.partmaster.co.uk
or call 0344 800 3456 (UK customers only). Calls charged at National Rate.