DVD2013HP - DVD player DMTECH - Free user manual and instructions
Find the device manual for free DVD2013HP DMTECH in PDF.


| Product Type | DVD Player |
| Brand | DMTech |
| Model | DVD2013HP |
| Dimensions (W x D x H) | 43 x 22 x 4 cm |
| Weight | 1.5 kg |
| Power Supply | AC 110-240V, 50/60Hz |
| Power Consumption | 10 W (max) |
| Disc Compatibility | DVD, DVD±R/RW, CD, CD-R/RW |
| Video Outputs | HDMI, Composite (RCA), Component |
| Audio Outputs | Stereo RCA, Digital Coaxial |
| USB Port | Yes, USB 2.0 for media playback |
| Playback Formats | DVD-Video, CD-DA, MP3, JPEG, DivX |
| Playback Functions | Play, Pause, Stop, Skip, Fast Forward/Reverse, Repeat, Shuffle, Program |
| Region Code | Region 1 (may support multi-region) |
| Remote Control | Yes, included |
| Languages Supported | English, Spanish, French, etc. |
| Maintenance | Clean lens with DVD lens cleaner disc; wipe exterior with dry cloth |
| Safety Precautions | Do not disassemble; avoid moisture; place on flat surface |
| Spare Parts Available | Remote control, power cord |
| Warranty | Manufacturer warranty (varies by region) |
Frequently Asked Questions - DVD2013HP DMTECH
User questions about DVD2013HP DMTECH
0 question about this device. Answer the ones you know or ask your own.
Ask a new question about this device
Download the instructions for your DVD player in PDF format for free! Find your manual DVD2013HP - DMTECH and take your electronic device back in hand. On this page are published all the documents necessary for the use of your device. DVD2013HP by DMTECH.
USER MANUAL DVD2013HP DMTECH
CLASS 1 LASER PRODUCT
- Skivfack 2. STANDBY 3. Sensor 4. Teckenfönster 5. USB Jack
WARNING: TO REDUCE THE RISK OF FIRE OR ELECTRIC SHOCK, DO NOT EXPOSE THIS APPLIANCE TO RAIN OR MOISTURE.
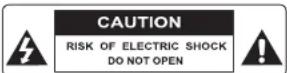
CAUTION: TO REDUCE THE RISK OF ELECTRIC SHOCK, DO NOT REMOVE COVER (OR BACK). NO USER SERVICEABLE PARTS INSIDE. REFER SERVICING TO QUALIFIED SERVICE PERSONNEL.

The lightening flash with arrowhead symbol, within an equilateral triangle, is intended the alert the user to the presence of uninsulated dangerous voltage within the products enclosure that may be of sufficient magnitude to constitute a risk of electric shock to persons.

The exclamation point within an equilateral triangle is intended to alert user to the presence of important operating and maintenance (servicing) instructions in the literature accompanying the appliance.

Laser product symbol: located on the rear panel of the unit, indicate this player is a class
laser product, only use weak laser and no hazardous radiation outside of the unit.
-
Read through this instruction manual before installation and use.
-
Do not touch the power plug with wet hand.
-
Switch off the main power when the unit is not in use. (Disconnect the power plug from the
power outlet when you do not intend to use the unit for a prolonged period of time.) Before moving the unit, remove the disc from the unit/ tray first.
4.Do not open the cover or touch any of the components exposed out of the unit, only for qualified technicians.
- Do not expose the unit under direct sunlight or nearby objects that radiate heat to avoid damage the unit.
6.Do not place the unit in moist and humid conditions, which effect the pick-up of the unit
lead to out of work.
- Place the unit on a flat surface and ventilative condition. Please ensure the ventilation
holes are not covered to avoid overheating and malfunction.
- Clear the panel and case with soft dry cloth only, do not apply any kind of thinner, alcohol
or sprays.
-
The apparatus shall not be exposed to dripping or splashing and that no objects filled with liquids, such as vases, shall be placed on the apparatus
-
unplug the apparatus when not using for a long time oriented to disconnect from the
Mains power
-
No naked flame sources, such as lighted candles, should not be placed on the apparatus.
-
Make sure there is free circulation of air (do not place the device on shelves, on a thick
normal on a bed, or anywhere that sheetrude the ventilation slots and leave at least 10cm
- If the electric cable is damaged, it must be replaced by the manufacturer, or by the qualification persons, in order to avoid a danger.
- The product's function maybe reset when it is subjected to electrostatic discharge disturbance. Just follow the instruction described in this manual to set the function again for normal operation.
During electrostatic discharge and the strong electromagnetic field, the product may malfunction, then press "POWER" button and the product will return to normal performance.
ROVI: This item incorporates copy protection technology that is protected by U.S. patents and other intellectual property rights of Rovi Corporation. Reverse engineering and disassembly are prohibited.
DOLBY: Manufactured under license from Dolby Laboratories. "Dolby" and the double-D symbol are trademarks of Dolby Laboratories.
Please reset the DVD player if you find the player crashed, then it can work well.
2.FRONT PANEL AND REAR PANEL ILLUSTRATION
Front panel

1.DVD DOOR
2.STANDBY BUTTON
3.REMOTE RECEIVER WINDOW
4.DISPLAY WINDOW
5.USB JACK
6.PREV BUTTON
7.PLAY/PAUSE BUTTON
5 NEXT BUTTON
- OPEN/CLOSE BUTTON
Rear panel
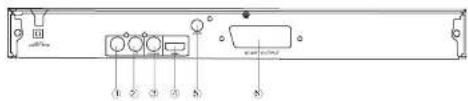
-
2.0CH LEFT OUTPUT JACK
-
2.0CH RIGHT OUTPUT JACK
-
DIGITAL COAXIAL OUTPUT JACK
-
HDMI OUTPUT JACK
5.VIDEO OUTPUT JACK
6.SCART OUTPUT JACK
3 REMOTE CONTROL
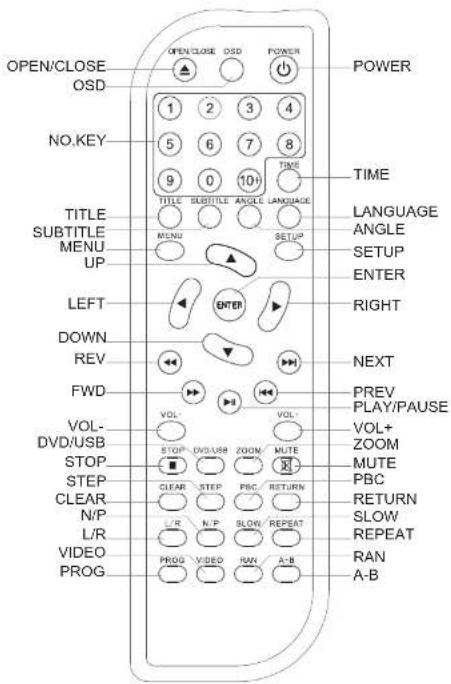
4 SYTSTEM SETUP
Press the SETUP button on the remote control, the SETUP MENU (main) will be displayed. After accessing the setup menu, press the direction buttons for up and down movement to select an item desired, then press the ENTER button to confirm. Press LEFT direction button return to the menu of upper level.
To exit the setup, press the SETUP button again. In the SETUP MENU, you may choose any of the following options as you like.
4.1 LANGUAGE SETUP
4.1.1 OSD Language
Use this item to select the language of the setup menu and screen display.
4.1.2 Subtitle
This option provides the preset subtitle language.
4.1.3 MP4 Subtitle
MP4 Subtitle setting is used for choosing the language domain, (only for MPEG4). After select one language domain (alphabet), when playback a MPEG4 with external subtitle, the subtitle display will use this language alphabet. If you find the displaying subtitle correctly, please ensure the external subtitle language and select the correct language.
4.1.4 Audio
This option provides the built-in disc dubbing language options.
4.1.5 DVD Menu
This option provides the film's menu language options.
4.2 VIDEO SETUP
4.2.1 Aspect Ratio
4:3 : Choosing this setting if your DVD player is connected to a normal ratio TV. You can fill the movie to the entire screen of your TV. This might mean that parts of the picture (the left and right edges) won't be seen.
16:9 : Choose this setting if your DVD player is connected to a wide screen TV. If you choose this setting and you don't have a wide screen TV, the images on the screen may appear distorted due to vertical compression.
Notes:
The image display ratio is related to the recorded disc format. Some disc can not display images in the aspect ratio you choose. If you play a disc recorded in 4:3 format on a wide screen TV, black bars will appear on the left and right side of the screen. You must adjust the screen setting depending on the type of the television you have.
4.2.2 View Mode
With this option you can select the different video vision mode on the screen.
4.2.3 TV System
This product supports output of various system, including AUTO, NTSC, PAL. If your TV set has only NTSC or PAL system, the screen will blink and become colorless when a wrong system is selected. In this case, press the N/P button on the Remote Control to switch the TV TYPE...
CVBS: Composite Video. Set the video output to interlacing component output.
RGB: Set the video output to SCART output. If you select SCART connection, you should set up the play mode as RGB state, then it will output normally.
up the play mode as RGB state, then it will output normally. HDMI: Set the Video output to high definition output. If you
HDMI. Set the video output to high definition output. If you select HDMI connection, you should set up the play mode as HDMI state, then it will output normally.
Should set up the play mode as HDMI state, then it will call us normally.
4.2.5 HD RESOLUTION
The High-Definition Multimedia Interface (HDMI) is a digital audio/video connector interface for transmitting uncompressed digital stream. HDMI supports, on a single cable, all video formats including standard, enhanced, and high-definition, as well as multi-channel digital audio. To enjoy the enhanced audio and video quality that HDMI offers, you need an HD Ready television with HDMI connections.
You then simply need to select the maximum resolution supported by your television in the
menu:
-480p/576p
-1280-720p(720p)
-1920*1080R(1080R)
-1920 1000p [1000P] HDMI Mode Display Problem: When you select an HDMI display mode which is not supported by your television (if you choose, for example, 1080i while your television supports up to 720p only), you get a black screen. As a result, you cannot change the HDMI resolution in the setup menu. You should then use a SCART cable to connect your television. Once the screen displays normally again, you can change to an appropriate HDMI setting in the menu.
4.3 Audio setup
1.0.1.2.
4.3.1 Digital output Selecting the Digital Output setting allows the user to adjust the audio output on S/PDIF ports to work in harmony with the audio equipment (e.g. receiver, speakers) connected to the player.
Off: Digital audio output is disabled.
PCM: Select this option when you are going to use stereo signals (2 channels). You should combine this option with the option "Lower sampling rate," which we explain furtheron
RAW: If you select this option the player will use the DVD's original audio track. Use this option when you want to use the Dolby Digital AC3 signals through coaxial audio output.
4.3.2 Night Mode
This listening mode is most suitable at night for softest audio output and least disturbance.
4.4 RATING SETUP
Select Rating in the setup menu, and display the Rating submenu: Note: Not all DVDs support ratings.
4.4.1 Parental Control
4.4.1 Parental Control Selecting a Rating allows the user to set the parental control feature of the player. Select Parental Control, and press ENTER to change the different mode. Note: Unlock the password before setting Parental Control
4.4.2 Set Password
Use the 0-9 keys to input four digits (password), then press ENTER to confirm. Note: If you forget your password, please use the universal password 0000 to unlock.
4.5 MISC SETUP
Select MISC in the setup menu, and display the submenu:
4.5.1 Use Default Settings : Reset setup data to factory default and re-load disc
4.5.2 Screen saver
- Technical specifications
| Signal system | PAL/AUTO/NTSC |
| Frequency Response | 20HZ-20KHZ ( at 1KHz 0 dB) |
| Signal-to-Noisy Ratio(Audio) | ≥slant 90 dB ( at 1KHz 0 dB) |
| Audio Distortion + Noise | ≤slant -60dB ( at 1KHz0dB) |
| Audio Output (Analog audio) | 2.0 Vrms |
| Video Output | Composite: 1.0 ± 0.2Vp-pLoad impedance: 75Ω, imbalance, negative polarity |
| Max Resolution | HDMI V1.3 1080p |
| Power Supply | ~110-240V 50/60Hz |
| Standby power | < 1W |
| Dimensions | 360(mm)X210(mm)X38(mm) |
| Supported Disc MPEG4/DVD/SV | VCD/VCD/CD/HDCD/MP3/KodakPicture/Photo CD |
6. RECYCLING
This product bears the selective sorting symbol for waste electrical and
electronic equipment (WEEE).
This means that this product must be handled pursuant to European Directive 2002/OSIFG in order to be recycled or elemented to minimize
Directive 2002/98/EC in order to be recycled or dishearted to minimize its impact on the environment.
For further information, please contact your local or regional authorities.
Electronic products not included in the selective sorting process are potentially dangerous
for the environment and human heath due to the presence of hazardous substances.

Brand : DMTECH
Model : DVD2013HP
Category : DVD player