DPF702MC - Digital photo frame DMTECH - Free user manual and instructions
Find the device manual for free DPF702MC DMTECH in PDF.


| Product Type | Digital Photo Frame |
| Brand | DMTech |
| Model | DPF702MC |
| Display Size | 7 inches TFT LCD |
| Display Resolution | 480(RGB) x 234 pixels |
| Power Supply | AC Adapter (Input 100-240V~, Output 5V, 1.5A) |
| Built-in Memory | 16MB NOR-Flash (shared with firmware) |
| Supported Memory Cards | Secure Digital (SD), MultiMedia Card (MMC) |
| USB Support | Yes (USB drive) |
| Slideshow Effects | 8 effects: Random, Split Horizontal In/Out, Jalousie, Split Vertical In/Out, Radiation, Surround |
| Slideshow Interval | Adjustable from 0 seconds to 1 minute |
| Image Display Modes | Auto Fit, Optimal, Full |
| Image Editing | Zoom, Rotate (90° clockwise/counter-clockwise) |
| Calendar Function | Yes, with date and time setting |
| Language Options | English, Swedish |
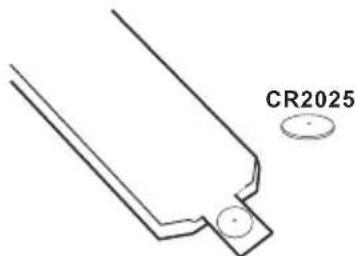
| Remote Control | Yes (battery included, CR2025) |
| Cleaning Instructions | Use soft, non-abrasive cloth; do not apply liquid directly |
| Operating Temperature | 0°C to 60°C |
| Storage Temperature | -10°C to 70°C |
| Accessories Included | Power Adapter, Remote Control, User Manual |
Frequently Asked Questions - DPF702MC DMTECH
User questions about DPF702MC DMTECH
0 question about this device. Answer the ones you know or ask your own.
Ask a new question about this device
Download the instructions for your Digital photo frame in PDF format for free! Find your manual DPF702MC - DMTECH and take your electronic device back in hand. On this page are published all the documents necessary for the use of your device. DPF702MC by DMTECH.
USER MANUAL DPF702MC DMTECH
natural_image
Snow-covered mountain landscape with a small wooden cabin and evergreen trees under a clear blue sky (no text or symbols visible)SD

natural_image
Snow-covered mountain landscape with snow-covered slopes and evergreen trees under a clear blue sky (no text or symbols visible)Multimediakort
JPEG-SPELARE
Inledning
Secure Digital Card (SD)
Multimedia Card (MMC)
USB-enhet
natural_image
Simple line drawing of a door handle with no text or symbolsFjärrkontrollens knappar
natural_image
Pure technical line drawing of a mechanical component with a downward arrow, no text or symbols present名
natural_image
Pure technical line drawing of a mechanical component with an arrow indicating direction (no text or symbols)2
- Lägg i batterier.
Precautions and Maintenance
• For indoor use only
- To avoid risk of fire or electric shock, do not expose this appliance to moisture.
To avoid overheating, do not block the ventilation holes on the back of this digital photo frame at any time. Keep this Multimedia Digital Photo Frame out of sunlight. Direct sunlight may cause damage.
Always use the eject buttons on the memory storage card slots to remove the memory storage cards. Do not dismantle the Multimedia Digital Photo Frame. There is a risk of electric shock, and there are no user serviceable parts inside. Dismantling your Multimedia Digital Photo Frame will void your warranty. Do not use the Multimedia Digital Photo Frame if conditions could allow condensation to occur, or damage may result.
Cleaning the LCD Screen
- Treat the screen gently. The screen on the multimedia Digital Photo Frame is made of glass and can be easily scratched or broken.
- If fingerprints or dust accumulates on the LCD screen, we recommend using a soft, non-abrasive cloth such as a camera lens cloth to clean the LCD screen.
- If you use the LCD cleaning Kit sold at various retail outlets, do not apply the cleaning liquid directly to the LCD screen. Moisten the cleaning cloth with the cleaning solution and apply the cloth to the screen.
WARNING:
Please STOP the unit before inserting or removing a card or USB Drive. Failure to do so may cause damage to the card/USB and the unit. To reduce the risk of fire or electric shock, do not expose this appliance to rain or moisture.
Table of contents
Precautions and maintenance 1
Cleaning the LCD Screen 1
Important Safety Precautions 3
Resource 4
Remote Controller Function Buttons 5
Installing and replacing the Remote Control Battery 6
Player Overview 7
Getting Started 8
Memory Card Choice 9
Play Photo File 9
Setup 10
Calender 11
Troubleshooting Guide 12
Specifications 13
Important Safety Precautions
- Read these instructions.
- Keep these instructions.
- Heed all warnings.
- Follow all instructions.
- Do not use this apparatus near water.
- Clean only with a dry cloth.
- Do not block any ventilation openings. Install in accordance with the manufacturer's instructions.
- Do not install near any heat sources such as radiators, heat registers, stoves or other apparatus (including amplifiers) that produce heat.
- Do not defeat the safety purpose of the polarized or grounding-type plug. A polarized plug has two blades with one wider than the other. A grounding type plug has two blades and a third grounding prong. The wide blade or the third prong is provided for your safety. If the provided plug does not fit into your outlet, consult an electrician for replacement of the obsolete outlet.
- Protect the power cord from being walked on or pinch particularly at plugs, convenience receptacles, and the point where they exit from the apparatus.
- Only use attachments/accessories specified by the manufacturer.
- Unplug this apparatus during lightening storms or when unused for long periods of time.
- Refer all servicing to qualified service personnel. Servicing is required when the apparatus has been damaged in any way, such as power supply cord or plug is damaged. Liquid has been exposed to rain or moisture, does not operate normally or has been dropped.
- This appliance shall not be exposed to dripping or splashing water and that no object filled with liquid such as vases shall be placed on the apparatus.

This symbol on the product or in the instructions means that your electrical and electronic equipment should be disposed at the end of its life separately from your household waste. There are separate collection systems for recycling in the EU. For more information, please contact the local authority or your retailer where you purchased the product.
Resource
Inserting Memory Cards
Your multimedia DPF is compatible with the following memory cards:
Secure Digital Card (SD)
Multimedia Card (MMC)
USB drive
Insert the memory card with the screen and slots all facing yourself. Do not force the card in the slot. If you are not able to easily insert the memory card completely, you may have inserted it in a wrong way.
Note: DPF = Digital Photo Frame

natural_image
Simple line drawing of a door handle with no text or symbolsRemote Controller Function Buttons
-
UP BUTTON( ▲ ): Up cursor selection function.
-
SETUP BUTTON: Used to enter the photo frame setup options.
-
ENTER BUTTON: Used to confirm your current.
-
LEFT SHIFT BUTTON(◀): Left cursor selecting function.
-
EXIT BUTTON: Press EXIT key to return into last interface.
-
DOWN BUTTON( ▼ ): Down cursor selection function.
-
ZOOM BUTTON: Used to zoom into the image. Each press advances the zoom one setting at a time. Used to select multiple files in photo menu.
-
ROTATE BUTTON: Picture rotate 90 clockwise.
-
SLIDE SHOW BUTTON: Browse picture automatically.
-
RIGHT SHIFT BUTTON( ▶ ): Right cursor selecting function.
-
POWER BUTTON( ): This is used to turn ON/OFF the player.

Installing and replacing the Remote Control Battery
- Rotate the remote control so it is face down and pop out the battery tray.

natural_image
Pure technical line drawing of a mechanical component with a downward arrow, no text or symbols present- Close the battery tray.

natural_image
Simple line drawing of a mechanical component with an arrow indicating direction (no text or symbols)- Insert the batteries.

Insert the batteries according to the correct (+)(-) polarity.
- Insert the battery matching the correct polarity.
- Do not expose the battery to heat/fire and do not Short-circuit the battery.
- Do not leave dead batteries in the remote control.
- If you do not use the remote control for a long period of time, remove the battery.
- If the remote control does not function correctly or the operating range becomes reduced, replace the battery.
Note:
- Point the remote control directly at the digital frame remote sensor.
- Do not leave the remote control in an extremely hot or humid place.
- Do not spill water or put anything wet on the remote control.
- Battery life is 1 year under normal operating conditions
Player Overview
Key control and Key functions:

- ENTER(PLAY/PAUSE) BUTTON: Confirm that what and Pause or Play.you chosen
- RIGHT SHIFT BUTTON(◀ / NEXT): Right cursor selecting function and next photo.
- LEFT SHIFT BUTTON( ▶/PREV ): Left cursor selecting function and previous photo.
-
EXIT/SETUP BUTTON: Press EXIT key to return into last interface. Use for setup programs, then by pressing long (above 2 seconds) enter to execute the command.
-
UP BUTTON(▲ /ROTATE): Functional selection button and Rotate 90 degrees counter-clockwise.
- DOWN BUTTON(▼ / ROTATE): Functional selection button and Rotate 90 degrees clockwise.
- STANDBY BUTTON: Ture ON/OFF the player.
- DC 5V: Input the DC poweradapter to the DPF Player.
- SD/MMC CARD: The slot for DPF player to connect the SD or MMC memory card.
- USB: Connect the USB disk.
- Bracket jack.
Getting started
Getting started
- Assemble the MultimediaDigital photo Framebracket to prop the unit up insert adaptor DC plug into the DPF player first, then plug the power cord to a standard wall outlet. Then the screen will display as below: (will play the pictures auto matically stored), If insert the SD/MMC card, then will play the pictures in the card.

Memory Card Choice
When power on, the digital frame will go into automatic show mode of SlideShow if it is inserted with memory Cards or keeps pictures in the built-in flash. Press EXIT key to return to Photo menu (Fig 1).
If the digital frame is not inserted with memory cards or there is no pictures in its built-in flash, then it goes into Photo menu. After memory card inserted, it goes into Select Cards mode (Fig 2).
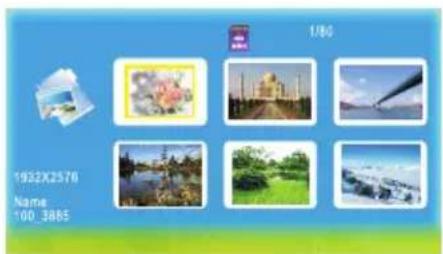
Fig 1
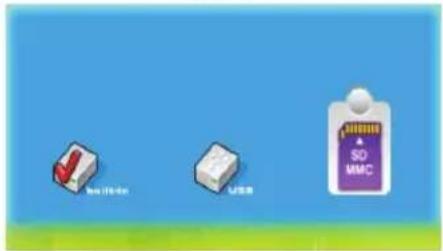
Fig 2
Play Photo File
After memory card inserted, the digital frame goes into Select Cards mode.
Operation:
In Select Cards mode, you can choose different memory cards by ◀ or ▶ key. Press ENTER key after choosing the memory card to go into SlideShow or Photo mode to play pictures (Fig 3). Press EXIT you can return from playing status.
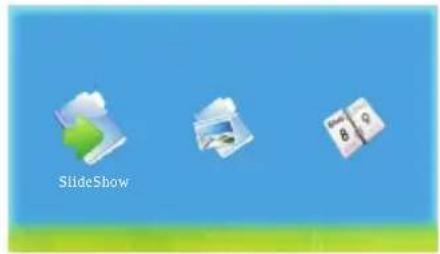
Fig 3
Setup
Operation:
In any menu, press SETUP key to go into the SETUP interface (Fig 4).
Press ▲▼ key to choose the set item.
Use the ENTER button to change the setting.

Fig 4
1. Image Size
Allows user change how the images are displayed on the photo frame. Choose between, Auto Fit, Optimal or Full.
2. Slide Show Effect
Allows user to set different effects to the slides when the images change. There are 8 options you can choose from Random, Split Horizontal in, Split Horizontal out, Jalousie, Split Vertical in, Split Vertical out, Radiation, Surround.
3. Slide Show Interval
Allows user to change the speed of the slideshow. The interval speed can be changed from 0 seconds to 1 minute. Use the ▲▼ button to change the setting.
4. Separated Slide Show
Allows user to change the Separated Slide Show from On to Off.
5. Start Slide Show
Allows user to choose the start slide show.
6. Rotate
Rotate Photos 90 degrees Clockwise. (Be effective when preview pictures on full screen)
7. Zoom
Allows user to zoom in and out on files. (Be effective when preview pictures on full screen)
8. Save Picture
Allow user to copy pictures from memory cards into the built-in flash. (Be effective when preview pictures on full screen)
9. Delete File
Allow user to delete pictures from the built-in flash. (Be effective in Photo menu, use Zoom button to select multiple files in Photo menu.)
10. Reset Setting
Allows user to the restore default settings.
11. Language
Choose between 2 different languages: English, Swedish.
Setup
12. Brightness
Allows you to change the brightness of the LCD screen.
13. Contrast
Allows you to change the contrast of the LCD screen.
14. Color
Allows you to change the color of the LCD screen.
15. Tint
Allows you to change the tint of the LCD screen.
16. Time
This function allows the user to se the system time.
Calendar

natural_image
Three icons on a blue background: a green thumbs-up, a white gift box, and a calendar with a number 8 (no text or symbols on the icons themselves)
Fig 5
Allow user to setup date and time of the system (Fig 5).
Operation:
Press ◀▶ key to choose Calendar in Select Mode, Press ENTER key to go into the calendar interface. In addition to displaying the current data, the user can the navigation key you can preview different year, Month, and day.
Troubleshooting Guide
If you are experiencing problems with your DPF, please consult both this guide and manual. If you need further assistance, please contact Technical Support.
No power:
Please check whether there is power, and that the DC power cord is plugged in correctly.
Can not play the file:
Please confirm whether the file format can be played the player.
Display too bright or too dark:
please adjust the brightness or contrast in the setup menu.
The color is light or no color:
Please adjust the color setup.
Can not read the CARD:
Please check that there is content on the card.
Specifications
Display: 7 TFT LCD 480(RGB)x234
Power: AC Adapter; Input 100-240V\~; Output 5V, 1.5A
Built-in Memory: 16MB NOR-Flash (not full capacity can be used for photo storage, subject to the sharing of internal software)
Environmental operating ranges Operating Temperature: 0\~60 degrees Storage Temperature: -10\~70 degrees
Accessories: Power Adapter User Manual Remote Control
All specifications and instructions are subject to change without Notice.
75-7HI1018DYR1-01R
- Inledning
- Fjärrkontrollens knappar
- Precautions and Maintenance
- Cleaning the LCD Screen
- WARNING:
- Table of contents
- Important Safety Precautions
- Resource
- Inserting Memory Cards
- Remote Controller Function Buttons
- Installing and replacing the Remote Control Battery
- Note:
- Player Overview
- Getting started
- Memory Card Choice
- Play Photo File
- Operation:
- Setup
- Image Size
- Slide Show Effect
- Slide Show Interval
- Separated Slide Show
- Start Slide Show
- Rotate
- Zoom
- Save Picture
- Delete File
- Reset Setting
- Language
- Brightness
- Contrast
- Color
- Tint
- Time
- Calendar
- Troubleshooting Guide
- No power:
- Can not play the file:
- Display too bright or too dark:
- The color is light or no color:
- Can not read the CARD:
- Specifications
Brand : DMTECH
Model : DPF702MC
Category : Digital photo frame