3D100SQC32 - Television VDiGi - Free user manual and instructions
Find the device manual for free 3D100SQC32 VDiGi in PDF.


| Product Type | LED Television |
| Screen Size | 32 inches (81 cm diagonal) |
| Resolution | HD (1366 x 768 pixels) |
| Aspect Ratio | 16:9 |
| Refresh Rate | 60 Hz |
| Brightness | 250 cd/m² |
| Contrast Ratio | 3000:1 (dynamic) |
| Viewing Angle | 178° horizontal / 178° vertical |
| 3D Support | Active shutter 3D (glasses not included) |
| Sound Output | 2 x 8W stereo speakers |
| Connectivity | 2 x HDMI, 1 x USB, 1 x VGA, 1 x AV, 1 x Coaxial audio out |
| Tuner | DVB-T/T2/C, analog PAL/SECAM |
| Power Supply | AC 100-240V, 50/60Hz |
| Power Consumption | 50W (typical), < 0.5W standby |
| Dimensions (with stand) | 730 x 480 x 180 mm |
| Dimensions (without stand) | 730 x 430 x 80 mm |
| Weight (with stand) | 5.2 kg |
| Weight (without stand) | 4.8 kg |
| VESA Mount | 200 x 200 mm |
| Remote Control | IR remote (batteries included) |
| Energy Class | A+ |
| Safety Features | Overvoltage protection, automatic shutdown after 4 hours of inactivity |
| Cleaning Instructions | Wipe with a soft, dry cloth; do not use liquid cleaners |
| Spare Parts Availability | Power supply board, main board, IR sensor, remote control available from authorized service centers |
| Repairability Index | 7.5 / 10 (modular design, easy access to internal components) |
Frequently Asked Questions - 3D100SQC32 VDiGi
User questions about 3D100SQC32 VDiGi
0 question about this device. Answer the ones you know or ask your own.
Ask a new question about this device
Download the instructions for your Television in PDF format for free! Find your manual 3D100SQC32 - VDiGi and take your electronic device back in hand. On this page are published all the documents necessary for the use of your device. 3D100SQC32 by VDiGi.
USER MANUAL 3D100SQC32 VDiGi
natural_image
Front view of a black VDigi TV computer monitor with a blank screen (no visible text or symbols on the screen body)3D100SOC32
目錄
目錄 ……
安全資訊....2
預先注意事項.... 4
底座安装 5.
遥控器
面板功能描述....7
後置端子及功能描述....8
基本操作及菜单操作....9
频道....10
影像....12
聲音及時間....13
其他設定 ……14
EPG及多媒體 15
四上卫立编
安全資訊
安裝/設定
全屏模式

Table of Contents....25
Safety Information....26
Precautions....28
Stand Installation....29
Remote Control ....30
Functions of the panel....31
Rear Panel and Descriptions....32
Basic Operation 33
Channel Menu.... 34
Picture Menu.... 36
Sound and Time Menu....37
Option Menu.... 38
EPG and Media Menu....39
Photo and Music Menu.... 40
Safety information
Installation/Set-up
Install and use the TV set in accordance with the instructions below in order to avoid any risk of fire, electrical shock or damage and/or injuries.
Installation
The TV set should be installed near an easily accessible AC power outlet.
Place the TV set on stable, level surface to avoid it form falling down and cause personal injury or damage to the TV.
Only qualified service personnel should carry out wall installations.
For safety reasons, it is strongly recommended that you use V DIGI Accessories.
Transporting
Before transporting the TV set, disconnect all cables.
Two or more people are needed to transport a large TV set
When transport the TV set hand, hold it as shown on the right. Do not put stress on the panel.
When lifting or moving the TV set, hold it firmly from the bottom.
When transporting the TV set, do not subject it to jolts or excessive vibration.
When transporting the TV set for repairs or when moving, pack it using the original carton and packing material.
Ventilation
Never cover the ventilation holes or insert anything in the cabinet.
Leave space around the TV set
To ensure proper ventilation and prevent the collection of dirt or dust
Notes:
Do not use the supplied AC power cord on any other equipment.
Do not pinch, bend, or twist the AC power cord excessively. The core conductors may be exposed or broken.
Do not modify the AC power cord.
Do not put anything heavy on the AC power cord.
Do not pull on the AC power cord itself when disconnecting the AC power cord.
Do not connect too many appliances to the same AC power outlet.
Do not use a poor fitting AC power outlet.
Prohibited Usage
Do not install/use the TV set in locations, environments or situations such as those listed below, or the TV set may malfunction and cause a fire, electrical shock, damage and/or injuries.
Location
Outdoors (in direct sunlight), at the seashore, on a ship or other vessel, inside a vehicle, in medical institutions, unstable locations, near water, rain, moisture or smoke.
Environment
Places that are hot, humid, or excessively dusty; where insects may enter; where it might be exposed to mechanical vibration, near flammable objects (candles, etc). The TV shall not be exposed to dripping or splashing and no objects filled with liquids, such as vases, shall be placed on the TV.
Situation
Do not use when your hands are wet, with the cabinet removed, or with attachments not
For children
Do not allow children to climb on the TV set.
Keep small accessories out of the reach of children, so that they are not mistakenly swallowed.
If the following problems occur
Turn off the TV set and unplug the AC power cord immediately if any of the following problems occur. Ask your dealer or V DIGI service centre to have it checked by qualified service personnel.
When:
AC power cord is damaged.
Poor fitting of AC power outlet.
TV set is damaged by being dropped, hit or having something thrown at it.
Any liquid or solid object falls through opening in the cabinet.
Precautions
Viewing the TV
View the TV in moderate light, as viewing the TV in poor light or during long period of time, strains your eyes.
When using headphones, adjust the volume so as to avoid excessive levels, as hearing damage may result.
Screen
Handing and cleaning the screen surface/cabinet of the TV set
Be sure to unplug the AC power cord connected to the TV set form AC power outlet before cleaning.
To avoid material degradation or screen coating degradation, observe the following precautions.
To remove dust form the screen surface/cabinet, wipe gently with a soft cloth of dust is persistent, wipe with a soft cloth slightly moistened with a diluted mild detergent solution. Never use any type of abrasive pad, alkaline/ acid cleaner, scouring powder, or volatile solvent, such as alcohol, benzene, thinner or insecticide. Using such materials or maintaining prolonged contact with rubber or vinyl materials may result in damage to the screen surface and cabinet material.
Periodic vacuuming of the ventilation openings is recommended to ensure to proper ventilation.
When adjusting the angle of the TV set, move it slowly so as to prevent the TV set form moving or slipping off from its table stand.
Optional Equipment
Keep optional components or any equipment emitting electromagnetic radiation away from the TV set. Otherwise picture distortion and/or noisy sound may occur.
Stand Installation
Your TV is packaged with the TV stand base separated from the cabinet. To setup the TV table stand, please carry out the installation according to the instructions below.
Step One
Place the TV faced down on a soft cloth or cushion to prevent the panel from being damaged. Note:
- The panel is easy to scratch so place choice on absolutely flat surface to place the
Remote Control

Description of television of remote control
POWER:Switch between working status and standby status
② MUTE: Turn on/off audio
③) 0-9: Press to select channel
4) -/-:Channel digit setup button
⑤) :Switch to the last channel
⑥ EPG:Show electronic program guide
⑦ SOURCE:Input source conversion button
8) MENU:Show the main menu
⑨) EXIT: Exit the OSD menu
10) ENTER: Confirm selection
: Navigate on menu
11) VOL+/-: Change sound volume
12) CH+/-: Change channel
13) SUBTITLE: Select language of subtitle
14) AUDIO: Select audio output
15) USB: Select USB source input
16) DTV: Select DTV source input
17) FAV.LIST: Display/Define favorite channel
18) CH.LIST:Show channel list
19) PICTURE: Select the picture mode
Functions of the panel
Back Panel Buttons
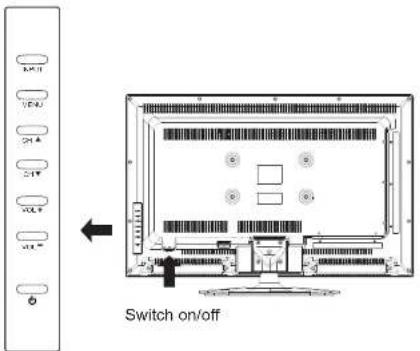
INPUT: Displays the Source Select List.
MENU: Displays the TV Main Menu.
CH: Scans up through the channel list. In the TV menu system, it acts like the up arrow on the remote control and can be used to select menu options.
CH▼: Scans down through the channel list. In the TV menu system, it acts like the down arrow on the remote control and can be used to select menu options.
VOL+: Increases the volume. In the TV menu system, it acts like the right arrow on the remote control and can be used to select menu options.
VOL:- Decreases the volume. In the TV menu system, it acts like the left arrow on the remote control and can be used to select menu options.
POWER (☐): Turns the TV on and off.
Rear Panel and Descriptions

Basic Operation
Power On /Off
- Connect the TV unit to the wall outlet using power cord.
- When the power indicator is in red, the TV is in standby mode. Now press the "POWER" button on remote control or "POWER" button on side panel to turn on the TV. The TV work normally when the power indicator is in blue.
- Switch the TV to standby mode, just press "POWER" button on the remote control or the "POWER" button on side panel. Now the indicator will be in red.
- If unused for a long time in standby mode, please disconnect the power cord from the wall outlet.
Note: The TV set will display "No signal" while there is no signal input.
Select Viewing Source
Press the "SOURCE" button to display the sources list.
| Input Source |
| DTV |
| ATV |
| AV |
| YPbPr |
| VGA |
| HDMI1 |
| HDMI2 |
| HDMI3 |
Menu Operation
If you want to adjust the display settings, please follow the instruction below
Press the "MENU" and ◀▶ buttons to browse the CHANNEL Menu, Picture Menu, Sound Menu,
Time Menu, Option Menu
Press ▲▼ button to select items and ENTER button to adjust it.
Press MENU button to return to the previous menu.
Press "EXIT" button to exit "MENU" mode.
Note: When an item in MENU is displayed as gray it means that the item is not available or can not be adjusted.
Channel Menu
Press MENU and buttons to select the CHANNEL.
Press ▲▼ button to select the items.
Press ENTER button to enter the submenu.

Channel Menu
DTV Manual Tuning (only available in DTV mode)
You can also set program list again one by one by DTV Manual Tuning function.
Press ◀▶ button to select channel.
Press ENTER button to search
When a channel is found, the searching process will stop.
the channel will be saved with current channel number.
If the program is not your expected one, please press
◀▶ button to continue the searching.
Press EXIT button to exit.

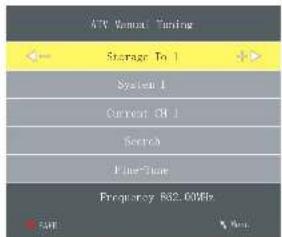
ATV Manual Tuning (only available in ATV mode)
If you find one channel is a little weak,
you can adjust the frequency of the channel.
It might improve the quality of picture and sound.
Storage To
Press ◀▶ button to select to storage to channel
NO. from 1 to 100.
System
Press ◀▶ button to select Audio System: I-BG-DK-MN.
Current CH
Press ◀▶ button to select current channel.
Search
Press ◀▶ button to search channel.
Fine -Tune
Press ◀▶ button to adjust frequency.
Frequency
Display the current channel frequency.
Press ▲▼ button to select items. Press ◀▶ button to adjust it.
Picture Menu
Press MENU and buttons to select the PICTURE menu.
Press button to select the items.
Press ENTER button to enter the submenu.

Picture Mode
Press ENTER button to enter the submenu to select the picture mode: Standard, User, Dynamic,
Mild. (you can adjust the contrast, brightness, color, sharpness, tint in User mode.)
Contrast : Press ◀▶ button to adjust the contrast of the picture.
Brightness : Press ◀▶ button to adjust the brightness of the picture.
Color : Press ◀▶ button to adjust the color saturation.
Sharpness : Press ◀▶ button to adjust the sharpness level of the picture
Tint : Press ◀ button to adjust the tint of the picture. (available in NTSC system)
Color Temperature
Press ENTER button to enter submenu to select: Standard, User, Warm, cool.
Aspect Ratio
Press ENTER button to enter submenu to select the ratio of the screen: Auto, 4:3, 16:9, Zoom1,
Zoom2.
Sound Menu
Press MENU and buttons to select the SOUND menu.
Press button to select the items.
Press ENTER button to enter the submenu.

Sound Mode
Press ENTER button to enter submenu to select sound mode: Standard, Music, Movie,
Sport, User. (you can adjust treble, bass in User mode.)
Balance
Press ENTER button to enter submenu to adjust the audio output between left and right speakers.
Auto Volume
Press ENTER button to turn on/off the function of auto volume.
SPDIF Output
Press ENTER button to enter submenu to select PCM, Off, Auto. (Only available in DTV)
Time Menu
On Time
Set the time to turn on the TV automatically: Off, Once, Every Day, Mon.-Fri., Mon.-Sat. Sat.-Sun., Sunday.
Sleep Timer
Press ENTER button to select the sleep timer: 10,20,30,60,90,120,180,240(min).
Auto Sleep
Press ENTER button to turn on/off the auto sleep.
Option Menu
Press MENU and buttons to select the OPTION menu.
Press button to select the item
Press ENTER button to enter the submenu.

OSD Language
Press ENTER button to enter the submenu to select OSD language: English, SChinese, TChinese.
Subtitle Language
EPG
EPG ( only available in DTV mode)
Press EPG button in the DTV Mode to display electronic program guide.
Record
Press the RED button to display the recorder menu. See detailed information about the different ways of recording with the television onto a USB device.
Display
Press the GREEN button to show information about the selected program.
Schedule
Press the YELLOW button to display the Reminder List. Press ▲/▼ to select a reminder, press the RED button to delete a reminder.

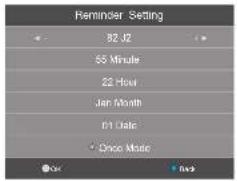
Remind
Press the BLUE button to display a reminder menu. Press ▲/▼ to select an item and ◀/▶ to change the setting. Press ENTER to add the program to the reminder list. An updated reminder list will be shown.

PHOTO
- Press [◀] / [▶] to select PHOTO. Press [ENTER] to enter.
- Press [◀] / [▶] / [▲] / [▼] to select the desired folder and press [ENTER] to open the folder; or press [◀] / [▶] / [▲] / [▼] to select the desired picture file and press [▶] to start playing.
- Press [■] to stop picture playing and return to picture list.
- Select the return icon to the previous menu.
Photo Control Bar

flowchart
graph TD
    A["Pause Previous Next"] --> B["Downward Pulse"]
    C["Stop"] --> D["Upward Square"]
    E["Repeat All Play Music"] --> F["Play Music Screen"]
    G["Info: Current Information"] --> H["90° Left Arrow"]
    I["Rotate Clockwise 90 Degrees"] --> J["90° Right Arrow"]
    K["Rotate Counterclockwise 90 Degrees"] --> L["Upward Arrow"]
    M["Zoom In"] --> N["Downward Arrow"]
    O["Zoom Out"] --> P["Move View"]
- Press [ ENTER] to display Photo Control Bar during photo slide show.
- Press [◀] / [▶] to select the desired settings, press ENTER button to confirm.
MUSIC
- Press [◀] / [▶] to select MUSIC. Press [ENTER] to enter.
- Press [◀] / [▶] / [▲] / [▼] to select the desired folder and press [ENTER] to open the folder; or press [◀] / [▶] / [▲] / [▼] to select the desired music file and press [▶] to start playing.
- Press [■] to stop music playing and return to music list.
- Select the return icon to the previous menu.
MOVIE
- Press [◀] / [▶] to select MOVIE. Press [ENTER] to enter.
- Press [◀] / [▶] / [▲] / [▼] to select the desired folder and press [ENTER] to open the folder; or press [◀] / [▶] / [▲] / [▼] to select the desired movie file and press [▶] to start playing.
- Press [■] to stop movie playing and return to movie list.
- Select the return icon to the previous menu.
Movie Control Bar

flowchart
graph TD
    A["Pause"] --> B["Fast Reverse"]
    B --> C["Fast Forward Previous"]
    C --> D["Next"]
    D --> E["Stop Repeat All"]
    F["Set A"] --> G["Playlist"]
    G --> H["Info.: Current Information"]
    H --> I["Slow Forward"]
    I --> J["Step Forward"]
    J --> K["Goto Time"]
    K --> L["Zoom In"]
    M["Zoom Out"] --> N["Aspect Ratio"]
    N --> O["Move View"]
- Press [ENTER] to display Movie Control Bar while playing the video.
- Press [◀] / [▶] to select the desired settings.
TEXT
- Press [◀] / [▶] to select TEXT. Press [ENTER] to enter.
Record Function (Only in DTV mode)
PVR settings
1) PVR File System
| Select Disk | C: |
| Check PVR File System | Start |
| USB Disk | |
| Format | |
| Time Shift Size | |
| Speed | |
| Free Record Limit | 6Hr. |
| Menu | |
2) Select Disk
| Select Disk | |
| USB | 0 |
| Disk | C: |
3) Check PVR File System:
| File System Size | |
| PVR File System Type | FAT32 |
| PVR File System Size | ALL |
| SD 104 Mins | |
| HD 29 Mins | |
Setup the PVR File system before you start recording.
Select Disk: Select the device for the Record files.
Check PVR File System
USB Disk: Display the USB state.
Format: Format the USB device for PVR operating.
Time Shift Size: Display the size of the USB device.
(The device has been formatted).
Speed: Display the speed of the USB device.
(The device has been formatted).
Free Record Limit: Display the free record limit of USB
device. (The device has been formatted).
As follows, default as C.
Choose the disc to store whatever content need record,
NOTE: please format your hard disk before use the
PVR function for the first time.
Check storage equipment PVR File System is well
established. Default as Start ENTER button to
inspect the USB files system and speed, the processing
shows Checking.
When no inserting USB, or inspection failed, it shows FAIL;
When inserting USB but didn't pass MStar Format, enter
Format menu;
6) Record Start
When you finish the settings above, you could start recording by pressing the REP/REC button on the remote control.
Record buttons
REP/REC: Press to enter the recording mode.
II PAUSE: Press to enter the timeshift mode.
DVR. LIST: Press to display the recording list.
■ Stop: Press to stop recording.
Recording menu
When you press REP/REC button, the screen will display the recording menu as below:
![Play FB FF [0:00:19] (00:00:16:17) 1 NINE DIGITAL 18:19](/content/2026/05/924684/images/c2938b179d000664e7a22a5fbfeed5abb7e61563f9c0d293f24baca4276cf417.jpg)
Full mode

Simple mode
Note: a. You could change the mode of Recording menu by REP/REC button.
b. Press STOP button to exit the recording mode.
c. Press PLAY button to play the program you are recording from the beginning.
d. Press DVR.LIST button to display the Recorder list, and you could play the program you selected. The recording will be going on, and the Recording menu will display when you exit the Recorder list.
e. After finish to record a program, press DVR.LIST button to display the Recorder list as below:

Display the recorded list
DVR.LIST: Display the Recorder List menu.
INFO: Display the information of the program you
Pre-Recorder
In EPG menu, press red button or REP/REC button to display Recorder menu.
| RECORDER | ||
| 82 J2Start Time | ||
| 30 Minute | ||
| 16 Hour | ||
| Jan Month | ||
| 16 Date | ||
| 90 Time | ||
| 00 Minute | ||
| 17 Hour | ||
| Jan Month | ||
| 30 Date |
Set the Recording Timer
The TV will record the program automatically according to your settings.
TITLE: Display the name of the recording program.
Start Time: Set the start recording time.
End Time: Set the end recording time.
MODE: Select the record mode.
Press ENTER button to save the setting and exit the menu, then TV will display the schedule list, as follow:
| Schedule List 16:09 21th May Delete | |||||
| Time Date | Programme Title | Channel Name | |||
| 16:14-16:30 | Web. 21 May | The Sleepover Club | 8 NBN Digital | ||
When timer recording is set, the TV can be placed into standby. The unit will then activate the recording when the time is reached and then return to standby when the end time is reached.
Play 3D TV
You can watching the 3D image by using the 3D glasses.
WARNING
-
Note that watching 3D TV while sitting too close to the screen for an extended period of time may weaken your eyesight.
-
Note that watching TV while wearing 3D glasses for an extended period of time may cause a headache, fatigue, or
dizziness. If you have a headache, tire, or dizziness, stops watching TV and rest.
- Some 3D pictures may startle viewers. The pregnant, elderly, epileptic, and those suffering from serious physical conditions are advised to avoid utilizing the whole 3D functionality.
conditions are advised to avoid utilizing the unit's 3D functionality.
- If you are in bad physical condition, sleep deprived, or you have drunk alcohol, we strongly recommend you not to use 2D cleaning review 3D privacy.
3D glasses of view 3D pictures.
- Please be aware of the world around you. This product is designed to be immersive. Do not use this product near open
stairwells, cables, balconies or other objects that can be tripped over, run into, knocked down, broken or knocked over.
If you are startled or misconstrue the 3D images as real, you may crush a nearby object or injure yourself trying to move
your body.
- When watching a 3D video, do not place anything nearby that can be easily broken. Involuntary movements or surprised
reactions may occur as a result of watching 3D TV, causing you to break surrounding objects or hurt yourself.
- Do not use the 3D glasses for any purpose other than the purpose it was designed for. Wearing the 3D glasses for any
other purpose (as general spectacles, sunglasses, protective goggles, etc.) may physically harm you or weaken your
eyesight.
- Photosensitive seizure warning and other health risks
- Some viewers may experience an epileptic seizure or stroke when exposed to certain flashing images or lights
contained a certain television pictures or video games. If you or any of your relatives has a history of epilepsy or strokes,
please consult with a medical specialist before using the 3D function.
- Even those without a personal or family history of epilepsy or stroke may have an undiagnosed condition that can cause
*photosensitive epileptic seizures.
- If you experience any of the following symptoms immediately stop watching 3D pictures and consult a medical
specialist: (1) altered vision; (2) lightheadedness; (3) dizziness; (4) involuntary movements such as eye or muscle
twitching; (5) confusion; (6) nausea; (7) loss of awareness; (8) convulsions; (9) cramps; and/or (10) disorientation.
Parents should monitor and ask their children about the above symptoms. Children and teenagers may be more likely
than adults to experience these symptoms.
- Do not watch 3D pictures when you feel incoherent, sleepy, tired or sick. Avoid watching 3D pictures for ling periods of
time. Take breaks.
- Parents careful supervision is required particularly when children or teenagers view 3D images.
3D Type Menu
In the PICTURE menu, press ▲ button to select 3D Type, and then press ENTER button to enter
submenu.
3D Off
Press ▲▼ button to select 3D Off, press ENTER button to turn off 3D function.
3D On
Specifications
1.YPbPr/HDMI
| Resolution | Vert.Freq.(Hz) |
| 480i | 60 |
| 480p | 60 |
| 720p | 60 |
| 1080i | 60 |
| 1080P | 60 |
2.VGA
| Resolution Vert.Freq.(Hz) | |
| 14 40 *90 0 | 60 |
| 10 24 *76 8 | 60 |
| 80 0*6 00 | 60 |
| 64 0*4 80 | 60 |
| Model 3D100SQC32 | |
| Panel Size | 32" |
| Resolution | 1920×1080 |
| Viewing Angle 178H/178V | |
| Brightness 360 cd/m | 2 |
| Contrast Ratio(Typ.) | 3500:1 |
| Response Time 6.5ms | |
| TV System DMB-T11;PAL | |
| Audio System BG;DK:I |
Troubleshooting
| Condition Explanation/Solution | |
| Picture | |
| There is no picture (screen is dark) and no sound. | Check the antenna/cable connection.Connect the TV to the AC power, and open the power supply on the TV.If the indicator lights up in red, press Power button. |
| Ghosting occurs, or double images appear. | Check the antenna/cable connection.Check the antenna/cable location and direction. |
| Only snow and noise appear on the screen. | Check if the antenna/cable is broken or bent.Check if the antenna/cable has reached the end of its serviceable life (three to five years for normal use, one to two years when used at the seaside). |
| The picture is distorted (dotted lines or stripes appear). | Keep the TV away from electrical noise sources such as cars, motorcycles, hair-dryers, or optical equipment.When installing optional equipment, leave some space between the optional equipment and the TV.Check the antenna/cable connections.Kccp the antenna/cable TV cable away from other connecting cables. |
| There is picture or sound noise when viewing a TV channel. | Check the antenna/cable connection. |
| Tiny back points and/or bright pointsSound | The screen is composed of pixels. Tiny black points and/or |
| The picture is good, but there is no sound. | Press Vol +/- or Mute key.Check the audio cable L/R connectionWhen using HDMI input with Super Audio CD or DVD-Audio, DIGITAL AUDIO OUT (COAXIAL) may not be able to output audio signal |
| Channels | |
| You cannot select your desired channel. | Switch between digital and analogue mode, and select the desired digital/analogc channel. |
| Some channels are blank. The channel is for scrambled/subscription service only. Subscribe to a pay TV service.The channel is used only for data (no picture or sound).Contact the broadcaster for transmission details. | |
| You cannot view digital channels. | Contact a local installer to find out if digital transmissions are provided in your area.Check if the antenna/cable is broken or bentUpgrade to a higher gain antenna. |
| General | |
| The TV turns off automatically (the TV enters standby mode). | Check if the “Sleep off” is activated. |
| The remote does not function. Replace the batteries. | |
| HDMI equipment cannot be recognized. | Check that your equipment is compatible with control for HDMI. |
| Not all channels are tuned for cable. | Contact the related cable broadcaster |
- 目錄
- 安全資訊
- Safety information
- Installation
- Transporting
- Ventilation
- Notes:
- Prohibited Usage
- Location
- Environment
- Situation
- For children
- If the following problems occur
- Precautions
- Viewing the TV
- Handing and cleaning the screen surface/cabinet of the TV set
- Optional Equipment
- Stand Installation
- Step One
- Remote Control
- Description of television of remote control
- Functions of the panel
- Back Panel Buttons
- Basic Operation
- Power On /Off
- Select Viewing Source
- Menu Operation
- Channel Menu
- Picture Menu
- Sound Menu
- Time Menu
- Option Menu
- EPG
- Record
- Display
- Schedule
- Remind
- PHOTO
- MUSIC
- MOVIE
- TEXT
- Record Function (Only in DTV mode)
- PVR settings
- 6) Record Start
- Record buttons
- Recording menu
- Pre-Recorder
- Set the Recording Timer
- Play 3D TV
- WARNING
- 3D Type Menu
- Specifications
- Troubleshooting
Brand : VDiGi
Model : 3D100SQC32
Category : Television