
BKK 2130 - Iron BEKO - Free user manual and instructions
Find the device manual for free BKK 2130 BEKO in PDF.


| Product Type | Household Steam Iron |
| Brand | Beko |
| Model | BKK 2130 |
| Voltage / Frequency | 220-230 V ~ 50/60 Hz |
| Power Consumption | 1850-2020 W |
| Soleplate Material | PTFE non-stick coated |
| Isolation Class | I |
| Steam Output | Variable steam control, burst of steam, vertical steam |
| Spray Function | Yes, with spray nozzle |
| Self-Cleaning Function | Yes, recommended at least once a month |
| Anti-Drip System | Automatic, prevents water leakage at low temperatures |
| Auto Shut-Off | Yes, horizontal (16-39 seconds) and vertical (approx. 15 minutes) |
| Built-in Anti-Scale System | Yes, reduces limescale buildup |
| Water Tank Capacity | Fills up to 'Max' mark (approx. 250 ml) |
| Cord Length | Approx. 1.8 m (estimate) |
| Safety Features | Auto shut-off, hot surface warning, child safety |
| Maintenance & Cleaning | Use damp cloth, no abrasives, drain water after use |
| Weight | Approx. 1.2 kg (estimate) |
| Dimensions (approx.) | 30 x 12 x 15 cm (estimate) |
| Color | White/Blue (typical) |
Frequently Asked Questions - BKK 2130 BEKO
User questions about BKK 2130 BEKO
0 question about this device. Answer the ones you know or ask your own.
Ask a new question about this device
Download the instructions for your Iron in PDF format for free! Find your manual BKK 2130 - BEKO and take your electronic device back in hand. On this page are published all the documents necessary for the use of your device. BKK 2130 by BEKO.
USER MANUAL BKK 2130 BEKO
Household Steam Iron
User Manual
Read this manual prior to initial operation of the product!
Dear Customer,
We hope that your product, which has been manufactured in modern facilities and passed through a strict quality control procedure, will give you very good results.
We advise you to read through this manual carefully before using your product and keep it for future reference.
The User Manual will help you use your machine in a fast and safe way.
- Read the User Manual before installing and starting your product.
- In particular, follow the instructions related to safety.
- Keep this User Manual within easy reach for future reference.
- Also read all additional documents supplied with this product.
Remember that this User Manual is also applicable for several other models. Differences between models will be identified in the manual.

This product has been produced in environmentally friendly, modern facilities
CONTENTS
| 1 Safety Warnings | 2-3 | |
| 2 Technical Aspects Of Your Machine | 4 | |
| 3 Hints For Ironing | 5-9 | |
| 4 Maintenance And Cleaning | 10 | |
1 SafetyWarnings
For safety purpose you should read these instructions carefully before using the iron for the first time.
DO'S
- Check the mains voltage stated on the iron.
- Unwind and straighten the power cord before use.
- Switch on the iron by turning the Temperature Dial in clockwise direction; pilot light glows.
- Turn the Temperature Dial to the middle point of 1 dot, 2 dots, 3 dots or maximum setting.
- Switch off the iron by turning the Temperature Dial in anti-clockwise direction when it is not in use, even for a short period of time. Turn the Temperature Dial to°•Min° position.
- Disconnect the iron from mains supply outlet when filling or emptying water.
- Remove the water remained in the water tank.
- Use the Self-Cleaning function at least once a month.
- Switch off the steam function by moving the steam control knob to
position when it is not in use, even for a short period of time. - If the supply cord is damaged, it must be replaced by the manufacturer or its service
agent or similarly qualified person in order to avoid a hazard.
- The iron must be used and rested on a stable surface
- When placing the iron on its stand, ensure that the surface on which the stand is placed is stable.
- The plug of the supply cord must be removed from the socket-outlet before the water reservoir is filled with water
DO NOT'S
- Do not allow children touch the iron or the power cord when ironing.
- Do not leave the iron unattended when it is connected to a mains supply outlet.
- Do not use an extension power cord set unless competent authority has approved it.
- Do not add perfumed, vinegar or other chemical liquids into the water tank; they can damage the iron seriously.
- Do not immerse the iron in water or any other liquid.
- Do not use the iron when it is damaged or it works improperly.
- Do not roll the power cord around the iron for storage until it has cooled down completely.
- Do not attempt to open the cabinets or dismantle any parts from the iron; there is no serviceable part inside.
- The iron is not to be used if it has been
dropped, if there are visible signs of damage or if it is leaking.
- Keep electrical appliances out of reach from Children or infirm persons. Do not let them use the appliances without supervision.
- This appliance is not intended for use by persons (including children) with reduced physical, sensory or mental capabilities, or lack of experience and knowledge, unless they have been given supervision or instruction concerning use of the appliance by a person responsible for their safety
- Children should be supervised to ensure that they do not play with the appliance.
- Keep the iron and its cord out of reach of children less than 8 years of age when it is energized or cooling down.
- Do not allow children to perform cleaning and user maintenance when they are without supervision.
- Do not touch the surfaces marked with symbol during or just after ironing. It is hot (Please refer to the following figure 1 and figure 2).


CAUTION:
HOT SURFACE.


CAUTION:
HOT SURFACE.
2 Technical Aspects Of Your Machine


1- Soleplate
2- Self-Clean button
3- Temperature Dial Knob
4- Pilot Light
5- Spray Nozzle
6- Water Inlet Cover
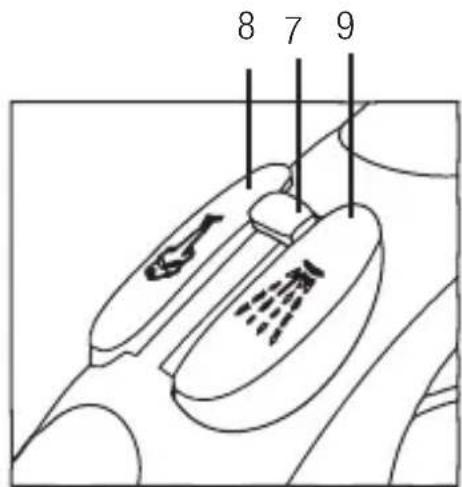
7- Variable Steam Control knob
8- Burst of Steam Button
9- Spray Button
10- Filling Beaker
Voltage/Frequency : 220 - 230 V \~ 50/60 Hz
Power : 1850 - 2020 W
Soleplate : PTFE non stick coated (BKK 2130)
/ Steel (BKK 2131)
Isolation class : |
All declared values on the product and on the printed leaflets are picked up after laboratory measurements performed according to related standards. These values may differ upon usage and ambient conditions.
3 Hints For Ironing
- Sort out the articles to be ironed according to the type of fabric. This will minimize the frequency of temperature adjustment for different garments.
- Test ironing a small area on the backside or inside the garment if you are unsure about the type of fabric. Start with a low temperature and increase gradually.
- Wait for about three minutes before ironing heat sensitive fabrics. Temperature adjustment needs certain time to reach the required level no matter it is higher or lower.
- Delicate fabrics such as silk, wool, velour, etc. are best ironed with an ironing cloth to prevent shine marks.
- You may need a few times of press to activate the spray, burst and vertically burst function.
Read The Garment Labels and follow the manufacturer's ironing instructions that are often shown by symbols similar to the follows:
Temperature Control Setting
| . Acetate. Elastsne. Polyamide. Polypropylene | . Cupro. Polyester. Protein. Silk. Triacetate. Viscose. Wool | . Cotton. Linen |
How To Fill Water
- Disconnect the iron from mains supply outlet.
- Move the Variable Steam Control Knob to
position.
- Open the Water Inlet Cover
- Fill water through the water inlet hole.
- Fill up to the 'Max' level marked on the side of water tank.
Note:
Do not use chemically descaled water or any other liquids.
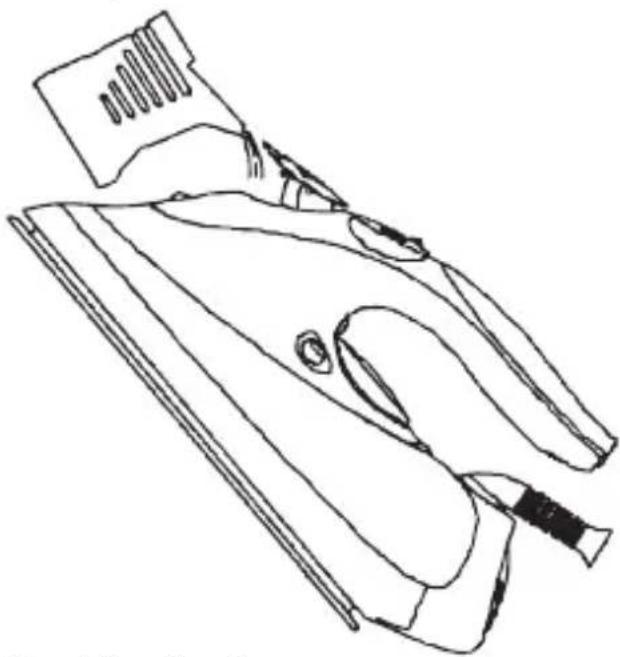
First Time Ironing
- Remove any protective films or stickers from the sole plate and the cabinet.
- Unwind and straighten the power cord.
- Fill the water tank. (See How To Fill Water)
- Connect the iron to a suitable mains supply outlet.
- Turn the Temperature Dial in clockwise
direction to maximum position; pilot light glows.
-
Pilot light goes off when the required temperature is reached.
-
Move the Variable Steam Control Knob to

position; steam starts coming out from the holes in the sole plate.
- Begin first time ironing with an old towel.
- When the water tank is empty and there is no more steam produced; the preparation work is completed. The iron is now ready for proper use.
Spraying

- This function can be used any time and is not affect any setting.
- Fill the water tank as described in How To Fill Water.
- Aim the nozzle to the garment.
- Press the Spray Button.
Note: It may be necessary to press the spray button a few times to start this function.
Dry Ironing
- Connect the iron to a suitable mains supply outlet.
- Turn the Temperature Dial in clockwise direction; select ‘•’ (1 dot), ‘••’ (2 dots) or ‘•••’ (3 dots) according to the recommendation of garment label.
- Pilot light glows indicating the iron is switched on.
-
When the required temperature is reached; pilot light goes off. The iron is ready for use.
-
Move the Temperature Dial in anti-clockwise direction to 'Min'; the iron is switched off.
- Disconnect the iron from mains supply outlet.
- When the iron gets cool completely, store it vertically in a safe place
Steam ironing
- Fill the iron as described in How To Fill Water.
- Connect the iron to a suitable mains supply outlet.

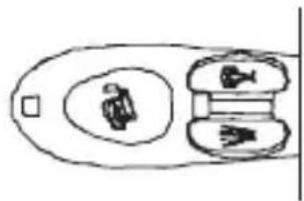
Steam off
Steam max
- Turn the Temperature Dial in clockwise direction to ‘●●●’ (3 dots) setting. (For optimum steam quality, do not use 1 dot or 2 dots setting for steam ironing)
- Pilot light glows indicating the iron is switched on.
- Pilot light goes off when the required temperature is reached.
- The iron is ready for use.
- Move the Variable Steam Control Knob to give the desired amount of steam.
- Turn the Temperature Dial in anti-clockwise direction to 'Min'; the iron is switched off.
- Disconnect the iron from mains supply outlet.
- When the iron gets cool completely, store it vertically in a safe place.
Note: Set the Variable Steam Control Knob to ✿position after use.
Burst of Steam


This function provides extra amount of steam to remove stubborn wrinkles.
- Fill the iron as described in the section of How To Fill Water.
- Turn the Temperature Dial to ‘●●●’ (3 dots) setting.
- Pilot light glows indicating the iron is switched on.
- Pilot light goes off when the required temperature is reached.
- The iron is ready for use.
- Press the Burst Of Steam Button.
- Steam will shoot from the holes of the soleplate into the fabric being ironed and removing the wrinkles.
- For stubborn wrinkles, wait a few seconds before pressing the Burst Of Steam Button again. Most wrinkles can be removed within three presses.
Note: It may be necessary to press the burst of steam button a few times to start this function.
For optimum steam quality, do not operate the Burst Of Steam more than three times in succession.
Burst of Steam in Vertical Position
Warning:
Do not apply steam on any clothes or fabrics that are being worn by human or pets.
Temperature of steam is very high.
This function provides extra amount of steam to remove wrinkles on delicate garments in hanging position, hanging curtains, or other hanging fabrics.

- Fill the iron as described in the section of How To Fill Water.
- Turn the Temperature Dial to 'Max' setting.
- Pilot light glows indicating the iron is switch on.
-
Pilot light goes off when the required temperature is reached. The iron is now ready for use.
-
Hold the iron between 15 and 30 centimeters away from the garment.
- Press the Burst of Steam Button once.
- Steam will penetrate into the garment removing the wrinkles.
- For Stubborn wrinkles, wait a few seconds before pressing the Burst Of Steam Button again.
- Most wrinkles can be removed within three presses.
Note: It may be necessary to press the burst of steam button a few times to start this function.
For optimum steam quality, do not operate the Burst Of Steam more than three times in succession.
Build-in Anti-scale System
The build-in anti-scale cartridge is designed to reduce the build-up of limescale which occurs during steam ironing. This will prolonge the working life of your iron.

Note: The anti-scale cartridge will not completely stop the natural process of limescale build-up.
Self-Cleaning
This function removes the scales and minerals built up in the Steam Chamber. The iron will remain in the best condition if this function is performed at least once a month or more regularly depending on the hardness of the water used.
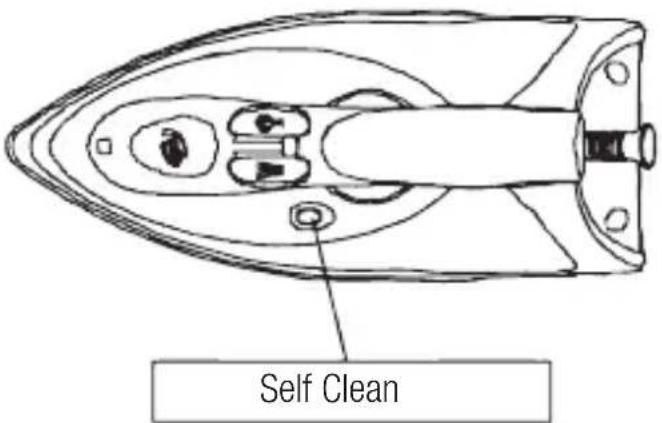
- Fill the iron as described in How To Fill Water; fill the water tank up to half.
- Place the iron on a surface in upright standing position.

- Connect to a mains supply outlet.
- Turn the Temperature Dial in clockwise direction to 'Max' setting.
- Pilot light glows indicating the iron is switched on.
- Pilot light goes off when the required temperature is reached.
- Wait for one more cycle; pilot light glows
and goes off.
- Turn the Temperature Dial in anti-clockwise direction to 'Min'.
- Disconnect the iron from mains supply outlet.
- Hold the iron horizontally over a sink.
- Press and hold the Self-Cleaning button.
- Steam and boiling hot water will drain from the holes on the soleplate washing away the scales and minerals that have built up inside the Steam Chamber.
- Gently move the iron back and forth until the water tank is empty.
- When Self-Cleaning is complete, release the Self-Cleaning button.
- Rest your steam iron back on its heel rest and allow to fully cool down.
- Wipe the soleplate with a cold damp cloth.
Caution: Keep skin/body away from the hot water.
Anti-Drip
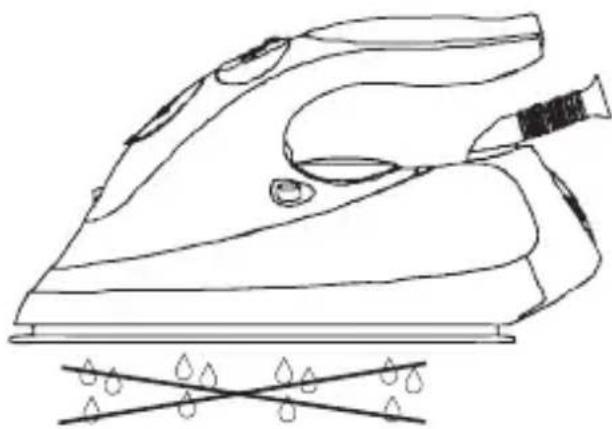
-
Anti-drip system, which is designed to prevent water escaping from the soleplate when the iron is too cold automatically.
-
During use, the anti drip system may emit a loud clicking sound, particularly during heat-up or whilst cooling down. This is perfectly normal and indicates that the system is functioning correctly.
The Auto shut-off feature will operate automatically when the iron is unattended and it is connected to a mains supply outlet.
Auto shut-off in horizontal
- The iron will switch off automatically between 16-39 seconds if the iron is immobile in the ironing position (horizontal).
- The auto shut-off indicator glows and having a continue beep sound.
- By simply moving the iron, Auto Shut Off will reset (Auto Shut-Off indicator goes off).
Auto-shut off in vertical
- The iron will switch off automatically in approximately in 15 minutes if the iron is left on its heel rest position (vertically).
- The auto shut-off indicator glows and having a continue beep sound.
- By simply moving the iron, the Auto Shut Off will reset (Auto Shut Off indicator goes off).
Note: After Auto Shut Off is reset, the iron will take about 60 seconds to reach its previous soleplate temperature set by the Temperature Dial.
4 Maintenance And Cleaning
Draining The Water

- Move the Variable Steam Control Knob to position.
- Disconnect the iron from the mains supply outlet.
- Hold the iron upside down and gently shake it to remove any remaining water out of filling hole.
- When the iron get cool completely, store it vertically in a safe place.
Note: Set the Variable Steam Control Knob to position before storing the iron.
Cleaning The Iron
- Disconnect the iron from the mains supply outlet.
- Use a damped cloth or non-scratching cleaner to remove any deposits on the sole plate or the cabinets.
Note:
Never use sharp or rough objects to remove the deposits on the sole plate.
Never use any abrasive, vinegar or descaling agents to clean the iron.


- HOUSEHOLD STEAM IRON
- READ THIS MANUAL PRIOR TO INITIAL OPERATION OF THE PRODUCT
- THE USER MANUAL WILL HELP YOU USE YOUR MACHINE IN A FAST AND SAFE WAY
- CONTENTS
- 1 SAFETYWARNINGS
- DO'S
- DO NOT'S
- CAUTION
- HOT SURFACE
- 2 TECHNICAL ASPECTS OF YOUR MACHINE
- 3 HINTS FOR IRONING
- HOW TO FILL WATER
- NOTE
- FIRST TIME IRONING
- DRY IRONING
- STEAM IRONING
- BURST OF STEAM IN VERTICAL POSITION
- WARNING
- BUILD-IN ANTI-SCALE SYSTEM
- SELF-CLEANING
- AUTO SHUT-OFF IN HORIZONTAL
- AUTO-SHUT OFF IN VERTICAL
- 4 MAINTENANCE AND CLEANING
- DRAINING THE WATER
- CLEANING THE IRON
Brand : BEKO
Model : BKK 2130
Category : Iron