
TG-10B - Air purifier MILL - Free user manual and instructions
Find the device manual for free TG-10B MILL in PDF.


| Product Type | Air Purifier |
| Brand | Mill |
| Model | TG-10B |
| Dimensions (H x W x D) | 45 cm x 25 cm x 25 cm |
| Weight | 3.5 kg |
| Power Supply | 220-240V, 50/60Hz, 30W |
| Coverage Area | Up to 30 m² |
| Filtration System | Pre-filter, HEPA filter, activated carbon filter |
| Filter Replacement Indicator | Yes |
| Fan Speeds | 3 speeds (Low, Medium, High) |
| Noise Level | 25-50 dB |
| Air Purification Rate (CADR) | 150 m³/h |
| Timer | 1-8 hours |
| Control Type | Touch panel with remote control |
| Display | LED touch display |
| Power Cord Length | 1.8 m |
| Filter Replacement Frequency | Every 6-12 months depending on usage |
| Cleaning | Wipe with dry cloth; pre-filter washable |
| Safety Features | Overheat protection, child lock |
| Spare Parts Available | Replacement filters, remote control |
| Repairability | Modular design; user-replaceable filters |
Frequently Asked Questions - TG-10B MILL
User questions about TG-10B MILL
0 question about this device. Answer the ones you know or ask your own.
Ask a new question about this device
Download the instructions for your Air purifier in PDF format for free! Find your manual TG-10B - MILL and take your electronic device back in hand. On this page are published all the documents necessary for the use of your device. TG-10B by MILL.
USER MANUAL TG-10B MILL
ASSEMBLY AND INSTRUCTION MANUAL (EN)
mill®
Series: Climate
This assembly and instruction manual applies to the following models:
TG10B
TG20B
Read the instructions carefully. Use and maintenance must also be in accordance with the instructions. Questions related to installation or use of the product should be addressed to the importer.
Table of contents
Important safety information....3
Specifications and error codes 4
Description of the product....5
Before use....6
Continuous use 7
Using TG10B 8
Using TG20B....10
Troubleshooting....12
Maintenance....13
Warranty and waste management....14
Important safety information
You must follow standard safety guidelines when using electrical products, especially in the presence of children.
WARNING! To avoid electric shock or damage, always make sure that the plug is disconnected before the product is moved or cleaned.
• Read the instructions carefully.
• Make sure the product is connected to regular mains (230 V), as indicated on the product label.
- Be particularly careful if the product is used in the presence of children, the handicapped or elderly.
• Make sure the cord is situated so that nobody can trip on it.
- The product must not be used if either the cord or plug is damaged. The product must not be used if it has been dropped on the floor or is damaged in any other way which causes it to malfunction.
- Avoid using extension cords, as such a cord may become overheated and possibly start a fire.
• If the cord is damaged, it must be repaired by the manufacturer or by an authorized technician to avoid dangerous situations.
• Never touch the product with wet hands, as this may cause electric shock.
• The product should not be installed in close proximity to flammable materials of any kind as this will result in the risk of fire.
• The product must be switched off and the plug must be disconnected before the product is moved.
• Do not insert your fingers or other objects into the air outlet on the top of the product.
- Avoid overloading the mains (the circuit) where the product is connected. Pay attention if other electrical apparatus are connected to the same power outlet or circuit.
Take into consideration the level of humidity in the room if the room is furnished with wooden furniture or other woodwork, as continuous dryness may result in the wood splitting.
- The product cannot be used by children under 8 years of age and persons with reduced physical or mental abilities or who lack experience and knowledge of the product, unless they are given supervision or instruction in the safe use of the device and understand the hazards involved.
• Children should not play with the device. Cleaning and maintenance should not be performed by children without supervision.
• Children under 3 years of age should be kept away from the device, unless under continuous supervision.
- Children aged 3 to 8 years are only permitted to turn the device ON/OFF, assuming the device is assembled according to the assembly instructions and the children have received instruction or supervision in the safe use of the product and understand the hazards involved.
KEEP THIS INSTRUCTION MANUAL FOR FUTURE USE!
NEVER TOUCH THE PRODUCT WITH WET HANDS OR COVER THE AIR OUTLET
Specifications
| Model | TG10B | TG20B |
| Product # | DYD-E10A | DYD-F20A |
| Capacity (Humidity 80%) | 10 liters/day (30 °C) | 20 liters/day (30 °C) |
| Capacity (Humidity 60%) | 6.0 liters/day (26.7 °C) | 12.0 liters/day (26,7 °C) |
| Power | ~220–240 V/50 Hz | ~220–240 V/50 Hz |
| Wattage | 200 W | 320 W |
| Amperage | 1.0 A | 1.6 A |
| Max power | 240 W | 380 W |
| Max amperage | 1.2 A | 1.8 A |
| Max pressure in | 1.0 Mpa | 1.0 Mpa |
| Max pressure out | 2.5 Mpa | 2.5 Mpa |
| Cooling fluid (freon free) | R134a/110 g | R134a/190 g |
| Operating temperature | 5–35 °C | 5–35 °C |
| Net weight | 9.4 kg | 13.2 kg |
| Product dimensions (B × D × Drainage pipe) | 32.5 × 24.8 × 47.5 cmYes (60 cm) | 38.5 × 29.0 × 59.5 cmYes (60 cm) |


natural_image
Line drawing of a portable air conditioner unit (no text or symbols)Error codes
Please contact Mill International AS if any of the error codes below appear on the display.
| Code | Display | Cause |
| E1—Faulty temperature sensor Flashes every 30 seconds Normal operation of the unit will not be affected, but the unit starts working in de-icing mode | ||
| E2—Faulty humidity sensor Flashes every 30 seconds Humidity level should be set to 50% The unit will be in continuous operation mode for further use | ||
Description of the product
TG10B:
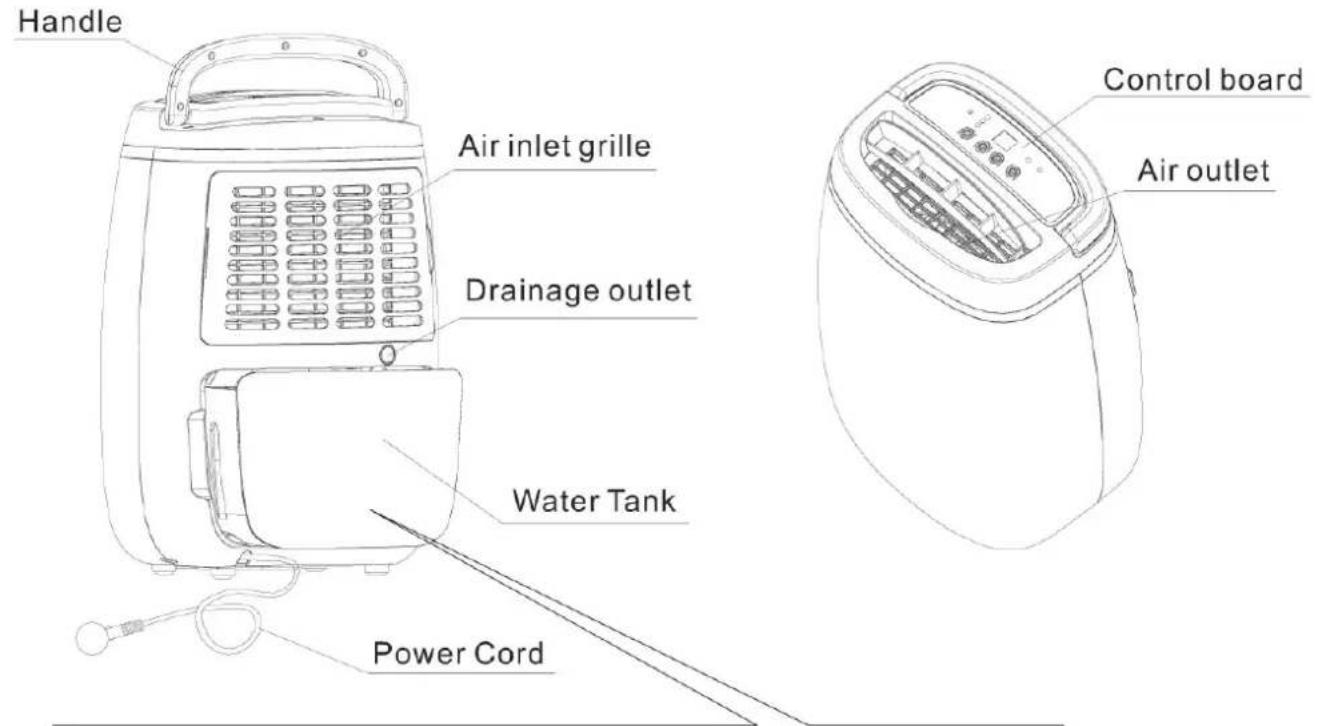
There maybe a little bit residual water in the new unit, that is because of performance test before selling, not malfunction or disqualification.
TG20B:
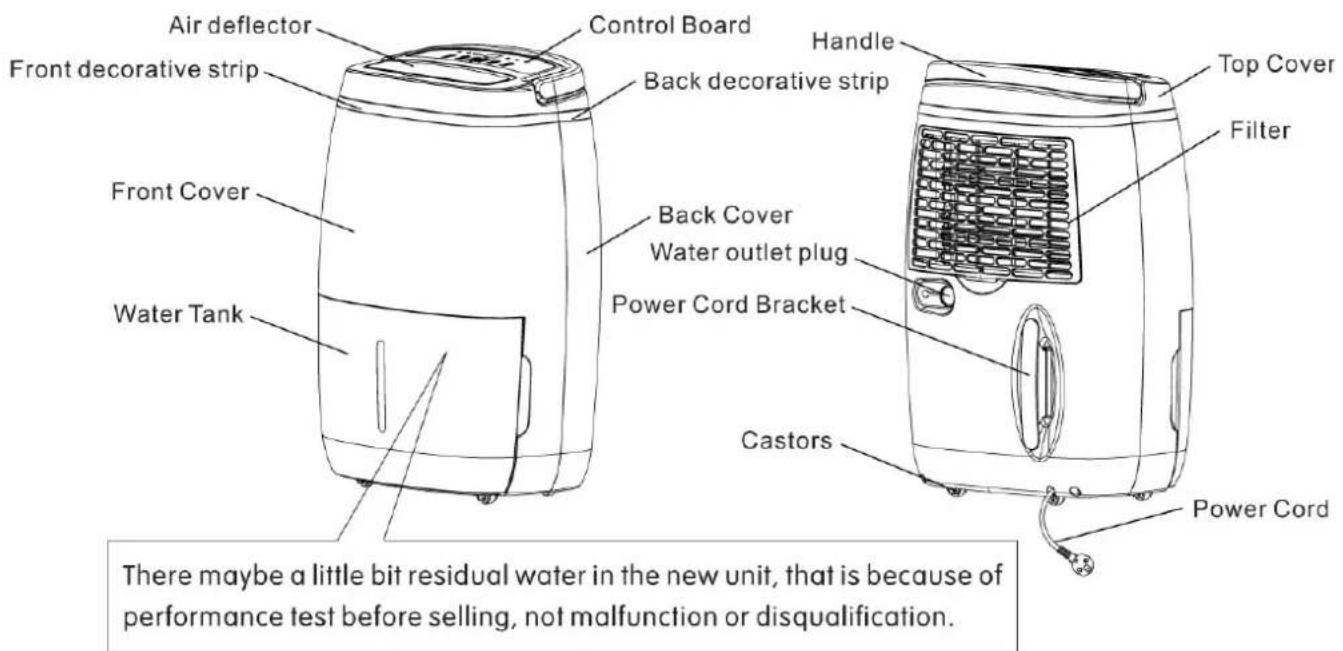
Before use
1) Place the product in a suitable place. Please look at the distance overview below.

2) Make sure the product is connected to regular mains (230 V), as indicated on the product label. The power connector must be grounded.
3) Check to make sure that the space in front of the air intake and air outlet is not blocked. On TG20B the hatch for the air outlet automatically goes up, while on TG10B this is done manually.
4) Make sure that the hatch above the air outlet is in the closed position when switching the product on. (Applies only to TG20B. On TG10B this hatch must be manually opened before starting the device.)
If you wish to use the product over a longer period of continuous operation, the drainage tube may prove useful. Please follow the steps below for each model
Make sure the product is turned off, unplug it from the outlet and remove the water tank
Remove the outlet plug from the water tank and plug this into the water outlet (Figure 1)
Use a knife to remove the protection in front of the drainage tube outlet (Figure 2)
Insert the supplied drainage tube (diameter 12 mm) (Figure 3). Make sure that the tube is properly fitted to avoid leakages
Insert the supplied drainage tube (diameter 14 mm). Make sure that the tube is properly fitted to avoid leakages
Make sure that the drainage tube is not flat or has other damage, as this can reduce the dehumidifying capacity of the product. In case of continuous use, the drainage tube should NEVER be located higher than the drainage outlet.
A) ON/OFF button. Press once to turn the product ON or OFF
B) UP/DOWN arrow keys
i) Use the arrow keys to set the desired humidity level (intervals of 5%)
C) Timer function (counting down until the product is turned OFF)
i) Press the clock once to activate the timer function
li) Use the arrow keys to set the desired number of hours for the timer function (intervals of 1 hour)
CAUTION! In order to lock/unlock the control panel, hold both arrow keys simultaneously for 2 seconds
Operation indicator: When the product receives power (standby position), the icon will flash. When the product is in operation, the icon will be continuously lit.
Water tank indicator: When the water tank is full, the product will go into standby position and the water tank icon will flash. Empty the tank
De-icing indicator: This icon will be lit during de-icing of the product.
The icon flashes when you activate the timer function (C)
The icon will be continuously lit when the timer function is active.
Instruction manual for TG10B:
1) ON/OFF button
i) Open the hatch above the air outlet and adjust it to the desired angle
ii) Press the ON/OFF button
iii) Turn off by pressing the ON/OFF button
CAUTION! Allow the product to stand still for at least 3 minutes after it is turned off, so that any remaining water in the system will pass down into the water tank. Disconnect the plug from the outlet when the product is OFF for power conservation and safety.
2) UP/DOWN arrow keys
i) Use the arrow keys to set the desired humidity level (interval 30–80%)
ii) CO = Continuous operation (regardless of humidity level)
A) Use the DOWN arrow key to get to CO. It is one down from 30% humidity.
iii) When the desired humidity level is + / - 3% off the actual humidity level, the product will stop/ start the dehumidification process.
Instruction manual for TG20B:
CAUTION! Selection will automatically be confirmed after 5 seconds of flashing
Control panel for TG20B:

A) ON/OFF button. Press once to turn the product ON or OFF
B) Press once to start/stop the automatic air control function
C) UP/DOWN arrow keys
i) Use the arrow keys to set the desired humidity level (intervals of 5%)
D) Timer function (counting down until the product is turned OFF)
i) Press the clock once to activate the timer function
li) Use the arrow keys to set the desired number of hours for the timer function (intervals of 1 hour)
E) Fan speed
i) Press once to change to LOW/HIGH speed
CAUTION! In order to lock/unlock the control panel, hold both arrow keys simultaneously for 2 seconds

Operation indicator: When the product receives power (standby position), the icon will flash. When the product is in operation the icon will be continuously lit.

Water tank indicator: When the water tank is full, the product will go into standby position and the water tank icon will flash. Empty the tank.

De-icing indicator: This icon will be lit during de-icing of the product.

The icon flashes when you activate the timer function (C). The icon is continuously lit when the timer function is active.

The icon is lit when the automatic air control function is activated.

HIGH fan

LOW fan
Instruction manual for TG20B:
1) ON/OFF button
i) Make sure that the hatch above the air outlet is closed
ii) Press the ON/OFF button once
iii) Turn off by pressing the ON/OFF button
CAUTION! Allow the product to stand still for at least 3 minutes after it is turned off, so that any remaining water in the system will pass down into the water tank. Disconnect the plug from the outlet when the product is OFF for power conservation and safety.
2) UP/DOWN arrow keys
i) Use the arrow keys to set the desired humidity level (interval 30–80%)
ii) CO = Continuous operation (regardless of humidity level)
A) Use the arrow key DOWN to get to CO. It is one down from 30% humidity.
iii) When the desired humidity level is + / - 3% off the actual humidity level, the product will stop/ start the dehumidification process.
3) The product will have a fixed position for the hatch above the air outlet when the product is switched on (90°). Press the B button once to activate the automatic air control function. The hatch will automatically change between 45°–90°.
4) Press the E button once to change the fan speed (2 positions: HIGH and LOW)
Troubleshooting (TG10B & TG20B)
Please go through the troubleshooting guide to identify what can be done to correct the problem.
Contact Mill International AS should the problem persist.
| Problem | Cause | Corrective measure |
| The unit is not working | The product is not receiving power Connect the plug to the socket and check | |
| The product is not switched on Turn on the product | ||
| The light indicating full water tank is lit | If the water tank is full, please empty the tank. The product will restart when the tank is re-inserted. | |
| Dehumidifying capacity is low | Operating me is too short Please leave the product on for a longer period | |
| Air Alter is dirty or blocked Wash the Alter or remove what is blocking it | ||
| Temperature or humidity is too low | Dehumidifying capacity becomes lower as the temperature drops. Please increase the room temperature for better capacity. | |
| Desired humidity level is set higher than the detected humidity in the room | Set the desired humidity level lower than detected humidity level | |
| Drainage tube (in continuous operation) is blocked or lat | Check the drainage tube and replace it if necessary Make sure that the tube has a sufficient drop. | |
| Desired humidity lever is not reached after long operation time | Open windows or doors | Shut windows and doors so that the room is not affected by other humidity levels |
| Water on the door The product has been pushed or moved and water from the water tank has splashed out | Usual corrective measures | |
| Air from the air outlet is hot Heat exchange process | Usual corrective measures | |
| Sound from the product Cooling liquid that passes through the compressor/compressor is working | Usual corrective measures | |
Maintenance (TG10B & TG20B)
Make sure the power connector is unplugged before you wipe it with a dry cloth .
1) Clean the air □ter
The air ter collects dust over me. This dust reduces operating efficiency and regular cleaning of the ter is required for the best possible operating efficiency.
Clean the □iter every 1–5 days if the room is dusty. Clean the □iter once a month if the room is relatively free of dust.
How to clean the □iter ?
A) Remove the llter from the back of the product (see illustration)
B) Vacuum the ter or wash it with warm water (not ho er than 40 °C)
C) Let the lter dry
D) Re-insert it in front of the air inlet of the product

2) Check the drainage tube (if in use)
It is important to check that the drainage tube is ed correctly (leakage, etc.) for the product to function normally. Therefore, check the drainage tube regularly .
3) Empty the water tank a'er use
Always empty the water tank after use and remove the plug from the socket.
The warranty is valid for 2 years. The product will be repaired or replaced during this time should any malfunctions occur. The warranty applies if the product is used according to these instructions and the customer can present a purchase receipt. If case of any product failures, please contact the store where it was purchased or the importer
The icon indicates that this product is not to be disposed of together with household waste.. This product must be delivered to a recycling service for electrical appliances and electronic equipment. This is done to avoid health risks and prevent harm to the environment. Your local utility, business or environmental center has an arrangement to ensure the environmentally correct disposal and recycling of such products
When submitting a claim, you have to provide the series number for your product and present the original receipt
In case of claims or questions about the product or spare parts, contact your retailer or Mill International


- ASSEMBLY AND INSTRUCTION MANUAL (EN)
- mill®
- Table of contents
- Important safety information
- KEEP THIS INSTRUCTION MANUAL FOR FUTURE USE!
- NEVER TOUCH THE PRODUCT WITH WET HANDS OR COVER THE AIR OUTLET
- Error codes
- Description of the product
- Before use
- CAUTION! In order to lock/unlock the control panel, hold both arrow keys simultaneously for 2 seconds
- Instruction manual for TG10B:
- 1) ON/OFF button
- 2) UP/DOWN arrow keys
- Instruction manual for TG20B:
- Control panel for TG20B:
- Troubleshooting (TG10B & TG20B)
- Maintenance (TG10B & TG20B)
- 1) Clean the air □ter
- How to clean the □iter ?
- 2) Check the drainage tube (if in use)
- 3) Empty the water tank a'er use
- When submitting a claim, you have to provide the series number for your product and present the original receipt
Brand : MILL
Model : TG-10B
Category : Air purifier