
2118DF - Safe FIRST ALERT - Free user manual and instructions
Find the device manual for free 2118DF FIRST ALERT in PDF.


| Brand | First Alert |
| Model | 2118DF |
| Product Type | Digital Fire Theft Safe |
| Lock Type | Digital keypad with LCD display |
| Override Key | Emergency Override Key (square top) |
| Companion Key | 2 Companion Entry Keys (round top) |
| Battery Type | 4 AA alkaline batteries (included) |
| Battery Life | Replace at least once a year |
| Passcode Length | 3 to 8 digits |
| Fire Rating | 1 hour at up to 1700°F (927°C); interior stays below 350°F (177°C) |
| Interior Shelving | 1 adjustable shelf with 5 positions |
| Security Lockout | 5-minute lockout after 3 invalid attempts; extended 1-hour lockout after 3 more attempts |
| Memory Retention | Passcode not erased upon battery removal |
| Warranty | 5-year limited warranty |
| After Fire Replacement | Lifetime free replacement if damaged by fire (consumer pays freight) |
| Recommended Use | Paper records, memory sticks, CDs, DVDs, USB drives |
| Not Recommended For | Guns, medications, pearls, audio/video cassettes, floppy discs, data cartridges, film, photos, negatives |
Frequently Asked Questions - 2118DF FIRST ALERT
User questions about 2118DF FIRST ALERT
0 question about this device. Answer the ones you know or ask your own.
Ask a new question about this device
Download the instructions for your Safe in PDF format for free! Find your manual 2118DF - FIRST ALERT and take your electronic device back in hand. On this page are published all the documents necessary for the use of your device. 2118DF by FIRST ALERT.
USER MANUAL 2118DF FIRST ALERT
natural_image
Three identical gray self-locking cabinets with open doors, each labeled 'First Alert' and showing internal control panels (no additional text or symbols visible)Model 2054DF
Model 2084DF
Model 2118DF
DIGITAL

FIRE THEFT SAFE™
Read These Instructions Very Carefully!
Index
Overview of Your Safe ......Page 1
Programming Preparation ...... Page 2
Step 1. Installing Batteries
Step 2. Opening Safe with Override Key
Programming a Passcode ......Page 3
LCD Display Menu
Step 3. Programming a Passcode
Opening & Closing Digital Safe Page 4
Open Safe with Passcode & Key
Close Safe
Open Safe with Override Key
Additional Features: Shelves...... Page 5
Additional Features: Bolt-Down Kit Page 6
Consumer Affairs Page 8
Use, Care and Maintenance ...... Page 10
For Your Protection
- Do not remove the Serial Number tag from the safe.
- Store Emergency Override Keys away from (NEVER INSIDE) safe.
- Record all Safe Identification Numbers on Safe Identification Record (last page).
■ Save this manual and NEVER keep it inside the safe.
Overview of Your Safe
WELCOME!
Your new First Alert® Fire Theft Safe™ will provide years of safe and secure protection for your valuables, important documents and other personal items. All First Alert® safes are designed and built using the highest manufacturing standards to ensure maximum user satisfaction under a variety of conditions. With proper care, your First Alert® safe will provide “Peace of Mind” for many years to come.
Thank you and Enjoy!
The following list outlines the items and quantities of each included with your new safe. Please carefully check the list to confirm all items have been received. If any item is missing, then please contact Consumer Affairs @ 1-800-223-8566.
Package Contents
All Models
1 First Alert® Firesafe
1 Operation & Installation Guide
2 Companion Entry Keys


natural_image
Line drawing of a simple safe with a door and control panel (no text or symbols)Models 2054DF (only)
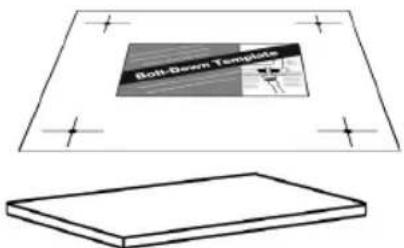
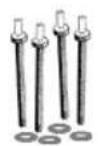
1 Bolt-Down Kit Including:
1 Mounting Template
4 Break-off Bolts
4 Washers
1 Removable Shelf
Models 2084DF / 2118DF (only)
1 Adjustable Shelf
4 Shelf Support Clips


Important: DO NOT RETURN SAFE TO STORE
If you are missing parts, have difficulty programming your safe or have any other questions pertaining to its proper use and care, DO NOT RETURN your safe to the store. Please contact Consumer Affairs at 1-800-223-8566 (USA & Canada) for assistance.
Programming Preparation
Step 1. Installing Batteries
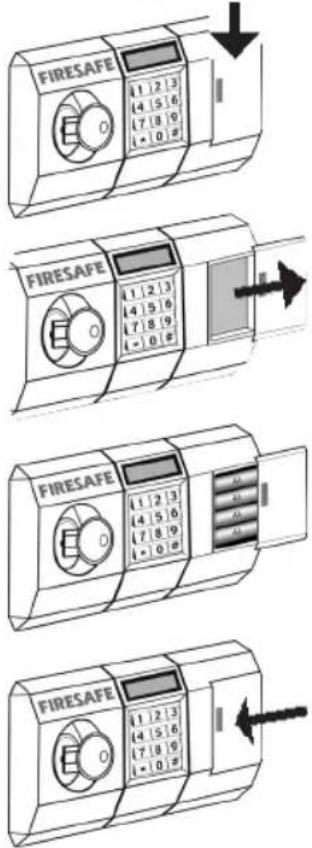
The digital keypad is powered by 4 "AA" batteries which must be installed before you can begin programming your personal code. For your convenience, we have provided you with 4 "AA" batteries. For best results and depending on use, we recommend replacing the batteries at least once a year.
- Locate battery compartment to the right of the digital keypad.
- To open the compartment, press firmly in on the battery cover and slide it to the right for removal.
- Install 4 new "AA" batteries in the battery compartment. Make sure they are installed in the correct direction as marked on the inside of the battery compartment.
- Once the batteries are installed properly, replace the cover by sliding it back on from the left.
Important: BATTERY REMOVAL
If the batteries are removed or fail, the keypad memory will NOT be erased.
BATTERY
COMPARTMENT
Step 2. Open Safe with Override Key (square top)
You will need access to the inside of the safe door to begin programming. You must use the Emergency Override Key (square top) to open the door for the first time.

natural_image
Abstract circular arrow symbol with a stylized 'G' and ring, no text or symbols present- Insert the Emergency Override Key (square top) in the lock, turn to the left (counterclockwise) and pull the door open.
Important: TURN OVERRIDE KEY TO LEFT ONLY
When using the Emergency Override Key, you must ONLY TURN IT TO THE LEFT. Turning it to the right may cause key to become stuck in the cylinder and may cause damage to the lock.

Programming A Passcode
LCD Display Menu
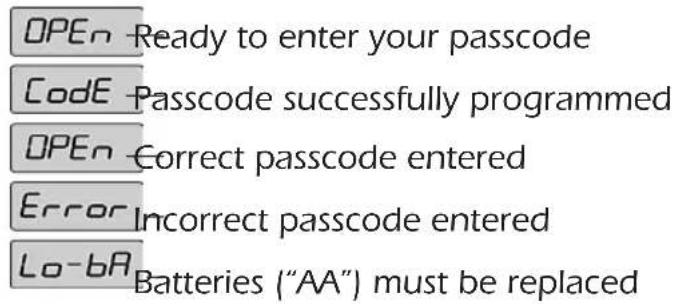
Your new Digital Firesafe features an LCD display to assist in programming and operating your safe. A menu of the codes is as follows:

Step 3. Programming a Passcode
Use the digital keypad to program your own 3 to 8 digit passcode. You may choose or change your personal passcode at any time by following these steps:
- Locate the memory button marked on the inside of the door.
- Using a pen or other blunt tip, quickly push and release the memory button.
- After you hear a "beep", the LCD display will read "OPEN" and you may begin entering your personal code (from 3 to 8 numbers) followed by the # button.
- Next, you will hear a longer "beep" and the LCD display will read "CODE", indicating that your personal code has been successfully programmed and can now be used to open your safe.

Important: SECURITY LOCKOUT PERIODS
For added security, the safe will automatically "Lockout" entry for 5 minutes after three attempts to open with an invalid passcode. After three more invalid attempts within this time period, a one-hour "lockout" period will begin. During these "Lockout" periods, entry MUST BE MADE using the emergency override key.
Opening & Closing Digital Safe
Open Safe with Passcode & Key
Once your passcode has been entered into the memory, the safe can be opened by following these simple steps:
- Insert one of the Companion Entry Keys (round top) into the lock cylinder but, DO NOT TURN KEY.
- Press the * button on the keypad, followed by your personal code and the # button.
- The LCD display will read "GOOD" and you will hear a tone indicating that the safe door is unlocked.
- To open, turn the Companion Entry Key (round top) to the RIGHT.
Note: You must open the safe door within 3 seconds or the electronic lock automatically engages.

TURN ENTRY KEY TO RIGHT ONLY
When using the Companion Entry Key, you must ONLY TURN IT TO THE RIGHT. Turning it to the left may cause key to become stuck in the cylinder and may cause damage to the lock.

Close Safe
- Make sure the key is in the open position: Right for Companion Entry Key (round top), and left for Emergency Override Key (square top).
- Close the door and turn the key to the locked position.
- Remove the key from the lock.
Open Safe with Override Key
If unable to gain access using your passcode and Companion Entry Key (round top), you may use the Emergency Override Key (square top) to open the door at anytime.
- Insert the Emergency Override Key (square top) in the lock, turn to the left (counterclockwise) and pull the door open.

natural_image
Abstract circular diagram with concentric rings and a stylized letter 'E' inside, no text or symbols present.Additional Features: Removable Shelves
Shelves
Removable Shelf (Model 2054DF only)
To remove the shelf, simply lift it up and tilt it on a sufficient angle to provide clearance for removal.
Adjustable & Removable Shelves (Models 2084DF & 2118DF)
These models are designed with 5 position adjustable shelves to allow greater flexibility and further accommodate your particular security storage needs.
To Install:
Your Shelf and Shelf Support Clips have been shipped inside your safe and wrapped for protection from damage during shipping.
- Remove Shelf and (4) Shelf Support Clips from protective wrapping.
- Determine the desired position of your shelf and note the corresponding Support Guide Slots (2 on each side of interior walls) that are best suited to support the shelf in that position.
- Install the (4) Shelf Support Clips in the same position on all four support guides.
- Install shelf into position by placing it inside the safe (tilting if necessary) at a point above the desired position.
- Once inside, lower it into position until resting on Shelf Support Clips.
To change the position of the shelf:
Simply remove the shelf and reposition the (4) shelf support clips by sliding them up and out of the support slots and reinstalling them into the new positions. Then reinstall shelf as described above.

Important: REMOVING SHELF
If you remove the shelf, it is strongly recommended that you DO NOT DISCARD it. You may lay the shelf flat in the bottom of the safe to assure full flexibility in the future.
Additional Features: Bolt-Down Kit
Model 2054DF (only)
Installing Your Safe
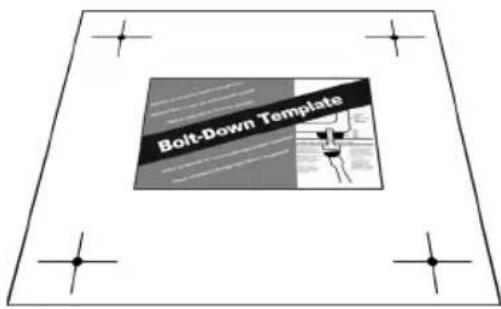
Certain models include a Bolt-Down kit with break-off bolts and a mounting template for permanent mounting to a flat surface. Once the safe is installed using the break-off bolts, it is permanent and cannot be easily removed.
Tools Required
4 Break-off Bolts (Supplied)
4 Washers(Supplied)
1 Mounting Template (Supplied)
1 Drill
1 Screwdriver


natural_image
Line drawing of a drill and screwdriver tool (no text or symbols)Important: SECURING TO FLOOR
Many consumers prefer to bolt their safe to the floor to increase protection from theft and resistance to tipping. If your safe was manufactured with bolt down holes pre-drilled in the floor of the safe, bolting your safe to the floor may provide additional theft deterrence.
If you have ANY QUESTIONS about how to accomplish this, or are uncomfortable using the tools necessary to complete this project, please check with your local retailer, home center, or independent contractor.
Additional Features: Bolt-Down Kit
Model 2054DF (only)
Installation Procedure
-
Choose a mounting location that is easily accessible from both above and below.
-
Carefully position the template on the location that you want to mount the safe.
-
Create the guide marks by pressing a sharp tool through the circles at the four corners of the template and into the mounting location.
-
Drill a hole (the diameter of the break-off bolt shaft) through each guide mark.
Important: DON'T DRILL SAFE
Do not drill into the feet, bottom or any other part of safe! Doing so will ELIMINATE THE FIRE PROTECTION that has been designed into your safe and invalidate all stated warranties.
- Before attaching the safe, you should check carefully that the 4 holes you have drilled match up precisely with the holes that have been pre-drilled in the bottom of the safe.
Note: On certain models, It may be necessary to remove the rubber foot pads that are screwed into the bolt-down holes at the factory.
-
Once you have confirmed that the holes are aligned and in the location you desire, install the break-off bolts and washers from underneath the mounting location (through the furniture or shelf), and into the pre-drilled holes in the safe.
-
Turn bolts until the screw heads break off.

natural_image
Line drawing of a simple table with four legs and a small object on top, no text or symbols present
natural_image
Line drawing of a simple table with a hand holding a small object above it (no text or symbols)
natural_image
Line drawing of a safe mounted on a table with arrows indicating mounting points (no text or symbols)
natural_image
Diagram of a mechanical device with a magnified inset showing a rotating shaft and base, no text or symbols present.Consumer Affairs
Your Safe's Unique Identification Numbers
When contacting Consumer Affairs, you should be prepared to supply some important information that specifically identifies your safe. This information is extremely important to assuring prompt and accurate customer assistance.
It is strongly recommended that you identify and record the following information in the "Safe Identification Record" form located on the inside back cover of this manual:
Model Number
Serial Number
Key Number
Locating Model and Serial Numbers
Most First Alert® safes include a small metallic silver or gray tag affixed to one of the surfaces. This tag is usually located on the front or right side of the safe. This tag contains the Serial Number, and on selected models a similar tag is attached containing the Model Number. If a Model Number tag is not attached to the safe, then it can be located on the front or side panel of the box that the safe was packaged in. Write this number down for future reference.
Key Number
The Key Number is located on the key. If you do not have the key, the number is also imprinted on the Emergency Override Key lock. See Emergency Override Key, page 3, for instructions on locating this lock.
Important: DO NOT REMOVE TAGS!
In case your safe becomes inoperable or you lose your keys, these identification numbers will be needed to correct the problem. It is recommended that the number tags remain in place on the safe. If removal is necessary, then they should be attached to the inside back cover of the Operation and Installation Guide. Store in a safe and secure place for future reference.
How to Contact Us
Phone: 1-800-223-8566 (USA and Canada)
Monday through Friday, 7:30 am to 4:30 pm Pacific Standard Time
Mail:
Attn: Consumer Affairs Dept.
BRK / SISCO
2835 E. Ana Street
Rancho Dominguez, CA 90221
EUROPE
email: customerserviceeurope@siscoproducts.com
Ordering Replacement Keys
If a key becomes misplaced or you would like additional keys, you may conveniently purchase them from our Consumer Affairs Department. You must supply the following information to assure accurate processing:
■ Name / Address / Telephone
■ Safe Model Number / Serial Number
■ Key Number (located on the key and on the Emergency Override Key lock)
■ Number of keys requested
■ E-mail address if available
In the USA, replacement keys are available for a fee and credit card orders are accepted by telephone or via our web site. Checks or Money Orders are required for orders received by mail and should be made payable to SISCO. Contact our Consumer Affairs Department for costing information prior to ordering.
Use, Care and Maintenance
Appropriate Use of Your Safe
First Alert ^® fire safes protect paper records and many other valuables.
Verified fire protection for:
Memory sticks, CD's & DVD's, USB Drives.
This product is NOT INTENDED to protect audio or video cassettes, floppy discs, data cartridges, film and photos or photo negatives
Testing shows that the interior temperature of the safe remains below 350^ F ( 177^ C) for 1 hour during a fire up to 1700^ F ( 927^ C) when used properly. Your safe must be closed and latched in order to properly protect the contents from fire.
Moisture Warning
We recommend that you place delicate items such as pictures or intricate jewelry into an air-tight container before storing them in your safe. Avoid placing your safe in areas of high humidity. For optimum performance, the safe should be opened and aired out for at least 20 minutes every two weeks.
Firearms Warning
This safe is not designed to store medication, items with combustible content, guns or other weapons. Please contact BRK / SISCO at 800-223-8566 or shop www.FirstAlert.com for information about safes that can securely store your firearms or medication.
Pearls
Because pearls sustain heat damage at temperatures below 350^ F, we advise that you DO NOT store pearls in this fire safe.
Safe Care and Maintenance
When properly maintained, your safe will continue to provide protection for many years. In order to ensure optimum performance of your safe, please follow these simple precautions:
Clean Hands - Do not attempt to operate combination dial if your hands have excessive dirt, debris, or liquids on them. Under normal circumstances, it is not necessary to wash your hands before using the safe.
Clean Safe – To clean the outside surface of your safe, it is recommended that you use a mild cleaner (e.g., window cleaner) to avoid scratching or discoloring the surface. Do not use abrasive cleansers.
For future reference, store this Operation and Installation Guide in a secure area away from the safe. DO NOT DISCARD!
Notes
Safe Identification Record
Model Number ____
Serial Number
Key Number ____
Digital Passcode Record

Your Passcode must be at least 3 digits and no more than 8 digits followed by the # sign.
LIFETIME AFTER FIRE REPLACEMENT GUARANTEE
If your First Alert® Firesafe is ever damaged by a fire, BRK will replace it with a comparable model at no charge to the consumer. Freight on the replacement unit is not included in the guarantee and must be paid by the consumer.
For claims, submit your name and address, a photo of the damaged safe along with its Model Number, and a copy of the Fire Department report to BRK Consumer Affairs as proof of loss. Once the information is received, Consumer Affairs will contact you with further instructions.
LIMITED WARRANTY
BRK Brands, Inc., ("BRK") warrants that for a period of five (5) years from the date of purchase, this product will be free from defects in material and workmanship. BRK, at its sole option, will repair or replace this product or any component of the product found to be defective during the warranty period. Replacement or repair will be made with a new or remanufactured product or component. If the product is no longer available, replacement may be made with a similar product of equal or greater value. This is your exclusive warranty.
This warranty is only valid for the original retail purchaser from the date of initial retail purchase and is not transferable. You must keep the original sales receipt. Proof of purchase is required to obtain warranty performance. BRK dealers, service centers, or retail stores selling this product do not have the right to alter, modify or in any way change the terms and conditions of this warranty.
This warranty does not apply to the finish on the product. This warranty does not cover normal wear and tear of parts or damage resulting from any of the following: negligent use or misuse of the product, use contrary to the operating instructions, disassembly, repair or alteration by anyone other than BRK or an authorized service center, improper installation, or exposure to extremes of heat or humidity. Further, the warranty does not cover Acts of God, such as fire, flood, hurricanes and tornadoes.
BRK shall not be liable for any incidental or consequential damages caused by the breach of any express or implied warranty. BRK is also not responsible for: costs associated with removing or installing the product; damage or loss of the contents of the product; nor for the unauthorized removal of the contents; or damages incurred during shipment.
Except to the extent prohibited by applicable law, any implied warranty of merchantability or fitness for a particular purpose is limited in duration to the duration of the above Warranty Period. Some states, provinces or jurisdictions do not allow the exclusion or limitation of incidental or consequential damages or limitations on how long an implied warranty lasts, so the above limitations or exclusion may not apply to you. This warranty gives you specific legal rights, and you may also have other rights that vary from state to state, or province to province, or jurisdiction to jurisdiction.
- DIGITAL
- FIRE THEFT SAFE™
- Index
- Overview of Your Safe ......Page 1
- Programming Preparation ...... Page 2
- Programming a Passcode ......Page 3
- Opening & Closing Digital Safe Page 4
- Additional Features: Shelves...... Page 5
- Additional Features: Bolt-Down Kit Page 6
- Consumer Affairs Page 8
- Use, Care and Maintenance ...... Page 10
- For Your Protection
- Overview of Your Safe
- WELCOME!
- All Models
- Models 2054DF (only)
- Models 2084DF / 2118DF (only)
- Important: DO NOT RETURN SAFE TO STORE
- Programming Preparation
- Step 1. Installing Batteries
- Important: BATTERY REMOVAL
- Step 2. Open Safe with Override Key (square top)
- Important: TURN OVERRIDE KEY TO LEFT ONLY
- Programming A Passcode
- LCD Display Menu
- Step 3. Programming a Passcode
- Important: SECURITY LOCKOUT PERIODS
- Opening & Closing Digital Safe
- Open Safe with Passcode & Key
- TURN ENTRY KEY TO RIGHT ONLY
- Close Safe
- Open Safe with Override Key
- Additional Features: Removable Shelves
- Shelves
- Removable Shelf (Model 2054DF only)
- Adjustable & Removable Shelves (Models 2084DF & 2118DF)
- To Install:
- To change the position of the shelf:
- Important: REMOVING SHELF
- Additional Features: Bolt-Down Kit
- Installing Your Safe
- Tools Required
- Important: SECURING TO FLOOR
- Installation Procedure
- Important: DON'T DRILL SAFE
- Consumer Affairs
- Your Safe's Unique Identification Numbers
- Locating Model and Serial Numbers
- Key Number
- Important: DO NOT REMOVE TAGS!
- How to Contact Us
- Mail:
- EUROPE
- Ordering Replacement Keys
- Use, Care and Maintenance
- Appropriate Use of Your Safe
- Moisture Warning
- Firearms Warning
- Pearls
- Safe Care and Maintenance
- Notes
- Safe Identification Record
- Digital Passcode Record
- LIFETIME AFTER FIRE REPLACEMENT GUARANTEE
- LIMITED WARRANTY
Brand : FIRST ALERT
Model : 2118DF
Category : Safe