
H-1626 - Radio HYUNDAI - Free user manual and instructions
Find the device manual for free H-1626 HYUNDAI in PDF.


| Product Type | Portable Radio Receiver |
| Brand | Hyundai |
| Model | H-1626 |
| Dimensions | 130 mm x 120 mm x 165 mm |
| Net Weight | 1 kg |
| Gross Weight | 1.3 kg |
| Radio Frequency Range (FM) | 64 - 108 MHz |
| Radio Frequency Range (AM) | 526.5 - 1606.5 KHz |
| Output Power | 4 W |
| Nominal Power Consumption | 4.5 W |
| Main Power Supply | 7.5 V DC (5× UM3/AA batteries or AC adapter) |
| Clock Power Supply | 3 V DC (2× AG13 batteries) |
| AC Adapter Input | 220 V ~ 50 Hz, 0.1 A |
| AC Adapter Output | 7.5 V DC, 600 mA |
| Display | Clock, calendar, thermometer, alarm, timer |
| Alarm Sounds | 8 sounds (6 tunes + 2 beepers) |
| Snooze Period | 1 - 60 minutes |
| AUX Input | 3.5 mm stereo |
| Thermometer | Celsius or Fahrenheit |
| Countdown Timer | Up to 23:59:59 |
| Antenna | Telescopic for FM |
| Accessories Included | Receiver, AC adapter, 2× AG13 batteries, audio cable, manual, warranty card, consumer info |
| Maintenance | Clean with damp cloth, do not expose to liquids |
| Safety | Do not disassemble, keep away from heat/moisture, remove exhausted batteries |
Frequently Asked Questions - H-1626 HYUNDAI
User questions about H-1626 HYUNDAI
0 question about this device. Answer the ones you know or ask your own.
Ask a new question about this device
Download the instructions for your Radio in PDF format for free! Find your manual H-1626 - HYUNDAI and take your electronic device back in hand. On this page are published all the documents necessary for the use of your device. H-1626 by HYUNDAI.
USER MANUAL H-1626 HYUNDAI
natural_image
Two glossy spheres with reflective reflections, no text or symbols presentPORTABLE RADIO RECEIVER
Thank you for purchasing our product. For safety, it is strongly recommended to read this manual carefully before connecting, operating and/or adjusting the product and keep the manual for reference in future.
Description
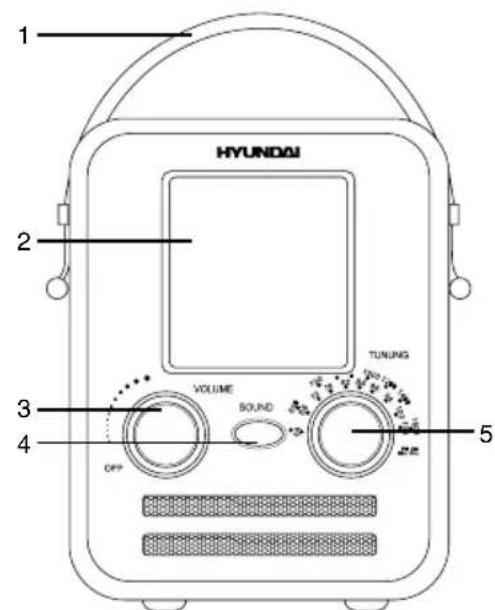
Front panel
- Handle
- Display
- VOLUME regulator
- SOUND button
- TUNING button
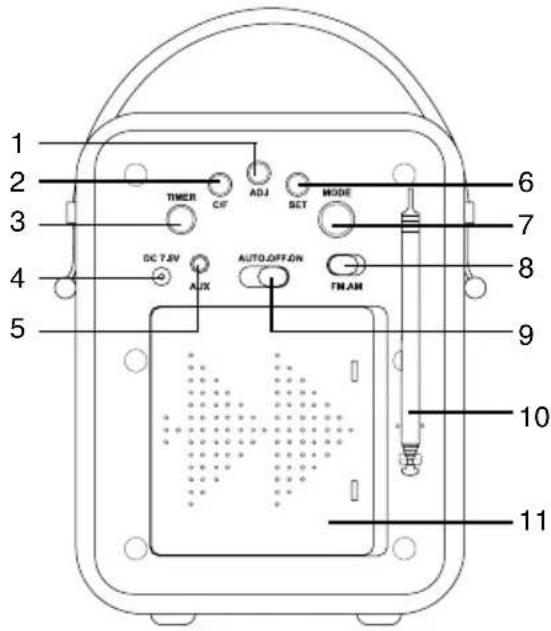
Back panel
- ADJ button
- C/F button
- TIMER button
- Power (DC7.5V) input
- AUX input
- SET button
- MODE button
- FM/AM switch
- AUTO/OFF/ON switch
- Telescopic antenna
- Battery compartment
Important safeguards
- The instruction manual contains important operating and maintenance instructions. For your safety, it is necessary to refer the manual. Keep the manual for use in future.
- Do not hit or drop the unit.
- Do not expose the unit to vibration, direct sunlight, too high or low temperature or humidity.
- Do not use the unit near TV sets, computers, fluorescent lamps and other electric equipment; this may jam AM reception.
- Do not disassemble the unit yourself. Refer servicing to qualified service personnel.
- When the battery is exhausted, it should be removed from the set to prevent leakage.
Power supply
Battery power
- Open the battery compartment cover. Insert 5 x UM3 (1.5 V) batteries. Please observe correct battery polarities or the unit will not work. Close the battery compartment cover.
- When the batteries are exhausted, they should be replaced.
- Do not use new and old batteries together.
- Disconnect power cord from the socket, when the unit is on battery supply. Battery power is automatically disconnected when the power cord is connected to a power socket.
AC adaptor power
- Plug the supplied AC/DC power adaptor into the power input on the back of the unit. Connect the power cord to the AC household main outlet. Make sure the voltage is compatible.
• Always remember to disconnect the power cord from the main supply before disconnecting it from the unit. - Disconnect the power cord from the mains when not in use.
Additional power
There are 2 batteries AG13 (1.5 V) in the terminal inside the battery compartment. This is additional power intended for operation of clock, alarm, termometer and countdown timer. Without the additional power the unit will function only as radio receiver.
General operations
Clock and calendar
- In clock mode (no ALARM indication) press ADJ button to select 12-hour or 24-hour clock display mode.
- Press repeatedly SET button to go to setting of parameters in following sequence: hour => minute => year => month => date. The selected parameter will blink meaning readiness for adjustment.
- Press ADJ button to adjust the parameter up. Press C/F button to adjust the parameter down.
• Day of week will be set automatically.
Termometer
The unit is equipped with a built-in termometer. The current temperature is updated every minute and is shown on the display. In clock mode press C/F button to select Celsius or Fahrenheit termometer mode.
AUX input
To connect an external audio device (eg. MP3-player), please use a standard stereo cable with 3.5 mm to 3.5 mm plugs to connect the audio line-out of the external device to the AUX input socket of this unit. Slide AUTO/OFF/ON switch to ON position.
Radio operation
- Radio reception is only available when AA/UM3 battery power or AC adaptor power is used.
- Slide AUTO/OFF/ON switch to ON. Select AM or FM band with the FM/AM switch.
- For FM reception extend the telescopic
antenna.
- Adjust the frequency by rotating TUNING regulator.
- Use VOLUME regulator to adjust volume level.
- To switch off the radio, slide AUTO/OFF/ON switch to OFF. The backlight will go off.
Alarm operation
Setting the alarm
- In clock mode press MODE button; the alarm symbol will be displayed.
- Press repeatedly SET button to go to setting of parameters in following sequence: alarm hour => alarm minute => snooze period => alarm sound. The selected parameter will blink meaning readiness for adjustment.
- Press ADJ button to adjust the parameter up. Press C/F button to adjust the parameter down.
- Press C/F button once to enable the alarm function.
Built-in alarm sound
- You can select 8 alarm sounds (including 6 tunes and 2 simple beepers). To use the built-in alarm sound, turn VOLUME regulator to OFF until a click.
- Set the alarm time. When the preset time comes, the alarm signal will start. To stop it press SET button, otherwise the alarm signal will be on for 1 minute, then stop automatically.
Radio/MP3 as alarm
- To use radio as alarm sound, adjust the volume of the radio, then slide AUTO/OFF/ON switch to OFF.
- Set the alarm time, then press MODE button to go to clock mode, and slide AUTO/OFF/ON switch to AUTO.
- When the alarm signal is in operation, press SET button and slide AUTO/OFF/ON switch to OFF position to stop it.
- If an MP3-player is connected to this unit
and file playback is on, it will sound as alarm signal instead of radio when the alarm time comes.
Snooze
- In alarm mode press C/F button until bell and Zz icons are displayed meaning the snooze mode is on.
- Set the alarm time, then set the snooze period (1 - 60 minutes).
- When the alarm signal is on, press ADJ, MODE or C/F button to stop it. Zz icon will blink showing that the snooze is in operation, and the alarm signal will repeat after the snooze period you had set (if you use radio as alarm signal, slide AUTO/OFF/ON to OFF, then again to AUTO).
- To disable the snooze function, press SET button when the alarm is in operation. The Zz icon will stop blinking.
Countdown timer
- Press TIMER button to enable timer mode; the clock icon will be displayed.
- Press repeatedly SET button to go to setting of parameters in following sequence: timer hour => timer minute => timer second. The selected parameter will blink meaning readiness for adjustment.
- Press ADJ button to adjust the parameter up. Press C/F button to adjust the parameter down.
- When the countdown time is set, turn VOLUME regulator to OFF until a click. Press TIMER button to start countdown. When the time elapses, the selected alarm signal will sound. To stop it, press MODE button.
- While the countdown is in progress, you can press TIMER button to pause it. To resume countdown, press TIMER button again.
Maintenance and care
If necessary, clean the unit with a piece of cloth dampened with water only (be sure the
power cord is disconnected). The unit shall not be exposed to dripping or splashing and no objects filled with liquids, such as vases, shall be placed on the unit. Normal ventilation of the unit shall not be impeded for intended use.
Accessories
Receiver 1 pc
AC/DC power adaptor 1 pc
AG13 (1.5 V) battery 2 pcs
Audio cable 3.5-3.5 mm 1 pc
Instruction manual 1 pc
Warranty card 1 pc
Consumer information 1 pc
Specifications
| FM frequency range 64 - 108 MHz | |
| AM frequency range 526.5 - 1606.5 KHz | |
| Nominal voltage (radio) 7.5 V (1.5 V x 5 batteries | JM3/AA) |
| Nominal voltage (clock) 3 V (1.5 V x 2 batteries AG13) | |
| Nominal power consumption 4.5 W | |
| Output power 4 W | |
| Adaptor input power 220 V ~ 50 Hz, 0.1 A | |
| Adaptor output power 7.5 V (DC)/ 600 mA | |
| Net/Gross weight 1 kg/1.3 kg | |
| Unit dimensions 130 mm x 120 mm x 165 mm |
Specifications and functions are subject to change without notice. It is connected with continual improvement of the device.
- Description
- Front panel
- Back panel
- Important safeguards
- Power supply
- Battery power
- AC adaptor power
- Additional power
- General operations
- Clock and calendar
- Termometer
- AUX input
- Radio operation
- Alarm operation
- Setting the alarm
- Built-in alarm sound
- Radio/MP3 as alarm
- Snooze
- Countdown timer
- Maintenance and care
- Accessories
Brand : HYUNDAI
Model : H-1626
Category : Radio