
H-1542 - Radio HYUNDAI - Free user manual and instructions
Find the device manual for free H-1542 HYUNDAI in PDF.


| Product Type | Portable AM/FM Radio |
| Brand | Hyundai |
| Model | H-1542 |
| Dimensions (approx.) | 25 cm x 15 cm x 8 cm (9.8 x 5.9 x 3.1 in) |
| Weight (approx.) | 0.5 kg (1.1 lb) |
| Power Supply | 3 x AA batteries (not included) or DC 6V adapter (optional) |
| Frequency Bands | AM (520-1710 kHz), FM (87.5-108 MHz) |
| Tuning Type | Digital PLL tuning |
| Display | LCD with backlight |
| Speaker | Built-in, 3 W output |
| Headphone Jack | 3.5 mm stereo |
| Antenna | Telescopic for FM; built-in ferrite for AM |
| Additional Functions | Alarm clock, sleep timer, snooze, calendar display |
| Memory Presets | 20 stations (10 AM + 10 FM) |
| Clock | 12/24 hour format, battery backup |
| Cleaning | Wipe with a soft, dry cloth. Do not use liquids. |
| Safety | Do not expose to water or extreme temperatures. |
| Spare Parts & Repairability | Contact Hyundai service center. No user-serviceable parts inside. |
| Accessories Included | User manual only. Batteries and adapter sold separately. |
Frequently Asked Questions - H-1542 HYUNDAI
User questions about H-1542 HYUNDAI
0 question about this device. Answer the ones you know or ask your own.
Ask a new question about this device
Download the instructions for your Radio in PDF format for free! Find your manual H-1542 - HYUNDAI and take your electronic device back in hand. On this page are published all the documents necessary for the use of your device. H-1542 by HYUNDAI.
USER MANUAL H-1542 HYUNDAI
RADIO WITH ALARM
Thank you for purchasing our product. For safety, it is strongly recommended to read this manual carefully before connecting, operating and/or adjusting the product and keep the manual for reference in future.
Description
- Infrared sensor
- TEMP/button
- AL.SET button
- Projector
- Y-M-D/button
- ON/OFF button
- 180°FLIP button
- VOLUME regulator
- BAND button
- AL.1 button
- MODE button
- SNOOZE/SLEEP button
- AL.2 button
- Button
- TUNING regulator
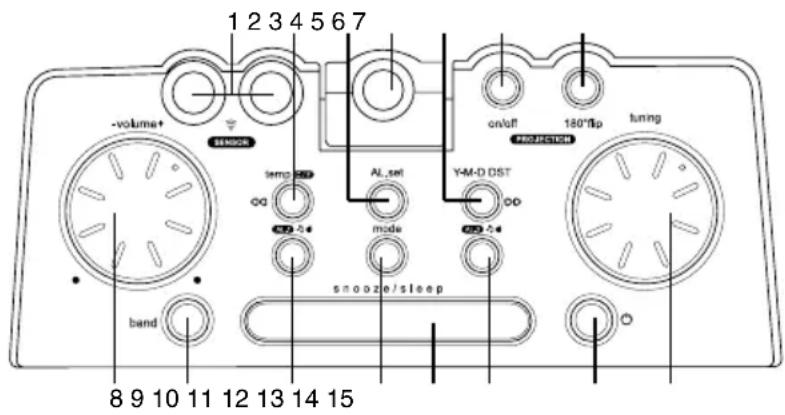
Not indicated: power cord (back panel), FM antenna (back panel), temperature sensor (back panel), line input (back panel), battery compartment (bottom), display dimmer switch (back panel), RESET button hole (bottom), display (front panel), FOCUS regulator (back panel).
Important safeguards
- The instruction manual contains important operating and maintenance instructions. For your safety, it is necessary to refer the manual. Keep the manual for use in future.
- Do not hit or drop the unit.
- Do not expose the unit to vibration, direct sunlight, too high or low temperature or humidity.
- If you are not going to use the unit within a long period of time, remove the batteries to avoid their leakage.
- Do not disassemble the unit yourselves. Refer servicing to qualified service personnel.
Power supply
Battery operation
- Insert 1 x 3 V lithium battery CR2032 (not included) to the terminal inside the battery compartment according to the polarity marks (+ and -). Your set will not work normally from the battery supply, but there is now the advantage that, in case there is a mains current failure, your clock will continue to work. The clock display will not light up, the clock time and alarm setting will be held in the clock memory by the battery back-up system.
This enables you to move the set from place to place without re-setting the clock every time. The
battery back-up system is only meant to be used from short temporary power failures. For longer durations the battery may become exhausted or there may be some deviation in accuracy.
- When the battery is exhausted, it should be removed from the set to prevent leakage. If you do not wish to take advantage of the battery back-up system, your set will work normally without a battery. However, if disconnected from the mains, the clock figures will flash when the mains are reconnected and you must re-set the clock.
AC operation
- The appliance is for household use only.
- Before the first connecting of the appliance check that voltage indicated on the rating label corresponds the mains voltage in your home.
- Insert the plug into the power supply.
- The set is now working as electronic clock.
General operations
Setting the clock and calendar
- Press and hold MODE button. Press it repeatedly to cycle through time and calendar settings in following order: Year => Month => Day => 12/24H mode => Current hours => Current minutes. The selected setting will blink.
- Press repeatedly TEMP/ button or press and hold it to decrease the setting; press repeatedly Y-M-D/ button or press and hold it to increase the setting.
- In normal mode, press repeatedly Y-M-D/▶ button to switch the display between current time, year and month and day. Each indication will be on for 5 seconds, the the display returns to initial mode.
Dimmer function
To adjust the brightness of the display, slide the display dimmer switch to HIGH or LOW position.
Reset
To reset all settings of the unit to default settings, press the RESET hole with a pointed object (e.g., a ballpoint pen). This measure is needed when you changed the batteries in the unit or if the unit does not function correctly.
Daylight saving time
Press and hold Y-M-D/button to switch on or off the DST (Daylight Saving Time) mode. This enables to observe 1-hour difference between summer and winter time.
Thermometer
Press TEMP/button to show the current temperature. The temperature indicatoin will be on for 5 seconds, the display returns to initial mode. Press and hold TEMP/button to switch between Celsius and Fahrenheit temperature modes.
Line input
- You can connect the audio output of an external device to this unit, to listen to the sound of that device through the amplifier of this unit.
- To connect an external audio device (eg. MP3 player), please use a standard stereo cable (not included) with 3.5 mm to 3.5 mm plugs to connect the headphone out or audio line-out of the external device to the Line input socket of this unit.
Radio operation
Tuner operations
- Press ⏻ button to turn the radio on or off.
- Press BAND button to switch between AM and FM radio bands.
- Adjust the program by rotating TUNER regulator.
- Use VOLUME regulator to adjust volume level.
- To obtain better FM signal reception, extend the FM wire antenna to its full length.
Instruction manual
- The AM signal is picked up through the built-in antenna. The unit should be placed to a position for the best reception.
Sleep to music
- In Radio mode, press SNOOZE/SLEEP button to turn on sleep mode. The default sleep time of 90 minutes will be set. Press this button repeatedly to select 60, 30 or 15 minutes of sleep time period. The figures will blink on the display for 5 seconds. “SLEEP” will be displayed meaning that the sleep function is activated. The radio will turn off automatically after the preset time period elapses.
- To cancel the sleep function, press ⏻ button.
Alarm operation
Setting the alarm
- Press and hold AL.SET button. Press it repeatedly to cycle through alarm settings in following order: Alarm 1 hours => Alarm 1 minutes => Alarm 1 weekend => Alarm 2 hours => Alarm 2 minutes => Alarm 2 weekend. The selected setting will blink.
- Press repeatedly TEMP/◀◀ button or press and hold it to decrease the setting; press repeatedly Y-M-D/▶▶ button or press and hold it to increase the setting.
- In normal mode, press repeatedly AL.SET button to show the alarm settings.
- Slide the display dimmer switch to AUTO OFF position. After 15 seconds the display will switch off and it will resume when the preset alarm time comes.
Alarm signal selection
Press repeatedly AL.1 button (for Alarm 1) or AL.2 button (for Alarm 2) to select alarm sound. Press once to select buzzer (will be on), press twice to select radio (will be on), press thrice to disable alarm signal (no indication will be on).
Snooze control
- When the alarm time comes, the signal will sound for 30 minutes if no button is pressed. After that the sound will mute and start at the same time the following day.
- When the alarm is on, press SNOOZE/SLEEP button to interrupt the alarm signal. After 9 minutes the alarm will be on again.
- If you want to stop the alarm, press ⏻ button. The alarm will resume in 24 hours.
Laser projection
- This unit is equipped with a laser projector showing the current time synchronized with the main display.
- Press ON/OFF button to switch the projector on. Adjust manually the position of the projector unit to direct the laser beam on a plain surface (ceiling, wall).
- Using FOCUS regulator, adjust the projected image focus. Maximum projection distance is 2.7 m.
- Press 180°FLIP button to flip the projected image.
Infrared sensor
- You can perform some functions with the display of this unit by placing your hand over the infrared sensor.
- In radio off mode, place your hand over the sensor for 1 second; the display will show the temperature.
- In radio on mode, place your hand over the sensor for 2 seconds; the unit will go to sleep time sitting mode.
- When the alarm is on, place your hand over the sensor for 1 second to interrupt the signal for 9 minutes (snooze function).
- In radio off mode, when the display dimmer switch is slid to AUTO OFF position, the display will switch off after 15 seconds. Place your hand over the sensor for 1 second;
the display will switch on.
- In radio on mode, place your hand over the sensor for 1 second; the display will show the temperature. Place your hand again for 1 second; the display will show the current radio frequency.
Maintenance and care
Switch off the appliance, unplug from the power supply. The outside of the appliance can be cleaned with a slightly damp cloth.
Accessories
Receiver 1 pc
Instruction manual 1 pc
Warranty card 1 pc
Consumer information 1 pc
Radio operation
| Nominal voltage 220 V, 50 Hz | |
| Nominal power consumption 5 W | |
| Output power 500 mW | |
| Stabilizer Quartz | |
| Display 1.8" height of symbols, LED | |
| FM radio frequency 64 - 108 MHz | |
| AM radio frequency 531 - 1629 kHz | |
| Net/Gross weight 0.750 kg/0.826 kg | |
| Unit dimensions 191 x 78 x 89 mm | |
| Gift box dimensions 214 x 92 x 128 mm |
Specifications and functions are subject to change without notice. It is connected with continual improvement of the device.


- DESCRIPTION
- IMPORTANT SAFEGUARDS
- POWER SUPPLY
- BATTERY OPERATION
- AC OPERATION
- GENERAL OPERATIONS
- SETTING THE CLOCK AND CALENDAR
- DIMMER FUNCTION
- RESET
- DAYLIGHT SAVING TIME
- THERMOMETER
- LINE INPUT
- RADIO OPERATION
- TUNER OPERATIONS
- INSTRUCTION MANUAL
- SLEEP TO MUSIC
- ALARM OPERATION
- SETTING THE ALARM
- ALARM SIGNAL SELECTION
- SNOOZE CONTROL
- LASER PROJECTION
- INFRARED SENSOR
- MAINTENANCE AND CARE
- ACCESSORIES
Brand : HYUNDAI
Model : H-1542
Category : Radio