
H-1624 - Radio HYUNDAI - Free user manual and instructions
Find the device manual for free H-1624 HYUNDAI in PDF.


| Product Type | Portable AM/FM Radio |
| Brand | Hyundai |
| Model | H-1624 |
| Dimensions (W x H x D) | 200 x 120 x 70 mm |
| Weight | 0.5 kg |
| Power Source | AC 230V 50Hz or 4 x AA batteries (not included) |
| Radio Bands | AM (530-1710 kHz) and FM (87.5-108 MHz) |
| Speaker | Built-in 3W mono speaker |
| Controls | Volume, tuning, band selector, power switch |
| Display | Analog tuning dial with frequency markings |
| Antenna | Telescopic FM antenna, built-in ferrite AM antenna |
| Output | Headphone jack (3.5mm) |
| Additional Features | Carry handle, LED power indicator |
| Cleaning | Wipe with dry soft cloth; avoid liquids |
| Safety Warnings | Keep away from water; do not disassemble |
| Spare Parts / Repairability | Contact authorized service center for replacement parts |
| Package Contents | Radio, user manual (paper or QR code for PDF) |
Frequently Asked Questions - H-1624 HYUNDAI
User questions about H-1624 HYUNDAI
0 question about this device. Answer the ones you know or ask your own.
Ask a new question about this device
Download the instructions for your Radio in PDF format for free! Find your manual H-1624 - HYUNDAI and take your electronic device back in hand. On this page are published all the documents necessary for the use of your device. H-1624 by HYUNDAI.
USER MANUAL H-1624 HYUNDAI


RADIO RECEIVER
РАДИОПРИЕМНИК
Instruction manual
Dear customer!
Thank you for purchasing our product. For safety, it is strongly recommended to read this manual carefully before connecting, operating and/or adjusting the product and keep the manual for reference in future.
Description
Top panel
- SD/MMC memory card slot
- ▶button
- ◀ button
- VOL-/VOL+ buttons
- RADIO button
- SNOOZE button
- USB port
- ▶ button
- LIGHT button
- SET button
- MODE button
- ALARM button

Back panel
- Handle
- Telescopic FM-antenna
- Power (DC7.5V) input
- AUX input
- Battery compartment
Not indicated: display (front panel), speaker (front panel)

Remote controller
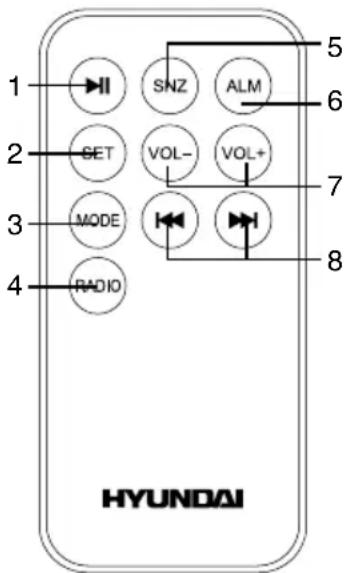
- ▶ button
- SET button
- MODE button
- RADIO button
- SNZ button (corresponds to SNOOZE button on the unit)
- ALM button (corresponds to ALARM button on the unit)
- VOL+/VOL- buttons
- 14 buttons (correspond to / < < > buttons on the unit)
Important safeguards
- The instruction manual contains important operating and maintenance instructions. For your safety, it is necessary to refer the manual. Keep the manual for use in future.
- Do not hit or drop the unit.
- Do not expose the unit to vibration, direct sunlight, too high or low temperature or humidity.
- Do not disassemble the unit yourself.
Refer servicing to qualified service personnel.
- When the battery is exhausted, it should be removed from the set to prevent leakage.
Power supply
Battery power
- Open the battery compartment cover. Insert 5 AA (1.5 V) batteries. Please observe correct battery polarities or the unit will not work. Close the battery compartment cover.
- When the batteries are exhausted, they should be replaced.
- Do not use new and old batteries together.
- Disconnect power cord from the socket, when the unit is on battery supply. Battery power is automatically disconnected when the power cord is connected to a power socket.
AC adaptor power
- Plug the supplied AC/DC power adaptor into the power input on the back of the unit. Connect the power cord to the AC household main outlet. Make sure the voltage is compatible.
• Always remember to disconnect the power cord from the main supply before disconnecting it from the unit. - Disconnect the power cord from the mains when not in use.
Additional power
There are 2 batteries AG3 (1.5 V) in the terminal inside the battery compartment. This is additional power intended for operation of clock, alarm, calendar, termometer and countdown timer. Without the additional power the unit will function only as radio receiver.
General operations
Clock and calendar
- In clock mode (no ALARM indication) press and hold SET button to enable time setting mode. Press repeatedly SET button to go to setting of parameters in following sequence: minute => hour => 12/24-hour => year => month => date. The selected parameter will blink meaning readiness for
adjustment. The default time setting is 01-01, 2009, THU, 12-hour, AM12:00.
- Press VOL+ button to adjust the parameter up. Press VOL- button to adjust the parameter down.
• Day of week will be set automatically. - In time setting mode, if no button is pressed within 30 seconds after a parameter is selected, the unit will automatically return to clock mode.
- In time setting mode, press MODE button to return to clock mode.
Termometer
The unit is equipped with a built-in termometer. The current temperature is updated every 30 seconds and is shown on the display. In clock mode press VOL- button to select Celsius or Fahrenheit termometer mode.
AUX input
To connect an external audio device (eg. MP3-player), please use a standard stereo cable with 3.5 mm to 3.5 mm plugs to connect the audio line-out of the external device to the AUX input socket of this unit.
Backlight
Press LIGHT button on the unit to switch on/off the display backlight.
Radio operation
- Radio reception is only available when AA/UM3 battery power or AC adaptor power is used.
- In clock mode press RADIO button to switch the FM radio on.
- For FM reception extend the telescopic antenna.
- To adjust the frequency step by step press repeatedly ◀ buttons. For automatic search of a station, press and hold ◀ or ▶ button; the unit will look for the next available station and start its broadcast. Repeat the operation to search more stations.
- To save a station, press and hold SET button. The memory position will blink. Press VOL+/VOL- buttons to select a memory position. Press SET button to save the current station under the selected number. You can maximum 20 stations in the memory.
During program saving, if no button is pressed within several seconds, the unit will return to normal radio mode.
- To call a saved station, press SET button, then press VOL+/VOL- buttons.
- To adjust volume, in radio mode press repeatedly VOL+/VOL- buttons.
- To switch off the radio, press MODE button.
USB/SD/MMC operation
Connecting USB/SD/MMC
- Insert a USB device into the USB port or insert a memory card into the memory card slot. Press ▶ button to enable USB/SD/MMC mode. The unit will start reading the device, LOAD will be displayed. Press and hold ▶ button to select between USB or SD/MMC mode, if both devices are inserted (USB is played by default). If no device is detected, NO CARD will be dispayed.
- When the device and tracks on it are detected, the display shows the total number of tracks, currently playing track number, playback time, equalizer mode and other playback information. If no tracks are found in the storage device, NO SONG will be displayed.
Playback operations
- During playback press button to pause playback. Press this button again to resume playback.
- During playback press <buttons to go to previous or next track.
- To adjust volume, press repeatedly VOL+/VOL- buttons.
- During playback press SET button, then press VOL+/VOL- buttons to select equalizer mode: Normal - Classic - Bass - Live - Rock.
The mode will be displayed blinking. Press SET button, then press VOL+/VOL- buttons to select playback mode: All - Shuffle - Repeat One - Repeat All. Press SET button to confirm.
During play mode selection, if no button is pressed within several seconds, the unit will return to normal playback mode.
- When all tracks are played or pause mode is enabled, the unit will go to clock mode after 30 seconds if no buttons are pressed.
- In playback mode, press MODE button switch off the player and go to clock mode. If afterward you press ▶ button, the unit will resume playing the last played track.
General USB/SD/MMC notes
- This unit is equipped with a USB socket that can accept and play MP3 files stored on standard USB flash (compatible with USB version 2.0) up to 32 Gb.
- This unit is also equipped with an SD/MMC card socket that can accept and play MP3 files stored on standard SD/MMC cards up to 32 Gb.
Always switch off the unit or change mode to another one before removing a USB flash drive or SD/MMC card, to prevent damage to your USB device or memory card.
Note: Although this product is fully compatible with USB 2.0 and SD/MMC card standard formats, a small percentage of USB flash drives and SD/MMC cards might not be readable, due to those device manufacturers' non-compliance with the full (official) USB and SD/MMC card standards.
Alarm operation
Setting the alarm
- In clock mode press MODE button; the word ALARM and bell icon will be displayed. The alarm is in OFF state and on AM12:00 by default. Press ALARM button to switch on/off the alarm.
- Press and hold SET button, then press repeatedly SET button to go to setting of
parameters in following sequence: alarm minute => alarm hour => alarm sound (MP3/FM/Bibi). The selected parameter will blink meaning readiness for adjustment.
- Press VOL+ button to adjust the parameter up. Press VOL- button to adjust the parameter down.
- In alarm time setting mode, if no button is pressed within 30 seconds after a parameter is selected, the unit will automatically return to clock mode.
- In alarm time setting mode, press MODE button to return to clock mode.
Radio/MP3 as alarm
- To use radio as alarm sound, enable radio mode, select a station, then press and hold ALARM button. AL SET will be displayed.
- To use MP3 as alarm sound, connect a USB or memory card, then enable USB/SD/MMC mode. Press ◀◀/▶buttons to select a track, then press and hold ALARM button. AL SET will be displayed.
When select MP3 as alarm sound, the alarm sound will change to Bibi automatically if the current mode is USB/SD/MMC or Radio, if USB/SD/MMC device is not detected or if the external power supply is disconnected.
Alarm switch off and Snooze
- When the alarm signal is on, press SNOOZE button to interrupt the alarm signal for 5 minutes. After 5 minutes the alarm sound will go on again.
- When the alarm signal is on, press any button (except SNOOZE) to switch off the alarm sound completely.
Snooze function is only available if Bibi sound is selected for alarm signal.
Sleep timer
- In USB/SD/MMC mode or Radio mode press ALARM button to enable sleep timer setting mode. The time figures will blink. The default sleep time is 30 minutes.
- Press repeatedly VOL+/VOL- buttons
to set the time after which the unit will automatically switch off. Each pressing decreases/increases the time by 10 minutes. 10 minutes as minimum and 3 hours as maximum can be set. After you set the sleep time, press ALARM button to confirm. The sleep time countdown will start.
If you select radio as alarm signal sound, sleep timer for radio mode is set automatically for 30 minutes.
Accessories
Receiver 1 pc
AC/DC power adaptor 1 pc
AG3 (1.5 V) battery 2 pcs
Remote controller with battery CR2025 1 pc
Audio cable 3.5-3.5 mm 1 pc
Instruction manual 1 pc
Warranty card 1 pc
Consumer information 1 pc
Maintenance and care
If necessary, clean the unit with a piece of cloth dampened with water only (be sure the power cord is disconnected). The unit shall not be exposed to dripping or splashing and no objects filled with liquids, such as vases, shall be placed on the unit. Normal ventilation of the unit shall not be impeded for intended use.
Specifications
| FM frequency range 65 - 108 MHz | |
| Nominal voltage (radio) 7.5 V (1.5 V x 5 batteries UM3) | |
| Nominal voltage (clock) 3 V (1.5 V x 2 batteries AG13) | |
| Nominal power consumption (radio) 4 W | |
| Adaptor input power 230 V ~ 50 Hz | |
| Adaptor output power 7.5 V (DC)/1200 mA | |
| Supported storages USB/SD/MMC | |
| Net/Gross weight 1.38 kg/1.63 kg | |
| Unit dimensions 140 mm x 127 mm x 220 mm | |
Specifications and functions are subject to change without notice. It is connected with continual improvement of the device.


- INSTRUCTION MANUAL
- DEAR CUSTOMER
- DESCRIPTION
- TOP PANEL
- BACK PANEL
- REMOTE CONTROLLER
- IMPORTANT SAFEGUARDS
- POWER SUPPLY
- BATTERY POWER
- AC ADAPTOR POWER
- ADDITIONAL POWER
- GENERAL OPERATIONS
- CLOCK AND CALENDAR
- TERMOMETER
- AUX INPUT
- BACKLIGHT
- RADIO OPERATION
- USB/SD/MMC OPERATION
- CONNECTING USB/SD/MMC
- PLAYBACK OPERATIONS
- GENERAL USB/SD/MMC NOTES
- ALARM OPERATION
- SETTING THE ALARM
- RADIO/MP3 AS ALARM
- ALARM SWITCH OFF AND SNOOZE
- SLEEP TIMER
- ACCESSORIES
- MAINTENANCE AND CARE
Brand : HYUNDAI
Model : H-1624
Category : Radio