KFD 80-8.1 - Range hood Exquisit - Free user manual and instructions
Find the device manual for free KFD 80-8.1 Exquisit in PDF.


| Product Type | Range Hood (Extractor Hood) |
| Brand | Exquisit |
| Model | KFD 80-8.1 |
| Color | Black |
| Dimensions (W x D x H) | 795 x 365 x 396 mm |
| Flue Height (Extendible, incl. Hood) | Up to 1155 mm |
| Net Weight | 18 kg |
| Power Consumption | 100 W |
| Electrical Connection | 220-240 V / 50 Hz |
| Lamp Type & Wattage | LED, 2 x 1.5 W, Fitting E14 |
| Exhaust Air Fitting Diameter | 150 mm (15 cm) |
| Fan Speeds | 3 speeds (adjustable via buttons) |
| Operation Modes | Exhaust air and recirculating air (optional charcoal filter) |
| Grease Filter | Aluminum, washable (monthly cleaning) |
| Activated Charcoal Filter | Optional, replace every 6-12 months |
| Minimum Clearance Above Electric Hob | 650 mm |
| Minimum Clearance Above Gas Hob | 700 mm (max 750 mm) |
| Run-On Time | Programmable 1-9 minutes |
| Controls | 5 pushbutton switches (On/Off, Speed -, Speed +, Run-on, Light) |
| Included Accessories | 2 flue panels, exhaust air hose (1.5 m), air outlet cover, wall bracket, installation materials |
| Warranty | 24 months (private use) |
Frequently Asked Questions - KFD 80-8.1 Exquisit
User questions about KFD 80-8.1 Exquisit
0 question about this device. Answer the ones you know or ask your own.
Ask a new question about this device
Download the instructions for your Range hood in PDF format for free! Find your manual KFD 80-8.1 - Exquisit and take your electronic device back in hand. On this page are published all the documents necessary for the use of your device. KFD 80-8.1 by Exquisit.
USER MANUAL KFD 80-8.1 Exquisit
natural_image
Black industrial kitchen chimney with a cylindrical top and rectangular base (no text or symbols visible)10 For your safety 33
10.1 Safety and responsibility....34
10.2 Safety and warnings....34
11 Installation....35
11.1 Unpacking the appliance....35
11.2 Preparing the appliance for installation....36
11.3 Installation for exhaust air mode....39
11.4 Installation for recirculating air mode 40
11.5 Wall mounting 41
12 Putting into operation 44
12.1 Control panel 44
13 Service and Maintenance 45
13.1 Cleaning the appliance....46
13.2 Cleaning the grease filter 46
13.3 Replacing the activated charcoal filter....47
13.4 Replacing the lamp 48
13.5 Decommissioning the appliance 49
13.6 Reduction of environmental impact 49
14 Troubleshooting 50
15 After Sales Service 51
16 Warranty terms....52
17 Technical data....53
18 Disposal....54
Zu Ihrer Sicherheit
natural_image
Line drawing of a two-tiered storage cabinet or shelf unit (no text or symbols)Montage
Seite | 22
Wartung und Pflege
It is essential to read the instruction manual carefully before operating the appliance. It contains important safety information for the installation, operation and maintenance of the appliance. Proper operation makes a major contribution to efficient energy use and minimises the energy consumption of the appliance.
Improper use of the appliance can be dangerous, particularly for children.
Keep the instruction manual for future reference and pass it on to any subsequent owners. Should you have any questions that are not dealt with sufficiently for you in this instruction manual, or if you need a new copy of the Instruction manual, please go to our website ^8 or contact After Sales Service ^7 Germany.
The manufacturer is working constantly on the further development of all types and models. We therefore reserve the right to make changes in form, equipment and technology.
Intended use
The appliance is intended for private/household use. If the appliance is used for other purposes or in any other way than as described in this instruction manual, the manufacturer assumes no liability for any damage resulting from such use.
For safety reasons, modifications or alterations to the appliance are not permitted.
^6 www.exquisit.de
^7 After Sales Service Tel. +49 2944 9716-791
Getting to know your appliance
Scope of delivery
1x Appliance
2x Flue panels 400 mm with wall bracket and flue panel brackets
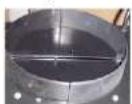
1x Air outlet cover
1x Accessory material
1x Exhaust air hose 153mm ∅, 1.5 m length
1x Instruction manual
Designation
Figure 8 Getting to know the appliance
If the air outlet cover is not included in the scope of supply, check whether it is already fitted in the exhaust air fitting.
Not included in the scope of supply:
- Activated charcoal filter for recirculating air operation, optional
- (can be ordered from After Sales Service ^1 )
- Exhaust air hose for air extraction mode
Accessories for installation
| Figure | Quantity | Designation |
 | 1x | Exhaust air hose |
 | 1x | Air outlet cover |
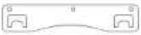 | 1x | Wall bracket |
 | ||
 | 2x | Flue panel brackets |
 | ||
 | 2x | Flue panels |
 | 1x | installation materials |
For your safety
10 For your safety
For safe and proper use of the appliance, read the instruction manual and other documentation accompanying the product and keep in a safe place for future reference. All safety instructions in this instruction manual are marked with a warning symbol. They draw your attention to potential hazards. Be sure to read and observe this information.
Explanation of the safety instructions

GEFAHR
Indicates a hazardous situation which, if not avoided, will lead to very serious injuries or even death!

WARNUNG
Indicates a hazardous situation which, if not avoided, can lead to very serious injuries or even death!

VORSICHT
Indicates a hazardous situation which, if not avoided, can lead to minor or moderate injuries!
ACHTUNG
Indicates a situation which, if not avoided, will lead to material damage.

RISK OF ELECTRIC SHOCK!

RISK OF SCALDING!

FIRE HAZARD!

➢ Information and instructions to be observed.
- Indicates a list.
√ Indicates inspection steps in sequence. - Indicates work steps in sequence.
→ Describes the response of the appliance to the work step
For your safety
10.1 Safety and responsibility
Safety of children and persons with limited capabilities

GEFAHR
RISK OF SUFFOCATION!
Packaging materials (e.g. plastic film, polystyrene) can be dangerous for children. Keep packaging materials out of the reach of children.

GEFAHR
This appliance is not to be used by persons (including children) with limited physical, sensory or mental aptitude or lack of experience and/or knowledge unless they are supervised by a person responsible for their safety, or have received instructions from that person as to how the appliance is to be used. Supervise children to ensure that they do not play with the appliance.
10.2 Safety and warnings

GEFAHR

RISK OF ELECTRIC SHOCK!
Never hold the plug of the mains cable with damp or wet hands when plugging in or unplugging the appliance.
- Install and connect the appliance only in accordance with the description in the instruction manual.
• In an emergency, pull the plug out of the plug socket immediately. - Do not pull the plug out of the plug socket with the cable.
- Remove the plug from the plug socket before starting cleaning or service work.
- A damaged power supply cable must be replaced by the supplier, dealer or after-sales service without delay.
- If cable or plug are damaged, do not use the appliance any longer.
- Do not carry out any work on the appliance other than the cleaning and service work described in this instruction manual.
4.
Installation
11 Installation
11.1 Unpacking the appliance
The packaging materials must be undamaged. Inspect the appliance for transport damage. On no account should a damaged appliance be connected to the mains power supply. In case of damage, contact the supplier.
Removing transport protection

VORSICHT
RISK OF INJURY!
Do not cut adhesive strip with a sharp object, e.g. carpet knife. Injuries can occur.
The appliance is secured for transport. Remove all packaging parts, plastic film and adhesive tapes. Remove residues of adhesive with white spirits. Remove all adhesive tape and packaging parts from the interior of the appliance too.

VORSICHT
Transport the appliance only in the original packaging materials to avoid any personal injury and/or material damage. Keep the original carton and packaging mouldings in a safe place. Transport the appliance only in its original packaging materials.
Installation
11.2 Preparing the appliance for installation
The extractor hood can be operated in both air extraction mode and in recirculating air mode.

WARNUNG

ELECTRIC SHOCK HAZARD!
The installation work and electrical may only be carried out by a qualified electrician in accordance with all the relevant regulations and standards applicable in your country, including the fire protection measures.
- Incorrect connection can result in destruction of the power electronics.
- The connection data on the type plate must correspond to those of the mains power supply grid.
- Connect the appliance only to a properly earthed plug socket with earthing contact.

The connection data can be found on the type plate and in the "Technical data" chapter of this instruction manual.
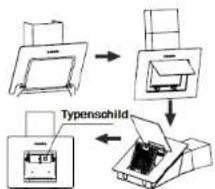
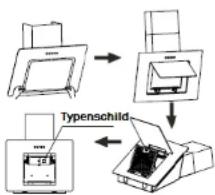
➢ Open the extractor hood and remove the filter cassette.
The type plate can be found inside the appliance.
flowchart
graph TD
    A["Printer"] --> B["Printer"]
    B --> C["Output"]
    D["Typenschild"] --> E["Output"]
Figure 9 Type plate

VORSICHT
RISK OF INJURY!
- Two persons are required to mount the extractor hood.
- Before drilling holes in walls or ceilings, check that there are no concealed power cables or pipes in that area.
- Use only installation materials that are suitable for the condition of the walls and ceilings.
Installation
Before installing the extractor hood, fit the exhaust air fitting on the housing. Use the screws supplied to fix the exhaust air fitting to the housing. Longer screws could damage the internal wiring. Failure to follow these instructions does not entitle you to any warranty claim.
Set up the appliance
- so that the mains plug is accessible at all times Do not pinch or damage the mains power cable.
- Do not connect to mains power supply via multiple sockets or extension leads.
• and do not operate outdoors.
• in accordance with the prescribed minimum clearances.
Minimum clearances
The following minimum clearances from the upper edge of the hob to the lower edge of the extractor hood must be observed when installing the extractor hood:
| Clearance | |
| Electric stoves | 650 mm |
| Gas stoves | 700 mm |
| max. | 750 mm |
Table 6 Minimum clearances
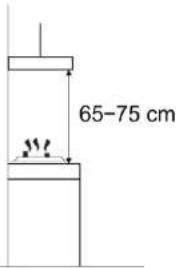

If the extractor hood is installed above a gas cooker and the installation instructions for the gas hob prescribes a larger clearance, this larger clearance must be observed.
Installation
| Appliance dimensions | mm |
| Height | 396 |
| Width | 795 |
| Depth | 365 |
| Flue height (extendible) | 669 |
Table 7 Appliance dimensions
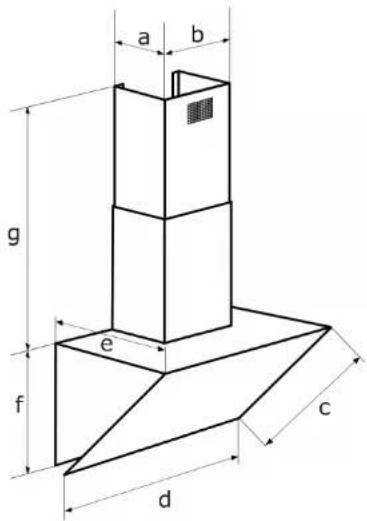
Figure 10 Appliance dimensions
Installation
11.3 Installation for exhaust air mode
During air extraction mode, the intaken air is cleaned in the grease filter and then discharged into the atmosphere via an exhaust air duct. An adequate supply of fresh air must therefore be ensured at all times.

GEFAHR
DANGER TO LIFE!
Do not discharge the exhaust air into a chimney. The discharge of exhaust air into a stack used for the ventilation of rooms in which there are fireplaces is not permitted. Combustion gases drawn back into the room could result in poisoning.
- Do not connect the extractor hood to other exhaust air ducts on which other appliances are already installed that are operated with power sources other than electricity (e.g. boilers, gas stoves, etc.).
- The regulations of the local authorities must always be observed for the extraction of the exhaust air.
- Due to regional and national building regulations, the operation of extractor hoods and chimney-vented fireplaces such as coal or oil ovens and gas water-heaters together in the same room is subject to certain restrictions.
The exhaust air is guided into an air shaft or to the outside.
- If connected to an air shaft, the exhaust air hose must not extend too far into the shaft.
- If the exhaust air is discharged outside the building, fitting a ventilation flap (not included in the scope of supply) on the outside is recommended.
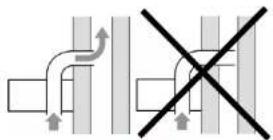
Figure 11 Air shaft
Installation
11.4 Installation for recirculating air mode
The installation of activated charcoal filters is necessary for recirculating air mode. The air extraction performance is reduced when the activated charcoal filter is installed. The intaken air is first passed through the grease filter and then through an additional activated charcoal filter and returned to the kitchen area as clean air. The air outlet openings on the flue must be open so that the cleaned air can flow freely into the room.
The inner flue shaft of this extractor hood must protrude far enough beyond the outer flue shaft that the cleaned air can flow out unhindered through the air outlet openings. In recirculating air mode, the non-return flap must be removed, otherwise the extractor hood will not work.
Installing the activated charcoal filter
- Remove the grease filter by pressing back the clips; clean it again if necessary.
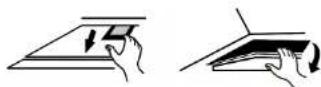
Figure13 Releasing the grease filter
- Insert the activated charcoal filters in both sides and turn until they click into place.
- Check whether the activated charcoal filter is securely fitted.
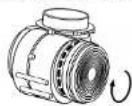
Figure 14 Attaching the activated carbon filter

The activated charcoal filters are optional and can be ordered from After Sales Service ^9 .
After Sales Service Tel. +49 2944 9716-791
Installation
11.5 Wall mounting
| Tools required | Designation |
| Drill | |
| Cross-head screwdriver | |
| Tape measure | |
 | Insulating tape |
Table 8 Tools required
Installation
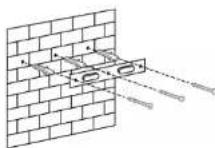
- Hold the wall bracket against the wall and mark 3 drill holes.
- Drill three holes in the wall (3x8 mm).
- Fix the dowels.
-
Mount the wall bracket with 3 screws (ST4x30 mm).
-
Hang the extractor hood on the wall bracket and hold it firmly in place.
- Mark the holes.
- Drill four holes in the wall.
- Fix the dowels.
- Hang the extractor hood on the wall bracket.
- Mount with 4 screws.
- Fasten the air outlet cover in the exhaust air fitting of the extractor hood (if not already pre-assembled).
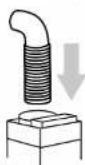
- Fit the exhaust air hose to the exhaust air fitting. The exhaust air hose is included in the scope of supply.
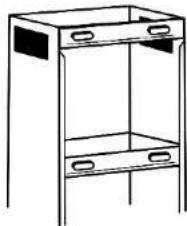
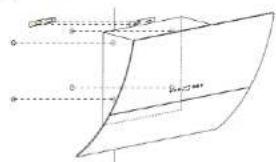
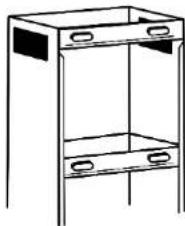
- To install the upper and middle flue bracket, draw a vertical line upwards.
- Mark the holes for the brackets, drill 8 mm holes and insert the dowels.
- Screw on the brackets.
- Place the lower flue panel on the hood.
- Connect the lower flue panel to the middle flue bracket, which is already mounted on the wall.
natural_image
Line drawing of a two-tiered storage cabinet or shelf unit (no text or symbols)Installation
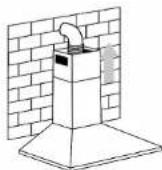
- Insert the upper flue into the lower flue.
- Pull out the upper flue until the desired height is reached.
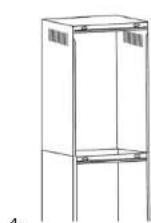
- There are two options for mounting the inner flue panel:
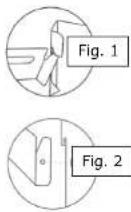
- Hook the outer and inner flue panels into the brackets (Fig. 1).
- Screw the inner flue panel to the side of the bracket with 2 screws (Fig. 2). Hang the outer flue panel in the bracket.
4.
Putting into operation
12 Putting into operation
Always switch on the extractor hood at the start of cooking and allow it to run for a few minutes longer after the end of cooking. This removes cooking fumes most effectively.

GEFAHR

RISK OF SUFFOCATION! FIRE HAZARD!
Always ensure adequate ventilation in the room when the extractor hood is in operation at the same time as gas cookers or other fluid-fired appliances. Always operate the extractor hood with a grease filter. Fats or oils can easily catch fire if they are overheated. Therefore always supervise the food while cooking.
• Operation is not permitted above a coal or wood-fired fireplace.
- Do not flambé food under the extractor hood.
- Do not open the gas supply of gas hobs as long as there is no cookware on the hob.
- Clean or replace the filter at regular Intervals.
12.1 Control panel


| Button symbol | Function |
| ON/OFFButton for switching the appliance on and off. | |
| Decreasing the fan speedButton for reducing the fan speed. | |
| Increasing the fan speedButton for increasing the fan speed. |
Service and Maintenance

Run-on time
Set a run-on time of 1 to 9 minutes. The extractor hood continues to run on the lowest setting and then switches off automatically.
Switch on the extractor hood and press the "Run-on time" button for 3 seconds until the digital display flashes.
Set the minutes using the "Decrease" or "Increase" button. Press the "Run-on time" button again to save the setting.
Do not press the button for 10 seconds to automatically save the last setting.

Light
Button for switching the light ON and OFF.

The digital display switches off after 2 minutes while the extractor hood is in operation. If you press one of the buttons, the display lights up again.
13 Service and Maintenance
Regular service and maintenance increase the service life of the appliance.

WARNUNG

ELECTRIC SHOCK HAZARD!
The appliance must not be connected to the mains power supply during cleaning and service work. Before starting cleaning and service work, switch off the appliance, remove the mains plug and switch off or unscrew the fuse. Never clean the appliance with a steam cleaner or high-pressure cleaner. Moisture could get into electrical components.
• Hot steam can result in damage to plastic parts.
- The appliance must be dry before use.
- Do not use abrasive or aggressive cleaning agents.
- Do not push pointed objects into the protective grille of the motor or into other electrical parts.
- Never try to check the condition of the filter while the extractor hood is in operation.
- Operate the extractor hood only with the lamp fitted to avoid the risk of an electric shock.
Service and Maintenance

VORSICHT

RISK OF SCALDING
When cleaning, select the water temperature so that there is no risk of scalding!
13.1 Cleaning the appliance
For hygiene reasons, clean the extractor hood at regular intervals. The frequency of cleaning depends on the operating hours and the application of the extractor hood.
- Push down the lock of the metal filter cassette.
- Carefully remove the metal filter cassette.
- Clean the inside and outside of the housing including the control panel with a soft, damp cloth and a warm detergent solution. Use only mild detergents. Do not use aggressive cleaning agents, brushes or scouring powder.
- Dry with a soft cloth
- Replace the metal filter cassette.
- After cleaning, connect the appliance to the mains power supply again.
13.2 Cleaning the grease filter
Clean the metal grease filter regularly every month. The frequency of cleaning depends on the operating hours and the application of the extractor hood.

WARNUNG

FIRE HAZARD!
Observe the filter changing and cleaning intervals. Failure to observe this may result in fires due to accumulations of grease.
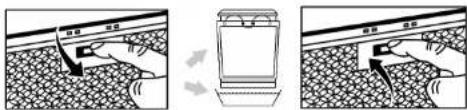
-
Push down the lock of the metal filter cassette.
-
Carefully remove the metal filter cassette.
-
Soak the filter in warm detergent solution and clean. Do not use aggressive
cleaning agents, brushes or scouring powder.
-
Rinse thoroughly with warm water and leave to dry.
-
Replace the metal filter cassette
-
Connect the appliance to the power supply again
Service and Maintenance
After several cleaning procedures, the colour of the filter may change. This is normal and cannot lead to replacement of the filter under guarantee. It does not affect the functionality of the hood in any way.
13.3Replacing the activated charcoal filter
Depending on the usage of the extractor hood in recirculating air mode, activated charcoal filters must be replaced every six months, but at least every year. Do not wash or re-use this filter.
In order to guarantee proper absorption of the odours, the volume of activated charcoal must match the extraction capacity of the hood. The high quality of the activated charcoal guarantees efficient absorption of the kitchen odours with normal operation. Therefore use only original filters and replace at regular intervals.
- Disconnect the appliance from the mains power supply.
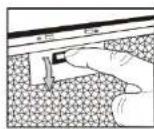
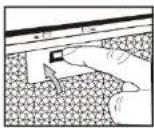
- Push down the lock of the metal filter cassette (I).
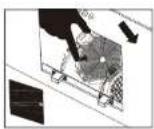
- Carefully remove the metal filter cassette (II).
- Unscrew the activated charcoal filter. Remove it and dispose of with
household waste - Fit new activated charcoal filters on both sides of the motor.
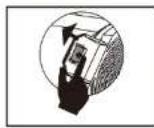
- Press the filters onto the plastic lugs and turn them clockwise until they
click into place (III). - Reinsert the metal filter correctly (IV).
- Connect the appliance to the power supply again.
①
||
③
IV
Service and Maintenance
13.4 Replacing the lamp
Replace the lamps in the appliance with the same type of lamp.

WARNUNG

ELECTRIC SHOCK HAZARD!
Before replacing the lamp, switch off the appliance, remove the mains plug and switch off or unscrew the fuse.

VORSICHT

RISK OF BURNS
Do not touch the lamp until the appliance has been switched off and the lamp
has cooled down completely
Do not cover the lamp with heat insulation or other material.

WARNUNG
RISK OF INJURY!
The light from LEDs is very bright and can damage the eyes. Do not look directly into the switched-on LEDs for longer than 60 seconds.
Lamp data: 220-240 V, max. 1.5 W
Fitting: E 14
Service and Maintenance
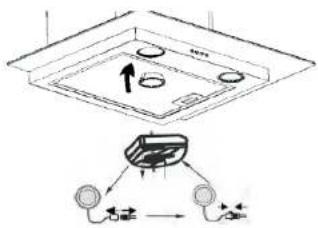
- Disconnect the appliance from the mains power supply.
- To replace the lamp, first remove the filter unit.
- Unscrew the defective lamp in anti-clockwise direction and remove it.
- Do not touch the new lamp directly with your fingers; use a clean cloth to screw in the lamp.
- Carefully insert the new lamp into the lamp bracket and screw tight in clockwise direction.
- Carefully fit the filter unit into the extractor hood again.
- Connect the appliance to the power supply again.

The LED modules can be ordered from After Sales Service ^10 .
13.5 Decommissioning the appliance
To switch off the appliance, remove the mains plug and switch off or unscrew the fuse.
13.6 Reduction of environmental impact
- Adjust the fan speed to the intensity of the cooking vapours.
- Pay attention to an adequate supply of fresh air during operation of the extractor hood.
- Observe the distance between the upper edge of the hob and the lower edge of the extractor hood as indicated in the installation instructions in order to achieve the optimum effect.
- Clean or replace the filters (grease filter/odour filter) at regular intervals.
- Switch off the extractor hood after the end of cooking.
- On extractor hoods with run-on time, activate this function.
- Switch off the light after the end of cooking.
Troubleshooting
14 Troubleshooting

WARNUNG
Have repairs to electrical appliances carried out only by a qualified electrician. An incorrectly performed repair can pose dangers for the user and lead to a voiding of warranty claims.
| Fault | Possible cause | Actions |
| Light is not working. | Lamp is defective. | Replace lamp (see chapter 4.4). |
| Appliance is not working. | Plug is not plugged in to the plug socket. | Connect the appliance to the mains power supply.Check whether the mains plug is correctly plugged in to the plug socket. |
| Power failure | Check whether the power supply is still functioning and that the fuses are intact. | |
| The extractor hood is running, but the kitchen odours are not extracted. | Filter is clogged. | Clean or replace the filter (see chapter 4). |
| In air extraction mode: | Check the exhaust air hose.Every bend decreases the extraction performance. |
After Sales Service
15 After Sales Service
If the fault cannot be remedied following the instructions given above, please call our After Sales Service. On no account should you carry out any further work, particularly not on the electrical parts of the appliance.

A visit by an After Sales Service technician is not free of charge even during the warranty period in the event of incorrect operation or one of the faults described above.
Responsible After Sales Service:
EGS GmbH
Dieselstraße 1
33397 Rietberg / GERMANY
Service telephone
for Germany 02944 9716-791
for Austria 0820 200 170
E-mail: kontakt@egs-gmbh.de
Internet: www.egs-gmbh.de
Repair orders can be made online.
The following information is required in order to be able to process your repair order:
5) Model
6) Version
7) Batch
together with your full address, telephone number and a description of the fault.
The appliance-specific data can be found on the type plate located inside the appliance behind the filter unit of the extractor hood.
flowchart
graph TD
    A["Printer"] --> B["Printer"]
    B --> C["Output"]
    D["Typenschild"] --> E["Printer"]
Warranty terms
16 Warranty terms
Warranty terms
As the buyer of an Exquisit appliance, you are entitled to the statutory warranty under the purchase contract with your dealer. In addition, we grant you a warranty on the following terms:
Warranty Period
The warranty period is 24 months from the date of purchase (proof of purchase must be presented). During the first 6 months, After Sales Service will fix defects in the appliance free of charge on condition that the appliance is accessible for repairs without any great effort. During the following 18 months, the buyer is obliged to prove that the defect already existed at the time of delivery. In the case of commercial use (e.g. in hotels, cantleens) or joint use by several households, the warranty period is 12 months from the date of purchase (proof of purchase must be presented). During the first 6 months, After Sales Service will fix defects in the appliance free of charge, on condition that the appliance is accessible for repairs without any great effort. During the following 6 months, the buyer is obliged to prove that the defect already existed at the time of delivery. The claim under warranty does not prolong the warranty period for either the appliance or for newly installed parts.
Scope of the defect remedy
Within the periods indicated, we will remedy all defects in the appliance that are demonstrably attributable to poor workmanship or material flaws. Replaced parts become our property.
The warranty does not cover:
Normal wear, deliberate or negligent damage, damage resulting from a failure to observe the Instruction manual, improper installation and set-up or connection to the wrong mains power supply, damage caused by chemical or electrothermal effects or other abnormal environmental conditions, glass, paintwork or enamel damage and possible differences in colour as well as defective lamps.
Defects in the appliance resulting from transport damage are also not covered. We are also not obliged to perform defect remedies, if - without our express written authorisation - work is carried out on the Exquisit appliance by unauthorised persons or third-party parts have been used. This limitation shall not apply to faultless work carried out by a qualified person using our original parts to adapt the appliance to the technical safety regulations of another EU member state.
Scope
Our warranty applies to appliances purchased in an EU member state and operated in the Federal Republic of Germany or Austria.
For appliances purchased in one EU member state and moved to another EU member state, defect remedies will be carried out by us within the framework of the national warranty terms. The obligation to provide services under warranty shall apply only as long as the appliance satisfies the technical regulation of the country in which the warranty claim is made.
For repairs outside the warranty period:
- If an appliance is repaired, the repair invoices are payable immediately without deduction.
- If an appliance is inspected or a started repair is not completed, After Sales Service will invoice flat-rate travelling expenses and labour costs.
- Advice from our after sales service centre is free of charge (see chapter "After Sales Service").
Technical data
17 Technical data
| MODEL | KFD 80-8.1 | |
| Product group | Extractor Hood | |
| Pushbutton switches | 5x | |
| Electrical connection Voltage/frequency | V / Hz | 220-240 / 50 |
| Power consumption | W | 100 |
| Lamp wattage | W | 2x1.5 (LED) |
| Dimensions, unpacked Hood | WxDxH mm | 795x365x396 |
| Flue extendible max. height incl. hood | mm | 396- 6691155 |
| Exhaust air fitting ∅ | cm | 15 |
| Weight, net | kg | 18 |
| EAN no. | black | 4016572022650 |
| Aluminium filterArticle no.EAN no. | Qty. | 110102014016572022834 |
| Activated charcoal filter, optionalArticle no.EAN no. | Qty. | 210101704016572018516 |
Subject to technical modifications.
All appliance-specific data on the energy label have been determined by the appliance manufacturer using standardised European measuring methods under laboratory conditions. These are documented in EN 61591. The actual energy consumption of the appliance in the household depends on the installation location and user behaviour, and can therefore in some cases be higher than the values determined by the appliance manufacturer under standardised conditions.
CE Conformity
At the time of its placement on the market, this appliance conforms to the requirements laid down in the Council directives on the approximation of the laws of the Member States relating to electromagnetic compatibility, Directive 2014/30/EU, and relating to the making available on the market of electrical operating equipment designed for use within certain voltage limits, Directive 2014/35/EU.
This appliance bears the CE mark and has a declaration of conformity that can be examined by the responsible market supervisory authorities.
Disposal
18 Disposal
Disposal of packaging materials
Sort packaging materials before disposal. Paper and cardboard with the waste paper and plastic film in the recycled materials bin.
Disposing of old appliances (EN)
Old appliances must not be disposed of with household waste. The symbol of the crossed-out wheeled bin on the product or its packaging means that the appliance must not be disposed of with household waste but requires separate disposal. You can return the old appliance free of charge to a suitable municipal collection point for old electrical and electronic equipment, e.g. a recycling centre.
You can obtain the addresses from your city administration or local government. Alternatively, you can return old electrical appliances with an edge length of up to 25 cm free of charge to retailers with a sales area for electrical and electronic equipment of at least 400 m² or food retailers with a total sales area of at least 800 m² who offer electrical and electronic equipment at least several times a year.
Larger old appliances can be returned free of charge to an appropriate retailer when purchasing a new appliance of the same type that performs essentially the same functions as the new appliance. Please contact your dealer regarding the modalities of returning an old appliance when delivering the new appliance.
Please remove - if possible - all (rechargeable) batteries as well as all lamps that can be removed without destroying them before disposing of the product.
Please note that you are responsible for deleting personal data from the appliance to be disposed of.
Children can often not recognise the hazards associated with household appliances. Ensure the necessary supervision and do not let children play with the appliance.
Disposing of old appliances
The symbol of the crossed-out wheeled bin on the product or its packaging means that the appliance must not be disposed of with household waste but requires separate disposal. You can return the old appliance free of charge to a suitable municipal collection point for old electrical and electronic equipment, e.g. a recycling centre. You can obtain the addresses from your city administration or local government. Alternatively, you can return old electrical appliances free of charge when you buy a new appliance of the same type and with the same function from an offline retailer. Please contact your dealer regarding the modalities of returning an old appliance when delivering the new appliance.
Please remove - If possible - all (rechargeable) batteries as well as all lamps that can be removed without destroying them before disposing of the product.
Please note that you are responsible for deleting personal data from the appliance to be disposed of.
The appliance may contain substances that can endanger the environment and human health if disposed of incorrectly. Material recycling helps to reduce waste and conserve resources. By collecting old appliances separately and recycling them, you help prevent negative impacts on the environment and human health.
exquisit
GGV HANDELSGES. MBH & CO. KG
AUGUST-THYSSEN-STR. 8
D-41564 KAARST
GERMANY
KFD80-8-1_BDA_DE-EN_E1-0_2023_02.docx
www.exquisit.de
- Intended use
- Getting to know your appliance
- Scope of delivery
- Designation
- Not included in the scope of supply:
- For your safety
- Explanation of the safety instructions
- GEFAHR
- WARNUNG
- VORSICHT
- ACHTUNG
- RISK OF ELECTRIC SHOCK!
- RISK OF SCALDING!
- FIRE HAZARD!
- Safety and responsibility
- Safety of children and persons with limited capabilities
- RISK OF SUFFOCATION!
- Safety and warnings
- Installation
- Unpacking the appliance
- Removing transport protection
- RISK OF INJURY!
- Preparing the appliance for installation
- ELECTRIC SHOCK HAZARD!
- Set up the appliance
- Minimum clearances
- Installation for exhaust air mode
- DANGER TO LIFE!
- Installation for recirculating air mode
- Installing the activated charcoal filter
- Putting into operation
- RISK OF SUFFOCATION! FIRE HAZARD!
- Control panel
- Run-on time
- Light
- Service and Maintenance
- RISK OF SCALDING
- Cleaning the appliance
- Cleaning the grease filter
- 13.3Replacing the activated charcoal filter
- Replacing the lamp
- RISK OF BURNS
- Service and Maintenance
- Decommissioning the appliance
- Reduction of environmental impact
- Troubleshooting
- Troubleshooting
- After Sales Service
- Responsible After Sales Service:
- Service telephone
- Warranty terms
- Warranty terms
- Warranty Period
- Scope of the defect remedy
- The warranty does not cover:
- Scope
- For repairs outside the warranty period:
- CE Conformity
- Disposal
- Disposal of packaging materials
- Disposing of old appliances (EN)
- Disposing of old appliances
- exquisit
Brand : Exquisit
Model : KFD 80-8.1
Category : Range hood