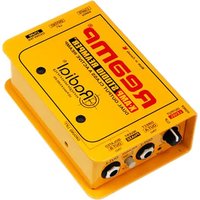
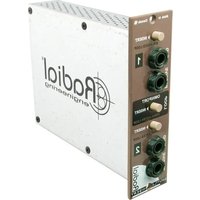
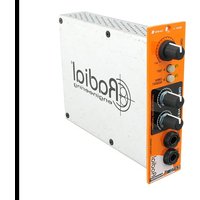
X-Amp ReAmp - Professional audio equipment Radial Engineering - Free user manual and instructions
Find the device manual for free X-Amp ReAmp Radial Engineering in PDF.


| Product Type | Active Reamp / Impedance and Level Matching Device |
| Brand | Radial Engineering |
| Model | X-Amp ReAmp |
| Audio Circuit Type | 100% discrete class-A |
| Frequency Response | 20 Hz - 15 kHz (±1.0 dB) |
| Signal to Noise Ratio | 88 dB below instrument level (-20 dBu) |
| Dynamic Range | 119 dB |
| Noise Floor | OUT-1: -110 dB; OUT-2: -108 dBu |
| Maximum Input Level | +22 dBu |
| Total Harmonic Distortion | 0.02% @ -15 dBu |
| Intermodulation Distortion | 0.02% @ -20 dBu |
| Input Impedance | 600 Ω |
| XLR Input | Balanced line-level, AES standard (pin-2 hot) |
| Output Type | High-Z instrument level; OUT-1 direct, OUT-2 transformer isolated |
| Output Level Control | Adjustable, recessed potentiometer |
| Polarity Reverse | 180° switch on OUT-2 |
| Ground Lift | Input side switch; OUT-2 recessed switch (internal) |
| Power Requirement | +15 VDC / 400 mA (adapter included) |
| Construction | 14 gauge steel chassis and outer shell, powder-coat finish |
| Dimensions (H x W x D) | 2 x 5 x 3.3 in (48 x 127 x 84 mm) |
| Weight | 1.55 lb (720 g) |
| Shipping Weight | 2.6 lb (1.18 kg) |
| Conditions for Use | Dry locations only, 5°C to 40°C |
| Warranty | Radial 3-year transferable limited warranty |
| Included Accessories | 15 VDC/400 mA power supply, user manual |
Frequently Asked Questions - X-Amp ReAmp Radial Engineering
User questions about X-Amp ReAmp Radial Engineering
0 question about this device. Answer the ones you know or ask your own.
Ask a new question about this device
Download the instructions for your Professional audio equipment in PDF format for free! Find your manual X-Amp ReAmp - Radial Engineering and take your electronic device back in hand. On this page are published all the documents necessary for the use of your device. X-Amp ReAmp by Radial Engineering.
USER MANUAL X-Amp ReAmp Radial Engineering
Radial Engineering Ltd.
1165 - 1845 Kingsway Ave, Port Coquitlam BC V3C 1S9
Tel: 604-942-1001 • Fax: 604-942-1010
Email: info@radialeng.com
Radial® XAMP™ REAMP® User Guide
Table of Contents Page
Overview....1
Input Panel....2
Output Panel....3
Getting Ready To Remap......5
Connecting And Using The X-Amp 6
Adjusting Levels And Adding A Second Amp 7
Using With Keyboards And Voice 8
Grounding Options....9
Specifications....9
Warranty Back Cover
INTRODUCTION
The Radial X-Amp is an active Reamper that has been developed with one goal in mind: To explore new musical sounds and spur on the creative process.
Like all Radial products, this ‘creative tool’ is made using the very finest components and care to ensure the very highest quality sound possible. And like any tool, the best way to get the most out of it is by understanding the functions, the intent behind the design and of course some of the safety features and instructions that have been provided. To this end, we recommend reading this manual before operating your X-Amp.
We are confident you will find the Radial X-Amp to be fun to use, musical and that it will open new doors to creativity. If you have question after you have read the user guide please visit the X-Amp FAQ page on our web site. If you still can not find what you are looking for, feel free to send us an email at info@radialeng.com and we will do our very best to reply to you in short order. We love to hear from you!


Please read the caution statement on the last page before connecting your Radial X-Amp
OVERVIEW
Designed as a creative tool, the Radial X-Amp is an active device that allows pre-recorded instrument tracks to be sent through guitar amplifiers and effect devices. Since guitar amps and recording devices work at different signal levels, they are not directly compatible. In essence, the X-Amp allows these devices to ‘speak’ to each other. The Radial X-Amp is an active ‘impedance and level-matching device’ that converts line level signals from a mixing console or tape recorder to guitar level signals to drive one or two guitar amplifiers without introducing ground-loops or noise.
To start Reamping, one would generally record a dry guitar or bass track using a direct box such as the Radial JDI, Radial J48 or Radial JDV.
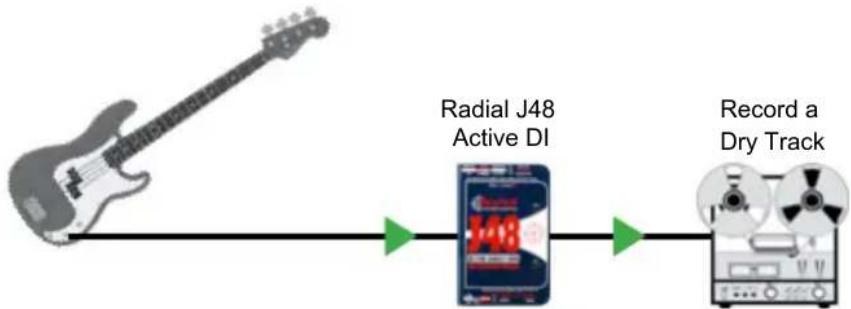
flowchart
graph LR
    A["Music Player"] --> B["Radial J48 Active DI"]
    B --> C["Record a Dry Track"]
Afterwards, the pre-recorded dry track is routed through the X-Amp, which in turn is connected to a guitar amplifier. The ‘Reamped’ sound is recorded to new tracks.

flowchart
graph TD
    A["Recorder (dry track)"] --> B["Radial X-Amp"]
    B --> C["Guitar Amps"]
    C --> D["Mic"]
    B --> E["Reamp Track"]
    E --> F["Reamp Track"]
    F --> A
The advantages of recording a track this way are many: Once the original track has been recorded, the engineer and producer can try different amplifiers and sounds without tiring out the player with relentless repetition. For the player-engineer, the track can be recorded, then the player can then sit in the control room and listen to a variety of guitar effects or amplifiers before committing a final sound to the track.
The X-Amp can also be used on other instruments. Keyboard tracks can be given extra life by warming up their sound by sometimes driving them through distortion pedals or tube guitar amps. Vocal tracks can also be twisted into new sounds by introducing these fun effects.
FEATURE SET: INPUT PANEL

-
LINE LEVEL XLR INPUT: The input to the Radial X-Amp is a balanced line level female XLR. This is typically fed from the output of a recording device or mixing console. The XLR connector is wired with pin-2 hot following the AES standard.
-
GROUND: A ground lift switch disconnects pin-1 ground at the XLR input. Depressing this switch assumes you will be providing a ground path via the OUT-1 to your amplifier. Lifting the ground often helps reduce hum or buzz caused by so-called ground loops.
-
CABLE CLAMP: Used to secure the power supply cable and prevent accidental power disconnection.
-
POWER: The 15VDC power supply is connected here. Plug in to activate the X-Amp.
-
FULL-BOTTOM NO-SLIP PAD: Provides mechanical isolation to reduce slipping and electrical isolation from amplifier frames and handles.
-
BOOKEND DESIGN: 14 gauge steel outer shell creates a protective zone around connectors and switches. Internal welded I beam construction for maximum durability.
-
POWER LED INDICATOR: The power LED will immediately illuminate when the 15VDC supply is connected.
FEATURE SET: OUTPUT PANEL
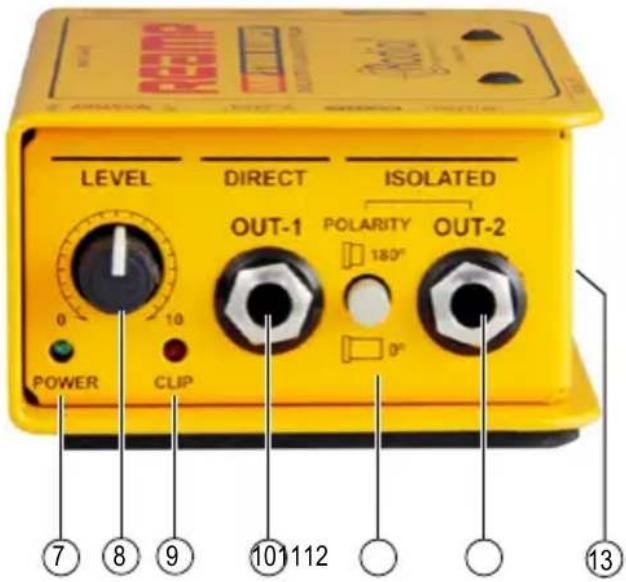
- LEVEL CONTROL: The output LEVEL control sets the volume level going to the guitar amplifiers. This potentiometer is recessed to prevent accidental change and is adjusted using a guitar pick or flat-head screwdriver.
- CLIP LED INDICATOR: To ensure the signal from the mixer or recorder does not overload the X-Amp, a clip indicator on the front panel provides clear viewing. If this LED illuminates, reduce the signal level.
- DIRECT OUT-1: This 14 " output connects to guitar amp-1. This is a transformerless, direct-coupled output and is used to connect to your primary guitar amplifier. This provides the primary ground path for the X-Amp. This output must always be connected to a properly grounded amplifier.
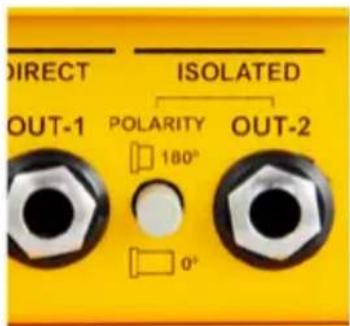
- POLARITY 180°: The polarity reverse works with the transformer-coupled OUT-2 14 " output jack. This flips the polarity of the output to allow two amplifiers to play 'in-phase'.
- ISOLATED OUT-2: This 14 " transformer isolated output connects to your second amplifier. Transformer isolation allows use of two amps without introducing hum and buzz caused by ground loops.
- GROUND LIFT OUT-2 (located on side): This recessed switch gives you the option to bypass the transformer isolation and convert the OUT-2 into a direct and grounded output. It is factory set to LIFTED (inward position) to provide a safe and noise free connection to amplifiers. See page 9 for more information about using this feature.
STEP-1: RECORD A DRY TRACK WITH A DIRECT BOX
As most Reamping is performed with an electric guitar, we have chosen to discuss the process using this example. The same process applies with bass, voice, keyboard, violin or any other instrument.
Start by recording a dry track using a high quality direct box (DI) such as the Radial JDI, Radial J48 or Radial JDV. Keep in mind that cheap DI boxes sound less realistic, have limited dynamic range and tend to have less warmth. When Reamping a track, it is important that the source track be as clean and natural sounding as possible.
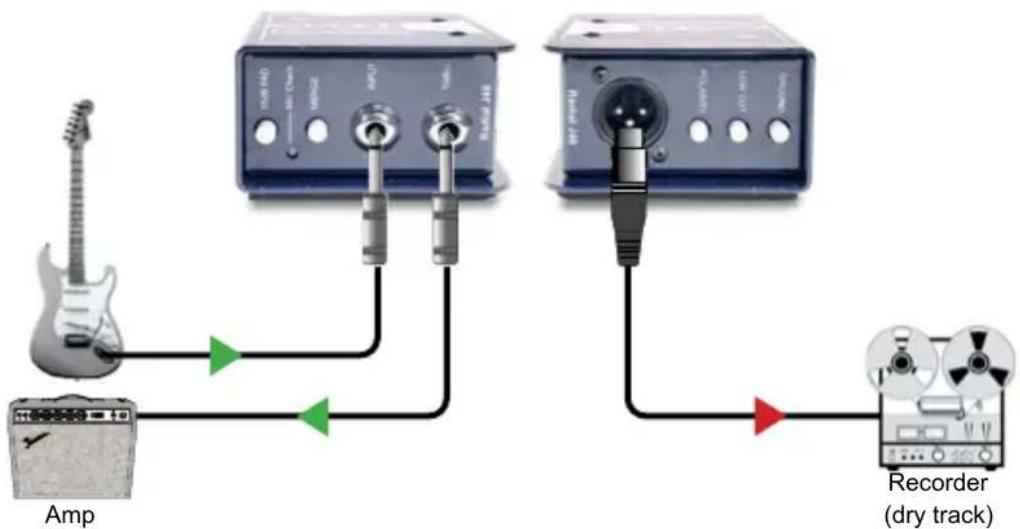
The usual connection when Reamping is to connect the guitar to the DI box and have the thru connection go to your guitar amplifier. The DI's balanced output is then connected to the mixer and recording device.
flowchart
graph TD
    A["Ang"] -->|Green Arrow| B["Audio Recorder (dry track)"]
    C["Radio Jitter"] -->|Black Arrow| D["Audio Recorder (dry track)"]
    E["Radio Jitter"] -->|Black Arrow| D
    B -->|Red Arrow| D
    style A fill:#f9f,stroke:#333
    style C fill:#ccf,stroke:#333
    style E fill:#cfc,stroke:#333
Recording a clean, dry track with a Radial direct box.
By recording this way, you are able to listen to your guitar amplifier's sound while recording a ‘clean’ signal. The clean guitar track retains all of the inflections and sustaining effects that you would normally hear and ‘feel’ when you perform. Note that when playing with a loud, heavily distorted sound, the guitar interacts with the amplifier. The amplifier's sonic vibrations excite the guitar strings which in turn can produce sustain and harmonic complexities.
The recorded ‘clean’ guitar tone will contain all the sustain and inflections of the original performance. When Reamping, the clean guitar track will drive the guitar amp in the same way as when the player was standing next to it. Reamping recreates the same complex tones between guitar, amp, and loudspeaker as when it was recorded. This allows you to replay the performance back through various amplifiers and effects devices to create new sounds.
It is a good idea to record the wet track (effects pedals and amplifier) at the same time with a traditional microphone set-up. This way, you can mix the original track with Reamped tracks to create new textures.
STEP-2: CONNECTING THE X-AMP TO YOUR AMP
Start by ensuring all amp and mixer levels are turned down. Place the X-Amp near your amplifiers in the studio. As soon as you connect the 15v/400mA power supply, the power LED on the front panel illuminates indicating the X-Amp is active and ready to use.
NOTICE: Before connecting the X-Amp to your guitar amplifier, make sure that it is equipped with a grounded 3-prong AC power cable. This important safety ground will ensure safe performance of your amplifier and the X-Amp. For safety, only use equipment that has passed electrical safety tests such as UL in the United States, CSA in Canada or the equivalent safety standards recognized in your country.
Use a balanced XLR cable to connect the output of your recorder or mixer to the input on the X-Amp. Next, use a high-Z 14 " guitar cable to connect the DIRECT OUT-1 to your amplifier's input.

flowchart
graph TD
    A["Recorder"] -->|Dry Track| B["Dry Tractor"]
    B --> C["Audio Amplifier"]
    D["Mic-1"] --> E["Audio Amplifier"]
    E --> F["Amp"]
    G["Level"] --> H["Direct"]
    H --> I["Isolated"]
    I --> J["Out-1"]
    I --> K["Out-2"]
Reamping the dry track and recording new tracks.
NOTICE: If you plan on connecting an amplifier to the second isolated OUT-2 jack it is very important your first grounded amplifier stay connected to direct OUT-1 at all times, even if not in use or powered on. The amp serves as an important safety ground.
Before connecting a second amplifier or effect pedals you should proceed to step-3 and finish setting up your first amp. This will help test the overall system and reduce troubleshooting.
STEP-3: ADJUSTING THE LEVEL
Start by setting the X-Amp's input LEVEL control to the 12 o'clock position. Play the dry track and turn up your recorder/mixer output until the CLIP LED on the X-Amp blinks occasionally with peaks in the recording. Now reduce the recorder/mixer level a bit so the clip light does not blink at all. This will ensure the X-Amp's output signal is clean.
Next test the connection to your amp. It's a good idea to set up a clean sound on your amp at first. This way you can hear if there is any distortion or ground loop hum. Turn your amp up to a comfortable listening volume. If you encounter hum or buzz, try depressing the X-Amp's input side GROUND LIFT switch.


Play the dry track while adjusting the X-Amp's LEVEL control. This control is used to ensure the signal coming from the dry track matches the level from your guitar. Because guitar amplifiers do not have input level meters this is done by plugging your guitar directly into your amp and taking note of the level and tone. Afterwards, connect the X-Amp to your amp and adjust the LEVEL control so that the level and tone is the same as when the guitar is connected directly.
STEP-4: ADD A SECOND AMP
At this point you can also connect a second amplifier to the ISOLATED OUT-2 14 " jack. This output is transformer isolated to eliminate hum and buzz caused by ground loops, a common problem when using two amps.

flowchart
graph TD
    A["Input"] --> B["Dry Track"]
    C["Ground"] --> B
    D["Reamp Track-1"] --> E["Recorder"]
    F["Reamp Track-2"] --> E
    G["Mic-1"] --> H["Amplifier"]
    I["Amp-2"] --> H
    H --> J["Amp-2Amp-1"]
    K["Level"] --> L["Direct"]
    M["Isolated"] --> N["Isolated"]
    O["Ground"] --> P["Ground"]
Recording two Reamped tracks at the same time.
STEP-5 TESTING PHASE
The OUT-2 14 " jack also features a 180° POLARITY reverse switch that is used to ensure both amplifiers are in-phase. To test for phase alignment place the amps side by side and turn up the volume on each amp equally. The POLARITY switch allows you to quickly invert the phase of your second amp. Try the switch in both the 0° and 180° positions and use the one that sounds the fullest. If you change amps or add effect pedals you may re-introduce a phase issue. After re-configuring your Reamping setup it's a good idea to quickly test for phase alignment by pressing the POLARITY switch and comparing the sound.
You are now set to go! The real magic begins when you start combining these tracks and adding effects. Have fun! Experiment!
USING THE X-AMP WITH KEYBOARDS
Keyboards may also enjoy the benefits of Reamping with the X-Amp by following the same procedures. There's no better way to turn a solo synthesizer track into a 'barn burner' than to pass it through a distorted tube guitar amplifier or Radial Tonebone tube distortion pedal. Players like the legendary Jan Hammer used this trick to create those amazing 'guitar' solo sounds. This is also a great way to get more 'growl' from those 'clean' B3 sounds. Half the magic of a traditional Hammond comes from the tube amp and Leslie being pushed to the limits. This is why Keith Emerson also used distorted guitar amps to record and perform. Try mixing sounds between clean and distorted ones and have fun!
USING THE X-AMP WITH EFFECT PEDALS
You can also use the X-Amp with guitar effect pedals. This is accomplished either by driving the pedal through a guitar amplifier or by sending the output of the effect pedal to a direct box like the Radial JDI and then to the mixer. We recommend the JDI for this application as the isolation transformer in the JDI will help eliminate potential noise caused by ground loops.
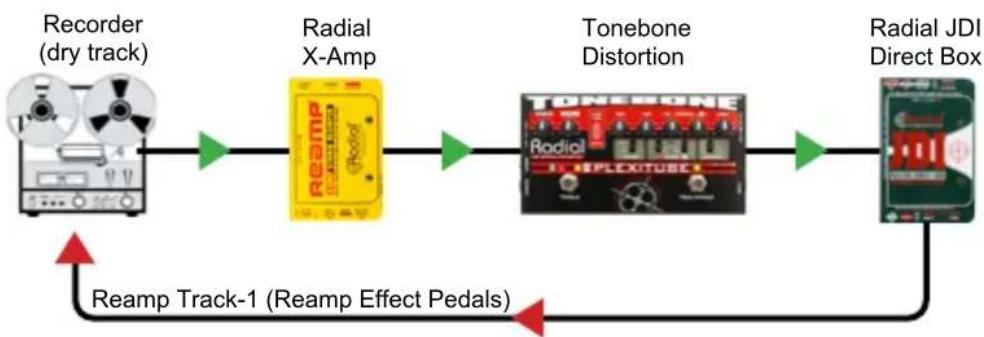
flowchart
graph LR
    A["Recorder (dry track)"] --> B["Radial X-Amp"]
    B --> C["Tonebone Distortion"]
    C --> D["Radial JDI Direct Box"]
    D --> E["Reamp Track-1 (Reamp Effect Pedals)"]
Reamping through a Tonebone distortion pedal and using a direct box instead of a mic.
USING THE X-AMP WITH VOICE
Often times voices can be too clean and lack that ‘seasoned’ rough edge. By driving a voice track through the X-Amp into a distortion pedal like the Radial Tonebone Classic or through an overdriven amplifier, one can introduce some great vocal effects. Double the clean track with distorted track and then mix them to suit. A subtle extra edge is often all that is needed to warm up a stale track.

flowchart
graph LR
    A["Recorder (vocal track)"] --> B["Radial X-Amp"]
    B --> C["Tonebone Distortion"]
    C --> D["Guitar Amp"]
    D --> E["Mic"]
    F["Reamp Track-1 (Distorted Vocals)"] --> A
Reamping a vocal track through a Tonebone distortion pedal.
OUT-2 GROUNDING OPTIONS
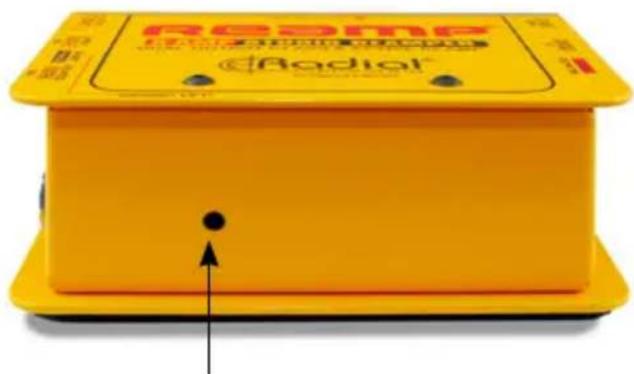
A second ground lift is provided for ISOLATED OUT-2. This switch is located inside the X-Amp and is accessed using a small screwdriver through a hole on the side panel. By factory default it is set to 'lifted' (inward position) allowing the transformer to isolate the signal ground between your recording system and your second amp. Setting the switch to 'grounded' (outward position) will bypass the transformer isolation.
In some situations it could be advantageous to connect the ground to your second amplifier. If you encounter noise and have tried lifting the input ground, try toggling the OUT-2 LIFT switch and use the setting that works best.
natural_image
Yellow electronic device labeled 'RSDM' with a black dot and arrow pointing to it (no readable text or symbols beyond branding)GROUND LIFT OUT-2: Use a small screwdriver to access the ground lift switch for OUT-2. Set inward to lift the ground (factory default) or outward to connect ground.
BLOCK DIAGRAM

flowchart
graph TD
    A["GND LIFT 1"] --> B["PSU"]
    B --> C["BAL IN"]
    C --> D["OVERLOAD"]
    D --> E["LEVEL"]
    E --> F["XFORMER"]
    F --> G["Polarity"]
    G --> H["OUT B"]
    I["OUT A"] --> F
    J["GND LIFT 2"] --> F
    K["PSU POWER ON"] --> C
    style A fill:#f9f,stroke:#333
    style B fill:#ccf,stroke:#333
    style C fill:#cfc,stroke:#333
    style D fill:#fcc,stroke:#333
    style E fill:#cff,stroke:#333
    style F fill:#ffc,stroke:#333
    style G fill:#fcc,stroke:#333
    style H fill:#fff,stroke:#333
    style I fill:#fff,stroke:#333
    style J fill:#fff,stroke:#333
    style K fill:#fff,stroke:#333
SPECIFICATIONS\*
Audio circuit type: 100% discrete class-A
Frequency response:....20Hz \~ 15kHz (± 1.0dB)
Signal to noise ratio: 88dB below instrument level (-20dBu)
Dynamic range: 119dB
Noise floor:....OUT-1 -110dB; OUT-2 -108dBu
Maximum input:....+22dBu
Total harmonic distortion: 0.02% @ -15dBu
Inter-modulation distortion: 0.02% @ -20dBu
Input impedance: 600Ω
XLR input: Balanced line-level, AES standard (pin-2 hot)
Ground lift (input): Disconnects pin-1 at the XLR input
Output level: .... Adjustable
Output type: ...... High-Z instrument-level, Out-1 direct, Out-2 transformer isolated
Polarity: 180° polarity reverse on Out-2
Power: ....+15VDC/400mA adapter included
Construction: 14 gauge steel chassis & outer shell, powder-coat finish
Size: 3.3" x 5.0" x 2" (84 x 127 x 48mm)
Weight: 1.55lb (720g)
Shipping Size: 5"x2.75"x10.75" (127x70x273mm)
Shipping Weight: 2.6lb (1.18kg)
Conditions:......For use in dry locations only between 5°C and 40°C
Warranty: Radial 3-year, transferable
*Specifications are subject to change without notice.
THREE YEAR TRANSFERABLE LIMITED WARRANTY
RADIAL ENGINEERING LTD. ("Radial") warrants this product to be free from defects in material and workmanship and will remedy any such defects free of charge according to the terms of this warranty. Radial will repair or replace (at its option) any defective component(s) of this product (excluding finish and wear and tear on components under normal use) for a period of three (3) years from the original date of purchase. In the event that a particular product is no longer available, Radial reserves the right to replace the product with a similar product of equal or greater value. In the unlikely event that a defect is uncovered, please call 604-942-1001 or email service@radialeng.com to obtain a RA number (Return Authorization number) before the 3 year warranty period expires. The product must be returned prepaid in the original shipping container (or equivalent) to Radial or to an authorized Radial repair center and you must assume the risk of loss or damage. A copy of the original invoice showing date of purchase and the dealer name must accompany any request for work to be performed under this limited and transferable warranty. This warranty shall not apply if the product has been damaged due to abuse, misuse, misapplication, accident or as a result of service or modification by any other than an authorized Radial repair center.
THERE ARE NO EXPRESSED WARRANTIES OTHER THAN THOSE ON THE FACE HEREOF AND DESCRIBED ABOVE. NO WARRANTIES WHETHER EXPRESSED OR IMPLIED, INCLUDING BUT NOT LIMITED TO, ANY IMPLIED WARRANTIES OF MERCHANTABILITY OR FITNESS FOR A PARTICULAR PURPOSE SHALL EXTEND BEYOND THE RESPECTIVE WARRANTY PERIOD DESCRIBED ABOVE OF THREE YEARS. RADIAL SHALL NOT BE RESPONSIBLE OR LIABLE FOR ANY SPECIAL, INCIDENTAL OR CONSEQUENTIAL DAMAGES OR LOSS ARISING FROM THE USE OF THIS PRODUCT. THIS WARRANTY GIVES YOU SPECIFIC LEGAL RIGHTS, AND YOU MAY ALSO HAVE OTHER RIGHTS, WHICH MAY VARY DEPENDING ON WHERE YOU LIVE AND WHERE THE PRODUCT WAS PURCHASED.

CAUTION: Only use the Radial X-Amp Reamp with amplifiers that are equipped with a properly grounded AC power cable and display electrical safety certifications such as the UL in the United States and CSA in Canada or the equivalent standards as approved in your country. If you are not sure about your amp please consult a qualified technician for advice before using this device or connecting any equipment to it.
To meet the requirements of California Proposition 65, it is our responsibility to inform you of the following:
WARNING: This product contains chemicals known to the State of California to cause cancer, birth defects or other reproductive harm.
Please take proper care when handling and consult local government regulations before discarding.

www.radialeng.com
Made in Canada
Radial Engineering Ltd.
1165 - 1845 Kingsway Ave, Port Coquitlam BC V3C 1S9
Tel: 604-942-1001 • Fax: 604-942-1010
Email: info@radialeng.com





- - 1845 Kingsway Ave, Port Coquitlam BC V3C 1S9
- Radial® XAMP™ REAMP® User Guide
- Table of Contents Page
- INTRODUCTION
- OVERVIEW
- FEATURE SET: INPUT PANEL
- FEATURE SET: OUTPUT PANEL
- STEP-1: RECORD A DRY TRACK WITH A DIRECT BOX
- STEP-2: CONNECTING THE X-AMP TO YOUR AMP
- STEP-3: ADJUSTING THE LEVEL
- STEP-4: ADD A SECOND AMP
- STEP-5 TESTING PHASE
- USING THE X-AMP WITH KEYBOARDS
- USING THE X-AMP WITH EFFECT PEDALS
- USING THE X-AMP WITH VOICE
- OUT-2 GROUNDING OPTIONS
- BLOCK DIAGRAM
- SPECIFICATIONS\*
- THREE YEAR TRANSFERABLE LIMITED WARRANTY
Brand : Radial Engineering
Model : X-Amp ReAmp
Category : Professional audio equipment