
Jensen Twin-Servo 500 - Professional audio equipment Radial Engineering - Free user manual and instructions
Find the device manual for free Jensen Twin-Servo 500 Radial Engineering in PDF.


| Product Type | 500 series microphone preamplifier |
| Brand | Radial Engineering |
| Model | Jensen Twin-Servo 500 |
| Dimensions | 7 x 5.5 x 1.5 inches |
| Weight | 1.75 lbs (0.8 kg) |
| Power Consumption | 110 mA (from 500 series rack) |
| Frequency Response | 14 Hz to 85 kHz (±1 dB) / 8 Hz to 100 kHz (±3 dB) |
| Microphone Input Impedance | 1.3 kΩ |
| Output Impedance | 75 Ω |
| Maximum Gain | +60 dB |
| Maximum Output Level | +22 dBu |
| Common Mode Rejection (CMRR) | -72 dB |
| Equivalent Input Noise (EIN) | -120 dBu @ maximum gain |
| Dynamic Range | 91 dB |
| Total Harmonic Distortion (THD+N) | 0.004% @ +4 dBu |
| Intermodulation Distortion | 0.004% @ +4 dBu |
| Meter | 10-segment LED peak indicator with hold |
| Polarity Reverse | 180° |
| Pad | -15 dB |
| High-Pass Filter | 6 dB/octave, -3 dB @ 150 Hz |
| Phantom Power | 48 VDC, 10 mA (as supplied by 500 frame) |
| Ground Lift | Rear panel switch, lifts ground on XLR inputs |
| Input Connector | Front combo XLR/1/4" (parallel to rear XLR) |
| Output Connector | Rear panel male XLR (via 500 series rack) |
| Circuitry | 100% discrete, dual JE-990 op-amps, servo-controlled, Jensen input/output transformers |
| Construction | Steel chassis, nylon guides (Workhorse compatible) |
| Warranty | 3 years, transferable |
| Country of Origin | Canada |
| Maintenance & Cleaning | Clean with dry cloth. Do not use solvents. No user-serviceable parts. |
| Safety | Professional use only. Do not hot-swap modules while rack is powered. Use thumb screws to secure. |
| Spare Parts & Repairability | Contact Radial Engineering for authorized service. No user-serviceable parts inside. |
| General Information | High-performance mic preamp based on Deane Jensen's original Twin-Servo 990 design. Delivers exceptional transparency and detail. |
Frequently Asked Questions - Jensen Twin-Servo 500 Radial Engineering
User questions about Jensen Twin-Servo 500 Radial Engineering
0 question about this device. Answer the ones you know or ask your own.
Ask a new question about this device
Download the instructions for your Professional audio equipment in PDF format for free! Find your manual Jensen Twin-Servo 500 - Radial Engineering and take your electronic device back in hand. On this page are published all the documents necessary for the use of your device. Jensen Twin-Servo 500 by Radial Engineering.
USER MANUAL Jensen Twin-Servo 500 Radial Engineering
Table of Contents Page
Feature Set .... 1
Overview 2
Making Connections....3
The Control Panel 4
Ground Lift and Omniport....5
Applications....6
Block Diagram....7
Specifications 8
Warranty......Back cover
Thank you for purchasing the Jensen Twin-Servo 500 ^™ series mic preamp. We are confident that as you become familiar with and gain experience using this device, you will quickly find that it is an exceptional sounding preamp for any application.
Although the Twin-Servo has been designed to be super easy to use, we urge you to take a few minutes to read the manual to ensure you gain familiarity with all of the features and functions that make it unique. If after you have done so, you find yourself looking for extra details, please visit the Twin-Servo FAQ page on the Radial web site. This is where we post updates and answer questions from other users that can shed light on various subjects. If afterwards you still do not find the appropriate answer, feel free to send us an email and we will do our very best to answer in short order.
Now get ready to plug into what may well be the most transparent and detailed sounding mic preamplifier you have ever heard.
FEATURE SET
-
10 SEGMENT METER: Custom designed circuit for greater VU meter accuracy.
-
GAIN CONTROL: Dual gang pot simultaneously controls the dual 990 op-amp topology for optimal gain at all settings. Stepped attenuation allows for easy recall of settings.
-
180°: Reverses pins-2 and 3 at the output to help phase align microphones when two channels are in stereo use.
-
HIGH PASS FILTER (HPF): Gentle high-pass filter may be inserted into the signal path to reduce excessive low frequency content and control resonance.
-
PAD: Reduces the input sensitivity by -15dB when amplifying exceedingly high output sources.
-
48V: Activates the 48V phantom power supply for use with condenser microphones and active direct boxes.
-
COMBO INPUT: Combination balanced XLR mic input and 1/4" instrument input is mounted on front panel for ease of use.
-
OMNIPORT: Available when used with the Radial Workhorse, the Omniport accesses a hi-Z instrument input.
-
JENSEN DUAL 990 OPAMPS: 100% discrete audio signal path without any tone shifting capacitors.
-
JENSEN OUTPUT TRANSFORMER: The JT-11-EM is linear from 2Hz\~200kHz with less than 0.001% distortion at 20Hz.
-
GROUND LIFT: Set and forget rear panel ground switch lifts the pin-1 ground at the XLR input.
-
JENSEN MIC INPUT TRANSFORMER: The JT-16-PCJR is exceptionally quiet and linear from 5Hz\~50kHz with less than 0.06% distortion at 20Hz.
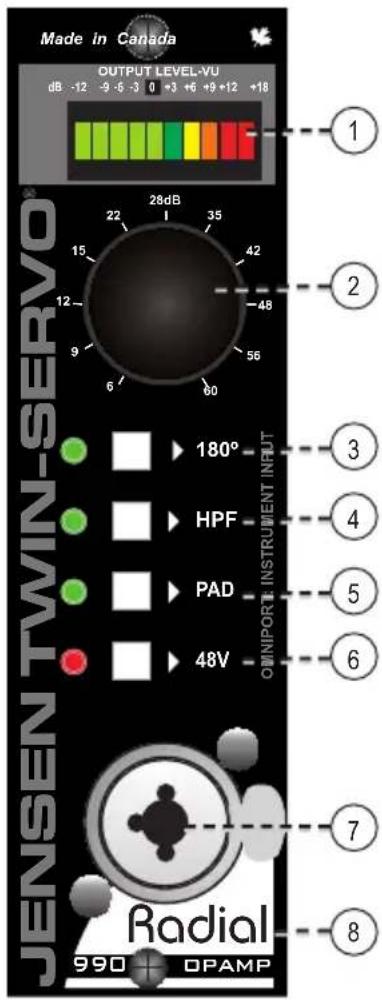

OVERVIEW
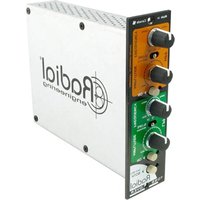
The Radial Jensen® Twin-Servo™ is a high-performance microphone preamp designed for exceptional frequency response, detail, and transparency. It's also remarkably easy to use; simply plug in your mic, adjust the gain, and you're ready to record. The Twin-Servo has features common to many mic preamps, such as a 180° polarity reverse, high-pass filter, input pad, and 48V phantom power. However, it's what's under the hood that really sets the Twin-Servo apart: two of Deane Jensen's famous JE-990 discrete operational amplifiers, two servos that eliminate all coupling capacitors, and two industry-leading Jensen transformers.
The Twin-Servo 500 has been meticulously designed to reproduce Deane Jensen's original Twin-Servo 990 mic pre, regarded by many audio professionals as the fi nest preamp ever made. The dual JE-990 op-amps allow for maximum effi ciency and lowest noise at all signal levels, while the servos eliminate the need for signal degrading capacitors in the audio path. Jensen transformers at the input and output deliver an amazing amount of bandwidth, extending the natural low end and providing for huge amounts of headroom. The Twin-Servo can provide up to 60dB of gain, perfect for source material with a high dynamic range. We encourage you to try the Twin-Servo on a variety of sources as we are confi dent you will be impressed with the results.

flowchart
graph LR
    A["TMIX"] --> B["SWITCHER"]
    B --> C["MODIFIER"]
    C --> D["KOMIT COMPRESSOR"]
    D --> E["Output"]
    style A fill:#f9f,stroke:#333
    style B fill:#ccf,stroke:#333
    style C fill:#cfc,stroke:#333
    style D fill:#fcc,stroke:#333
    style E fill:#ffc,stroke:#333
MAKING CONNECTIONS
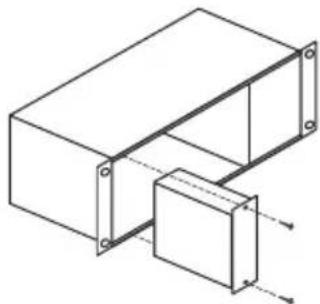
Before making connections, ensure your audio system is turned off and volume levels turned down. Hot swapping or inserting the module into a 500 series power rack when power is on is not recommended as it can harm some equipment and shorten the lifespan of the card edge connectors. Gently slide the Twin-Servo module into place ensuring you align the card edge with the 15-pin receptacle. If you have a newer Radial Workhorse, the nylon guides make this easy. The Twin-Servo comes with a pair of handy ThumbSet™ thumb screws. These should be hand-tightened to secure the module in place before use.
natural_image
Isometric line drawing of a mechanical assembly with two components (no text or symbols)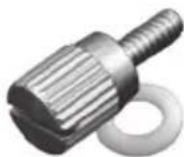
Radial ThumbSet™ knurled screws are included for easy installation.
Your power rack will likely be equipped with XLR inputs and outputs for each strip. Connect your microphone to either the female XLR input on the rear panel or the handy front panel Combo connector. These are wired in parallel and only one should be used at any one time. Connect the output using the male XLR on the power rack to your recording system. Ensure the volume levels on your recording system are turned off and set the volume control on the Twin-Servo fully counter-clockwise to 7 o'clock. You are now ready to turn on your power rack and recording system. Note that there is no power switch on the Twin-Servo. As soon as your power rack is turned on, the Twin-Servo will spring to life.
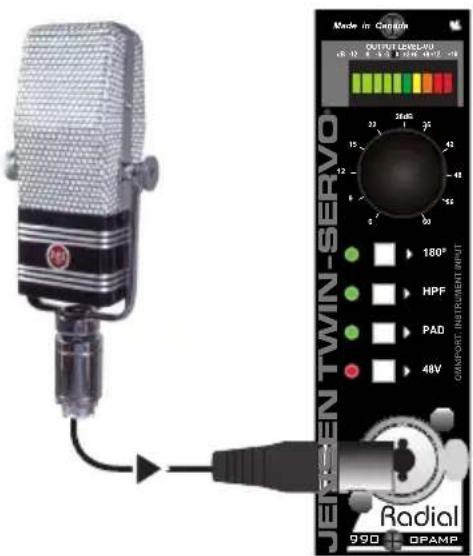

REAR PANEL INPUT (WORKHORSE)
If you are using a condenser microphone, activate the phantom power by depressing the front panel 48V switch. All other switches should be in the out position. Slowly increase the volume on your recording system and then turn up the volume on the Twin-Servo. It is always best to test at low volumes as this will reduce the opportunity of damaging more sensitive components such as tweeters should a connection be improperly seated. You should now hear the audio and see activity on the 10 bar LED meter.
THE CONTROL PANEL
The 10 Segment LED
The Twin-Servo is equipped with a 10 segment LED meter that gives you instant visual feedback of the incoming input signal. Although the Twin-Servo is unlikely to ever distort, keeping the signal within normal working range will ensure optimal signal-to-noise. Turn up the level control by testing for maximum volume. When in the red, turn down for headroom and you are set to go.
180° Polarity Reverse
Another handy feature on the Twin-Servo is the polarity reverse switch. This can be used to better phase-align two sources such as two microphones that may be spaced differently in a room or when combining a microphone with a direct box. You can also increase the width of the stereo field when the two mics are out of phase. It is also great for matching up older audio gear that may not follow the AES standard with pin-2 hot.
High Pass Filter (HPF)
One of the truly unique advantages with the Twin-Servo is that amazing frequency response. Most preamps are unable to effectively reproduce frequencies below 20Hz. The Twin Servo actually measures down to 5Hz! With so much bass, you will hear low end like never before. The downside is that with so much bass to work with, it may be excessive, particularly when recording several acoustic instruments together. The solution: reduce the resonance and excessive bass by engaging the high-pass filter. This is one of the most practical features on the Twin-Servo. When engaged, it gently rolls off bottom end below 80Hz and can help clean up the mix.
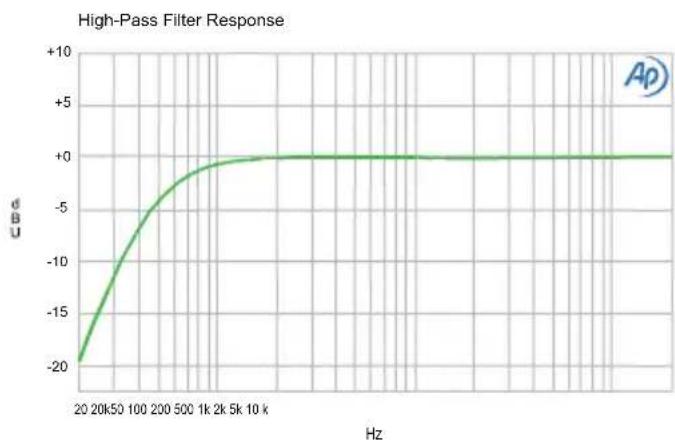
line
| Hz | dB | | ------ | ---- | | 20 | -20 | | 50 | -10 | | 100 | -5 | | 200 | -2 | | 500 | -1 | | 1k | 0 | | 2k | 0 | | 5k | 0 | | 10k | 0 |-15dB Pad
A pad is primarily used to reduce the preamp's input sensitivity so that when confronted with an extra high level output signal, it will not overload the input stage of the mic preamp and cause distortion. As the Twin-Servo has so much headroom, it will be unlikely that you will ever need to use this feature. But it's there just in case.
48V Phantom
This switch activates standard 48V phantom power to remotely feed your condenser mic, active direct box or McBoost mic booster. When on, 48 volts DC is sent from the Twin-Servo using the pin-1 (ground) and pin-2 (hot) wires to power the connected device. Simply engage if needed. Always make sure to turn down the levels before engaging phantom power.
Ground Lift
There is a hidden ground lift switch (mini slider) that lets you lift the ground on the front and rear XLR inputs. As the Twin-Servo is equipped with an input transformer, you will likely never need to lift the ground. This should be set in the upward position. However, a unique situation could arise where you may incur noise. To lift the ground, you have to pull the module from your power rack and then move the slider downwards towards the 15-pin card edge connector. The ground lift switch does not affect the 14 " guitar input portion of the Combo jack or the output side of the Twin-Servo. Note that when the ground is lifted, the Twin-Servo will no longer pass 48V phantom power to your microphone.
HI-Z Input and Omniport™
The Twin-Servo has two instrument input options. The immediately obvious one is on the front panel - as part of the Neutrik Combo connector. Note that this is a standard hi-Z 1/4" instrument input and using a 1/4" TRS connector is not recommended. The second is via the Omniport™ for those that are equipped with a Radial 500 series power rack. Both are connected in parallel but as soon as you engage the front panel jack, it will automatically switch the rear panel 1/4" input off.
Switch Located Here

natural_image
Pure electrical circuit lines without any symbols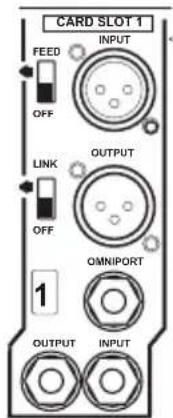
REAR PANEL INPUT (WORKHORSE)

WARNING NOTICE TO USER!
Although preventative safety measures have been designed into Radial 500 series products we strictly advise against hot-swapping modules or plugging and unplugging them when the Workhorse or other 500 series rack are powered on. Hot swapping can cause connection sparks at the card-edge connector that could send damaging transients to other equipment. This also greatly reduces the life span of the contacts. Damage due to hot swapping is not covered under warranty. There are no user serviceable parts inside.
APPLICATIONS
Using the Twin-Servo with an active DI
When recording live, capturing the direct feed from an instrument can provide much more consistent results as bleed from other instruments can be eliminated. Connect a piezo transducer to the Radial PZ-DI and send this to the Twin-Servo for amazing bottom end!
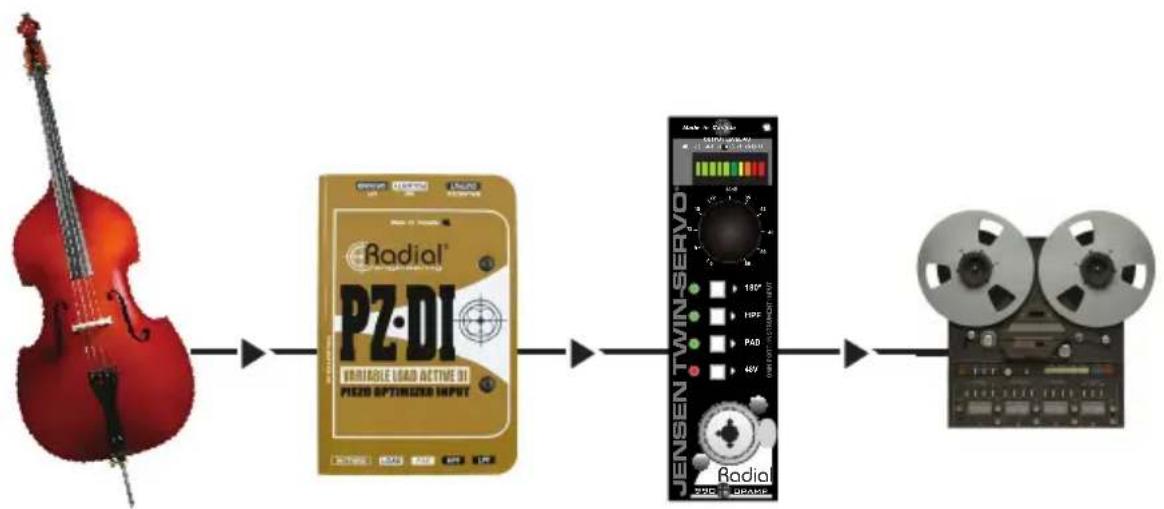
flowchart
graph LR
    A["Red Violin"] --> B["PZ-DI Variable Load Active Oil Piezo Optimized Input"]
    B --> C["Jensen Twin-Server"]
    C --> D["Rolls 2000: Radar, 100%"]
    C --> E["Rolls 2001: Radar, 100%"]
    C --> F["Rolls 2002: Radar, 100%"]
Using the Twin-Servo with a ribbon mic
Most modern ribbon microphones have plenty of output and can connect directly to the Twin-Servo's low noise circuitry. When using old vintage mics, add the Radial McBoost to increase the output by up to 25dB for a total of about 85dB of gain!
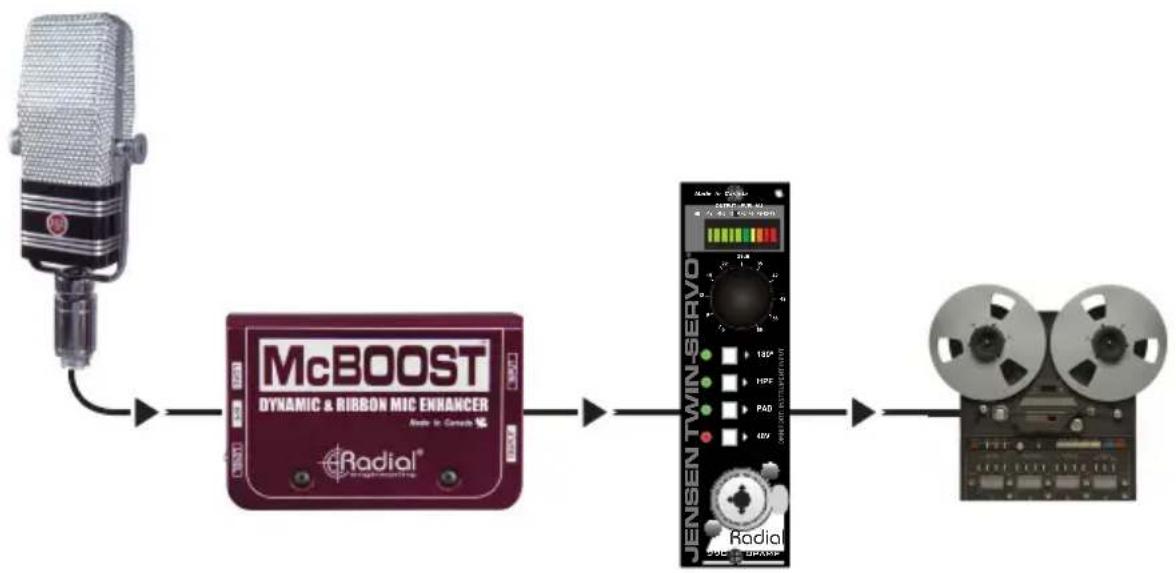
flowchart
graph LR
    A["Microphone"] --> B["McBOOST Dynamic & RIBBON MIC ENHANCER"]
    B --> C["Jensen Twin-Serv0"]
    C --> D["Film reel"]
BLOCK DIAGRAM\*

flowchart
graph LR
    A["FRONT PANEL XLR/PHONE COMBO JACK"] --> B["PHANTOM POWER"]
    B --> C["INPUT PAD"]
    C --> D["HIGH-PASS FILTER"]
    D --> E["PHASE REVERSE"]
    E --> F["INPUT TRANSFORMER"]
    F --> G["DEANE JENGEN 890 DISCRETE COMPONENT OPAMP"]
    G --> H["LEVEL CONTROL"]
    H --> I["SERVO"]
    I --> J["MEETER"]
    J --> K["BUS OUT"]
    K --> L["OUTPUT TRANSFORMER"]
    L --> M["REAR PANEL OUTPUT"]
    N["ORPORT AUTO DETECT"] --> C
    O["UNIT FACTOR"] --> F
    P["MEC/INSTRUMENT RELAY"] --> C
* Subject to change without notice.
SPECIFICATIONS\*
Circuit Type: 100% discrete using original Deane Jensen circuit with IC DC servo
Microphone Input:......Transformer coupled, Jensen JT-15KE
Power: 110mA
Frequency Response: 14Hz to 85kHz / 8Hz to 100KHz (±1dB / ±3dB)
Input Impedance - XLR: 1.3kΩ
Mic Preamp Gain:....+60dB
Maximum Output:....+22dBu
Output Impedance: 75Ω
Common Mode Rejection (CMRR): -72dB
Equivalent Input Noise (EIN): -120dbu @ maximum gain
Dynamic Range: 91dB
Total Harmonic Distortion (THD+N): 0.004% @ +4dBu
Intermodulation Distortion: 0.004% @ +4dBu
Instrument Input
Input Impedance - Instrument: 220kΩ, unbalanced
Instrument Preamp Gain: ....+60dB, unbalanced
Control Panel
Meter: 10 segment peak indicator with hold
Polarity Reverse: 180°
Pad: -15dB
High-Pass Filter: 6dB/octave, -3dB @ 150Hz
Phantom Power: 48VDC - 10mA (as supplied by 500 frame)
XLR Configuration:....AES spec: pin-1 ground, pin-2 (+), pin-3 (-)
Ground Lift (rear panel):....Lifts ground on XLR inputs
Mechanical
Weight: 1.75lbs (0.8kg)
Size: 7 x 5.5 x 1.5 (inches)
Warranty: 3 years, transferable
THREE YEAR TRANSFERABLE LIMITED WARRANTY
RADIAL ENGINEERING LTD. ("Radial") warrants this product to be free from defects in material and workmanship and will remedy any such defects free of charge according to the terms of this warranty. Radial will repair or replace (at its option) any defective component(s) of this product (excluding fi nish and wear and tear on components under normal use) for a period of three (3) years from the original date of purchase. In the event that a particular product is no longer available, Radial reserves the right to replace the product with a similar product of equal or greater value. In the unlikely event that a defect is uncovered, please call 604-942-1001 or email service@radialeng.com to obtain a RA number (Return Authorization number) before the 3 year warranty period expires. The product must be returned prepaid in the original shipping container (or equivalent) to Radial or to an authorized Radial repair centre and you must assume the risk of loss or damage. A copy of the original invoice showing date of purchase and the dealer name must accompany any request for work to be performed under this limited and transferable warranty. This warranty shall not apply if the product has been damaged due to abuse, misuse, misapplication, accident or as a result of service or modification by any other than an authorized Radial repair centre.
THERE ARE NO EXPRESSED WARRANTIES OTHER THAN THOSE ON THE FACE HEREOF AND DESCRIBED ABOVE. NO WARRANTIES WHETHER EXPRESSED OR IMPLIED, INCLUDING BUT NOT LIMITED TO, ANY IMPLIED WARRANTIES OF MERCHANTABILITY OR FITNESS FOR A PARTICULAR PURPOSE SHALL EXTEND BEYOND THE RESPECTIVE WARRANTY PERIOD DESCRIBED ABOVE OF THREE YEARS. RADIAL SHALL NOT BE RESPONSIBLE OR LIABLE FOR ANY SPECIAL, INCIDENTAL OR CONSEQUENTIAL DAMAGES OR LOSS ARISING FROM THE USE OF THIS PRODUCT. THIS WARRANTY GIVES YOU SPECIFIC LEGAL RIGHTS, AND YOU MAY ALSO HAVE OTHER RIGHTS, WHICH MAY VARY DEPENDING ON WHERE YOU LIVE AND WHERE THE PRODUCT WAS PURCHASED.
To meet the requirements of California Proposition 65, it is our responsibility to inform you of the following:
WARNING: This product contains chemicals known to the State of California to cause cancer, birth defects or other reproductive harm.
Please take proper care when handling and consult local government regulations before discarding.

This product is intended for professional use only. The user should be familiar and experienced with the 500 series rack and module format.

www.radialeng.com
Made in Canada

Radial Engineering Ltd.
1588 Kebet Way, Port Coquitlam BC V3C 5M5
tel: 604-942-1001 • fax: 604-942-1010
info@radialeng.com • www.radialeng.com



- Table of Contents Page
- FEATURE SET
- OVERVIEW
- MAKING CONNECTIONS
- THE CONTROL PANEL
- The 10 Segment LED
- 180° Polarity Reverse
- High Pass Filter (HPF)
- -15dB Pad
- 48V Phantom
- Ground Lift
- HI-Z Input and Omniport™
- WARNING NOTICE TO USER!
- APPLICATIONS
- Using the Twin-Servo with an active DI
- Using the Twin-Servo with a ribbon mic
- BLOCK DIAGRAM\*
- SPECIFICATIONS\*
- Instrument Input
- Control Panel
- Mechanical
- THREE YEAR TRANSFERABLE LIMITED WARRANTY
Brand : Radial Engineering
Model : Jensen Twin-Servo 500
Category : Professional audio equipment