
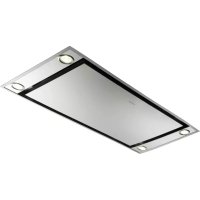
The Heaven Compact - Range hood FABER - Free user manual and instructions
Find the device manual for free The Heaven Compact FABER in PDF.


| Product Type | Ceiling-mounted range hood |
| Brand | Faber |
| Model | The Heaven Compact |
| Minimum Installation Height | 650 mm above cooktop |
| Exhaust Duct Diameter | Minimum 120 mm |
| Motor Speeds | 4 speeds (1, 2, 3, Intensive) |
| Intensive Speed Duration | 6 minutes (automatic return to previous speed) |
| Control Type | Touch buttons with LED indicators |
| Remote Control Compatible | Yes (CR2032 battery, not included) |
| Lighting | LED lights, dimmable |
| Grease Filter Type | Metal, washable in dishwasher |
| Grease Filter Saturation Alarm | After 100 working hours (LED S1) |
| Charcoal Filter Type | Activated carbon, replaceable |
| Charcoal Filter Saturation Alarm | After 200 working hours (LED S1 flashing) |
| Delay Function | Automatic shut-off after 30 minutes |
| Power Supply | Mains voltage (see rating plate) |
| Safety Features | Earthing required, CE certified |
| Use with Gas Appliances | Allowed if room ventilation adequate |
Frequently Asked Questions - The Heaven Compact FABER
User questions about The Heaven Compact FABER
0 question about this device. Answer the ones you know or ask your own.
Ask a new question about this device
Download the instructions for your Range hood in PDF format for free! Find your manual The Heaven Compact - FABER and take your electronic device back in hand. On this page are published all the documents necessary for the use of your device. The Heaven Compact by FABER.
USER MANUAL The Heaven Compact FABER
natural_image
Technical line drawing of a mechanical housing assembly with internal components (no text or symbols)Instructions Manual
INDEX
EN
SAFETY INFORMATION 3
INSTALLATION....6
USE 7
CARE AND CLEANING 9

For your safety and correct operation of the appliance, read this manual carefully before installation and use. Always keep these instructions with the appliance even if you move or sell it. Users must fully know the operation and safety features of the appliance.

The wire connection has to be done by specialized technician.
- The manufacturer will not be held liable for any damages resulting from incorrect or improper installation.
- The minimum safety distance between the cooker top and the extractor hood is 650 mm (some models can be installed at a lower height, please refer to the paragraphs on working dimensions and installation).
- If the instructions for installation for the gas hob specify a greater distance, this must be respected.
- Check that the mains voltage corresponds to that indicated on the rating plate fixed to the inside of the hood.
- Means for disconnection must be incorporated in the fixed wiring in accordance with the wiring rules.
- For Class I appliances, check that the domestic power supply guarantees adequate earthing.
- Connect the extractor to the exhaust flue through a pipe of minimum diameter 120 mm. The route of the flue must be as short as possible.
- Regulations concerning the discharge of air have to be fulfilled.
-
Do not connect the extractor hood to exhaust ducts carrying combustion fumes (boilers, fireplaces, etc.).
-
If the extractor is used in conjunction with non-electrical appliances (e.g. gas burning appliances), a sufficient degree of aeration must be guaranteed in the room in order to prevent the backflow of exhaust gas. When the cooker hood is used in conjunction with appliances supplied with energy other than electric, the negative pressure in the room must not exceed 0,04 mbar to prevent fumes being drawn back into the room by the cooker hood.
- The air must not be discharged into a flue that is used for exhausting fumes from appliances burning gas or other fuels.
- If the supply cord is damaged, it must be replaced from the manufacturer or its service agent.
- Connect the plug to a socket complying with current regulations, located in an accessible place.
- With regards to the technical and safety measures to be adopted for fume discharging it is important to closely follow the regulations provided by the local authorities.
⚠ WARNING: Before installing the Hood, remove the protective films.
- Use only screws and small parts in support of the hood.
⚠ WARNING: Failure to install the screws or fixing device in accordance with these instructions may result in electrical hazards.
- Do not look directly at the light through optical devices (binoculars, magnifying glasses...).
- Do not flambè under the range hood; risk of fire.
- This appliance can be used by children aged from 8 years and above and persons with reduced physical, sensory or mental capabilities or lack of experience and knowledge if they have been given supervision or instruction concerning use of the appliance in a safe way and understand the hazards involved. Children shall not play with the appliance. Cleaning and user maintenance shall not be made by children without supervision.
- Children should be supervised to ensure that they do not play with the appliance.
- The appliance is not to be used by persons (including children) with reduced physical, sensory or mental capabilities, or lack of experience and knowledge, unless they have been given supervision or instruction.
⚠️ Accessible parts may become hot when used with cooking appliances. - Clean and/or replace the Filters after the specified time period (Fire hazard). See paragraph Care and Cleaning.
- There shall be adequate ventilation of the room when the range hood is used at the same time as appliances burning gas or other fuels (not applicable to appliances that only discharge the air back into the room).
- The symbol on the product or on its packaging indicates that this product may not be treated as household waste. Instead it shall be handed over to the applicable collection point for the recycling of electrical and electronic equipment. By ensuring this product is disposed of correctly, you will help prevent potential negative consequences for the environment and human health, which could otherwise be caused by inappropriate waste handling of this product. For more detailed information about recycling of this product, please contact your local city office, your household waste disposal service or the shop where you purchased the product.
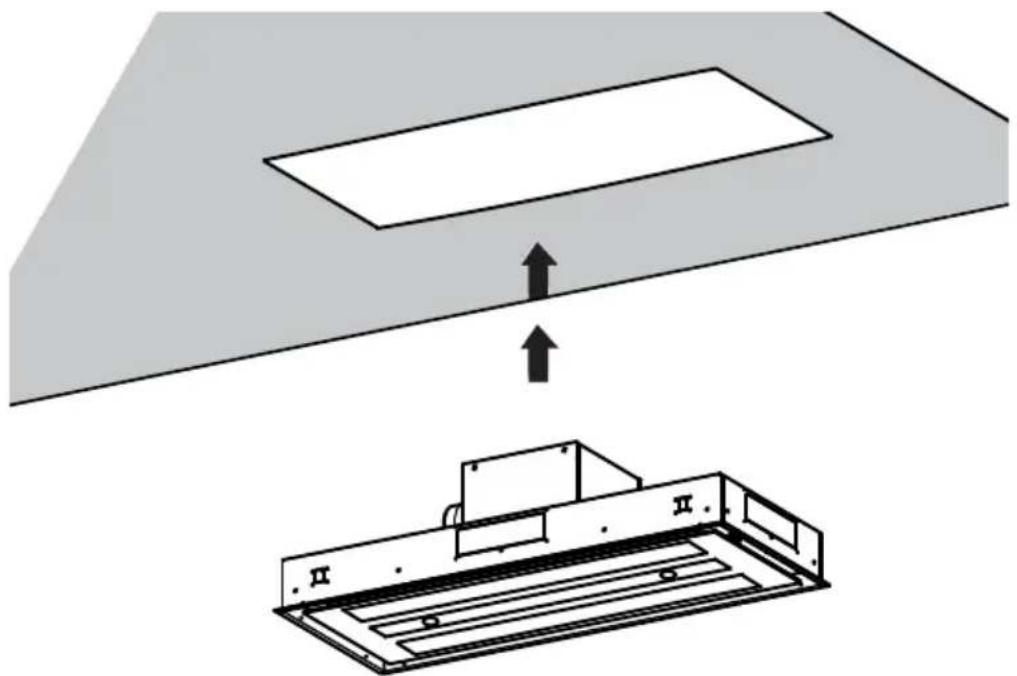
Fixing the Hood
natural_image
Diagram showing a device with an open lid and a base tray, both with upward arrows indicating motion (no text or symbols)- In all cases where the ceiling is not strong enough at the suspension point, the installer must provide strengthening using suitable plates and backing pieces anchored to the structurally sound parts.

Control panel
| Button | Led Function | |
| L - Turns the lights ON/OFF at maximum strength. | ||
| Press and hold for approx. 2 seconds to turn the lighting system on and off at reduced intensity. | ||
| T1 Fixed Turns the motor on/off at speed one. | ||
| Delay function:Press and hold the button for approx. 3 seconds to Activate/Deactivate the Delay function (automatic switching off of the Motor, the Fans and the Lighting with a 30' delay).Cannot be enabled when Intensive or 24h are on. | ||
| T2 Fixed Turns the Motor on at speed two. | ||
| Press and hold the button for approximately 5 seconds, with all the loads turned off (Motor and Lights), to turn the Activated Charcoal Filter alarm on. The relevant LED flashes twice to confirm.To turn the alarm off, press the button again and hold for at least 5 seconds. The relevant LED flashes once. | ||
| T3 Fixed Turns the Motor on at speed three. | ||
| Press and hold the button for approximately 3 seconds, with all the loads turned off (Motor and Lights), to perform a reset. The LED S1 flashes three times. | ||
| T4 Fixed Turns the Motor on at INTENSIVE Speed.This speed is timed to run for 6 minutes. At the end of this time, the system returns automatically to the speed that was set before. If it is activated with the motor turned off, it will switch to OFF at the end of the time. | ||
| Press and hold for 5 seconds to enable the remote control, indicated by the LED flashing twice.Press and hold for 5 seconds to disable the remote control, indicated by the LED flashing just once. | ||
| S1 | Fixed | Signals the Metal Grease Filter saturation alarm, indicating that it is necessary to wash the filters. The alarm is triggered after the Hood has been in operation for 100 working hours. (Reset see the parag. Maintenance) |
| Flashing | When this is activated, it signals the Activated Charcoal Filter saturation alarm, indicating that the filter must be changed; the Metal Grease Filters must also be washed. The Activated Charcoal Filter saturation alarm comes into operation after the Hood has been working for 200 hours. (Activation and Reset see the parag. Maintenance) | |
REMOTE CONTROL
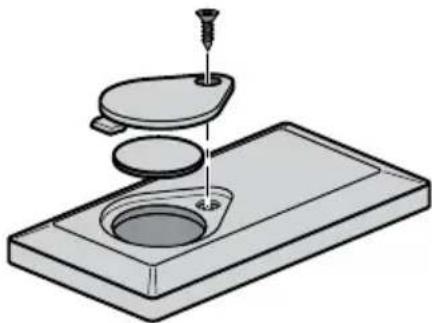
This appliance can be commanded using a remote control, powered by a CR2032 type 3 V battery (not supplied).
- Do not place the remote control near heat sources.
- Do not discard the batteries with normal waste, they must be put into the specific containers.
natural_image
Illustration of a mechanical assembly with a screw and two circular components on a base plate (no text or symbols)3emoteycontrolypanely
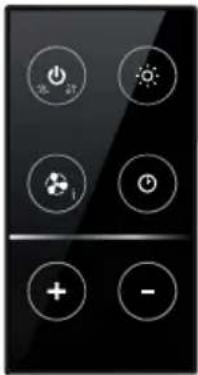
| Motor | Motor On / Off | ||
| -- | |||
| -- | |||
| Light | Lights On / Off | ||
| Press for 2 seconds to modify the intensity of the Light. | |||
| Intensive | Activates the Intensive function. | ||
| Delay | Activates / Deactivates the Delay function | ||
| + | - | Increases the working speed each time it is pressed. | |
| - | Decreases the working speed each time it is pressed. | ||
CA3EyAADyCMEAAIAI
Opening Panel
- Open the Panel by pulling it.
- Clean the outside with a damp cloth and neutral detergent.
- Clean the inside using a damp cloth and neutral detergent; do not use wet cloths or sponges, or jets of water; do not use abrasive substances.

natural_image
Simple line drawing of a box with a hand pointing at the top and a green curved arrow indicating rotation (no text or symbols)Metal grease filters
These can be washed in the dishwasher, and need to be cleaned whenever the S1 Led comes on or at least once every 2 months use, or more frequently if use is particularly intensive.
CLEANING THE FILTERS
Resetting the alarm signal
- Turn the Lights and the Suction Motor off.
- Press T3 and hold for at least 3 seconds, until LED flashes three times in confirmation.

natural_image
Hand pressing a green arrow on a smartphone screen (no text or symbols visible)Cleaning the Filters
- Open the doors.
- Remove the Filter, pushing it towards the back of the unit and at the same time pulling downward.
- Wash the filter without bending it, and leave it to dry thoroughly before replacing (if the surface of the filter changes colour over time, this will have absolutely no effect on its efficiency).
- Replace, taking care to ensure that the handle faces forwards.
- Close the doors again.
This cannot be washed or regenerated, and must be changed when led S1 starts to flash, or at least once every 4 months. The Alarm signal, if it has been activated, only appears when the Suction motor is turned on.
Activating the alarm signal
- In Recirculation Version Hoods, the Filter Saturation Alarm must be activated on installation or at a later date.
- Turn the Lights and the Suction Motor off.
- Press button T2 and hold it for 5 seconds until the LED flashes twice in confirmation:
CHANGING
Resetting the alarm signal
- Turn the Lights and the Suction Motor off.
- Press T3 and hold for at least 3 seconds, until LED flashes three times in confirmation.
Changing the Filter
- Open the doors.
- Remove the Metal Grease Filter.
- Remove the saturated Activated Charcoal Filters, as indicated (A).
• Fit the new Filters, as indicated (B). - Replace the Metal grease filters.
- Close the doors.

natural_image
Diagram of a mechanical device with green arrows indicating rotational motion (no text or symbols)
natural_image
Diagram of a mechanical device with green arrows indicating rotational or directional motion (no text or symbols)Lighting unit
- For replacement contact technical support ("To purchase contact technical support").
CE


Brand : FABER
Model : The Heaven Compact
Category : Range hood