PSX11BT - Loudspeaker Reflexion - Free user manual and instructions
Find the device manual for free PSX11BT Reflexion in PDF.


| Product Type | Portable Bluetooth Speaker |
| Brand | Reflexion |
| Model | PSX11BT |
| Dimensions (approx.) | 20 x 10 x 10 cm (7.9 x 3.9 x 3.9 in) |
| Weight (approx.) | 800 g (1.76 lb) |
| Power Supply | Built-in rechargeable Li-Ion battery, 5V DC USB charging |
| Battery Life | Up to 10 hours at moderate volume |
| Bluetooth Version | Bluetooth 5.0 |
| Wireless Range | Up to 10 meters (33 ft) |
| Input Interfaces | Bluetooth, AUX 3.5mm, TF card slot, USB playback |
| Additional Functions | FM Radio, Hands-free calling, TWS pairing |
| Controls | Power, Volume +/-, Play/Pause, Mode, Next/Previous track |
| Speaker Configuration | Full-range driver + passive radiator for enhanced bass |
| Sound Output | 10W RMS |
| Frequency Response | 20 Hz – 20 kHz |
| Material | Plastic with fabric grille and rubber base |
| Water Resistance | No official IP rating; avoid exposure to water |
| Maintenance | Wipe with a soft, dry cloth. Do not use solvents. |
| Safety Warnings | Do not disassemble. Keep away from heat sources and liquids. |
| Spare Parts & Repairability | Battery replacement possible by qualified technician. Contact support. |
| Included Accessories | USB charging cable, AUX cable, user manual |
| Warranty | 1 year limited warranty |
Frequently Asked Questions - PSX11BT Reflexion
User questions about PSX11BT Reflexion
0 question about this device. Answer the ones you know or ask your own.
Ask a new question about this device
Download the instructions for your Loudspeaker in PDF format for free! Find your manual PSX11BT - Reflexion and take your electronic device back in hand. On this page are published all the documents necessary for the use of your device. PSX11BT by Reflexion.
USER MANUAL PSX11BT Reflexion
natural_image
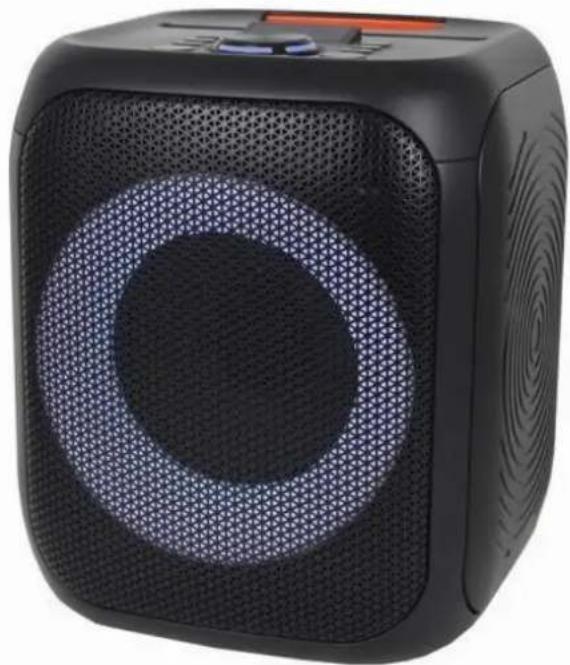
Black square portable electric heater with circular vent and mesh grille (no visible text or symbols)Bluetooth party speaker with AUX IN / USB / microphone input / integrated rechargeable battery
English user manual: page 16
Bluetooth party speaker
Model no.: PSX11BT
natural_image
Black square digital ice cream cube with circular vent and mesh grille (no visible text or symbols)Bluetooth party speaker with AUX IN / USB / microphone input / integrated rechargeable battery
English user manual: page 16
Read the manual carefully before using the appliance for the first time and keep it in a safe place for future reference.
 | Dangerous voltages inside the unit. Do not insert any objects into the openings in the housing. There is a risk of fatal electric shock. |
 | The operating and maintenance instructions (service) in this manual must be followed. Use of the appliance other than as described in this manual may result in damage to health, a defect in the appliance and invalidation of the warranty. |
 | To eliminate the risk of electric shock, do not open the unit. Opening the appliance will invalidate the warranty. Repairs may only be carried out by an authorised specialist workshop and qualified persons. There are no parts inside that can be repaired by the user. |
 | This appliance is a Class II or double insulated electrical appliance. It has been designed so that it does not require a safety connection to electrical earth. |
 | This unit is designed for AC 100-240V~50/60Hz mains voltage. If the unit is not to be used for a long period of time, disconnect the power supply from the unit. |
 | This unit complies with the water splash protection class IPX4. Close the unit with the protective caps on the back to protect the unit from splashing water.Do not expose the unit to high humidity >85%, do not immerse the unit in water, do not hold the unit under running water such as a tap and do not place objects filled with liquids such as vases on the unit. |
 | Position the unit so that an undisturbed supply of fresh air is always ensured. Do not place the unit on carpets or near curtains and do not install the unit in bookshelves. |
 | Do not expose the appliance to direct sunlight or heat sources such as heaters or stoves and do not place naked flames such as candles on the appliance. |
 | Always observe basic safety precautions when using this Bluetooth speaker system, especially when children are present. |
-
Read these operating instructions carefully before using the appliance for the first time.
-
Keep this manual in a safe place for future reference.
-
Use the appliance only as described in this manual. Use other than as described in these instructions will invalidate the warranty.
-
Do not expose the unit to dripping or splashing water unless the unit is closed with the protective caps on the back. Do not expose the unit to high humidity > 85%, do not immerse the unit in water, do not hold the unit under running water such as a tap and do not place objects filled with liquids such as vases on the unit. If the unit stops working after coming into contact with water, do not connect the unit to the mains or disconnect the power cable from the unit. Place the appliance in a dry place to dry and contact your dealer or the manufacturer's service department.
-
Do not expose the appliance to direct sunlight or heat sources such as radiators or stoves, and do not place naked flames such as candles on the appliance.
-
Children should be supervised to ensure that they do not play with the appliance.
-
The unit is operated with AC 100 - 240V. The power cable serves as a disconnecting device and must be easily accessible. To avoid damage to the appliance, only use accessories and spare parts approved by the manufacturer.
-
Only place the unit in sufficiently ventilated environments. Place the unit on a flat and stable surface.
-
Do not expose to temperatures above 40 °C. When installing the appliance, make sure that it is 30 cm from the back and the top of the appliance and 5 cm from each side.
-
Dispose of used batteries / rechargeable batteries in an environmentally friendly manner and follow the disposal instructions in this manual.
-
Always make sure that you disconnect the appliance from the power supply before transporting or cleaning it. Only clean the unit with a dry cloth.
-
When the battery is fully charged or during a thunderstorm, disconnect the unit from the mains.
-
This unit has no user-serviceable parts. Do not attempt to repair this appliance yourself. Only qualified service personnel may perform maintenance. In the event of a defect, return the unit to your dealer or the manufacturer's service department.
-
Never leave the appliance unattended and ensure that no objects are inserted into the appliance through the ventilation openings. This may result in a fatal electric shock.
-
Do not place the unit near televisions, loudspeakers and other objects that generate strong magnetic fields.
-
The mains plug or appliance plug is used to disconnect the appliance from the mains and should be easily accessible at all times.
-
Do not allow small children to play with the appliance unsupervised and ensure that the appliance is not used without supervision.
PREPARE THE DEVICE FOR USE
Unpacking and setting up
-
Carefully remove the unit from the carton and remove all packing material from the unit.
-
Remove the accessories and check that they are complete.
-
Unwind the power cable and unplug it to its full length.
-
Place the unit on a stable and level surface.
-
Connect the power cable to the appliance and a household socket (AC 100-240V).
-
Before first use, fully charge the built-in battery (approx. 4-5 hours).
-
When the battery is fully charged, disconnect the power cable from the unit.
What's in the box?
- x1 Main unit
- x1 Power cable
• x1 Cable microphone
- x1 User manual
Top view
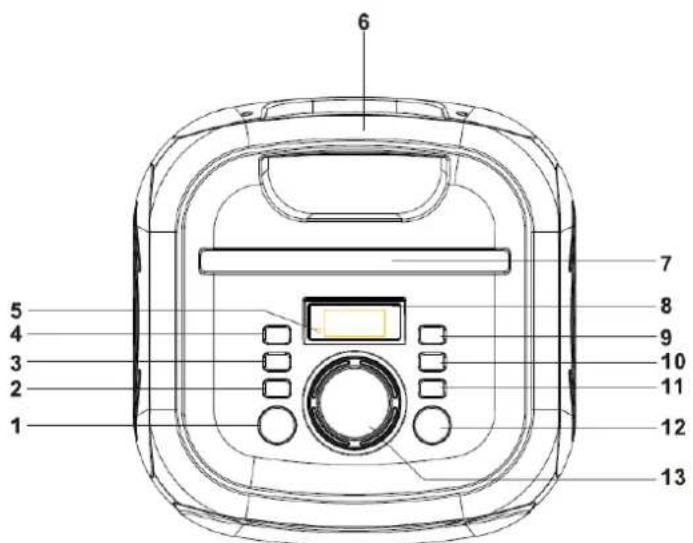
| 1. | EQ / BASS-button | • EQ: Press the button several times to select the preset equalisers. • BASS: Press and hold the button for approx. 3 seconds to switch the bass function on or off. |
| 2. | Pair-button ⌘/R | • Bluetooth: Press the button briefly to disconnect the active Bluetooth connection. • TWS: Press and hold the button to activate the TWS mode. |
| 3. | Previous title ◀◀ | Press the button to select the previous track. Press and hold the button to rewind to a desired point in the title. |
| 4. | Menu-button | Press the button several times to call up the various settings for microphone volume (CU), echo effect (EC), microphone effect (H1-H4). Change the set value by turning the volume control. |
| 5. | Charge indicator (LED) | Displays the charging status. |
| 6. | Carrying handle | Practical carrying handle for easy carrying of the unit. |
| 7. | Smartphone tray | Insert your smartphone here so that it is always at hand and does not get lost. |
| 8. | Display | Displays information such as track number, playback time, etc. |
| 9. | Party-light-button | Select the different lighting effects (L1-L5) by pressing the button several times. |
| 10. | Next title ▶▶ | Press the button to select the next track. Press and hold the button to fast-forward to a desired point in the title. |
| 11. | Play/Pause button ▶▶| | Press the button to pause or resume the current playback. |
| 12. | Power/Function-button (♪) | • Power: Press and hold the button for approx. 3 seconds to switch the unit on or off. • Function: Press the button several times to select the different modes. |
| 13. | Volume control | Turn the control to select the desired volume. |
Front and rear view
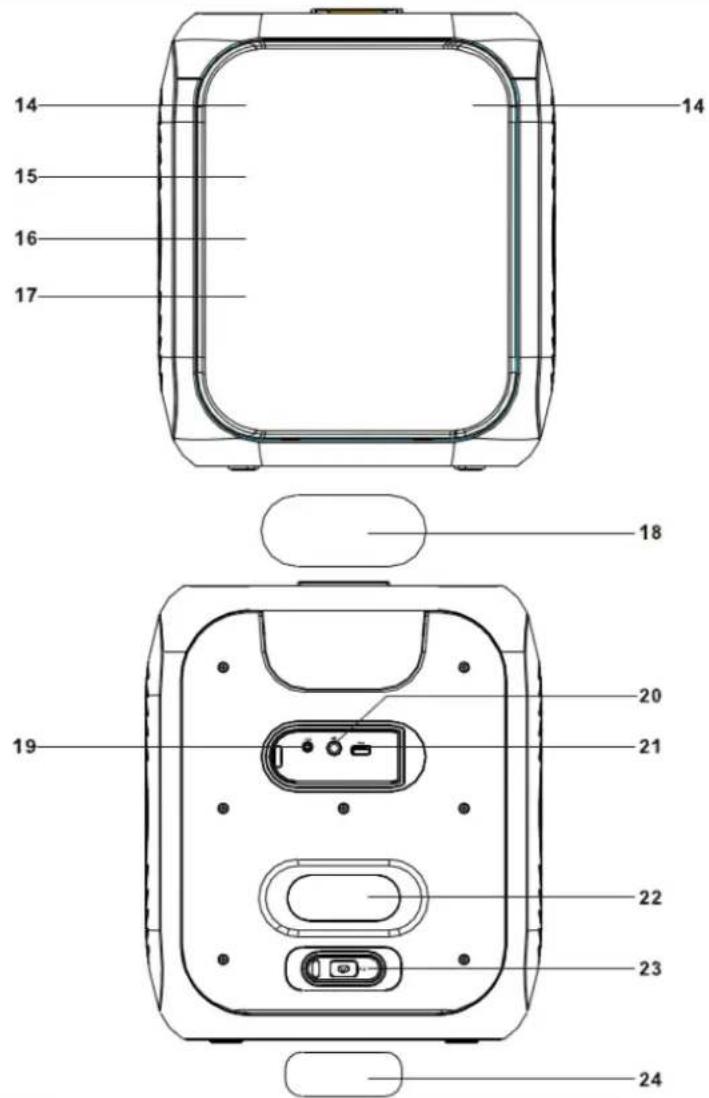
| 14. | Tweeter | The high tones are output here. |
| 15. | LED lighting | Lights up in a different sequence and colour depending on the mode set. |
| 16. | Low-mid speaker | The mid and low tones are output here. |
| 17. | Loudspeaker grille | Loudspeaker protection. |
| 18. | Connection cover | Protection cover. |
| 19. | AUX-IN connection (3.5mm) | Connect your playback device here to play music on the PSX11BT. |
| 20. | Microphone connection (6.3mm) | Connect a microphone with a 6.3 mm jack cable here. |
| 21. | USB connection | Connect a USB flash drive (FAT32 / Max. 32GB) to play music through the PSX11BT. |
| 22. | Ventilation holes | Do not cover any of the ventilation openings. |
| 23. | AC connection | Connect the power cable to charge the integrated battery. |
| 24 | AC cover | Mains connection cover. |
Battery charging
This unit uses a rechargeable lithium battery (battery capacity 3600mAh). Fully charge the unit (approx. 4 hours) before using it for the first time. The playback time with a fully charged battery is approx. 4-5 hours depending on the volume level set.
- Plug the power cable into the mains socket and into the AC socket on the back of the unit.
- The charging indicator shows the current battery status during charging.
• The battery is being charged: The charging indicator lights up red during charging.
- Battery level low: The charging indicator flashes red. Connect the unit to the power cable to charge.
- Battery fully charged: When the battery is fully charged, the charging indicator lights up green. Disconnect the power cable to change the battery mode of the unit.
- After the battery is charged, unplug the power cable from the socket to complete the charging process.
Notes:
- When the unit is fully charged, disconnect the mains plug from the unit to protect the battery from overcharging.
- Do not replace the battery, this operation must only be carried out by highly qualified personnel.
Switch on / Switch off
- To switch on the unit, press and hold the power button for about 3 seconds.
- To switch the unit off, press and hold the power button for about 3 seconds.
Note:
- The unit starts with the last active mode and volume when it is switched on.
Select mode
- Press the function key repeatedly to switch to the corresponding mode.
- The mode is shown in the display.
- The following modes are available: AUX-IN (AUX) / USB / Bluetooth (bt)
Volume
- Adjust the volume with the volume control.
- When the unit is switched on, it starts with the last selected volume setting.
Microphone volume
- To adjust the microphone volume, press the menu button until the display shows "CU" (microphone volume).
- Turn the volume control to change the microphone volume.
Automatic switch off
- The unit has a power-saving function according to the European ErP standard, which makes the unit switch to standby mode after 15 minutes without an audio signal. Press the power/function button to switch the unit back on.
- Please note that a low volume setting of the audio source can be detected as "no audio signal". This may affect the unit's signal detection capability and also trigger an automatic switch to standby mode. In this case, please reactivate the audio signal transmission or increase the volume setting of the audio source to resume playback.
Notes on electrostatic discharge
The unit may reset or not return to normal operating mode due to electrostatic discharge, just switch it off and switch the unit on again.
Equalizer and SUPER Bass function
Equalizer
- Press the equaliser key several times to select the preset equalisers.
Super Bass
- Press and hold the equaliser button for approx. 3 seconds to switch the bass boost on or off.
Microphone echo effect
- Press the menu button as often as "EC" (echo effect) is shown in the display.
- Turn the volume control to increase or decrease the echo effect.
Set microphone effect
Change your voice by adjusting the microphone effect that changes your voice.
- Connect a microphone to the unit.
- Press the menu button repeatedly until „OFF“ appears in the display.
- Turn the volume control to adjust the microphone effect (H1-H4).
- To deactivate the microphone effect, repeat steps 2 and 3 and select "Off".
Party light mode
There are 5 lighting modes. The key illumination is also active when the LED mode is deactivated. The key illumination is only active when keys are pressed and goes out a short time later.
- Press the Party light button repeatedly to select the light modes.
- The display shows "L1 - L5".
- To switch off the LED effect, press the Light button repeatedly until "LOff" appears in the display.
Play music from your USB stick on the PSX11BT. USB sticks up to a maximum of 32GB in FAT32 format are supported. Hard drives are not supported. Do not use a USB extension to connect a USB flash drive to the unit and do not attempt to charge USB devices via the USB port. You risk overloading the USB port and damaging the PSX11BT and the connected device. Follow the steps below to start USB playback.
- Press the power/function key (⏻) repeatedly until "USB" appears in the display.
- Insert a USB stick into the USB socket. Playback starts automatically with the first track.
- The playback time is shown in the display.
- You control playback with the following buttons.
| Play / Pause | ▶ I (short key press) |
| Next Title / Previous Title | ▶ / (short key press) |
| Fast forward / rewind | ▶ / (keep pressed until the desired passage is reached) |
BLUETOOTH-MODE
Connect your external device wirelessly via Bluetooth to the PSX11BT to play music from your external device on the PSX11BT. Only Bluetooth is received and not transmitted. No devices such as external Bluetooth speakers or Bluetooth headphones can be connected to the PSX11BT for external playback. Follow the steps below to start Bluetooth playback.
- Press the power/function key (⏻) repeatedly until "bt" appears in the display.
- The connection status is indicated by the blue pair indicator on the display.
• Connected: The pair indicator lights up blue.
• Not connected: The Pair indicator flashes blue.
- Start the Bluetooth search on your external Bluetooth device and select the PSX11BT device from the list of devices found.
- When the units are successfully paired, a tone sounds and the pair indicator lights up continuously.
- Start playback on your external device.
- You control the volume on your external device and the PSX11BT.
- You can control playback on your external device or with the following buttons on the PSX11BT:
| Play / Pause | ▶I (short key press) |
| Next title | ▶▶ (short key press) |
| Previous title | ◀◀ (short key press) |
- To disconnect the Bluetooth connection, press the pairing button.
Note:
- If the basic volume on your external device is set too low, you may not hear any sound from the PSX11BT. In this case, increase the volume on your external device.
- Bluetooth works best within 10 metres and outdoors without obstructions.
Connect an external device such as a smartphone or MP3 player to the PSX11BT with a 3.5mm audio cable to play music from your external device wired (mp3 player and smartphone are not included).
- Press the power/function key (⏻) repeatedly until "AUX" appears in the display.
- Connect your device to the PSX11BT using a 3.5mm audio cable (audio cable not included).
- Start playback on your external device.
- You control the playback on your external device.
- You control the volume on your external device or the PSX11BT.
Note:
- If the basic volume on your external device is set too low, you may not hear any sound from the PSX11BT. In this case, increase the volume on your external device.
TWS MODE
You can pair two PSX11BT units wirelessly to create a stereo system. TWS mode is only available in Bluetooth mode. To pair two PSX11BT devices into a TWS system, please follow the steps below.
- Connect an external Bluetooth device to the PSX11BT. This PSX11BT is now the master device.
- Switch on the second PSX11BT device and switch to Bluetooth mode.
- Press and hold the pairing button on the master unit. Now the two units connect automatically and a sound is emitted to indicate that the units are connected. The master unit will display "tS R" (right speaker) and the second unit will display "tS L" (left speaker).
- The following things can be adjusted on both speakers: Equalizer, volume, play, pause, next track, previous track, super bass and party light mode.
- To interrupt the TWS function and disconnect the two units, press and hold the Pair button on one of the units.
- To disconnect the Bluetooth connection to your external device, briefly press the Pair button once.
| GENERAL | |
| Power supply unit | AC 100 – 240V ~ 50/60Hz |
| Protection class | Protection class II |
| Maximum power consumption | Max. 40W |
| Standby power consumption | < 0,5W |
| Battery type | Built-in rechargeable lithium battery (3600mAh / 14.8V) |
| AUX-IN connection | 3,5mm |
| Microphone connection | 6,3mm |
| Working temperature | 5°C - +35°C |
| Max. Music power | Max. 500W |
| IPX4 | Splash water protected |
| USB | |
| Playback formats | WMA / MP3 |
| USB connection | 5V / 200maMax. 32GB / FAT32 |
| BLUETOOTH | |
| Version / Frequency | V 5.3 / 2,4GHz |
| Range | Approx. 10 metres (line of sight) |
| Profiles | Advanced Audio Distribution Profile (A2DP) |
| Dimensions | |
| Dimensions (L / D / H) in mm | 296 x 301 x 346mm |
| Weight | 7,30 Kg |
Design and specifications are subject to change without notice.
Simplified EU Declaration of Conformity
Herewith UltraMedia GmbH & Co. Handels KG that the radio equipment type PSX11BT complies with Directive 2014/53/EU.
The full text of the EU Declaration of Conformity is available at the following internet address.
We hope you enjoy using the device.
Your UltraMedia Team
CE
Disposal instructions
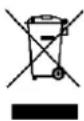
This symbol on the product or in the instructions means that the appliance, electrical and electronic equipment and batteries must be disposed of separately from your household waste at the end of their working life. There are separate collection systems for recycling in the EU. For more information, please contact your local authority or your dealer.
Battery disposal instructions
BATTERIES AND RECHARGEABLE BATTERIES MUST NOT BE DISPOSED OF WITH HOUSEHOLD WASTE! NON-PROFESSIONAL DISPOSAL OF BATTERIES AND RECHARGEABLE BATTERIES CAUSES ENVIRONMENTAL POLLUTION / DAMAGE.
EVERY CONSUMER IS LEGALLY OBLIGED TO RETURN BATTERIES AND ACCUMULATORS AT THE END OF THEIR LIFE CYCLE TO SUITABLE COLLECTION POINTS SUCH AS THEIR LOCAL AUTHORITY/BOROUGH OR TO RETAILERS. DROP-OFF AT COLLECTION POINTS IS FREE OF CHARGE. BY HANDING THEM IN AT COLLECTION POINTS, BATTERIES AND ACCUMULATORS ARE RECYCLED AND THUS DISPOSED OF IN AN ENVIRONMENTALLY FRIENDLY WAY.
DISPOSING OF BATTERIES AND ACCUMULATORS IN HOUSEHOLD WASTE DOES NOT ENSURE ENVIRONMENTALLY FRIENDLY DISPOSAL AND MAY CAUSE ENVIRONMENTAL DAMAGE.
BATTERIES AND ACCUMULATORS MUST BE REMOVED FROM THE APPLIANCE BEFORE DISPOSAL. PLEASE RETURN ONLY IN DISCHARGED CONDITION!
*) MARKED WITH:
CD = CADMIUM,
HG = MERCURY,
PB = LEAD

Dear Customer,
Thank you for choosing one of our products. Our products undergo precise quality control in the course of production. If one of our devices gives you cause for complaint, or you have questions about one of our devices, please call our customer support.
We give a 36 month warranty on TV and SAT devices, and a 24 month warranty on portable DVD and audio devices from the date of purchase. Outside of the warranty, we offer you a paid repair based on a cost estimate. Please contact our customer support before submitting.
The warranty relates to material and production defects. Your device will be repaired or replaced during the warranty period. Unfortunately, UltraMedia cannot reimburse the purchase price. Damage caused by improper use, the use of third-party accessories, falls, dust, water damage and signs of wear (e.g. scratches, optical wear and tear) caused by the customer or external influences are excluded from the guarantee.
In order to assert the warranty claims, send the device with all accessories, a copy of the invoice and the description of the fault to the address given below. Devices that do not have a proof of purchase cannot be guaranteed. Please do not forget to include your full address and a telephone number / email address for any queries.
Shipping to us takes place at your own expense. Unpaid parcels cannot be accepted and are returned to the sender.
Please pack the device securely for transport. UltraMedia assumes no liability for damage in transit that occurs on the way to us. After receiving your submission, we will process your device as soon as possible and send it back to you.
Before sending your device in, please contact our customer support or your specialist dealer, as many problems can also be solved over the phone.
- English user manual: page 16
- Bluetooth party speaker
- Model no.: PSX11BT
- PREPARE THE DEVICE FOR USE
- Unpacking and setting up
- What's in the box?
- Top view
- Front and rear view
- Battery charging
- Notes:
- Switch on / Switch off
- Note:
- Select mode
- Volume
- Microphone volume
- Automatic switch off
- Notes on electrostatic discharge
- Equalizer and SUPER Bass function
- Equalizer
- Super Bass
- Microphone echo effect
- Set microphone effect
- Party light mode
- BLUETOOTH-MODE
- TWS MODE
- Simplified EU Declaration of Conformity
- CE
- Disposal instructions
- Battery disposal instructions
Brand : Reflexion
Model : PSX11BT
Category : Loudspeaker