DVD1017 - Portable DVD Player Reflexion - Free user manual and instructions
Find the device manual for free DVD1017 Reflexion in PDF.


| Brand | Reflexion |
| Model | DVD1017 |
| Product Type | Portable DVD Player |
| Screen Size | 10.1 inches |
| Display Resolution | 1024 x 600 pixels |
| Dimensions (W x D x H) | 260 x 190 x 40 mm |
| Weight | 1.2 kg |
| Power Supply | AC 100-240V, 50/60Hz; DC 9-12V |
| Battery Type | Rechargeable Li-ion |
| Battery Life | Up to 3 hours |
| Supported Disc Formats | DVD, DVD±R/RW, CD, CD-R/RW |
| Video Output | AV out, HDMI |
| Audio Output | 3.5mm headphone jack, built-in speakers |
| USB Port | USB 2.0 for media playback |
| Card Reader | SD/MMC card slot |
| Remote Control | Included |
| Car Adapter | Included |
| Region Code | Region 2 (or multi-region) |
| Playback Features | Repeat, zoom, subtitle, angle |
| Parental Control | Yes |
| Color | Black |
| Manual Languages | English, German, French, etc. |
Frequently Asked Questions - DVD1017 Reflexion
User questions about DVD1017 Reflexion
0 question about this device. Answer the ones you know or ask your own.
Ask a new question about this device
Download the instructions for your Portable DVD Player in PDF format for free! Find your manual DVD1017 - Reflexion and take your electronic device back in hand. On this page are published all the documents necessary for the use of your device. DVD1017 by Reflexion.
USER MANUAL DVD1017 Reflexion
natural_image
Line drawing of a laptop computer front panel with monitor, keyboard, and screen (no text or symbols)VCD / CD: Single, Alle, Aus
MP3: Single, Ordner, Aus
23. VOL-
Zeitausgleich:
www.ultramedia.de

vironment protection Instructions on en

GEWÄHRLEISTUNG

USER'S MANUAL DVD1017
Before connecting, operating or adjusting this product, please read this user's manual carefully and completely.
IMPORTANT SAFETY INSTRUCTIONS
Warning: To reduce the risk of electric shock, do not open the device. There are no serviceable parts inside the device. Always contact qualified service personnel.
Warning: To reduce the risk of fire or electric shock, do not expose the unit to rain or liquids.
Do not expose the device to moisture, liquids or splashing water. Do not place objects filled with liquids, such as vases, on the device.
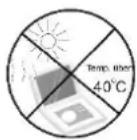
Do not expose the player to direct sunlight or heat sources such as radiators or stoves.
Do not cover ventilation openings. Slots and openings on the unit are used for ventilation. Never place the device on cushions, sofas or similar surfaces.
Only place the device on solid and level surfaces to avoid damage and avoid possible injury from falling down.
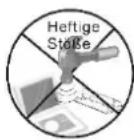
Never place heavy or sharp objects on the LCD screen or on the case.
Use only the supplied AC adapter. By using a different AC adapter, all warranty claims are null and void.
The mains plug of the device serves to interrupt the power supply and must be accessible at all times.
When not in use, disconnect the mains plug and press the mains switch.
Attention should be drawn to the environmental aspects of battery disposal.
CAUTION: An incorrectly inserted battery can explode. Replace only with the same or similar type of battery.
WARNING: The battery (battery pack or batteries inserted) must not be exposed to high temperatures. Avoid heat sources such as direct sunlight, fire, etc.
WARNING: Excessive headphone volume can cause hearing loss.
WARNING: Use only mounting hardware and accessories recommended by the manufacturer. The player is powered by a power adapter. The power adapter is used to interrupt the power supply and must be accessible at all times.
Caution: A wrongly inserted battery can explode. Replace only with the same or similar type of battery (lithium battery).
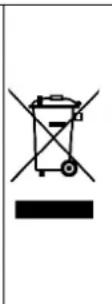
This marking indicates that this product should not be disposed with other household wastes throughout the EU. To prevent possible harm to the environment or human health from uncontrolled waste disposal, recycle it responsibly to promote the sustainable reuse of material resources. To return your used device, please use the return and collection systems or contact the retailer where the product was purchased. They can take this product for environmental safe recycling.


Only use original accessories from the manufacturer mentioned in the manual. Read the instructions completely.

To prevent hearing damage, avoid prolonged hearing at high volume. Make sure that the volume is low or the power is off when left unattended.

This device is a Class II device or double insulated electrical device. It does not require a safety connection to the electrical ground.
SAFETY INSTRUCTIONS
WARNING
RISK OF ELECTRIC SHOCK DO NOT OPEN
Warning: This digital video disc player uses a laser system. Control or adjustments other than those described in this manual may result in the release of hazardous radiation.
Warning: To avoid direct exposure to the laser beam, do not open the case. Visible laser radiation when the housing is open.
Warning: Never look into the laser beam.
COUTION: Do not place this unit in a closed room, such as in a bookshelf or similar places.
Warning: If the device is being used by a child, parents must ensure that the child understands the operating instructions and how to handle the battery so that it is always used correctly.
Warning: If the battery overheats, swells, or begins to smell, stop using it and contact a service center for replacement.
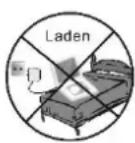
Warning: Do not charge the battery in places with insufficient ventilation, such as: mattresses, safa, pillows etc.
Warning: We accept no responsibility for any damage resulting from misuse or failure to observe the sticker with warnings on the back of the device.
Warning: No USB extension cable longer than 250mm may be used on the USB port.
Warning: Do not swallow the battery supplied with the remote control. There is a risk of chemical burns. If the button cell is swallowed, severe internal combustion can occur in only 2 hours, which can lead to death. Keep new and used batteries away from children. If the battery compartment does not close properly, stop using the remote control and keep it away from children. If you suspect that batteries have been swallowed or introduced into a body orifice, seek medical help immediately.
Notes on Copyrights
It is forbidden by law to copy, broadcast, show,broadcast via cable, play in public, or rent copyrighted material without permission.
This product features the copy protection function developed by Macrovision. Copy protection signals are recorded on some discs. When recording and playing the pictures of these discs picture noise will appear. This product incorporates copyright protection technology that is protected by method claims of certain U.S. Patents and other intellectual property rights owned by Macrovision Corporation and other rights owners. Use of this copyright protection technology must be authorized by Macrovision Corporation, and is intended for home and other limited viewing uses only unless otherwise authorized by macrovision Corporation. Reverse engineering or disassembly is prohibited.
Serial number:
You will find the serial number on the back of the device. This number is for this device only and will not be used for any other device. You should note the data here and keep this manual together with the proof of purchase.
Modell-Nr.
Serial-Nr.
Date of purchase

DESCRIPTION OF KEYS: DEVICE
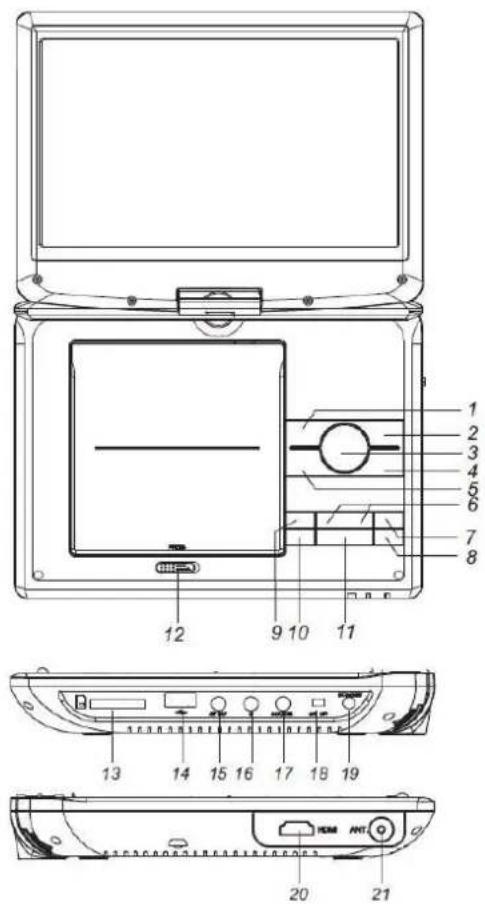
- ←: Left / Fast backward
- : Right / Fast forward
- ENTER: Menu enter confirm
- : Down / Next title
- : Up previous title
- VOL - / VOL +: Sound level down / level up
- SETUP: Open / close setup menu
- SOURCE
- MENU
- : Stop
- ▶||: Play / Pause
- OPEN: Open / Close DVD drivce
- SD/MMC
- USB
- Earphone socket 3,5mm
- AV OUT (only for DVD Mode)
- COAXIAL
- ON / OFF: Ein / Aus
- DC in: 9-12V
- HDMI: HDMI output (only for TV Mode)
- Antenna output: DVB-T/T2HD
Inserting the battery (Remote-Control)
-
Pull out the battery holder
-
Insert the battery.
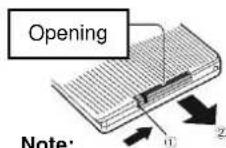
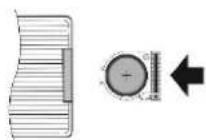
Note: Remove the battery from the remote control during storage or prolonged disuse of the DVD player.
DESCRIPTION OF KEYS: REMOTE-CONTROL
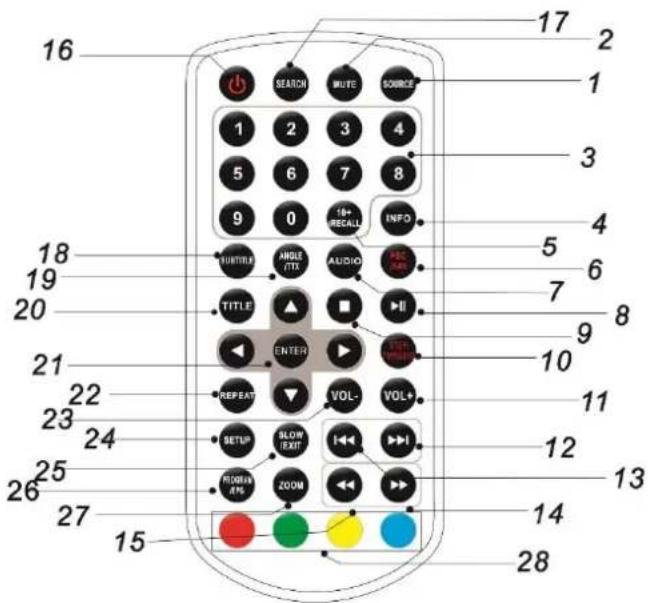
- SOURCE
DVD / Digital TV (DVB-T/T2HD) / Media
- MUTE
Mute the sound
- 0-9 NUMBER BUTTONS
Switch programs
- INFO
Displays the play time and status information
- 10+ / RECALL
To select a title that is ranked 10th or higher. Example: To select track 12, press the 10+ button and then the 2
- PBC / FAV
DVD: PBC On / Off switch TV: Open the list of favorite programs
- AUDIO
DVD: Switch audio language if available CD / VCD: Audio channel selection if available (L/R/Mix/Stereo)
- PLAY / PAUSE
Press once to pause playback Press again to resume playback
- STOP
Press once to stop playback (Press Play / Pause button to resume playback) Press again to delete the playback point
- STEP / TV / RADIO
DVD: Press multiple times for stepwise playback TV: Switch between TV and radio channels
- VOL+
Volume Up
-
| / NEXT PLAYBACK
Select the next title or chapter
- |<< / PREVIOUS PLAYBACK
Select the previous title or chapter
-
/ FAST PLAYBACK
Press multiple to toggle through the different modes for fast playback: (2x -> 4x -> 8x -> 16x -> 32x -> normal playback)
- << / FAST RETURN
Press multiple to toggle through the different modes for fast return: (2x -> 4x -> 8x -> 16x -> 32x -> normal playback)
DESCRIPTION OF KEYS: REMOTE-CONTROL
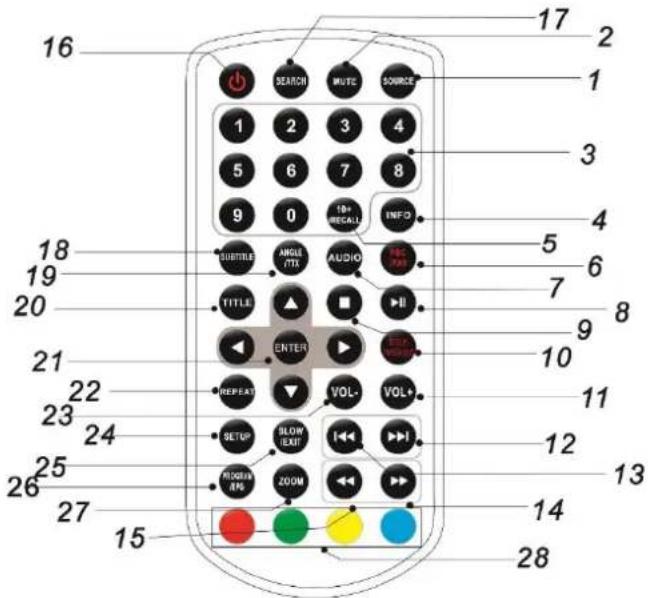
16. POWER
Turn the device on or standby
(Note: To switch off the device completely, move the
„POWER SWITCH“ on the device to the „OFF“ position).
17. SEARCH
DVD: Choose time, title or chapter
18. SUBTITLE
Press multiple to switch the subtitles
19. ANGLE
DVD: Switch the DVD angle if available
20. TITLE
Press to open the DVD Title view
21. ENTER
Confirm entries
22. REPEAT
Choose between different repeat modes
DVD: Chapter, Title, Off
VCD / CD: Single, All, Off
MP3: Single, Folder, Off
23. VOL-
Volume down
24. SETUP
Open Setup-Menu
25. SLOW
Press multiple to toggle through the different speeds:
(1/2, 1/4, 1/8, 1/16, normal playback)
26. PROGRAM / EPG
DVD / VCD: Press to open the favorites menu. Enter the track number and select the playback mode. To resume normal playback, press the button again
TV: Open EPG menu
27. ZOOM
DVD/ VCD: Press multiple to toggle through the various zoom modes:
(2x size, 3x size, 4x size, 1/2, 1/3, 1/4, normal size)
JPEG: Press to start the zoom function
: Zoom in
<<: Zoom out
▲▼◀▶: Navigate in the picture
28. RED / GREEN / YELLOW / BLUE
Adjustment buttons for the Digital TV mode.
IMPORTANT-BATTERY-INFORMATION
Charge the battery:
Fully charge the battery before first use. To charge the built in battery, plug in the power adapter into the device and into your house electricity. The LED-charging indicator starts to flash green. When the charging process is completed, the charge indicator lights up in a steady green. The charging process can take about 3-4 hours.
FIRST-TIME-INSTALLATION
- Check again that all connections are correctly connected and fold the device.
- Slide the power switch on the unit to the "ON" position.
- Press the "SOURCE" button.
- Navigate to the menu item „Digital TV“.
- Press the „Enter“ button.
- When the unit is first switch to Digital TV or has been reset, the following settings menu appears on the screen.
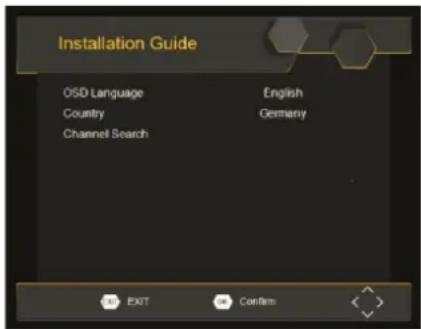
- Select the OSD language.
-
Select the installation country for the DVB-T/T2HD tuner.
-
Press the "ENTER" button to start the automatic channel search.
- After the channel search, the device changes to the first installed channel.
Note: If an active DVB-T antenna is used, switch the menu item "ANTENNA POWER" to "ON".
Note:
Make sure that the antenna cable and power supply are correctly plugged into the device.
Note:
The number of programs received depends on the signal quality and can vary from side to side.
Note:
The device always starts in DVD mode after switching on and must be switched to "DIGITAL TV" for TV reception via the "SOURCE" button.
Note:
In the menu navigate with the buttons „▲ / ▼ / ◀ / ▶“. Press the “ENTER” key to confirm the entry.
Note:
If no channels is found, the device goes back to the first time installation screen.
MENU-NAVIGATION-DVD-MODE
The device starts automatically in DVD mode. To switch from Digital TV mode to DVD mode, press the "SOURCE" button. Use the „▲ / ▼” buttons to navigate in the menu. Select the menu item "DVD". Confirm the entry with the „ENTER" button to enter the DVD mode.
- Press the „SETUP“ button to open the setup menu for the DVD mode.
- Press the „▲ / ▼ / ◀ / ▶” buttons to navigate in the menu.
- Press the „ENTER“ button to confirm a menu entry.
- Press the „◀“ button to return to the previous menu item in the setup menu.
- Press the „Setup“ button to close the setup menu.
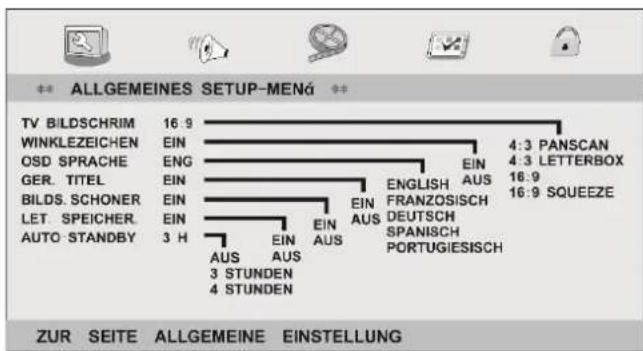
GENERAL-SETUP-PAGE
flowchart
graph TD
    A["TV BILDSCHRIM"] --> B["WINKLEZEICHEN"]
    B --> C["OSD SPRACHE"]
    C --> D["GER. TITEL"]
    D --> E["BILDS. SCHONER"]
    E --> F["LET. SPEICHER."]
    F --> G["AUTO STANDBY"]
    H["16:9"] --> I["EIN"]
    I --> J["ENG"]
    J --> K["EIN"]
    K --> L["EIN"]
    L --> M["EIN"]
    M --> N["EIN"]
    N --> O["AUS"]
    O --> P["AUS"]
    P --> Q["AUS"]
    Q --> R["AUS"]
    R --> S["AUS"]
    S --> T["AUS"]
    T --> U["AUS"]
    U --> V["AUS"]
    V --> W["AUS"]
    W --> X["AUS"]
    X --> Y["AUS"]
    Y --> Z["AUS"]
    Z --> AA["AUS"]
    AA --> AB["AUS"]
    AB --> AC["AUS"]
    AC --> AD["AUS"]
    AD --> AE["AUS"]
    AE --> AF["AUS"]
    AF --> AG["AUS"]
    AG --> AH["AUS"]
    AH --> AI["AUS"]
    AI --> AJ["AUS"]
    AJ --> AK["AUS"]
    AK --> AL["AUS"]
    AL --> AM["AUS"]
    AM --> AN["AUS"]
    AN --> AO["AUS"]
    AO --> AP["AUS"]
    AP --> AQ["AUS"]
    AQ --> AR["AUS"]
    AR --> AS["AUS"]
    AS --> AT["AUS"]
    AT --> AU["AUS"]
    AU --> AV["AUS"]
    AV --> AW["AUS"]
    AW --> AX["AUS"]
    AX --> AY["AUS"]
    AY --> AZ["AUS"]
    AZ --> BA["AUS"]
    BA --> BB["AUS"]
    BB --> BC["AUS"]
    BC --> BD["AUS"]
    BD --> BE["AUS"]
    BE --> BF["AUS"]
    BF --> BG["AUS"]
    BG --> BH["AUS"]
    BH --> BI["AUS"]
    BI --> BJ["AUS"]
    BJ --> BK["AUS"]
    BK --> BL["AUS"]
    BL --> BM["AUS"]
    BM --> BN["AUS"]
    BN --> BO["AUS"]
    BO --> BP["AUS"]
    BP --> BQ["AUS"]
    BQ --> BR["AUS"]
    BR --> BS["AUS"]
    BS --> BT["AUS"]
    BT --> BU["AUS"]
    BU --> BV["AUS"]
    BV --> BW["AUS"]
    BW --> BX["AUS"]
    BX --> BY["AUS"]
    BY --> BZ["AUS"]
    BZ --> CA["AUS"]
    CA --> CB["AUS"]
    CB --> CC["AUS"]
    CC --> CD["AUS"]
    CD --> CE["AUS"]
    CE --> CF["AUS"]
    CF --> CG["AUS"]
    CG --> CH["AUS"]
    CH --> CI["AUS"]
    CI --> CJ["AUS"]
    CJ --> CK["AUS"]
    CK --> CL["AUS"]
    CL --> CM["AUS"]
    CM --> CN["AUS"]
    CN --> CO["AUS"]
    CO --> CP["AUS"]
    CP --> CQ["AUS"]
    CQ --> CR["AUS"]
    CR --> CS["AUS"]
    CS --> CT["AUS"]
    CT --> CU["AUS"]
    CU --> CV["AUS"]
    CV --> CW["AUS"]
TV Display:
Select the display format to match the media being played. The following settings are available:
4:3 Panscan / 4:3 LetterBox / 16:9 / Wide Squeeze
ANGLE MARK:
Display the currently set angle at the right corner on the screen, if available on the DVD.
OSD LANGUAGE:
Set the menu language of the setup menu.
CLOSED CAPTIONS:
Closed captions are data that are hidden in the video signal of some discs. Before you select this function, please ensure that the disc contains closed captions information and your TV set also has this function.
SCREEN SAVER:
This function is used to turn the screen saver "ON" or "OFF".
AUTO-STANDBY:
Sets the time after which the unit should automatically go into standby mode. The following settings are available:
3 hours / 4 hours / Off
Note:
If the option is set to 3 hours, the device automatically goes into standby mode after 3 hours if no button is pressed.
Note:
If a button on the remote control or on the device is pressed within the set option, the setting is reset and the time starts from the beginning.
AUDIO-SETUP-PAGE
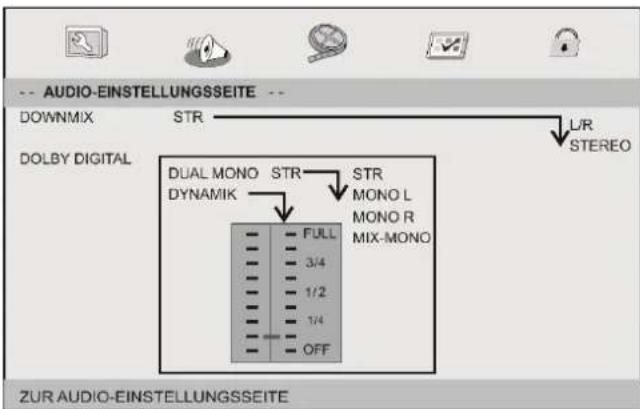
The audio output can be adjusted in the menu. The following settings are available in the menu:
DOWNMIX:
Sets the analog stereo output of your DVD player.
• LT / RT: Select this option if the DVD player is connected to a Dolby Pro-Logic decoder.
• STEREO: Select this setting when playing through two front speakers.
DIGITAL-OUTPUT:
Select the output signal for the digital audio output. The following settings are available:
SPDIF: OFF / RAW / PCM
DOLBY-DIGITAL:
The following settings are available in the menu.
DUAL MONO:
• STEREO: The left mono is played on the left and the right mono is played on the right speaker or output.
• MONO L: The left mono sound is played back on the left and right speakers or output.
• MONO R: The right mono sound is played back on the left and right speakers or output.
- MIX MONO: The left and right mono sound are mixed together and played back on both speakers and outputs.
DYNAMIC:
Set the dynamic compression. The following settings are available:
1/4, 1/2, 3/4, FULL, OFF
VIDEO-SETUP-PAGE
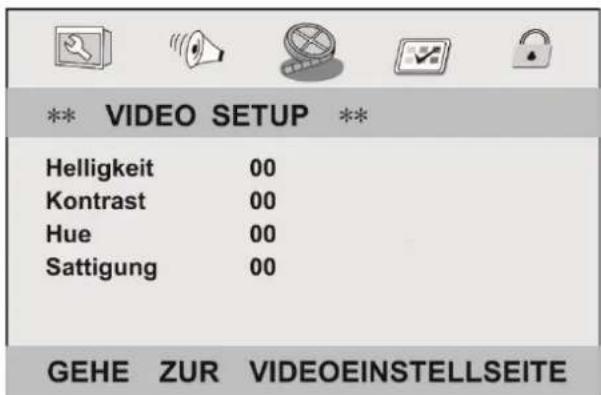
Adjust the picture settings in this menu. The following settings are available in the menu:
BRIGHTNESS / CONTRAST / HUE / SATURATION
PREFERENCE-PAGE
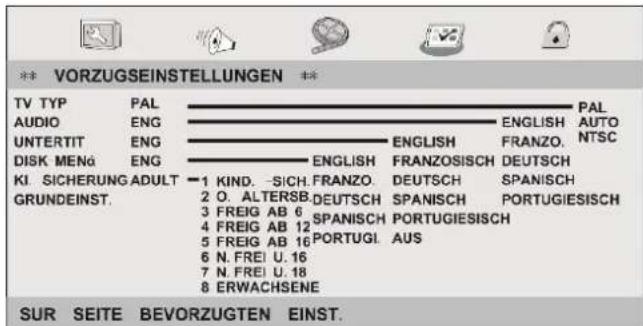
TV-TYPE:
Set the color system on the AV output of the device. This DVD player is compatible with PAL and NTSC. The following settings are available in the menu:
PAL: Select this option if the connected TV uses the PAL system. It changes the video signal of an NTSC disc and the output is in PAL format.
NTSC: Select this option if the connected TV uses the NTSC system. It changes the video signal to a PAL disc and the output is in NTSC format.
AUTO: Changes the output video signal according to the disc.
AUDIO:
Selects a language for audio (if available).
SUBTITLE:
Selects a language for subtitle (if available).
DISC-MENU:
Selects a language for disc menu (if available).
PARENTAL:
Some DVDs may have a parental level assigned to the complete disc
or to certain scenes on the disc. This feature lets you set a playback limitation level. The rating levels are from 1 to 8 and are country dependent. You can prohibit the playing of certain discs that are not
suitable for your children or have certain discs played with alternative scenes.
Note: mostly not available on European discs. Step information for the USA.
DEFAULT:
Back to the factory setting.
PASSWORD-SETUP-PAGE
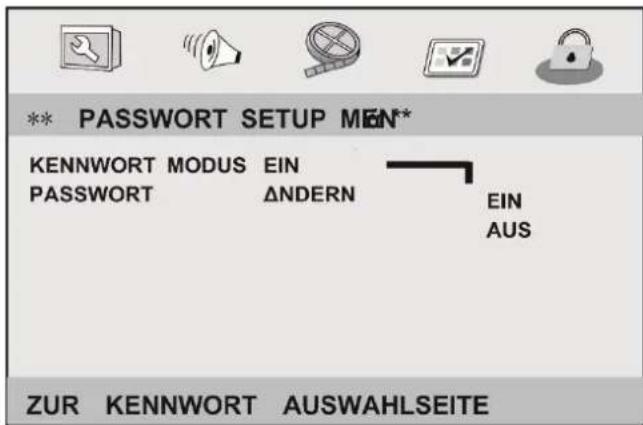
PASSWORD MODE:
Set password mode on/off. If set to off, change parental level will not check password.
PASSWORD CHANGE:
In this menu you can set your own password.
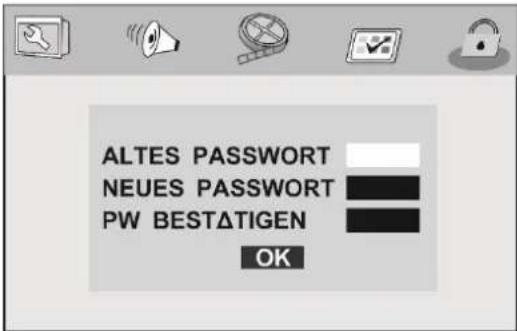
OLD PASSWORD:
Enter the old password using the number buttons on the remote control.
NEW PASSWORD:
Enter your new 4-digit password using the number buttons on the remote control.
CONFIRM PASSWORD:
Enter the new password again using the number buttons on the remote control.
OK:
Press the „ENTER“ button to confirm the new set password.
Note:
The default password is 1369
Note:
If the password is changed, the password for the menu "PARENTAL CONTROL" will also change.
Note:
The default password is 1369, even if the password has been changed.
Note:
Make a note of the newly set password so that it will not be forgotten.
MENÜ-NAVIGATION-DIGITAL-TV-MODUS
When the device is switched on, the device always starts in DVD mode. To switch from DVD mode to Digital TV mode, press the "SOURCE" button. With the keys "▲/▼" Navigate in the menu. Select the menu item "DIGITAL TV". Confirm the entry with the "ENTER" button to enter the Digital TV mode.
- Press the "SETUP" button to open the setup menu for the Digital TV mode.
- Press the „▲ / ▼ / ◀ / ▶” buttons to navigate in the menu.
- Press the „ENTER“ button to confirm a menu entry.
- Press the „SETUP“ button to return in the menu bar.
- Press the „EXIT (SLOW)" button to close the setup menu.
PROGRAM-MENU
In the menu you have access to the following menu items:
Program Edit / EPG / Sort / LCN
Sort:
In this menu, you can specify different default sorter presets: LCN: Sort the channels in ascending order.
ONID: Sort the channels in alphabetical order.
SERVICE ID: Sort the channels according to the station.
LCN:
The setting assigns a fixed program slot to each station.
Note:
If the "LCN" setting is activated, the station information used for program numbering will be used.
Wichtig:
For program editing, set the LCN setting to "OFF".
EPG:
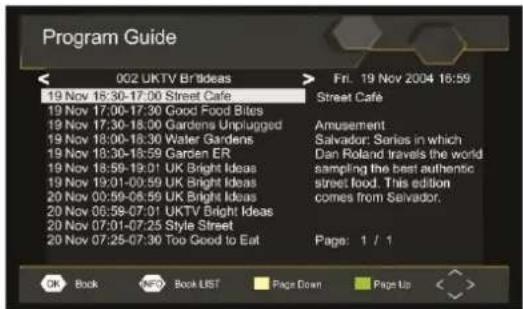
In this menu, stations and broadcast information are displayed up to 7 days in advance.
- Navigate in the menu with the buttons
$$ , \triangle / \nabla / \triangleleft / \triangleright^ {\prime \prime}. $$
- Press the „YELLOW” button to go back one page.
- Press the „GREEN“ button to go to next page.
- Press the „INFO“ button to get into the schedule menu. In the menu, a channel / broadcast can set as a reminder.
Note:
This menu can also be directly selected via the remote control button "EPG (PROGRAM)".
Program Edit:
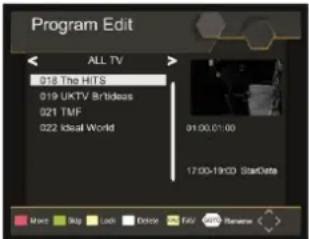
RED / MOVE:
- Press the „▲ / ▼“ button to mark a channel to be moved.
- Press the "ROT" button. The channelis marked with a symbol.
- Press the „▲ / ▼“ button to move a channel.
- Press the „ENTER“ button to save the moved channel.
- Repeat steps 1-4 until the desired channels order is reached.
GREEN / SKIP:
- Press the „▲ / ▼“ button to mark a channel to be skipped.
- Press the "Skip / Green" button. The transmitter is now marked with an icon and is skipped when the programs are switched through with the "▲ / ▼" buttons.
- Repeat steps 1 and 2 to skip further programs.
- To stop skipping stations, scroll to the highlighted stations and press the "GREEN" button again.
- The station will no longer be skipped.
YELLOW / LOCK:
- Press the "▲ / ▼" button to mark a station to be locked.
- Press the "YELLOW" button to lock a highlighted channel. The channel is now marked with an icon.
- If a channel is blocked, a password query takes place when the channel is selected.
- To stop the lock for the locked channels, navigate to the selected stations and press the "YELLOW" button again.
BLUE / DELETE:
- Press the "▲ / ▼" button to mark a station to be deleted.
-
Press the "BLUE" key to delete a highlighted station.
-
Confirm the confirmation prompt with the "ENTER" key or the "EXIT" key to cancel.
FAV:
- Press the "▲ / ▼" button to mark a station to be saved as a favorite.
- Press the "FAV" button to add a selected station to a favorites list.
- Select the category with the "▲ / ▼" buttons and confirm the entry with the "ENTER" button.
- Then press the "EXIT" button.
- The station is now marked with an icon and will be displayed in the favorites list.
- Repeat steps 1-4 until all desired stations are added to the favorites.
- To remove a station from the favorites list, select a station marked as favorite and press the "FAV" button. Select Disable and confirm the entry with the "ENTER" button.
- Then press the "EXIT" button.
Note:
Press the "EXIT" button to save the settings in the menu.
Open the Favorites list:
- Press the "FAV" button in TV mode to open the favorites list.
- Press the "▲ / ▼" buttons to select the channels and the "◀ / ▶" buttons to select the lists.
- Press the "ENTER" button to switch to the desired station.
PICTURE-MENU
To enter the menu, press the "SETUP" button and select "PICTURE" with the "◀ / ▶" buttons.
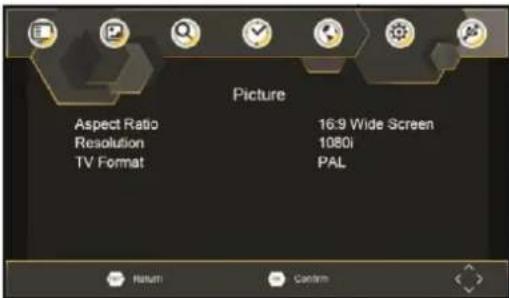
- Press the "▲ / ▼" buttons to select the menu items.
- Press the "◀ / ▶" buttons to change the settings.
ASPECT RATIO:
In this menu you can adjust the picture aspect ratio. The following setting options are available in the menu:
16:9 Wide Screen / Auto / 16:9 PillarBox / 16:9 Pan&Scan / 4:3 Letter Box / 4:3 Pan&Scan / 4:3 Full
RESULOTION:
In this menu you can adjust the resolution. The following setting options are available in the menu:
1080i / 1080P(50Hz) / 576i / 576p / 720p
TV-Format:
In this menu you can adjust the TV format. The following setting options are available in the menu:
PAL / NTSC
CHANNEL-SEARCH-MENÜ
To access the menu, press the "SETUP" button and select the "CHANNEL SEARCH" menu item with the "◀ / ▶" buttons.
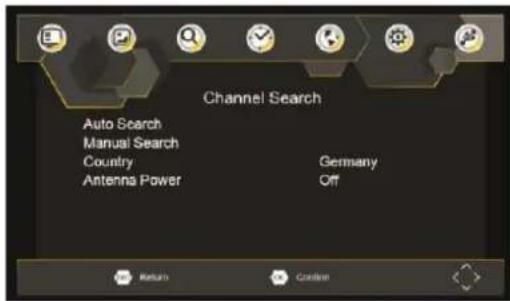
Auto-Search:
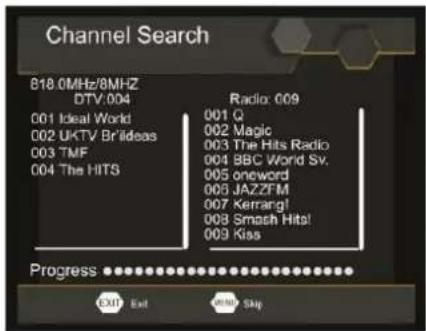
Press the menu item to start the automatic station search.
Manual Search:
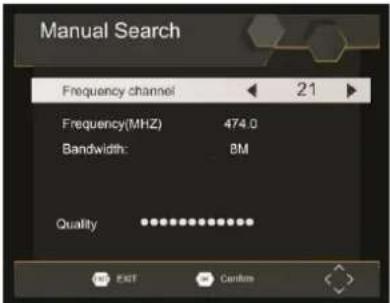
Set the frequency channel for a manual station search.
Country:
Set the location for the DVB-T / T2HD search.
Antenna Power:
In this menu item you can switch the 5V voltage for the active DVB-T antennas "On" or "Off".
TIME-MENU
- To access the menu, press the "SETUP" button.
- Press the "◀ / ▶" button and select the Time menu item.
- Press the "ENTER" button.
- Press the "▲ / ▼" buttons to navigate in the menu.
- Press the "◀ / ▶" buttons to change the menu items.
- Press the "SETUP" button to return to the menu bar.
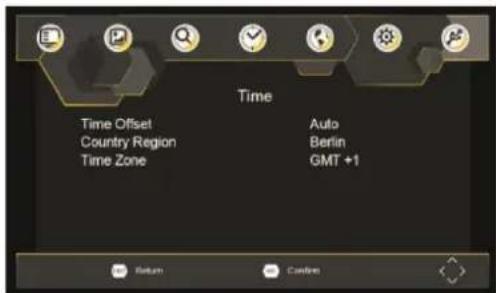
Time Offset:
Set whether the time balance should be "Auto" or "Manual".
Country Region:
Select the country area.
Note:
The menu item is only available if the menu item time compensation is set to "AUTO".
Time Zone:
In the menu the time zone can be selected manually.
Note:
The menu item is only active if the menu item time compensation is set to "MANUAL".
OPTION-MENU
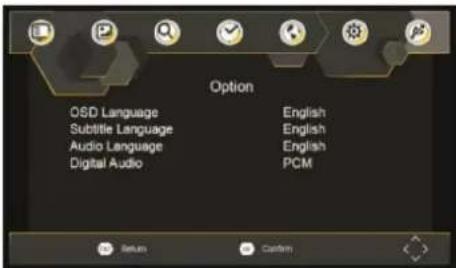
- To access the menu, press the "SETUP" button.
- Press the "◀ / ▶" button and select the item item.
- Press the "ENTER" button.
- Press the "▲ / ▼" buttons to navigate in the menu.
- Press the "◀ / ▶" buttons to change the menu items.
- Press the "SETUP" button to return to the menu bar.
The following menu items are available in the menu:
OSD Language / Subtitle Language / Audio Language / Digital Audio
OSD Language:
Set the menu language.
Subtitle Language:
Set the preferred subtitle language for the TV channels.
Audio Language:
Set the preferred audio language for the TV channels.
Digital Audio:
Set the preferred audio format for the Digital Audio Output (Coaxial).
SYSTEM-MENU
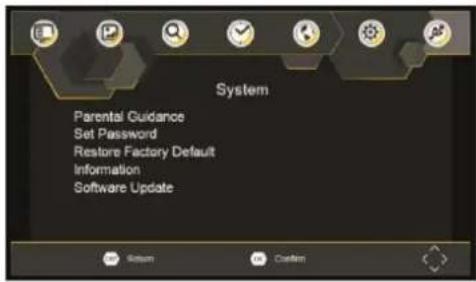
- To access the menu, press the "SETUP" button.
- Press the "◀ / ▶" button and select the menu item System.
- Press the "ENTER" button.
- Press the "▲ / ▼" buttons to navigate in the menu.
- Press the "ENTER" buttons to select a menu item.
- Press the "SETUP" button to return to the menu bar.
The following menu items are available in the menu:
Parental Guidance:
You can restrict access to channels that are not appropriate. To activate the child safety lock, press the "ENTER" button and set the height of the child safety lock.
Set Password:
This menu item lets you set your own password.
Enter old password: Enter the default password "(000000)" or the current password.
Enter new password: Now enter the new password.
Confirm password: Enter the new password again to confirm the password and press the "EXIT" key to exit the menu.
Note:
The default password is 000000
The menu item deletes all settings made and restores the default settings. Before the execution, a password query takes place.
- Enter the password.
- Confirm the confirmation prompt with the "ENTER" key or the "EXIT" key to cancel.
- The device then starts with the initial installation.
Information:
The menu item displays model, hardware and software information.
Software Update:
Perform a software update using an update file via USB cable. When available.
USB-MENU
To access the USB menu, press the "SETUP" button and select the menu item USB with the "◀/▶" buttons.
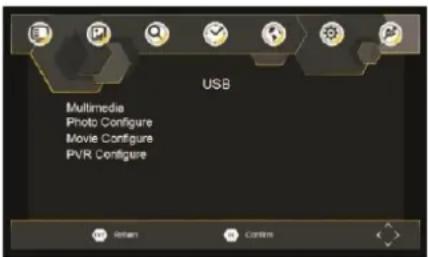
Multimedia:
- Use the "▲ / ▼" buttons to navigate to the "MULTIMEDIA" menu item.
- Confirm the entry with the "ENTER" key.
- The device enters USB mode.
- Now you can access data that exists on the USB stick.
Note:
The menu item can also be accessed via the "SOURCE" button.
ERROR SOLUTION
| Problem | Possible reasons | What should I do |
| No picture | Electricity is not connected | Connect to the power adapter |
| The power switch is off | Press the power button | |
| Screen shows no signal | DVB-T cable / antenna is not connected | DVB-T cable / antenna is not connected |
| No sound from the speaker | Sound is muteWrong audio format | Disable mute function / Select a different sound format |
| Only sound, no picture | Wrong setting radio program selected | Press the button "TV / Radio" |
| Remote control does not respond | The batteries are empty | Replace battery |
| Remote control does not show to the device | Hold remote control to the device | |
| The device is too far away | Move closer to the device with the remote control | |
| Suddenly no picture anymore (mosaic education) | The received signal is too weak | Amplify the signal. Other position of the antenna |
Errors and technical changes reserved.
DEVICE-SPECIFICATIONS
ELECTRONIC PARAMETERS
| Power supply: | AC 100-240V, 50/60Hz | |
| Power consumption: | <10W | |
| Humidity during operation: | 5% bis 90% | |
| Output Voltage | Video output: | 1Vp-p(75Ω) |
| Audio output: | 1,2 Vrms (1KHz, 0dB) | |
Errors and technical changes reserved.
SYSTEM
| Laser: | Semiconductor laser, wavelength 650nm |
| Signal system: | NTSC, PAL |
| Frequency range: | 20Hz bis 20KHz (1dB) |
| Signal-to-noise-ratio: | More then 80dB (Only analog output sockets) |
| Dynamic range: | More then 85dB (DVD/CD) |
Errors and technical changes reserved.
TECHNICAL-PARAMETER
| TUNER | Frequency range | 170~230MHz470~860MHz |
| RF Input level | -79db`Bm (T), -75dBm (T2) | |
| IF Bandwidth | 7MHz und 8MHz | |
| Modulation | QPSK, 16QAM, 64QAM, 128QAM (T2), 256QAM (T2) | |
| VIDEO | Decoder Format | MPEG4 AVC / H.264 HP@4HEVC / H.265 HT@L4MPEG2 MP@ML.HL |
| Output Format | 480i, 480p, 576i, 576p, 720p, 7080i, 1080p, 4,3 und 16:9 | |
| Output Port | HDMI |
Note: Design and specifications are subject to change without notice.
BATTERY-PARAMETERS
Battery specifications:
Charging time: 3-4 hours Battery Voltage: 7,4V
Bearings and operating conditions:
| 1. Storage | Temperatur | Humidity |
| 6 Month | -20^ to +45^ | 65 ± 20% |
| 1 Week | -20^ to +65^ | 65 ± 20% |
| 2. Storage | Temperatur | Humidity |
| Load | 0^ to ± 45^ | 65 ± 20% |
| Unloaded | -20^ to +65^ | 65 ± 20% |
Charge the battery
To charge the built-in battery, plug the power adapter into the device and into the power outlet. The LED charging indicator starts to flash green. When the charging process is completed, the charge indicator lights up in a steady green. The charging process can take about 3-4 hours.
Note:
The duration of the charging process depends on whether the device is charged in the switched-off state during use.

www.ultramedia.de

vironment protection
Instructions on en

Electrical and electronic equipment and batteries contain materials, components and substances which may be harmful to you and your environment, provided that the waste materials (waste electrical and electronic equipment and batteries) are not handled correctly.
Electrical and electronic equipment and batteries are marked with the crossed-out wheelie bin, as shown below. This symbol means that old electrical and electronic equipment and batteries must not be disposed of with the trash, they must be disposed of separately.
As an end user, it is necessary that you deliver your depleted batteries to the appropriate collection points. In this way you ensure that the batteries are recycled according to the legislation and do not cause any environmental damage.
Cities and municipalities have set up collection points where electrical and electronic waste and batteries can be returned free of charge for recycling, or pickup is also an alternative. For more information, please contact your community's environmental agency.
SIMPLIFIED-EU DECLARATION
Hereby, UltraMedia GmbH & Co. Handels KG declares that the radio equipment type DVD1017 is in compliance with Directive 2014/53 / EU.
The full text of the EU Declaration of Conformity can be requested at the following email address.
info@ultramedia.de
We hope you enjoy using the device.
Your UltraMedia team
Warranty

Dear Customer,
Thank you for choosing one of our products. Our products undergo precise quality control during production. If one of our devices gives you cause for complaint or you have questions about one of our devices, please call our customer support.
We give a warranty of 24 months on this device from the date of purchase.
Outside of the warranty, we offer you a repair that is subject to a charge and a cost estimate. Please contact our customer support before submitting.
Please understand that the warranty can only be taken into account for devices that we receive within the warranty period.
The warranty relates to material and production defects. Your device will be repaired or replaced during the warranty. A reimbursement of the purchase amount by the company UltraMedia is unfortunately not possible. Damage caused by improper use, the use of third-party accessories, fall, dust, water damage and wear and tear (e.g. scratches, optical wear and tear) caused by the customer or external influences are excluded from the warranty.
In order to assert the warranty claims, send the device with all accessories, a copy of the invoice and the description of the error to the address below. Please do not forget to include your complete address, a telephone number / email address if you have any questions.
Shipping to us takes place at your own expense. Parcels that are not prepaid cannot be accepted and are returned to the sender.
Please pack the device sufficiently for transport. UltraMedia assumes no liability for transport damage that occurs on the way to us. After receiving your submission, we will process your device as quickly as possible and send it back to you.
Please contact our customer support or your specialist dealer before sending in your device, as many problems can also be solved by telephone.

- VOL-
- Zeitausgleich:
- GEWÄHRLEISTUNG
- IMPORTANT SAFETY INSTRUCTIONS
- SAFETY INSTRUCTIONS
- WARNING
- Notes on Copyrights
- Serial number:
- DESCRIPTION OF KEYS: DEVICE
- Inserting the battery (Remote-Control)
- POWER
- SEARCH
- SUBTITLE
- ANGLE
- TITLE
- ENTER
- REPEAT
- SETUP
- SLOW
- PROGRAM / EPG
- ZOOM
- RED / GREEN / YELLOW / BLUE
- IMPORTANT-BATTERY-INFORMATION
- Charge the battery:
- FIRST-TIME-INSTALLATION
- Note:
- MENU-NAVIGATION-DVD-MODE
- TV Display:
- ANGLE MARK:
- OSD LANGUAGE:
- CLOSED CAPTIONS:
- SCREEN SAVER:
- AUTO-STANDBY:
- AUDIO-SETUP-PAGE
- DOWNMIX:
- DIGITAL-OUTPUT:
- DOLBY-DIGITAL:
- DUAL MONO:
- DYNAMIC:
- VIDEO-SETUP-PAGE
- PREFERENCE-PAGE
- TV-TYPE:
- AUDIO:
- SUBTITLE:
- DISC-MENU:
- PARENTAL:
- DEFAULT:
- PASSWORD-SETUP-PAGE
- PASSWORD MODE:
- PASSWORD CHANGE:
- OLD PASSWORD:
- NEW PASSWORD:
- CONFIRM PASSWORD:
- OK:
- MENÜ-NAVIGATION-DIGITAL-TV-MODUS
- PROGRAM-MENU
- Sort:
- LCN:
- Wichtig:
- Program Edit:
- RED / MOVE:
- GREEN / SKIP:
- YELLOW / LOCK:
- BLUE / DELETE:
- FAV:
- Open the Favorites list:
- PICTURE-MENU
- ASPECT RATIO:
- RESULOTION:
- TV-Format:
- CHANNEL-SEARCH-MENÜ
- Manual Search:
- Country:
- Antenna Power:
- TIME-MENU
- Time Offset:
- Country Region:
- Time Zone:
- OPTION-MENU
- Subtitle Language:
- Audio Language:
- Digital Audio:
- SYSTEM-MENU
- Parental Guidance:
- Set Password:
- Information:
- Software Update:
- USB-MENU
- Multimedia:
- DEVICE-SPECIFICATIONS
- BATTERY-PARAMETERS
- Battery specifications:
- Charge the battery
- SIMPLIFIED-EU DECLARATION
- Warranty
Brand : Reflexion
Model : DVD1017
Category : Portable DVD Player