
Cordless Care SICH2200RBC - Iron GORENJE - Free user manual and instructions
Find the device manual for free Cordless Care SICH2200RBC GORENJE in PDF.


| Product Type | Cordless Iron |
| Brand | Gorenje |
| Model | Cordless Care SICH2200RBC |
| Power Supply | 220-240 V, 50/60 Hz |
| Power Consumption | 2400 W |
| Cordless Operation | Yes |
| Soleplate Material | Ceramic |
| Water Tank Capacity | 300 ml |
| Steam Output | 40 g/min |
| Steam Boost | 150 g/min |
| Spray Function | Yes |
| Vertical Steaming | Yes |
| Auto Shut-Off | Yes, after 30 seconds on soleplate / 8 minutes upright |
| Self-Cleaning Function | Yes |
| Anti-Drip System | Yes |
| Anti-Calc System | Yes |
| Heating Time | Approximately 2 minutes |
| Dimensions (L x W x H) | 30 x 15 x 20 cm |
| Weight | 1.5 kg |
| Unlock Mechanism | Automatic lock when placed on base |
| Base Station | Includes charging base with cord storage |
Frequently Asked Questions - Cordless Care SICH2200RBC GORENJE
User questions about Cordless Care SICH2200RBC GORENJE
0 question about this device. Answer the ones you know or ask your own.
Ask a new question about this device
Download the instructions for your Iron in PDF format for free! Find your manual Cordless Care SICH2200RBC - GORENJE and take your electronic device back in hand. On this page are published all the documents necessary for the use of your device. Cordless Care SICH2200RBC by GORENJE.
USER MANUAL Cordless Care SICH2200RBC GORENJE



Napomena: kao što je navedeno u prethodnoj tablici, nemojte upotrebljavati paru ili nalet pare na niskoj temperaturi jer u suprotnom vruća voda može curiti iz glačala.
① U prethodnoj tablici pronađite odgovarajuću postavku kotačića za temperaturu za svoj odjevni predmet.
② Odaberite postavku pare koja odgovara temperaturi koju ste podesili.
③ Postavite glačalo na bazu za punjenje i spojite bazu za punjenje na utičnicu.
Napomena: pobrinite se da baza leži na stabilnoj i ravnoj površini. Preporučuje se postavljanje baze na mekani dio daske za glačanje.
4 Kad se glačalo prvi put uključi, vidjet ćete trepereće crveno svjetlo (slika 7. – indikator napajanja narančaste boje) koje označava da se ploča glačala počela zagrijavati. Kad indikator napajanja zasvijetli, to znači da je temperatura ploče dovoljno visoka za glačanje, tako da sada možete uzeti glačalo iz baze za punjenje i početi glačati.
Glavne značajke






Read the English Manual carefully before you use the appliance. Save both documents for future reference.
General description (Fig. 1)
1 Spray nozzle
2 Cap of the filling opening
3 Steam control
4 Spray button
5 Steam burst button
6 Temperature dial
7 Power indicator / Auto shut-off indicator
8 Soft grip
9 Back body
10 Shirt body
11 Water tank
12 Calc clean button
13 Ceramic coating soleplate
14 Power charging base
15 Iron storage lock
16 Power cord
Filling the water tank
Note: Your appliance is designed to be used with tap water. In case you live in an area with hard water, limescale build-up may occur soon. Therefore, it is recommended to use distilled or de-mineralized water to prolong the useful life of your appliance.
Note: Do not add perfume, water from tumble dryer, vinegar, magnetically treated water, starch, descaling agents, ironing aids, chemically descaled water, or other chemicals as they may cause water spitting, brown staining, or damage to your appliance.
① Set the steam control to position 0.
② Fill the water tank up to the MAX indication.
③ Close the cap of the filling opening.
Set the temperature as described below.
Type of fabric and temperature dial:
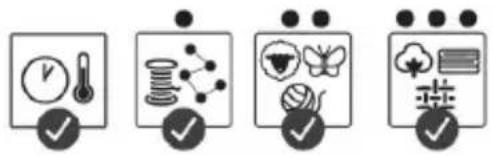


Note: As indicated in the table above, do not use steam or steam burst at a low temperature, otherwise hot water may leak from the iron.
① Consult the table above to set the temperature dial to an appropriate setting for your garment.
2 Select a steam setting that corresponds to the temperature you have set.
3 Place the iron on its power charging base and connect the power charging base to a power socket.
Note: Make sure that the base sits on a stable and level surface. It is recommended to place the base on the soft part of the ironing board.
4 When the iron is first plugged in, you will see the flashing red light (Fig 7 – power indicator light with orange colour) indicating that the iron's soleplate has begun to heat up. When this power indicator light goes off, it means the soleplate temperature of the iron is high enough for ironing, so you can now take the iron from the power charging base and start ironing.
Main features
Spray function
--- Press the spray button to moisten the garment to be ironed. This helps remove stubborn creases.
Steam burst function
--- Press and release the steam burst button for a powerful burst of steam (for removing stubborn creases).
For optional steam boost performance, we recommend pressing the steam burst button at 5-second intervals.
Vertical steam
--- You can also use the steam burst function when you hold the iron vertically for removing creases from hanging clothes, curtains etc.
Dry ironing
--- Set the steam control to position 0.
Optional features
Anti-calc
--- The iron has a small built-in filter that can soften hard water to prevent limescale accumulation on the surface of the soleplate. Thus, this feature can extend the useful life of the iron.
Anti-drip
--- If the iron is unplugged from the power mains or if the temperature of the soleplate drops considerably during operation, the ant-drip function will prevent water from dripping from the iron even if the steam control is set to maximum.
Auto shut-off
--- When the iron is plugged in, the power indicator will be constantly lit, indicating that the iron is powered.
If you leave the iron:
- In a horizontal position without moving it, or accidentally tip the iron over, it will automatically stop heating after 30 seconds. The auto-off indicator – auto shut-off indicator, in red colour) will blink to indicate that the iron has stopped heating.
- In a vertical position (on its heel rest) without moving it, the iron will automatically turn off after 8 minutes. The auto-off indicator will blink to let you know that the iron has stopped heating.
IMPORTANT: The red auto-off indicator – auto shut-off indicator will continue to blink until the iron is unplugged or reset.
To reset the iron:
Move the iron back and forth. The auto-off indicator will stop blinking and the iron will start heating again.
WARNING: The automatic safety shut-off is a safety feature, not a recommended way to turn off your iron.
Cleaning and Maintenance
Cleaning
1 Set the steam control to 0, unplug the base and let the iron cool down.
2 Pour any remaining water out of the water tank.
3 Wipe flakes and any other deposits off the soleplate with a damp cloth and a non-abrasive (liquid) cleaning agent.
Caution: To keep the soleplate smooth, avoid hard contact with metal objects. Never use a scouring pad, vinegar, or other chemicals to clean the soleplate.
Note: Regularly rinse the water tank with tap water. Empty the water tank after rinsing it.
IMPORTANT: To prolong the lifetime of your appliance and to maintain good steam performance, use the calc-clean function once every two weeks. If the water in your area is very hard (i.e., when flakes come out of the soleplate during ironing), use the calc-clean function more frequently.
1 Make sure the steam control is set to 0.
2 Fill the water tank to the MAX indication.
Do not pour vinegar or other descaling agents into the water tank.
3 Set the temperature dial to MAX.
4 Plug in the power charging base, put the iron on the base and let the iron heat up.
5 Remove the iron when the power indicator light goes off.
6 Hold the iron over the sink. Press the calc-clean button and hold it.
7 Gently shake the iron while holding the steam control until all water in the water tank has been used up.
Caution: While scale is flushed out, steam and boiling water also come out of the soleplate.
⑧ Set the steam control back to 0.
Note: Repeat the Calc-Clean process if the water that comes out of the iron still contains scale particles.
After the calc-clean process
1 Place the iron on the power charging base. Let the iron heat up to dry the soleplate.
2 Take the iron from the base when the power indicator light goes off.
3 Move the iron gently over a piece of cloth to remove any water stains on the soleplate.
Storage
① Set the steam control back to 0 (Fig. 2).
2 Pour any remaining water from the water tank.
Do not pour vinegar or other descaling agents into the water tank.
3 Unplug the mains cord and retract the mains into the power charging base (Fig. 14)
Remove iron from the power charging base when you retract the mains into the base, as the soleplate could still be hot.
4 Put the iron on the power charging base. Lock the iron to its base. (Fig. 15).
5 Let the iron cool down before you store it.
You can carry the iron and power charging base by the iron handle.
Troubleshooting
If you encounter some of the most common problems with the appliance, just follow the simple and basic instructions below to try to resolve the issue yourself. If you cannot fix the problem by observing the troubleshooting tips, please contact our customer service department. We can be at your service soon after receiving your request for assistance.
| Problem | Possible cause | Solution |
| The iron does not produce steam. after | Cordless iron cools down a while. It needs to be recharged again. | Put the iron back on the power charging base until the power indicator light goes off, indicating that the iron is ready for use again. |
| The steam control is set to 0. | Set the steam control to the right steam setting as described above. |
The water tank is empty. Fill the water tank.
| Problem Possible cause Solution | ||
| The iron is leaking | You are using a temperature of below 2 dots. | Set the thermostat dial at a temperature level above the 2 dots. |
| You are using steam or steam burst at a low temperature. | Put the iron back onto its power charging base to heat up and dry the soleplate. | |
| You used the steam burst function too frequently within a very short period. | Put the iron back onto its power charging base to heat up and dry the soleplate. Use the steam burst function less frequently. | |
| The water tank is overfilled. | Do not fill the water tank beyond the MAX indication. | |
| The cap of the filling opening is not closed properly. | Make sure that the door of filling opening is closed properly. | |
| Flakes and impurities are coming out of the soleplate during ironing. | You have not performed calc-clean function for some time. The iron needs to be cleaned. | Use the calc-clean function (see chapter "Cleaning and maintenance", section "Calc-clean function"). |

Dôležité





8 Ustaw regulator pary z powrotem na 0.

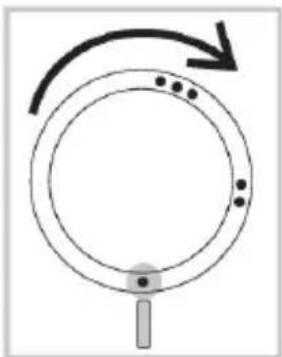

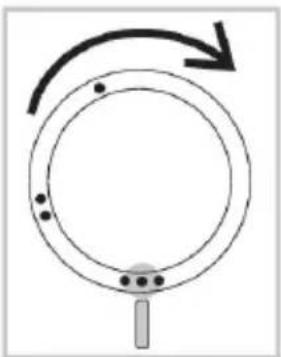




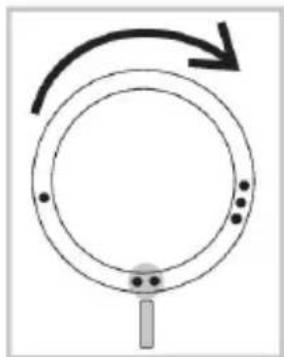


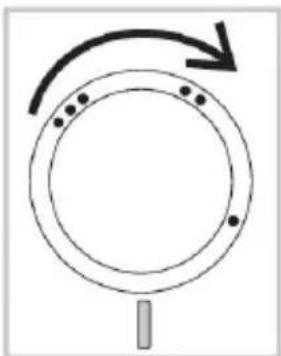
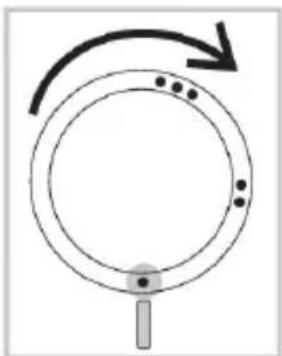


Vrsta tkanine i regulator temperature:


Napomena: Kao što je navedeno u gornjoj tabeli, nemojte koristiti paru ili povećano ispuštanje pare na niskoj temperaturi, u suprotnom može doći do curenja vruće vode iz pegle.
① Pogledajte gornju tabelu da biste podesili regulator temperature na odgovarajuće podešavanje za odeću.
② Izaberite podešavanje pare koje odgovara temperaturi koju ste podesili.
3 Postavite peglu na bazu za punjenje i uključite bazu za punjenje u utičnicu.
Napomena: Pobrinite se da baza stoji na stabilnoj i ravnoj površini.
Preporučuje se da se baza stavi na meki deo daske za peglanje.
4 Kada se pegla prvi put uključi, videćete crveno trepćuće svetlo (Slika 7 – indikator snage sa narandžastom bojom) koje ukazuje da je grejna ploča pegle počela da se zagreva. Kada se svetlo indikatora snage isključi, to znači da je temperatura grejne ploče pegle dovoljno visoka za peglanje, tako da sada možete uzeti peglu iz baze za punjenje i početi da peglate.
Glavne odlike
Funkcija prskanja
--- Pritisnite dugme za prskanje da biste navlažili odeću koju želite da ispeglate. Ovo pomaže u uklanjanju nabora.


- GLAVNE ZNAČAJKE
- GENERAL DESCRIPTION (FIG. 1)
- FILLING THE WATER TANK
- SET THE TEMPERATURE AS DESCRIBED BELOW
- MAIN FEATURES
- SPRAY FUNCTION
- STEAM BURST FUNCTION
- VERTICAL STEAM
- DRY IRONING
- OPTIONAL FEATURES
- ANTI-CALC
- ANTI-DRIP
- AUTO SHUT-OFF
- CLEANING AND MAINTENANCE
- CLEANING
- AFTER THE CALC-CLEAN PROCESS
- STORAGE
- TROUBLESHOOTING
- DÔLEŽITÉ
- GLAVNE ODLIKE
- FUNKCIJA PRSKANJA
Brand : GORENJE
Model : Cordless Care SICH2200RBC
Category : Iron