USER MANUAL 3005 ELNA
INSTRUCTION MANUAL GEBRAUCHSANWEISUNG MANUEL D'INSTRUCTION MODED'USO
IMPORTANT SAFETY INSTRUCTIONS
When using an electrical appliance, basic safety precautions should always be followed, including the following:
Read all instruction before using this household sewing machine.
DANGER - to reduce the risk of electric shock:
This household sewing machine should never be left unattended when plugged in. Always unplug it from the electric outlet immediately after using and before cleaning. Always unplug before relamping. Replace bulb with same type and rating, 15 W max. (Model 3003) or 3 W (Models 3005+3007).
WARNING - To reduce the risk of burns, fire, electric shock, or injury to persons:
- Do not allow to be used as a toy. Close attention is necessary when this appliance is used by or near children.
- Use this sewing machine only for its intended use as described in this manual. Use only attachments recommended by the manufacturer as contained in this manual.
- Never operate this sewing machine if it has a damaged cord or plug, if it is not working properly, if it has been dropped or damaged, or dropped into water. Return the sewing machine to the nearest authorized dealer or service center for examination, repair, electrical or mechanical adjustment.
- This machine is equipped with a special connexion cord which, if damaged, must be replaced by an identical cord. This can be obtained from the dealer.
- Never operate the sewing machine with any air opening blocked. Keep ventilation openings of the sewing machine and foot controller free from the accumulation of lint, dust and cloth.
- Never drop or insert any object into any opening.
- Do not use outdoors.
- Do not operate where aerosol (spray) products are being used or where oxygen is being administered.
-
To disconnect, turn all controls to the off position, then remove plug from outlet.
-
Do not unplug by pulling on cord. To unplug, grasp the plug, not the cord.
- Keep fingers away from all moving parts. Special care is required around the sewing needle.
- Always use the proper needle plate. The wrong plate can cause the needle to break.
- Do not use bent needles.
- Do not pull or push fabric while stitching. It may deflect the needle causing it to break.
- Switch the sewing machine off when making any adjustment in the needle area, such as threading needle, changing needle, threading bobbin, or changing presser foot, and the like.
- Always unplug the sewing machine from the electrical outlet when making any user servicing mentioned in the instruction manual.
- Use only identical replacement parts.
"SAVE THESE INSTRUCTIONS"
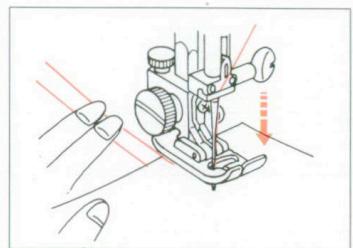
Warning
When working close to the needle, be very careful not to prick your fingers.
TABLE OF CONTENTS
I MAIN PARTS
Designation of Parts A-3,4
Fool Storage Compartment A-5
Extension Table (Accessory Box) A-5
II GETTING READY TO SEW
Connecting the Machine to the Power Supply A-6
Needle Up/Down (Model 3007) A-6
Foot Control A-6
Speed Reducer A-6
Sewing Light A-6
Foot Pressure A-7
Dropping the Feed Dog A-7
To Snap Off and On the Presser Foot A-7
To Remove and Attach the Foot Holder A-8
Sewing in Reverse 48
Seam Guide A-8
Changing the Needle A-8
Fabrics, Threads and Needles A-9
Placing the Thread Spool A-9
Additional Spool Pin A-9
Removing the Bobbin A-9
Winding the Bobbin (Model 3003) A-10
Inserting the Bobbin (Model 3003) A-10
Winding the Bobbin (Model 3005+3007) A-11
Inserting the Bobbin (Model 3005+3007) A-11
Threading the Machine A-12
Automatic Needle Threader (Model 3005+3007) A-13
Drawing Up the Bobbin Thread A-14
Balancing the Thread Tension A-14
Pattern Selection A-15
Stitch Width A-15
Stitch Length A-15
Decentering the Needle A-15
III BASIC SEWING
StraightStitch A-16
Sewing an Angle A-16
Straight Stiatching on Heavy Fabrics A-16
Zigzag Stitch A-17
IV UTILITY STITCHES
Quick Overcasting A-17
Assembling Stretch Fabrics (Model 3007) A-17
OveredgeStitch A-17
Double Overcasting A-18
Elastic Stitch A-18
Triple Seam A-19
Interlock Shell Stitching A-19
Sewing on Buttons A-20
Automatic Buttonhole A-20, 21
Manual Buttonhole A-22
Coreded Buttonhole A-23
Zipper Insertion A-23, 24
Narrow Hem
BlindStitch A-26
V DECORATIVE SEWING
Decorative Satin Stitch A-27
Stretch Stitch Patterns A-27
Adjusting Stretch Stitch Balance A-27
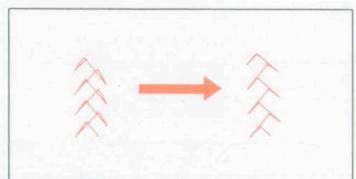
Smocking A-28
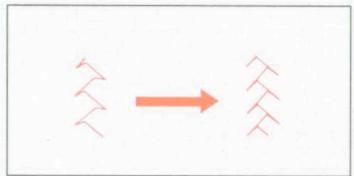
Quilting A-28
Pin-Tucking 29
Shell Tuck 29
Fogoting (Model 3007) A-29
Applications 30
Assembling Edge-to-Edge A-30
VI MAINTENANCE
Cleaning the Bobbin Case A-31
Cleaning the Hook A-31
Refitting the Bobbin Case. A-31
Minor Disorders A-32, 33
I MAIN PARTS
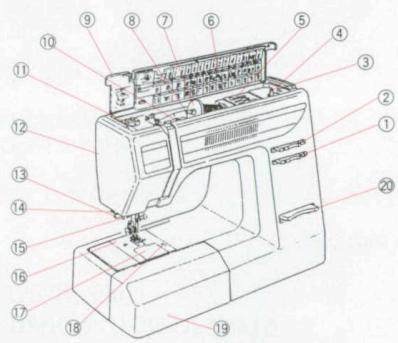
DESIGNATION OF PARTS (Model 3007)
- Stitch length slide
- Stitch width slide
3 Bobbin winder stop
4 Bobbin winder
5 Foot storage compartment
6 Sewing instruction panel
7 Spool holder disc (large)
8 Spool pin
9 Top cover
10 Thread tension dial
11 Foot pressure dial
12 Face plate
13 Buttonhole lever
14 Thread cutter
15 Automatic needle threads
16 Needle plate
17 Hook cover plate
18 Hook cover plate release button
19 Extension table (accessory box)
20 Needle position up/down (liftmatic)
21 Reverse stitch push button
22 Speed reducer

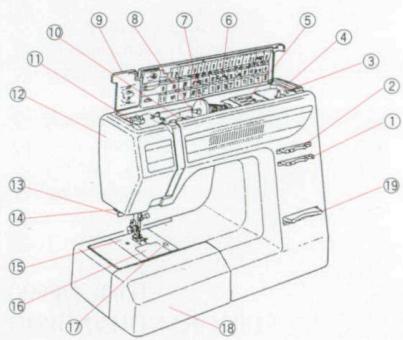
DESIGNATION OF PARTS (Model 3005)
- Stitch length slide
2.2.17.3.1.2.1.4.1.5.1.6.1.7.8.9.10.11.12.13.14.15.16.17.18.19.20.21.22.23.24.25.26.27.28.29.30.31.32.33.34.35.36.37.38.39.40.41.42.43.44.45.46.47.48.49.50.51.52.53.54.55.56.57.58.59.60.61.62.63.64.65.66.67.68.69.70.71.72.73.74.75.76.77.78.79.80.81.82.83.84.85.86.87.88.89.90.91.92.93.94.95.96.97.98.99.
3 Bobbin winder stop
4 Bobbin winder
5 Foot storage compartment
6 Sewing instruction panel
7 Spool holder disc (large)
8 Spool pin
9 Top cover
10 Thread tension dial
11 Foot pressure dial
12 Face plate
13 Buttonhole lever
14 Thread
15 Automatic needle threads
16 Needle plate
17 Hook cover plate
18 Hook cover plate release button
19 Extension table (accessory box)
20 Reverse stitch push button
DESIGNATION OF PARTS (Model 3003)
- Stitch length slide
2.2.17.3.1.2.1.4.1.5.1.6.1.7.8.9.10.11.12.13.14.15.16.17.18.19.20.21.22.23.24.25.26.27.28.29.30.31.32.33.34.35.36.37.38.39.40.41.42.43.44.45.46.47.48.49.50.51.52.53.54.55.56.57.58.59.60.61.62.63.64.65.66.67.68.69.70.71.72.73.74.75.76.77.78.79.80.81.82.83.84.85.86.87.88.89.90.91.92.93.94.95.96.97.98.99.
3 Bobbin winder stop
4 Bobbin winder
5 Foot storage compartment
6 Sewing instruction panel
7 Spool holder disc (large)
8 Spool pin
9 Top cover
10 Thread tension dial
11 Foot pressure dial
12 Face plate
13 Buttonhole lever
14 Thread
15 Needle plate
16 Hook cover plate
17 Hook cover plate release button
18 Extension table (accessory box)
19 Reverse stitch push button
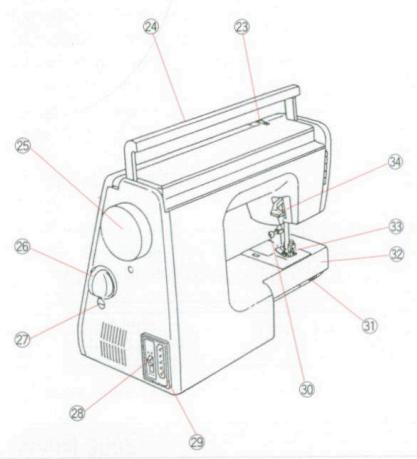
DESIGNATION OF PARTS (Model 3007)
23 Thread take-up lever
24 Carrying handle
25 Balance wheel
26Stitch selector
27 Fine adjustment
28 Power switch
29 Machine socket
30 Needle clamping screw
31 Drop feed lever
32 Free arm
33 Presser foot
34 Presser foot lever
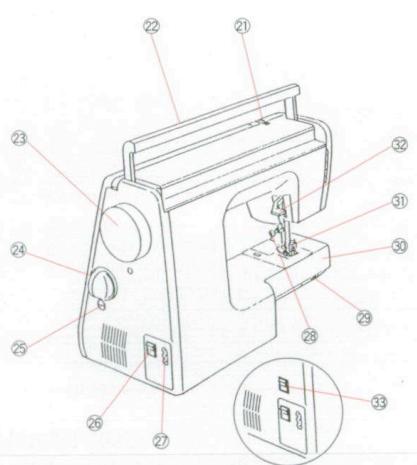
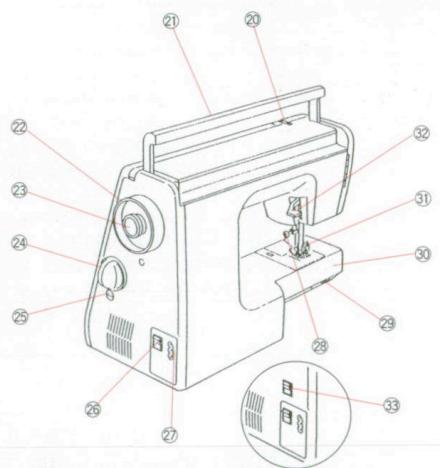
DESIGNATION OF PARTS (Model 3005)
21 Thread take-up lever
22 Carrying handle
23 Balance wheel
24Stitch selector
25 Fine adjustment
26 Power switch
27 Machine socket
28 Needle clamping screw
29 Drop feed lever
30 Free arm
31 Presser foot
32 Presser foot lever
33 Sewing speed switch (for 120 V)
(120 V)
DESIGNATION OF PARTS (Model 3003)
20 Thread take-up lever
21 Carrying handle
22 Balance wheel
23 Coupling knob
24Stitch selector
25 Fine adjustment
26 Power switch
27 Machine socket
28 Needle clamping screw
29 Drop feed lever
30 Free arm
31 Presser foot
32 Presser foot lever
33 Sewing speed switch (for 120 V)
(120 V)
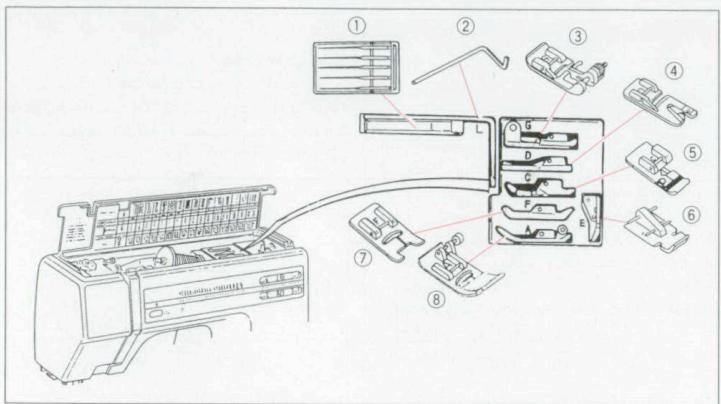
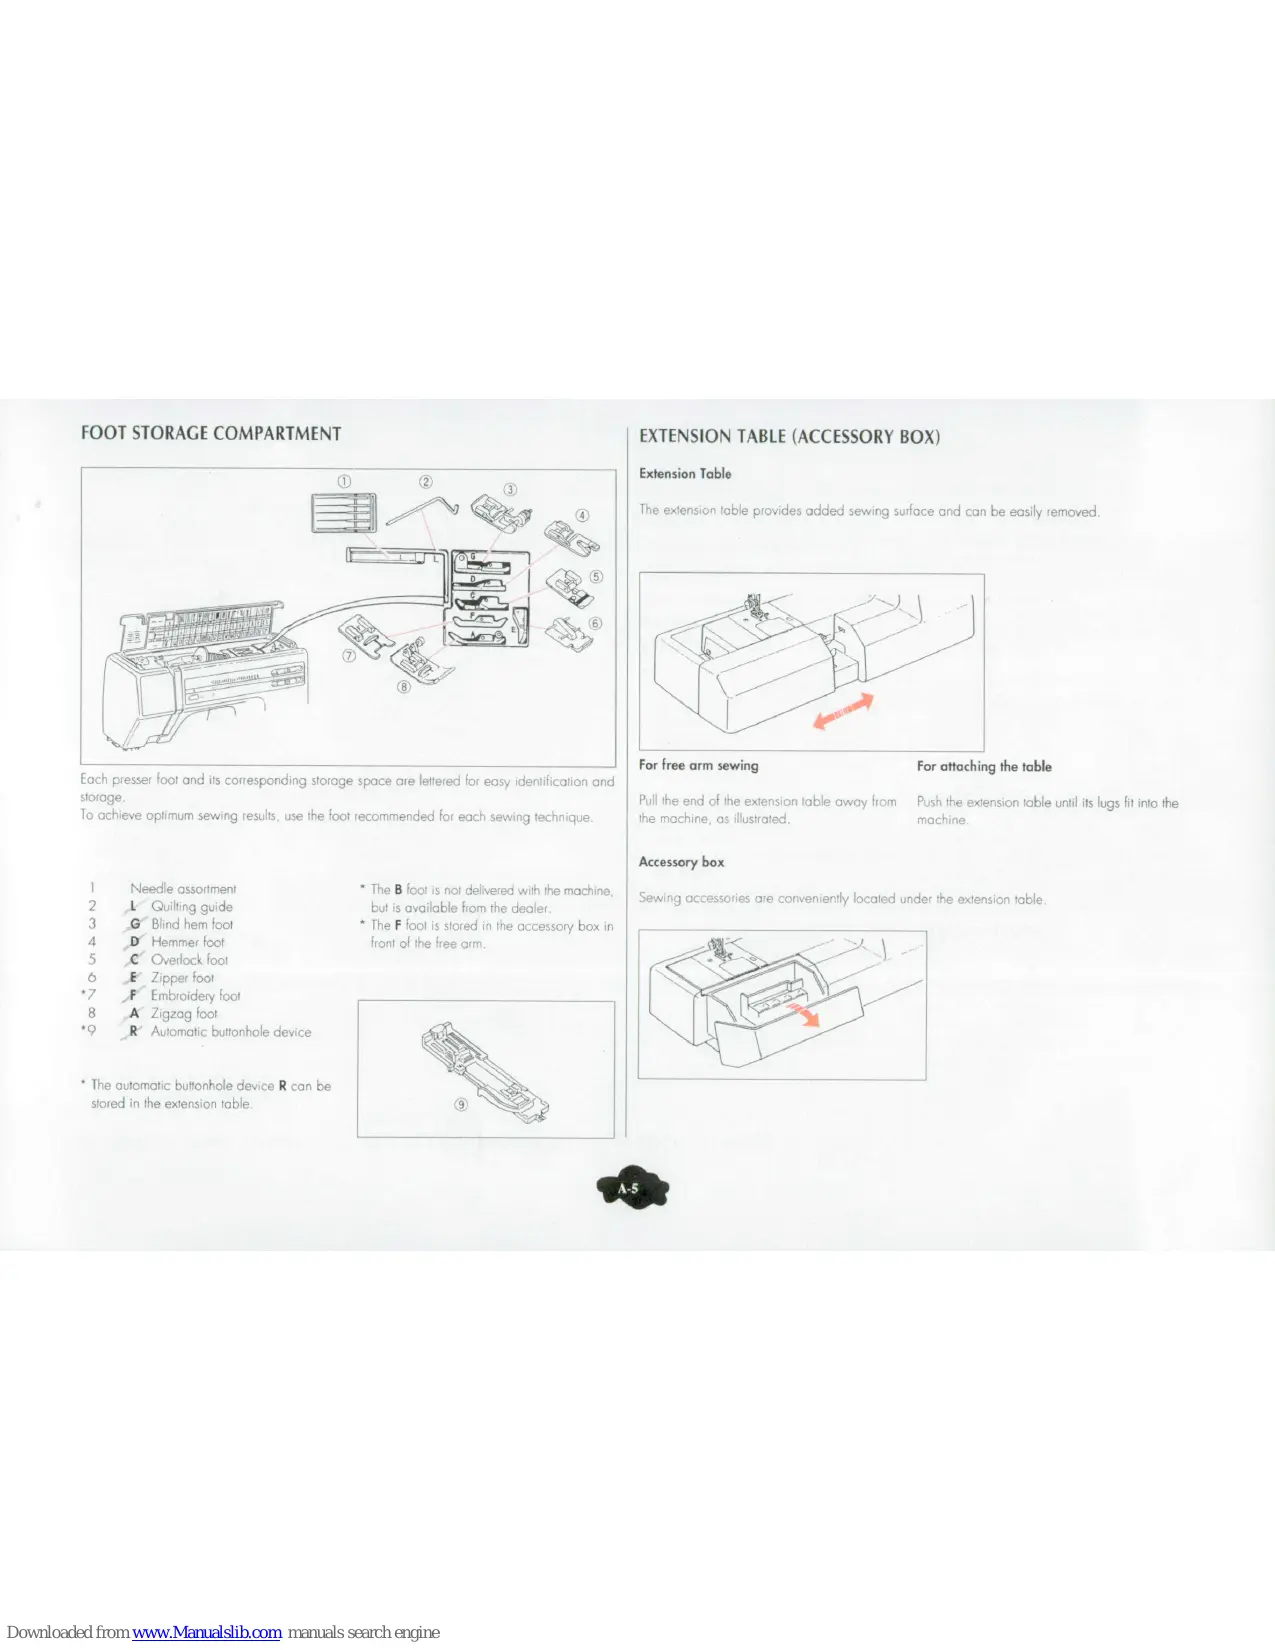
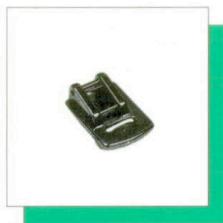
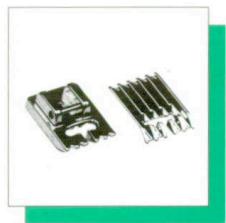
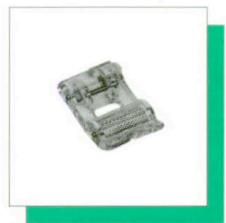
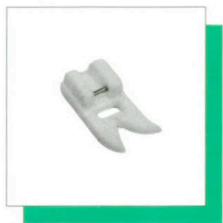
FOOT STORAGE COMPARTMENT
Each presser foot and its corresponding storage space are lettered for easy identification and storage.
To achieve optimum sewing results, use the foot recommended for each sewing technique.
1 Needle assortment
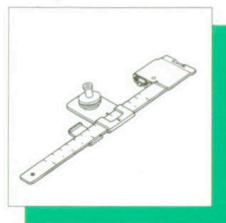
2 L Quilting guide
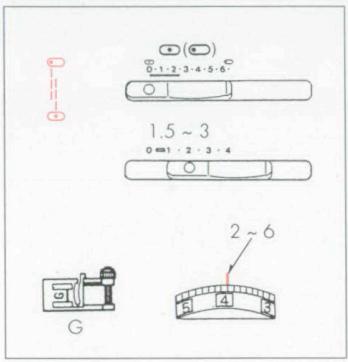
3 G Blind hem foot
4 D Hemmer foot
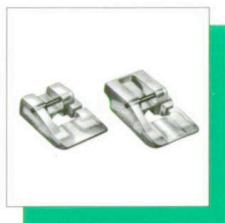
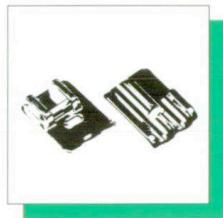
5 C Overlock foot
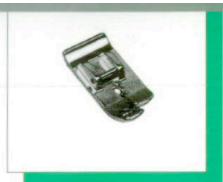
6 E Zipper foot
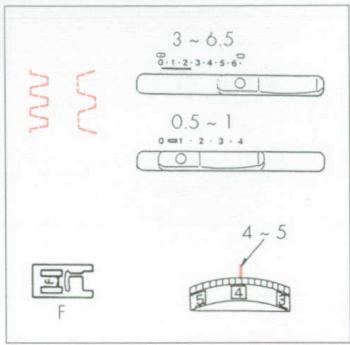
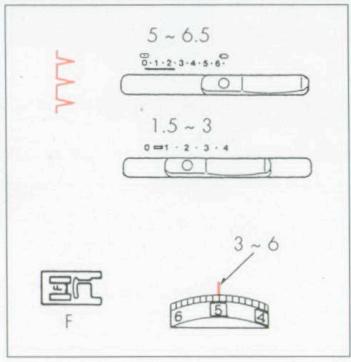
7 F Embroidery foot
8 A Zigzag foot
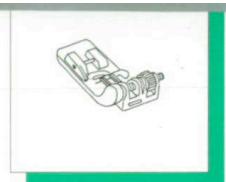
9 R Automatic buttonhole device
-
The automatic buttonhole device R can be stored in the extension table.
-
The B foot is not delivered with the machine, but is available from the dealer.
- The F foot is stored in the accessory box in front of the free arm.
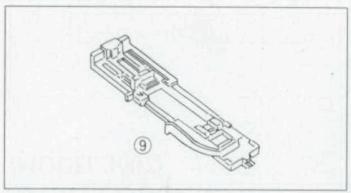
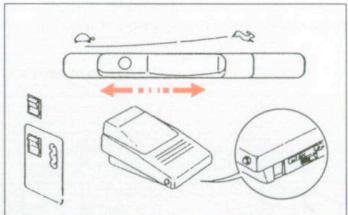
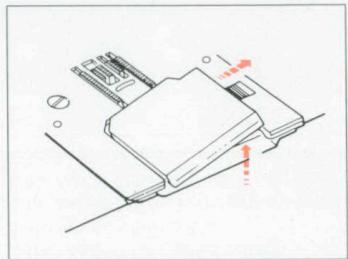
EXTENSION TABLE (ACCESSORY BOX)
Extension Table
The extension table provides added sewing surface and can be easily removed.
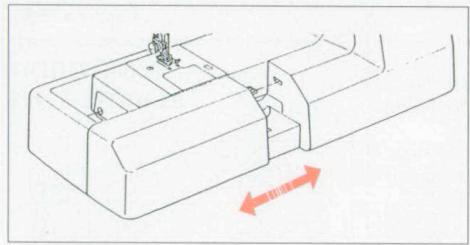
For free arm sewing
Pull the end of the extension table away from the machine, as illustrated.
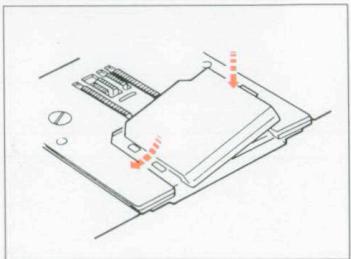
For attaching the table
Push the extension table until its lugs fit into the machine.
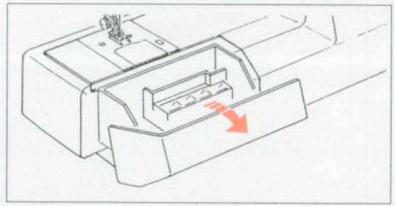
Accessory box
Sewing accessories are conveniently located under the extension table.
II GETTING READY TO SEW
CONNECTING THE MACHINE TO THE POWER SUPPLY
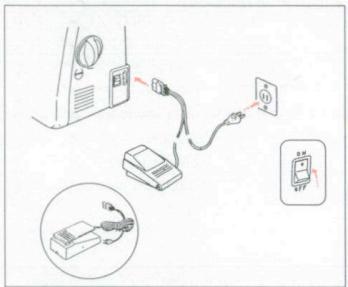
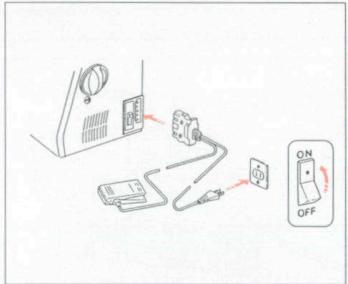
Before connecting, make sure that the voltage of the power supply is identical to that of the machine. With the switch on "OFF", fit the nonreversible plug into the machine socket and plug the machine into the wall socket. Switch it on.
N.B. Make it a habit to switch off the machine when you are not using it.
NEEDLE UP/DOWN (MODEL 3007)
A pressure on this key, when the machine is not running, makes the needle rise or come down. If the needle is in the upper position, it will come down into the fabric and vice versa.
CAUTION: Don't press the foot control whilst the needle up/down key is depressed.
This key is used for:
-Making the bobbin thread come up (down/up), hold the end of the bobbin thread.
- Sewing an angle (make the needle go down before turning the fabric).
Thus it is no longer necessary to turn the balance wheel by hand to raise and lower the needle.
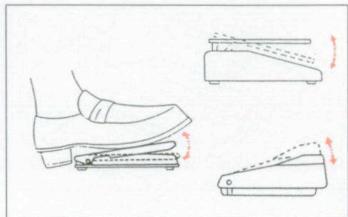
Sewing speed can be varied by the foot control. The harder you press on the control, the faster the machine runs.
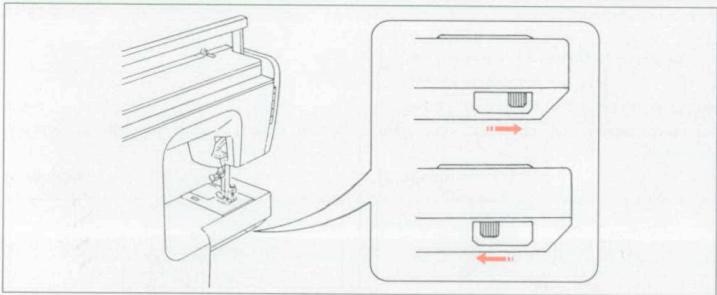
SPEED REDUCER MODEL 3007
The sewing speed range can be varied by the speed reducer.
For a higher speed, slide it to the right, for a lower speed slide it to the left.
MODELS 3003 + 3005
The sewing speed range can be varied by the switch situated on the front of the foot control.
For high speed, set the switch at "HIGH" (230 V) or "..." (120 V).
For low speed, set the switch at "LOW" (230 V) or "O" (120 V).
- Do not move the switch when the machine is running.
SEWING LIGHT
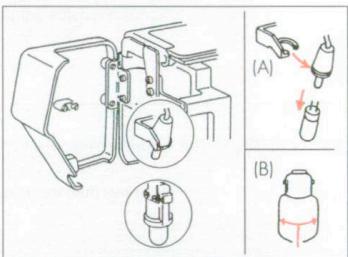
The sewing light is located behind the face plate.
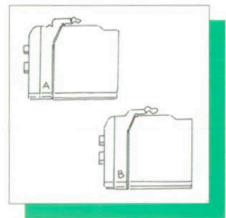
(A)To remove Pull out.
To replace Push in while the pins are in line with the holes of light socket.
(B) To remove Push and turn to the left. To replace Push and turn to the right.
N.B. When replacing the bulb, unplug the machine. Use a bulb of:
(A) Halogen lamp: 12.3V / 3W .
(B) Tungsten lamp: 1.5 W max.
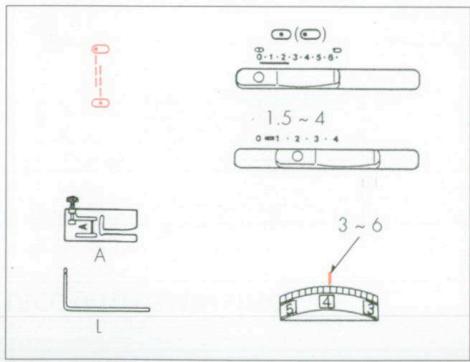
FOOT PRESSURE
The pressure dial should be set at "3" for regular sewing.
Reduce the pressure to "2" for applications and very stretchy jackets.
Reduce the pressure to "1" when sewing knits, to avoid distortion.
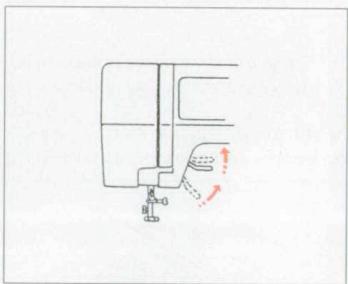
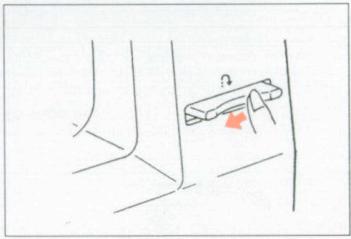
DROPPING THE FEED DOG
The drop feed lever is located under the free arm.
To raise the feed dog, push the lever in the direction of the arrow, as illustrated. To lower the feed dog, push the lever in the direction of the arrow, as illustrated.
- The feed dog must always be up for normal sewing.
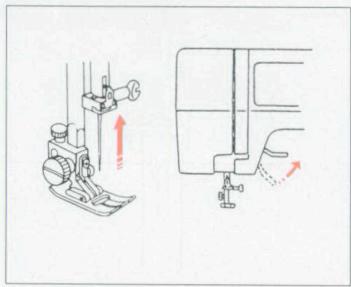
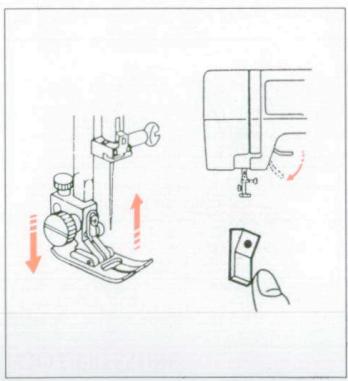
TO SNAP OFF AND ON THE PRESSER FOOT
To snap off:
Press the up/down needle position key (model 3007) or turn the balance wheel towards you to raise the needle to its highest position.
Raise the presser foot.
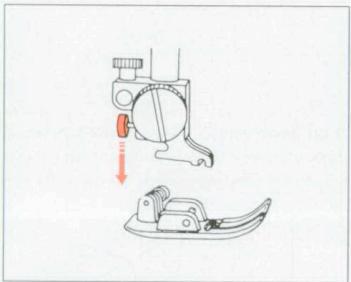
To snap on:
When attaching the foot, the pressure dial should always be on "3".
Place the presser foot so that the pin of the foot lies just under the groove of the foot holder. Lower the foot holder to lock the foot in place.
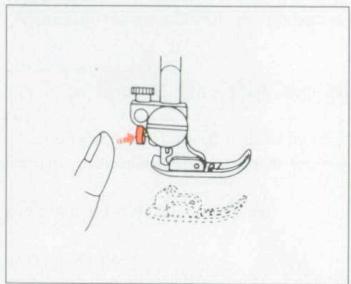
Press the red button behind the foot holder. The presser foot will drop off.
"Additional Clearance"
The presser foot can be raised higher for additional clearance when placing thick woollens.
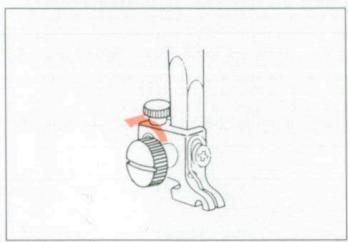
To remove:
Unscrew counter-clockwise, using a screwdriver.
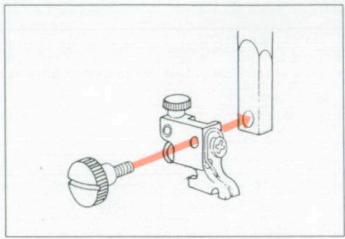
To attach:
Align the hole in the foot holder with the threaded hole in the presser bar and fit the foot holder screw into the hole. Tighten the screw by turning it clockwise.
SEWING IN REVERSE
As long as you keep the reverse stitch push button depressed, the machine sews backwards.
SEAM GUIDE

The numbers on the needle plate indicate the space between the line and the left needle position.
The numbers at the front are in millimeters. The numbers at the back are in inches.
CHANGING THE NEEDLE
Raise the needle by turning the balance wheel towards you or by pressing the up/ down needle position key (model 3007). Lower the presser foot.
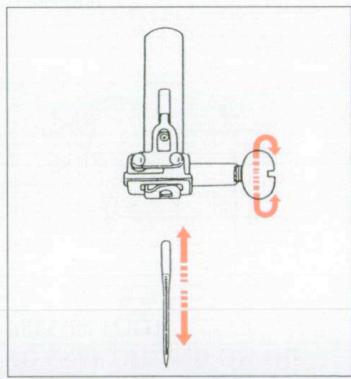
Loosen the needle clamping screw by turning it counter-clockwise.
Remove the needle from the clamp.
Insert the new needle into the clamp with the flat side to the rear, pushing it up as far as it will go.
Tighten the clamping screw firmly, with the screwdriver, if needed.
- Check the needle regularly for barbed or blunted point. A defective needle may spoil your fabrics.
FABRICS, THREADS AND NEEDLES
| Fabrics | Threads | Needles |
| Light weight | Crepe de Chine, Voile, Lawn, Georgette, Organdie, Tricot, Mesh, Percale | Fine Silk Fine Cotton or Synthetic Thread | 10/70 or 11/75 or 12/80 |
| Medium weight | Linen, Cotton, Piqué Woollens, Double Knits, Percale | Medium Weight Cotton or Synthetic Thread | 12/75 or 12/80 or 14/90 |
| Heavy weight | Denim, Tweed, Gabardine, Coating, Drapery and Upholstery Fabrics | Sewing Silk, Heavier Cotton or Synthetic Thread | 12/80 or 14/90 |
For best results, use needles and threads that are adapted to the fabrics. For finer fabrics, fine needles and threads, for heavier fabrics, stronger needles and threads.
Use the same thread for needle and bobbin.
When sewing stretch, very fine fabrics and synthetics, use a needle with blue shank. This needle prevents skipped stitches.
When sewing very fine fabrics, reinforce the reverse side with fusible interlining or very fine paper that will be torn off after.
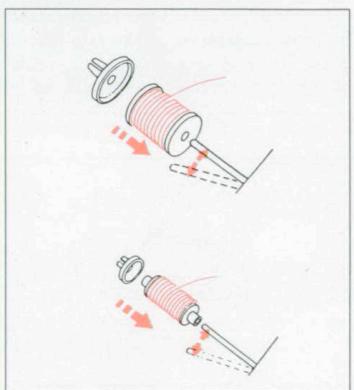
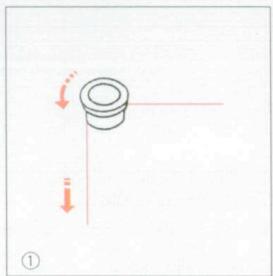
PLACING THE THREAD SPOOL
Lift up the spool pin as shown. Place the matching spool holder on the spool and lower the spool pin.
* The small spool holder is used with narrow thread spools.
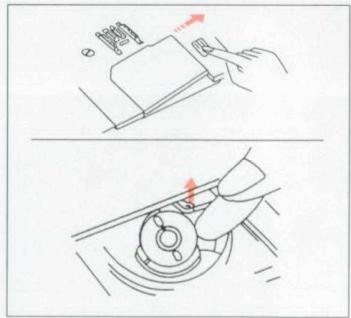
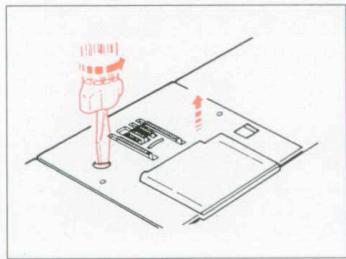
REMOVING THE BOBBIN
Push the hook cover plate button to release the cover plate.
Lift out the bobbin.
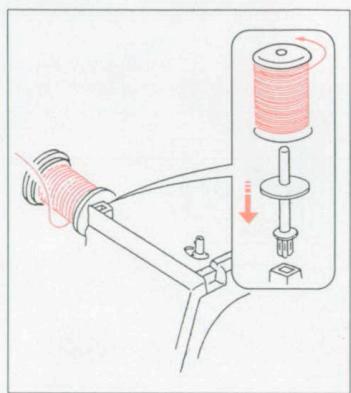
ADDITIONAL SPOOL PIN
The additional spool pin is used for sewing with 2 needles or to wind the bobbin without
unthreading the machine.
Place the felt on the spool pin.
WINDING THE BOBBIN (Model 3003)
- Pull out the coupling knob to disengage the needle motion.
- Draw the thread from the spool.
- Engage the thread into the thread guide.
- Guide the thread around the bobbin winder thread guide.
- Pass the thread through the hole in the bobbin.
- Place the bobbin on the bobbin winder and push it to the right.
- Hold the end of the thread and depress the foot control for a couple of turns. Cut the thread. Depress the foot control. The bobbin will stop automatically when it is full.
- Push the bobbin winder back to the left, take off the bobbin and cut the thread.
- Push the coupling knob on the balance wheel to reengage the needle motion.
- The machine will not sew until the coupling knob is pushed in.

INSERTING THE BOBBIN
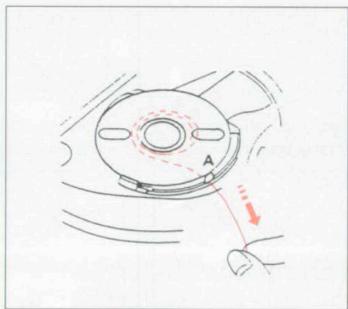
Place the bobbin in the bobbin case with the thread running counter-clockwise.
Guide the thread into the notch "A" on the front. Hold the bobbin with your right hand and pull the thread to the left and through the tension spring blades.

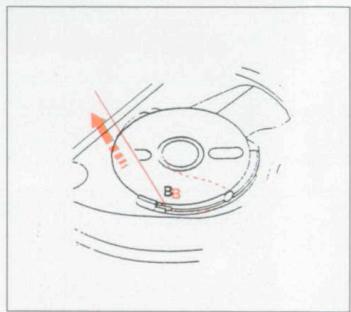
Keep slowly pulling the thread until it slides into the notch "B".
Pull out about 15cm(6^ ) of thread and refit the hook cover plate.
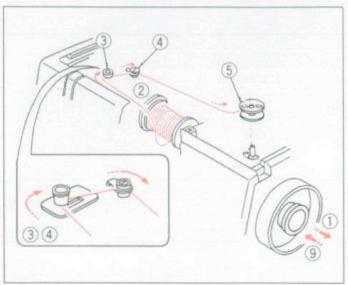
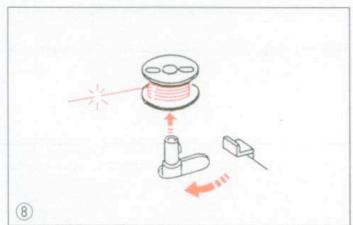
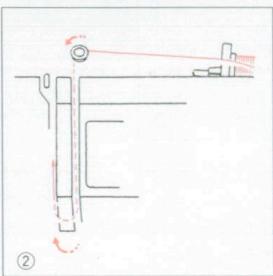
WINDING THE BOBBIN (Models 3005 + 3007
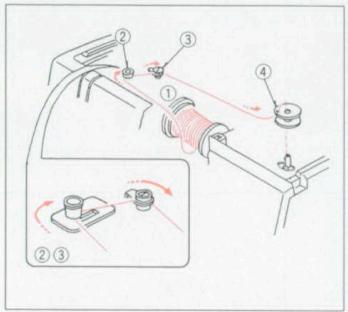
- Draw the thread from the spool.
- Engage the thread into the thread guide.
- Guide the thread around the bobbin winder thread guide.
- Pass the thread through the hole in the bobbin.
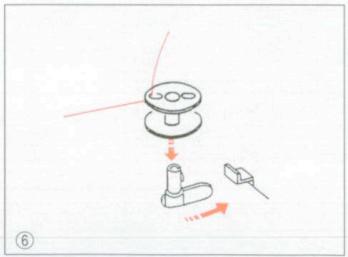
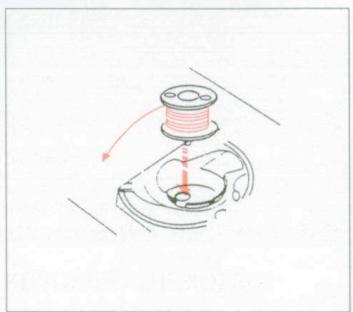
- Place the bobbin on the bobbin winder and push it to the right.
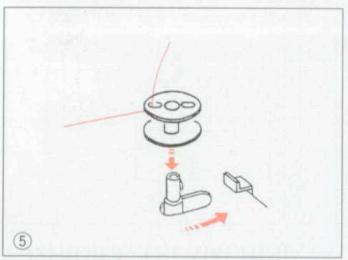
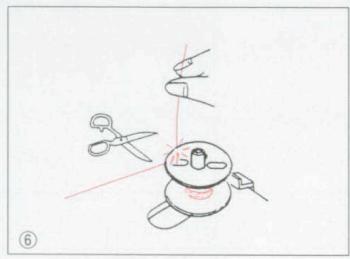
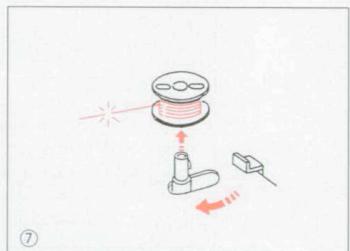
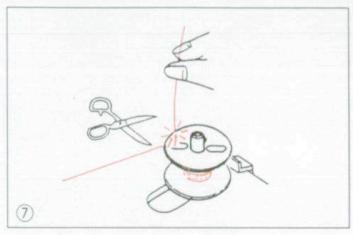
- Hold the end of the thread and depress the foot control for a couple of turns. Cut the thread. Depress the foot control. The bobbin will stop automatically when it is full.
- Push the bobbin winder back to the left, take off the bobbin and cut the thread.
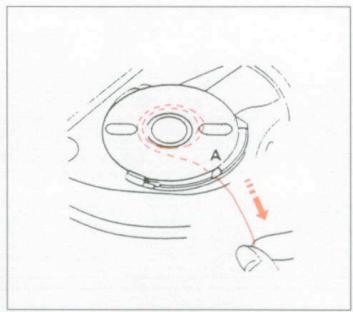
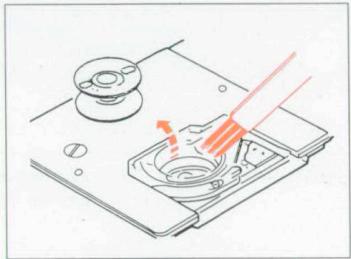
INSERTING THE BOBBIN

Place the bobbin in the bobbin case with the thread running counter-clockwise.
Guide the thread into the notch "A" on the front. Hold the bobbin with your right hand and pull the thread to the left and through the tension spring blades.
Keep slowly pulling the thread until it slides into the notch "B".
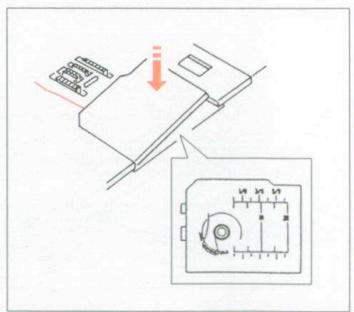
Pull out about 15cm(6^ ) of thread and refit the hook cover plate.

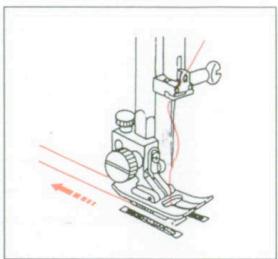
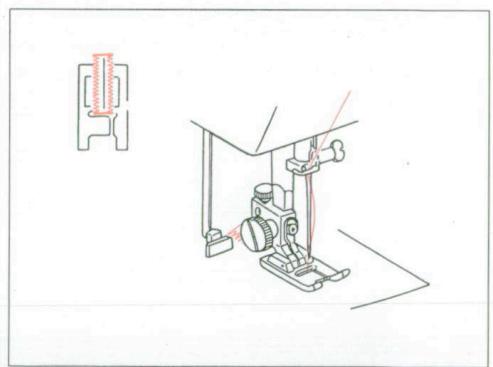
THREADING THE MACHINE

Raise the take-up lever to its highest position by turning the balance wheel towards you.
Raise the presser foot, then pass the thread in the order from 1 to 5.
- Pass the thread into the thread guide and draw it down along the right slot.
- Pass the thread around the thread guide and up again in the left slot.
- Firmly draw the thread from right to left into the take-up lever eyelet.
- Slide the thread to the left behind the thread guide on the needle bar.
Model 3003:
- Draw about 15 cm (6") of thread through needle eye.
Models 3005 + 3007:
- Thread the needle by using the needle threader (see page A-13).
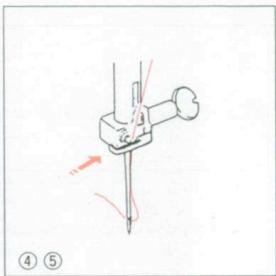
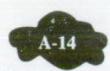
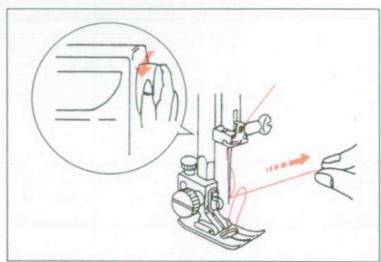
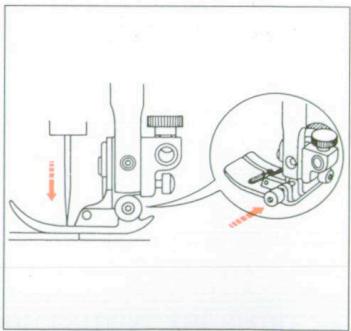
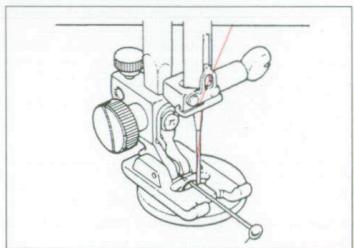
AUTOMATIC NEEDLE THREADER (MODELS 3005 + 3007)
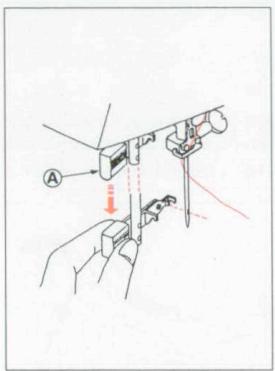
(Model 3005): Turn the balance wheel towards you to raise the needle to the highest position. Pull 15cm(6^ ) of thread.
(Model 3007): By pressing the up/down needle position key, raise the needle to its highest position. Pull 1.5cm(6^ ) of thread. Pull the automatic needle threads down as far as it will go.
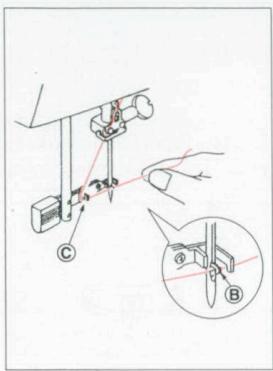
Turn the knob A in the direction of the arrow in the illustration, then insert the hook B into the needle eye. Lead the thread around the guide C and under the hook B.
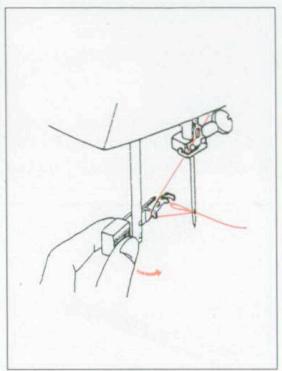
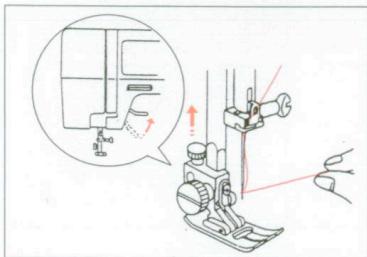
Turn the knob A in the direction of the arrow in the illustration, then draw the thread loop to the back of the needle.
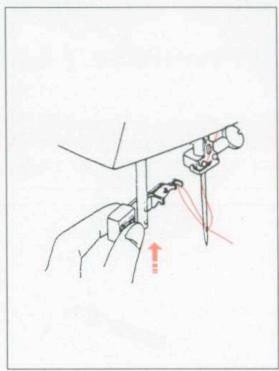
Raise the needle threads knob A slowly to draw the thread loop up.
Pass the end of the thread through the needle eye by pulling the thread loop to the back.
- The needle threader can be used with needles No. 11/75, 12/80, 14/90, 16/100 and needles with blue shank.
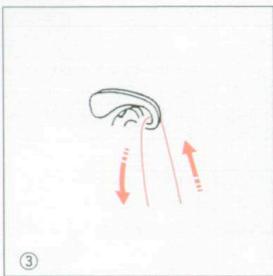
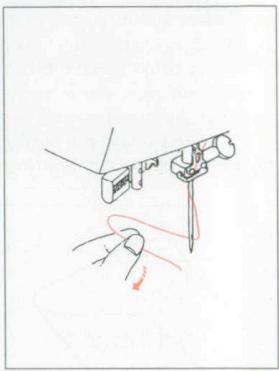
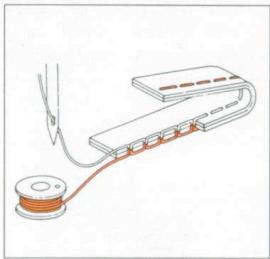
DRAWING UP THE BOBBIN THREAD
Raise the presser foot and hold the needle thread lightly with your left hand.
(3007): Press the up/down needle position key twice.
(3003 + 3005): Turn the balance wheel towards you until the needle has risen and the take-up lever is at its highest position.
Lightly draw up the needle thread forming a loop of the bobbin thread.
Pull both threads to the left and under the presser foot, leaving 10cm (4^ )
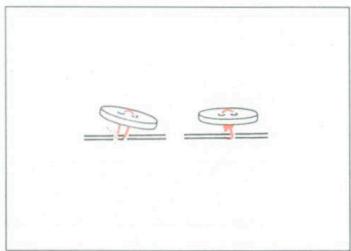
BALANCING THE THREAD TENSION
In straight seams, the needle thread and the bobbin thread should interlock in the center of the two layers of fabric.
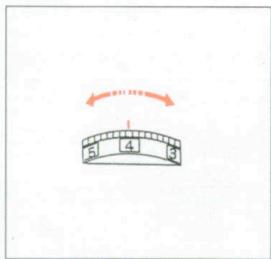
Turn the thread tension dial until the desired number is facing the setting mark.
Loosen the needle thread tension by moving the dial to a lower number.
Tighten the needle thread tension by turning the dial to a higher number.
Adjusting the Thread Tension for Zigzag and Embroidery.
The upper thread tension should be slightly weaker when sewing a zig-zag or a pattern based on the satin stitch. The upper thread should appear slightly on the reverse side of the fabric.
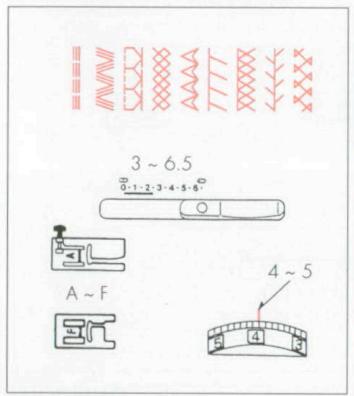
PATTERN SELECTION

Select a pattern by turning the stitch selector. The red signal confirms the chosen pattern.
N.B. The needle must be in the upper position when you turn the stitch selector.
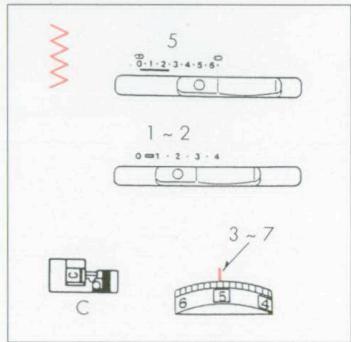
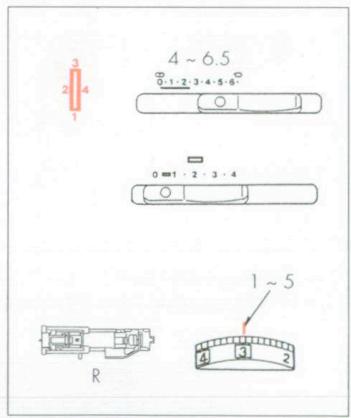
STITCHWIDTH
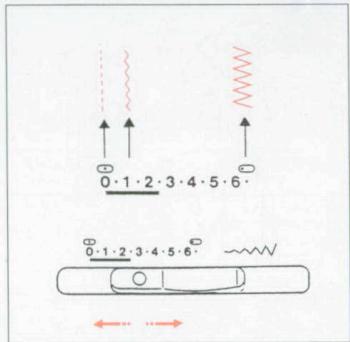
The higher the number, the wider the stitch. This machine can sew stitches of a maximum width of 6.5mm (1 / 4^ )
* For adjusting the stitch width, the needle must be in the upper position, i.e. out of the fabric.
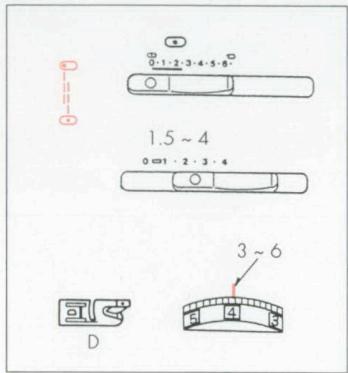
STITCH LENGTH
The higher the number, the longer the stitch. For a fine fabric, a stitch length of 1.5 to 2.5 is preferable. For a thicker fabric, a stitch length of 2.5 to 4.0 is indicated.
N.B. The stitch length is automatic and cannot be modified as from the triple seam onward.
DECENTERING THE NEEDLE
The straight stitch and the triple seam may be decentered to the left by using the stitch width slide.

III BASIC SEWING
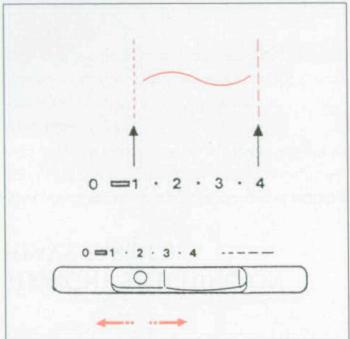
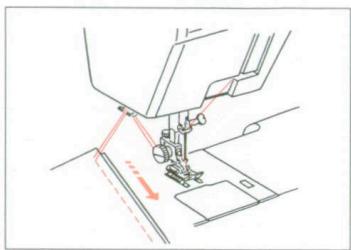
STRAIGHT STITCH
Raise the presser foot and place the fabric next to the guide line on the needle plate.
Smooth the threads to the left and lower the presser foot. Depress the foot control.
Gently guide the fabric along the guide line.
To secure the ends of the seams, press the reverse stitch button and sew a few stitches.
Raise the presser foot and remove the fabric pulling the threads to the rear.
- The needle must be in its highest position when removing the fabric.
The thread cutter cuts the threads to the proper length for starting the next seam.
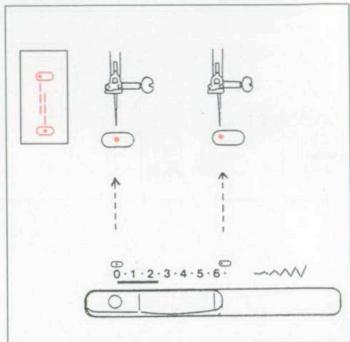
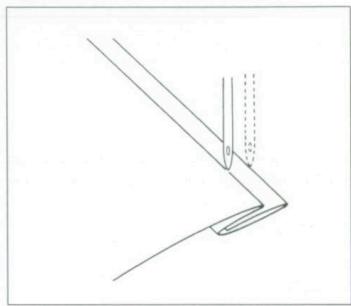
SEWING AN ANGLE
Stop the machine.
(3003 + 3005) : Turn the balance wheel towards you to bring the needle down into the fabric.
[3007]: Lower the needle into the fabric by pressing the needle up/down key. Raise the presser foot.
Pivot the fabric around the needle to change the sewing direction. Lower the presser foot and continue sewing.
Lower the needle into the fabric at the starting point. Press the small black button on foot A with your left hand thus giving extra weight to the presser foot.
Lower the presser foot with your right hand, maintaining the pressure on the black button with your left hand. Release the black button and start sewing.
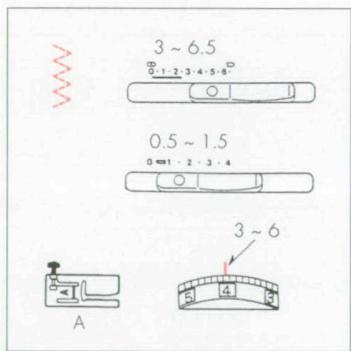
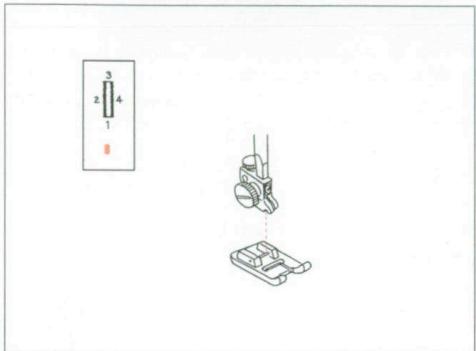
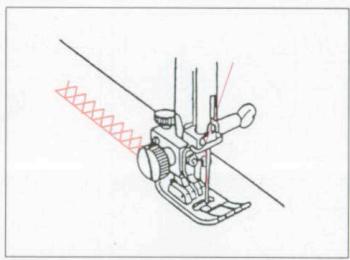
ZIGZAG STITCH

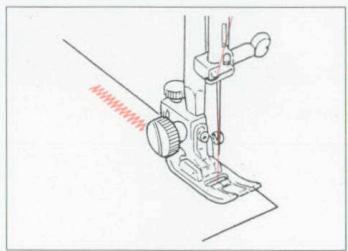
Simple zigzag stitching is used For overcasting and sewing on buttons.
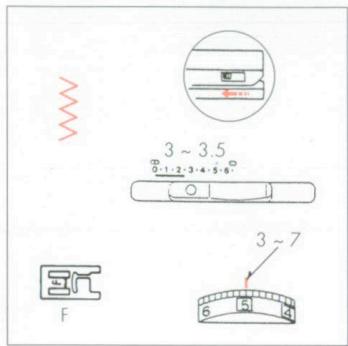
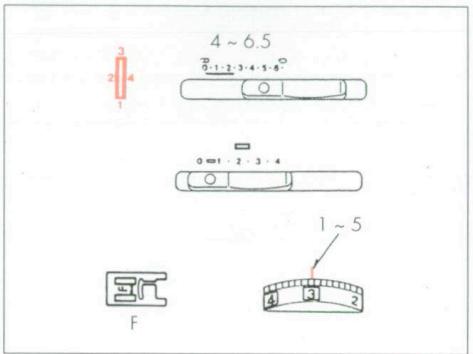
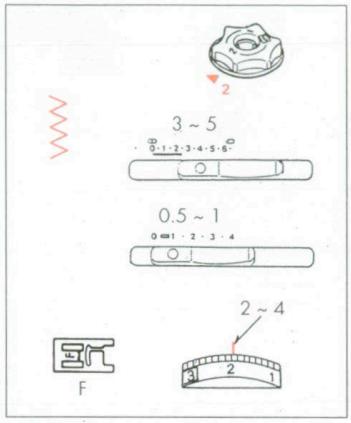
N.B. For a decorative satin stitch, use transparent foot F, reduce stitch length between 0.3 and 0.5 and thread tension between 2 and 3.
IV UTILITY STITCHES
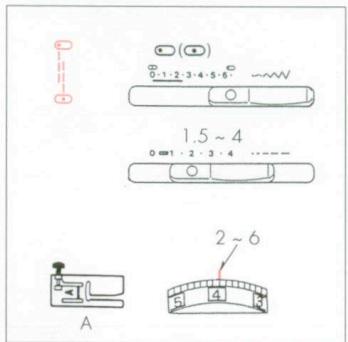
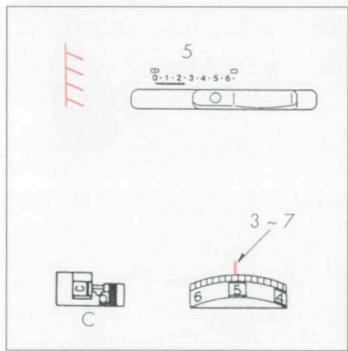
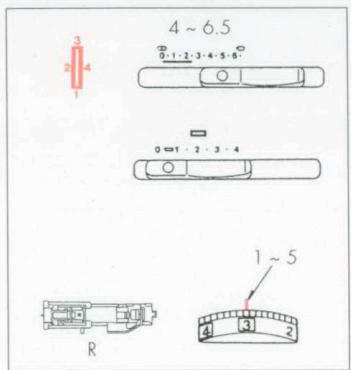
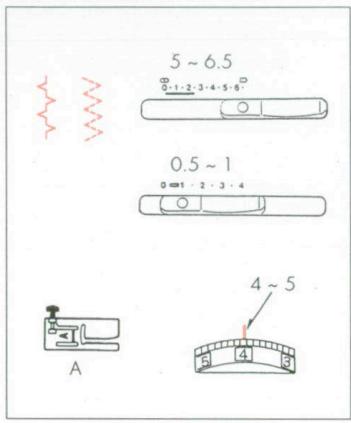
QUICK OVERCASTING
The C foot prevents the fabric from rolling, when overcasting.
Place the fabric next to the black guide on the right. Minimum stitch width 5.
ASSEMBLING STRETCH FABRICS (MODEL 3007)
For assembling and overcasting stretch fabrics and jackets in one operation.
For light jersey, the C foot keeps the fabric flat. Place the edge of the fabric next to the black guide on the right.
Use the F foot for sewing inside the fabric. N.B. To prevent distortion in jeans, reduce the foot pressure (see page A-7).
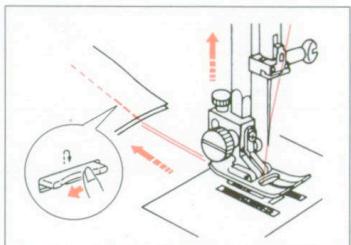
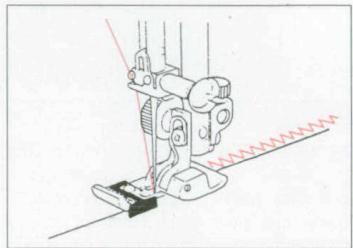
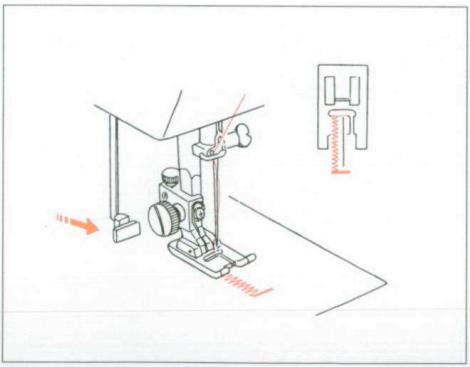
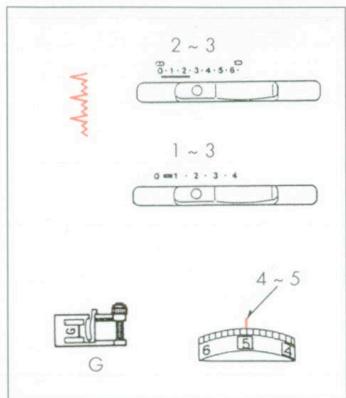
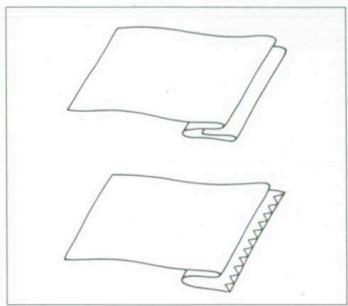
OVEREDGE STITCH

This stitch is useful to prevent raw edges from fraying.
Place the fabric under the presser foot, so that the right edge runs along the brim of the transparent part.
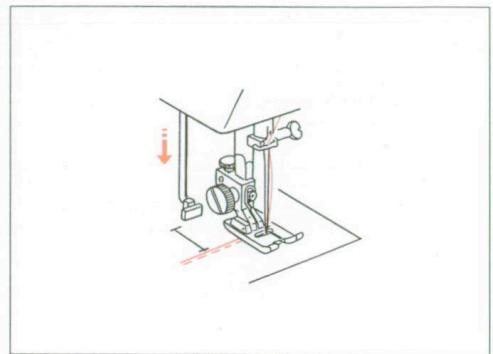
DOUBLE OVERCASTING
This stitch is useful for fabrics which tend to fray. Place the edge of the fabric next to the black guide on the right.
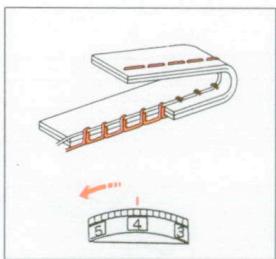
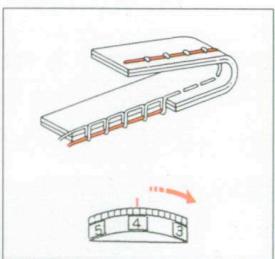
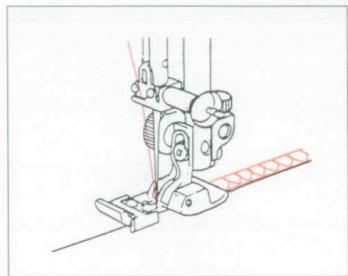
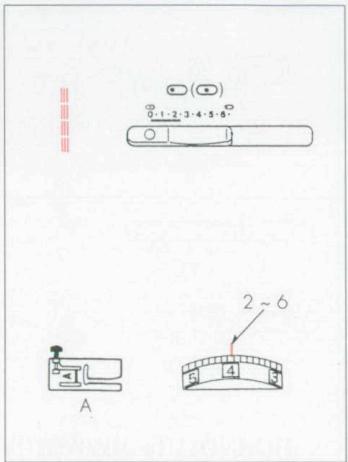
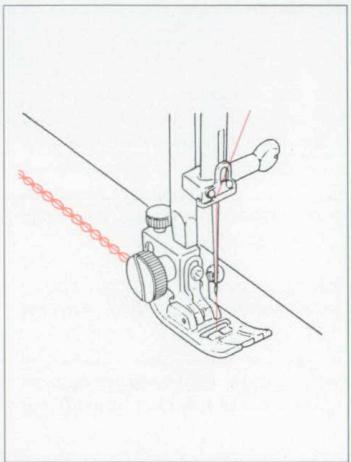
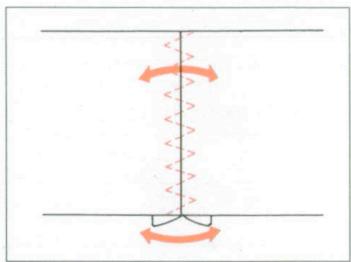
ELASTIC STITCH
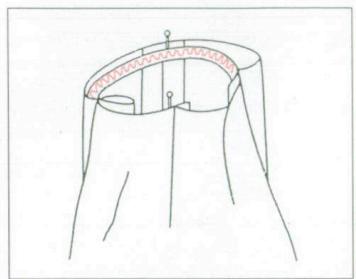
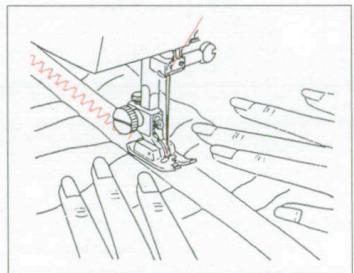
Choose this stitch to attach elastic to garments.
1. Mark the elastic into quarters and match these to the center front, center back and side seams.
2. Place the middle of the elastic under the center of the presser foot and stitch into place, making sure the elastic is evenly distributed.
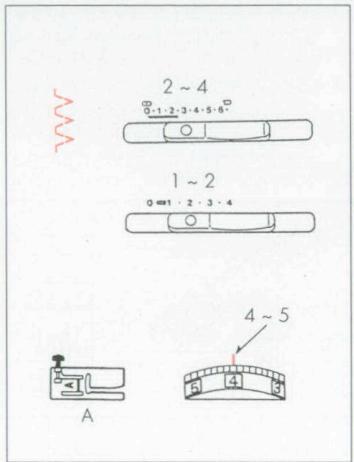
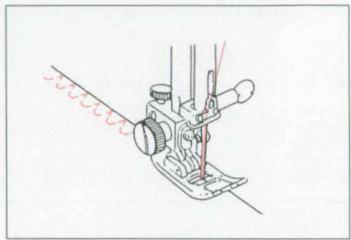
TRIPLE SEAM
This reinforced and extensible seam is recommended for armholes, working garments and sports-wear.
This stitch is sewn with 2 stitches forward and 1 stitch backward, forming a very solid seam.
Garments should be basted and tried before final sewing.
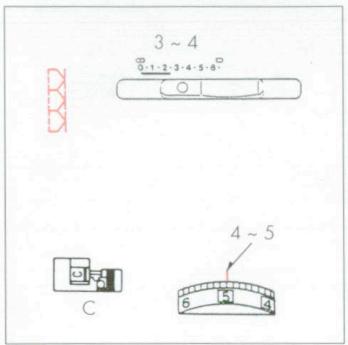
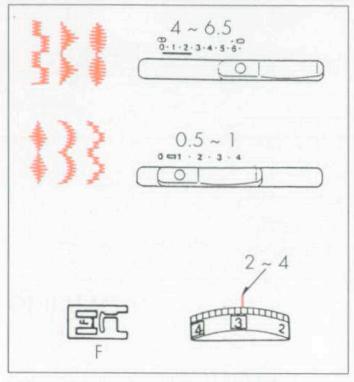
INTERLOCK SHELL STITCHING
For shell stitching on blouses and lingerie. This stitch can also be used as a single overlock stitch.
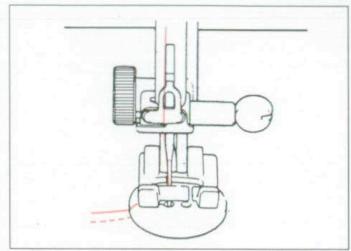
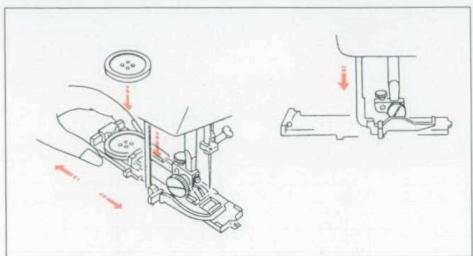
Push the lever to the right to drop the feed dog.
Place the button on the fabric and lower the needle into the left hole by turning the balance wheel.
Lower the foot.
Make sure that the needle stitches well into the right hole. If necessary, adjust the width.
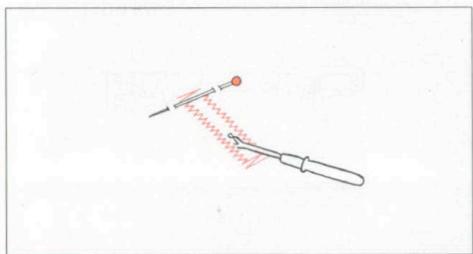
Sew a few stitches. When sewing on buttons with a shank, place a pin over the foot. To reinforce the shank, cut the threads leaving a 20cm (8^ ) tail. Draw the thread through one
of the holes, wind it round the shank and knot it safely on the wrong side.
N.B. Bring the feed dog back to its original position by pushing the lever to the left. The feed dog will raise automatically when turning the balance wheel.
- The size of the buttonhole its automatically set to the size of the button when the latter is placed into the buttonhole device R.
- The button holder of the device takes a button up to a 2.5 cm (1") size on its rear end.
- Make a test buttonhole on a sample of your fabric lined with interfacing.
- Mark the starting point of the buttonhole.
- Use interfacing for stretchable and fine fabrics.
(3003 + 3005): Turn balance wheel towards you or (3007) depress the needle up/down key to raise the needle to its highest position.
Raise the presser foot.
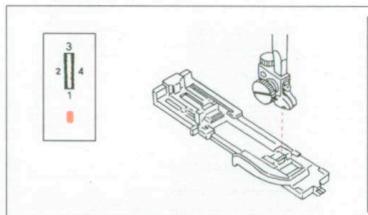
Turn stitch selector to "BH".
- If the indicator light is already on "BH" reset the machine according to the instructions on page A-21.
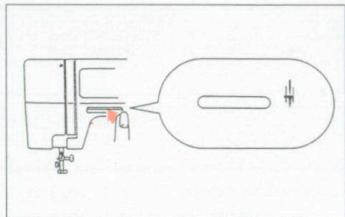
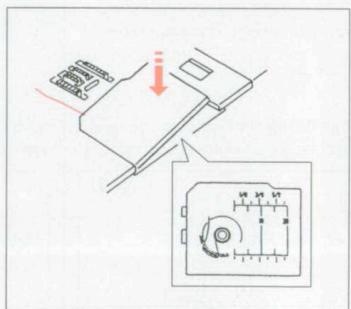
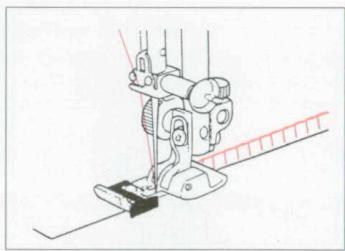
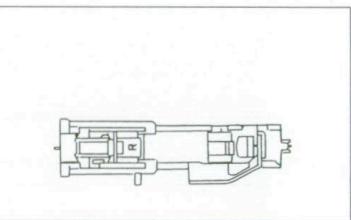
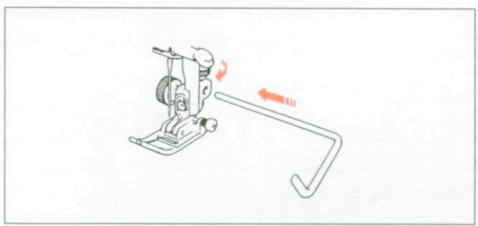
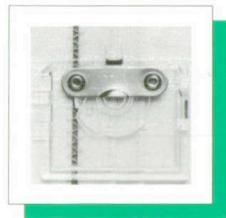
Attach the automatic buttonhole device R
NOTE: There should be no gap between the presser foot and the front of the device, see illustration.
Pull the button holder to the back and place the button.
Push the button holder firmly back to secure the button.
Pull down the buttonhole lever as far as it will go.
Pass the needle thread under the presser foot.
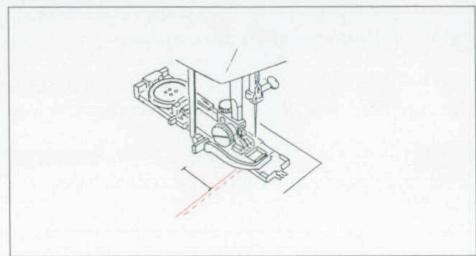
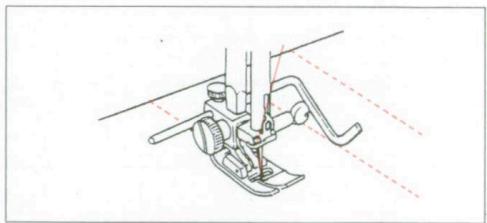
Place the fabric under the presser foot.
Turn the balance wheel towards you, until the needle descends exactly at the starting point of the buttonhole.
Lower the presser foot.
- The buttonhole starts with the bartack. The left row is sewn backwards.
Cut threads at 10cm(14^ ) Pass the needle thread to the wrong side of the fabric by pulling the bobbin thread. Knot the threads.
To repeat a buttonhole:
After the buttonhole is sewn, select stitch "1" and return to "BH" to be at the starting point of the buttonhole.
Models 3003 + 3005:
Sew slowly and stop the machine at the starting point when a buttonhole is completed.
Model 3007:
Depress the foot control until the machine stops by itself.
When the buttonhole is completed, the "BH" indicator light will flash.
When buttonhole sewing is finished, raise the buttonhole lever to its initial position.
*Buttonholes for buttons with a diameter of more than 2.5cm 1") have to be sewn manually.
(3003 + 3005) : Turn the balance wheel towards you or (3007) depress the needle up/down key to raise the needle to its highest position. Raise the presser foot.
Turn the selector dial to "BH" for the buttonhole.
* If the indicator light is already on "BH", reset the machine according to the instructions on page A-21. Attach the F foot.
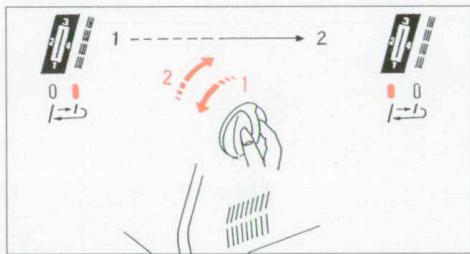
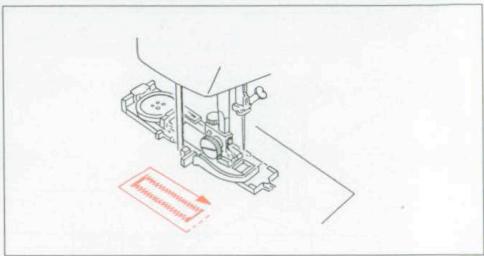
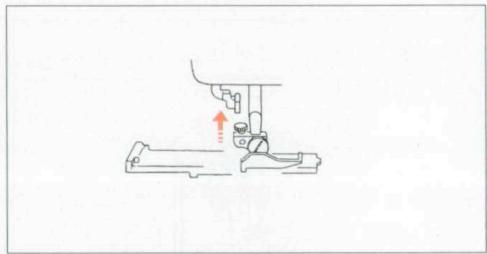
Sew the first bartack and the left row to the desired length. Pull the buttonhole lever towards you:
Sew the second bartack and the right row. Stop when you reach the first bartack.
* To open the buttonhole and start the next one, refer to the instructions on page A-21.
Pull down the buttonhole lever completely. Lower the needle into the fabric at the starting point of the buttonhole and lower the foot.
- Adjust the stitch width to the thickness of the cord used.
- To open the buttonhole and start the next one, refer to the instructions on page A-21.
With the buttonhole foot raised, hook the cord on the cord spur at the back of the foot. Lead the two ends of the cord towards you and under the foot, with the tails showing in front.
Pass the ends into the forks at the front of the foot and hold them tightly.
Lower the needle into the fabric at the starting point, then lower the foot.

Sew the buttonhole according to the instructions given on pages A-20 and A-21.
Remove the garment from the machine and secure the threads.

Pull the left end of the piping cord to make disappear the loop at the rear.
Cut flush the cord ends.
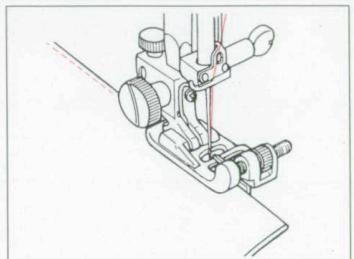
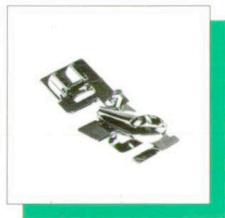
ZIPPER INSERTION
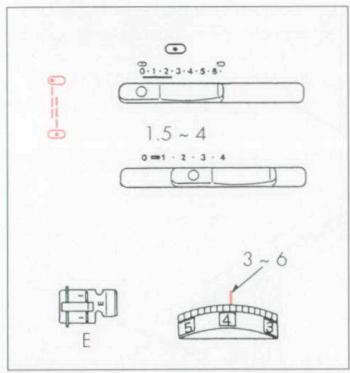
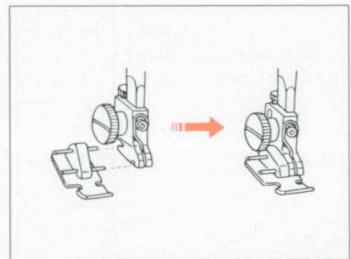
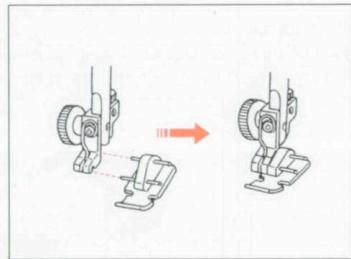
The zipper foot E can be attached either on the left or on the right, depending on the way the zipper is fixed on the garment.
Preparing the fabric:
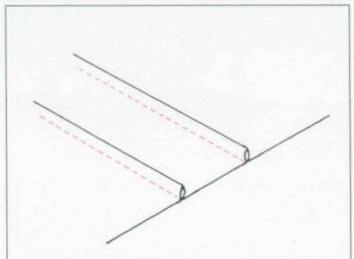
Prepare an open seam and sew both fabrics together, right side against right side to the height of the opening.
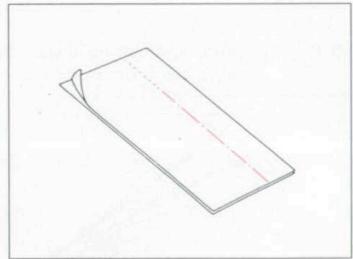
Baste the opening and iron. Remove the bast ing threads.
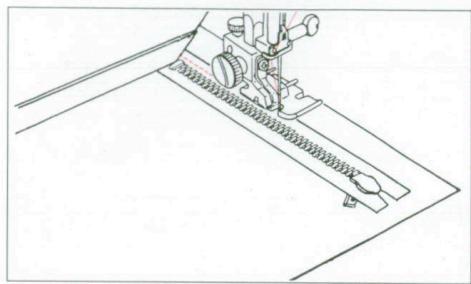
Start on the visible side of the zipper. The foot is on the right side.
Place the closed zipper, right side against right side of the fabric, so that the zipper teeth run along the fold of the fabric. Pin and baste.
Start sewing from the lower end, using the tape as a guide for the edge of the foot; the zipper remains closed.
Before stopping to sew, lower the needle into the fabric, lift the presser foot and open the zipper by pulling the slide. Lower the presser foot to finish the seam.
Close the zipper and pin the other side of the fabric onto the fastener taking care that it is well covered. It is preferable to baste first.
Start sewing from the lower end, with the zipper closed.
Finish by opening the zipper as indicated before. If the zipper is covered from the other side, attach the foot on the left.
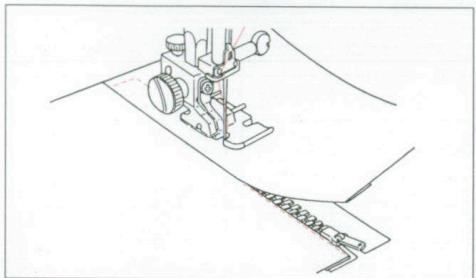
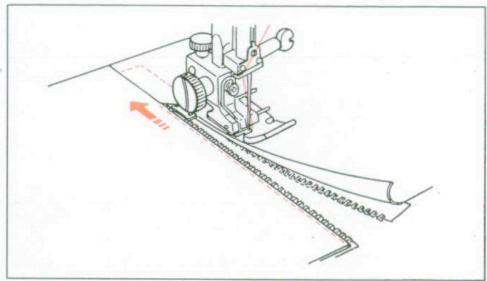
NARROW HEM
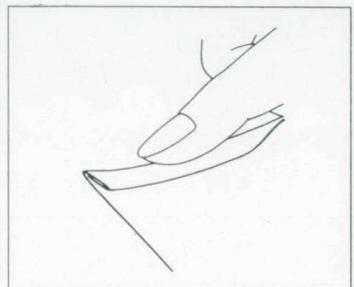
Make a double fold of 2.5mm (1 / 8^) over a length of about 8cm [3^] .
Lower the needle into the fabric at the starting point, then lower the hemmer foot D. Sew 2 or 3 stitches while holding both threads.
Lower the foot, then sew, carefully guiding the fabric so that it remains in the spiral.
Lower the needle into the fabric, lift the presser foot and insert the folded portion into the spiral of the foot.

Trim about 7mm (1 / 4^ ) from the corners, as illustrated, to reduce bulk.
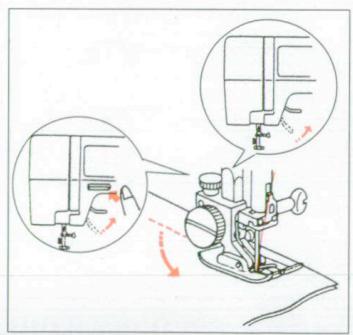
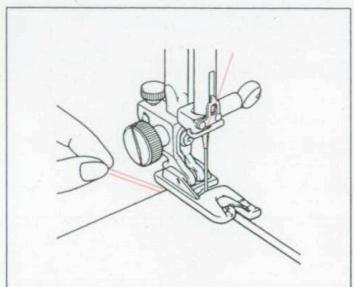
BLIND STITCH
On light fabrics, the raw edge can be turned under and pressed. On heavy fabrics that tend to fray, the row edge should be overcast first.
Iron the hem at the required height.
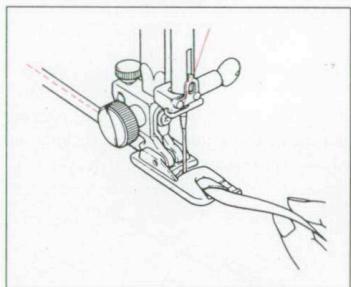
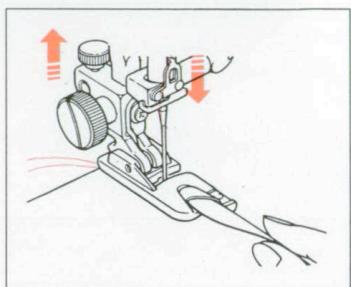
Place the fabric so that the needle just pierces the folded part of the fabric when it comes to the left. Lower the presser foot.

Adjust the guide by turning the nut. Sew by guiding the folded edge along the guide.
V DECORATIVE SEWING
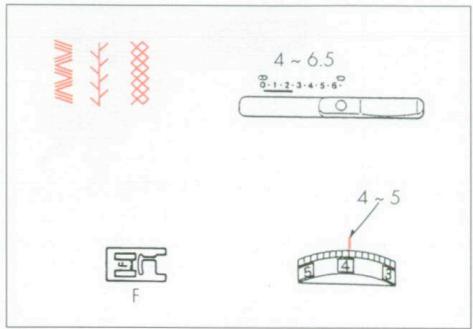
DECORATIVE SATIN STITCH
STRETCH STITCH PATTERNS
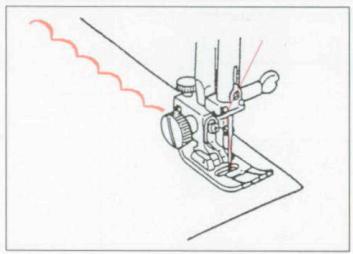
Sew a row of stitches and adjust the tension, so that the needle thread will slightly appear on the reverse side of the fabric. Test the stitch on a piece of the actual fabric for the best result.
The stitch lengths of the automatic patterns are preset. No adjustment is needed for the stitch length.
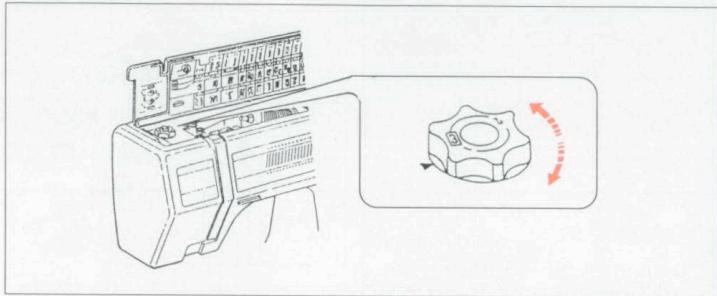
ADJUSTING STRETCH STITCH BALANCE
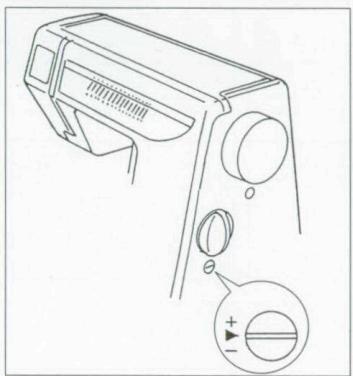
If the patterns are not neat, it is possible to adjust them with the feed balance screw.
- After sewing with the modified feed balance, return to the standard adjustment “▶”.
- If the patterns are compressed, the stitch is too short. Correct by turning the screw to " +".
- If the patterns are too distorted, the stitch is too long. Correct by turning the screw to "..."
SMOCKING
With the stitch length on 4, sew straight stitch lines at a distance of 10mm (3 / 8^ ) over the whole area to be smocked. Knot the threads on one side, Pull the bobbin threads and distribute the gathers evenly. Knot the threads on the other side. Sew the decorative stitch in the middle between the stitch rows. Remove the gathering threads.
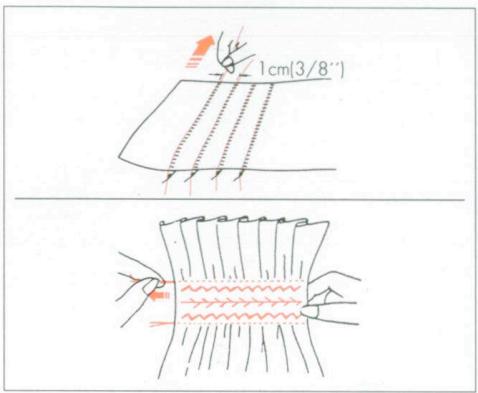
N.B. Gathering is easier with a weaker upper tension.
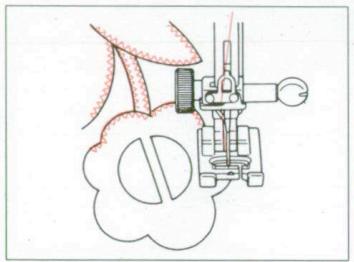
QUILTING
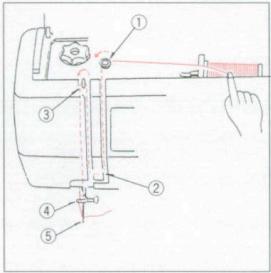
Attach the quilting guide L. It will help you to keep an even distance between the stitch rows.
Sew and let the guide follow the previous stitch row.
PIN-TUCKING
Fold the fabric left side against left side.
Place the fabric under the presser foot. Lower the needle into the fabric according to the desired depth of the tucks. Lower the presser foot. Adjust the guide by turning the thumb nut.
Hold the fabric against the guide when sewing.
Press the tucks to one side.
SHELL TUCK
Place the folded fabric on the edge of the transparent part on the right. The needle should stitch just outside on the right and form a fold.
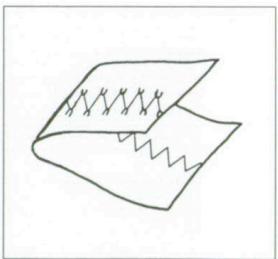
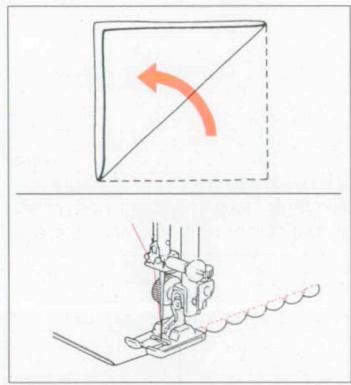
FAGOTING (MODEL 3007)
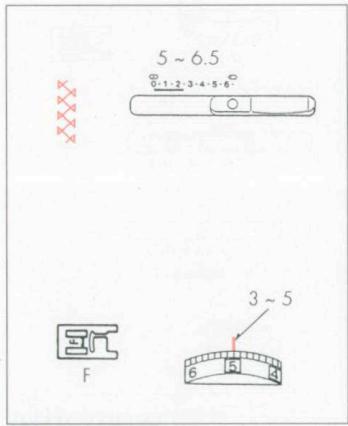
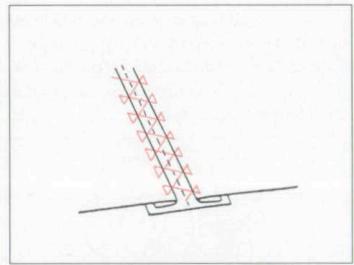
Fold under each fabric edge 1.5cm (1 / 2^ ) and press. Pin the two edges to paper or tear-away backing 2 to 3mm (1 / 8^ ) apart. Sew slowly, guiding the fabric so that the needle catches the folded edge on each side.
APPLICATIONS
Baste, or press, using self-adhesive lining, the application onto the fabric.
Sew around the entire application, making sure the needle always goes down outside the application when at the right.
When sewing curbs, stitch the needle into the fabric, raise the presser foot and swing round the fabric in the direction of the design.
- When the application is finished, reset the foot pressure on "3".
ASSEMBLING EDGE-TO-EDGE
Fold each fabric edge to the wrong side and press. Present the folded edges facing one against the other under the middle of the pres- ser foot.
VI MAINTENANCE
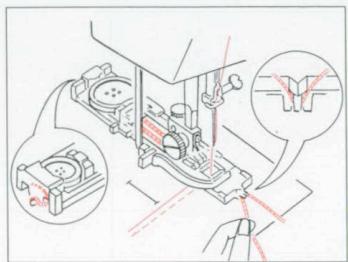
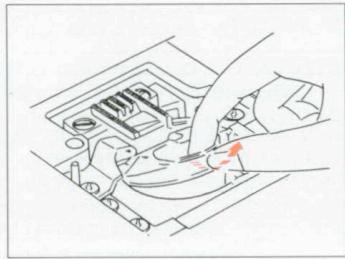
CLEANING THE BOBBIN CASE
Remove the plug from the outlet socket.
This machine does not need oiling. However, the area around the bobbin and hook must be cleaned each time the machine has been used extensively. The casing may be cleaned with a soft cloth and pure soap. Remove the needle before cleaning the machine.
To remove the hook cover push the button on the side to the right.
Take out the bobbin. Clean the whole area with the lint brush.
Insert the bobbin. Refit the hook cover.
CLEANING THE HOOK
Remove the plug from the outlet socket.
Raise the needle to its highest position.
Remove the presser foot and the needle. With the screwdriver, remove the screw at the left of the needle plate.
Remove the needle plate.
Remove the bobbin and the bobbin case.
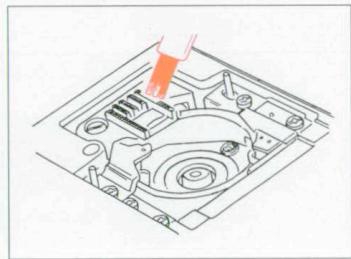
Clean the feed dog, the hook and the bobbin case with the lint brush.
REFITTING THE BOBBIN CASE
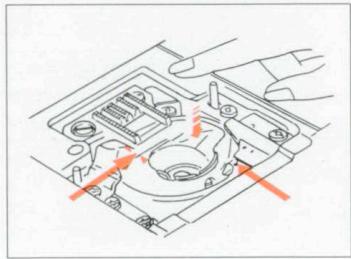
When refitting the bobbin case, make sure that the front notch holds the bobbin case well in place to prevent it from turning.
MINOR DISORDERS
| Problem | Cause | See page |
| The machine is noisy and does not run smoothly | 1. Threads have been caught in the hook mechanism2. The feed dog is packed with lint | A-31A-31 |
| The needle thread breaks | 1. The needle is not threaded properly2. The upper tension is too tight3. The needle is bent or blunt4. The needle is not inserted correctly5. The fabric cannot be removed to the rear after sewing6. The thread is either too heavy or too fine for the needle | A-8A-14A-8A-8A-16A-9 |
| The bobbin thread breaks | 1. The bobbin thread is not threaded correctly in the bobbin case2. Lint has collected in the bobbin case3. The bobbin is damaged and does not turn smoothly | A-10, 11A-31Change the bobbin |
| The needle breaks | 1. The needle is badly secured2. The needle is bent or blunt3. The needle clamp screw is loose4. The upper tension is too tight5. The fabric cannot be removed to the rear after sewing6. The needle is too fine for the fabric being sewn7. The pattern selector dial has been turned while the needle was in the fabric | A-8A-8A-8A-14A-16A-9A-15 |
| Skipped stitches | 1. The needle is not inserted correctly2. The needle is bent or blunt3. The needle and/or the threads are unsuitable for the work4. No needle with blue shank is being used for sewing stretch, very fine and synthetic fabrics5. The needle thread is not threaded properly | A-8A-8A-9A-9A-12 |
| The seam puckers | 1. The upper tension is too tight2. The machine is not threaded correctly3. The needle is too heavy for the fabric being sewn4. The stitches are too long for the fabric5. The pressure of the presser foot is not set correctly* When sewing extremely light weight fabrics place a sheet of paper underneath the fabric | A-14A-12A-9A-9A-7 |
| The stitches form loops underneath the fabric | 1. The upper tension is too loose2. The needle is either too heavy or to fine for the thread | A-14A-9 |
| The fabric is not fed smoothly | 1. The feed dog is packed with lint2. The pressure of the presser foot is too weak3. The stitches are too short | A-31A-7A-15 |
| The machine does not work | 1. The machine is not plugged in2. A thread is caught in the hook race3. The coupling knob is disengaged4. The bobbin winder spindle is in the winding position | A-6A-31A-10, 11A-10, 11 |
| The buttonhole is not balanced | 1. The stitch length is not suitable for the fabric being sewn2. The work is being pulled or held back3. No interfacing is being used with stretch or fine fabrics | A-15Guide the fabric gentlyA-9 |
1
2
3
4
5
6
7
8
9
10
11
12
13
14
15
16
17
18
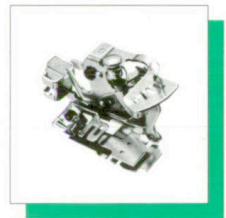
① Elastic gatherer
Fronceur elastique
Gummibandkräusler
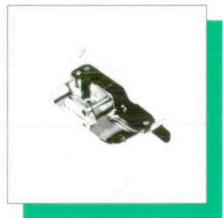
⑤ Seguins and ribbon sole