
MX-HE2670 - Oven Mx Onda - Free user manual and instructions
Find the device manual for free MX-HE2670 Mx Onda in PDF.


| Product Type | Built-in Electric Oven |
| Brand | Mx Onda |
| Model | MX-HE2670 |
| Dimensions (W x H x D) | 595 x 595 x 550 mm |
| Weight | Approx. 28 kg |
| Power Supply | 230 V ~ 50 Hz |
| Power Consumption | 2200 W |
| Capacity | 65 Liters |
| Energy Class | A |
| Main Functions | Conventional, Fan-assisted, Grill, Defrost, Pizza, Rotisserie |
| Temperature Range | 50°C - 250°C |
| Control Type | Knobs and Touch Panel |
| Display | LED Digital Display |
| Interior Light | Yes |
| Cleaning | Easy-clean enamel interior; wipe with damp cloth |
| Safety Features | Child Lock, Automatic Shut-off, Overheat Protection |
| Spare Parts Availability | Through authorized Mx Onda service centers |
| Repairability Index | 7.5/10 |
| Accessories Included | Grill rack, baking tray, rotisserie spit |
Frequently Asked Questions - MX-HE2670 Mx Onda
User questions about MX-HE2670 Mx Onda
0 question about this device. Answer the ones you know or ask your own.
Ask a new question about this device
Download the instructions for your Oven in PDF format for free! Find your manual MX-HE2670 - Mx Onda and take your electronic device back in hand. On this page are published all the documents necessary for the use of your device. MX-HE2670 by Mx Onda.
USER MANUAL MX-HE2670 Mx Onda
natural_image
Technical line drawing of a heat exchanger or cooling unit with airflow indicators (no text or symbols)Figura 1

Figura 2


Figura 4
natural_image
Two circular diagrams showing hand pressing a button on a control panel, with no text or symbols present.natural_image
Line drawing of an oven with a black plastic bag inside, labeled 'Figura 7' (no text or symbols on the diagram itself)natural_image
Line drawing of an open refrigerator with doors open, showing internal compartments and ventilation slots (no text or symbols)Figura 8

natural_image
Line drawing of an open oven with internal compartments and ventilation slots (no text or symbols)Figura 9

natural_image
Technical line drawing of a mechanical assembly with no visible text or symbolsFigura 8.1
natural_image
Technical line drawing of a mechanical component or bracket (no text or symbols visible)Figura 8.2

natural_image
Pure technical line drawing of a structural joint or bracket (no text or symbols)Figura 9.1

natural_image
Technical line drawing of a door frame with mounting bracket and side panel (no text or symbols)Figura 9.2
natural_image
Technical line drawing of a square component with mounting holes and directional arrows (no text or symbols)Figura 10

natural_image
Technical line drawing of a square component with a directional arrow indicating rotation (no text or symbols)Figura 11
natural_image
Technical line drawing of a mechanical assembly with no visible text or symbolsFigura 12
natural_image
Line drawing of an oven with a door open and a hand inserting a fan (no text or symbols)Figura 13
natural_image
Line drawing of an oven with a door open and a tray inserted, showing internal structure (no text or symbols)Figura 14
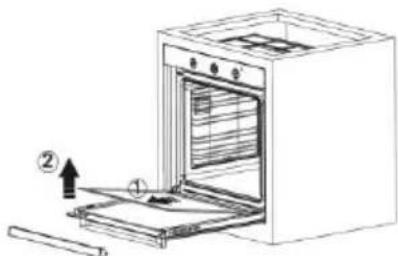
Figura 15
natural_image
Line drawing of a hand holding a knob or knob next to a piece of wood (no text or symbols)natural_image
Pure electrical circuit lines without any symbolsFigura 16
Tipo E14 Lámpara

natural_image
Line drawing of a mechanical component with a circular knob and layered structure (no text or symbols)220-240 V, AC 15 W
natural_image
Line drawing of a hand adjusting a mechanical component (no text or symbols)Figura 17
Guías soporte

USER AND INSTALLATION MANUAL
Mx Onda
60 CM BUILT-IN OVEN
MODELS: MX-HE2663 y MX-HE2670

CE
BEFORE USE PLEASE READ THIS MANUAL CAREFULLY
ATTENTION
THIS APPARATUS WORKS WITH A VOLTAGE OF 220/240 V, TO AVOID A POSSIBLE ELECTRIC SHOCK DO NOT TRY TO OPEN IT. This device does not have any part that can be repaired by yourself, in case of a malfunction do not manipulate it, go to an Official MX ONDA Technical Service.
After the useful life of this electrical product has expired, do not dispose of it in household waste. Deposit it in the appropriate container of a clean point in your locality, for later recycling.
This appliance is labeled according to the European Directive 2012/19 / EU on used electrical and electronic equipment (waste electrical and electronic equipment WEEE).
The Directive sets the framework for the return and recycling of used appliances appropriately across the EU.

Packaging information
The packaging of this product is manufactured with recyclable materials, in accordance with our National Regulation on the Environment. Do not dispose of the packaging materials together with household or other waste. Take them to your local recycling point.
This product complies with the European RoHS Directive (2011/65 / EU), on the restriction of the use of certain dangerous substances in electrical and electronic equipment.

INTRODUCTION
MX ONDA thanks you for the deference you have shown by purchasing this product. This built-in oven has been manufactured with high quality materials, its design makes it adapt to any type of kitchen. Among others it has the following characteristics:
• Energy efficiency class A
- Capacity 80 liters
- Fontal in stainless steel (glass in the MX-HE2670 model)
- 8 operating modes
- Buttons with concealment system
- Steam cleaning system
- 50% removable and detachable telescopic guides
- Double tempered glass oven door
- Multi-function LED display with 3 adjustment buttons
• Temperature control from 40 °C to 240 °C.
- Enamel lined oven cavity
- Includes enameled tray and grill
- Please read these instructions carefully and save them for later use.
- After removing the packaging, check that the appliance is not damaged. If in doubt do not use it; contact technical support personnel.
- All operations related to the electrical installation and / or repair must be carried out by a specialized and authorized installer.
- Check that the voltage of your electrical outlet is 220/240 V \~ 50 Hz and that it is grounded.
- The manufacturer declines any responsibility for damages arising from improper, incorrect or reckless use of the appliance.
- The electrical safety of this appliance is guaranteed only if it is connected to an effective earth connection, as provided by current safety regulations. The manufacturer declines any responsibility for damages derived from the lack of grounding of the installation. If in doubt, consult a qualified electrician.
- The power cord must not be in contact with the hot parts of the oven.
- Packaging materials such as plastic bags, Styrofoam, etc., should not be left within the reach of children, as they are a potential source of danger.
SECURITY MEASURES
- Children must not play with this appliance. Cleaning and maintenance to be carried out by the user cannot be carried out by children, unless they are over 8 years old and are supervised.
- Accessible parts may become hot during use, be careful to keep children away.
-
Warning: Fire hazard, do not store products inside the oven.
-
This appliance may not be used by children (under the age of 8 years) or people with reduced physical, sensory or mental capacities or without experience and knowledge, unless they have received appropriate instructions on the use of the appliance and understand the dangers involved, as well as supervision by an adult or responsible person.
- Warning: The inside of the oven acquires high temperatures, be extremely careful. Always use oven mitts when handling trays or containers.
- Warning: This appliance is designed for cooking only, it should NOT be used for other purposes.
- To clean the oven, do not use steam cleaners.
- Make sure the oven door is completely closed after placing food inside.
- In case of fire NEVER TRY to smother the flames with water, cut off the electrical supply and cover the flames with a fire blanket or a damp cloth.
- When the oven is in operation NEVER leave it unattended, if you have to be away, turn it off.
- This appliance is designed for household, non-professional use only. MX ONDA will not accept any responsibility and the guarantee will be invalid in case of improper use or non-compliance with the instructions.
- Keep children under 8 years old away from accessible parts of the oven, as well as the power cord.
- Keep flammable materials such as curtains, paper, etc., away from the oven. Do not place flammable materials on top of or in the oven.
- Do not block the vents.
- This appliance is not suitable for use with an external timer or remote control system.
- Do not heat cans or glass containers, as the pressure can cause them to explode.
-
Do not use the oven handle to hang tea towels, etc.
-
Do not use the oven if you are under medication that may impair its capabilities.
- Do not place the oven tray, containers or aluminum foil on the base of the oven. The accumulated heat can damage the base of the same.
- Be very careful if you use alcohol in your food. Alcohol will evaporate at high temperatures and can cause flames if it comes in contact with hot surfaces.
• After each use, check that the oven is turned off. - DO NOT store flammable materials inside the oven. They run the risk of igniting if you turn on the oven without first removing them. Use the device only for the purpose for which it was designed.
- Do not touch the plug with wet hands. To disconnect the oven from the mains, gently pull the plug from the socket. Never do it by pulling on the cord.
- Do not use the oven with the door glass broken or without the glass.
- Place the rack or tray correctly on the guides and check that they are properly attached before placing food on them.
- If you use baking paper or aluminum foil, remove the excess parts. Y Never set the oven to a temperature higher than that specified on the parchment paper. Also, do not place it on the base of the oven.
- When the oven door is open, do not place any heavy object on it, do not lean on it, and do not allow children to sit. It can cause damage to the door hinges.
- Do not use abrasive cleaners or metal scrapers, scratching the glass surface of the door may cause the glass to break when the oven reaches high temperatures.
- When opening the oven door, use caution as the vapors can injure you.
-
Unplug the oven from the mains if you are going to make any changes to the home's electrical system.
-
Unplug the oven or switch it off using the magnetothermic switch before cleaning it. During cleaning, be extremely careful not to damage the internal heating elements.
- To avoid overheating, do not cover the oven with a decorative panel.
- Make sure that the electrical socket or the magneto-thermal switch where the appliance is connected is easily accessible, but not accessible to children.
- Do not place food directly on the grill, use suitable containers.
- This oven has been designed for indoor use, do not expose it to rain or moisture and do not use it outdoors.
- Never wash the oven by spraying or pouring water on it, it will damage the oven and there is a danger of electrocution.
- Warning: To avoid electric shock, disconnect e the oven from the mains using the thermomagnetic switch before replacing the interior bulb or unplugging it from the mains.
- Do not use extension cords, use only the original cable.
- Make sure that the socket where the oven is connected is protected from moisture, liquid spills, etc.
- The back of the oven becomes hot, so avoid letting the power cord touch this surface.
- Make sure the power plug makes good contact, otherwise it may heat up and deteriorate due to poor electrical contact.
- This appliance must be connected to a circuit incorporating an isolation switch that provides complete disconnection from the power source.
- In case of breakdown, anomalies, if the glass door is damaged (scratches, cracks, etc.), the plug or the cable or other parts show deterioration, unplug the appliance and do not try to repair it yourself. Contact the closest MX ONDA Official Technical Service.
CONTROLS AND ELEMENTS

- Front panel
- Deep tray (optional)
- Chicken roast stand (optional)
- Grill
- Enameled tray
- Oven door
CONTROL PANEL

A. On / off and function selector
B. Multifunction LCD display
C. Temperature selector
MULTIFUNCTION LED DISPLAY
The multifunction screen, in addition to showing the current time, the operating status, the timer, and the child lock, incorporates three buttons for adjusting the different functions.
D. Decrease button
E. Adjust button
F. Increase button

Display symbols
| SYMBOL | FUNTION |
 | Oven status indicatorWhen it is lit, it indicates that the oven is cooking or ready to cook. When this symbol is off, the oven is in standby or off. |
 | Timer status indicatorWhen it is lit it indicates that the timer is activated, if it remains flashing it is in the setting mode and when it is off the timer is deactivated. |
 | Child lock indicatorWhen it is lit, the buttons on the multifunction display are locked (child lock) and when this indicator is off, the child lock is deactivated. |
 | Automatic cooking status indicatorWhen it is lit, it indicates that the complete or semi-automatic cooking mode is activated. If it remains flashing, it is in the automatic or semi-automatic cooking setting mode, and when this symbol is off it indicates that the automatic or semi-automatic cooking mode is deactivated. |
Important: The clock of this oven takes as reference the frequency of the mains voltage 50 Hz, and it may be that in some cases the clock of the oven will be ahead or behind. This is not a malfunction and can be caused by disturbances in the electricity supply.
When the oven is plugged in for the first time, the time as well as the symbol will appear flashing and you can set the time. To adjust the time, proceed as follows:
Actual time setting
To set the time, it is essential that the reminder timer or automatic cooking mode is not running.
To adjust the time, follow the steps below:
- Press and hold the + and - buttons for 4 seconds, until the dot between the hour and minute digits starts flashing.
- Using the buttons + and - set the current time. The clock format is 24 hours.
- To memorize the time, allow 6 seconds without touching any button or press the button ⏻.
Note: The time setting can also be done the first 7 seconds after turning on the oven.
Timer
The timer (or countdown counter) is used to alert you with an audible signal that a preset time has elapsed. This function is very useful when you need to add ingredients, turn the food, vary the temperature, etc. during cooking.
Follow the steps below to set the timer:
- Press the button ⏻ once to enter the timer mode, the 📋 symbol will start flashing.
- With the + and - buttons set the timer time. The maximum duration is 10 hours.
- To start the timer, allow 6 seconds to elapse without touching a button or press the button ⏻.
- After the previously set time has elapsed, a buzzer will sound and the symbol 📁 will begin to flash. Press any button to stop the buzzer. If you do not press any button, the buzzer will stop sounding after 5 minutes.
- To cancel the timer choose the time "0.00" and the symbol ☒ will disappear.
Semi-automatic cooking
The semi-automatic cooking mode consists in which, once a previously set time has elapsed, the oven turns off automatically.
To adjust semi-automatic cooking, follow these steps:
- Put the food in the oven, choose the operating mode using the function selector A and select the temperature using the temperature selector C.
- Press the button ⏻ twice to access the semi-automatic cooking mode, the symbol Ⓐ will start flashing. The indication du'r and the time for automatic power off will appear alternately.
- Using the + and - buttons, set the cooking duration time (operating time).
- To start semi-automatic cooking, wait 6 seconds without touching any button or press the button twice. The display will show the symbol as well as the current time.
Automatic cooking
In the automatic cooking mode, the oven will automatically start at a certain time, carry out the cooking process for a previously set time and end the cooking process at the desired time, turning off automatically.
For example, if you want to cook a food for 30 minutes and the food is ready at 3:00 p.m., you must first set the cooking time (30 minutes) and then you must set the time you want the food to be ready. (3:00 p.m.). The oven will automatically calculate the ignition time, automatically turning on at 2:30 p.m. and automatically turning off at 3:00 p.m. when the food is ready.
To adjust automatic cooking, follow the steps below:
- Carry out steps 1 to 3 described in the previous section, to select the cooking duration time.
- Press the button 📋 again, the symbol ⚠ will flash and the display will show the indication En as well as the time you want the oven to finish cooking.
- Using the + and - buttons, set the time you want the food to be ready.
- The symbol 🙏 will disappear from the display, and the symbol Ⓐ will remain on the display flashing letting you know that the oven is set to auto cook mode.
- To finish programming automatic cooking, allow 6 seconds to elapse without touching any button or press the ⏻ button. The screen will display the current time.
Semi-automatic or automatic cooking completion
At the end of cooking (semi-automatic or automatic) an acoustic warning will sound, the oven will turn off and the symbol 🐃 all also turn off. Press any button to stop the buzzer. If you do not press any button, the buzzer will stop sounding after 7 minutes.
Press and hold the ⏻ button to deactivate semi-automatic or automatic cooking mode.
Child lock
This function locks the buttons on the screen, to prevent inadvertent use (for example, children changing the automatic cooking mode). FOR SAFETY the lock is always activated automatically 30 seconds after the last press of any button.
To deactivate the child lock, press and hold the button the symbol 🔒 disappears from the screen.
④ for 3 seconds until
Programmable options
Buzzer tone
Press and hold the ⏻ and button for three seconds, the current beeper will sound. Using the ⏻ and ⏻ buttons, choose the desired acoustic tone (there are three different acoustic tones available).
To memorize the desired buzzer tone, allow 6 seconds to elapse without touching any button or press the 🔒 button.
Screen brightness adjustment
Press and hold the + button for three seconds, the screen will display the current brightness level. Use the + and - buttons to choose the desired brightness level (there are eight brightness levels available).
To memorize the desired brightness level, allow 6 seconds to elapse without touching any button or press the ⏻ button.
Notes:
• Factory default values are highest.
- Programmable options are non-volatile and will remain even if there is a power failure.
Power supply failure
A power outage for less than 50 seconds will not affect the clock or auto cook mode programming.
If the supply cut is greater than 50 seconds, the current time, as well as the programming in the automatic cooking mode will be erased, the display will show the hour digits 12:00 as well as the A indication flashing. It is necessary to adjust the current time as explained in the corresponding section.
Note: The flashing indication ⚠ warns that the oven is inactive and that it has to enter manual mode.
INSTALLATION
Warning: Before installing the oven, check that there is no damage to the oven. DO NOT install the oven if after removing the packaging you notice damage to it, bumps, broken or cracked glass, damaged cord or plug, etc.
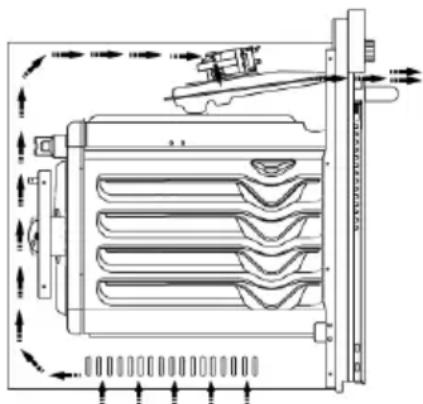
Very important: The cooling fan extracts heat to prevent overheating of external surfaces during oven operation. The fan is essential to improve the cooking and performance of the appliance. The cooling fan will continue to run after cooking is complete and will stop automatically when the outside oven temperature is low.
natural_image
Technical line drawing of a mechanical or electrical component with no visible text, numbers, or symbols.Fig. 1
You must leave a space behind the back of the oven and never obstruct the air inlet holes (located at the bottom of the sides) for optimal and efficient cooling (Figure 1). Good oven cooling is essential for optimal and long-lasting operation.
Oven location
This oven is designed to be installed in furniture openings of 60 cm, you must install it leaving a space or safety distance between the walls of the oven and the walls of the cabinet, refer to the illustrations on the following pages to obtain the correct measurements (the values are in millimeters).
- The surfaces used, synthetic sheets, adhesives, etc. They must be heat resistant (minimum 100 °C).
- The kitchen cabinet where the oven is located must be level and fixed to the rest of the furniture.
- If there is a drawer under the oven, you must place a protection grid between them.
Warning: Do not install the oven next to the refrigerator or refrigerator. The heat emitted by the oven increases the energy consumption of the refrigeration appliances.
Warning: Do not use the door or door handle to carry or carry the oven.
Cautions
You must choose the location of the oven by making the appropriate measurements and taking into account that you must have a mains power outlet with sufficient power before starting the installation.
Do not install the oven in areas with strong drafts.
At least two people will be required to move the oven.
To avoid damaging the oven and / or the floor, do not drag the oven.
Remove all protection elements, packaging and accessories from the oven.
Installation under the kitchen worktop
The furniture must have the dimensions indicated in Figure 2.
For optimal and efficient cooling, you should leave a space at the rear of the cabinet as indicated in Figure 2.
After mounting the oven, the space between the top of the oven front and the bottom of the hob is indicated in Figure 5 by the letter “A”. This space is for refrigeration and should not be covered or covered.


Fig. 2

Installation in a raised kitchen cabinet
The furniture must have the dimensions indicated in Figure 4.
For optimal and efficient cooling, you should leave a space at the back, top and bottom of the cabinet as indicated in Figure 4.
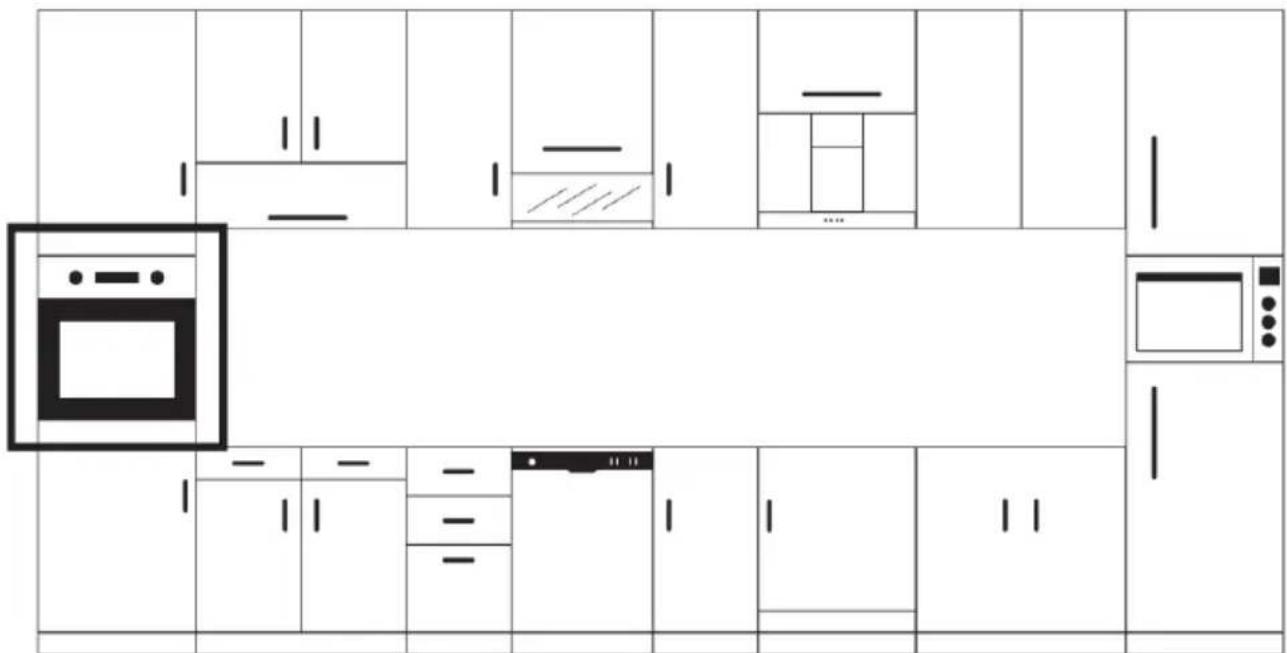

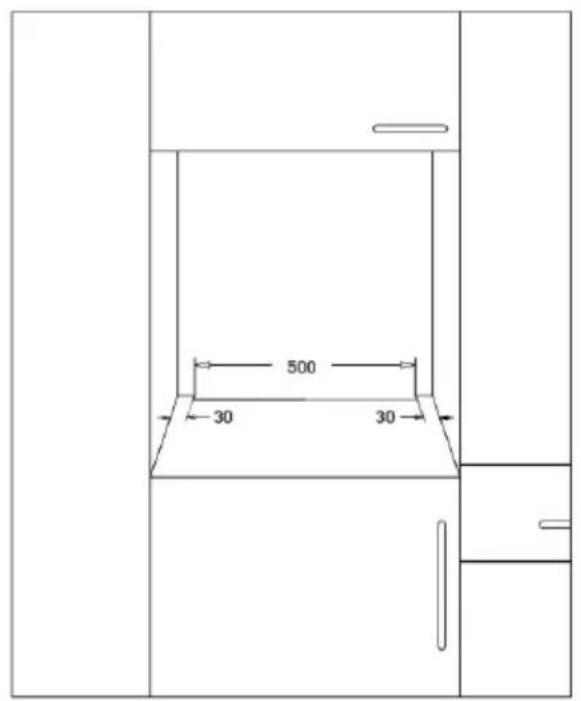
Fig. 4
Installation requirements
- The dimensions of the oven are indicated in Figure 3.
- The material of the cabinet where the oven is to be installed must be heat resistant to avoid deformation caused by heat radiation, it must withstand a minimum temperature of 100 °C .
- The furniture where the oven is to be installed must be level and correctly fixed to the rest of the furniture to prevent the oven from tilting.
- The base of the furniture must be strong enough to support a load of 60 Kg

Fig. 3
Place and fix the oven
- To place the oven in the cabinet, it is recommended that there be at least two people.
- Check that the oven frame and the front edge of the cabinet coincide evenly.
- The power cord must not be under the oven, caught between the oven walls and the cabinet, or remain bent.
- To fix the oven to the cabinet use the supplied screws. The screws must be positioned as indicated in Figure 5, passing them through the plastic supports fixed to the oven frame. Do not overtighten the screws as you may damage the plastic brackets.
- Once the oven is attached to the cabinet, check that it remains properly attached and does not move.

ELECTRICAL CONNECTION OF THE OVEN

The oven must be installed by a licensed electrician or suitably qualified technician.
Before connecting the oven to the mains, check that:
- The electrical installation where the oven is to be connected must be adequate for the power consumed by the oven.
- The voltage must correspond to the nominal value specified in the characteristics described in this manual.
- The section of the power cables must withstand the current specified on the specifications plate.
The electrical connection of the oven must only be carried out in grounded sockets, installed in accordance with current regulations. The manufacturer will not be liable for damage caused by connection to ungrounded sockets.
To connect the oven to the mains socket, do not use adapters, reducers or branches, as these devices can become hot and cause a fire.
The power cord of the oven must not touch any part or area where it acquires high temperatures and must be positioned so that the temperature will not exceed 75^ C at any point.
Check with a licensed and qualified electrician for proper electrical installation. Any modification to the electrical installation must only be carried out by a licensed electrician.
The electrical connection of the oven must be made in accordance with current regulations and protected by a two-pole magnetothermic or automatic switch.
- If the cable is damaged, to be substituted or replaced, the operation must be carried out by an Official Mx Onda Technical Service.
- The authorized installer must ensure that the correct electrical connection has been made and that it complies with safety regulations.
- The cable must not be bent or compressed.
- The cable should be checked regularly and replaced only by authorized technicians.
- The manufacturer is not responsible for any accident resulting from the use of an appliance that is not grounded or from faulty grounding continuity.
- The plug must be located in a place that can be accessed after installation.
Before using the oven for the first time, you must carry out the following process:
- Remove the labels, packaging and protection elements, as well as the accessories contained inside the oven.
- Wipe the inside of the oven with a slightly damp cloth and close the oven door.
- Set the temperature selector to the maximum level 240^ C.
- Turn the on / off button and function selector to the heat position at the bottom and top □.
-
Using the timer, choose an operating time of 30 minutes.
-
During operation, there may be a little smoke and odor, this is normal and is due to the removal of traces of oil to protect the internal elements from the manufacture.
- Once the oven is completely cool, wipe it with a cloth slightly dampened with soapy water, then wipe it dry with a clean, dry cloth. Do not use alcohol or abrasive products and do not allow the oven to come into contact with volatile agents such as gasoline, solvents, insecticides, etc.
BUTTONS WITH HIDING SYSTEM
If the purchased model has concealable buttons, to be able to use the oven you must first remove them.
The concealment system for the buttons, in addition to being an aesthetic improvement, is a safety measure to prevent inadvertent use (for example, children accidentally turning the oven on or off or modifying the operating mode).
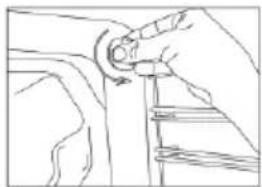
To remove the button, press it and then release it, it will automatically pop out. Once the button is fully pulled out, you can make any necessary adjustments by turning the button to the left or right.

natural_image
Diagram showing a hand pressing a button on a door panel before and after adjustment (no text or symbols)To hide the button, press it again and it will be retained and hidden.
On/off and function selector
The selector has 9 positions, which are indicated in the following table together with the function they perform. Depending on the food to be cooked, you must choose the most appropriate operating mode, in order to obtain the best results and in the shortest possible time.

flowchart
graph TD
    A[" "] --> B[" "]
    A --> C[" "]
    A --> D[" "]
    A --> E[" "]
    A --> F[" "]
    A --> G[" "]
    style A fill:#f9f,stroke:#333
    style B fill:#ccf,stroke:#333
    style C fill:#cfc,stroke:#333
    style D fill:#fcc,stroke:#333
    style E fill:#cff,stroke:#333
    style F fill:#ffc,stroke:#333
    style G fill:#cfc,stroke:#333
| POSITION | SYMBOL | FUNCTION PERFORMED BY THE OVEN |
| 1 |  | OFF mode |
| 2 |  | Convection |
| 3 |  | Heat at the top and bottom |
| 4 |  | Heat at the top and bottom + Convection |
| 5 |  | Turbo mode + Convection |
| 6 |  | Steam cleaning |
| 7 |  | Grill + Convection function |
| 8 |  | Grill Plus function |
| 9 |  | Multifunction cooking (3D) |
Convection
Use this function when you have finished the cooking process and want to keep food warm using residual heat through the convection system.
Heat at the top and bottom
Use this mode of operation to cook foods such as cakes, pizza and cookies.
Heat at the top and bottom + Convection
This operating mode is ideal for cooking cakes, biscuits, lasagna, meat or fish.
Turbo mode + Convection
With this operating mode the heat is distributed more quickly than in normal mode (heat at the top and bottom), it is suitable for baking and roasting. Set the temperature a little lower than in the top and bottom heat mode as the airflow distributes the heat more intensely improving and reducing cooking time.
Steam cleaning mode
This operating mode is for cleaning the oven with steam, see section Steam Cleaning.
Grill + Convection function
This operating mode is suitable for cooking meat foods. Depending on the food to be cooked, we recommend placing a tray in the lower part with a little water, to prevent the food from being too dry.
Grill Plus function
Use this operating mode to gratin or roast meat or fish, etc. Depending on the food to be cooked, we recommend placing a tray in the lower part with a little water, to prevent the food from being too dry.
Multifunction cooking (3D)
This operating mode is suitable for baking and roasting. The turbo mode plus convection together with the heat in the upper and lower part generates hot air currents inside the oven that surround the food and distribute the heat evenly. It is suitable for cooking that requires a single tray and intense heat.
Temperature selector
Choose the temperature between a range of 40 to 240 °C, depending on the food to be cooked. Turn this control clockwise to increase the temperature and counterclockwise to decrease it.
Note: The oven takes some time to reach the selected temperature, so it is recommended to "preheat" the oven before putting the food in.

TIPS FOR THE USE OF THE OVEN
- Before putting the food in, we recommend that you preheat the oven.
- Use ovenproof (high temperature resistant) containers.
- The time required to cook the food depends on the size and quality of the food.
- Try to open the oven door as little as possible, use the oven door window to check the process. You will save time and energy!
- Distribute the food over the entire grill or enamel pan area for even cooking.
- If the pieces are medium-large, in the middle of the process you should turn them over and thus obtain a homogeneous result.
MAINTENANCE AND CLEANING
Warning: Before cleaning, disconnect the oven from the mains (plug or magnetothermic switch). And make sure the oven is totally cool. Do not use alcohol or abrasive products (wax brush, steel wool or sharp objects) and do not allow the appliance to come into contact with volatile agents such as gasoline, solvents, insecticides, etc.
Cleaning the outside of the oven
- Clean the outside with a damp cloth, followed by a dry one.
- Avoid getting water through the ventilation holes.
- Always keep the door clean on both sides and the sealing gaskets. Clean these parts with a damp cloth with warm soapy water. Then dry them carefully.
Cleaning the accessories
- Clean the accessories after each use with an anti-grease product.
- You can also wash the accessories in the dishwasher.
Cleaning the inside of the oven
- Do not use metal scourers that can scratch the surfaces, use specific cleaning products for ovens.
- For stubborn stains, clean after preheating at 90^ for 30 seconds.
- Do not use steam cleaners.
• After cleaning, remove the soap residue and thoroughly dry the oven walls.
Steam cleaning
The steam cleaning system will facilitate the removal of stubborn grease, as well as solid remains adhering to the oven walls, the steam will soften the grease and solid remains, making cleaning more comfortable and easy. Follow the process below:
Remove all accessories from inside the oven.
-
Pour half a liter of water into the enamel tray and place it at the bottom of the oven (Figure 7).
-
Set the temperature selector to 70^ C.
-
Set the on / off button and function selector to the position 📄.
-
Turn the timer to the 30 minute position.
-
At the end of the previously set time, open the oven door and remove the fat and solid remains with a slightly damp cloth.
-
For stubborn dirt, pour dishwashing liquid on a damp cloth and rub until all dirt is removed, then wipe dry with a clean, dry cloth.

natural_image
Line drawing of an oven with a door open, showing internal structure and a small object inside (no text or symbols)Removing and installing the oven door
The oven door can be removed to facilitate cleaning, to do this, follow the steps below:
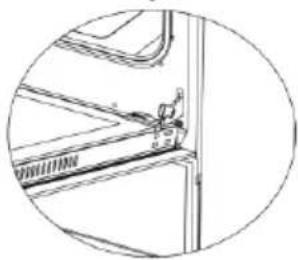
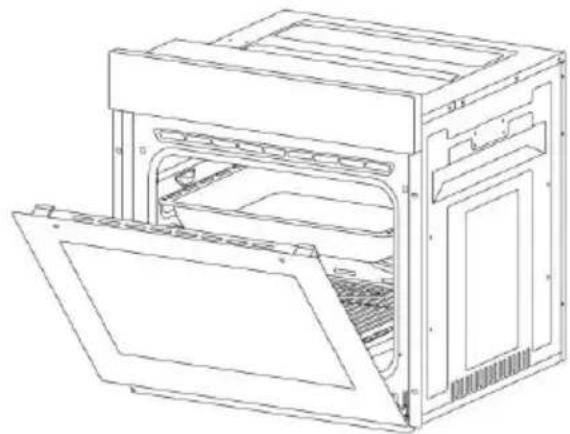
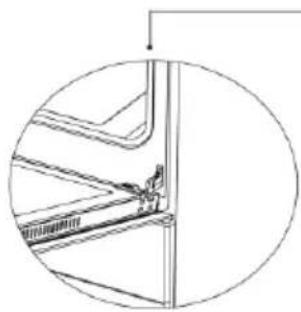
- Fully open the oven door 90°, then unlock it by pulling the hinge lock up with the help of a screwdriver as shown in Figure 8.1.
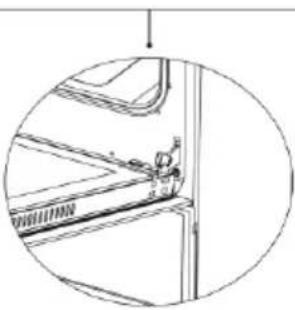
- Set the hinge lock at the largest angle as shown in Figure 8.2. Adjust the two hinges that hold the door to the oven to the same position.
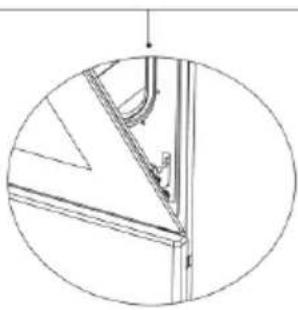
- Then close the door so that it is in contact with the hinge lock, as shown in Figure 9.1.
- In order to easily remove the oven door, when it approaches the closed position, grasp the door with both hands and pull it upwards, see Figure 9.2.
natural_image
Line drawing of an open oven or rack unit with internal compartments and ventilation ducts (no text or symbols)Fig. 7

natural_image
Line drawing of an open oven with internal grating and ventilation slots (no text or symbols)Fig. 9
natural_image
Technical line drawing of a mechanical bracket or frame assembly (no text or symbols)Fig. 8.1
natural_image
Technical line drawing of a vehicle door panel with no visible text or symbolsFig. 8.2
natural_image
Pure technical line drawing of a mechanical bracket or frame structure without any text, numbers, or symbolsFig. 9.1

natural_image
Technical line drawing of a door frame with mounting bracket (no text or symbols)Fig. 9.2
Cleaning the oven door glass
To remove the glass from the oven door and depending on the model you have, you must proceed as indicated in point 1 or point 2.
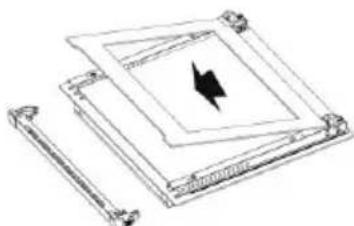
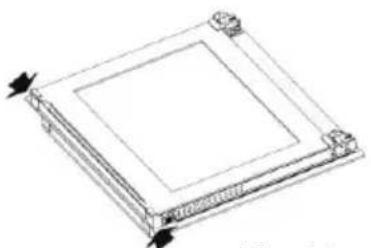
- Press the plastic latches located on both sides (right and left) of the profile as shown in Figure 10, then remove the profile by pulling it out as shown in
Figure 11. The glass will be free after removing the profile, as shown in Figure 12. Pull the released glass very carefully towards you, if it includes a central glass it can also be removed in the same way, the outer glass is fixed to the door frame. Once the crystals are clean, proceed to place them in the reverse way to that described to extract them.
natural_image
Technical line drawing of a square mechanical component with mounting holes and directional arrows (no text or symbols)Fig. 10

natural_image
Technical line drawing of a square electronic component with a pull rod and arrow indicating rotation (no text or symbols)Fig. 11

natural_image
Technical line drawing of a mechanical assembly with a central arrow symbol (no text or labels)Fig. 12
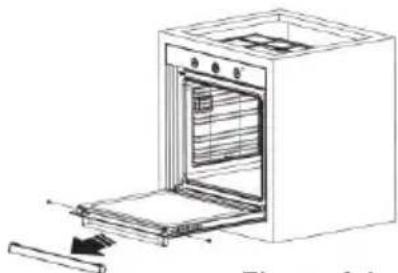
- Remove the screws located on both sides (right and left) of the profile as shown in Figure 13, then remove the profile by pulling it out as shown in Figure 14. The glass will be free after removing the profile as shown in Figure 15. Carefully pull the released glass towards you. If it includes a central glass, it can also be removed in the same way. The outer glass is fixed to the door frame. Once the crystals are clean, proceed to place them in the reverse way to that described to extract them.

natural_image
Line drawing of an oven with a door and drawer, labeled as Fig. 13 (no text or symbols on the diagram itself)Fig. 13

natural_image
Line drawing of an oven with a tray and lid, labeled as Fig. 14 (no text or symbols on the diagram itself)Fig. 14

Fig. 15
Replacing the interior light
Warning: Before changing the light bulb, disconnect the oven from the mains (plug or magnetothermic switch). And make sure the oven is totally cool. Remove the glass shield by turning it counterclockwise, use rubber gloves if you have difficulty removing the glass shield.
Depending on the oven model purchased, the type of lamp varies, it can be type G9 (Figure 16) or E14 (Figure 17). In the case of being type G9 to extract the bulb pull it outwards, in the case of being type E14 unscrew the bulb by turning it counterclockwise.
Once the bulb has been replaced, replace the glass protection and re-establish the power supply to the oven (plug or magnetothermic switch).
G9 Lamp type

natural_image
Line drawing of a hand holding a circular object over a surface, with no visible text or symbolsnatural_image
Pure electrical circuit lines without any symbolsFig. 16
E14 Lamp type

natural_image
Line drawing of a mechanical joint or bracket with no visible text or symbols220-240 V, AC 15 W

natural_image
Line drawing of a hand adjusting a mechanical component (no text or symbols)Fig. 17
Support guides
Warning: It is very important to correctly position the support guides. Do not place the guides touching the back of the oven. The position of the support guides for is shown in the following figure.

Removing and inserting the support guides
Press the clips in the direction indicated by the arrows and separate the bottom of the support guides from the oven wall, then slide the support guides up and remove them.
To insert the support guides, pay attention to their position (see the previous figure), insert the hooks located at the top of the support guides into the holes located on the wall of the oven, then slide the support guides downwards and slightly press the clips (in the direction of the arrows) secure them to the lower bracket.
TECHNICAL SPECIFICATIONS
Power supply voltage 220 V - 240 V \~ 50/60 Hz
Maximum consumption 2500 W
Capacity 80 liters
Lower heater power 1200 W
Top heater power 1200 W
Turbo mode power 1800 W
Grill power 1200 W
Grill Plus power 2400 W
Temperature range 40 to 240 °C
Glass door Double tempered
Lamp power 15 to 25 W
External dimensions 595 x 587 x 595 mm (l, w, h)
Approximate weight 28.5 Kg
Technical specifications attached to change without notice.
This product complies with the European Directives 2014/30 / EC (EMC) on Electromagnetic Compatibility and 2014/35 / EC (LVD) on low voltage safety.
"MX, MX ONDA" and their logos are registered trademarks of MX ONDA, S.A.
Information and Technical Service telephone number: 902 551 501
MX ONDA, S. A.
C / Matabueyes, 7 nave 1A
19171 - Cabanillas del Campo (Guadalajara)
E-MAIL: mxsat@mxonda.es
http://www.mxonda.es


- Guías soporte
- USER AND INSTALLATION MANUAL
- Mx Onda
- CM BUILT-IN OVEN
- MODELS: MX-HE2663 y MX-HE2670
- ATTENTION
- Packaging information
- INTRODUCTION
- SECURITY MEASURES
- MULTIFUNCTION LED DISPLAY
- Actual time setting
- Timer
- Semi-automatic cooking
- Automatic cooking
- Semi-automatic or automatic cooking completion
- Child lock
- Programmable options
- Buzzer tone
- Screen brightness adjustment
- Notes:
- Power supply failure
- INSTALLATION
- Oven location
- Cautions
- Installation under the kitchen worktop
- Installation in a raised kitchen cabinet
- Installation requirements
- Place and fix the oven
- ELECTRICAL CONNECTION OF THE OVEN
- BUTTONS WITH HIDING SYSTEM
- On/off and function selector
- Convection
- Heat at the top and bottom
- Heat at the top and bottom + Convection
- Turbo mode + Convection
- Steam cleaning mode
- Grill + Convection function
- Grill Plus function
- Multifunction cooking (3D)
- Temperature selector
- TIPS FOR THE USE OF THE OVEN
- MAINTENANCE AND CLEANING
- Cleaning the outside of the oven
- Cleaning the accessories
- Cleaning the inside of the oven
- Steam cleaning
- Removing and installing the oven door
- Cleaning the oven door glass
- Replacing the interior light
- Support guides
- Removing and inserting the support guides
- TECHNICAL SPECIFICATIONS
Brand : Mx Onda
Model : MX-HE2670
Category : Oven