
Pro U7 - Projector Yaber - Free user manual and instructions
Find the device manual for free Pro U7 Yaber in PDF.


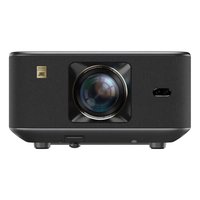
| Brand | Yaber |
| Model | Pro U7 (Buffalo Pro U7) |
| Product Type | LCD Projector |
| Native Resolution | 1920 x 1080P |
| Display Technology | LCD |
| Light Source | LED |
| Color Gamut | 16.7M Full |
| Aspect Ratio | 4:3 / 16:9 |
| Keystone Correction | Manual Vertical & Horizontal; Digital 4D (4-Point) |
| Digital Zoom | Up to 50% reduction |
| Projection Distance | 4.0 - 22.3 ft (recommended 10.8 ft) |
| Projection Methods | Front/Rear on Desk, Front/Rear on Ceiling |
| Built-in Speaker | Stereo 5W |
| Connectivity | HDMI x2, USB x2, AV, 3.5mm Headphone Jack |
| Wireless | WiFi (iOS Cast, Miracast), Bluetooth |
| Supported Media | Video: 3GP, AVI, MP4, MPG, MKV, VOB, TS, MOV, TRP; Audio: MP3, AAC, FLAC, OGG, WAV, WMA; Picture: JPG/JPEG/BMP/PNG; Office Suite (PPT, Word, Excel via USB) |
| Power | AC 100-240V |
| Weight | 4.8 lb |
| Lens | Optical coated glass; Manual focus |
| Special Features | Detachable dust filter, dust cleaning port, ceiling mount compatible, 3-year warranty |
| Included Accessories | Remote control, power cord, HDMI cable, 3-in-1 AV cable, lens cover, cleaning kit, quick start guide, carry bag |
Frequently Asked Questions - Pro U7 Yaber
User questions about Pro U7 Yaber
0 question about this device. Answer the ones you know or ask your own.
Ask a new question about this device
Download the instructions for your Projector in PDF format for free! Find your manual Pro U7 - Yaber and take your electronic device back in hand. On this page are published all the documents necessary for the use of your device. Pro U7 by Yaber.
USER MANUAL Pro U7 Yaber
-
Installation Method 06
-
Projection Distance and Size ....07
-
Install on the Ceiling 07
STARTING PROJECTOR 08
IMAGE ADJUSTMENT 08
1.Focus Adjustment 08
- Digital 4D Keystone Correction ....09
SETTING UP THE PROJECTOR 09
- Select The Input Signal Source 09
2.USB Disk Insert Mode 10
3.WiFi Setting 13
3.1.iOS Cast(for iOS Devices) 14
3.2.Miracast(for Android Devices)....15
- Bluetooth Setting 16
5.Projector Image Setting 16
5.1.Projection Mode 16
5.2. Keystone Advanced & 4-Point Keystone 17
5.3.Digital Zoom 19
-
System Update .... 19
-
Other Setting 20
8.About 21
SIGNAL LINES CONNECTION ....21
-
Connect USB Disk ....21
-
Connect the Devices via the HDMI ports ..... 21
-
Connect to the DVD Player ....21
-
Connect to the Soundbar/Speaker 21
SAFE SHUTDOWN 22
WARRANTY 22
TROUBLESHOOTING 23
YABER Lifetime Professional Support
Dear customer,
Thank you very much for supporting YABER!
Please read this manual thoroughly before using the projector. If you have any issues, email your order number and the problem to
aftersales@yabertech.comWe will provide a fast solution in 24 hours.
Actually, many problems can be easily solved by setting, such as no signal, no sound, bluetooth connection failed, WiFi connection failed, dark spots, choppy animation etc. We promise all the projectors have been 100 % carefully checked and packaged before shipping.
If you have any questions, could you please contact us so that the problem can be solved. And give us an opportunity to improve. We guarantee we will provide you a satisfactory solution.
Thanks for your understanding!
YABER Service Team
TIPS:
-
Do not place projector in too warm or too cold room, because the high temperature or low temperature will shorten lifespan of the device. The working environment would be 5°C\~35°C better.
-
If there are black spots on the projection screen, please don't worry, please contact aviasales@webertclsechyou a video
about how to remove the dust.
-
The ventilation is equipped for the projector to work stably. Don't cover the vent with cloth, blanket or other things. Don't insert anything into the slit of the projector, or it may produce a short circuit or an electric shock to your device and cause damage.
-
The projector shall be strictly protected from strong impact, extrusion and vibration. Do not try to move and on strong impact, extrusion and vibration. Do not try to move and the internal circuit faults.
-
Lens, as the core component of the projector, is directly related to the picture definition and effect. The excessive dust thereon will affect image quality. The dirty lens shall be wiped with soft cotton cloth for the glass lens surface. Hard cloth or abrasives shall not be used.
PACKAGE LIST
| Buffalo Pro U7 Projector*1 | Remote Control*1 | Power Cord*1 |
| HDMI Cable*1 | 3-in-1 AV Cable | Lens Cover*1 |
| Cleaning Kit*1 | Quick Start Guide*1 | Carry Bag*1 |
PROJECTOR SPECIFICATIONS
| Model No. Buffalo Pro U7 | |||
| Native Resolution | 1920*1080P | Keystone Correction | Manual Vertical & Horizontal |
| Display Technology | LCD | Light Source | LED |
| Color Game | 16.7M Full | Aspect Ratio | 4:3/16:9 |
| Recommended Projection Distance | 4.0-22.3ft | Minimum Projection Distance | 4.0ft |
| Power Voltage | AC100-240V | Projector Weight | 4.8lb |
| Picture File | JPG/JPEG/BMP/PNG | Interfaces | HDMI*2/USB*2/3.5mm Headphone jack/AV |
| Projection Method | Front/Rear on Desk, Front/ Rear on Ceiling | ||
| Video File | 3GP/ AVI/ MP4/ MPG/ MKV/ VOB/ TS/ MOV/ TRP | ||
| Audio File | MP3/ AAC/ FLAC/ OGG/ WAV/ WMA | ||

| 1/18 | Height Adjustment Screw | Adjust the height of the projector |
| 2/5 | IR Window | Infrared signal receiver |
| 3 | Projector lens | Optical coated glass lens |
| 4 | Power Cord Port | Power Cord Port |
| 6 | Headphone Jack | 3.5mm Headphone Output |
| 7/10 | HDMI Ports | HDMI 1 input / HDMI 2 input |
| 8 | USB Ports | USB 1 port / USB 2 port |
| 9 | AV Port | Audio input |
| 11 | Speaker | Stereo 5W |
| 12 | Air Outlet | Prevent the projector from overheating |
| 13 | Focus Ring | Adjust the focus ring to get the clearest image |
| 14 | Detachable Dust Filter Switch | Push the switch to open the detachable dust filter |
| 15 | Detachable Dust Filter/Air Inlet | Prevent the projector's inside from the dust/Circulate inside and outside air |
| 16 | Dust Cleaning Port | When black spots and dust appear on the screen, open the port to clean the dust |
| 17 | Rubber Pads | Protective pads/remove to install ceiling mount |

- Power Key
- Back
- OK Key
- Arrow Key
| 1 | Power | Turn on/off the power |
| 2 | Back | Return to the previous menu |
| 3 | OK | Confirm the option |
| 4 | Arrow Keys | Used to adjust the parameter of the projector in the menu mode |
REMOTE CONTOL

-
Power
-
Source
-
Arrow keys
-
Menu
-
Homepape
-
Volume +
-
Volume -
-
Mute
-
Picture flip
-
Confirmation key (Play and Pause)
-
Back
-
Previous
-
Next
| 1 |  | Turn on/off the power |
| 2 |  | Select the input signal source |
| 3 |  | Used to adjust the parameter of the projector in the menu mode |
| 4 |  | Press once: Operate picture and sound settings in AV or HDMI ModePress twice in succession: select 16:9/4:3 projection |
| 5 |  | Enter the home page |
| 6 |  | Volume up |
| 7 |  | Volume down |
| 8 |  | Close the sound |
| 9 |  | Picture flips |
| 10 |  | Confirm the option/Play or pause the video |
| 11 |  | Return to the previous menu |
| 12 |  | Switch to the previous video |
| 13 |  | Switch to the next video |
Note:
1). Install 2 pieces of AAA batteries into the remote controller before using it. Do not combine new batteries with old ones in remote controller, which can cause operation failure due to insufficient power supply.
2). When using the remote controller, please make sure that the signal transmitter of the remote controller aims at infrared signal receiver of the projector.
3). If you are not using the remote controller for an extended period, please take out batteries to prevent batteries leakage.
INSTALLATION
1. Installation Method
The projector can be hanged on the ceiling with special hanger frame, and placed on the stable desk to project the image according to the operating environment and requirements. In addition, the projector can be installed with following methods:
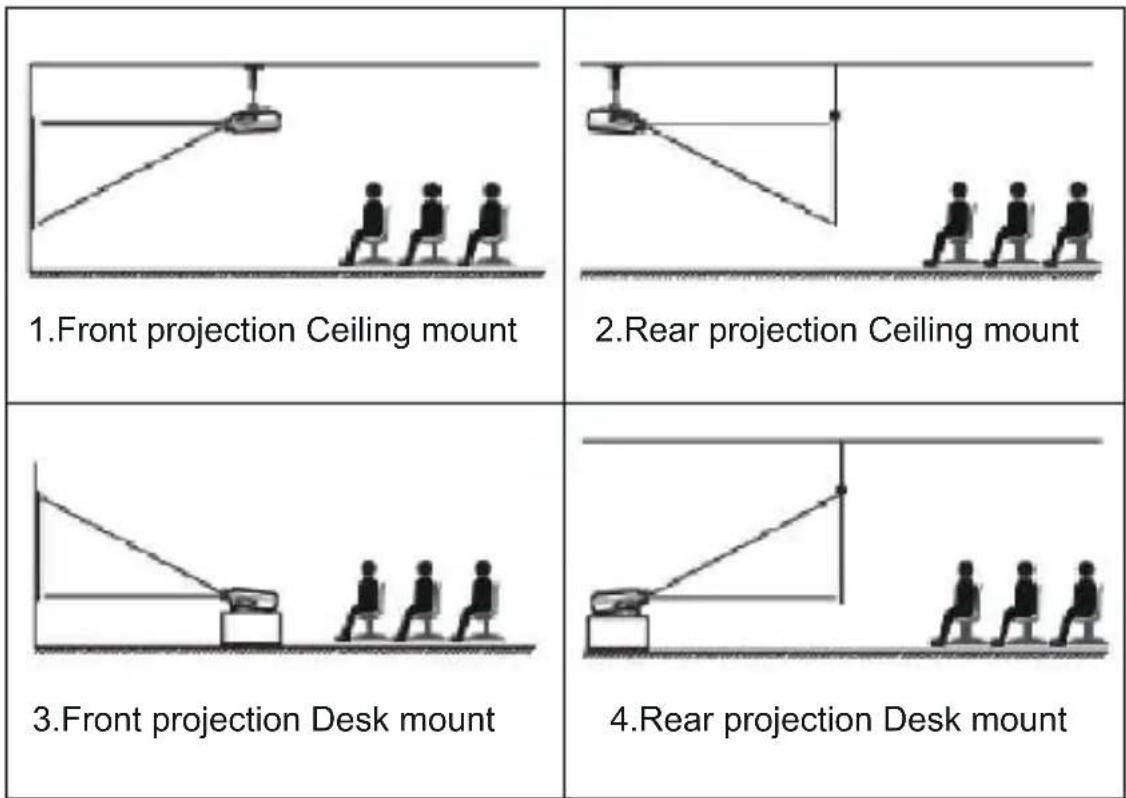
Keep the projector at a height where its lens is axial symmetry to the screen. If this is not possible, use the keystone correction function to adjust the projection image.
If you want to get a free projection screen, please contact us via aftersales@yabertech.com
| Aspect Ratio: 16:9 | |
| Distance (ft.) Screen Size | |
| 4.0 | 35" |
| 5.6 | 50" |
| 7.7 | 70" |
| 10.8 | 100" |
| 13.1 | 120" |
| 16.3 | 150" |
| 22.3 | 200" |
The recommended projection distance is about 10.8ft, the shortest projection distance is 4.0ft.
The image size depends on the distance between projector and screen, there may be 3% deviation among above listed data. Different settings cause various distances.
2. Install on the Ceiling
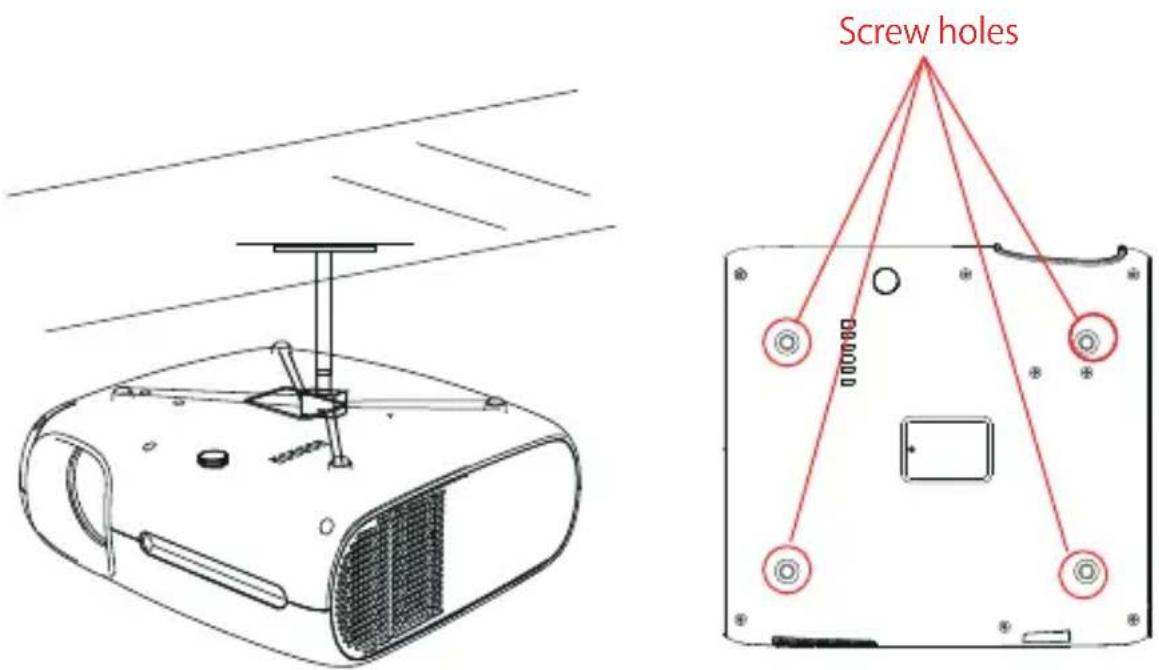
A. Please purchase an universal projector ceiling mount;
B. Remove the four rubber pads on the bottom of the projector, you will see the screw holes and use the M5*11mm screws for installing the ceiling, and then install it.
STARTING PROJECTOR
1) Press the power key on the remote controller or projector, the indicator light will turn blue;
2) Adjust the focus ring of the projector to get the best image performance; (If it is still blurry, please try to adjust the projection distance.)
3) Use the keystone function of the projector to get a rectangle projection screen;
4) Connect the external device (Smart phone, iPad, Fire TV, TV box, DVD player, Computer, etc.) in the corresponding interfaces of the projector, please be sure to select the corresponding source. If you do not select the correct source, the projector will not be able to detect the signal;
5)Select the " 🔒 " menu,enter the [ Other Setting],then you can select the option [ Language Setting ] to set your preferred language.
IMAGE ADJUSTMENT
When using the projector for the first time, it normally displays an unclear image. This is due to the lens being out of focus or the incorrect trapezoid setting.
Please follow the below steps to correct:
1.Focus Adjustment


flowchart
graph LR
    A["Fish Icon"] --> B["Single Fish Icon"]
    B --> C["Arrow Left"]
    C --> D["Single Fish Icon"]
Rotate the focus ring or lens slowly. At the same time, check the focus point carefully. The best focus point for the lens would be where the image most clear.
Note: If it is still blurry, please try to adjust the projection distance.
- Digital 4D Keystone Correction.
Use the digital 4D keystone correction of the projector to change the image to be rectangle(vertical and horizontal). Detail please refer the page 17 of this manual.
SETTING UP THE PROJECTOR
The projector's home page is as follow.

1. Select The Insert Signal Source
Select the desired insert signal source (HDMI1/HDMI2/AV) on the home-page
2.USB Disk Input Mode
2.1.Play Movie/Music/Photo/Office Suite in the USB Disk Insert Mode
1). Insert the USB Disk, the [USB] icon of the homepage will turn white.
2).Select the option [ Movie/Music/Photo/Office Suite].
3). Select the desired file (or folder to enter the subfolder) in the USB disk, then press the [OK] button to play it.
External Device

PS:
a. Buffalo Pro U7 upgraded projector supports U disk to directly play PPT, Word, Excel files.
b. If you enter from the [Movie] menu, you can only play the video, The same as other 3 options.
2.2.Play Interface

| Menu | Function |
 | Select play mode (directory play/single cycle/directory loop) |
 | Switch to the previous video |
 | Fast Backward,rewinds the video back quickly while playing it. The rewinding speed ranges from 2X to 32X |
 | Play or pause the current video |
 | Fast Forward, pushes the video to move forward quickly while playing it. The forward speed ranges from 2X to 32X |
 | Switch to the next video |
 | Select all playlists in the current folder |
 | Playing settings |
 Include | Function |
| Video subtitle | close,inner,external | Set multiple modes of video subtitles |
| Breakpoint play | close,open | You can set the video continue to play from the point where it was stopped |
| Audio track | Audio track | You can see the audio information |
| Display mode | 16:9,full,over,auto,4:3 | You can set the video aspect ratio |
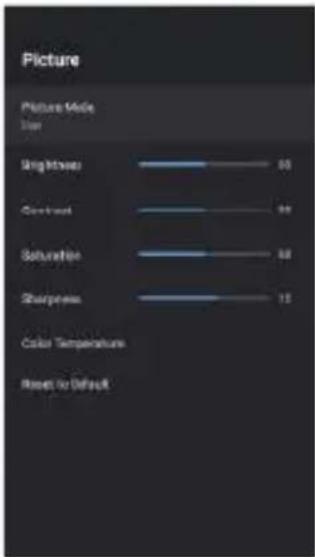
| Picture settings | Picture Mode, Color Temperature, Reset to Default | You can set the picture information |
| Sound settings | Sound Style, Equalizer Detail, Reset to Default | You can set the sound information |
| Menu | Content | Mode | Function |
| Picture Mode | User/Standard/Vivid/Sport/Movie/Game/Energy Saving | Brightness | Modify the picture parameters in the range 0-100 |
| Contrast | |||
| Saturation | |||
| Sharpness | |||
| Sound Style | User/Standard/Vivid/Sports/Movie/Music/News | Balance | Modify the sound parameters in the range 0-100 |
| Bass | |||
| Treble |
2.3. Music Play Interface

| Menu | Function |
 | Switch to the previous music. |
 | Play or pause the current music. |
 | Switch to the next music. |
 | Repeat the music. |
 | Select the music list. |
 | Set the sound information. |
2.4.Picture Play Interface
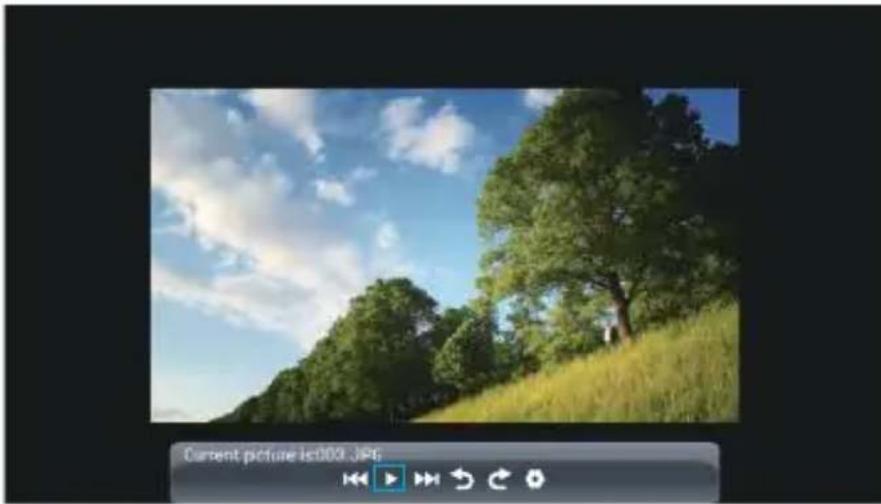
natural_image
Landscape photo of a green tree on a grassy hill under a blue sky with scattered clouds (no text or symbols visible)| Menu | Function |
 | Switch to the previous picture. |
 | Pause the auto - play mode of a picture. |
 | Switch to the next picture. |
 | Flip picture 90°to the left. |
 | Flip picture 90°to the right. |
 | Set the picture information. |
3.WiFi Setting
Wireless Connection
Warming Tips:
①The fluency of screen mirroring with wireless connection will be affected by the network environment. A bandwidth of 100Mbit or more is recommended when using screen mirroring.
②Make sure your mobile device is close to the projector when using wireless connection. A distance within 1 meter is recommended.
③ Some mobile devices may not support screen mirroring due to the compatibility.
④Any questions, please feel free to email YABER via aftersales@yabertech.com
3.1.iOS Cast (for iOS Devices)
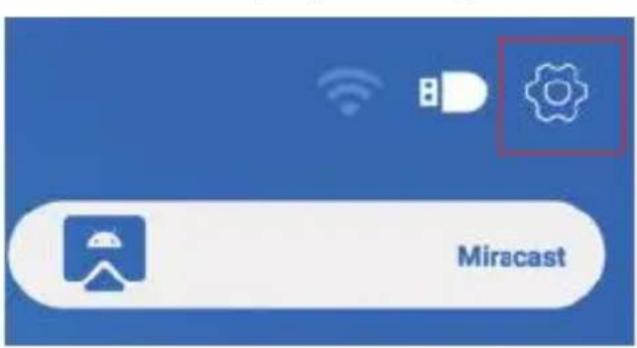
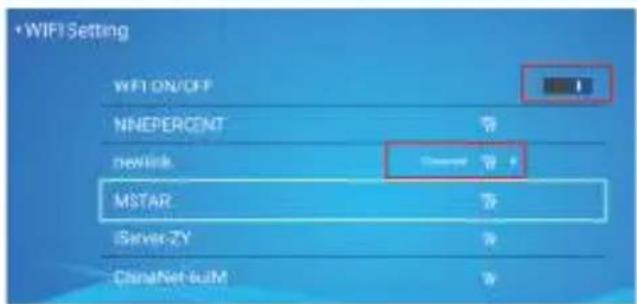
- Go to home page -- Select the [ 🔗 ] menu -- Select the [ WiFi Setting ] menu -- Open the WiFi function -- Select your home WiFi from the list -- Connect the Buffalo Pro U7 projector to your home WiFi.


- Back to home page -- Select [ iOS Cast ] menu -- Press the OK button to enter the [ iOS Cast ] menu.

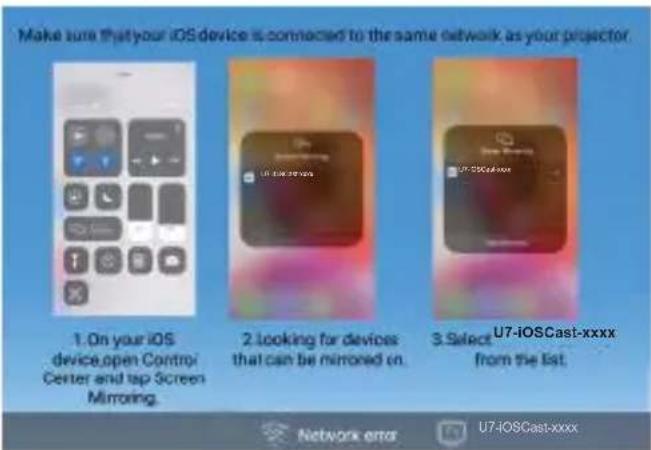
- Select the [ Settings ] menu on your iOS device -- Turn on the [ Wi-Fi ] function -- Connect your iOS device to the same home network as the projector.
4.Open the [ Control Center ] on your iOS device -- Select the [ Screen Mirroring ] function -- Select and connect the iOS Cast receiver named [ U7-iOSCast-xxxx ] -- your iOS device screen will be displayed on the projection screen after 3 seconds.
3.2.Miracast (for Android Devices)
- Go to home page -- Select the [ Miracast ] menu -- Press the OK button to enter the [ Miracast ] interface.
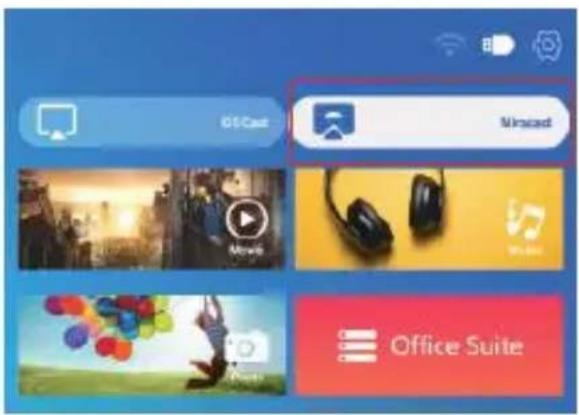
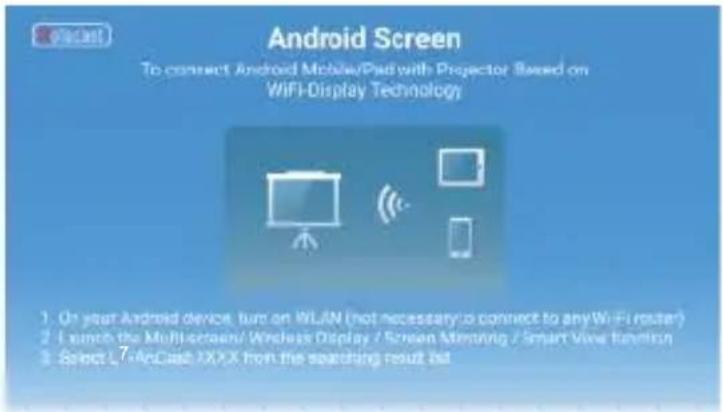
- Select the [ Settings ] menu on your Android device -- Select the [ Screen mirroring ] function -- Select your Miracast receiver named [ U7-AnCast-XX ] -- your Android device screen will be displayed on the projection screen after 3 seconds.

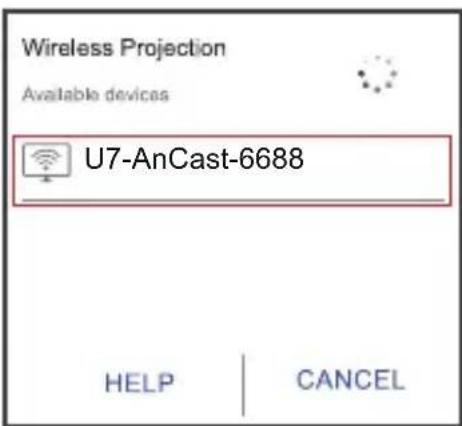

- On your Android device, tap [ Settings ] -[ WLAN Display ] -Turn [ Wi-Fi ] ON, Connect your home WiFi.
Note:
- Different brands of Android phones have different operations for select Screen Mirroring Display, please refer to your phone's manual. [Multiscreen/Wireless display/WLAN display/Screen mirroring/Wireless projection/Smart view etc.]
- Not all Android phones support this function. Please make sure it is supported before use.
4. Bluetooth Setting
Go to home page -- Select the [ 🔗 ] menu -- Select the [ Bluetooth Setting ] Option -- Open the Bluetooth function and your Bluetooth device -- Scan the Bluetooth devices nearby automatically -- Choose the Bluetooth device desired -- it will be paired and connected automatically.
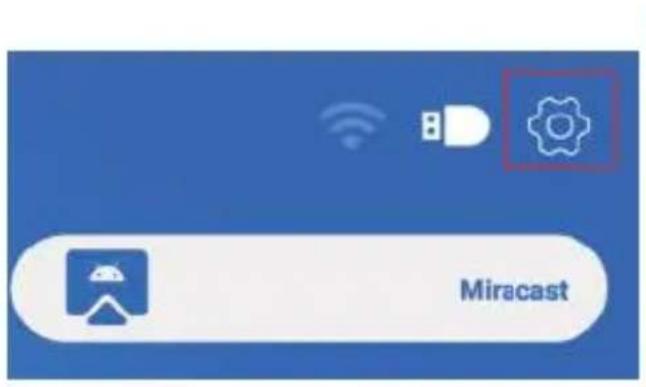


Note:
- The Buffalo Pro U7 projector is compatible with the Bluetooth headsets, Bluetooth speakers and Airpods, but not the Bluetooth keyboards or Bluetooth phones.2. If you have any question, please feel free to email YABER via: aftersales@yabertech.com
5.Projector Image Setting
5.1.Projection Mode


natural_image
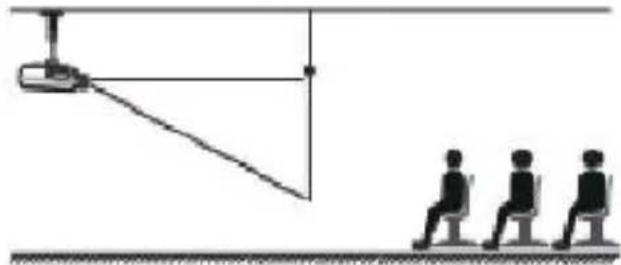
Simple line drawing of a ceiling-mounted device connected to three seated figures (no text or symbols)- Front projection Ceiling mount
natural_image
Diagram showing a suspended object with three seated figures on a ground surface, no text or symbols present.- Rear projection Ceiling mount

natural_image
Simple line drawing of a projector setup with three seated figures (no text or symbols)3.Front projection Desk mount

natural_image
Diagram showing a person observing a camera from a viewing platform, with three seated figures nearby (no text or symbols present)- Rear projection Desk mount
5.2. Keystone Advanced & 4-Point Keystone
5.2.1.Vertical Keystone Correction
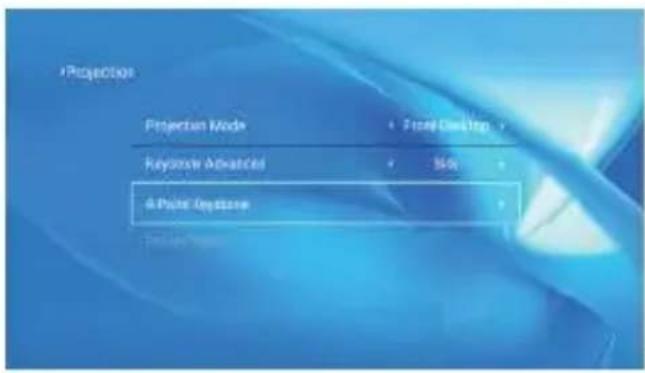
Step 1: Select the [ Front ] option in the [ Keystone Advanced ] menu, then press the ▼ button to enter the [ Manual Keystone ] menu.

Step 2: If the projection image shows as (1), press the button on the remote controller or projector to increase the vertical parameter (-50\~0), until to achieve the projection image (2).
Step 3: If the projection image shows as (3), then press the button on the remote controller or projector, and decrease the vertical parameter (0\~50), until to achieve the projection image (4).

(1)


(2)

(3)


(4)
5.2.2. Horizontal & Vertical Keystone Correction
When the projection screen is not rectangular, it can be adjusted by 4-point keystone correction.
Step 1: Select the [Side] option in the [Keystone Advanced] menu.
Step 2: Press the button to select the [4-Point Keystone] menu, then press the [OK] bottom to enter the submenu.
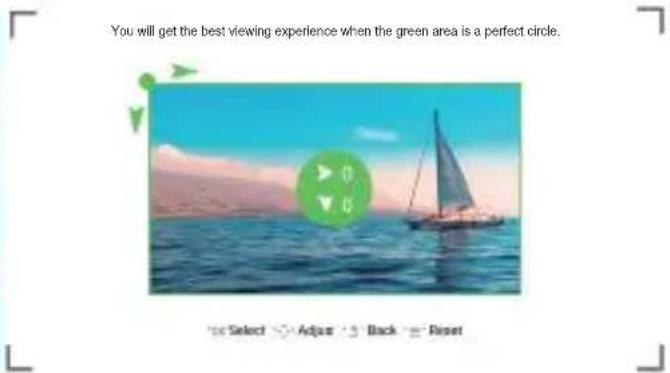
Step 3: Keep pressing the OK button on the remote controller or projector to select the point.
Step 4: Press the arrow keys on the remote controller or projector to adjust the horizontal or vertical parameters, until the projection screen becomes the desired rectangle.

natural_image
Solid gray trapezoid shape with no text or symbols
natural_image
Solid gray trapezoid shape with no text or symbols


natural_image
Simple graphic with a blue downward arrow above a gray rectangle (no text or symbols)OK Pick point : Keep pressing the OK button on the remote controller or projector, until the positioning icon appears at the point desired, then release the button immediately.
Adjustment :Press the arrow keys on the remote controller or projector to adjust the horizontal or vertical parameters.
Back : Press the key on the remote controller to back to previous page.
≡ Reset :Press the ☐ key on the remote controller to restore the original parameters.
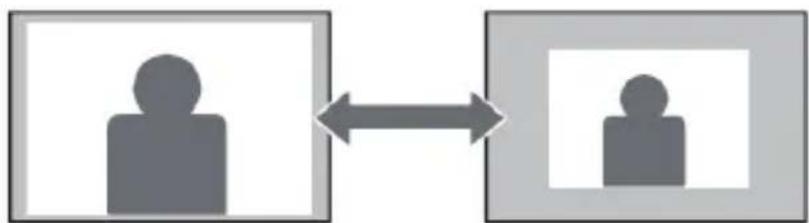
5.3.Digital Zoom
Step 1: Select the [ Digital Zoom ] option and press the OK button on the remote controller or projector to enter the submenu.
Step 2: By pressing the button on the remote controller or projector, you can reduce the height and width of projection size up to 50%.


| Menu | Function |
| Online Update | Online update |
| Local Update | Local update |
| Restore Factory | Restore user operation application configuration and system setting |
7. Other Setting
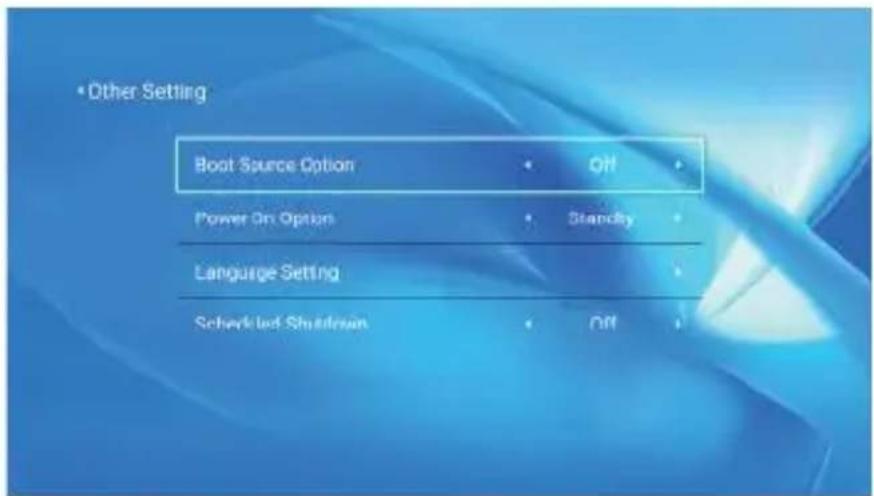
| Menu | Function |
| Boot Source Option | Off/HDMI1/HDMI2/AV |
| Power On Option | Direct/Standby |
| Language Setting | Set up the language |
| Scheduled Shutdown | Off/10min/20min/30min/60min/120min |
About the Direct/Standby Power On Option
Direct Mode: When the projector is powered on, the projector will be automatically turned on.
Standby Mode: When the projector is powered on, you need to press the ⏻ button on the remote controller or projector to turn on the projector.
8.About
| Menu | Content |
| System Version | V1.0.0.2:2022-XX-XX |
| MAC Address | Ac:5d:5c:c5:d9:83 |
SIGNAL LINES CONNECTION
Buffalo Pro U7 projector has 6 interfaces, HDMI ports*2/ USB ports*2/ 3.5mm headphone output/ AV in. Please select the correct connecting port to connect your device (PC, Phone, DVD Player, Sound bar, USB, PS4 etc.)
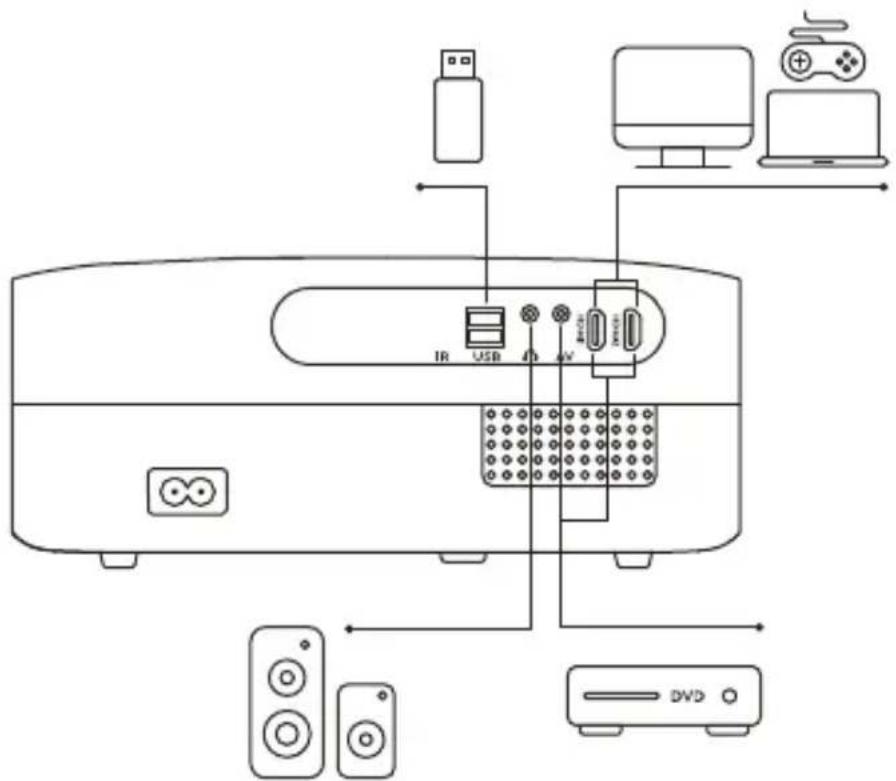
1. Connect USB Disk
1) Insert the U disk into either of the two usb input ports;
2) You can directly enter the start-up screen on the home page, select the option [ Movie/Music/Photo/Office Suite]
3) Select the desired file (or enter the subfolder) in the USB disk, then press the [OK] button to play it.
2. Connect the Devices via the HDMI ports
1) Connect your TV stick or laptop to any HDMI port of the projector;
2) Enter the home page to select the corresponding HDMI1 or HDMI2 as the signal source.
3. Connect to the DVD Player
Use the 3-in -1 AV cable in the package
1) Turn on your DVD player and the projector;
2) Connect the colorful female connectors to your DVD player's RCA cable with the 3-in-1 AV cable in the package;
3) Connect the black connector to the AV port of the projector, enter the home page to select [AV] as the signal source.
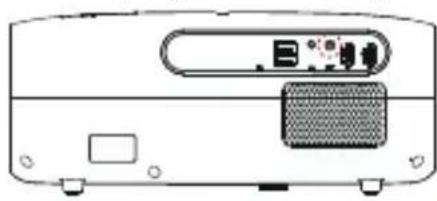
natural_image
Front view of a projector with visible ports and screen (no text or symbols)
Or connect to the DVD Player with the HDMI cable in the package.

natural_image
Front view of a computer monitor with ports and indicator lights (no visible text or symbols)
flowchart
graph LR
    A["HDMI"] <--> B["Data Transmission Line"]
    B --> C["HDMI"]
    C --> D["Photograph"]
4. Connect to the Sound bar/Speaker
If your speaker has AUX port, please use your 3.5mm audio cable connect the projector and your speaker as the picture shows, enter the home page to select [AV] as the signal source.

natural_image
Front view of a computer monitor with a speaker grille and indicator lights (no visible text or symbols)
SAFE SHUTDOWN
- Press the ⏻ button on the projector or remote controller, then press OK key to power off the projector.
- Unplug the power cord of the projector.
- Cover the lens and store the projector in a cool and dry place.
WARRANTY
Thank you so much for your purchase and support! We provide 3-year warranty for Buffalo Pro U7 projector. If you have any questions, please feel free to contact us via aftersales@yabertech.com.
TROUBLESHOOTING
Problems listed below might occur during the operation of your projector. Please refer to the possible factors which might cause the issue to do troubleshooting.
- When turning on the power switch, the indicator light does not work.
1) The power might not be connected well.
2) Check the over-heat protection system.
- The remote controller does not communicate with the projector.
1) The power switch at the back of the projector is turned on or off?
2) The remote controller's batteries are depleted?
3) Something obstructing the signal between the remote and IR
4) Strong light on IR directly.
- No image on the screen.
1) Is the channel set-up correct?
2) Is there an input signal?
3) Is the input cable plugged well?
4) Under PC mode, is the refresh rate > 75KHz ?
- Blue screen, no picture, no sound.
Input cables connected right?
5.Picture right, no sound.
1) Input cables connected right?
2) Volume at min or on Mute.
6.Can't play the movies.
1)The format of the video is right?
2)Files are broken?
3)Device is broken?
- There is picture, no sound?
The decode system doesn't match.
- Can't find devices when connected with hard drive or flash drive.
Check if the device is broken.
- Auto-off after working for a while.
1) The projector ventilation is blocked.
2) The over-heat protection system.
FCC ID:2A4K9-PROU6
FCC STATEMENT :
This device complies with Part 15 of the FCC Rules. Operation is subject to the following two conditions:
1) This device may not cause harmful interference, and
2) This device must accept any interference received, including interference that may cause undesired operation.
Warning: Changes or modifications not expressly approved by the party responsible for compliance could void the user's authority to operate the equipment.
NOTE: This equipment has been tested and found to comply with the limits for a Class B digital device, pursuant to Part 15 of the FCC Rules. These limits are designed to provide reasonable protection against harmful interference in a residential installation. This equipment generates uses and can radiate radio frequency energy and, if not installed and used in accordance with the instructions, may cause harmful interference to radio communications. However, there is no guarantee that interference will not occur in a particular installation. If this equipment does cause harmful interference to radio or television reception, which can be determined by turning the equipment off and on, the user is encouraged to try to correct the interference by one or more of the following measures:
Reorient or relocate the receiving antenna.
Increase the separation between the equipment and receiver.
Connect the equipment into an outlet on a circuit different from that to which the receiver is connected.
Consult the dealer or an experienced radio/TV technician for help.
FCC Radiation Exposure Statement:
This equipment complies with FCC radiation exposure limits set forth for an uncontrolled environment. This equipment should be installed and operated with minimum distance 20cm between the radiator & your body.
WARRANTY AND SERVICE
We guarantee the unit TO BE free from defects in material or workmanship for a period of one (1) year from the date of purchase.
Should this unit be operated under conditions other than those recommended or at voltages other than the voltage indicated on the unit, or any attempts made to service or modify the unit, this will render WARRANTY VOID. The product you buy may sometimes differ slightly from illustration.

DISPOSAL:
This marking indicates that this product should not be disposed with other household wastes throughout the EU. To prevent possible harm to the environment or human health from uncontrolled waste disposal, recycle it responsibly to promote the sustainable reuse of material resources. To return your used device, please use the return and collection systems or contact the retailer where the product was purchased. They can take this product for environmental safe recycling.
Declaration of Conformity
We (Manufacturer is responsible for this declaration)
YABER TECHNOLOGIES CO., LIMITED.
(Company name)
Room 406,4 Floor,B Building,BanTian International Center,HuanCheng
South Road, Ban Tian Street, Long Gang District, Shenzhen, China (Company address)
declare under our sole responsibility that the product
Trade name: Yaber
Equipment: Entertainment Projector
Model No.: Buffalo Pro U7
to which this declaration relates is in conformity with the essential requirement set out in the Council Directive on the Approximation of the laws of the Member States relating to LVD Directive(2014/35/EU) &
EMC Directive(2014/30/EU) & RoHS(2011/65/EU) product is responsible to affix CE marking, the following standards were applied:
EN 62368-1:2014+A11:2017
EN IEC 62311:2020
ETSI EN 301 489-1 V2.2.3(2019-11)
ETSI EN 301 489-17 V3.2.4(2020-09)
ETSI EN 301 489-3 V2.1.1(2019-03)
EN 55032:2015+A11:2020
EN 55035:2017 +A11:2020
EN IEC 61000-3-2:2019
EN 61000-3-3:2013+A1:2019
ETSI EN 300 328 V2.2.2(2019-07)
ETSI EN 301 893 V2.1.1(2017-05)
natural_image
Simple smiley face icon with two dots above and a curved line below (no text or symbols)
www.yabertech.com

aftersales@yabertech.com

@Yaber Entertainment Projector

@Yaber Entertainment Projector
- YABER Lifetime Professional Support
- TIPS:
- REMOTE CONTOL
- Note:
- INSTALLATION
- Installation Method
- Install on the Ceiling
- STARTING PROJECTOR
- IMAGE ADJUSTMENT
- SETTING UP THE PROJECTOR
- Select The Insert Signal Source
- 2.USB Disk Input Mode
- PS:
- 2.2.Play Interface
- Music Play Interface
- 2.4.Picture Play Interface
- 3.WiFi Setting
- Wireless Connection
- Warming Tips:
- 3.1.iOS Cast (for iOS Devices)
- 3.2.Miracast (for Android Devices)
- Bluetooth Setting
- 5.Projector Image Setting
- 5.1.Projection Mode
- Keystone Advanced & 4-Point Keystone
- 5.2.1.Vertical Keystone Correction
- Horizontal & Vertical Keystone Correction
- 5.3.Digital Zoom
- Other Setting
- About the Direct/Standby Power On Option
- 8.About
- SIGNAL LINES CONNECTION
- Connect USB Disk
- Connect the Devices via the HDMI ports
- Connect to the DVD Player
- Connect to the Sound bar/Speaker
- SAFE SHUTDOWN
- WARRANTY
- TROUBLESHOOTING
- FCC STATEMENT :
- This device complies with Part 15 of the FCC Rules. Operation is subject to the following two conditions:
- FCC Radiation Exposure Statement:
- WARRANTY AND SERVICE
- DISPOSAL:
- Declaration of Conformity
Brand : Yaber
Model : Pro U7
Category : Projector