
Royal DS 5 C - Pressure sprayer EINHELL - Free user manual and instructions
Find the device manual for free Royal DS 5 C EINHELL in PDF.


| Product Type | Cordless Drill/Driver |
| Brand | Einhell |
| Model | Royal DS 5 C |
| Voltage | 18 V |
| Battery Type | Li-Ion |
| Chuck Type | Keyless |
| Max Drilling Diameter (Steel) | 10 mm |
| Max Drilling Diameter (Wood) | 25 mm |
| No-Load Speed | 0-650 rpm |
| Torque Settings | 20+1 |
| Weight | 1.5 kg |
| Dimensions (L x W x H) | 200 x 70 x 250 mm |
| Charging Time | Approx. 1 hour |
| Includes | Battery, Charger, Double-ended Bit, Belt Clip |
| Key Features | Variable speed, Forward/reverse, LED light |
| Maintenance | Clean chuck and vents after use; store in dry place |
| Safety | Use safety glasses; disconnect battery before maintenance |
| Spare Parts Availability | Yes, from Einhell service centers |
| Warranty | 2 years (subject to registration) |
Frequently Asked Questions - Royal DS 5 C EINHELL
User questions about Royal DS 5 C EINHELL
0 question about this device. Answer the ones you know or ask your own.
Ask a new question about this device
Download the instructions for your Pressure sprayer in PDF format for free! Find your manual Royal DS 5 C - EINHELL and take your electronic device back in hand. On this page are published all the documents necessary for the use of your device. Royal DS 5 C by EINHELL.
USER MANUAL Royal DS 5 C EINHELL
natural_image
Simple diagram showing a person holding a pole with an arrow indicating rotation (no text or symbols)
natural_image
Cross-sectional view of a mechanical component with concentric rings and labeled section A (no text or symbols beyond label)
Montage
● The pressure sprayer is designed for spraying common home and garden solutions. This is primarily meant to include pesticides, weed killers and liquid fertilizers.
● The pressure sprayer is not designed to spray acidic and caustic liquids. Nor should it be used to spray impregnating agents.
● Only use a suitable nozzle wire or cleaning agent to clean clogged nozzles.
- Do not spray contents of sprayer on persons or animals.
● Always wear protective clothing when spraying pesticides and insecticides.
● Ensure that liquid sprays are not heated beyond the permitted operating temperature of 40 °C .
- When mixing and working with spray solutions, always follow the manufacturer's instructions.
● Each time the spraying unit has not been used for an extended period of time it should be checked for possible damage prior to reusing it.
- Immediately replace defective parts.
● Use only original replacement parts.
- Do not leave the unit (filled or empty) in direct sunlight.
● Before placing the unit in winter storage, thoroughly clean and dry it out so that it is not damaged by freezing temperatures.
- We will not be liable for any damage that results from improper repairs and/or improper handling of the unit (e.g. using the unit in ways for which it was not intended).
- Opening the unit or performing maintenance work on it is only permitted when the tank is depressurized.
● To relieve the pressure, pull up the funnel-shaped knob connected to the safety valve.
● Only spray pesticides that have been approved by the German Biological Research Center for Agriculture and Forestry (BBA) or equivalent.
- Please observe the safety data sheets for chemical materials and preparations compliant with DIN 52 900, "DIN Safety Data Sheet for Chemical Materials and Preparations".
- Pesticides include - but are not limited to - herbicides, insecticides, fungicides and growth regulators as well as materials that are intended to be used in conjunction with these agents in order to modify their properties or effects.
Maintenance
● To change the pump membrane, pull up the pump lever as far as it will go, turn it counterclockwise until you come against notable resistance, and then turn it a little further counterclockwise until the cover plate and the bayonet separate.
- Press the membrane plate out of its holder, insert a new membrane and lubricate it with acid-free grease.
● After using the unit and prior to performing any maintenance work, always relieve the pressure by simply pulling up on the funnel-shaped knob connected to the safety/overpressure valve (letter C, Fig. 3).
Technical data
Pressure sprayer DS 5 C
| Max. filling capacity 5 l |
| Total filling capacity 7 l |
| Volumetric flow rate, Vmax = 1.07 liters/mln. |
| Permissible operating pressure 3 bar |
| Permissible operating temperature + 40°C |
| Safety valve / vent valve 1 |
| Nozzle hollow cone 1 mm |
| Nozzle spraying angle max. 60° |
| Repulsion angle at the nozzle less than 5N |

GB

natural_image
Diagram showing a person holding a long pole with a curved arrow indicating motion (no text or symbols)
natural_image
Cross-sectional view of a mechanical component with concentric rings and labeled section A (no text or symbols beyond label)
Assembly
● Screw the spray tube to the pistol grip (Figure 1).
- Do not unscrew the overpressure valve (letter C, Fig. 3)!
- Check to ensure that the screw connections for the hose at the spray gun handle and on the tank are tight!
Starting up and venting
● Unscrew the feed funnel from the bottom of the pressure sprayer (Fig. 2/Pos. A).
● Screw out the pump by turning the pump grip (counter-clockwise).
● Screw the feed funnel onto the tank (Fig. 3/Pos. A).
- Fill the container up to no further than the 5 liter mark with the preparation you want to spray. Follow the instructions issued by the producer of the preparation you are using.
- Remove the feed funnel from the tank.
● Screw in the pump again (clockwise) until it is tight.
● Screw the feed funnel back onto the bottom of the pressure sprayer.
● Turn the pump grip slightly counter-clockwise in order to release it from the bayonet lock.
● Build up pressure in the container by pumping up and down. The current pressure inside the tank can be read off of the pressure gauge (Fig. 3/Pos. B). You can build up more or less pressure in the container depending on the force with which you want to spray. The overpressure valve (Fig. 3/Pos. C) triggers at a positive pressure of 3 bar and relieves any pressure exceeding this amount.
● To spray, simply squeeze the pistol grip.
Spraying will stop as soon as you let go of the
pistol grip.
● Clean the sprayer each time after you have used it and leave it open to dry.
- You can prolong the working life of the sprayer by occasionally applying resin- and acid-free grease (Vaseline) to the seal rings and collars.
- Please note: Severe stress during transportation, use and storage, negative environmental factors (at the point of use and storage), and poor maintenance and care may cause the sprayer to suffer premature wear. Each time before you use the sprayer it is important, therefore, to check that it is in safe and good operating condition and that there are at least no visible signs of external damage.
We recommend that you arrange for a specialist or Service Center to check whether the sprayer is still safe for operation as soon as you discover any defects with a potentially negative effect on safety and at least every 5 years.
GB

Pull the pump lever all the way up until it stops, then turn it counterclockwise to unscrew it from the tank.

Always use the feed funnel when filling the tank with a spray solution!

Keep a firm grip on the spray wand and do not direct the stream toward persons!

Flat spray pattern with angle of 60°

Do not place the pressurized tank in direct sunlight for extended periods of time!

Do not subject the tank to negative temperatures when it is filled with a spray solution!

Never fill the pressure tank with a poisonous spray solution or use the tank to spray it!

Always depressurize the tank prior to cleaning or maintaining it!
Pull up on the relief valve to release the pressure!
E
natural_image
Diagram showing a person holding a pole with an arrow indicating rotation (no text or symbols)
natural_image
Cross-sectional view of a mechanical component with concentric rings and labeled section A (no text or symbols beyond label)
Montaje
natural_image
Diagram showing a person holding a pole with an arrow indicating rotation (no text or symbols)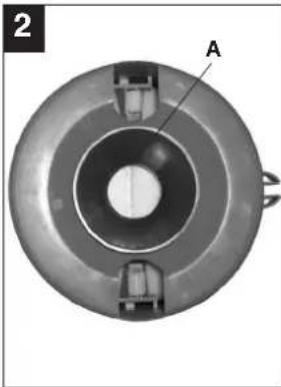
natural_image
Cross-sectional view of a mechanical component with concentric rings and labeled section A (no text or symbols beyond label)
Asennus
natural_image
Silhouette of a person holding a long pole with a directional arrow indicating rotation (no text or symbols)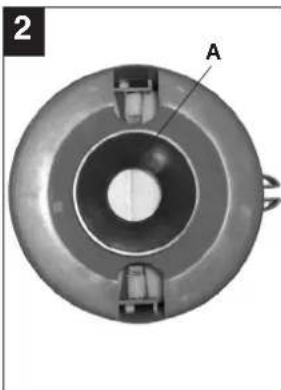
natural_image
Cross-sectional view of a mechanical component with labeled section A (no text or symbols beyond label)
Felszerelés
Eschenstraße 6 · D-94405 Landau/Isar (Germany)
Info-Tel. 0190-145 048 (62 Cu/Min.) • Telefax 0 99 51-26 10 und 52 50
The guarantee period begins on the sales date and is valid for 2 years.
Responsibility is assumed for faulty construction or material or functional defects.
Any necessary replacement parts an necessary repair work are free of charge.
We do not assume responsibility for consequential damage.
Your customer service partner
EINHELL-TAKUUTODISTUS
S.C. A Ap. 9 Sector 1
RO 75 121 Bucharest
Tel. 021 4104800, Fax 021 4103568
CZ Poker Plus S.R.O.
Areal Vu Bechovice
Budava 10B
CZ-19011 Praha - Bechovice 911
Tel.+Fax 02579 10204
YU MP Trading d.o.o.
Cika Ljubina 8/IV
YU 11000 Beograd
GR An. Mayrofidopoulos S.A.
Technical & Commercial company
- Papastratou & Asklipiou Str.
GR 18545 Piräus
Tel 0210 4136155, Fax 0210 4137692
RUS Bermas
Altufyevskoye shosse, 2A
RUS 127273 Moscowi
Tel 095 3639580, Fax 095 3639581
EH 04/2003
Brand : EINHELL
Model : Royal DS 5 C
Category : Pressure sprayer