
Victoria-V-210617 - Slicer ADE - Free user manual and instructions
Find the device manual for free Victoria-V-210617 ADE in PDF.


| Product Type | Vertical Slicer |
| Brand | ADE |
| Model | Victoria-V-210617 |
| Blade Diameter | 250 mm (Victoria 250-V) / 300 mm (Victoria 300-V) |
| Slice Thickness | 0 – 15 mm, infinitely adjustable |
| Cutting Area (W x D) | 180 x 175 mm (250-V) / 215 x 205 mm (300-V) |
| Dimensions (W x D x H) | 460 x 440 x 390 mm (250-V) / 520 x 610 x 440 mm (300-V) |
| Net Weight | Approx. 20 kg (250-V) / 23 kg (300-V) |
| Power | 0.23 kW |
| Voltage / Frequency | 230 V / 50-60 Hz |
| Duty Cycle | Maximum 40% (24 minutes per hour) |
| Noise Level | < 70 dB at 1 m |
| Vibration | < 2.5 m/s² |
| Material | Anodized aluminum housing, product carriage, feed plate, and sickle guard |
| Blade Types | Smooth (default), Teflon-coated smooth, serrated, serrated with Teflon (optional) |
| Intended Use | Slicing cooked/raw sausage, warm/cold meat, cheese, bread (depending on blade) |
| Not Suitable For | Frozen products, bones, fruits, vegetables, non-food items |
| Safety Devices | Blade guard, slice assembly cover, product carriage lock, sharpening device lock, emergency stop |
| Accessories Included | Food pusher, leftover holder, sharpening device, blade removal device (optional) |
| Cleaning | Hand wash removable parts at 60°C; no dishwasher; disassemble daily |
| Lubrication | Petroleum jelly (e.g., MARCOL 82) on carriage guide, arm, blade hub |
| Warranty | 2 years from purchase (does not cover moving parts, wear, or misuse) |
Frequently Asked Questions - Victoria-V-210617 ADE
User questions about Victoria-V-210617 ADE
0 question about this device. Answer the ones you know or ask your own.
Ask a new question about this device
Download the instructions for your Slicer in PDF format for free! Find your manual Victoria-V-210617 - ADE and take your electronic device back in hand. On this page are published all the documents necessary for the use of your device. Victoria-V-210617 by ADE.
USER MANUAL Victoria-V-210617 ADE
OPERATING INSTRUCTIONS
Vertical Slicer

natural_image
A white ADE cutlotype solar water heater with a flat blade and control knobs (no text or symbols visible on the device itself)VICTORIA-V Series
Victoria-V-210617-Rev007-UM-en
CONTENTS
1 FOREWORD 2
2 START-UP....3
3 USING THE POTATO PEELING MACHINE....5
4 SHARPENING OPERATIONS....6
5 CLEANING 7
6 TRAINING 9
7 DISPOSAL 9
8 WARRANTY....9
9 TECHNICAL DATA....10
10 CE MARKING AND DECLARATION OF CONFORMITY.... 11
11 WIRING DIAGRAMS 12
12 EXPLODED VIEWS.... 14
13 SPARE PARTS LISTS.... 15
2 FOREWORD

This symbol means: "Observe operating instructions." Read these operating instructions carefully and observe the information contained therein. Keep these operating instructions handy for future reference.
This manual has been written to comply with the Machinery Directive as amended.
With it, the manufacturer intends to furnish the customer with clear and concise instructions for the use and maintenance of the machine, as well as information regarding the safety devices with which it is fitted to assure maximum efficiency throughout its service life.
The slicers may be updated; this eventuality shall not prejudice the instructions and explanations contained in the manual.
Before starting up the slicer, you must read this manual carefully.
Should this manual be damaged or lost, apply for a copy from the manufacturer immediately.
Many accidents and injuries that occur when using the machine result from insufficient familiarity with its functions and safety devices. Before starting work with the machine, please read the instructions herein carefully and follow them to the letter.
2.1 Introduction
The slicers have been designed to comply with applicable safety standards. Consequently, all our slicers are fitted with a plate featuring the "CE" mark attesting to the product's conformity with said provisions.
The housing, product carriage, feed plate, and sickle guard are made of anodized aluminum. The housing design enables easy cleaning. The blade is set in motion by an electric motor with a V-belt drive, which has a noise level of <70 dB measured at a distance of 1 meter at a height of 1.60 meters.
The total vibration of the parts coming into contact with the user's hands and arms is < 2.5m / s^2 .
2.2 Use
This slicer is intended for slicing cooked and raw sausage products, warm or cold meat, cheese, and bread, depending on the blades used. The machine is fitted with a smooth blade by default. When slicing cheese, we recommend using a blade with Teflon coating at cheese temperatures between 7 and 10 °C. The machine can also be fitted with optional serrated blades with and without Teflon coating, which are ideal for slicing bread. The machine is not suitable for slicing some types of hard cheese and bread. The machine allows adjusting the slice thickness up to 15 mm.

Never use the slicer to slice frozen products, meats, or sausage products with bones, fruits, vegetables, or non-food products.
Any attempt to slice such products or similar foods may cause severe damage to the machine and render the warranty null and void.
The machine's duty cycle is sufficient for preparing food for about 60 (Victoria 250-V) and 100 people (Victoria 300-V). These values are merely recommendations based on experience and may vary depending on the application. The maximum duty cycle is 40% (24 minutes per hour). The electric motor must then be allowed sufficient time to cool down. Operating the machine continuously for shorter periods also shortens the cooling intervals.
The machine may only be used in its original condition and with original parts. It is strictly forbidden to dismantle the safety devices. Should any safety devices be damaged, immediately shut down the machine and contact ADE for repair or replacement.
2.3 Residual risks
Even though extensive safety precautions have been taken on the machine, there are still residual risks for the operator in his daily work with the machine. They occur, in particular, when the operator attempts to push the product against the blade with their hand. Always use the leftover holder provided to feed the food to be sliced. The operator must always keep their hands clear of the carriage during slicing.
3 START-UP
The slicer is supplied fully assembled and ready for use. Remove the packing material, take the machine out of the carton, and check the carton contents, making sure they correspond to the specifications on the packing slip. You must also ensure the machine is intact and has not been damaged during transportation.
Any damages to the slicer must be reported to the transport company in writing within three days of the date of the accompanying documents, specifying in detail the damages found.

Packaging materials are recyclable and must never be disposed of with household waste. Check with the local authorities for the appropriate ways to dispose of waste properly.
The machine must be disposed of under local regulations.
Never dispose of the packaging material out in the open!
3.1 Installation
Place the slicer on a flat, smooth, and vibration-free surface that is stable and sturdy enough to ensure adequate safety, considering the weight of the machine. It is recommended that the table height be about 70 cm and may vary depending on the operator's height. Any unevenness of the surface on which the machine is rested can be compensated using the adjustable feet. Ensure a free space of at least 200 mm around the machine to allow sufficient motor cooling.

Before plugging the machine into the power supply, check that the machine's power rating specified on its nameplate corresponds to the supply voltage and frequency of your local power grid.
In the event of a mismatch, never connect the machine to the power supply, as this may cause damage to the machine and lead to fire!
The machine controls (on/off switch and slice assembly) should face the operator, with the blade and motor facing away from the operator.
A minimum space of 4 sq.m should be provided to ensure convenient and smooth operation, cleaning, and maintenance of the machine.
Proper machine operation is guaranteed at temperatures between +8 °C and +38 °C and relative humidity not exceeding 80%.
3.2 Wiring
The fish slicing machine has a Schuko plug.
Before plugging the slicer into the power outlet, ensure the power grid features an electrical overload cutout.

Unless otherwise specified, the slicer must always be connected to a 400 V power supply!
Always ensure that the machine's power rating specified on its nameplate matches the specifications of your local power grid!
When connecting the machine to the power supply, make sure the connection cable is laid in a way that prevents any risk of tripping or falling.
3.3 Mechanical safety devices
- The blade is completely protected by a rigidly fixed guard, excluding the food slicing area.
- The product carriage can only be removed if the slice assembly covers the blade and the graduated knob is set to "0" (zero) or beyond that up to the stop.
- The slice assembly can only be opened (using the graduated knob) if the product carriage is secured in its normal operating position.
- The blade can be removed with the aid of safety gloves or a blade removal device (optional). In any case, the user must exercise particular caution and care.

All safety devices are permanently fitted to the machine and must not be removed. Dismantling or tampering with them or any unauthorized modifications would make the machine unsafe. This will result in the manufacturer no longer being responsible for accidents or injuries.

Use the appliance as it was designed to be used. Improper or unintended use of the machine may pose a risk to the health and safety of persons and result in property damage.

The manufacturer shall not be held liable for any damage caused by improper use of the machine, failure to comply with the safety information in this manual, and tampering with or modifications to the machine without official approval from the manufacturer.
3.4 Electrical safety devices
- The slicer stops automatically in the event of a power failure. Restart the machine once the power supply is restored.
3.5 Acceptance testing
- Make sure all the slicer components are correctly assembled.
- Check that the knurled screw securing the blade guard is locked in place.
- Press the green start button and red stop button and check that the machine can be switched on and off.
- Check the sliding of the product carriage and food holder.
- Check the operation of the blade sharpening device.
- Check the opening of the slice assembly.
- Check that the product carriage can only be removed if the graduated knob is set to the "0" position and that the handle then remains locked.

If you find any malfunctions, immediately shut down the machine, tag it clearly as "DEFECTIVE," and contact customer service!
3.6 Safety precautions
- The slicer must only be operated by trained personnel.
- Children, disabled persons, and untrained personnel must not be allowed to operate the machine.
- Never operate the machine while under the influence of alcohol or drugs.
- Never push the product against the blade by hand while the machine is running.
- Never leave the machine unattended while it is running.
- Before carrying out any maintenance work (except for blade sharpening), unplug the machine from the power outlet.
- Never clean the machine under running water or in a water basin.
-
Should you notice any unusual noises or unpleasant odors coming from the machine, shut it down immediately, disconnect it from the power supply, and contact customer service.
-
Never use the machine with a damaged plug or cord. If you find any defects, shut down the machine immediately and have it repaired by the manufacturer or an authorized service center.
- The power cord may only be replaced by authorized and trained personnel.
3.7 Operation
Use the slicer exclusively as it was designed to be used.
The machine comes with a food pusher that helps push the food against the blade.

Never push the product towards the blade by hand!
Keep hands well away from the blade and only use the product carriage, carriage arm, or leftover holder to move the product carriage safely back and forth.
4 USING THE POTATO PEELING MACHINE
4.1 Machine overview

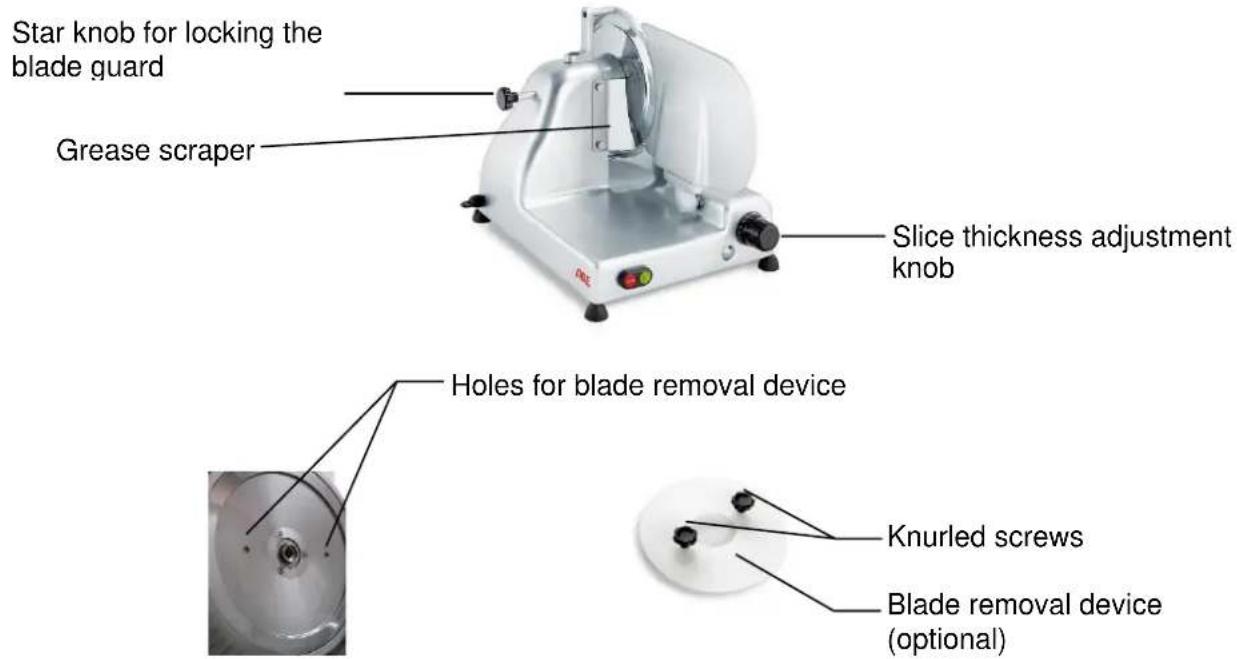
4.2 Operating functions
Two buttons are used to operate the slicer: the green button switches the machine on, and the red button switches it off.
Between the two power buttons is a white power lamp that indicates when the blade is rotating. Whenever machine operation is interrupted due to a voltage drop, the green start button must be pressed to restart the machine.
4.3 Switching on
Press the green start button to switch on the machine. The white power lamp between the start and stop buttons indicates that the machine is running.
4.4 Feeding the product
You must only feed the product when the machine is switched off. The leftover holder is rigidly fixed to the machine for safety reasons. If the food is too long to fit within the movement range of the leftover holder, the latter should be placed loosely on top of the food. If the food fits easily within the movement range of the leftover holder, the latter should be placed behind the food. With the product fed and using the food pusher or the carriage arm, move the product carriage back and forth steadily at an appropriate pace to slice the product.
4.5 Adjusting the slice thickness
The slice thickness is infinitely adjustable from 0 to 15 mm. To adjust the slice thickness, use the knob located above the control unit with a 1 mm increment scale. This will adjust the position of the stop plate. When the cutting process is complete, you must always set the knob back to the "0" position for safety reasons.
If the slicer is to work correctly, the blade must always be kept sharp. It is better to sharpen the blade a little at regular intervals than a lot less frequently.

Please note that the blade is highly efficient and sharp and must only be sharpened when the quality of the cut is visibly poor!
Before performing this operation, make sure the graduated slice thickness adjustment knob is set to "0".

Only blades with a smooth cutting edge can be sharpened. Sharpening operations involving serrated blades for bread slicing must be performed by skilled personnel.

Before sharpening, ensure the blade is clean and grease-free, as any food residues sticking to the blade can damage the sharpening device and its grinding wheels
After sharpening, remove any traces of dirt from the grinding wheels. In addition, every single grain of sand must be removed from the blade and machine using a cloth dampened with alcohol.
5.1 Sharpening the Blade
1) Clean the blade thoroughly before sharpening and ensure there are no traces of grease left on it.
2) Switch off the machine.
3) Attach the separate sharpening device to the stop plate through the two holes. To do this, fully open the stop plate using the slice thickness adjustment knob, pull the product carriage to yourself until hard stop using the carriage arm, and fold up the leftover holder. Undo the knurled screw on the top of the sharpening device and attach the sharpening device to the stop plate. Do this by inserting the pin on the sharpening device into the hole in the stop plate closest to the blade and fastening the knurled screw to the sharpening device through the second hole in the stop plate. The metal part on the sharpening device is in front of the blade and points downwards, with its bend facing the operator. It provides additional protection against injury.

Only use compatible sharpening devices and those supplied with the machine.
4) Switch the slicer on. By turning the slice thickness adjustment knob slightly to the right, carefully move the grinding wheel towards the rotating blade using little force. When touching the blade, the grinding wheel must also rotate. Normally, it takes just a few seconds to sharpen the blade.
5) Deburr the blade after sharpening. To do this, press and hold the spring-loaded button on the sharpening device for about 2 to 3 seconds to remove burrs from the blade.
6) After the blade has been sharpened, shut down the slicer, dismantle the sharpening device in reverse order, and set the slice thickness adjustment knob back to "0".
7) Wipe the blade and leftover holder shaft thoroughly with a cloth to remove any abrasive chips left after sharpening.

The sharpening operation must be performed by authorized and skilled personnel only.

Do not sharpen the blade anymore if it is worn down by more than 6 mm in diameter
6 CLEANING
For the sake of hygiene, the slicer must be kept clean at all times. The machine must be disassembled and cleaned at the end of each day on which it was used and whenever the type of food being sliced is changed (for example, if you want to slice cooked meats after fresh meats).
Make sure to clean all parts and cavities that come into contact with products being cut and in which product residues can build up.
The slicer must be cleaned by fully trained personnel only. Special care must be taken when cleaning the cutting edge of the blade.
At least two people are required to move the machine, using the four feet as holding points.
6.1 Cleaning
Before cleaning the machine, switch it off and unplug it from the power supply. The product carriage can be removed. Never use force when doing so to prevent damage to the machine, and always heed the following instructions:
- Turn the graduated knob for slice thickness adjustment clockwise as far as it will go.
- Completely undo the product carriage locking screw at the bottom end of the carriage arm by turning it counterclockwise.
- Pull the product carriage all the way to the operator's side with a slight jerk.
- The graduated knob for slice thickness adjustment is now locked and must not be opened by force.
- You can now remove the product carriage with the carriage arm for cleaning.
- Let all parts dry out completely. Any residual water may lead to the formation of flash rust.
- After cleaning the product carriage and housing, proceed in reverse order: Push the carriage arm over the carriage arm holder and re-fasten it with the locking screw. This releases the slice thickness lock, and you can move the product carriage freely again.

Use extreme care when cleaning the machine to ensure that no water gets into the blade hub to prevent damage to the ball bearings, electric motor, and inner machine components. If not allowed sufficient time to dry out, any residual water may lead to the formation of flash rust.

Never clean the slicer or its parts (e.g., product carriage) in the dishwasher!
Any operations involving the disassembly of the blade for cleaning the blade or the machine housing must be carried out by trained personnel only. In this case, special precautions must be taken to prevent the risk of injury. We strongly recommend using safety gloves or a blade removal device when performing any cleaning work. This accessory enables the blade to be removed safely, with the blade and its dangerous cutting edge being completely covered by a plastic disk that prevents hands from coming into contact with the blade during handling. To safely remove the blade from the machine, attach the optional blade removal device to the blade so that its holes are perfectly aligned with the holes in the blade, and secure the blade removal device using the two knurled screws. Using a screwdriver, undo the screws securing the blade, and remove the blade by grasping the two knurled screws.
Use a damp cloth (a soft brush is helpful in some cases) and warm water (approx. 60 °C) for cleaning. Only use cleaning and disinfection products or additives compatible with foodstuffs and approved for this purpose. Always follow the instructions for these detergents. After treatment with chemicals, rinse with clean, fresh water and let dry thoroughly.

You must never use a water jet or high-pressure cleaner to clean the machine or its parts!

Under no circumstances use abrasive detergents or sodium-hypochlorite-based solutions as they would irreparably damage the machine's surfaces.

Cleaning the slicer with cleaning agents that can adversely affect the health of operators or customers is strictly prohibited. Only use products with a pH value of 7-8 for cleaning.

Never attempt to clean the blade while the machine is running (i.e., whilst the blade is moving).
After cleaning, reassemble the machine in reverse order.
6.2 Lubricating
In order to keep the product carriage and leftover holder sliding movements fluid, the slicer must be lubricated regularly at different points, including the carriage guide, carriage arm, and blade hub. Use petroleum jelly only (e.g., MARCOL 82 ESSO or WHITE OIL 105 BERGOIL). Apply the lubricant of choice sparingly but frequently.
7 TRAINING
The adult operator installing the slicer must be adequately trained in the use, cleaning, servicing, and blade sharpening and be aware of potential hazards resulting from improper use of the machine.
The training will be given by the suitably authorized and trained installer familiar with the European community machine standards.
8 DISPOSAL

Waste electrical and electronic equipment must not be disposed of in household waste. Old electrical appliances with this marking must not be disposed of in residual waste and must be recycled.
9 WARRANTY
If the product malfunctions within 2 years from the date of purchase (receipt required) due to defects in material and workmanship, ADE will repair or replace the product.
The warranty does not cover moving parts such as blades, sharpening devices, product carriages, etc. The warranty does not extend to external normal wear and tear or damage caused by accident or misuse.
This warranty does not cover the products tampered with by unauthorized personnel.
The warranty agreement does not affect the customer's statutory rights.
Any complaints shall be submitted to the dealer from whom you purchased the machine.
10 TECHNICAL DATA
| Model | Victoria 250-V-230 | Victoria 300-V-230 |
| Blade diameter | 250 mm | 300 mm |
| Slice thickness | 0 – 15 mm | 0 – 15 mm |
| Cutting area (W x D) | 180 x 175 mm | 215 x 205 mm |
| Dimensions (W x D x H) | 460 x 440 x 390 mm | 520 x 610 x 440 mm |
| Power | 0.23 kW | 0.23 kW |
| Net weight (approx.) | 20 kg | 23 kg |
| Current type | 230 V | 230 V |
Optional:
| Blade removal device | H4020-051 | H4050-106 |
| Cut-resistant gloves | Size M: | T6113 |
| Size XL: | T6114 |
| Circular blade, smooth with Teflon coating (e.g., for cheese): | |
| H4090-0141 | H4090-0191 |
| Circular blade, serrated lengthwise (e.g., for bread): | |
| H4090-021 | H4090-022 |
| Circular blade, serrated with Teflon coating (e.g., for bread): | |
| H4090-0211 | H4090-0221 |
11 CE MARKING AND DECLARATION OF CONFORMITY
CE
Manufacturer's declaration of conformity
This product was manufactured according to the harmonized European standards. It complies with the provisions of the EC directives listed below:
– Machinery Directive 2006/42/EC
- EMC Directive 2014/30/EU
– Low Voltage Directive 2014/35/EU
– RoHS Directive 2011/65/EU
in their current version.
This declaration becomes invalid if the machine is modified in any way that has not been approved by us.
Hamburg, May 2021
ADE Germany GmbH
Neuer Höltigbaum 15
22143 Hamburg
Manufacturer:
ADE Germany GmbH
Neuer Höltigbaum 15
22143 Hamburg
+49 40 432 776 - 0
昌 +49 40 432 776 - 10
info@ade-germany.de
www.ade-germany.de
12 WIRING DIAGRAMS
12.1 VICTORIA 250-V / VICTORIA 300-V - 230 V/50 Hz
12.1.1 Wiring Diagram

12.1.2 Circuit diagram

12.2 VICTORIA 250-V / VICTORIA 300-V - 230 V/60 Hz
12.2.1 Wiring Diagram
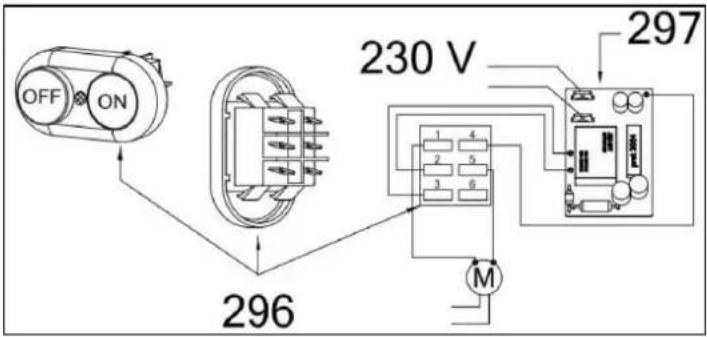
12.2.2 Circuit Diagram

13 EXPLODED VIEWS
13.1 VICTORIA 250-V
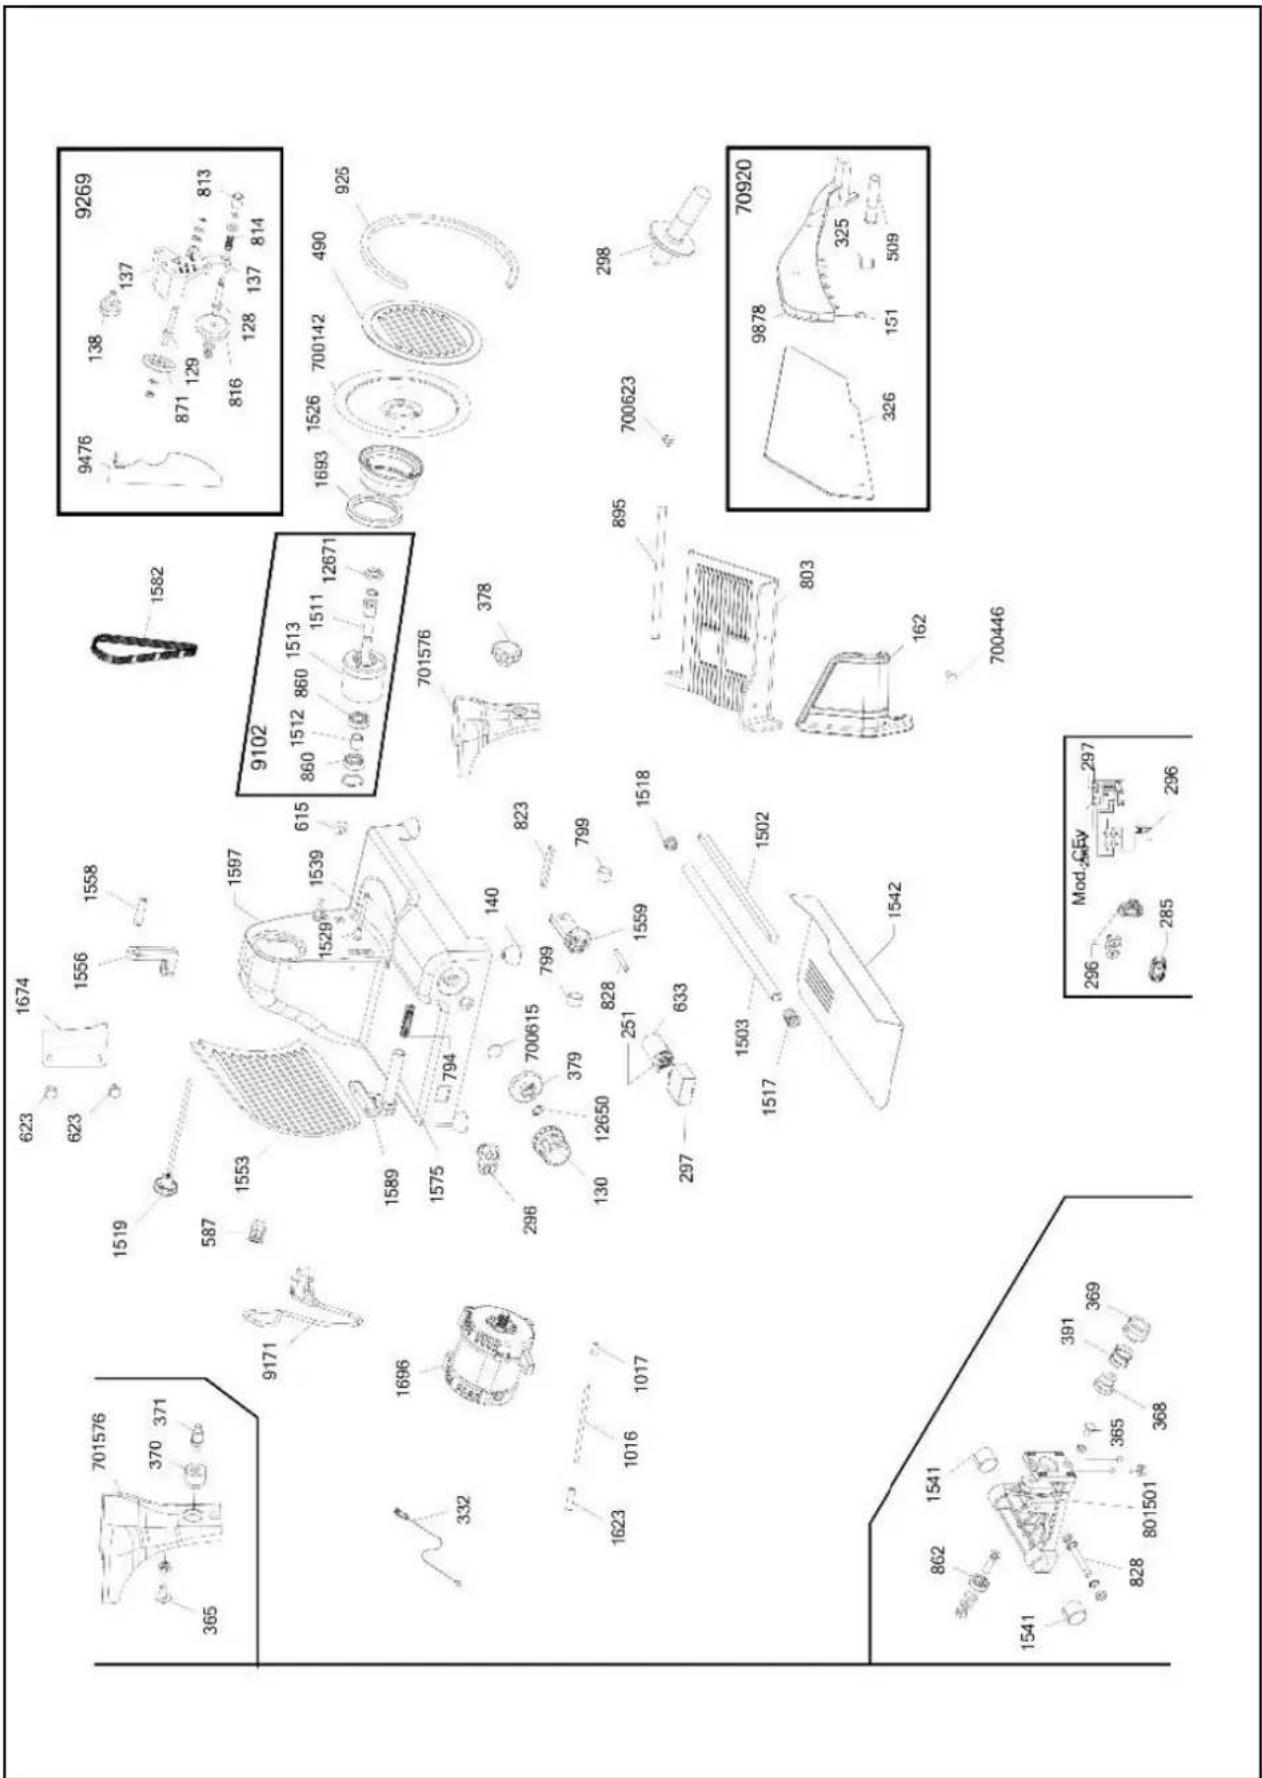
14 SPARE PARTS LISTS
14.1 VICTORIA 250-V
| NO. | DESCRIPTION | VICTORIA 250-V | |
| QUANTITY | ARTICLE NUMBER | ||
| 130 | Slice thickness | 1 | H4090-011 |
| 140 | Suction cup | 1 | H4090-005 |
| 151 | Leftover holder lock | 1 | |
| 162 | Food carriage rear panel | 1 | H4090-001 |
| 285 | Switch cap | 1 | H4090-0231 |
| 296 | Switch | 1 | H4090-053 |
| 297 | Relay | 1 | H4090-066 |
| 325 | Leftover holder catch | 1 | |
| 326 | Leftover holder protective plate | 1 | H4090-002 |
| 700142 | Circular blade, smooth | 1 | H4090-014 |
| 379 | Eccentric screw | 1 | H4090-012 |
| 490 | Blade guard | 1 | |
| 509 | Leftover holder bushing | 1 | |
| 623 | Grease scraper screw | 2 | |
| 633 | Capacitor MF10 | 1 | H4090-056 |
| 803 | Carriage plate | 1 | |
| 816 | Sharpening device honing wheel | 1 | |
| 871 | Sharpening device grinding wheel | 1 | H4090-017 |
| 895 | Leftover slide shaft | 1 | |
| 926 | Sickle guard | 1 | H4090-015 |
| 1582 | Drive belt | 1 | |
| 1519 | Retaining bar with grip for blade guard | 1 | |
| 378 | Locking knob for blocking unit | 1 | H4090-0311 |
| 1553 | Feed plate | 1 | |
| 1641 | Sealing ring | 1 | |
| 1674 | Grease scraper | 1 | |
| 1696 | Electric motor 230 V/50 Hz | 1 | |
| 9102 | Blade hub assembly | 1 | |
| 9269 | Sharpening device assembly | 1 | H4090-016 |
| 9171 | Power cord (Schuko) | 1 | |
| 298 | Leftover holder handle | 1 | H4090-0201 |
| 700446 | Food carriage rear panel locking screw | 2 | |
| 700623 | Leftover slide shaft locking knob | 1 | |
| 1542 | Base plate | 1 | |
| 701576 | Carriage arm assembly | 1 | |
| 709205 | Leftover holder assembly | 1 | H4090-028 |
| 801501 | Blocking unit | 1 |
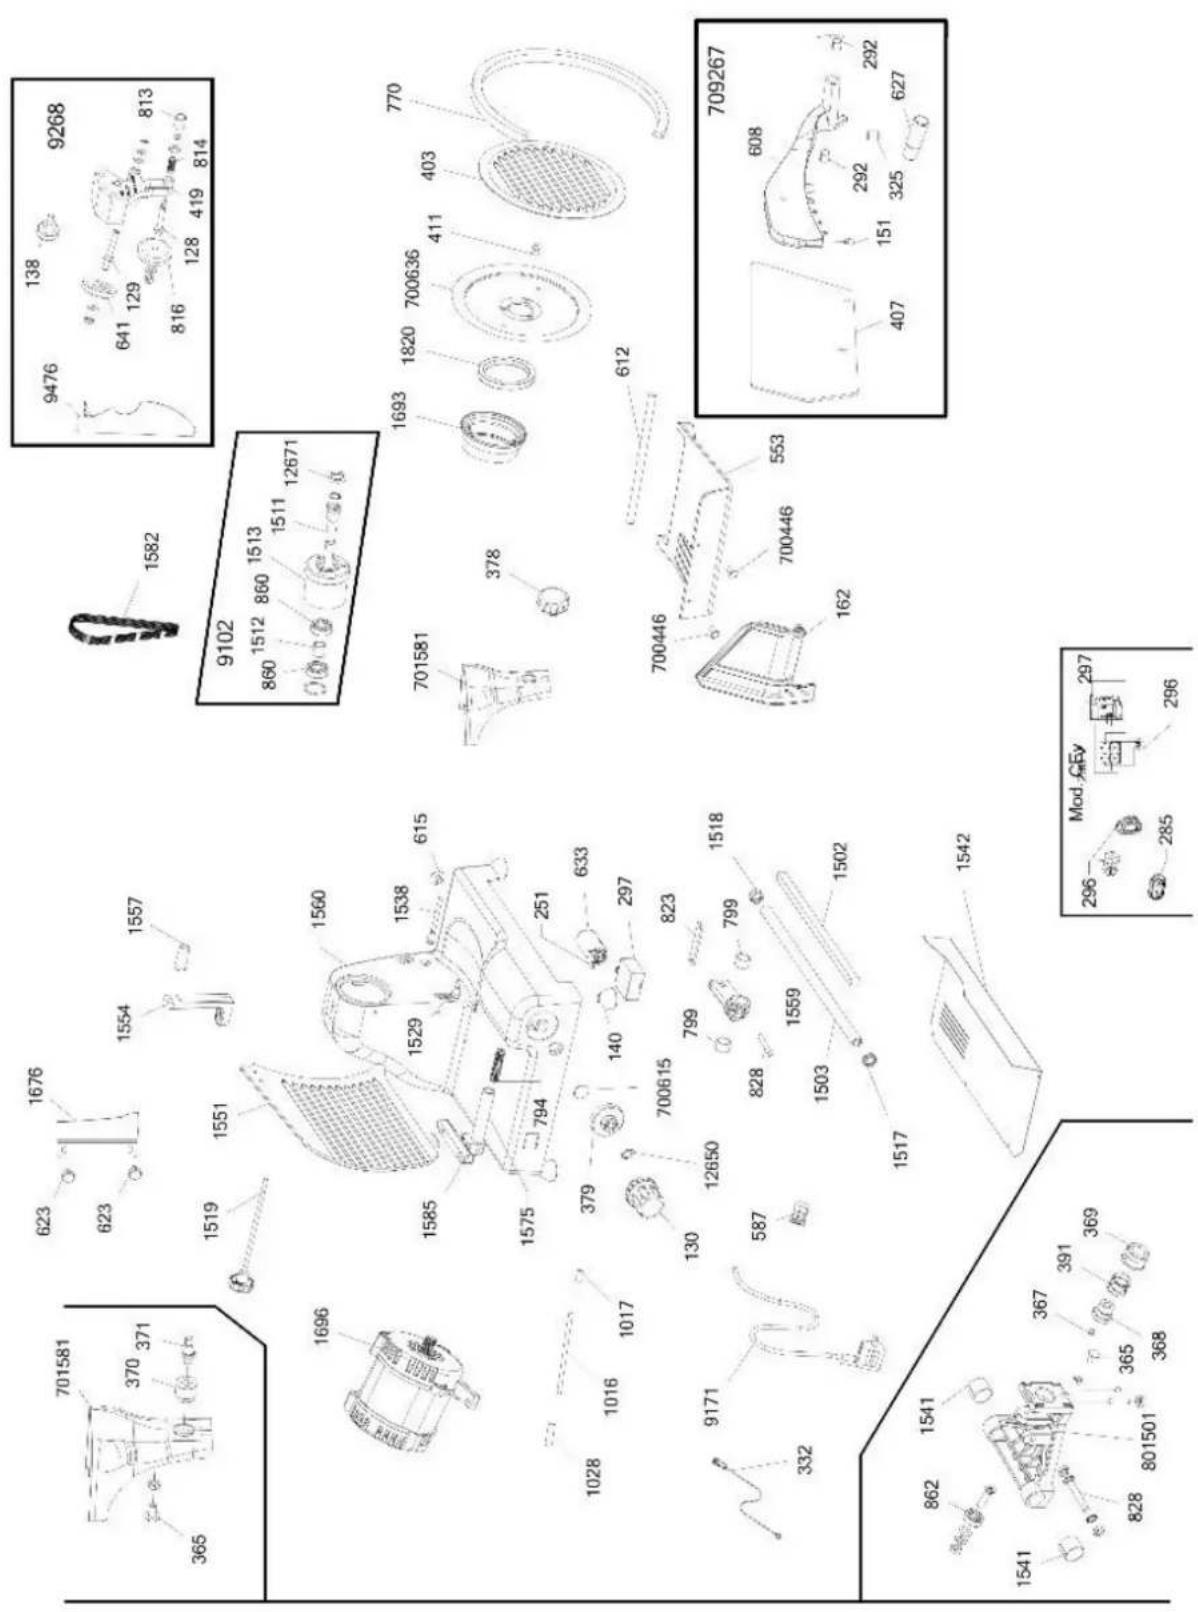
14.3 VICTORIA 300-V
| NO. | DESCRIPTION | VICTORIA 300-V | |
| QUANTITY | ARTICLE NUMBER | ||
| 130 | Slice thickness | 1 | H4090-011 |
| 140 | Suction cup | 1 | H4090-005 |
| 151 | Leftover holder lock | 1 | |
| 162 | Food carriage rear panel | 1 | H4090-001 |
| 285 | Switch cap | 1 | H4090-0231 |
| 292 | Leftover holder threaded bush | 1 | |
| 296 | Switch | 1 | H4090-053 |
| 297 | Relay | 1 | H4090-066 |
| 325 | Leftover holder catch | 1 | |
| 379 | Eccentric screw | 1 | H4090-012 |
| 403 | Blade guard | 1 | |
| 407 | Leftover holder protective plate | 1 | |
| 411 | Threaded rod insert | 1 | |
| 553 | Carriage plate | 1 | |
| 612 | Leftover slide shaft | 1 | |
| 623 | Grease scraper screw | 2 | |
| 627 | Leftover holder bushing | 1 | |
| 633 | Capacitor MF10 | 1 | H4090-056 |
| 641 | Sharpening device grinding wheel | 1 | |
| 770 | Sickle guard | 1 | |
| 816 | Sharpening device honing wheel | 1 | |
| 1582 | Drive belt | 1 | |
| 1519 | Retaining bar with grip for blade guard | 1 | |
| 378 | Locking knob for blocking unit | 1 | H4090-0311 |
| 1551 | Feed plate | 1 | |
| 1641 | Sealing ring | 1 | |
| 1676 | Grease scraper | 1 | |
| 1696 | Electric motor 230 V/50 Hz | 1 | |
| 9102 | Blade hub assembly | 1 | |
| 9171 | Power cord (Schuko) | 1 | |
| 9268 | Sharpening device assembly | 1 | |
| 1542 | Base plate | 1 | |
| 700446 | Food carriage rear panel locking screw | 2 | H4090-009 |
| 700636 | Circular blade, smooth | 1 | H4090-019 |
| 701581 | Carriage arm assembly | 1 | |
| 709267 | Leftover holder assembly | 1 | |
| 801501 | Blocking unit | 1 |
Distributor:
- OPERATING INSTRUCTIONS
- VICTORIA-V Series
- CONTENTS
- FOREWORD
- Introduction
- Use
- Residual risks
- START-UP
- Installation
- Wiring
- Mechanical safety devices
- Electrical safety devices
- Acceptance testing
- Safety precautions
- Operation
- USING THE POTATO PEELING MACHINE
- Machine overview
- Operating functions
- Switching on
- Feeding the product
- Adjusting the slice thickness
- Sharpening the Blade
- Only use compatible sharpening devices and those supplied with the machine.
- The sharpening operation must be performed by authorized and skilled personnel only.
- Do not sharpen the blade anymore if it is worn down by more than 6 mm in diameter
- CLEANING
- Cleaning
- Lubricating
- TRAINING
- DISPOSAL
- WARRANTY
- CE MARKING AND DECLARATION OF CONFORMITY
- CE
- Manufacturer's declaration of conformity
- ADE Germany GmbH
- Manufacturer:
- WIRING DIAGRAMS
- VICTORIA 250-V / VICTORIA 300-V - 230 V/50 Hz
- Wiring Diagram
- Circuit diagram
- VICTORIA 250-V / VICTORIA 300-V - 230 V/60 Hz
- Wiring Diagram
- Circuit Diagram
- EXPLODED VIEWS
- VICTORIA 250-V
- SPARE PARTS LISTS
Brand : ADE
Model : Victoria-V-210617
Category : Slicer