
Diagonal SN1 - Slicer ADE - Free user manual and instructions
Find the device manual for free Diagonal SN1 ADE in PDF.


| Product Type | Electric Slicer |
| Brand | ADE |
| Model | Diagonal SN1 |
| Blade Diameter | 250 mm |
| Slice Thickness Range | 0–12 mm |
| Slicing Area | 220 x 175 mm |
| Dimensions (W x D x H) | 475 x 630 x 490 mm |
| Weight | 19 kg |
| Power | 0.33 kW |
| Voltage | 230 V |
| Protection Class | IP33 |
| Intended Use | Commercial gastronomic slicing of cooked and raw sausage, warm or cold meat, bread, cheese, cored fruits and vegetables |
| Maximum Slice Thickness | 15 mm |
| Operation Mode | Continuous operation |
| Safety Features | Blade guard, food carriage locking mechanism, circuit breaker, emergency stop button, overload protection |
| Materials Approved for Slicing | Not for frozen products, bones, or stone fruits |
| Cleaning | Hand wash only; removable parts for thorough cleaning; do not immerse in water or dishwasher |
| Maintenance | Oil carriage and leftover holder shafts; sharpen blade with supplied grinder |
| Optional Accessories | Teflon-coated blade (cheese), long-toothed blade (bread), long-toothed blade with Teflon coating, blade removal device, cut-resistant gloves |
| Warranty | 2 years against workmanship and material defects |
| Compliance | CE, Machinery Directive 2006/42/EC, EMC 2014/30/EU, Low Voltage 2014/35/EU, RoHS 2011/65/EU |
Frequently Asked Questions - Diagonal SN1 ADE
User questions about Diagonal SN1 ADE
0 question about this device. Answer the ones you know or ask your own.
Ask a new question about this device
Download the instructions for your Slicer in PDF format for free! Find your manual Diagonal SN1 - ADE and take your electronic device back in hand. On this page are published all the documents necessary for the use of your device. Diagonal SN1 by ADE.
USER MANUAL Diagonal SN1 ADE
natural_image
Line drawing of a mechanical cutting machine with levers and gears (no text or symbols)Operating Manual | EN
Translated manual

natural_image
Icon of a person using a computer inside a circle (no text or symbols)Manufacturer:
ADE Germany GmbH | Neuer Höltigbaum 15 | 22143 Hamburg, Germany
Tel.: +49 (0) 40 / 432776-0 | Fax: +49 (0) 40 / 432776-10
E-mail: info@ade-hamburg.de
TABLE OF CONTENTS
About this manual....3
General information....3
Storage 3
Target group 3
Explanation of symbols 4
Intended use....4
Scope of delivery 4
Optional accessories 5
Dealer....5
Safety 6
Training the operating personnel 8
Parts and controls....9
Start-up 12
Notes on the installation site 12
Unpacking and installing the machine 12
Switching the machine on 12
Switching the machine off....12
Installing the machine 13
Conducting an acceptance inspection....13
Cleaning before the first use....13
Slicing food....14
Cleaning.... 17
Changing/replacing the circular blade....22
Maintenance and care 22
Sharpening the blade.... 24
Storage and transport....26
Technical data 27
Name plate....27
Warranty 27
Declaration of conformity 28
Disposal 28
Appendix 29
GENERAL INFORMATION
- This operating manual describes the safe operation as well as the handling, care and maintenance of the machine.
- Only compliance with the operating manual is considered to be proper use.
- Therefore, read this operating manual carefully before connecting and using the machine. Failure to observe this operating manual may result in injuries or damage to your product.
- Our products are constantly being developed and improved. For this reason, design and technical modifications are possible at any time. However, this has no influence on the content of this manual.
- The slicer is designed and assessed in accordance with the latest version of the EN 1974 Safety Standard and bears the CE mark as a sign of conformity with the relevant requirements.
- Production based on the technical documents supplied is not permitted.
STORAGE
The operating manual is an integral part of the machine. It must be kept in the immediate vicinity of the machine and be easily accessible to everyone.
If the machine is resold, the operating manual must be included.
TARGET GROUP
This operating manual is intended for personnel entrusted with the installation, handling, care and maintenance of the machine.
- Personnel who operate the machine must have read and understood this operating manual before using it for the first time and must have been instructed in the operation of the machine by the owner/operator. Above all, the dangers arising from improper use must therefore be pointed out. The owner/operator must ensure that the operating personnel (“operators”) are able to use the machine as intended and safely.
- Maintenance and adjustment work, e.g. blade sharpening, may only be carried out by authorised and trained personnel.
EXPLANATION OF SYMBOLS

This symbol means: "Observe the Operating Manual". Read the operating manual carefully before use and keep it for future reference.

This symbol combined with the word DANGER warns of serious injuries.

This symbol combined with the word WARNING warns of moderate and mild injuries.

This symbol combined with the word NOTE warns of material damage.

This symbol indicates additional information and general notes.
INTENDED USE
This slicer is intended for slicing:
- cooked and raw sausage products,
- warm or cold meat,
- bread and cheese,
- cored fruits and vegetables.
The machine is suitable for continuous operation in commercial gastronomic use. The slicing thickness reaches up to 15 mm.
Any other use is considered improper.
- Never use the slicer to slice frozen products, meat or sausage products with bones or stone fruits.
- Failure to observe these instructions can seriously damage the machine and, where applicable, void existing warranty claims.
SCOPE OF DELIVERY
- Machine
- Operating manual
- Grinder
Oil bottles
OPTIONAL ACCESSORIES
- Teflon-coated blade (cheese)
- Long-toothed blade (bread)
- Long-toothed blade with Teflon coating
- Blade removal device
- Cut-resistant gloves
DEALER
Dealer's stamp
GENERAL SAFETY INSTRUCTIONS
- This slicer may only be used by persons of legal age.
- The operator must be in full possession of his/her mental and physical capacities. Persons who do not speak the German language or who cannot read are to be informed about the content of these instructions by suitable personnel or trained on this machine in accordance with the operating manual.
- The machine may only be used if it has been visually inspected before use and is clearly undamaged and fully assembled.
- Stop using the machine if the distance between the blade protection and the blade is more than 6 mm. In this case, the blade must be changed. See “Changing/replacing the circular blade”.
- Always observe the safety rules and regulations of the owner/operator.
DANGER FROM ELECTRICITY
- Do not immerse the machine, power cord or power plug in water or other liquids.
- Place the machine in such a way that no liquids can spill over the machine plug connection. Observe the notes in chapter "Notes on Installation Site".
- Do not operate the machine with wet hands.
- Do not operate the machine outdoors.
- Connect the machine to a properly installed mains outlet with a voltage that corresponds to the name plate.
- Ensure that the mains outlet is readily accessible so that you can quickly unplug the power cord, if necessary.
- Do not use the machine:
- if the machine or its parts are damaged,
- if the power cord or plug is damaged,
- if the machine has fallen down.
- Unwind the power cord completely before each use. Ensure that the power cord is not damaged by sharp edges or hot objects.
- Unplug the power cord from the mains outlet:
- if you are not using the machine,
- after each use,
- before cleaning or putting away the machine,
- if there appears to be a malfunction during operation,
- during thunderstorms.
To unplug, always grasp the power plug; do not pull from the power cord.
- Do not modify the machine or power cord. Only have repairs carried out by a specialist workshop, as improperly repaired machines endanger the operator.
- Do not use an extension cable.
WARNING OF RISK OF INJURY
- The blade is very sharp. It is often not possible to tell whether the blade is rotating or standing still. Thus, never touch the blade with your fingers or other body parts.
- Always wear suitable protective gloves that protect against cuts during cleaning or maintenance works.
- Pull back long hair and secure it or cover it under a cap while working. Avoid loose or hanging clothes such as scarves, ties, etc.
- Lay the power cord so that it does not create a tripping hazard.
BEWARE OF MATERIAL DAMAGE
- Never place the machine on or near hot surfaces (e.g. hot plates, etc.).
- Avoid contact of the power cord with hot objects.
- Never expose the machine to a high temperature (heating, etc.) or adverse weather conditions (rain, etc.).
- Place the machine on a robust, smooth, and easy-to-clean work surface. When processing foods, occasional splashes are unavoidable. Observe the notes in chapter "Notes on Installation Site".
- Use only original accessories and spare parts.
- The machine and its parts must not be cleaned in the dishwasher.
SAFETY DEVICES ON THE MACHINE
- All safety devices are permanently installed on or in the machine and must not be removed. Unauthorised changes to the machine will render it a dangerous device. In such cases, the manufacturer cannot be held liable for any accidents or injuries.
- The machine is equipped with a circuit breaker that is triggered in the event of a voltage drop. After a power failure, the machine must be switched on again in order to continue working with it.
- The blade is protected (except for the area where the cutting process takes place) by a rigidly attached cover.
- The food carriage can only be removed when the feed plate covers the blade and the slice thickness adjustment knob has been turned to "0" (zero) or to the stop beyond it.
- If the food carriage has been removed or detached, the slice thickness adjustment knob cannot be adjusted. The feed plate remains closed.
During installation of the machine and before it is used for the first time, the machine operator of legal age must be adequately trained in the use, cleaning, maintenance and sharpening of the circular blade. Particular attention should be paid here to the dangers that can arise from improper use.
Training must be carried out by a person who has been entrusted with the installation of the machine and who has sufficient knowledge of the safety standards.
The owner/operator of the machine is responsible for actual training of the operating personnel.

1 Food carriage
2 Hand guard
3 Slice thickness adjustment knob
4 Green operating button I with integrated operating light
5 Red stop button 0
6 Handwheel for fastening the blade cover plate
7 Power cord with power plug
8 Grease remover
9 Circular blade

10 Feed plate
11 Star grip for guide rail
12 Guide rail
13 Blade cover plate
14 Foot
15 Locking handle for the blocking unit of the food carriage
16 Handle for food holder
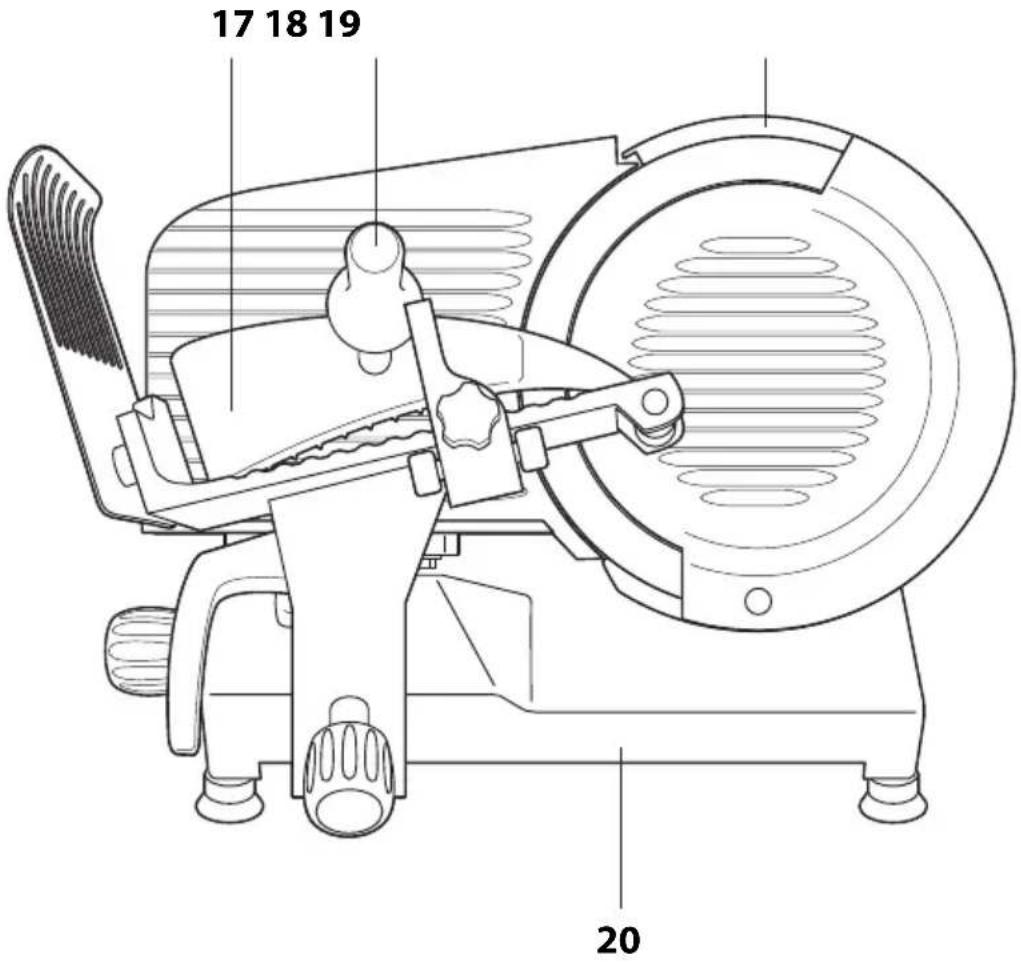
17 Leftover holder
18 Handle for leftover holder
19 Blade protection
20 Outer housing
NOTES ON THE INSTALLATION SITE
Note the following points when selecting the installation site:
- Proper operation of the machine is guaranteed at a relative humidity of up to 80% and in the immediate vicinity of heat sources with a maximum temperature of 40 °C.
- The surface must be flat, smooth, vibration-free, and easy-to-clean. Recommended height above ground: Max. 80–90 cm.
- There must be at least 30 cm free space around the slicer to ensure fault-free operation, cleaning and maintenance of the machine.
- The area should be well lit. There must also be a readily accessible mains outlet with protective contacts nearby.
UNPACKING AND INSTALLING THE MACHINE

- You will need a second person to help unpack the machine. The machine is heavy and unwieldy.
-
Please keep the outer packaging at least until expiry of the warranty.
-
Check the packaging for any damage.
- With a second person, carefully take the machine out of the packaging.
- Place the slicer on a flat, smooth, and vibration-free surface.
- Remove the transparent outer packaging of the machine.
- If necessary, correct any minor unlevelness using the rotating feet.
SWITCHING THE MACHINE ON
- Press the green operating button I to switch on the machine. The power light will signal the operation.
SWITCHING THE MACHINE OFF
- Press the red stop button 0 to switch off the machine. Note the time lag of the blade. Risk of injury!
INSTALLING THE MACHINE

WARNING: Risk of injury!
- Lay the power cord so that it does not create a tripping hazard.
- Before plugging the power cord, check whether ...
- ... the mains voltage corresponds to the values provided on the name plate.
- ... the existing power supply is equipped with a suitable circuit breaker.
-
Plug the machine's power plug directly into the mains outlet. Do not use an extension cable.
-
Switch on the machine and check the direction of rotation of the blade: When looking at the machine from the side of the blade cover plate, the cutting blade must rotate counter-clockwise.

The polarity of the machines is according to DIN. If the direction of rotation of the three-phase slicer is not correct, two of the three phases of the plug must be reversed. This work may only be carried out by a qualified electrician.
- Switch the machine off.
CONDUCTING AN ACCEPTANCE INSPECTION
The following points must be checked before the machine is put into normal operation:
- Check whether all components of the slicer have been assembled correctly.
- Check whether the handwheel for fastening the blade cover plate is firmly tightened.
- Press the operating buttons and check whether the machine can actually be switched on and off.
- Check whether the operating light works when it is switched on.
- Check the sliding movement of the food holder and the leftover holder.
- Check that the slice thickness adjustment knob is working properly.
CLEANING BEFORE THE FIRST USE
- Proceed as described in the chapter "Cleaning".

DANGER - Risk of injury
- Do not turn on the machine until it is ready for immediate slicing. - Observe the safety instructions in chapter "Safety".

For the sake of referencing, the graphics in this chapter are (only) numbered consecutively.

natural_image
Technical line drawing of a mechanical device with no visible text or symbolsFig. 1
- Set the slice thickness adjustment knob to "0" or turn until it stops.
- Pull the food holder to yourself as far away from the blade as possible.

natural_image
Line drawing of a manual cutting machine with a blade and handle, showing internal components and motion arrows (no text or symbols)Fig. 2
- If necessary, loosen the fastening screw for the guide rail and push the guide rail a bit backward.
- Lift the leftover holder and place the food to be sliced on the food carriage.
If you need both hands to place the food to be sliced, you can fix the leftover holder: Guide the food holder all the way to the right, bring it up completely and guide it to the left into its holding position. The leftover holder will be fixed in this position and you will have both hands free.

natural_image
Technical line drawing of a lathe machine with blade and drum components (no text or symbols)Fig. 3
-
Depending on the size of the food to be cut, bring the food holder onto or behind the food.
-
Push the guide rail loosely up to the food to be cut and fix the guide rail with the star grip for the guide rail.
-
Use the slice thickness adjustment knob to set the desired slice thickness.
-
Turn on the machine.
The blade will start to rotate.

natural_image
Illustration of a hand using a manual cutting machine to cut a tomato, with arrows indicating the process (no text or symbols present)Fig. 4
- Use the handle to move the food holder back and forth evenly and smoothly to cut the food.

If the weight or dimensions of the food no longer permit satisfactory cutting, use the handle of the leftover holder to guide the food carriage.
- Turn off the machine after slicing.
- Set the slice thickness adjustment knob to 0.
BRIEF CLEANING
If the blade, blade protection and/or blade cover plate are only slightly soiled after use, it may be sufficient just to clean them briefly before slicing other food. It is essential that you also observe the operating instructions.
Note the following points regarding a brief cleaning:
- The feed plate must be closed during cleaning and also remain closed (set the slice thickness adjustment knob to 0 or turn until it stops).
- We recommend that you wear suitable cut-resistant gloves.
There is a risk of injury!
- Turn off the machine.
-
Put on a cut-resistant glove (recommended).
-
Using a damp cloth, press it on the blade surface and slowly move it from centre to edge on both sides.
-
Wipe the blade cover plate clean with the cloth.
-
Wipe the surfaces dry with a dry, soft cloth.
CLEANING

DANGER - Risk of injury
- The machine may only be cleaned by persons who have been trained for this.
- The circular blade is very sharp. Take extreme care. We recommend that you wear suitable cut-resistant gloves.

WARNING: Risk of injury!
- Only clean the machine with suitable and approved cleaning agents. Only products with a pH of 7-8 may be used.

NOTE - Risk of material damage
- The machine and its parts must not be cleaned in the dishwasher.
The machine must always be clean for hygienic reasons. It must be cleaned at the end of each working day and whenever the type of food to be cut is changed (e.g. from fresh meat to roasted meat).
For thorough cleaning, the machine parts must be disassembled and later reassembled.
- Turn off the machine and unplug the power cord from the mains outlet.
- If necessary, remove any food to be sliced from the food holder.
natural_image
Technical line drawing of a mechanical device with rotating components and directional arrows (no text or symbols)Fig. 5
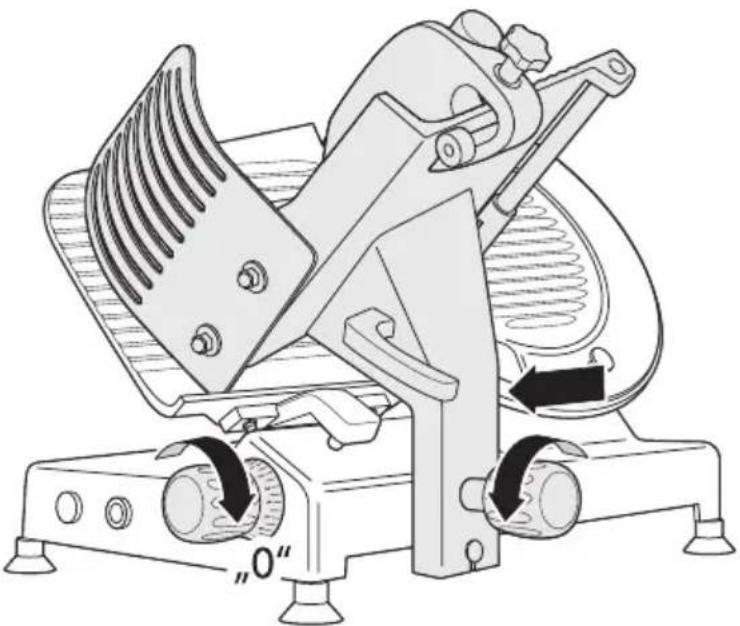
- Set the slice thickness adjustment knob to "0" or turn until it stops. The feed plate must be closed during cleaning and also remain closed.
- Turn the locking handle for the locking unit of the food carriage fully counter-clockwise.
- Pull the food carriage toward you.
The locking mechanism must click into place so that you can hear and feel this. The food carriage can only be removed using this secure locking.

natural_image
Technical illustration of a mechanical device with hands operating it, showing internal components and motion lines (no text or symbols)Fig. 6
- Use both hands to lift the food carriage up and out of its guide.

natural_image
Line drawing of a mechanical component with a base and spring, no text or symbols presentFig. 7
- Loosen the handwheel that secures the blade cover plate fully counter-clockwise.

natural_image
Line drawing of a hand operating a lathe machine with a circular component being inserted (no text or symbols)Fig. 8
- Remove the blade cover plate.

natural_image
Illustration of a hand cleaning a circular mechanical component with directional arrows indicating motion (no text or symbols)
Fig. 9
- Wipe the blade surface and the feed plate clean with a damp cloth as shown. Then wipe the blade and the feed plate dry with a soft cloth in the same way. No moisture may enter the blade hub.
natural_image
Line drawing of a hand operating a lathe machine with a circular component on top (no text or symbols)Fig. 10
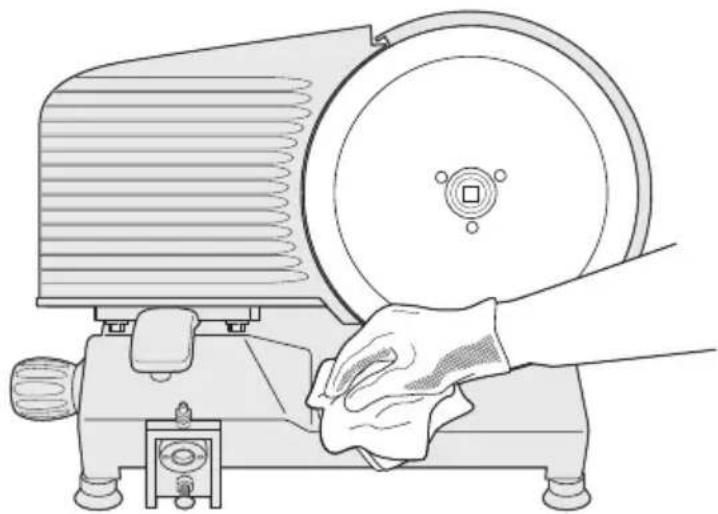
- Clean the outer housing with a damp cloth or sponge using a suitable cleaning agent and warm water. Then thoroughly wipe the machine dry with a soft cloth.
No moisture may enter the interior of the machine.
- Then the machine should be assembled in reverse order.
IF THE BLADE IS HEAVILY SOILED:
If the blade is heavily soiled, it must be removed before cleaning. For this purpose, we recommend that you wear cut-resistant gloves. Risk of injury!
- Proceed as described in the previous chapter and remove the blade cover plate (see Fig. 8).

Only if you use the optionally available blade removal device:
- Place the blade removal device on the holes provided in the blade and screw it tight.
- Use a screwdriver to remove the screws that hold the blade in place and take it off.
- Clean the removed blade with a little liquid cleaning agent and rinse it with hot water. Never use scouring cleaning agents. Do not clean the blade in the dishwasher.
- Dry the blade thoroughly afterwards.
CHANGING/REPLACING THE CIRCULAR BLADE

DANGER - Risk of injury
- The circular blade may only be changed by persons who have been trained to do so.
- The circular blade is very sharp. Take extreme care.
We recommend that you wear suitable cut-resistant gloves.

WARNING: Risk of injury!
- Before replacing the blade, turn off the machine and unplug the power cord from the mains outlet.
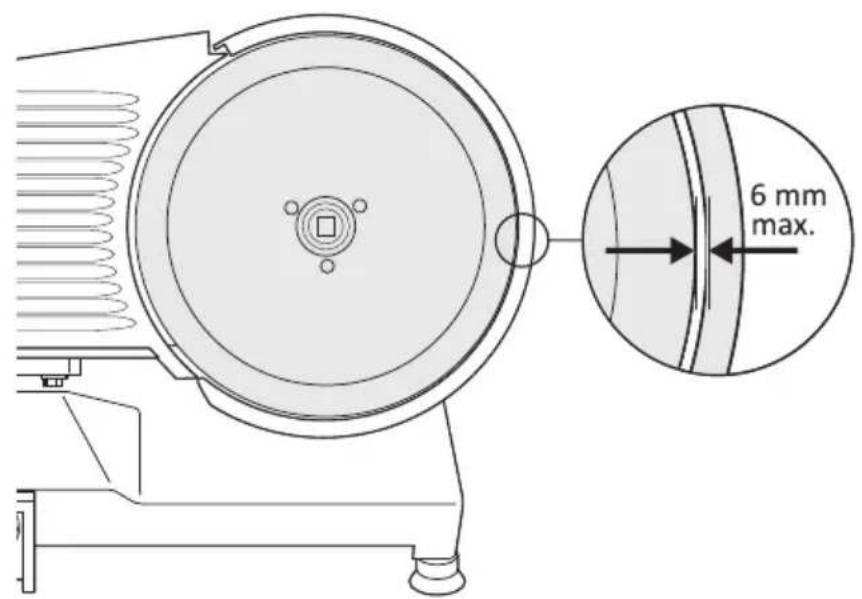
The circular blade must be changed:
- if the distance between the blade protection and the blade is more than 6 mm or
- if you want to use a different blade, see "Optional accessories".
Fig. 11
- To disassemble or replace the blade, proceed as described in chapter "Cleaning".
MAINTENANCE AND CARE

WARNING: Risk of injury!
- Before maintenance and care, turn off the machine and unplug the power cord from the mains outlet.

NOTE - Risk of material damage
- Only use food-grade, resin-free oils for oiling. For example, never use cooking or vegetable oils.
The moving parts of the machine should be greased, if necessary.

Fig. 12
OILING THE CARRIAGE SHAFT (A)

The machine must be lifted for this. You will therefore need a second person to accomplish this work.
- Lift the machine.
- Apply a few drops of oil directly from above on the carriage shaft.
- Lower the machine back to the surface.
- Move the food holder back and forth a few times.
OILING THE LEFTOVER HOLDER SHAFT (B)
- Apply a few drops of oil on the shaft.
- If necessary, remove excess oil with a soft and clean cloth.
- Move the leftover holder to the left and right a few times.

WARNING: Risk of injury!
- Before grinding the blade, turn off the machine and unplug the power cord from the mains outlet.

DANGER - Risk of injury
- The circular blade may only be sharpened by persons who have been trained to do so.
- The circular blade is very sharp. Take extreme care. We recommend that you wear suitable cut-resistant gloves.

NOTE - Risk of material damage
- The blade to be sharpened must be clean. Grinding a blade with leftovers on it can damage the grinding wheels.
For good, trouble-free operation, it is important that the blade is always well-ground and sharp. Toothed circular blades may only be sharpened by specialist companies and not with the grinder supplied.
Pay attention to the following:
- The blade cannot and must no longer be sharpened if the distance between the blade protection and the blade is more than 6 mm.
- Regular brief grinding is better than an extensive grinding process.
- The blade may only be ground if it has been cleaned beforehand or is clean.
- After grinding, remove any grinding residues from the blade or machine with a cloth soaked in alcohol.
-
Any dirt deposits remaining on the grinding wheels after grinding must be removed as well.
-
Turn off the machine and unplug the power cord from the mains outlet.
- Turn the slice thickness adjustment knob all the way to the left to open the feed plate as far as possible.

natural_image
Technical line drawing of a mechanical device with no visible text or symbolsFig. 13
- Assemble the grinder as shown above.
-
Carefully guide the grinder mounted on the food carriage to the blade. Ensure that the lower grinding stone is guided on the left side past the blade edge (see Fig. 14).
The upper grinding stone does not touch the blade. -
Pull the food carriage back into its starting position.
-
Plug the power cord into the mains outlet.
-
Turn on the machine.
-
Carefully guide the grinder mounted on the food carriage to the rotating blade.
-
Ensure that only the lower grinding stone comes into contact with the blade when sharpening.
- Avoid jerky movements.

natural_image
Technical illustration of a mechanical assembly with two views showing internal components (no text or symbols)Fig. 14
- Deburr the blade by briefly pressing the upper button on the grinder (see arrow).

Grinding and deburring should only take a few seconds, depending on the condition of the blade.
- Turn off the machine and unplug the power cord from the mains outlet.
- Remove the grinder.
- Set the slice thickness adjustment knob to "0" to close the feed plate.
- Clean the blade and the machine with a suitable and approved cleaning agent.
STORAGE AND TRANSPORT
Note the following points when storing or transporting the machine:
- It is imperative that two people carry the machine. Grasp the machine by the four feet as a guide.
- Clean the machine and accessories before storing them.
- Keep the device out of reach of children and in a dry, frost-free place. You can use the original packaging as outer packaging.
TECHNICAL DATA
Model: Diagonal SN1 Diagonal SN2 Diagonal SN3
| Blade diameter: 250 mm 300 mm 350 mm |
| Slice thickness selector: 0-12 mm 0-14 mm 0-14 mm |
| Slicing area: 220 x 175 mm 270 x 205 mm 305 x 240 mm |
| Dimensions (in mm): 475 x 630 x 490 560 x 680 x 550 580 x 700 x 630 |
Nominal power: 0.33 kW 0.37 kW 0.37 kW
| Weight: | 19 kg | 29 kg | 36 kg |
| Current/Voltage: | 230 V | 230 V / 400 V | 230 V / 400 V |
| Protection class: | IP33First number “3”: Protected against solid foreign objects2.5 mm ∅ and largerSecond number “3”: Protected against spraying water | ||
NAME PLATE

The name plate and the CE mark are clearly visible on the outer housing.
The name plate with the CE marking is located next to the power connection.
The name plate contains the following information:
- Company name and full address of the manufacturer
- Machine name
- CE marking
-
Type designation
-
Year of manufacture
- IP protection rating
■ Power supply information
■ Service life information

Products marked with this symbol meet all applicable community regulations of the European Economic Area.
WARRANTY
ADE will repair or replace this product if it has failed within 2 years from the date of sale (proof of purchase is required) as a result of poor workmanship or defective material.
All moving parts such as blades, grinders, etc. are excluded.
The warranty does not apply to the normal appearance of usage or signs of wear or any damage caused by accidents or misuse.
The warranty will not apply for devices that have been opened by unauthorised persons.
This warranty agreement does not affect the customer's legal rights in any manner.
The dealer from whom the machine was purchased is responsible for complaints.
DECLARATION OF CONFORMITY
This machine has been manufactured in accordance with the harmonised European standards. It complies with the following EC guidelines:
- Machinery directive 2006/42/EC
- EMC Directive 2014/30/EU regarding electromagnetic compatibility
- Low voltage directive 2014/35/EU
- RoHS Directive 2011/65/EC
in the currently valid versions.
The declaration will be void if a change that was not agreed with us has been made on the machine.
Hamburg, September 2021
ADE Germany GmbH
Neuer Höltigbaum 15
22143 Hamburg, Germany

DISPOSAL
PACKAGING DISPOSAL

Dispose of the packaging with similar materials. Dispose of cardboard with waste paper and of films with recyclable materials.
MACHINE DISPOSAL
Dispose of the machine in accordance with the regulations that apply in your country.

Devices must not be disposed of in normal household waste
The machine must be disposed of properly at the end of its service life. In this way, valuable materials contained in the device will be recycled and the burden on the environment avoided. Bring the old device to a collection point for electronic waste or to a recycling depot. For more information, contact your local waste disposal firm or your local administrative body.
This Appendix includes:
- Exploded drawings with spare parts lists
SN1 (4 drawings)
SN2 (4 drawings)
SN3 (4 drawings)
- Circuit diagram SN1/SN2/SN3 - 230 V
- Circuit diagram SN2/SN3 - 400 V
EXPLODED DRAWINGS SN1
DRAWING 1 (SN1)
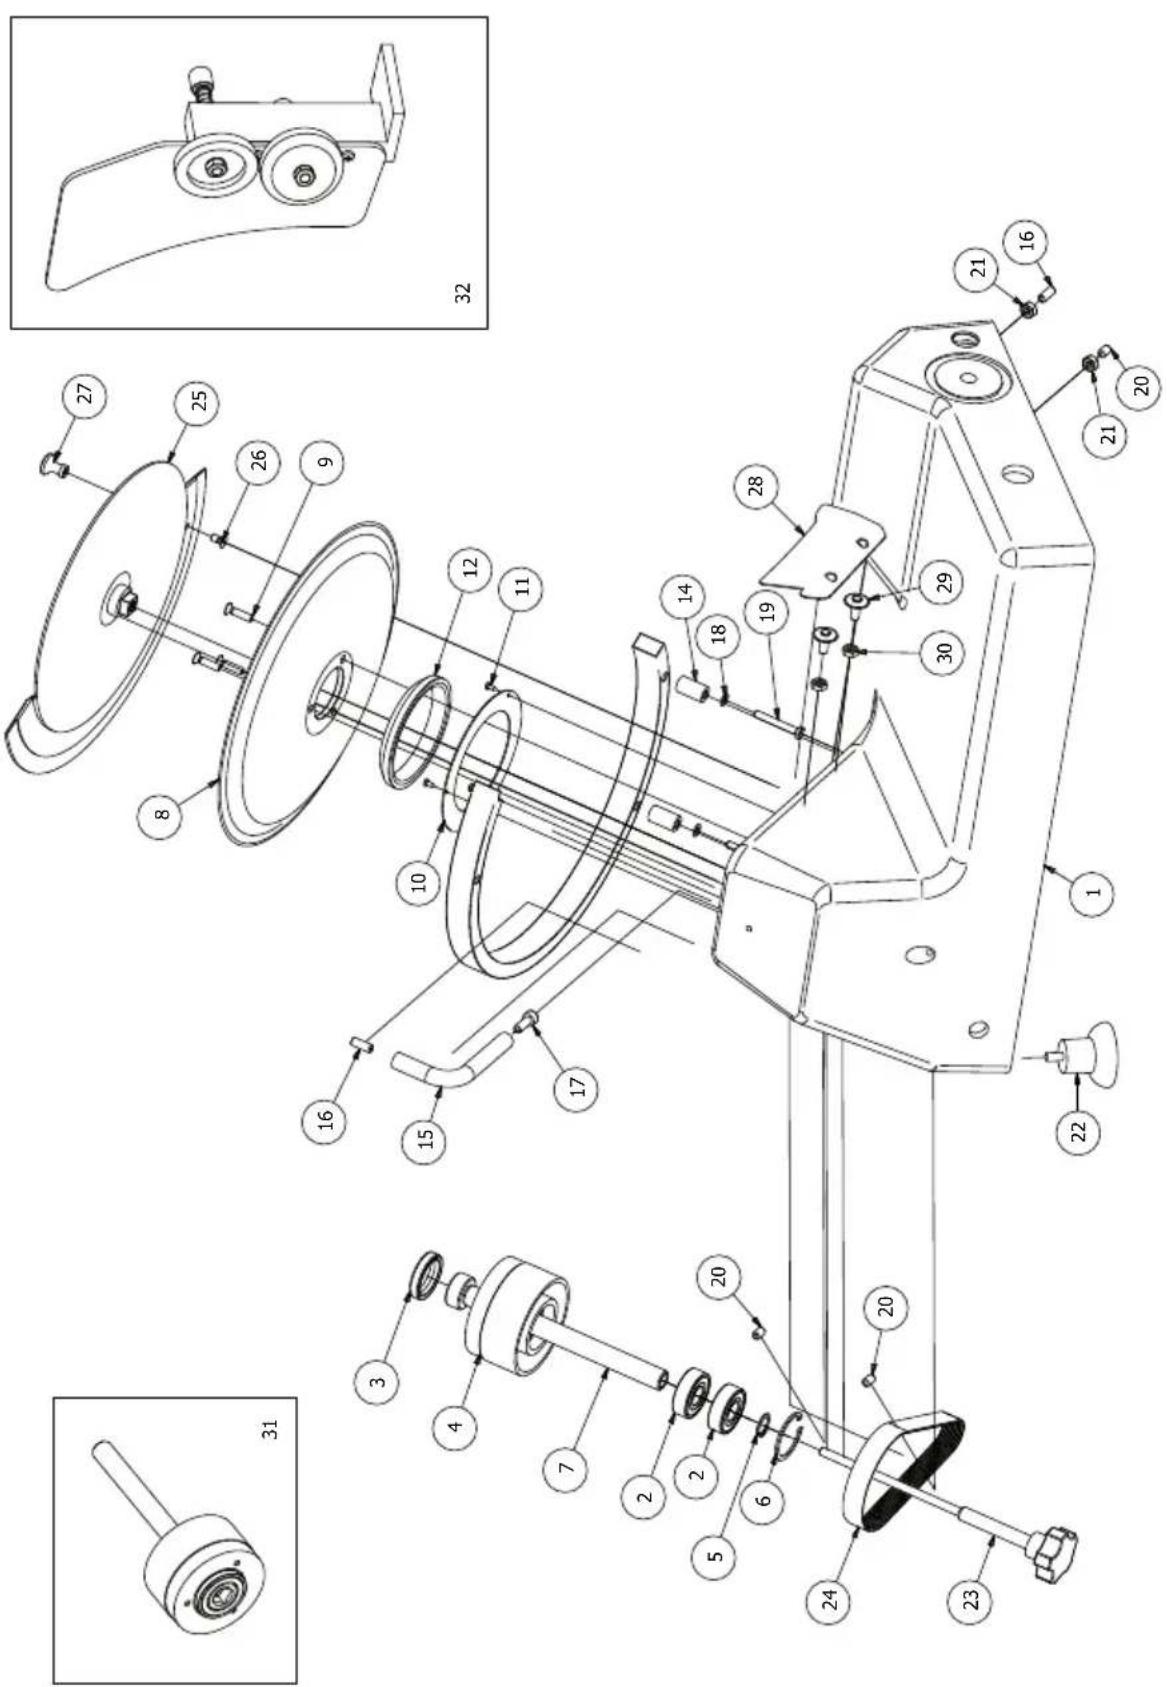
| Item Drawing 1 Item No. DESCRIPTION | ||
| 8 H4020-0 | 11 Smooth round blade | 250 mm |
| 9 H4042-10 | 09 Blade screw | |
| 13 H4042-10 | 13 Blade protection | |
| 22 H4042-10 | 22 Suction foot | |
| 23 H4042-10 | 23 Handle with shaft | |
| 24 H4042-10 | 24 Drive belts | |
| 25 H4042-10 | 25 Blade cover plate w/ M6 thread insert | |
| 26 H4042-10 | 26 Screw for cover plate holder | |
| 27 H4042-10 | 27 Holder for blade cover plate | |
| 28 H4042-10 | 28 Grease remover | |
| 31 H4042-10 | 31 Blade hub | |
| 32 H4042-10 | 32 Complete grinder | |
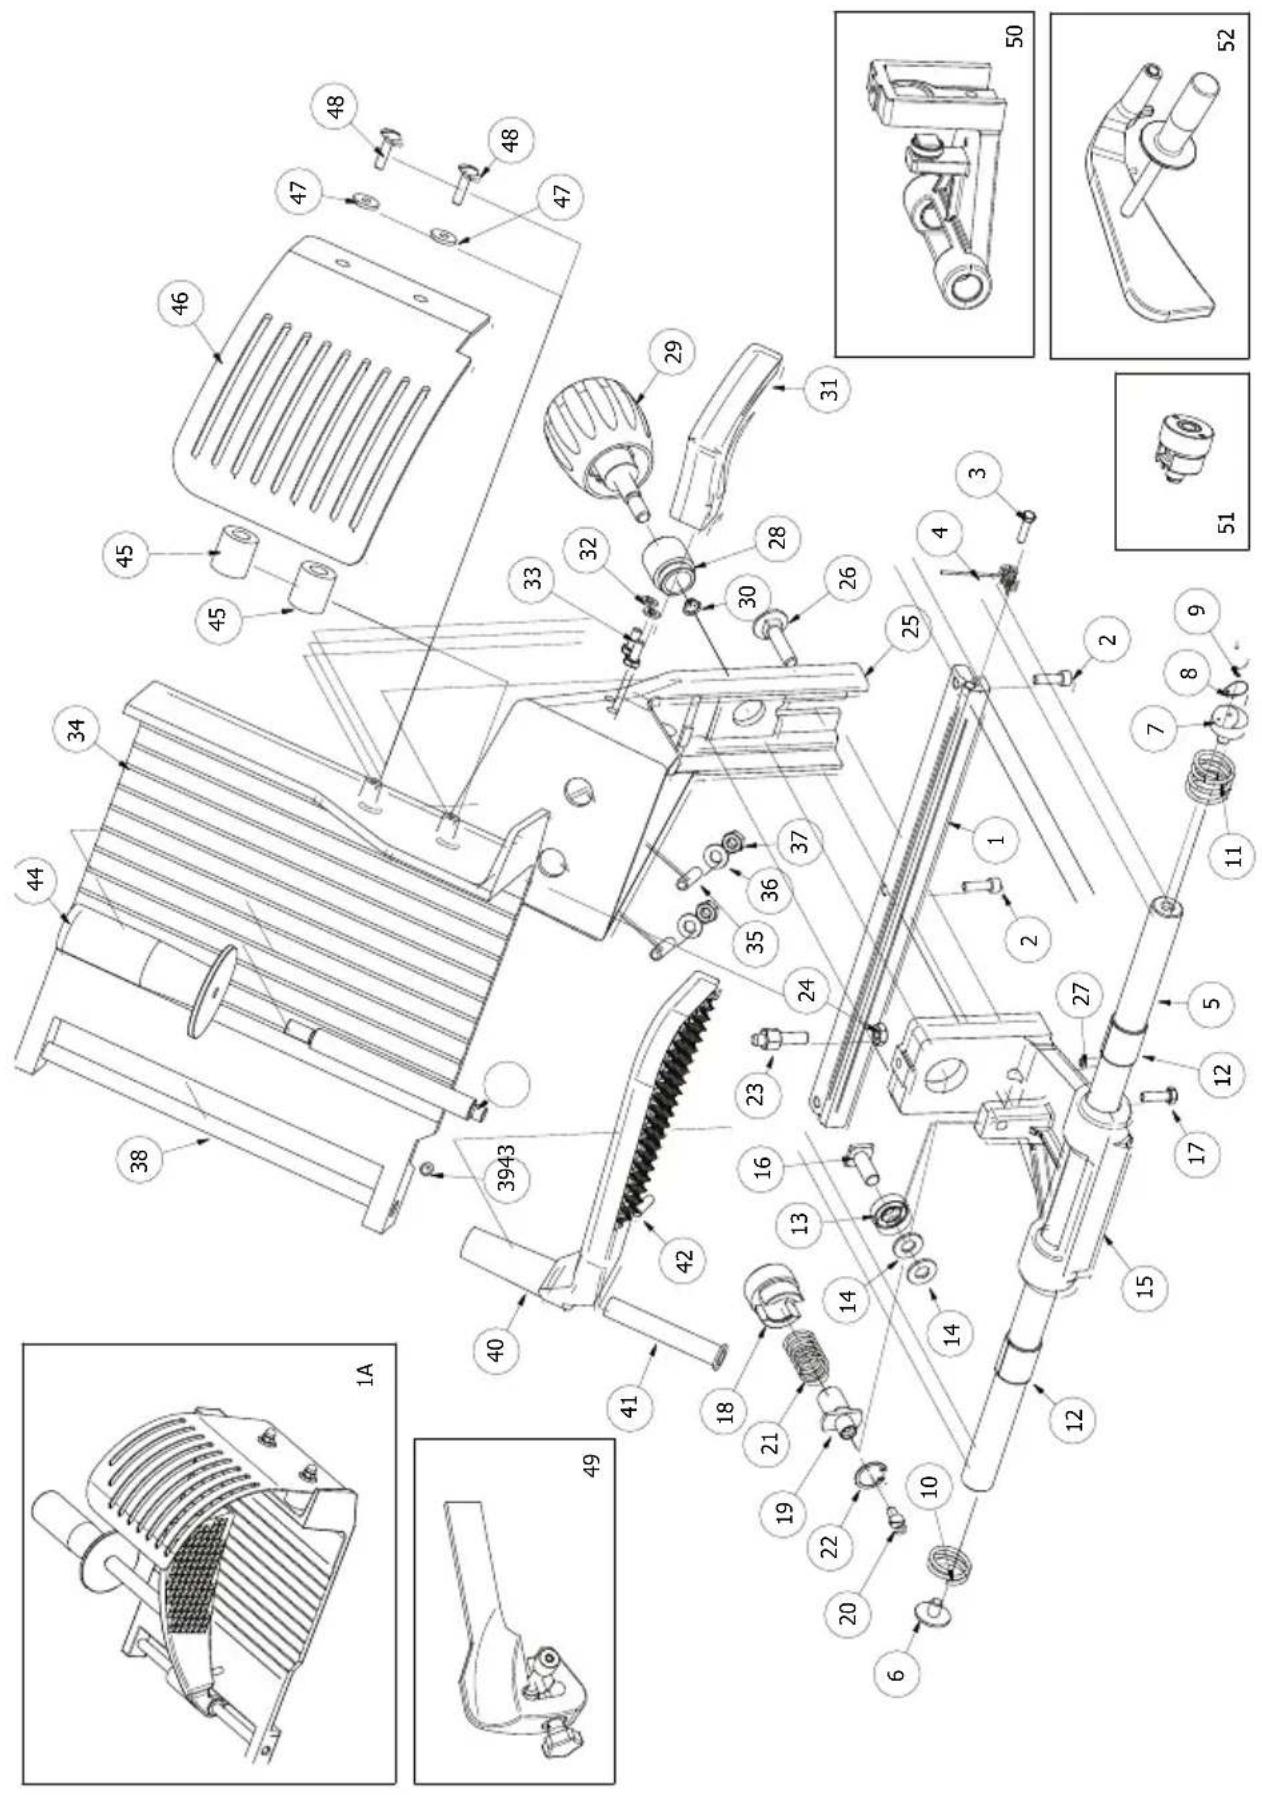
DRAWING 2 (SN1)

| Item Drawing 2 Item No. DESCRIPTION | ||
| 1A H4042-2 | 001 Complete carriage | |
| 4 H4042-2 | 004 Carriage shaft | |
| 17 H4042-2 | 017 Screw for carriage shaft | |
| 20 H4042-2 | 020 Food carriage arm | |
| 22 H4042-2 | 022 Mushroom-head screw | |
| 23 H4042-2 | 023 Handle for blocking unit | |
| 30 H4042-2 | 030 Leftover holder shaft | |
| 34 H4042-2 | 034 Spacer for handle | |
| 35 H4042-2 | 035 Handle for leftover holder | |
| 45 H4042-2 | 045 Cylinder for blocking unit | |
| 46 H4042-2 | 046 Leftover holder | |
| 47 H4042-2 | 047 Guide rail | |
| 48 H4042-2 | 048 Carriage guide | |
DRAWING 3 (SN1)

natural_image
Technical line drawing of a mechanical component with mounting holes and a numbered label '35' (no text or symbols on the object itself)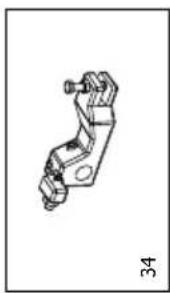
natural_image
Mechanical clamp or bracket component (no text or symbols visible)
| Item Drawing 3 Item No. DESCRIPTION | ||
| 3 H4042-3 | 003 Blade holder | |
| 4 H4042-3 | 004 Feed plate/blade | |
| 7 H4042-3 | 007 Sealing ring for adjustment knob | |
| 8 H4042-3 | 008 Adjustment knob | |
| 10 H4042-3 | 010 Eccentric screw | |
| 34 H4042-3 | 034 Blade guide | |
DRAWING 4 (SN1)

| Item Drawing 4 Item No. DESCRIPTION | ||
| 1 H4042-4001 Switch box | ||
| 5 H4042-4005 Capacitor | ||
| 6 H4042-4006 Motor | ||
| 16 H4042-4016 Connection cable | ||
| 21a H4050-0021 ON button | ||
| 21b H4050-002 OFF button | ||
| 21 H4042-4021 Circuit board | ||
EXPLODED DRAWINGS SN2
DRAWING 1 (SN2)

| Item Drawing 1 Item No. DESCRIPTION | ||
| 12 H4050-030 Smooth round | blade 300 mm | |
| 13 H4042-1009 Blade screw | ||
| 14 H4043-1013 Blade protection | ||
| 21 H4043-1021 Blade cover plate w/ M6 thread insert | ||
| 22 H4042-1022 Screw for cover plate holder | ||
| 23 H4042-1027 Holder for blade cover plate | ||
| 24 H4043-1024 Drive belts | ||
| 27 H4043-1027 Grease remover | ||
| 30 H4043-1030 Locking handle for cover plate | ||
| 32 H4043-1032 Suction foot | ||
| 34 H4043-1034 Blade hub | ||
| 35 H4043-1035 Complete grinder | ||
DRAWING 2 (SN2)
| Item Drawing 2 Item No. DESCRIPTION | ||
| 1A H4043-2 | 001 Complete carriage | |
| 5 H4043-2 | 005 Carriage shaft | |
| 6 H4043-2 | 006 Screw for carriage shaft | |
| 26 H4043-2 | 026 Mushroom-head screw | |
| 29 H4043-2 | 029 Handle for blocking unit | |
| 38 H4043-2 | 038 Leftover holder shaft | |
| 43 H4042-2 | 034 Spacer for handle | |
| 44 H4042-2 | 035 Handle for leftover holder | |
| 49 H4043-2 | 049 Guide rail | |
| 50 H4043-2 | 050 Carriage guide | |
| 51 H4043-2 | 051 Cylinder for blocking unit | |
| 52 H4043-2 | 052 Leftover holder | |
DRAWING 3 (SN2)

natural_image
Technical line drawing of a mechanical clamp or bracket component (no text or symbols)
| Item Drawing 3 Item No. DESCRIPTION | ||
| 2 H4043-3 | 002 Blade holder | |
| 3 H4043-3 | 003 Feed plate/blade | |
| 6 H4043-3 | 006 Spacer | |
| 7 H4043-3 | 007 Sealing ring for adjustment knob | |
| 8 H4043-3 | 008 Adjustment knob | |
| 9 H4043-3 | 009 Spring washer | |
| 10 H4043-3 | 010 Eccentric screw | |
| 27 H4043-3 | 027 Blade guide | |
DRAWING 4 (SN2)

| Item Drawing 4 Item No. DESCRIPTION | ||
| 1 H4043-4001 Switch box | ||
| 3 H4043-4003 Control board | ||
| 4 H4043-4004 Capacitor | ||
| 12 H4050-0021 ON button | ||
| 13 H4050-002 OFF button | ||
| 15 H4043-4015 Motor 230V | ||
| H4043-4015B Motor 400V | ||
| 23 H4043-4023 Strain relief | ||
| 24 H4042-5016 Connection cable 230V | ||
| H4043-4024 | Connection cable 400V | |
EXPLODED DRAWINGS SN3
DRAWING 1 (SN3)
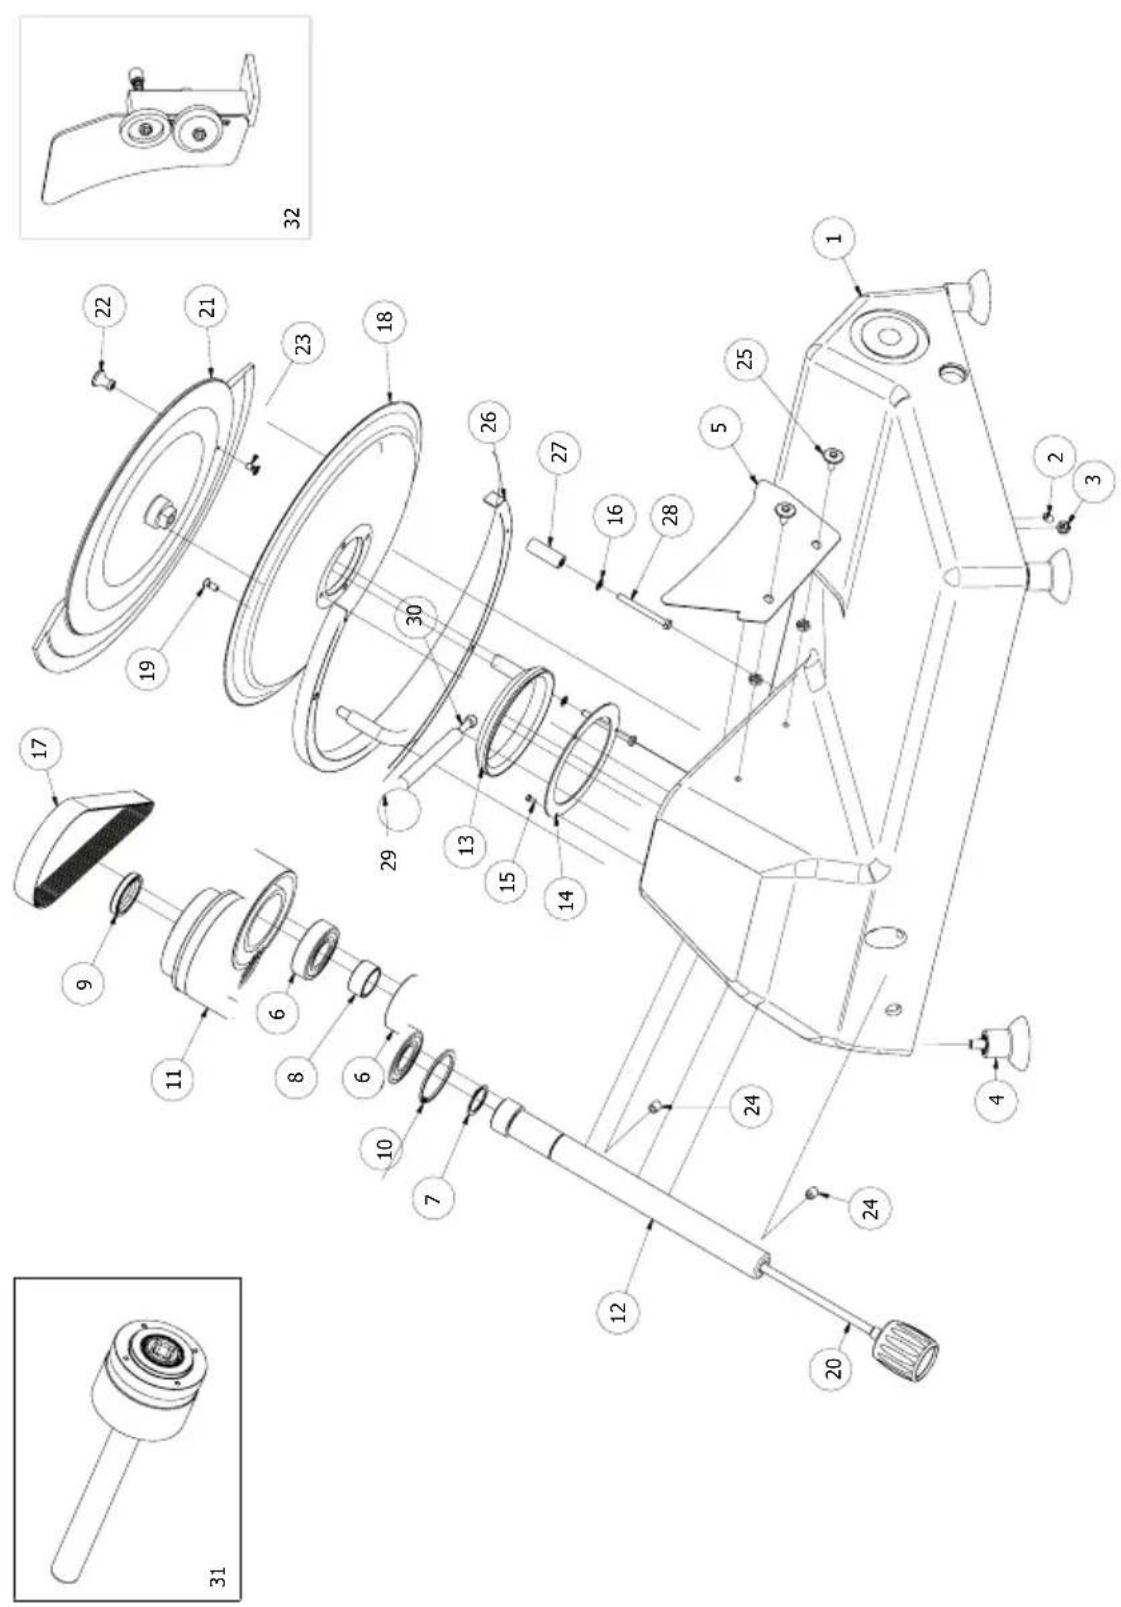
| Item Drawing 1 Item No. DESCRIPTION | ||
| 4 H4045-1004 Suction foot | ||
| 5 H4045-1005 Grease remover | ||
| 17 H4045-1017 Drive belts | ||
| 18 H4064-002 Smooth round blade 350 mm | ||
| 19 H4042-1009 Blade screw | ||
| 20 H4045-1020 Locking handle for cover plate | ||
| 21 H4045-1021 Blade cover plate w/ M6 thread insert | ||
| 22 H4042-1027 Holder for blade cover plate | ||
| 23 H4042-1022 Screw for cover plate holder | ||
| 26 H4045-1026 Blade protection | ||
| 31 H4045-1031 Blade hub | ||
| 32 H4043-1035 Complete grinder | ||
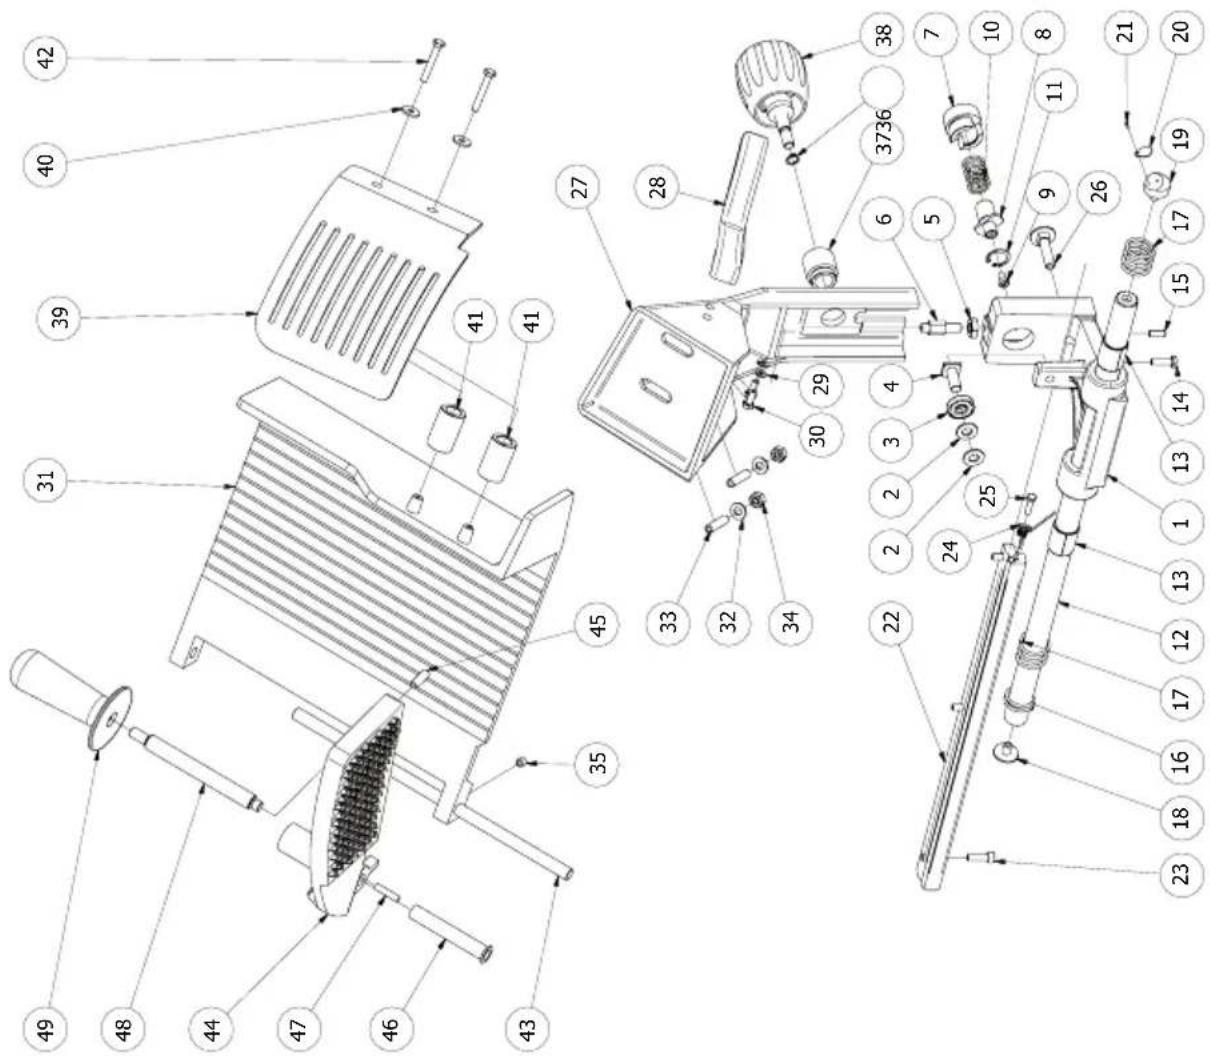
DRAWING 2 (SN3)

natural_image
Technical line drawings of two mechanical components, labeled 53 and 54 (no text or symbols on the diagrams themselves)
natural_image
Technical line drawing of a mechanical component with ribbed structure and mounting bracket (no text or symbols)
natural_image
Technical line drawing of a mechanical component with a cylindrical shaft and textured internal structure (no text or symbols)
natural_image
Line drawing of a mechanical component with a base and mounting bracket (no text or symbols)
natural_image
Technical line drawing of a mechanical device with cylindrical components and a base mount (no text or symbols)| Item Drawing 2 Item No. DESCRIPTION | ||
| 1A H4045-2 | 001 Complete carriage | |
| 12 H4045-2 | 012 Carriage shaft | |
| 18 H4045-2 | 018 Screw for carriage shaft | |
| 38 H4043-2 | 029 Handle for blocking unit | |
| 43 H4043-2 | 038 Leftover holder shaft | |
| 48 H4042-2 | 034 Spacer for handle | |
| 49 H4042-2 | 035 Handle for leftover holder | |
| 50 H4045-2 | 050 Complete leftover holder | |
| 51 H4045-2 | 051 Guide rail | |
| 52 H4043-2 | 050 Carriage guide | |
| 53 H4043-2 | 051 Cylinder for blocking unit | |
| 54 H4045-2 | 054 Slide shaft lubrication | |
DRAWING 3 (SN3)

| Item Drawing 3 Item No. DESCRIPTION | ||
| 1 H4045-3001 Blade holder | ||
| 2 H4045-3002 Feed plate/blade | ||
| 24 H4043-3009 Spring washer | ||
| 25 H4045-3025 Eccentric screw | ||
| 26 H4043-3007 Sealing ring for adjustment knob | ||
| 27 H4043-3006 Spacer | ||
| 28 H4043-3008 Adjustment knob | ||
| 29 H4045-3029 Blade guide | ||
DRAWING 4 (SN3)
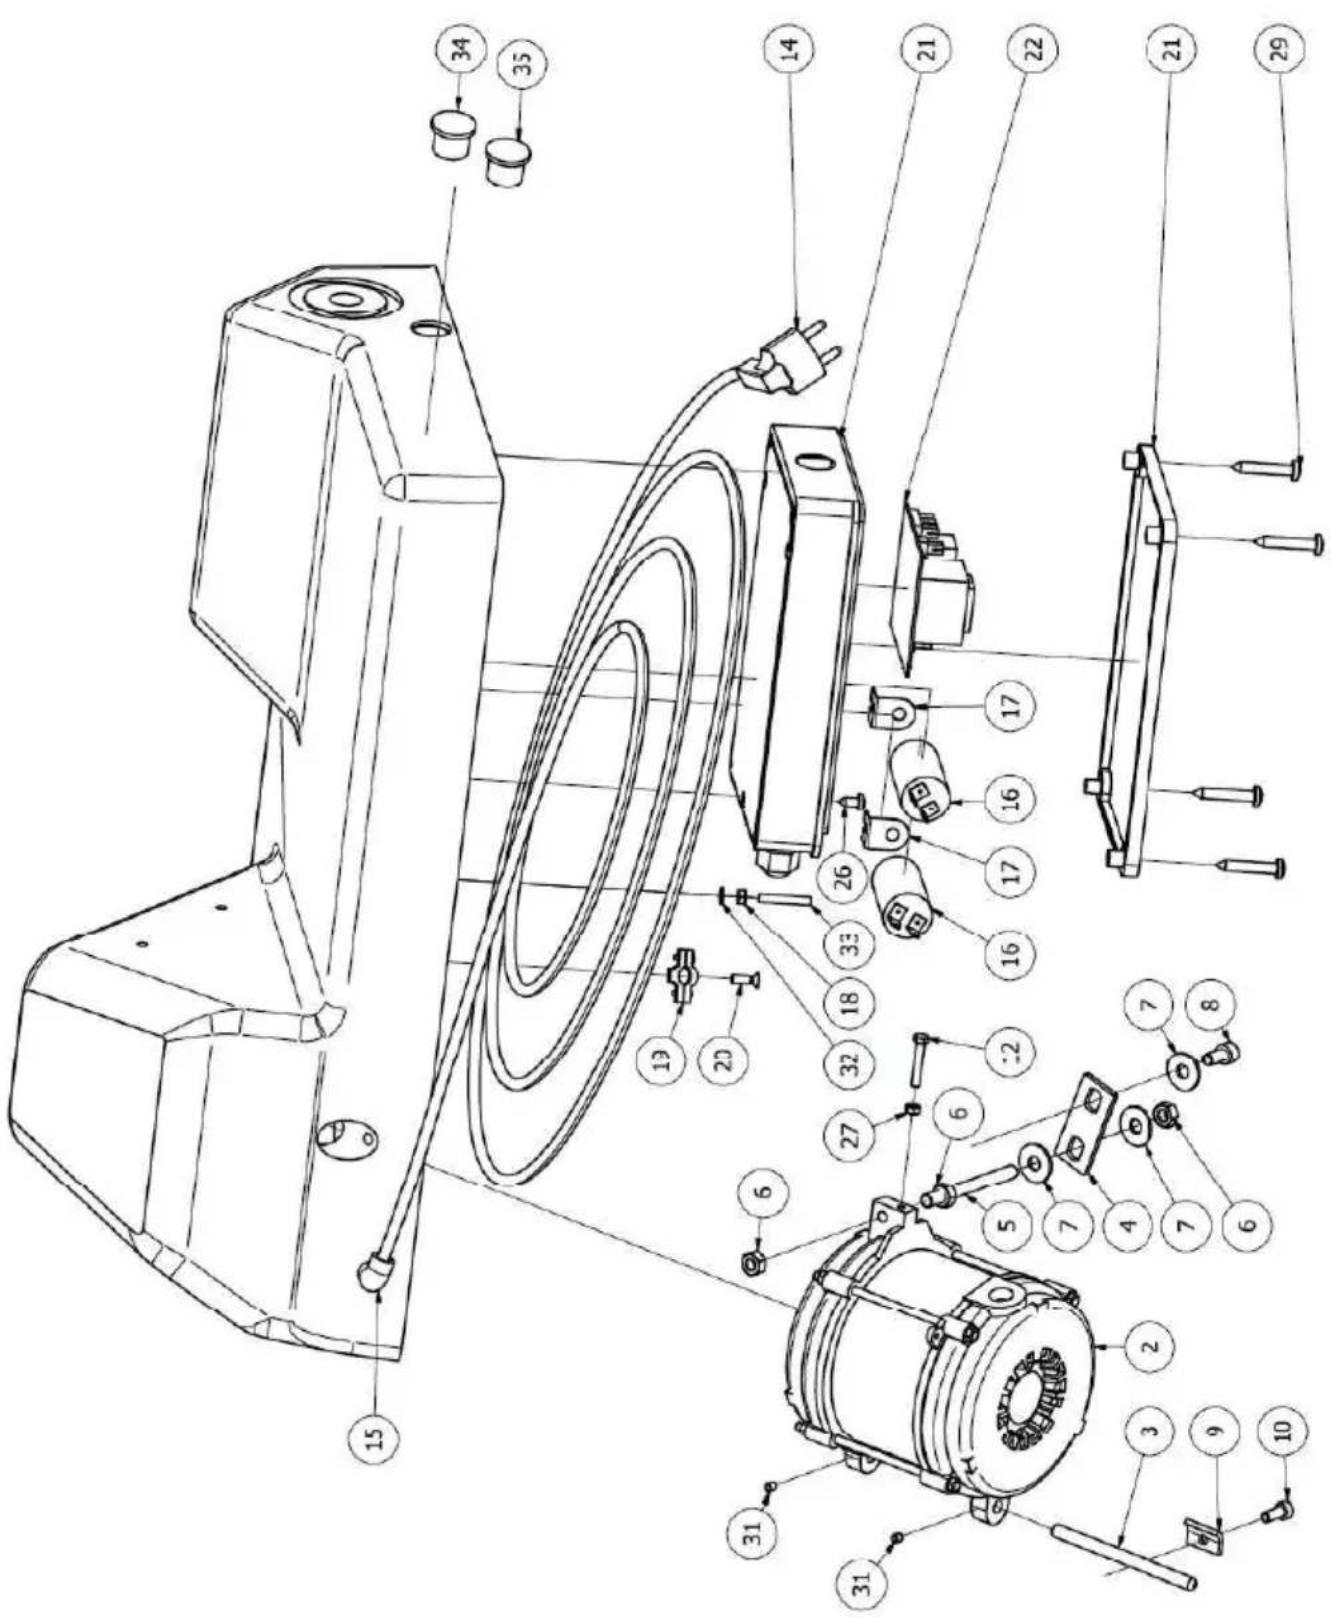
| Item Drawing 4 Item No. DESCRIPTION | ||
| 2 H4043-4015 Motor | ||
| H4043-4015B Motor 400V | ||
| 14 H4042-4016 Connection cable 230V | ||
| H4043-4024 Connection cable 400V | ||
| 15 H4043-4023 Strain relief | ||
| 16 H4043-4004 Capacitor | ||
| 21 H4043-4001 Switch box | ||
| 22 H4043-4003 Circuit board | ||
| 34 H4050-0021 ON button | ||
| 35 H4050-002 OFF button | ||
CIRCUIT DIAGRAM SN1/SN2/SN3 - 230 V

CIRCUIT DIAGRAM SN2/SN3 - 400 V

- Operating Manual | EN
- TABLE OF CONTENTS
- About this manual....3
- Dealer....5
- Safety 6
- Training the operating personnel 8
- Parts and controls....9
- Start-up 12
- Slicing food....14
- Cleaning.... 17
- Changing/replacing the circular blade....22
- Maintenance and care 22
- Sharpening the blade.... 24
- Storage and transport....26
- Technical data 27
- Name plate....27
- Warranty 27
- Declaration of conformity 28
- Disposal 28
- Appendix 29
- GENERAL INFORMATION
- STORAGE
- TARGET GROUP
- EXPLANATION OF SYMBOLS
- INTENDED USE
- SCOPE OF DELIVERY
- OPTIONAL ACCESSORIES
- DEALER
- GENERAL SAFETY INSTRUCTIONS
- DANGER FROM ELECTRICITY
- WARNING OF RISK OF INJURY
- BEWARE OF MATERIAL DAMAGE
- SAFETY DEVICES ON THE MACHINE
- NOTES ON THE INSTALLATION SITE
- UNPACKING AND INSTALLING THE MACHINE
- SWITCHING THE MACHINE ON
- SWITCHING THE MACHINE OFF
- INSTALLING THE MACHINE
- WARNING: Risk of injury!
- CONDUCTING AN ACCEPTANCE INSPECTION
- CLEANING BEFORE THE FIRST USE
- DANGER - Risk of injury
- BRIEF CLEANING
- CLEANING
- NOTE - Risk of material damage
- IF THE BLADE IS HEAVILY SOILED:
- CHANGING/REPLACING THE CIRCULAR BLADE
- MAINTENANCE AND CARE
- OILING THE CARRIAGE SHAFT (A)
- OILING THE LEFTOVER HOLDER SHAFT (B)
- STORAGE AND TRANSPORT
- TECHNICAL DATA
- NAME PLATE
- WARRANTY
- DECLARATION OF CONFORMITY
- DISPOSAL
- PACKAGING DISPOSAL
- MACHINE DISPOSAL
- Devices must not be disposed of in normal household waste
- This Appendix includes:
- EXPLODED DRAWINGS SN1
- DRAWING 1 (SN1)
- DRAWING 2 (SN1)
- DRAWING 3 (SN1)
- DRAWING 4 (SN1)
- EXPLODED DRAWINGS SN2
- DRAWING 1 (SN2)
- DRAWING 2 (SN2)
- DRAWING 3 (SN2)
- DRAWING 4 (SN2)
- EXPLODED DRAWINGS SN3
- DRAWING 1 (SN3)
- DRAWING 2 (SN3)
- DRAWING 3 (SN3)
- DRAWING 4 (SN3)
- CIRCUIT DIAGRAM SN1/SN2/SN3 - 230 V
- CIRCUIT DIAGRAM SN2/SN3 - 400 V
Brand : ADE
Model : Diagonal SN1
Category : Slicer