BC18KL2101F - Air conditioner Be Cool - Free user manual and instructions
Find the device manual for free BC18KL2101F Be Cool in PDF.


| Product Type | Portable Air Conditioner |
| Brand | Be Cool |
| Model | BC18KL2101F |
| Cooling Capacity | 18,000 BTU/h |
| Energy Efficiency Ratio (EER) | 8.5 |
| Power Supply | 115 V / 60 Hz |
| Power Consumption (Cooling) | 1,750 W |
| Refrigerant Type | R410A |
| Air Flow (High) | 350 CFM |
| Noise Level (Low/High) | 48 / 54 dB(A) |
| Dimensions (W x D x H) | 18.5 x 15.7 x 30.3 in |
| Net Weight | 75 lbs |
| Controls | Remote control and digital touch panel |
| Modes | Cool, Dehumidify, Fan, Auto |
| Timer | 24-hour programmable timer |
| Air Filter | Washable high-density foam filter |
| Installation | Includes window kit for exhaust hose |
| Safety Features | Auto shut-off for overheat and overflow prevention |
| Warranty | 1 year limited parts and labor |
Frequently Asked Questions - BC18KL2101F Be Cool
User questions about BC18KL2101F Be Cool
0 question about this device. Answer the ones you know or ask your own.
Ask a new question about this device
Download the instructions for your Air conditioner in PDF format for free! Find your manual BC18KL2101F - Be Cool and take your electronic device back in hand. On this page are published all the documents necessary for the use of your device. BC18KL2101F by Be Cool.
USER MANUAL BC18KL2101F Be Cool
natural_image
White portable air conditioner unit with 'BE COOL' branding and control panel (no visible text or symbols on body)INBETRIEBNAHME
natural_image
Technical line drawing showing a portable air conditioner unit connected to a wall-mounted panel, with no visible text or symbols.natural_image
Line drawing of a portable air conditioner unit connected to a wall-mounted panel (no text or symbols)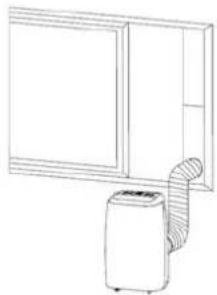
natural_image
Line drawing of a wall-mounted air conditioner unit next to a cabinet (no text or symbols)
ACHTUNG!!
natural_image
Black-and-white photo of a window with a white hose and ventilation duct, no visible text or symbolsnatural_image
Technical line drawing of a handheld device with internal components and battery housing (no text or symbols)HINWEIS
| Important informations on safety, location and electrical connectic | 21 - 22 | |
| Recycling, Disposal and declaration of confirmity | 22 | |
| Technical description and delivery content | 23 | |
| Start Up | 24 - 25 | |
| Operating Panel and Remote Control | 26 - 27 | |
| Setting Functions | 27 - 29 | |
| Tips for correct use | 29 | |
| Maintenance and cleaning | 30 - 31 | |
| Tasks at beginning and end of the season | 31 | |
| Troubleshooting | 32 | |
| Technical Informations | 33 | |
| Warranty | 34 | |
 | ONLY FOR BE COOL-SERVICE CENTERInstructions for repairing devices that contain R290 | 35 - 40 |
PLEASE READ THE INSTRUCTION MANUAL CAREFULLY BEFORE STARTING ASSEMBLY, INSTALLATION, OPERATION OR MAINTENANCE. PROTECT YOURSELF AND OTHERS BY FOLLOWING THE SAFETY INSTRUCTIONS. FAILURE TO COMPLY WITH INSTRUCTIONS COULD RESULT IN PERSONS AND / OR PROPERTY DAMAGES AND / OR LOSS OF THE WARRANTY CLAIM!
IMPORTANT INFORMATION ON SAFETY, LOCATION AND ELECTRICAL CONNECTION.
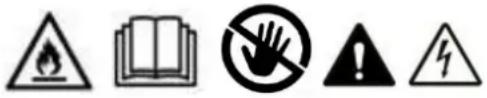
- Read all instructions carefully before using the device.
- Use this device only in accordance with the instructions in the manual. Any other use not recommended by the manufacturer could result in fire, electric shock, or personal injury.
- This device is intended for cooling in households and may not be used for any other purpose.
- The device is not suitable for continuous and precision operation and should not be used for cooling electrical systems (e.g: in server rooms).
- It is forbidden to modify the characteristics of this device in any way and only use replacement parts and accessories recommended by the manufacturer (failure to do so will void the warranty).
- For any repairs to the device, power plug or cable, always and exclusively contact authorized service centers. The customer service centers can be accessed online at www.becool.at.
• - Remove the packaging and make sure the air conditioner is not damaged. If in doubt, do not use the air conditioner and contact the service center or your seller.
- Keep children away from packaging material. If swallowed there is danger of suffocation!
- If the power cord is damaged, it must be replaced by the manufacturer or an authorized service center to avoid all possible risks.
- The device must be installed in accordance with local electrical system installation and operating instructions.
- The electrical socket in which you connect the device must not be defective or loose and must be suitable for the required current load and above all be reliably earthed. If in doubt, have your electrical installation checked by a qualified electrician.
- Before connecting to the device to the electrical socket, you must check whether the type of current and the mains voltage comply with the information given on the back of the device.
- Avoid using an extension cord as it could overheat and cause a fire.
- Do not twist or bend the power cord.
• - This device may only be used by adults.
- Children under the age of 8 and persons with limited physical, mental, sensory or mental abilities, and lack of experience and knowledge may only use this device if it is under appropriate supervision and provide detailed instructions for use of the device in a safe manner and how the existing dangers have been described.
- Do not let children play with the packaging and make sure that children do not play with the device.
• - Do not use the air conditioner outdoors.
- Do not use the device with wet hands.
- Never operate the device in areas where gas, oil or sulfur are present.
- Do not place the device near sources of heat (e.g.: near heating systems and gas heaters) and avoid direct sunlight.
- Keep a minimum distance of at least 50cm to combustible materials (e.g., alcohol, etc.) or pressurized vessels (e.g., spray containers).
- Do not use the air conditioner near water or high humidity, e.g.: in the wet basement, next to swimming pool bath or shower. Make sure that no water gets into the device.
- Do not place heavy or hot objects on the unit and never cover the unit.
- Never insert fingers, pins or other objects into the unit, being careful not to block the air inlet and outlet.
- Always turn off the power before unplugging the power cord.
- Do not pull the power cord to disconnect the device from the mains. Always pull on the plug to pull out the power cord. Do not handle the plug with wet hands to avoid electric shock.
- Unplug the device when not in use before cleaning, servicing or moving it from one location to another.
- If the device has a defect, switch it off with the on / off button on the control panel and contact the custom hotline.
• - Maintain the air conditioner in good condition by caring for and cleaning the unit.
- The air filter should be cleaned at least once a week.
- Store the device vertically in a safe place, dry and out of the reach of children, when not in use. Do not do the device with plastic packaging.
-
Store the unit in a room with no ignition sources in operation (e.g.: open fire, service gas appliance or electric heater with open heat source).
-
The air conditioner should be transported in an upright position or slightly sideways position. Empty the internal condensate tank first. Wait at least one hour after transporting the device before turning on the device.
- Always contact authorized service centers for repairs to the device, power plug, or cable.
- Do not use any means to accelerate or eliminate the defrost process, the device will do it on its own.
- If you have any questions about maintenance, you can contact the manufacturer's authorized hotline / service center.
WARNING

The main power switch and the on / off switch should not be used as means of power disconnection. Always unplug the power cord before servicing or moving the unit.
To avoid the risk of electric shock, disconnect the plug from the power when not in use - as well as before each cleaning.
SPECIFIC INFORMATION ON REFRIGERANT R290
- R290 is a refrigerant according to the EC environmental guidelines.
- The refrigerant is odorless.
- The appliance should be installed in a room where there are no ignition sources in operation (e.g.: open fire, gas and electrical appliances in operation with open heat source)
- Do not perforate or burn the air conditioner.
- Make sure that the cooling circuit is not drilled.
- Non-ventilated rooms in which the appliance is installed, operated or stored must be designed in such a way that any loss of refrigerant does not build up. This avoids the risk of fire or explosion caused by ignition of the refrigerant caused by electric ovens, cookers or other sources of ignition. The device must be stored in such a way that no mechanical damage can occur.
- Persons operating or intervening on a refrigeration circuit shall be in possession of a valid certificate issued by an authorized authority certifying their expertise in the handling of refrigerants by a rating specification recognized by the industry associations.
- The repair work must be carried out according to the instructions of the manufacturer of the device. Repair and maintenance operations that require the use of additional specialist personnel are to be carried out under the supervision of a specialist who is responsible for the handling of flammable refrigerants.

RECYCLING
The packaging materials can be recycled. Therefore it is recommended to dispos in sorted waste.
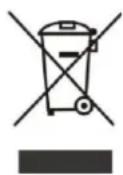
DISPOSAL
The crossed-out bin symbol requires the separate disposal of waste elect electronic equipment (WEEE). Electrical and electronic equipment may con hazardous and environmentally hazardous substances. Therefore, do not d of it in unsorted residual waste, but at a designated collection point for electrical and electronic equipment. This helps to protect resources and tl environment.
For more information, contact your dealer or the local authorities.
DECLARATION OF CONFIRMITY
We hereby confirm that this article complies with the essential requirement regulations and directives of the EU.
The detailed declaration of conformity can be viewed at any time under following link:
www.becool.at/downloads

Errors and technical changes reserved
TECHNICAL DESCRIPTION and DELIVERY CONTENT
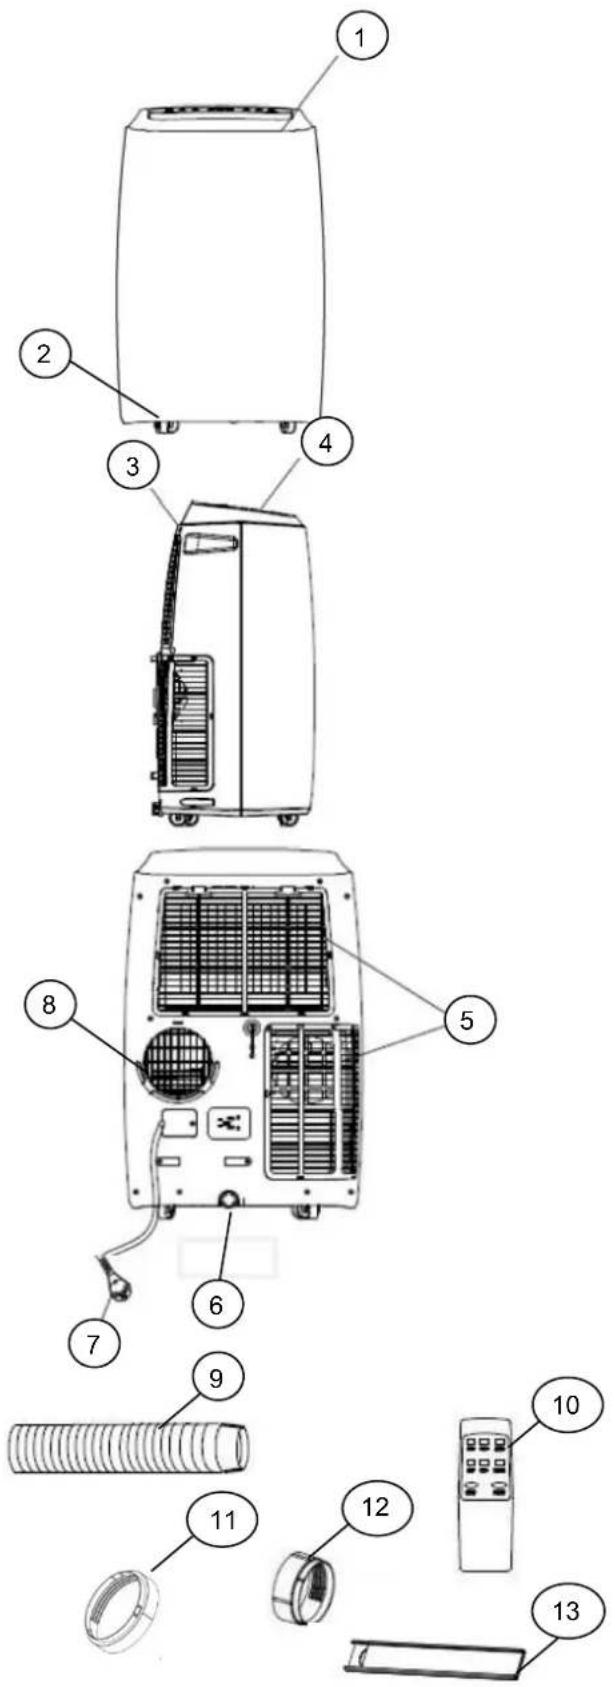
FRONT SIDE
- Control panel
- Castors
SEITLICHE-Ansicht
- Handle
- Air Outlet
BACK SIDE
- Air Inlet
- Condensation water drain
- Power supply cable
-
Opening for exhaust hose
-
Exhaust hose
- Remote Control
- Adapter for air conditioner
- Adapter for window
- Window frame
STARTUP
PREPARING FOR USE
IMPORTANT!
Leave the device in an upright position for at least 2 hours before starting it for the first time and make sure the condensation water outlet is well sealed.
- Place the device on a level surface close to a window and a grounded outlet.
- It must be at least 50 cm away from walls and other objects.
- Prior to using the device make sure that both air inlet and air outlet are free from items and not blocked.
- Observe the instructions in the chapters "Important information on safety, location and electrical connection".
INSTALLATION
You can start your air conditioning unit up after following a few simple steps:
| 1. Prepairing the Exhaust hoseFirst connect the adapter for the air condi to one side of the exhaust hose. Then co the adapter for the window on the other : | 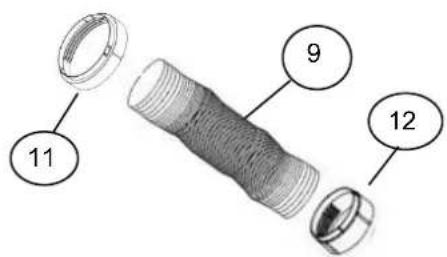 |
| 2. Installing the air hose on the deviceScrew the air hose into the designated op on the back of the device. | 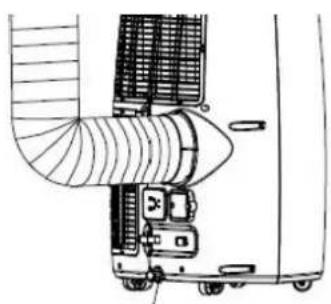 |
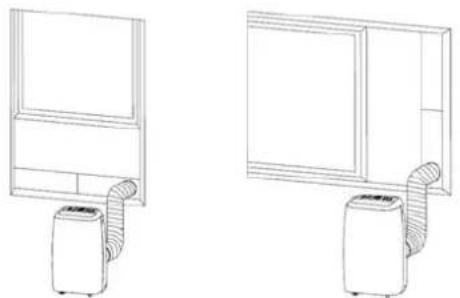
3. Installation of the hose
If you want to use the window mount (15 out along the entire length/height of the w and fasten it with a bolt or screw and sl window onto the mount. Now insert the ac into the opening.
natural_image
Line drawings of two household appliances: a front-mounted air conditioner and a portable air conditioner, both with coiled tubing (no text or symbols)
ATTENTION!!
Observe the following instructions for both installation methods:
The air hose must be as short and as little curved possible to make sure the air can flow freely.
The air conditioning unit should be set up on level g minimise noise and vibration. Place the device on a surface stable enough to support the device.
The device must be placed in the proximity of a pro grounded outlet. Never block the air inlet and outlet openings on the device.
The air hose is precisely tailored to this device. Do extend it or replace it with another hose. Non-compliance can lead to damages to the device.
RECOMMENDATION
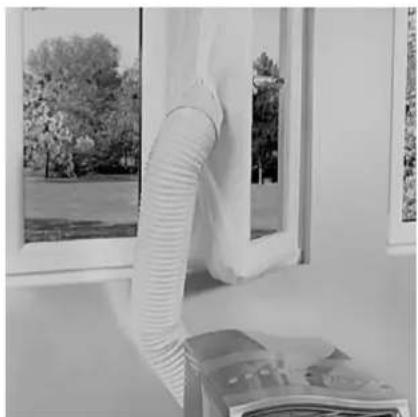
We recommend the SHE Hot-Air Stop for install on windows, balcony doors or sliding doors:
They offer the following advantages:
• Energy saving → all the warm our is blo
- Easy and quick installation
• Durable, water-repellent material
- Opening and closing with the HOT AIR S is still possible
- Washable
Available at your air conditioner provider.
natural_image
Interior view of a room with a person hanging up a large pipe near a window, overlooking trees and grass (no text or symbols visible)OPERATING PANEL and REMOTE CONTROL
1. Description of the control panel
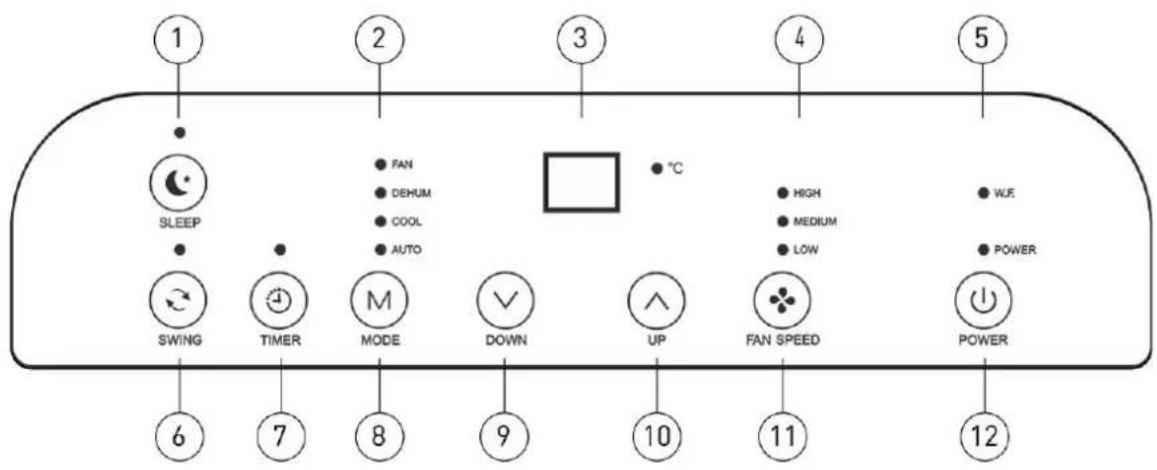
| 1. SLEEP Button + Indicator Light | 7. TIMER Button + Indicator light |
| 2. Indicator Lights for MODE | 8. MODE Button |
| 3. Display | 9. DECREASE- |
| 4. Indicator Lights for SPEED | 10. INCREASE+ |
| 5. Indicator Light for WATERTANK FU | 11. SPEED Button |
| 6. SWING Button + Indicator light | 12. POWER → Button + Indicator light |
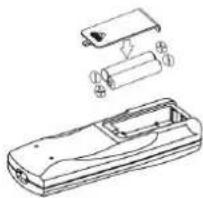
2. Preparing the remote control – inserting or replacing batteries
Please follow these instructions:
- Remove the cover on the back of the remote control.
- Now insert three "type A" batteries observe the information the inside of the battery compartment to properly insert the batteries.
- Now put the cover back onto the remote control.
natural_image
Technical line drawing of a device casing with battery pack and internal components (no text or symbols)NOTE
If the remote control has to be replaced or disposed of, you must take the batteries out and dispose of them in accordance with the applicable regulations! Also remove the batteries in case you won't use the remote control for a longer period of time avoid corrosion damage.
If you have to replace batteries always replace them with the same type and charge status.
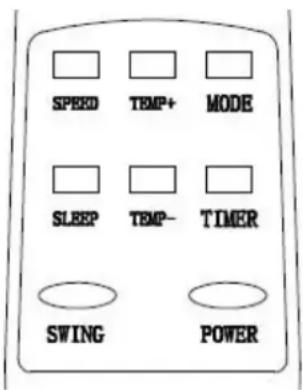
2. Description of the control panel and the remote control
SPEED → Set the Speed
TEMP + →Increase+
MODE → Set the Mode
SLEEP → Sleep-Mode
TEMP - →Decrease-
TIMER →Timer
SWING → Oscillation
POWER → ON/OFF
SETTING FUNCTIONS
You can set all functions directly on the device or using the remote control.
Depending on the set function both the indicators on the operating panel display light up.
SWITCHING THE DEVICE ON
- Connect the device to a grounded outlet.
- When you switch the device on for the first time a start signal is emitted and the device immediately switches to its standby mode.
- Press the POWER button to switch the device on. The POWER indicator lights up.
NOTE
Never switch the air conditioning unit off by pulling the plug. Always use the on/off button to switch the device off and wait a few minutes before disconnecting it from mains. This allows the device to perform a cycle of functional checks.
SETTING MODES
Cooling mode
Ideal for cooling the room in hot and humid weather.
- Push the MODE-Button until „COOL“ indicator light lights up.
- With the + and - buttons you can set the desired temperature (16-31C°)
-
With the "SPEED"-Button you can set the desired blower level. You can choose between:
-
HIGH → High blower level
○ MIDDLE → Middle blower lebel - LOW → Low blower level
- Once you set the desired fan level the respective indicator light lights up.
NOTE
In the summer we recommend setting a room temperature between 24 and 27 degrees Celsius. Generally it is not recommended to set a temperature far below the outside temperature.
Dehumidification mode
Perfectly suited to reducing the humidity in the room (e.g. in the spring and autumn, in hun rooms, during rainy periods etc.).
- Push the MODE-Button until the "DEHUM" indicator light lights up.
- The device now starts to dehumidify the air and sets the temperature to the current room temperature minus 2C^ and to the lowest blower level.
Blower / fan mode
In this mode only the blower is running.
- Push the MODE-Button, until the „FAN“ indicator light lights up.
- With the "SPEED"-Button you can set the desired blower level. You can choose between:
○ HIGH → High blower level
○ MIDDLE → Middle blower level
○ LOW → Low blower level
• Once you set the desired fan level the respective indicator light lights up.
Auto Mode
The air conditioner sets the mode and the temperature automatically according to the current room temperature.
| Roomtemperatur | >23°C | 23 – 26°C | <26°C |
| Mode | Blower-Mode | Dehumidification Mode | Cooling Mode |
| Auto Temperature | 21 Grad | 23 Grad | 25 Grad |
TIMER
Use this function to turn the device on and off at a certain time.
1. Programmed activation
- When the device is switched off push the „TIMER“-Button.
- With the + and - buttons you can set the desired time (0-24 hours). The indicator light for "TIMER" is lighting up.
- The device automatically switches on once this time has elapsed and starts to operate in the last activated mode or the previous settings regarding operating mode, temperature and blower level. (e.g. cool, 25°C and high blower level)
2. Programmed deactivation
- When the device is switched on push the „TIMER“-Button.
- With the + and - buttons you can set the desired time (0-24 hours). The indicator light for "TIMER" is lighting up.
- The device automatically switches off once the set time has elapsed.
SWING
This functions blows the air tot he left and right. This allows you to achieve a horizontal ai distribution in the room
- First set the desired mode.
- Push the SWING-button.
- By pressing the SWING-button again, the function stops and the slats remain in the respective position.
SLEEP
This feature is especially useful for operating the device during the night, as it gradually reduces its performance.
- While the unit is in the COOLING-Mode, press the „SLEEP“-Button.
- When the mode is active, the indicator lights up.
- By pressing the „SLEEP“-Button again the function stops.
NOTE
When the sleep function is active, the setpoint temperature increases by 1^ C after on hour and by 1^ C after two hours for your comfort.
TIPS FOR CORRECT USE
Here you will find information on the optimal use of your air conditioning unit:
| Close the windows and doors of the room you want to use the a conditioning unit in. | 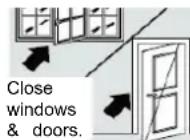 |
| Protect the room from direct sunlight using curtains, Venetian blinds blinds to save energy. | 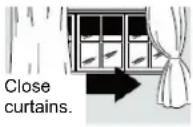 |
| Do not place any objects onto the device and do not cover the a outlet. Keep the guards free from obstructions. | 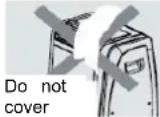 |
| Make sure no sources of heat are operating in the room. | |
| Never use the device in very damp rooms (e.g. laundry rooms). | |
| Do not use the device outdoors. | |
| Make sure the air conditioning unit is placed on level ground. | |
MAINTENANCE AND CLEANING
CLEANING THE HOUSING
Switch the device off prior to cleaning, wait a few minutes and then always the plug to disconnect the device from mains.
Clean the device using a slightly damp cloth, follow up with a dry cloth.
- For safety reasons never use water to clean the device. This could be dangerous.
- Never use petrol, alcohol or solvents to clean the device.
- Don't spray insecticides or similar agents onto the air conditioning unit.
CLEANING THE AIR FILTER
To assure the air conditioning unit's proper function you should clean the air filters every week of operation.
The air filters are located in the air inlet guard.
- Remove the exhaust hose.
- Remove the air inlet cover from the back of the unit take the air filter out.
- Use a vacuum cleaner to remove the dust accumula the air filter.
- If the air filter is very dirty, immerse it in warm water, little neutral detergent and rinse under running water 40^ C).
- Allow the air filter to dry well after washing, and then reinstall it in the air intake grille.
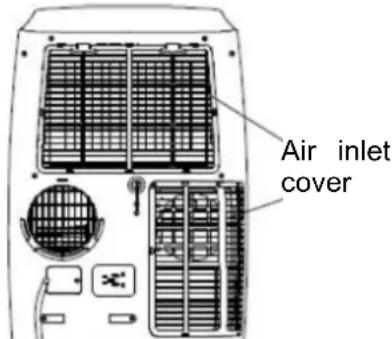
NOTE Never use the device without the filters.
EMTYING THE WATER TANK
The device has a water pump and an automatic water evaporation system. The vaporized air is blown out through the exhaust hose.
If the water tank is still full or the water pump fails, the air conditioner will have a water I safety switch. When the water level reaches a certain level, the water level indicator lights u (warning light W.F on the control panel) and you must drain the water tank.
To empty the condensed water tank, proceed as follows:
- Pull the plug out of the outlet.
- Place a catchment container underneath the condens outlet on the back of the device, carefully remove the sealing cap and plug from the outlet and drain the into the catchment container. Towards the end, slight the air conditioning unit (no more than 30°) grabbing the handle with one hand and at the upper edge of outlet with the other.
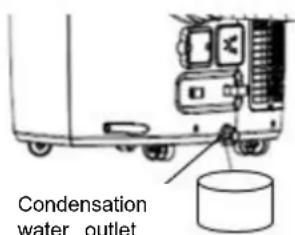
-
Once the tank is fully emptied carefully place the plug back in the water outlet and screw the sealing cap back on.
-
Plug the device back in and start it up.
Permanent water drain
In order not to empty the tank every time manually, you install a permanent water drain. This is especially recom for if you intend to use the device for a long period of The air conditioner has two different permanent condensa water outlets for two different Mode.
The permanent condensation water outlet on the TOP is DEHUMIDIFIER-Mode.
The permanent condensation water outlet on the BOTTOM for the COOLING-Mode.
Please use the correct water outlet for permanent installation, because the outlets are tuned to each mode
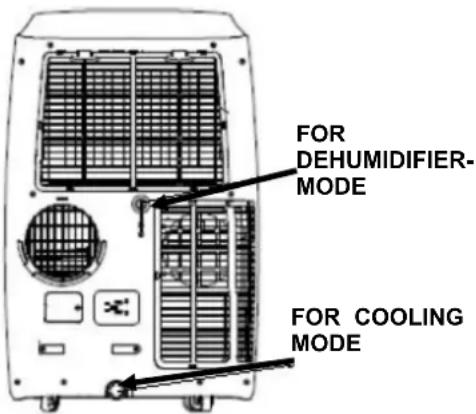
To install the permanent water drain, please proceed as
- Before fitting a suitable drain hose to the outlet, the water tank must be completely drained.
- Remove the plug of the permanent condensation v outlet and attach the drain hose.
- Put the other end of the hose into a catchment or drain making sure that the hose is not located than the drain valve and that it's not kinked.
- Carefully re-attach the plug if you choose to remove permanent drain.
For the permanent water drain you need a water exhaust hose with the
following dimensions: 16x1mm
(not included in the
NOTE:
You can also attach both hoses at once, if you do not change them while changing the modes.
TASKS AT BEGINNING AND END OF SEASON
TASKS AT END OF SEASON
- Carefully empty the condensed water tank into a suitable container as described in the section on “emptying the water tank”.
- Let the air conditioning unit run for 2 hours in the blower/fan mode until the device is completely dry inside.
- Switch the device off and pull the power plug.
- Clean the filter and re-insert it after drying it (see section on “cleaning the air filter”).
- Remove the air hose and the accessories and store them carefully.
- Remove the batteries from the remote control.
- Pack the device and store it at a cool and dry place.
CHECKS AT BEGINNING OF SEASON
- Make sure the power supply cable and the outlet are fault free and that it is properly grounded.
- Make sure the plug is properly fitted to the condensation outlet and that the filters have been inserted.
- Observe the installation and safety instructions precisely.
TROUBLESHOOTING
Before contacting our customer hotline / service line check whether you can rectify the fault using the information below.
| PROBLEM | POSSIBLE CAUSE | SOLUTION |
| The air conditioning unit does not switch on. | Power outage | Wait for power to come back of |
| The device is not connected to power supply. | Connect the device to a power supply and wait for 30 minutes!! | |
| The water tank is full. | Empty the water tank. | |
| The room temperature is already lower than the temperature set you. | Please set a lower temperature. | |
| The air conditioning unit only works for a short time. | Limited air flow in the hose. | Correctly attach the air hose and keep it as short and kink-free a possible. |
| Air outlet is blocked. | Check and remove all obstruction that block the air passage. | |
| Unpleasant odours are emitted during operation. | Air filter contaminated. | Clean air filter according to instructions. |
| The air conditioning unit working, but the room doesn't get any cooler. | Open windows, doors and/or curtains. | Close windows and doors as we as curtains. Observe the previous mentioned "tips on correct use". |
| The set temperature is too high | Please set a lower temperature. | |
| The air inlet guard is blocked contaminated. | Make sure the air inlet guard is and clean the air filter. | |
| There are sources of heat in t room (ovens, hair dryers etc.). | Switch off sources of heat. | |
| Air hose has been disconnected from the device. | Attach air hose to the opening the back of the device. | |
| The device's technical specifications are insufficient for the room which it is set up. | ||
| The remote control is no working. | The gap between the remote control and the device is too g | Get closer to the device. |
| Batteries are empty. | Please replace the batteries. | |
| Code E0 | The temperature sensor has broke.(The temperature sensor measures the ambient temperature). | Change the sensor as soon as possible. You can use the devic without it, but we do not recommend it. |
| Code E2 | The water tank is full | Please empty the watertank. |
| CODE E3 | The pipe temperature sensor has failed.(The pipe temperature sensor checks the temperature in the hose - if the temperature is too low, the device switches off automatically). | Change the sensor as soon as possible. You can use the devic without it, but we do not recommend it. |
IMPORTANT
Never try to repair the device yourself or to open the housing. This can lead to the immediate loss of the guarantee.
| Technical information | |
| Item nr. BC18KL2101F | |
| Input Voltage 220-240V~ | |
| Frequency 50Hz | |
| Rated Current 8.6A | |
| Max. Current 9.3A | |
| Power consumption cooling | 1923W |
| Max. Input | 2000W |
| Cooling Capacity 5.0KW / 18.000 BTU/h | |
| EER Energy Efficiency 2.6 | |
| Refrigerant/capacity R290/300g | |
| Noise level (sound power level) 65dB(A) | |
| IP Class IPX0 | |
| Air circulation 450 m3/h | |
| Max. permissible pressure 3.2Mpa | |
| Weight 34kg | |
| Contact addresses for further information | Schuss Home Electronic GmbHScheringgasse 3, A-1140 WienTel: +43 (1) 97 0 21 - 0Serviceline: +43 (1) 97 0 21 - 502www.becool.atFB-Nr: 236974 t / FB-Court: Wien |
WARRANTY
By purchasing a BE COOL quality product you have acquired an innovative, long lasting and reliable item.
For this BE COOL device we grant a warranty of 2 years from the date of purchase, valid in Austria only. In the unlikely event that service work is required on your device in this period we warrant free repair (spare pa and labour) or (subject to Schuss's decision) to replace the product. In the event that neither repair nor exchange make sense from an economical perspective we reserve the right to issue a credit based on current value.
When dealing with air conditioning devices you should always contact the customer hotline first (see label on the device or the title page of the instruction manual), in case of fans contact your dealer or us directly. Please note that repair not performed by the authorised workshop in Austria immediately renders this warranty void.
This warranty does not include:
- Repair of replacement of parts due to normal wear
- Damage due to non-compliance with the instruction manual
• Devices that are used commercially – even in part
• Devices damaged by external forces (falling, impact, cracking, improper use etc.) as well as aesthetic wear
• Devices that have been used improperly
• Devices that were not opened by our authorised workshop. - Damages caused by improperly closed condensation drains on air conditioning devices or improperly inserted water container.
- Unfulfilled customer expectations.
- Damage caused by force majeure, water, lightning and overvoltage.
- Devices on which type denomination and/or serial number on the device have been erased, rendered illegible or removed.
- Service work not performed by our authorised workshops, transport costs to an authorised workshop or us and back as well as associated risks.
Please note that within the warranty period we charge a flat rate of 60 € (indexed as per consumer price index 2015, June 2020) in case of operating errors or if no fault can be found.
The total warranty period of 2 years is not extended if warranty service is performed (repair or device replacement).
The 2 year warranty is only valid if the original invoice (must contain name and address of the dealer as well as full device name) and the respective warranty certificate are produced, on which the device type and serial number (can be found on the box and the device's rear or bottom) are to be noted! Only the statutory warranty coverage applies if the warranty certificate cannot be produced!
Please note that the statutory warranty coverage is not altered by this warranty and that it applies in full regardless.
Schuss Home Electronic GmbH and its vicarious agents are only liable for damages in case of gross negligence or intent. Liability for loss of profit, expected but not incurred savings, consequential damages and damages from third party claims is excluded in any case. Damages to or for recorded data are always excluded from the liabilit for damages.
Congratulations on your choice. We hope you will enjoy using your BE COOL device!
ADDRESS
BE COOL Sales
Schuss Home Electronic GmbH
-1140 Vienna, Scheringgasse 3
Tel.: +43 (0)1/ 970 21
Type designation:
Serial number:......
Together with the device, this warranty certificate must be handed to the authorised workshop or dealer you bought the device from in the event of a warranty claim!
WICHTIG!
These instructions are only for the BE COOL-Service center!
A Service or repairing of the device must only be performed by a qualified technician who is allowed to handle the R290 refrigerant.
Do not attempt to repair or open the case of the air conditioner yourself this leads to the immediate loss oft he warranty.
INSTRUCTIONS FOR REPAIRING APPLIANCES CONTAINING R290
1 GENERAL INSTRUCTIONS
1.1 Checks to the area
Prior to beginning work on systems containing flammable refrigerants, safety checks are necessary to ensure that the risk of ignition is minimized. For repair to the refrigerating system, the following precautions shall be complied with prior to conducting work on the system.
1.2 Work procedure
Work shall be undertaken under a controlled procedure so as to minimize the risk of a flammable gas or vapor being present while the work is being performed.
1.3 General work area
All maintenance staff and others working in the local area shall be instructed on the nature of work being carried out. Work in confined spaces shall be avoided. The area around the workspace shall be sectioned off. Ensure that the conditions within the area have been made safe by control of flammable material.
1.4 Checking for presence of refrigerant
The area shall be checked with an appropriate refrigerant detector prior to and during work, to ensure the technician is aware of potentially flammable atmospheres. Ensure that the leak section equipment being used is suitable for use with flammable refrigerants, i.e. non sparking, adequately sealed or intrinsically safe.
1.5 Presence of fire extinguisher
If any hot work is to be conducted on the refrigeration equipment or any associated parts, appropriate fire extinguishing equipment shall be available to hand. Have a dry powder or CO 2 fire extinguisher adjacent to the charging area.
1.6 No ignition sources
No person carrying out work in relation to a refrigeration system which involves exposing any pipe work that contains or has contained flammable refrigerant shall use any sources of ignition in such a manner that it may lead to the risk of fire or explosion. All possible ignition sources, including e-cigarette smoking, should be kept sufficiently far away from the site of installation, repairing, removing and disposal, during which flammable refrigerant can possibly be released to the surrounding space. Prior to work taking place, the area around the equipment is to be surveyed to make sure that there are no flammable hazards or ignition risks. “No Smoking” signs shall be displayed.
1.7 Ventilated area
Ensure that the area is in the open or that it is adequately ventilated before breaking into the system conducting any hot work. A degree of ventilation shall continue during the period that the work is carried out. The ventilation should safely disperse any released refrigerant and preferably expel it externally into the atmosphere.
1.8 Checks to the refrigeration equipment
Where electrical components are being changed, they shall be fit for the purpose and to the correct specification. At all times the manufacturer's maintenance and service guidelines shall be followed. If in doubt consult the manufacturer's technical department for assistance. The following checks shall be applied to installations using flammable refrigerants: the charge size is in accordance with the room size within which the refrigerant containing parts are installed; the ventilation machinery and outlets are operating adequately and are not obstructed; if an indirect refrigerating circuit is being used, the secondary circuit shall be checked for the presence of refrigerant; marking to the equipment continues to be visible and legible. Markings and signs that are illegible shall be corrected; refrigeration pipe or components are installed in a position where they are unlikely to be exposed to any substance which may corrode refrigerant containing components, unless the components are constructed of materials which are inherently resistant to being corroded or are suitably protected against being so corroded.
1.9 Checks to electrical devices
Repair and maintenance to electrical components shall include initial safety checks and component inspection procedures. If a fault exists that could compromise safety, then no electrical supply shall be connected to the circuit until it is satisfactorily dealt with. If the fault cannot be corrected immediately but it is necessary to continue operation, an adequate temporary solution shall be used. This shall be reported to the owner of the equipment so all parties are advised.
Initial safety checks shall include: Those capacitors are discharged: this shall be done in a safe manner to avoid possibility of sparking; that there no live electrical components and wiring are exposed while charging, recovering or purging the system; that there is continuity of earth bonding.
2 REPAIRS TO SEALED COMPONENTS
2.1 During repairs to sealed components, all electrical supplies shall be disconnected from the equipment being worked upon prior to any removal of sealed covers, etc. If it is absolutely necessary to have an electrical supply to equipment during servicing, then a permanently operating form of leak detection shall be located at the most critical point to warn of a potentially hazardous situation.
2.2 Particular attention shall be paid to the following to ensure that by working on electrical components, the casing is not altered in such a way that the level of protection is affected. This shall include damage to cables, excessive number of connections, terminals not made to original specification, damage to seals, incorrect fitting of glands, etc. Ensure that apparatus is mounted securely. Ensure that seals or sealing materials have not degraded such that they no longer serve the purpose of preventing the ingress of flammable atmospheres. Replacement parts shall be in accordance with the manufacturer's specifications.
NOTE The use of silicon sealant may inhibit the effectiveness of some types of leak detection equipment. Intrinsically safe components do not have to be isolated prior to working on them.
3 REPAIR TO INTRINSICALLY SAFE COMPONENTS
Do not apply any permanent inductive or capacitance loads to the circuit without ensuring that this will not exceed the permissible voltage and current permitted for the equipment in use.
Intrinsically safe components are the only types that can be worked on while live in the presence of a flammable atmosphere. The test apparatus shall be at the correct rating. Replace components only with parts specified by the manufacturer. Other parts may result in the ignition of refrigerant in the atmosphere from a leak.
4 CABLING
Check that cabling will not be subject to wear, corrosion, excessive pressure, vibration, sharp edges or any other adverse environmental effects. The check shall also take into account the effects of aging or continual vibration from sources such as compressors or fans.
5 DETECTION OF FLAMMABLE REFRIGERANTS
Under no circumstances shall potential sources of ignition be used in the searching for or detection of refrigerant leaks. A halide torch (or any other detector using a naked flame) shall not be used.
6 LEAK DETECTION METHODS
The following leak detection methods are deemed acceptable for systems containing flammable refrigerants. Electronic leak detectors shall be used to detect flammable refrigerants, but the sensitivity may not be adequate, or may need recalibration. (Detection equipment shall be calibrated in a refrigerant-free area.) Ensure that the detector is not a potential source of ignition and is suitable for the refrigerant used. Leak detection equipment shall be set at a percentage of the LFL of the refrigerant and shall be calibrated to the refrigerant employed and the appropriate percentage of gas (25 % maximum) is confirmed. Leak detection fluids are suitable for use with most refrigerants but the use of detergents containing chlorine shall be avoided as the chlorine may react with the refrigerant and corrode the copper pipe-work. If a leak is suspected, all naked flames shall be removed/extinguished. If a leakage of refrigerant is found which requires brazing, all of the refrigerant shall be recovered from the system, or isolated (by means of shut off valves) in a part of the system remote from the leak. Oxygen free nitrogen (OFN) shall then be purged through the system both before and during the brazing process.
7 REMOVAL AND EVACUATION
When breaking into the refrigerant circuit to make repairs – or for any other purpose – conventional procedures shall be used. However, it is important that best practice is followed since flammability is a consideration. The following procedure shall be adhered to: remove refrigerant; purge the circuit with inert gas; evacuate; purge again with inert gas; open the circuit by cutting or brazing. The refrigerant charge shall be recovered into the correct recovery cylinders. The system shall be “flushed” with OFN to render the unit safe. This process may need to be repeated several times. Compressed air or oxygen shall not be used for this task. Flushing shall be achieved by breaking the vacuum in the system with OFN and continuing to fill until the working pressure is achieved, then venting to atmosphere, and finally pulling down to a vacuum. This process shall be repeated until no refrigerant is within the system. When the final OFN charge is used, the system shall be vented down to atmospheric pressure to enable work to take place. This operation is absolutely vital if brazing operations on the pipework are to take place.
Ensure that the outlet for the vacuum pump is not close to any ignition sources and there is ventilated available.
8 CHARGING PROCEDURES
In addition to conventional charging procedures, the following requirements shall be followed.
- Ensure that contamination of different refrigerants does not occur when using charging equipment. Hoses or lines shall be as short as possible to minimize the amount of refrigerant contained in them.
- Cylinders shall be kept upright.
- Ensure that the refrigeration system is earthed prior to charging the system with refrigerant.
- Label the system when charging is complete (if not already).
- Extreme care shall be taken not to overfill the refrigeration system.
- Prior to recharging the system it shall be pressure tested with OFN. The system shall be leak Tested on completion of charging but prior to commissioning. A follow up leak test shall be Carried out prior to leaving the site.
9 DECOMMISSIONING
Before carrying out this procedure, it is essential that the technician is completely familiar with the equipment and all its detail. It is recommended good practice that all refrigerants are recovered safely. Prior to the task being carried out, an oil and refrigerant sample shall be taken in case analysis is required prior to re-use of reclaimed refrigerant. It is essential that electrical power is available before the task is commenced.
- Become familiar with the equipment and its operation.
- Isolate system electrically.
- Before attempting the procedure ensure that :mechanical handling equipment is available, if required, for handling refrigerant cylinders; all personal protective equipment is available and being used correctly; the recovery process is supervised at all times by a competent person; recovery equipment and cylinders conform to the appropriate standards.
- Pump down refrigerant system, if possible.
- If a vacuum is not possible, make a manifold so that refrigerant can be removed from various parts of the system.
- Make sure that cylinder is situated on the scales before recovery takes place.
- Start the recovery machine and operate in accordance with manufacturer's instructions.
- Do not overfill cylinders. (No more than 80 % volume liquid charge).
- Do not exceed the maximum working pressure of the cylinder, even temporarily.
- When the cylinders have been filled correctly and the process completed, make sure
- that the cylinders and the equipment are removed from site promptly and all isolation
- valves on the equipment are closed off.
- Recovered refrigerant shall not be charged into another refrigeration system
- unless it has been cleaned and checked.
10 LABELLING
Equipment shall be labelled stating that it has been de-commissioned and emptied of refrigerant. The label shall be dated and signed. Ensure that there are labels on the equipment stating the equipment contains flammable refrigerant.
11 RECOVERY
When removing refrigerant from a system, either for servicing or decommissioning, it is recommended good practice that all refrigerants are removed safely. When transferring refrigerant into cylinders, ensure that only appropriate refrigerant recovery cylinders are employed. Ensure that the correct number of cylinders for holding the total system charge is available. All cylinders to be used are designated for the recovered refrigerant and labelled for that refrigerant (i.e. special cylinders for the recovery of refrigerant). Cylinders shall be complete with pressure relief valve and associated shut-off valves in good working order. Empty recovery cylinders are evacuated and, if possible, cooled before recovery occurs.
The recovery equipment shall be in good working order with a set of instructions concerning the equipment that is at hand and shall be suitable for the recovery of flammable refrigerants. In addition, a set of calibrated weighing scales shall be available and in good working order. Hoses shall be complete with leak-free disconnect couplings and in good condition. Before using the recovery machine, check that it is in satisfactory working order, has been properly maintained and that any associated electrical components are sealed to prevent ignition in the event of a refrigerant release. Consult manufacturer if in doubt.
The recovered refrigerant shall be returned to the refrigerant supplier in the correct recovery cylinder, and the relevant Waste Transfer Note arranged. Do not mix refrigerants in recovery units and especially not in cylinders.
If compressors or compressor oils are to be removed, ensure that they have been evacuated to an acceptable level to make certain that flammable refrigerant does not remain within the lubricant. The evacuation process shall be carried out prior to returning the compressor to the suppliers. Only electric heating to the compressor body shall be employed to accelerate this process. When oil is drained from a system, it shall be carried out safely.
Competence of service personnel
General
Special training additional to usual refrigerating equipment repair procedures is required when equipment with flammable refrigerants is affected.
In many countries, this training is carried out by national training organizations that are accredited to teach the relevant national competency standards that may be set in legislation.
The achieved competence should be documented by a certificate.
Training
The training should include the substance of the following:
Information about the explosion potential of flammable refrigerants to show that flammables may be dangerous when handled without care.
Information about potential ignition sources, especially those that are not obvious, such as lighters, light switches, vacuum cleaners, electric heaters.
Information about the different safety concepts:
Unventilated – (see Clause GG.2) Safety of the appliance does not depend on ventilation of the housing. Switching off the appliance or opening of the housing has no significant effect on the safety. Nevertheless, it is possible that leaking refrigerant may accumulate inside the enclosure and flammable atmosphere will be released when the enclosure is opened.
Ventilated enclosure – (see Clause GG.4) Safety of the appliance depends on ventilation of the housing. Switching off the appliance or opening of the enclosure has a significant effect on the safety. Care should be taken to ensure a sufficient ventilation before.
Ventilated room – (see Clause GG.5) Safety of the appliance depends on the ventilation of the room. Switching off the appliance or opening of the housing has no significant effect on the safety. The ventilation of the room shall not be switched off during repair procedures.
Information about the concept of sealed components and sealed enclosures according to IEC 60079-15:2010.
Information about the correct working procedures:
1. Commissioning
o Ensure that the floor area is sufficient for the refrigerant charge or that the ventilation duct is assembled in a correct manner.
- Connect the pipes and carry out a leak test before charging with refrigerant.
- Check safety equipment before putting into service.
2. Maintenance
o Portable equipment shall be repaired outside or in a workshop specially equipped for servicing units with flammable refrigerants.
- Ensure sufficient ventilation at the repair place.
- Be aware that malfunction of the equipment may be caused by refrigerant loss and a refrigerant leak is possible.
○ Discharge capacitors in a way that won't cause any spark. The standard procedure to short circuit the capacitor terminals usually creates sparks.
- Reassemble sealed enclosures accurately. If seals are worn, replace them.
- Check safety equipment before putting into service.
3. Repair
o Portable equipment shall be repaired outside or in a workshop specially equipped for servicing units with flammable refrigerants.
- Ensure sufficient ventilation at the repair place.
- Be aware that malfunction of the equipment may be caused by refrigerant loss and a refrigerant leak is possible.
- Discharge capacitors in a way that won't cause any spark.
- When brazing is required, the following procedures shall be carried out in the right order:
- Remove the refrigerant. If the recovery is not required by national regulations, drain the refrigerant to the outside. Take care that the drained refrigerant will not cause any danger. In doubt, one person should guard the outlet. Take special care that drained refrigerant will not float back into the building.
• Evacuate the refrigerant circuit.
- Purge the refrigerant circuit with nitrogen for 5 min.
BE COOL
- Evacuate again.
- Remove parts to be replaced by cutting, not by flame.
- Purge the braze point with nitrogen during the brazing procedure.
- Carry out a leak test before charging with refrigerant.
- Reassemble sealed enclosures accurately. If seals are worn, replace them.
- Check safety equipment before putting into service.
4. Decommissioning
○ If the safety is affected when the equipment is put out of service, the refrigerant charge shall be removed before decommissioning.
o Ensure sufficient ventilation at the equipment location.
- Be aware that malfunction of the equipment may be caused by refrigerant loss and a refrigerant leak is possible.
- Discharge capacitors in a way that won't cause any spark.
o Remove the refrigerant. If the recovery is not required by national regulations, drain the refrigerant to the outside. Take care that the drained refrigerant will not cause any danger. In doubt, one person should guard the outlet. Take special care that drained refrigerant will not float back into the building.
- Evacuate the refrigerant circuit.
o Purge the refrigerant circuit with nitrogen for 5 min.
- Evacuate again.
- Fill with nitrogen up to atmospheric pressure.
o Put a label on the equipment that the refrigerant is removed.
5. Disposal
- Ensure sufficient ventilation at the working place.
o Remove the refrigerant. If the recovery is not required by national regulations, drain the refrigerant to the outside. Take care that the drained refrigerant will not cause any danger. In doubt, one person should guard the outlet. Take special care that drained refrigerant will not float back into the building. - Evacuate the refrigerant circuit.
o Purge the refrigerant circuit with nitrogen for 5 min. - Evacuate again.
- Cut out the compressor and drain the oil.
Transportation, marking and storage for units that employ flammable refrigerants Transport of equipment containing flammable refrigerants
Attention is drawn to the fact that additional transportation regulations may exist with respect to equipment containing flammable gas. The maximum number of pieces of equipment or the configuration of the equipment, permitted to be transported together will be determined by the applicable transport regulations.
Marking of equipment using signs
Signs for similar appliances used in a work area generally are addressed by local regulations and give the minimum requirements for the provision of safety and/or health signs for a work location. All required signs are to be maintained and employers should ensure that employees receive suitable and sufficient instruction and training on the meaning of appropriate safety signs and the actions that need to be taken in connection with these signs. The effectiveness of signs should not be diminished by too many signs being placed together. Any pictograms used should be as simple as possible and contain only essential details.
Disposal of equipment using flammable refrigerants
See national regulations.
Storage of equipment/appliances
The storage of equipment should be in accordance with the manufacturer's instructions. Storage of packed (unsold) equipment Storage package protection should be constructed such that mechanical damage to the equipment inside the package will not cause a leak of the refrigerant charge. The maximum number of pieces of equipment permitted to be stored together will be determined by local regulations.
- INBETRIEBNAHME
- ACHTUNG!!
- HINWEIS
- IMPORTANT INFORMATION ON SAFETY, LOCATION AND ELECTRICAL CONNECTION.
- SPECIFIC INFORMATION ON REFRIGERANT R290
- RECYCLING
- DISPOSAL
- DECLARATION OF CONFIRMITY
- TECHNICAL DESCRIPTION and DELIVERY CONTENT
- FRONT SIDE
- SEITLICHE-Ansicht
- BACK SIDE
- STARTUP
- PREPARING FOR USE
- IMPORTANT!
- INSTALLATION
- Installation of the hose
- ATTENTION!!
- RECOMMENDATION
- They offer the following advantages:
- OPERATING PANEL and REMOTE CONTROL
- Description of the control panel
- Preparing the remote control – inserting or replacing batteries
- NOTE
- Description of the control panel and the remote control
- SETTING FUNCTIONS
- SWITCHING THE DEVICE ON
- SETTING MODES
- Cooling mode
- Dehumidification mode
- Blower / fan mode
- Auto Mode
- TIMER
- Programmed activation
- Programmed deactivation
- SWING
- SLEEP
- TIPS FOR CORRECT USE
- MAINTENANCE AND CLEANING
- CLEANING THE HOUSING
- CLEANING THE AIR FILTER
- EMTYING THE WATER TANK
- Permanent water drain
- NOTE:
- TASKS AT BEGINNING AND END OF SEASON
- TASKS AT END OF SEASON
- CHECKS AT BEGINNING OF SEASON
- TROUBLESHOOTING
- IMPORTANT
- WARRANTY
- This warranty does not include:
- WICHTIG!
- INSTRUCTIONS FOR REPAIRING APPLIANCES CONTAINING R290
- GENERAL INSTRUCTIONS
- Checks to the area
- Work procedure
- General work area
- Checking for presence of refrigerant
- Presence of fire extinguisher
- No ignition sources
- Ventilated area
- Checks to the refrigeration equipment
- Checks to electrical devices
- REPAIRS TO SEALED COMPONENTS
- REPAIR TO INTRINSICALLY SAFE COMPONENTS
- CABLING
- DETECTION OF FLAMMABLE REFRIGERANTS
- LEAK DETECTION METHODS
- REMOVAL AND EVACUATION
- CHARGING PROCEDURES
- DECOMMISSIONING
- LABELLING
- RECOVERY
- Competence of service personnel
- General
- Training
- Commissioning
- Maintenance
- Repair
- BE COOL
- Decommissioning
- Disposal
- Transportation, marking and storage for units that employ flammable refrigerants Transport of equipment containing flammable refrigerants
- Marking of equipment using signs
- Disposal of equipment using flammable refrigerants
- Storage of equipment/appliances
Brand : Be Cool
Model : BC18KL2101F
Category : Air conditioner