
FLC-210504 - Meat Grinder ADE - Free user manual and instructions
Find the device manual for free FLC-210504 ADE in PDF.


| Product Type | Meat Grinder |
| Model | FLC-210504 (FLC70 series) |
| Dimensions (W x D x H) | 245 x 415 x 500 mm |
| Net Weight | 26 kg |
| Power Supply | 230 V, 50/60 Hz |
| Power Consumption | 0.55 kW |
| Duty Cycle | 40% (max 24 minutes continuous operation per hour) |
| Max Capacity | 120 kg per hour |
| Perforated Disk Diameter | 70 mm |
| Included Perforated Disks | 4.5 mm and 7.8 mm hole diameter |
| Housing Material | Stainless steel |
| Auger Material | Stainless steel |
| Cutting Knife Material | Stainless steel |
| Filling Tray Material | Stainless steel |
| Meat Pusher Material | Plastic |
| Sausage Nozzle | 12 mm diameter, plastic |
| Safety Features | Union nut safety guard, feed chute guard, emergency stop buttons |
| Cutting Set | Two-part (grinder knife + perforated disk) |
| Operation | Continuous max 24 minutes, then allow cool down |
| Cleaning Instructions | Hand wash only; do not immerse in water or use dishwasher |
| Warranty | 1 year from date of purchase |
| Certification | CE, Machinery Directive 2006/42/EC, EMC 2014/30/EU, Low Voltage 2014/35/EU, RoHS |
| Recommended Meat Preparation | Fresh, boneless, cut into goulash-sized pieces; do not process frozen meat |
Frequently Asked Questions - FLC-210504 ADE
User questions about FLC-210504 ADE
0 question about this device. Answer the ones you know or ask your own.
Ask a new question about this device
Download the instructions for your Meat Grinder in PDF format for free! Find your manual FLC-210504 - ADE and take your electronic device back in hand. On this page are published all the documents necessary for the use of your device. FLC-210504 by ADE.
USER MANUAL FLC-210504 ADE
OPERATING INSTRUCTIONS
ADE
Meat Processing Machines
natural_image
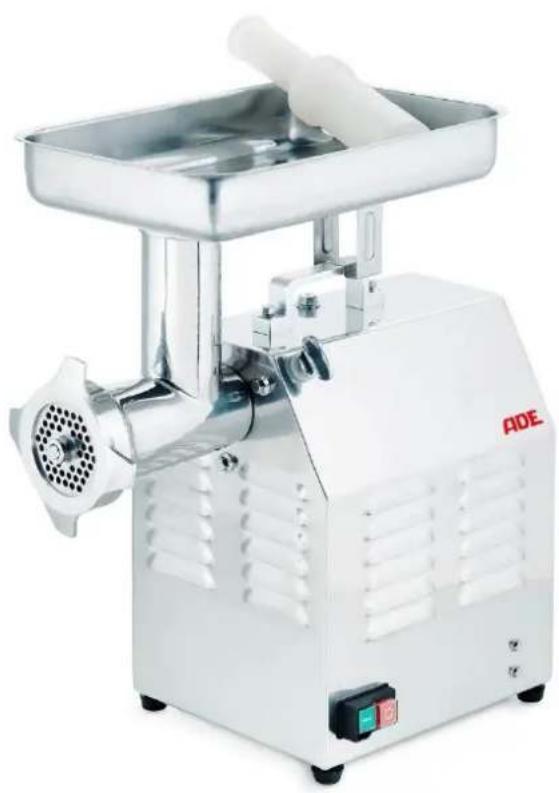
Exterior view of a stainless steel meat processing machine (no visible text or symbols)Meat Grinder - FLC Series
(FLC-210504-Rev004-UM-en)
CONTENTS
CONTENTS....1
FOREWORD 2
Introduction....3
SAFETY INSTRUCTIONS .... 3
General Safety Instructions....3
Personal Safety 3
Machine Safety 4
Working Area Safety 4
Maintenance Safety 4
Safety Information....5
START-UP....5
Checking the Box Contents....5
Machine Identification....6
Installation 6
Wiring....6
Acceptance testing....6
OPERATING FUNCTIONS....7
Operating the Meat Grinder 7
Switching the Meat Grinder On and Off....7
Using the Machine....8
Fitting and Removing the Cutting Set....8
Changing the Cutting Set....9
Operating Time 9
CLEANING AND CARE....9
Cleaning....9
Maintenance....10
Storage and Disposal....10
TRAINING 10
TROUBLESHOOTING....11
WARRANTY....11
Warranty....11
Storage and transportation conditions....11
TECHNICAL DATA....12
CE MARKING AND DECLARATION OF CONFORMITY....13
WIRING DIAGRAMS 14
EXPLODED VIEWS....14
SPARE PARTS LISTS....15
FOREWORD

This symbol means: "Observe operating instructions." For accurate results, read these operating instructions carefully and observe the information contained therein. Keep these operating instructions handy for future reference.
This publication contains a comprehensive description of how to install, operate, clean, and maintain the meat grinder.
The publication, referred to below as the “manual,” aims to provide the user with clear and comprehensible information to ensure a long service life and smooth operation of the machine.
The machine is designed for processing fresh meat in industrial kitchens, restaurants, and hotels, for small-scale use in commercial kitchens and butcher's stores, as well as in the commercial catering sector. Never use the machine to process frozen meat or other frozen products.
We reserve the right to continuously improve our meat grinders, which shall in no way affect the instructions and information contained in this manual.
Before using the machine for the first time, you must read this manual carefully.
Should this manual be damaged or lost, apply for a copy from the manufacturer immediately.
Many accidents and injuries that occur during the operation of the machine result from insufficient familiarity with its functions and safety devices. Before starting work with the machine, please read the instructions herein carefully and follow them to the letter.
Any repairs or modifications of the appliance that are not described in this manual are not permitted.
The manufacturer assumes no liability for damage resulting from improper use or maintenance of the appliance not described in these operating and maintenance instructions.

You must read and understand these operating instructions before unpacking, plugging in, and operating the appliance.

The manufacturer assumes no liability for personal injury or material damage resulting from failure to comply with these operating and safety instructions!

Dismantling the safety devices is not permitted!

Stop using the machine immediately if any safety devices are damaged. You should promptly return the machine to your customer service for repair or replacement.

Never fit and use perforated disks with a hole diameter greater than 8 mm with the FLC series meat grinders!
Introduction
The design of the FLC series meat grinders complies with applicable safety standards.
Consequently, all our appliances are fitted with a plate featuring the “CE” mark attesting to the product's conformity with said standards.
The machine has a stainless steel housing.
The power buttons used to switch the meat grinder on and off are connected to an auxiliary control circuit that prevents unintentional start-up after power supply interruption.
SAFETY INSTRUCTIONS
General Safety Instructions
- Read these operating instructions carefully before using your meat grinder for the first time.
- The machine must only be operated by trained personnel.
- User training must include all information on the hazards associated with the use of the machine and the safety measures that may need to be observed.
- The user must receive adequate instruction on safety guards and devices. The user must also receive training in performing regular check-ups of these safety guards and devices.
- Children, disabled persons, and untrained personnel must not be allowed to operate the appliance.
- This machine must only be operated by one user at a time.
- Never operate the machine while under the influence of alcohol or drugs.
- Never push meat into the feed chute by hand while the machine is running.
- Never leave the machine unattended while it is running.
- Before carrying out any maintenance work, unplug the machine from the power outlet.
- Never clean the machine under running water or in a water basin.
- Should you notice any unusual noises or unpleasant odors coming from the machine, shut it down immediately, disconnect it from the power supply, and contact customer service.

Optimal safety is your concern, as there are hazards involved in the use of any kind of electrical appliance!
Personal Safety
- Always read and understand these instructions before using the meat grinder. Your eyes are the best safety device you have. Always look before you move or act!
- Experience shows that some objects you may wear can provoke accidents. Take off your rings, watches, bracelets, or bangles before using the appliance. Keep your sleeves tight around your wrists and button them up securely. Take off your tie that can get caught in the appliance. Tidy up your hair using bonnets, elastics, hair pins, etc., and hold it together.

Follow all general instructions and recommended safety and accident prevention measures!
Machine Safety
- Thoroughly inspect the appliance before using it for the first time and perform regular check-ups of the safety guards and devices.
- All safety guards (union nut, feed chute) must be properly closed before switching on the appliance.
- Ensure the meat grinder is switched off before fitting any safety guards.
- Before starting the meat grinder, make sure all safety guards are correctly fitted and fully functional. Never start using the appliance if these conditions are not met.
- Never process too large pieces of meat that may overload the appliance.
- Avoid processing meat cuts with bones or similar products.
- Never attempt to push the meat with your hands during processing.
- Never attempt to remove pieces of meat with your hands or objects while the meat grinder is running.
- Always unplug the appliance from the power outlet before fitting or removing any parts and before cleaning and maintenance work.
- To disconnect the power cord, pull it out by the plug; NEVER drag the cord itself.
- Replace the power cord immediately if it shows even slight damage. The power cord must be free of cracks, abrasions, bulges, etc.
- If you notice any unusual noises or odors, switch the meat grinder off immediately and determine the cause.
Working Area Safety
- The working area in which the meat grinder is used must be sufficiently illuminated and large enough to ensure that all operations can be carried out smoothly and safely for the user.
- The surface on which the meat grinder is placed must be free of moisture, processing residues, or other debris. The working area must be kept neat and clutter free, and any slipping, snagging, or entanglement hazards must be completely eliminated. The working area must be free from loose materials lying around.
- Only the operator performing the meat processing is allowed in the working area.
Maintenance Safety
- Always switch the meat grinder off before cleaning and maintenance and before fitting or removing any parts: Pull the power plug out of the power outlet!
- General cleaning of the meat grinder is vital for safety.
- If you notice any faults or signs of damage to the appliance or its safety guards, switch the appliance off immediately and report them to the supervisor. All faults must be remedied to continue using the appliance.
Residual risks
Even though extensive safety precautions have been taken on the machine, there are still residual risks for the operator in his daily work with the machine. They occur, in particular, when the operator attempts to push meat into the feed chute with their hand. Always use the meat pusher provided to push the meat down into your meat grinder. The operator must never bend over the machine while wearing loose clothing or long hair. Other residual risks include electrocution from contact with live parts of the appliance and improper working position of the user.
Safety Information
We can no longer guarantee safe operation
- when the power plug or power cord shows visible signs of damage;
- when the power plug is not working;
- after prolonged storage in wet environments;
- when the thread of the auger housing and/or the auger pin are damaged;
- when the on/off switch is damaged;
- when perforated disks thinner than 5 mm are used.
Should this occur, contact your dealer or service provider for your safety.
START-UP
Upon receiving the box containing the meat grinder, ensure that it is intact and has not been damaged during transportation.
If you notice any signs of damage, contact the dealer from whom you purchased the appliance without delay.
Checking the Box Contents

Always hold the packaging box vertically.
- Open the box and remove the machine.
-
Check the contents of the box for completeness:
-
1x FLC series meat grinder:
Two-part cutting set consisting of:
1x grinder knife
2x perforated disks (hole diameter 4.5 mm + 7.8 mm)
1x spare grinder knife -
Spare parts (included)
3x plastic spacer rings
6x square auger studs
30x locking screws -
Stainless steel filling tray
○ Meat pusher - Sausage nozzle
FLC70: 12 mm
○ Operating instructions incl. declaration of conformity.

Packaging materials are recyclable and must never be disposed of with household waste. Check with the local authorities for the appropriate ways to dispose of waste properly.
The machine must be disposed of under local regulations.
Never dispose of the packaging material out in the open!
Machine Identification
The identification details of the appliance can be found on the nameplate attached to the meat grinder's housing:
Type Machine model
No. Serial number
V Supply voltage
kW Power rating
Hz Electrical frequency in Hertz
% ED Duty cycle (per unit of time)
Make sure you have this information to hand when contacting your service provider or the manufacturer in writing or by telephone. You must also state the date of purchase and the dealer from whom you purchased the appliance and provide detailed information on any faults that have occurred.
Installation
The meat grinder must be placed on a level, smooth, vibration-free, and non-slip surface that is stable and sturdy enough to ensure safe operation and support the machine.
Leave adequate free space around the meat grinder to ensure easy operation, cleaning, and maintenance. Leave a space of at least 300 mm free around the machine.
The slicer works properly in places with a relative humidity of less than 80% and near heat sources at temperatures up to 30 °C.
Before switching on the meat grinder, check that the cutting set is locked using the locking lever, handle, or button.
The union nut must exert slight pressure on the perforated disk, which, in turn, must press on the knife.

NEVER screw the union nut too tight. This may cause rapid wear of the knife and perforated disk.

Do not operate the meat grinder when it is empty, i.e., without meat inside. Doing so would result in overheating of the perforated disk and blade, accelerate their wear, and even cause them to break. The machine user is solely responsible for any damage caused by improper use.
Wiring
Before plugging in the machine, check that the machine's power rating specified on its nameplate matches the specifications of your local power grid.

In the event of a mismatch, never connect the machine to the power supply, as this may cause damage to the machine and lead to fire!
Appliances with AC electric motors are fitted with a safety power plug. Replacing the power plug is not permitted. If you replace the plug, your appliance will no longer comply with EC provisions, and your warranty will be void.
Electrical connection of appliances with AC electric motors and subsequent check-ups must be carried out by a qualified electrician using the wiring diagram supplied with the appliance.
After switching the machine on, check that the auger rotates counterclockwise.
Acceptance testing
Before you start processing meat, press the start and stop buttons and check that the machine starts and stops properly.
OPERATING FUNCTIONS
Use
The FLC series meat grinders are designed to process fresh meat.
We recommend preparing meat cuts that are roughly the same size. Cut the meat into roughly goulash-sized pieces. For optimal results, run the meat through the meat grinder twice if necessary. Fatty meats should be ground only once.
The machine should be operated continuously for no longer than 24 minutes (the duty cycle is 40% per hour). The machine must be allowed to cool down for roughly the same period before you can resume operation.

The machine's duty cycle is reduced when processing very tough meats!

Processing too much meat at a time inevitably affects the processing quality and shortens the machine's service life!
Operating the machine continuously for shorter periods also shortens the cooling intervals.
The machine may only be used in its original condition and with original parts. Dismantling or deactivating any mechanical or electrical safety devices is not permitted. Before starting the machine, ensure there are no loose electrical connections, i.e., provisional or uninsulated cables. If you notice any signs of damage to the safety devices, defects, malfunctions, broken parts, incorrect operation, unusual noises, or similar, shut down the machine immediately and contact ADE for repair or replacement.
Operating the Meat Grinder
Before feeding meat into the machine, check that the filling tray is in place. Use the meat pusher provided to press the meat down into the machine. If the auger area becomes jammed or any foreign object falls into the feed chute, switch off the appliance immediately and remove the foreign object.

Never put your hands or other objects, such as sticks, cooking utensils, etc., into the feed chute! There is a risk of injury!
Switching the Meat Grinder On and Off
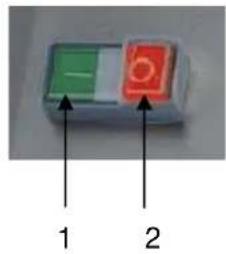
- To switch the meat grinder on, press the green button (1).
- To switch the meat grinder off, press the red button (2).
Using the Machine
Place a meat container (or a similar container; not included) under the cutting set to collect the ground meat. Before processing, cut the meat into cubes that can easily pass through the feed inlet. Switch on the meat grinder. Put the pieces of meat into the filling tray and gently push them into the feed inlet using the meat pusher.

NEVER use your hands or other aids to push meat into the feed inlet!
Put the meat into the feed chute gradually and constantly to ensure smooth processing without overloading the machine. The ground meat is forced out of the meat grinder. The coarseness of the processed meat is determined by the diameter of the holes in the perforated disk. The smaller the holes, the finer the ground meat.

Fitting or using perforated disks with a hole diameter greater than 8 mm with the FLC series meat grinders is not permitted!
Fitting and Removing the Cutting Set

Always unplug the machine from the power supply before fitting the cutting set.

Handle the knife with the utmost care when fitting and removing it. You may cut your hands if you handle it without due care!
The cutting set is fitted as follows:

natural_image
Close-up of a mechanical device with a black arrow pointing to a component (no visible text or symbols)-
Push the auger housing firmly into the machine body and secure it using the locking screw to be inserted into the side of the housing from above (see illustration).
-
Put the plastic spacer ring onto the auger guide to minimize friction between the auger and the housing.
-
Fit the auger into the auger housing. Turn the auger slightly by hand to check that it fits snugly into the guide of the auger housing.
-
Insert the grinder knife into the auger with the knife blade facing to the outside (in the direction of the perforated disk).
-
Fit the perforated disk. The perforated disk can only be fitted when the notch on the perforated disk is aligned with the guide on the auger housing.
-
The sausage nozzle is attached in front of the machine.
-
Fit the union nut and tighten it. The union nut must exert slight pressure on the perforated disk, which, in turn, must press on the knife. Ensure the union nut is NEVER too tight to prevent rapid wear of the knife and perforated disk.
-
Attach the filling tray to the feed inlet.

NEVER screw the union nut too tight. This may cause rapid wear of the knife and perforated disk.
To remove the cutting set, proceed in reverse order.
Changing the Cutting Set
The meat grinder is versatile in that you can use perforated disks with different hole diameters to achieve the desired coarseness of meat.
Always fit the union nut at the very end.

You must fit the cutting set strictly in the order described above.

Fitting or using perforated disks with a hole diameter greater than 8 mm with the FLC series meat grinders is not permitted!

Make sure the thickness of the perforated disk on the machine outlet is never less than 5 mm.
Operating Time
These machines are suitable for about 100 catering staff members, depending on the model (FLC70). These values are merely recommendations based on experience and may vary depending on the application.
The maximum duty cycle is 40% (24 minutes per hour). The electric motor must then be allowed sufficient time to cool down. Operating the machine continuously for shorter periods also shortens the cooling intervals.

The machine's duty cycle is reduced when grinding very tough meats.
CLEANING AND CARE
Cleaning
For the sake of hygiene, the meat grinder must be kept clean at all times. The machine must be thoroughly cleaned after each use and before processing new portions of meat. Always pull the plug out of the socket before cleaning the machine. It is never enough just to switch off the machine by pressing the stop button.
When cleaning the machine housing, only use a cloth moistened with warm water at about 60 °C and a non-foaming, eco-friendly dishwashing detergent with a neutral pH of 7-8. Only use food-grade cleaning agents and disinfectants of approved quality to clean the machine. Adhere to the relevant instructions when using cleaning products! After cleaning, thoroughly wipe the machine dry with a cloth moistened with clean water.
Thorough cleaning of the meat grinder and its components is only possible by removing the cutting set from the housing. Avoid stacking the individual components on top of each other to prevent damage. After dismantling individual parts of the cutting set, disinfect them by placing them in an approved water solution for about 30 minutes, then rinse them with warm water and allow them to dry thoroughly.

The meat grinder, including the auger housing and auger shaft, must never be cleaned in the dishwasher!

Never clean the meat grinder with water spray!

Do not clean the appliance by immersing it fully or even partially in water!

You must never use a water jet or high-pressure cleaner to clean the machine or any parts!
Maintenance
Always unplug the appliance from the power supply before attempting any maintenance work. It is never enough just to switch off the machine by pressing the stop button. The appliance or its components should only be dismantled and fitted on a clean working surface that is free from slipping, snagging, or entanglement hazards. The working area must be free from loose materials lying around.
Lubricating the Drive Unit
The machine is supplied with pre-lubricated moving and drive parts.
Check the oil level once every six months if necessary. You only need to refill oil if it has leaked, for example, after the meat grinder has been stored upside down.
Contact your service provider or the manufacturer for further guidance.
Checking the Safety Devices
The proper functioning of the safety guards and devices is essential for the safe operation of the appliance.
Check whether the machine starts and stops flawlessly every day before using it.
You should also check all safety guards (union nut with cutting set, filling tray) for proper function and effectiveness every day before using the appliance.
Any faults identified during check-ups should be reported to the supervisor without delay. The supervisor must take the appliance out of operation and, if necessary, contact customer service.
Storage and Disposal
When the appliance is not used for a long time, it must be disconnected from the power supply and thoroughly cleaned as described above.
The meat grinder must not be stored in damp areas for extended periods and must be protected from weather influences.
The appliance is made from non-toxic and harmless materials.
Metal parts must be separated from plastic parts and disposed of separately.
TRAINING
The adult machine operator performing the installation must be adequately trained in the use, cleaning, and maintenance of the machine and be aware of potential hazards resulting from improper use.
The training will be given by the suitably authorized and trained installer familiar with the European community machine standards.
TROUBLESHOOTING
The table below shows the most common faults that can occur during operation.
| Malfunction | Possible causes | Remedy |
| The electric motor does not rotate; the auger shaft is stationary. | Check whether the machine is connected to the power supply.Socket fuses are blown.The circuit board is defective. | Connect the machine to the power supply.Replace the fuses.Replace the circuit board. |
| The auger shaft does not rotate. | Foreign object in the grinding area. | Remove the foreign object. |
| The auger shaft produces noise while running. | The union nut is too tight.The auger shaft is not engaged in the holder.The disk and knife are worn. | Loosen the union nut slightly.Refit the auger shaft correctly.Sharpen or replace the disk and knife. |
| Oil spill under the meat grinder. | The oil seal in the electric motor may be leaking. | Replace the oil seal in the electric motor. |
WARRANTY
Warranty
If this product is proven to have failed within 1 year from the date of purchase (proof of purchase is required) due to defects in material and workmanship, ADE will repair or replace this product.
The warranty does not cover moving parts such as cables, grinder knives, perforated disks, etc. The warranty does not extend to external normal wear and tear or damage caused by accident or misuse.
This warranty does not cover the products tampered with by unauthorized personnel.
The warranty agreement does not affect the customer's statutory rights.
Any complaints shall be addressed to the dealer from whom you purchased the machine.
Storage and transportation conditions
Keep all parts of the packaging for possible return shipments to avoid possible damage during transportation.
TECHNICAL DATA
Model FLC70-230
Diameter of perforated disks: 70 mm
Max. capacity: 120 kg
Dimensions (W x D x H): 245 x 415 x 500 mm
Power rating: 0.55 kW
Type of current: 230 V
Duty cycle: 40%
Net weight: 26 kg
- Machine body, filling tray, auger, auger shaft, and cutting set made of stainless steel
- Auger housing, auger, and cutting set can be easily dismantled for cleaning
- Perforated disks with hole diameters of 4.5 mm and 7.8 mm are included
- Plastic meat pusher is included
- Plastic sausage nozzle
- FLC70: Outlet diameter 12 mm
CE MARKING AND DECLARATION OF CONFORMITY
CE
Manufacturer's declaration of conformity
This product was manufactured according to the harmonized European standards. It complies with the provisions of the EC directives listed below:
– Machinery Directive 2006/42/EC
- EMC Directive 2014/30/EU
– Low Voltage Directive 2014/35/EU
– RoHS Directive 2011/65/EU
– EU Food Contact Materials Framework Regulations 1935/2004 and 10/2011
in their current version.
This declaration becomes invalid if the machine is modified in any way that has not been approved by us.
Hamburg, May 2021
ADE Germany GmbH
Neuer Höltigbaum 15
22143 Hamburg
Manufacturer:
ADE Germany GmbH
Neuer Höltigbaum 15
22143 Hamburg
+49 40 432 776 - 0
+49 40 432 776 - 10
info@ade-germany.de
www.ade-germany.de
WIRING DIAGRAMS
Model FLC70

M-Moter C1-Capacitor Initiator C2-Capacitor start SB1-Switch-off button
SB2-Switch-on button KM-Relay TR-overheating protection switch
EXPLODED VIEWS
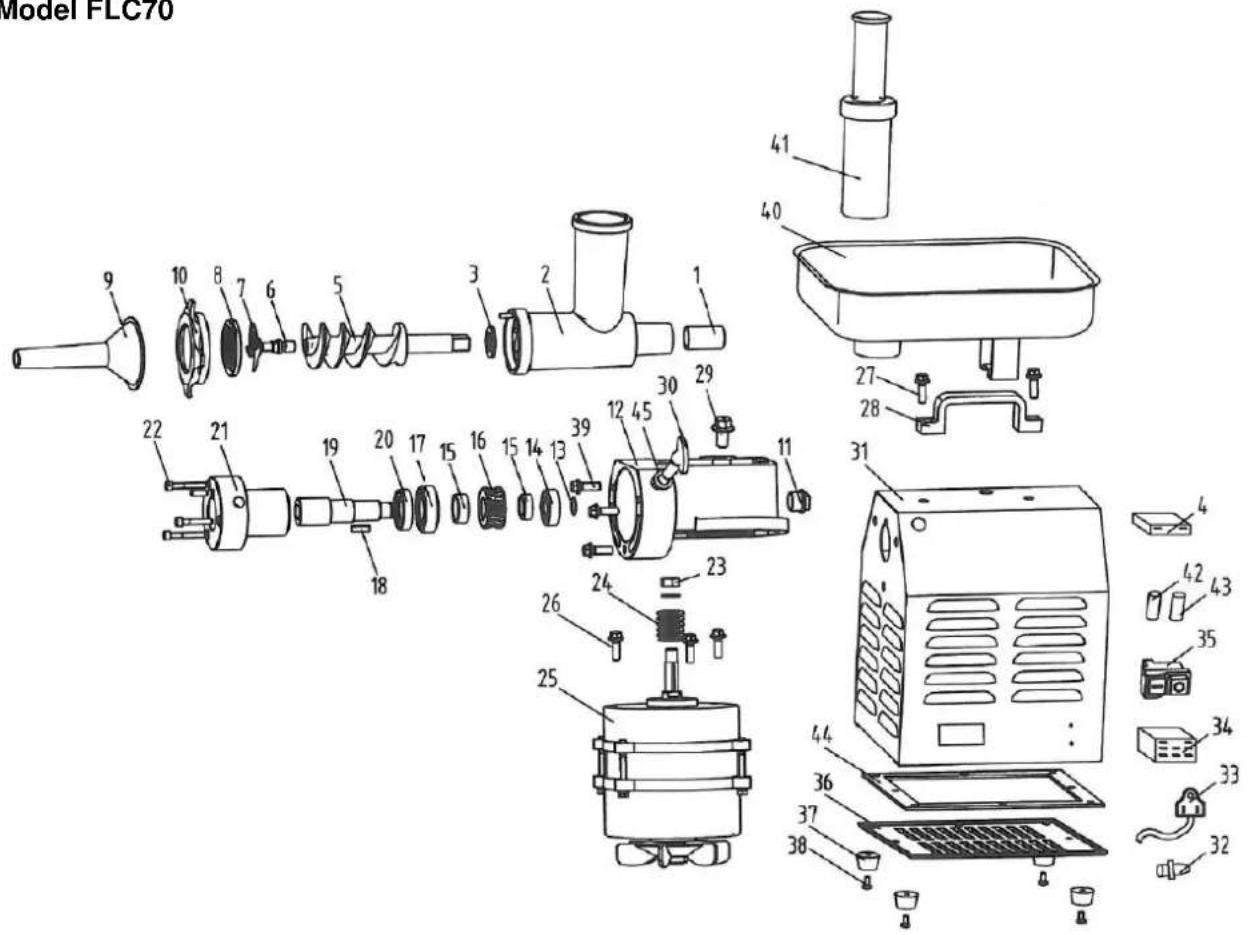
Model FLC70
SPARE PARTS LISTS
Model FLC70-230V
| Number | Designation | ADE item no. |
| 2 | Auger housing | |
| 5 | Auger shaft | H4325-005 |
| 7 | Grinder knife | H4325-007 |
| 8a | Perforated disk ∅ 70 mm/hole ∅ 4.5 mm, inox | H4325-008 |
| 8b | Perforated disk ∅ 70 mm/hole ∅ 6 mm, inox | H4325-0081 |
| 8c | Perforated disk ∅ 70 mm/hole ∅ 7.8 mm, inox | H4325-0082 |
| 9 | Sausage nozzle ∅ 12 mm | H4325-009 |
| 10 | Union nut | |
| 34 | Circuit board | |
| 35 | On/off switch | |
| 37 | 4x leveling feet | |
| 38 | 4x M6 screws for leveling feet | |
| 40 | Filling tray | |
| 41 | Plastic meat pusher |
| Distributor: |
- OPERATING INSTRUCTIONS
- ADE
- CONTENTS
- FOREWORD
- Introduction
- SAFETY INSTRUCTIONS
- General Safety Instructions
- Personal Safety
- Machine Safety
- Working Area Safety
- Maintenance Safety
- Residual risks
- Safety Information
- START-UP
- Checking the Box Contents
- Always hold the packaging box vertically.
- Machine Identification
- Installation
- Wiring
- Acceptance testing
- OPERATING FUNCTIONS
- Use
- Operating the Meat Grinder
- Switching the Meat Grinder On and Off
- Using the Machine
- NEVER use your hands or other aids to push meat into the feed inlet!
- Fitting or using perforated disks with a hole diameter greater than 8 mm with the FLC series meat grinders is not permitted!
- Fitting and Removing the Cutting Set
- NEVER screw the union nut too tight. This may cause rapid wear of the knife and perforated disk.
- Changing the Cutting Set
- Operating Time
- CLEANING AND CARE
- Cleaning
- Maintenance
- Lubricating the Drive Unit
- Checking the Safety Devices
- Storage and Disposal
- TRAINING
- TROUBLESHOOTING
- WARRANTY
- Storage and transportation conditions
- TECHNICAL DATA
- CE MARKING AND DECLARATION OF CONFORMITY
- CE
- Manufacturer's declaration of conformity
- ADE Germany GmbH
- Manufacturer:
- WIRING DIAGRAMS
- EXPLODED VIEWS
- SPARE PARTS LISTS
Brand : ADE
Model : FLC-210504
Category : Meat Grinder