
FL82N - Meat Grinder ADE - Free user manual and instructions
Find the device manual for free FL82N ADE in PDF.


| Product Type | Meat Grinder |
| Brand | ADE |
| Model | FL82N |
| Power Consumption | 500 W |
| Voltage | 220-240 V ~ 50/60 Hz |
| Housing Material | Stainless steel and ABS plastic |
| Cutting Blades Material | Stainless steel |
| Grinding Discs Included | Fine (3 mm), Medium (5 mm), Coarse (7 mm) |
| Functions | Grinding meat, making sausages, shredding vegetables |
| Capacity | Up to 2 kg per minute |
| Feed Tube Diameter | 55 mm |
| Dimensions (L x W x H) | 30 x 20 x 20 cm |
| Net Weight | 4.2 kg |
| Cord Length | 1.2 m |
| Safety Features | Overload protection, non-slip feet, safety switch |
| Cleaning | Detachable parts, hand wash recommended |
| Accessories | Pusher, sausage stuffing tube, kebab attachment |
| Warranty | 2 years |
Frequently Asked Questions - FL82N ADE
User questions about FL82N ADE
0 question about this device. Answer the ones you know or ask your own.
Ask a new question about this device
Download the instructions for your Meat Grinder in PDF format for free! Find your manual FL82N - ADE and take your electronic device back in hand. On this page are published all the documents necessary for the use of your device. FL82N by ADE.
USER MANUAL FL82N ADE
Machines for Meat Processing

natural_image
Exterior view of a stainless steel meat mill (no visible text or symbols)Fleischwolf - Serie FL-N
FL-210504-Rev008-UM-en
Inhaltsverzeichnis
Safety information....2
General safety instructions....2
Personal safety 2
Safety of the device 3
Work area safety....3
Safety in maintenance 4
Residual risks 4
Intended use....4
Exclusion of use: 4
Installing and setting up the meat mincer 5
Inspecting the contents of the box....5
Installing the meat mincer 5
Start-Up 5
Operating the meat mincer 6
Power On and Off 6
Operating the meat mincer....6
Dis- and Reassembling the cutting set....7
Disassembling the cutting set 7
Reassembling the cutting set 8
Changing the cutting set 9
Cleaning, maintenance and servicing, disposal....9
Disassembling the meat mincer for cleaning....9
Cleaning 9
Troubleshooting....10
Storage and Transport Conditions 10
Warranty 10
Disposal....10
CE marking and declaration of conformity.... 11
Technical Data....12
Exploded view 13
Spare parts list.... 15
Block diagram....16
Safety information

This symbol means: "Consult operating instructions". Read the instructions for use carefully before use and follow all instructions provided therein. Keep the instructions for use for future reference.
General safety instructions
- Read this operation and maintenance manual carefully before operating the meat mincer.
- Carefully read the labels with the safety information attached to the device and follow the instructions.
- Only properly trained persons may use the meat mincer.
- The user training must include all information regarding the hazards associated with the use of the device and the precautions to be observed.
- The user must be properly informed about the protection and safety devices. Furthermore, the user must be trained to carry out regular inspections of these protection and safety devices.
- The user must NEVER leave the meat mincer unattended during operation.
- This meat mincer must be operated only by one user.
- The device offers both optimal safety and utmost performance.
- The manufacturer assumes NO liability for damage caused by unauthorised modifications to the device.
- Do not use the meat mincer under the influence of alcohol, drugs or medicines.

The optimal safety is in your hands, because the use of any electrical devices is dangerous!
Dismantling the protective equipment is not allowed!
In case of damage to the protective equipment, the machine must be immediately put out of operation and must be handed over to your customer service for renewal or replacement delivery.
Personal safety
- The user must read and understand this manual before operating the meat mincer. Your eyes are the best safety device: first look and then move and act!
- Experience has shown that some items worn by the user can cause accidents: remove rings, watches, wristbands and bracelets before using the device; button or tie up sleeves securely around the wrist; remove the tie, which can hang down and get caught in the device; pin up or bind your hair with a cap, rubber bands, hairpins, etc.

Follow all internationally accepted and recommended safety and accident prevention measures!
Safety of the device
Thoughtfully inspect the device before operation and carry out regular inspections of the protection and safety devices. In the event of damage to protective equipment, the machine must be taken out of operation immediately and handed over to your customer service for renewal or replacement.
- ALWAYS close the protective covers properly before turning on the device.
- NEVER process large pieces of meat, i.e. those exceeding the device capacity.
- DO NOT process pieces of meat with bones.
- Do not press in the meat with your hands during processing.
- The protective covers must be attached when the meat mincer is turned off.
- ALWAYS unplug the power cord from the mains outlet before assembling or disassembling any device parts.
- ALWAYS disconnect the device from the power supply before performing any maintenance work on it.
- Use the meat mincer ONLY with properly fitted and fully functional protective covers. Do not use the device if these conditions are not met.
- NEVER try to remove pieces of meat from the running meat mincer.
- The power cord must be replaced immediately once it is damaged, even slightly. It must be free of cracks, damages, bulges, etc.
- NEVER pull on the power cord to unplug it from the mains outlet.
- If you hear any abnormal noises, immediately turn off the meat mincer.
- Disassembly of the protective devices is not permitted!
Safe operation is no longer guaranteed:
- If the mains plug or the mains cable is visibly damaged.
- If the mains plug is no longer working.
- After prolonged storage in humid areas.
- If the thread of the worm housing and/or the drive pins of the worm show damage.
- If the keypad/on-off switch shows damage.
- If perforated discs thinner than 5 mm are used.
In these cases, contact your dealer or your service partner for your own safety.
Work area safety
- The work area where the meat mincer is used must be sufficiently lit and large enough to allow all operations to be carried out smoothly and without risk to the user.
- The installation site must be FREE of any water, processing residues or other residual products. The work surface must be kept in perfect condition, with any possible slipping, catching or entanglement hazards being eliminated. The installation site must be kept free of any other loose materials.
- ONLY the operator responsible for the meat processing must be present in the meat mincer work area.
Safety in maintenance
- The meat mincer must be turned off before cleaning, maintenance, assembly or disassembly of the device parts: Unplug the power cord from the mains outlet!
- The general cleaning of the meat mincer is an important safety factor.
- Once any faults or damages to the device or protective covers have been discovered, they must be reported to the person responsible for the meat mincer and the device must be turned off.
Residual risks

A meat mincer presents a residual risk of injury despite sensible accident protection devices. Therefore, special caution is required in this type of work!
- Never bend over the machine with loose clothing (such as ties) or loose long hair.
- Never reach into the filling opening with your fingers or any unsuitable objects (such as forks, knives, etc.)!
- Do not tamper with the electrical installation or the safety devices! Always have electrical defects repaired by a specialist.
- Always disconnect the mains plug prior to an intervention!
- Wear safety gloves during maintenance work if possible!
- Only coded cutting sets may be used!
Intended use
Your ADE meat mincer is a quality product and is intended for use in canteens and large kitchens.
It is a meat mincer used to process meat products, which must not be frozen and must be boneless. Other foodstuffs such as fruit, vegetables, bread, nuts etc. may not be processed.
The machine may only be used in its original condition and with original parts.
Exclusion of use:
- The machine must never be used for processing frozen or bone-in meat products.
- The machine must not be used to process any food other than meat products or any other goods and substances that are not food products.
- The operating environment temperature must not be below +5°C.
The machine may only be used in accordance with its intended use. All applications with the machine that are not mentioned in the chapter "Intended use" are considered as non-intended use in the same way as non-observance of the safety instructions. For any resulting damage to property and personal injury caused by misuse, the user of the device and not the manufacturer is liable.
The use of other components or original components not supplied by the manufacturer will void the manufacturer's warranty.
Installing and setting up the meat mincer
Check the scope of delivery for completeness immediately after receipt of the machine. Carefully remove the machine and accessories from the packaging and remove all packaging materials.
The scope of delivery includes:
Inspecting the contents of the box
➢ 1 FL series meat mincer: incl. 1 worm housing
incl. 1 worm
➢ 5-piece coded UNGER cutting set: 1 pre-cutter
2 cross blades
1 perforated disc, 3 mm hole diameter
1 perforated disc, 8 mm hole diameter
➢ 2 (FL82) or 1 (FL98) spacer ring(s)
1 hand wheel
▶ 1 filling tray
▶ 1 collecting tray
1 darner
▶ 1 withdrawing hook
▶ 1 operating manual
Installing the meat mincer
The meat mincer is delivered in a stable packaging box that is strong enough for transport.
Take the meat mincer out of the packaging. Due to its weight, this should be done by two adult persons.
Place the machine on a working surface that provides sufficient strength and stability to ensure adequate safety, taking into account the machine's own weight.
Depending on the size of the operator, the machine should not be too high to allow comfortable and effortless operation!
The machine is most conveniently positioned when the switch points towards the operator and the outlet opens to the left.
Start-Up
First of all, it is absolutely necessary to place the filling tray (38) on the housing, since the meat mincer cannot be operated without it.
Then, the seat of the hand wheel (33) must be checked.
For safe operation of the cutting set, the hand wheel is first tightened slightly and then released by approx. 5°.
Insert the plug into a suitable three-phase socket and the machine is then ready for use.

natural_image
Close-up of a metallic kitchen grater with a 5° angle indicator and red measurement lines (no text or symbols on the grater itself)Operating the meat mincer
Power On and Off
| Symbol Bezeichnung Funktion | ||
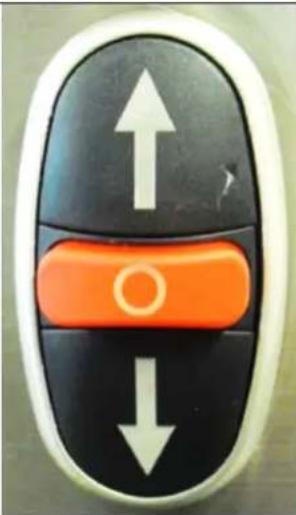 | Arrow-Up-Button„Forward“ | Press this button to start operation of the worm.The worm now starts to turn counter-clockwise. |
| OFF-Button Press this button to stop the worm. | ||
| Arrow-Down-Pushbutton„Reverse“ | To Reverse the worm (in case of a jam in the worm section) press this pushbutton. | |

The worm must turn counterclockwise when switched on (Arrow-Up-Button pressed)!
In case a reverse run of the worm is occurred (due to the different layout of the local power grids) 2 of the 3 power phases in the plug must then be swapped by a specialist!
Operating the meat mincer
Feeding must always be carried out with the filling tray installed. The supplied darner must be used for pressing. In case of a jam in the worm section or if a foreign object enters the filling shaft, this situation can be corrected by pressing the Arrow-Down-Pushbutton (reverse).

Never reach into the filling shaft with your hands or insert other objects such as sticks, cooking utensils, etc. into the filling shaft! There is a risk of injury!
Never run the mincer without material being cut!
Dis- and Reassembling the cutting set
Disassembling the cutting set

natural_image
Line drawing of a mechanical kitchen unit with a handle and vent, showing internal components and a top tray (no text or symbols)The filling tray can be removed upwards without tools.

natural_image
Technical line drawing of a mechanical device with internal components and directional arrows (no text or symbols)The hand wheel can be unscrewed by turning it to the left.

natural_image
Technical line drawing of a mechanical device with ports and a directional arrow (no text or symbols)A withdrawing hook is included for easier removal of the cutting set and worm.
After removing the hand wheel, this can be pulled over the worm pin and locked by a 90° rotation. The worm and the cutting set can then be slowly pulled out from the worm cylinder.
The spacer ring, perforated disc, cross-shaped blade and pre-cutter can then be removed.

Now, the worm housing (28) is removed by simply pulling it out. After turning the locking lever (7) above the switch from bottom to top (clockwise), it can be removed forwards (without tilting sideways).
Reassembling the cutting set
Reassembly is done in reverse order.
First insert the worm housing (28). The worm housing is fixed by turning the locking lever (7) from top to bottom.
The worm (34) is inserted in such a way that the stub shaft protrudes from the machine to attach the knife and perforated disc. Pushing it all the way back, the worm shaft is rotated until it latches with its oval pin at the rear end into the uniform slot of the drive.

The perforated disc (39) is now pushed onto the stub shaft with the 3 large oval openings (pre-cutter) and rotated so that the rectangular notch on the edge of the disc slides over the uniformly shaped ridge of the worm housing (this also applies to the subsequent discs).
This is followed by the cross blade (40). Care has to be taken that the cutting edges point in the forward direction of rotation.
Then, place the perforated disc (41) on the stub shaft.
This is followed by the second cross knife (40). Make sure that it is in the correct position again (cutting edges point in the direction of rotation).
Then the second perforated disc (42) is added.
Then, place the spacer ring (6) in this way, that the nose of the spacer ring engages the notch of the perforated disc (42) provided for this purpose.
The hand wheel (33) forms the end, which is first slightly tightened and then released by approx. 5°. (The latter is particularly important because the worm shaft must have some clearance in the longitudinal direction for proper functioning of the mincer).
NOTE on the use of spacer rings:
One spacer ring is always used with the FL82. The narrow one is used when operating with a 5-part cutting set, the wider one when operating with a 3-part cutting set.
For the FL98, operation with a 5-piece cutting set is done WITHOUT a spacer ring and operation with a 3-piece cutting set is done with the spacer ring.
Changing the cutting set
Individual perforated discs enable versatile use, depending on the desired cutting effect. In any case, the enclosed coded spacer ring (6) must be used and attached as the last part in front of the hand wheel (33).
Care has to be taken that the sequence of assembly of the cutting set takes place in accordance with the exploded view.

Only coded perforated discs may be used, where the hole diameter must not exceed 8 mm!
The perforated discs must not be ground thinner than 5 mm!
Cleaning, maintenance and servicing, disposal

In principle, the machine must be switched off before cleaning, maintenance and service and the power plug must be disconnected from the mains.
Disassembling the meat mincer for cleaning
The hand wheel can be unscrewed by turning it to the left. Thereafter, the distance ring and the first perforated disc is removed. By pulling on the worm shaft, the worm can now be removed completely with the cutting set.

If only the cross blade is removed, special care is required. There is a risk of injury (cutting injury).
Now remove the worm housing. After unlocking, the worm housing can be pulled out of the housing.
Cleaning
Before first use, thoroughly clean the machine with a damp cloth and lukewarm water.
Depending on the load and frequency of use, the machine must be cleaned regularly – at least after each daily work sequence.
All parts and cavities that come into contact with meat, where deposits can form, must be cleaned.
Use a damp cloth (preferably a brush for some parts) and approx. 60° warm water for cleaning. For cleaning and disinfecting, choose only products or accessories that are food-grade and approved for this purpose. Follow the instructions for using these materials.
It is strictly prohibited to clean the slicing machine with products that can damage the health of the operator or the customer.
After removing the meat residues, all components must be cleaned with water and disinfectants. Rinse with warm water and rub the components up to drying.
Make sure that the parts do not hit one another to avoid damage.
For better and more effective disinfection, it is recommended to place the parts in a bath containing 3% NaCl hypotonic solution for about 30 minutes, then rinse with warm water and rub dry.
After such treatment, rinse with clean drinking water. Before assembling, ensure that all residues from the drive mechanism, including the housing wall, have been wiped out and that all parts have been completely rubbed dry.
All removable parts must also be cleaned in the dishwasher.
However, regular cleaning of the knives in the dishwasher can cause them to dull faster and thus require more frequent sharpening.

The machine must in no way be treated with a water jet or a steam pressure cleaner!
Water must never be sprayed directly into the drive!
Removable parts must not be cleaned in a dishwasher as the surface treatment may be destroyed.
Troubleshooting
The table below shows the main problems that may occur during operation.
| FAULT CAUSES REMEDY | ||
| The motor does not rotate and the worm shaft has stopped | Check whether the machine is connected to the mainsCheck whether the connection of the three-phase plug + ground + neutral is correct. | Connect it to the mainsEnsure proper connection |
| The worm shaft does not rotate | Foreign object in the mincing section | Remove the foreign object |
| The running worm shaft makes noiseDisc and blade are worn out | The hand wheel is over-tightenedThe worm shaft is not latched into the slot | Slightly loosen the hand wheelInsert the worm shaft correctlySharpen or replace the disc and blade |
| Oil under the meat mincer | Possible leak in the oil seal of the motor | Replace the oil seal of the motor |
Storage and Transport Conditions
Keep all parts of the packaging in case you need to return the shipment to avoid possible damage during transportation.
Warranty
ADE will repair or replace this product if it has failed within 1 year from the date of purchase (proof of purchase is required) due to poor workmanship or defective material.
All moving parts, such as cables, cross blades, perforated discs, etc., are excluded from this warranty. Warranty does not apply to normal appearance of usage or sign of wear or any damages caused by accidents or misuse.
The warranty will not apply for devices that have been opened by unauthorised persons.
This warranty agreement does not affect the customer's legal rights in any manner.
The dealer from whom you purchased the machine is responsible for complaints.
Disposal
Waste electrical equipment do not belong in household waste. Please dispose of defective or old devices according to the legal and country-specific regulations!
CE
Declaration of conformity by the manufacturer
This product has been manufactured in accordance with the harmonised European standards. They conform to the regulations of the EC-directives listed below:
– Machinery directive 2006/42/EC
- EMC Directive 2014/30/EU
– Low voltage directive 2014/35/EU
– RoHS Directive 2011/65/EC
- 1935/2004/EC and 10/2011/EU to food contact materials in the currently valid versions.
The declaration will be void if a change that was not agreed with us has been made on the machine.
Hamburg, May 2021
ADE Germany GmbH
Manufacturer: ADE Germany GmbH
| Model | FL 82N FL 98N | |
| Perforated disc ∅: | 82 mm 98 mm | |
| Capacity: | 300 Kg 500 Kg | |
| Dimensions: | 340 x 220 x 495 mm 380 x 220 x 495 mm | |
| Power: | 1.2 kW 1.85 kW | |
| Net weight: | approx. 40 kg approx. 53 kg | |
| Type of current: | 400 V 400 V | |
| IP-Protection: IP45: Protection against solid particles ≥ 1mmProtection against water jets (not from the bottom side!) | ||
| Operating Environmental Condition: | Temperature: +5°C bis +40°CHumidity: 10 – 95% (non-condensating) | |
- Housing, filling and collecting trays, worm and worm housing made of stainless steel
- Powerful motor with forward and reverse
- Easy removal of worm housing, worm and cutting set for easy cleaning
- Includes darner, spacer ring and collecting tray
- Coded 3-piece Unger cutting set with perforated disc, 7.8 mm hole diameter optionally with perforated disc, 3 mm hole diameter
- Sound pressure level according to VDI directive 2058: 64/67 db (A)
measured at a distance of 1 m and a height of 1.70 m
Exploded view

| Number Description | |
| 1 Ball bearing 6005ZZ | |
| 2 Basin | |
| 3 Worm screw puller | |
| 4 Gear | |
| 5 Worm housing mounting pin | |
| 6 Coded Unger spacer ring | |
| 7 Locking lever | |
| 8 Ventilation cover | |
| 9 O-Ring 117 | |
| 10 Darner | |
| 11 Spacer washer | |
| 12 Rubber foot | |
| 13 Sensor | |
| 14 Magnet | |
| 15 Spacer | |
| 16 Drive shaft | |
| 17 Plastic washer | |
| 18 Oil seal | |
| 19 Ball bearing 51206 | |
| 20 Locking ring 30 x 47 x 7 | |
| 21 Plug 4 x 35 | |
| 22 Base plate | |
| 23 Gear housing | |
| 24 Drive shaft | |
| 25 Motor | |
| 26 Circuit board | |
| 27 Switch | |
| 28 Unger worm housing | |
| 29 Cover plate housing | |
| 30 Housing | |
| 31 Mounting pins | |
| 32 Cable with plug | |
| 33 Hand wheel | |
| 34 Worm shaft with Unger pin | |
| 35 Locking shaft | |
| 36 Rear panel | |
| 37 Guide tube for filling tray | |
| 38 Filling tray | |
| 39 Pre-cutter | |
| 40 Cross blade | |
| 41 Perforated disc, 8 mm hole diameter, coded | |
| 42 Perforated disc, 3 mm hole diameter, coded | |
Spare parts list
| No.: Description | Spare part number | ||
| FL 98 N FL 82 N | |||
| 33 Hand | wheel H4306-0081 H4305-0241 | ||
| 7 Locking lever, incl.: H4300-0041 H4300-0041 | |||
| 11 ➤ Spacer washer | |||
| 35 ➤ Locking shaft | |||
| 34 Worm shaft with pin | H4306-0191 H4305-0151 | ||
| 39 Pre-cutter | H4306-0162 H4305-0091 | ||
| 40 Cross blade | H4306-0152 H4305-008 | ||
| 41 Perforated disc 8 mm | H4306-0132 H4305-028 | ||
| 42 Perforated disc 3 mm | H4306-0102 H4305-027 | ||
| 6 Spacer ring | H4306-0052 H4305-026 | ||
| 27 Switch for FL-82 / 98 | H4300-038 | H4300-038 | |
| 26 Circuit board | H4300-036 | H4300-036 | |
| 10 Darner | H4306-020 | H4306-020 | |
| 38 Filling tray | H4306-007 | H4300-0031 | |
| 18 Oil seal | H4303-032 | H4303-032 | |
| 28 Worm housing | H4306-0181 H4305-0141 | ||
| 12 Rubber foot | H4300-0071 H4300-0071 | ||
| 25 Motor 400V | H4315-001 | H4314-001 | |
| 16 Drive shaft | H4303-029 | H4303-029 | |
Block diagram
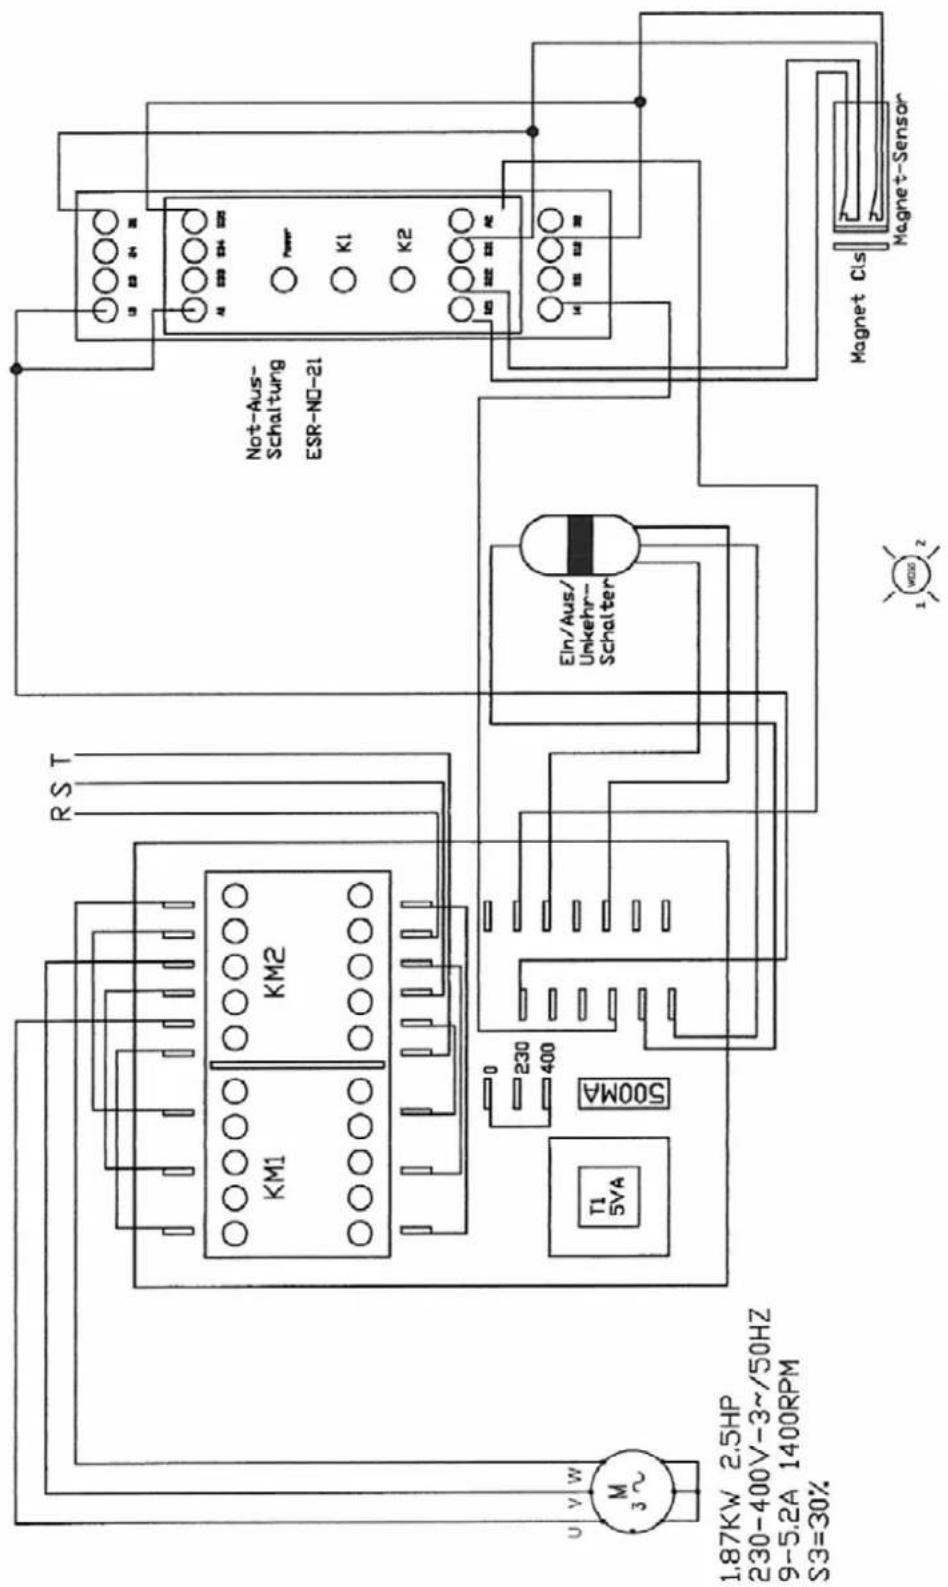
Dealer:
- Machines for Meat Processing
- Inhaltsverzeichnis
- Safety information
- General safety instructions
- Personal safety
- Safety of the device
- Work area safety
- Safety in maintenance
- Residual risks
- A meat mincer presents a residual risk of injury despite sensible accident protection devices. Therefore, special caution is required in this type of work!
- Intended use
- Exclusion of use:
- Installing and setting up the meat mincer
- Inspecting the contents of the box
- Installing the meat mincer
- Start-Up
- Operating the meat mincer
- Dis- and Reassembling the cutting set
- Disassembling the cutting set
- Reassembling the cutting set
- NOTE on the use of spacer rings:
- Changing the cutting set
- Disassembling the meat mincer for cleaning
- Cleaning
- The machine must in no way be treated with a water jet or a steam pressure cleaner!
- Troubleshooting
- Storage and Transport Conditions
- Warranty
- Disposal
- CE
- Declaration of conformity by the manufacturer
- ADE Germany GmbH
- Exploded view
- Block diagram
Brand : ADE
Model : FL82N
Category : Meat Grinder