
Bully1000-240618 - Meat Grinder ADE - Free user manual and instructions
Find the device manual for free Bully1000-240618 ADE in PDF.


| Product Type | Meat Grinder |
| Brand | ADE |
| Model | Bully1000-240618 |
| Power Consumption | 1000 W |
| Voltage / Frequency | 220-240 V ~ 50/60 Hz |
| Housing Material | Stainless steel and plastic |
| Blade Material | Stainless steel |
| Grinding Plates | 3 plates (fine, medium, coarse) |
| Reverse Function | Yes |
| Safety Lock | Yes |
| Dimensions (W x D x H) | 30 x 20 x 30 cm |
| Weight | 4.5 kg |
| Included Accessories | Pusher, meat tray, sausage filler, kibbe attachment |
| Dishwasher Safe Parts | Yes (grinding plates, knife, screw) |
| Noise Level | < 80 dB |
| Continuous Operation | 10 minutes max before cooling |
Frequently Asked Questions - Bully1000-240618 ADE
User questions about Bully1000-240618 ADE
0 question about this device. Answer the ones you know or ask your own.
Ask a new question about this device
Download the instructions for your Meat Grinder in PDF format for free! Find your manual Bully1000-240618 - ADE and take your electronic device back in hand. On this page are published all the documents necessary for the use of your device. Bully1000-240618 by ADE.
USER MANUAL Bully1000-240618 ADE
Burger forming machine

natural_image
Industrial machine with warning sign and blue conveyor belt (no readable text or symbols)Bully1000-230
Bully1000-240618-Rev003-UM-en
CONTENTS
- FOREWORD 2
1.1 Introduction......2
1.2 Intended use....2
1.3 Residual risks 3 - MACHINE OVERVIEW....3
- INSTALLATION AND START-UP 5
3.1 Scope of Supply 5
3.2 Unpacking 5
3.3 Setting up the machine 6
3.4 Installing the conveyor belt 6
3.5 Installing the scraper....7
3.6 Fitting the squeegee 7
3.7 Connecting to the power supply....7
3.8 Electrical safety devices.... 8
3.9 Safety precautions 8
3.10 Acceptance testing 9 - USING THE BURGER FORMER.... 10
4.1 Operating functions.... 10
4.2 Switching on 10
4.3 Securing the machine against accidental switch-on.... 10
4.4 Switching off 10
4.5 Feeding in food and cutting....10 - INSERTING RELEASE PAPER....11
- ADJUSTING PRODUCT THICKNESS AND WEIGHT 12
- CLEANING AND CARE 13
- TRAINING 16
- DISPOSAL 16
- WARRANTY.... 17
- TECHNICAL DATA.... 18
- DECLARATION OF CONFORMITY 19
- DIAGRAMS 20
- SPARE PARTS/ACCESSORIES....21
1. FOREWORD

This symbol means: "Observe operating instructions." Read these operating instructions carefully and observe the information contained therein. Keep these operating instructions handy for future reference.
This manual has been written to comply with the Machinery Directive as amended.
With it, the manufacturer intends to furnish the customer with clear and concise instructions for the use and maintenance of the machine, as well as information regarding the safety devices with which it is fitted to assure maximum efficiency throughout its service life.
The burger formers may be updated; this eventuality shall not prejudice the instructions and explanations contained in the manual.
Before starting up the burger former, you must read this manual carefully.
Should this manual be damaged or lost, apply for a copy from the manufacturer immediately.
Many accidents and injuries that occur when using the machine result from insufficient familiarity with its functions and safety devices. Before starting work with the machine, please read the instructions herein carefully and follow them to the letter.
1.1 Introduction
The burger formers have been designed to comply with applicable safety standards. Consequently, all our burger formers are fitted with a plate featuring the “CE” mark attesting to the product's conformity with said provisions.
1.2 Intended use
This burger former is designed for forming burger patties. The minced meat / vegetables / fish is pressed through a squeegee into a rotating moulding drum. After that, the burger patty can be automatically covered with a release paper. Subsequently, the patty is pressed out of the mold onto the conveyor belt. The conveyor belt conveys the burger patty away from the drum.
The machine features a patty mold with a diameter of 130 mm. You can adjust the patty thickness infinitely (only when the machine is at a standstill) up to a thickness of 32 mm. The machine capacity is up to 1300 patties per hour (theoretically).
Use the burger former exclusively as it was designed to be used.

The burger former must not be used to process frozen food.
Failure to observe the safety instructions may result in severe damage to the machine and cause the warranty to become void.
The machine may only be used in its original condition and with original parts. It is strictly forbidden to dismantle the safety devices. Should any safety devices be damaged, immediately shut down the machine and contact ADE for repair or replacement.
1.3 Residual risks
Even though extensive safety precautions have been taken on the machine, there are still residual risks for the operator in his daily work with the machine. These are particularly associated with the machine's rotating parts. The machine features the following warning signs to alert the operator to the residual risks:
| Symbol | Meaning |
 | Warning of cutting injury |
 | Warning of hand injuries |
2. MACHINE OVERVIEW


natural_image
Close-up of a metallic cylindrical container with a side-mounted bolt and a numbered label (17) pointing to the top part (no readable text or symbols beyond the number)

natural_image
Close-up of a mechanical component with a red arrow and number 19, no visible text or symbols| No. | Designation |
| 1 | Lid |
| 2 | Hopper |
| 3 | Drum cover |
| 4 | Paper dispenser |
| 5 | Drum ring |
| 6 | Forming drum |
| 7 | Scraper |
| 8 | Driven idler pulley |
| 9 | Free-running idler pulley |
| 10 | Conveyor belt |
| No. | Designation |
| 11 | Stop button |
| 12 | Machine housing |
| 13 | |
| 14 | Lid holder |
| 15 | Start button |
| 16 | Main switch |
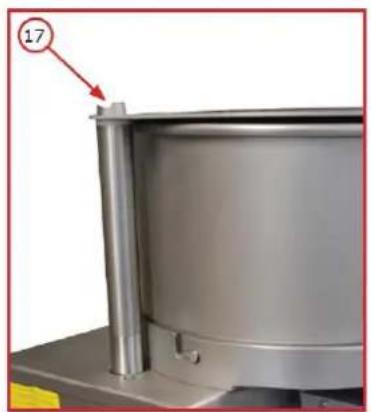
| 17 | Lid magnetic sensor |
| 18 | Drum cover magnetic sensor |
| 19 | Drum housing magnetic sensor |
| 20 | Operating voltage indicator |
3. INSTALLATION AND START-UP
3.1 Scope of Supply
The burger former is shipped partially assembled. The package includes:
| Operating Instructions | Release paper (D) |
| Burger former | Scraper (E) |
| Squeegee (A) | Hopper (F) - (factory-assembled) |
| Conveyor belt (B) | Forming drum (G) - (factory-assembled) |
| Conveyor belt sliding plate (C) | Lid (H) - (factory-assembled) |

natural_image
Collection of industrial equipment including a metallic tank, plastic components, and a gray cover plate (no visible text or symbols)3.2 Unpacking

natural_image
3D diagram of a container with a cylindrical lid and two red arrows indicating upward motion (no text or symbols)- Upon receiving the machine, inspect the package box and ensure the machine has been delivered in perfect condition.
- First, remove the screws from the upper part of the box and remove the lid.
- Then remove the screws from the lower part of the box and lift off the box walls.
- Check the package contents and ensure they correspond to the specifications on the packing slip.
- You must also ensure the machine is intact and has not been damaged during transportation.
Any damages to the burger former must be reported to the transport company in writing within three days of the date of the accompanying documents, specifying in detail the damages found.

The packaging materials are recyclable and must never be disposed of in household waste. Check with the local authorities for the appropriate ways to dispose of waste properly.
The machine must be disposed of under local regulations.
3.3 Setting up the machine

natural_image
Top-down line drawing of a person with arms raised, no text or symbols presentYou can now lift the machine off the pallet.
- Pick the machine up at the bottom of the machine housing, as illustrated, preferably with three assistants to ensure maximum safety.
- Place the burger former on a flat, smooth, and vibration-free surface that is stable and sturdy enough to ensure adequate safety, considering the weight of the machine. It is recommended that the table height be about 70 cm and may vary depending on the operator's height. Any unevenness of the surface on which the machine is rested can be compensated using the adjustable feet.
- The machine controls (on/off switch) must face the operator. A minimum space of 4 sq.m should be provided to ensure convenient and smooth operation, cleaning, and maintenance of the machine.
- The machine must be placed in a dry, well-ventilated room away from heat sources.
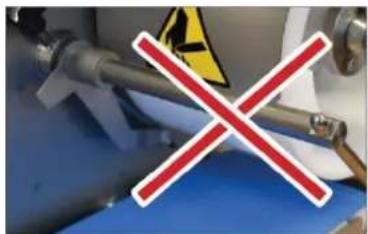

Never use the scraper arm to move the machine! Always remove the scraper arm before moving the machine!
3.4 Installing the conveyor belt
natural_image
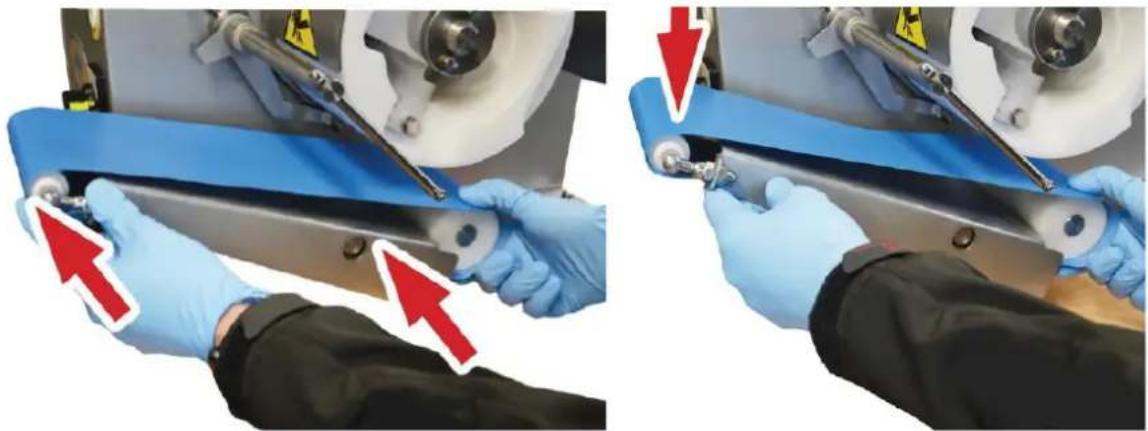
Two-panel image showing hands operating a mechanical device with red arrows indicating motion or adjustment (no text or symbols present)- Place the conveyor belt around the sliding plate vet to be mounted.
- Fit the sliding plate onto the machine's guide pin and slide the conveyor belt over the drive pulley assembled on the machine side.
- Align the conveyor belt.
- Tighten the conveyor belt by pushing it downwards with the sliding rail.
3.5 Installing the scraper
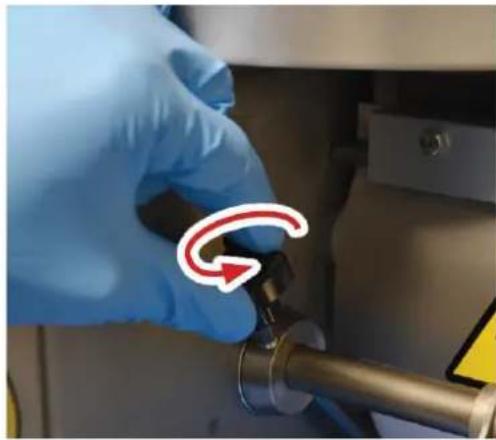
Loosen the star knob screw.
natural_image
Close-up of a gloved hand holding a mechanical component with a red circular arrow indicating rotation (no text or symbols)Fit the scraper into the holder.
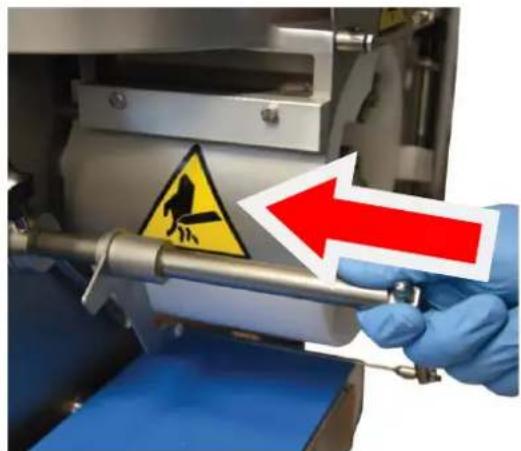
Retighten the star knob screw.
3.6 Fitting the squeegee
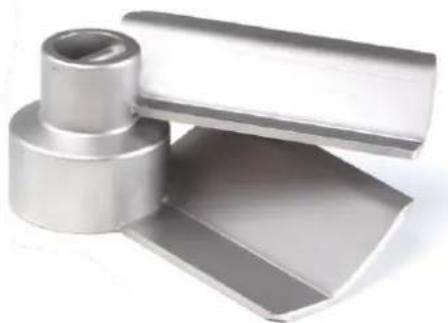
Open the lid (1). Attach the squeegee to the drive shaft and turn it clockwise until it engages in the drive shaft.
natural_image
Metal mechanical component with cylindrical and rectangular parts, no visible text or symbolsNOTICE: You can only fit the squeegee in one position.
3.7 Connecting to the power supply
The burger former has a Schuko plug. Before plugging the burger former into the outlet, ensure the power grid features an electrical overload cutout.

Before plugging the machine into the power supply, ensure that the local power supply and current frequency match the specifications on the machine's nameplate.
If this is not the case, never connect the machine to the power supply, as this may cause damage to the machine and lead to fire!
When connecting the machine to the power supply, make sure the connection cable is laid in a way that prevents any risk of tripping or falling.
3.8 Electrical safety devices
The burger former features the following safety devices:
- A magnetic sensor on the lid axis to check whether the lid is closed (17).
- A magnetic sensor to check whether the protective flap is closed (18).
- A sensor to check whether the drum has been installed (19).
- The burger former stops automatically in the event of a power failure. Restart the machine once the power supply is restored.

All safety devices are permanently fitted to the machine and must not be removed. Dismantling them or any unauthorized modifications would make the machine unsafe.
The machine must only be used for its intended purpose. Improper or unintended use of the machine may pose a risk to the health and safety of persons and result in property damage.
The manufacturer shall not be held liable for any damage caused by improper use of the machine, failure to comply with the safety information in this manual, and tampering with or modifications to the machine without official approval from the manufacturer.
3.9 Safety precautions
- The burger former must only be operated by trained and skilled personnel.
- Children, disabled persons, and untrained personnel must not be allowed to operate the machine.
- Never operate the machine while under the influence of alcohol or drugs.
- Wear tight-fitting clothing to avoid getting caught on the machine's moving parts. Long hair must be tied back or worn under a hair net.
- Avoid wearing rings, bracelets, or chains.
- Never leave the machine unattended while it is running.
- Before carrying out any maintenance work, unplug the machine from the power outlet.
- Never clean the machine under running water or in a water basin.
- Should you notice any unusual noises or unpleasant odors coming from the machine, shut it down immediately, disconnect it from the power supply, and contact customer service.
- Never use the machine with a damaged plug or cord. If you find any defects, shut down the machine immediately and have it repaired by the manufacturer or an authorized service center.
- The power cord may only be replaced by authorized and trained personnel.
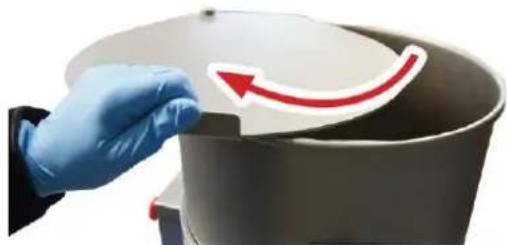
3.10 Acceptance testing
Ensure that the hopper, lid, conveyor belt, and forming drum are mounted and in place before running the acceptance test.
- Make sure all the burger former components are correctly assembled.
- Close the lid (1) and the drum cover (3).
- Plug the machine into a power outlet.
- Set the main switch (16) to "I."
- The control lamp (20) should light up.
- Press the green start button (15) and red stop button (11) and check that the machine can be switched on and off.
- Check the direction of rotation of the conveyor belt (10) (direction of arrow).
- Check whether the machine shuts off when the lid (1) is opened.
- Check whether the machine shuts off when the drum cover (3) is opened.
natural_image
Hand in blue glove holding a white container with a red curved arrow pointing upward (no text or symbols)
natural_image
Industrial machine with warning sign and blue directional arrow (no readable text or symbols)

If you find any malfunctions, immediately shut down the machine, tag it clearly as "DEFECTIVE," and contact customer service!
The machine cannot be switched on without the forming drum in place. However, this function has nothing to do with safety and merely prevents unwanted soiling of the machine.
4. USING THE BURGER FORMER
4.1 Operating functions
The burger former has a main switch (16) and is operated using two buttons. The green start button (15) switches the machine on, and the red stop button (11) switches it off. The control lamp (22) indicates that the mains voltage is applied.
4.2 Switching on
Power up the machine using the main switch (16). Start up the machine by pressing the green start button (15).
4.3 Securing the machine against accidental switch-on
Before carrying out maintenance work and fitting/replacing the burger mold, the machine must be secured against accidental switch-on. With the main switch (16) in the "0" position, press its yellow lock down and secure it with a small padlock.
4.4 Switching off
Switch off the machine by pressing the red stop button (11). Be sure to shut down the machine with the main switch (16) when not in use and when you leave it unattended.
4.5 Feeding in food and cutting
Open the lid (1) and put minced food into the hopper (2). Close the lid. Power up the machine with the main switch (16).
Press the green start button (15). The product will fall onto the conveyor belt to be carried away from the drum. Promptly pick up the finished product from the conveyor belt by hand.
Clean the scraper wire of product residues during operation, if necessary. In doing so, move the scraper to the right and left once during operation, if necessary.

5. INSERTING RELEASE PAPER
- Remove the paper holder by pressing the button (A) and pulling the paper holder out of the guide.

natural_image
Two-panel image showing gloved hands operating a mechanical device with red arrows pointing to features (no text or symbols visible)- Tighten the compression spring. Put the paper pad on the holding rod and remove the banderols and the cardboard wrappers.

natural_image
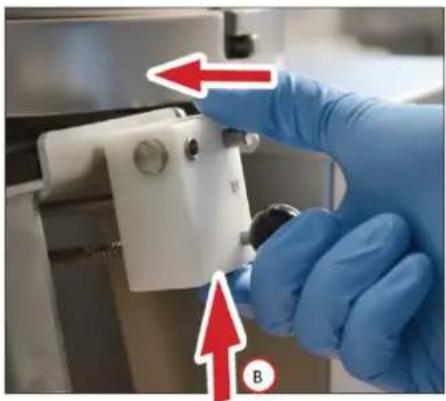
Hand in blue glove inserting a small block into a 3D block, with a red arrow pointing to the block (no text or symbols)- Push the paper holder into the guide until it clicks into place. Press the button (B). The spring pushes the paper stack forward.
natural_image
Close-up of a gloved hand operating a mechanical device with red arrows and label B (no readable text or symbols)- Release the paper holder lock by pulling the lever (C) upwards and pushing the entire paper feeder against the drum.

natural_image
Close-up of a gloved hand operating a mechanical clamp or fixture with a red upward arrow and letter 'C' (no text or symbols on the main subject)- Start up the machine. If the paper is not positioned correctly under the product, use the star knob screw (D) to align the paper correctly under the product.

natural_image
Close-up of a gloved hand holding a small mechanical component with red circular arrows indicating rotation (no text or symbols)6. ADJUSTING PRODUCT THICKNESS AND WEIGHT
The machine comes factory preset. Before changing the product thickness and weight, shut off the machine with the main switch (16).
Fold up the drum cover.

Turn the drum ring clockwise and pull the drum off the drive shaft.

natural_image
Close-up of gloved hands holding a metallic mechanical component with a white arrow indicating rotation (no text or symbols visible)Loosen the locking screw (A) that secures the white regulating disk.

natural_image
Close-up of gloved hands operating a mechanical device with red arrows indicating rotation or adjustment (no text or symbols visible)Turn the regulating disk (B) to change the product thickness.

natural_image
Close-up of a gloved hand holding a white mechanical component with a red circular arrow and letter 'A' indicating a specific part (no text or symbols on the device itself)
natural_image
Close-up of a hand holding a white mechanical component with a blue glove, showing a red arrow and label 'B' (no text or symbols on the device itself)
As you turn the regulating disk, the spring in the forming drum is tensioned. Use caution when turning the spigot of the regulating disk, as overdoing will slacken the spring and may pinch your finger!
Retighten the locking screw (A).
Replace the drum.

natural_image
Close-up of a gloved hand operating a mechanical component with red arrows indicating rotational motion (no text or symbols)The drum is mounted correctly when the drum ring engages in the slot at the end of the drive shaft.

natural_image
Close-up of gloved hands holding a metallic mechanical flange component (no visible text or symbols)7. CLEANING AND CARE
For the sake of hygiene, the burger former must be kept clean at all times. The machine must be disassembled and cleaned thoroughly at the end of each working day and whenever the type of food or type of meat (e.g., change from pork to beef or poultry) being processed is changed.
Make sure to clean all parts and cavities that come into contact with food and in which product residues can build up.
Cleaning of the burger former must only be carried out by trained personnel.

Before cleaning, unplug the machine from the power supply!
Never clean the burger former or its parts in the dishwasher!
Exception: The conveyor belt (without the sliding plate!) and the forming drum can be cleaned in the dishwasher.
Under no circumstances use sodium-hypochlorite-based solutions or abrasive detergents as they would irreparably damage the machine's surfaces. Never use solvents, thinners or alcohol, etc. for cleaning.
The cleaning of the burger former with harmful products liable to affect the health of either operators or customers is strictly prohibited. Only use products with a pH value of 7-8 for cleaning.
Clean the structure of the machine with soft cloths, sponges, and rinse with water frequently. Finally dry with soft and dry cloths. If drying is insufficient, there is a risk of flash rust forming.

Under no circumstances must the machine or parts of it be cleaned with a powerful water jet, high-pressure or steam jet cleaner!
It is possible to rinse the machine with running water from the water hose.
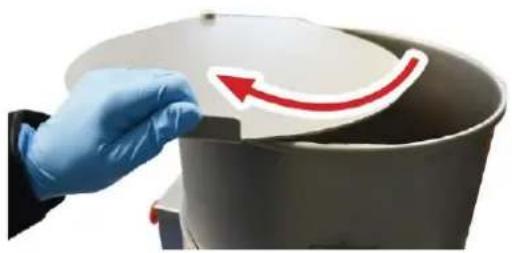
Removing the hopper
Open the lid.
natural_image
Hand in blue glove holding a white container with a red curved arrow pointing upward (no text or symbols)Turn the hopper counter-clockwise and lift it off.

natural_image
Person holding a black pot with red arrows indicating rotation or motion, placed on a stovetop (no text or symbols visible)Removing the squeegee
Turn the squeegee counter-clockwise and lift it off.

natural_image
Close-up of a mechanical component with a red curved arrow indicating rotation (no text or symbols visible)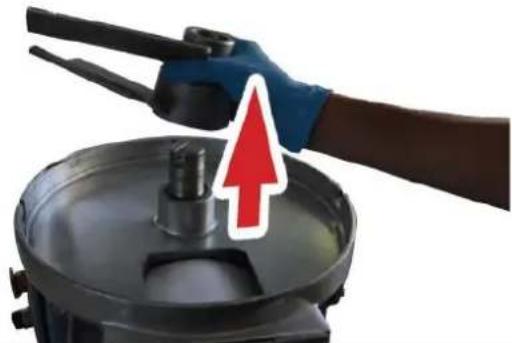
natural_image
Close-up of a hand using a tool to press or install a black mechanical component, with a red upward arrow symbol (no text or symbols present)Removing the conveyor belt
Lift the conveyor belt at the front end about 30^ to 40^ .

natural_image
Close-up of hands operating a blue industrial machine with tools and a red arrow indicator (no text or symbols)Pull the conveyor belt with the sliding plate off the machine.

natural_image
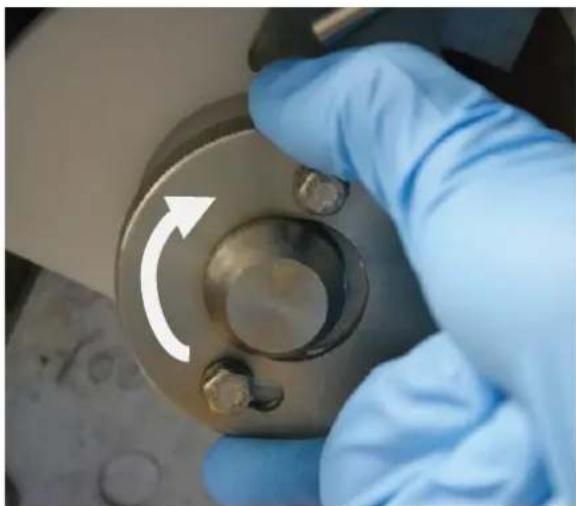
Close-up of gloved hands operating a blue industrial machine with red arrows indicating downward pressure (no text or symbols visible)Removing the forming drum
Fold up the drum cover.

Turn the drum ring clockwise and pull the drum off the drive shaft.
natural_image
Close-up of gloved hands holding a metallic mechanical component with a white arrow indicating rotation (no text or symbols visible)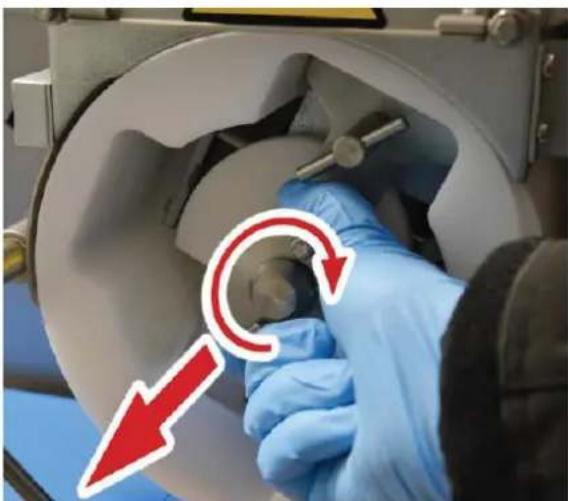
natural_image
Close-up of a gloved hand operating a mechanical device with a red circular arrow indicating rotational motion (no text or symbols)Removing the scraper
Loosen the star knob screw.

Pull the scraper out of the holder.
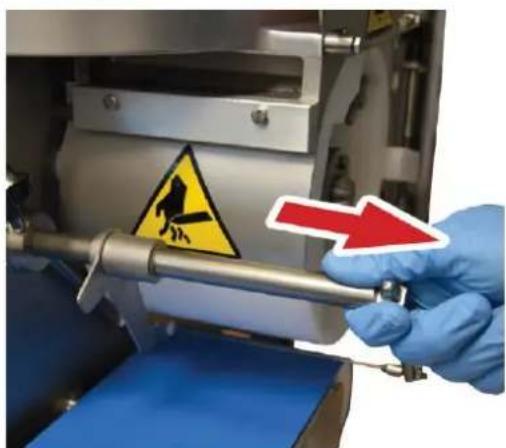
Cleaning the disassembled parts
Only clean the disassembled parts with hot water and a neutral detergent. Then dry the parts well.
Mounting the cleaned parts
Fit the cleaned parts back by following the disassembly procedure in reverse order. In doing so, proceed as follows:
Fitting the hopper
Assemble the hopper so that the magnetic holder is positioned next to the lid axis.
Fitting the squeegee
Ensure the squeegee is fully seated on the drive shaft and locks into the drive shaft when twisted. NOTICE: You can only fit the squeegee in one position.
Fitting the drum
The drum is assembled correctly when the drum ring engages in the slot at the end of the drive shaft.

natural_image
Close-up of a gloved hand operating a mechanical component with red arrows indicating rotational motion (no text or symbols)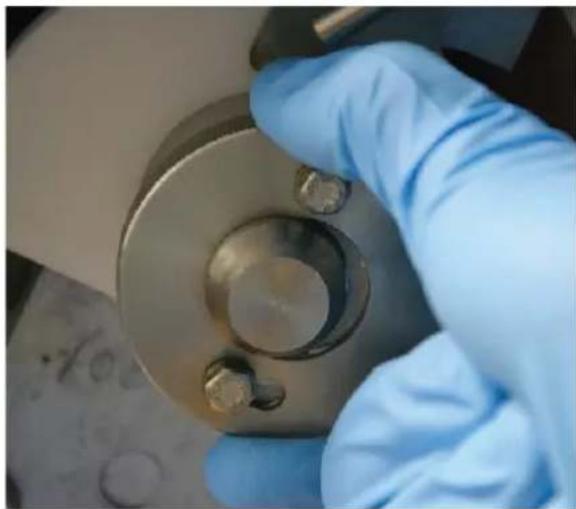
natural_image
Close-up of gloved hands holding a metallic mechanical component with two bolts (no visible text or symbols)8. TRAINING
During the machine's installation, an operator of age must be trained in the regular use-cleaning-care, especially regarding the hazards which are likely to be encountered if the machine is operated incorrectly.
The training will be given by the suitably authorized and trained installer familiar with the European community machine standards.
9. DISPOSAL

Waste electrical and electronic equipment must not be disposed of in household waste. Equipment with this marking must not be disposed of in residual waste and must be recycled.
10. WARRANTY
If the product malfunctions within 1 year from the date of purchase (receipt required) due to defects in material and workmanship, ADE will repair or replace the product.
The warranty does not cover moving parts such as the scraper, conveyor belt, squeegee, drum, etc.
The warranty does not extend to external normal wear and tear or damage caused by accident or misuse.
This warranty does not cover the products tampered with by unauthorized personnel.
The warranty agreement does not affect the customer's statutory rights.
Any complaints shall be submitted to the dealer from whom you purchased the machine.
- TECHNICAL DATA
| Model | Bully1000-230 |
| Round patty diameter | 130 mm |
| Patty thickness (max.) | max. 32 mm |
| Hopper volume | 16 l |
| Conveyor belt length: | 450 mm |
| Machine dimensions | |
| Width: | 518 mm |
| Depth: | 579 mm |
| Height: | 607 mm |
| Power | 0.55 kW |
| Net weight | 57 kg |
| Current type | 230 V, 50 Hz |
| IP-Protection (Machine) | IP65 |
| IP- Protection (Switch) | IP69 |
12. DECLARATION OF CONFORMITY
ADE
CE
EC declaration of conformity
Manufacturer:
ADE Germany GmbH
Neuer Höltigbaum 15
22143 Hamburg / Germany
Person authorized to compile the technical documentation:
ADE Germany GmbH
Neuer Höltigbaum 15
22143 Hamburg / Germany
Type/Model:
Burger forming machine
Bully1000
Serial numbers:
Bully1000-230
62229-xxxxxxxx-00001
until
62229-xxxxxxxx-99999
The above manufacturer declares under sole responsibility that the above machine complies with the requirements of the following EC directives in the currently valid version:
2006/42/EC
Machinery Directive
(OJ L 157, June 9, 2006, p. 24–86)
2014/30/EU
EMC directive
(OJ L 96, March 29, 2014, p. 79 – 106)
2011/65/EU
RoHS directive
(OJ L 174, July 1, 2011, p. 88 – 110)
Directive 2014/35/EU is complied with in terms of its protection objectives in accordance with Annex I No. 1.5.1 MRL 2006/42/EC.
This declaration only applies to the machine in the condition in which it was placed on the market. The declaration becomes invalid as soon as a change is made to the machine that has not been agreed with the manufacturer.
P. Mack
Hamburg, April 5 ^th , 2023
Managing Director
Location,
Date
13. DIAGRAMS

14. SPARE PARTS/ACCESSORIES

| No. | Designation | Item No. |
| 1 | Conveyor belt (standard - 140 x 840 mm) | H4352-xxx |
| 2 | Drive belt | H4352-xxx |
| 3 | Voltage converter 230 V/24 V | H4352-xxx |
| 4 | Inverter board 230 V 50/60 Hz | H4352-xxx |
| 5 | Scraper assembly | H4352-xxx |
| 6 | Stainless steel wire ∅ 0.8 mm | H4352-xxx |
| 7 | Cleaning disk | H4352-xxx |
| 8 | Capacitive sensor ∅ 18 mm | H4352-xxx |
| 9 | Sensor ∅ 8 mm | H4352-xxx |
| 10 | Magnet 18 x 14.5 mm | H4352-xxx |
| 11 | Sensor ∅ 10 x 0.75 2NA | H4352-xxx |
| 12 | White non-stick parting film | Z4352-001 |
| 13 | Stainless steel scoop | Z4352-002 |
Distributor:
Manufacturer:
ADE Germany GmbH
Neuer Höltigbaum 15
22143 Hamburg
+49 40 432 776 - 0
+49 40 432 776 - 10
info@ade-germany.de
www.ade-germany.de
- CONTENTS
- FOREWORD
- Introduction
- Intended use
- Residual risks
- MACHINE OVERVIEW
- INSTALLATION AND START-UP
- Scope of Supply
- Unpacking
- Setting up the machine
- Installing the conveyor belt
- Installing the scraper
- Fitting the squeegee
- Connecting to the power supply
- Electrical safety devices
- Safety precautions
- Acceptance testing
- USING THE BURGER FORMER
- Operating functions
- Switching on
- Securing the machine against accidental switch-on
- Switching off
- Feeding in food and cutting
- INSERTING RELEASE PAPER
- ADJUSTING PRODUCT THICKNESS AND WEIGHT
- CLEANING AND CARE
- Removing the hopper
- Removing the squeegee
- Removing the conveyor belt
- Removing the forming drum
- Removing the scraper
- Cleaning the disassembled parts
- Mounting the cleaned parts
- Fitting the hopper
- Fitting the squeegee
- Fitting the drum
- TRAINING
- DISPOSAL
- WARRANTY
- DECLARATION OF CONFORMITY
- ADE
- CE
- EC declaration of conformity
- DIAGRAMS
- SPARE PARTS/ACCESSORIES
Brand : ADE
Model : Bully1000-240618
Category : Meat Grinder