BC52LR2101 - Air purifier Be Cool - Free user manual and instructions
Find the device manual for free BC52LR2101 Be Cool in PDF.


| Product Type | Air Purifier with Humidifier |
| Model | BC52LR2101 |
| Brand | Be Cool |
| Dimensions (H x W x D) | 548 x 382 x 223 mm |
| Net Weight | 7.5 kg |
| Power Consumption | 70 W |
| Input Voltage | 230 V~, 50 Hz |
| Max. Current | 0.3 A |
| CADR (Clean Air Delivery Rate) | 380 m³/h |
| Filter Type | HEPA H13 + Activated Carbon + Pre-filter |
| Modes | Smart, Sleep, Manual (3 speeds + Turbo) |
| Timer | 1–12 hours |
| Ionizer | Yes, can be activated separately |
| Humidification | Automatic (target 45–60% RH), manual activation |
| Air Quality Sensor | PM2.5 sensor with color indicator (Blue/Green/Yellow/Red) |
| Light Sensor | Yes, dims display in darkness |
| Filter Replacement Indicator | Timer-based, flashes after approx. 6–9 months |
| Pre-filter Cleaning | Every 2 weeks (vacuum or rinse with water) |
| HEPA/Carbon Filter Cleaning | Every 2 weeks (vacuum and air out for 12 hours) |
| Humidifier Cleaning | Regularly, with soft brush, no solvents |
| Warranty | 2 years (Austria) |
| Repairability | Only by authorized service centers |
| Safety Features | Child lock, overheat protection, tip-over? not specified, grounded plug |
Frequently Asked Questions - BC52LR2101 Be Cool
User questions about BC52LR2101 Be Cool
0 question about this device. Answer the ones you know or ask your own.
Ask a new question about this device
Download the instructions for your Air purifier in PDF format for free! Find your manual BC52LR2101 - Be Cool and take your electronic device back in hand. On this page are published all the documents necessary for the use of your device. BC52LR2101 by Be Cool.
USER MANUAL BC52LR2101 Be Cool
natural_image
White cylindrical device with a circular button, labeled 'BE COOL' above (no other text or symbols visible)natural_image
Three technical line drawings of a heat exchanger or radiator unit, showing internal structure and mounting brackets (no text or symbols)natural_image
Two technical line drawings of a device with internal components, showing no text or symbols.HINWEIS
natural_image
Illustration of a hand placing a rectangular object onto a wallet with an upward arrow (no text or symbols)natural_image
Line drawing of a hand holding a device with a cap and ruler, no text or symbols presentnatural_image
Illustration of hands pouring liquid into a container (no text or symbols)natural_image
Illustration of a hand inserting a card into a wallet (no text or symbols)Achtung!
| Important information on safety, location and electrical connection | 19 – 20 |
| Recycling, disposal, declaration of conformity | 20 – 21 |
| Description of the device | 21 |
| Description of the display and the control panel | 22 |
| Scope of delivery | 22 |
| Commissioning | 22 – 24 |
| Operation | 25 – 28 |
| Maintenance and cleaning | 28 – 30 |
| Troubleshooting | 30 |
| Technical information | 31 |
| Warranty | 32 |
PLEASE READ THE INSTRUCTION MANUAL CAREFULLY BEFORE STARTING ASSEMBLY, INSTALLATION, OPERATION OR MAINTENANCE. PROTECT YOURSELF AND OTHERS BY FOLLOWING THE SAFETY INSTRUCTIONS. FAILURE TO COMPLY WITH INSTRUCTIONS COULD RESULT IN PERSONS AND / OR PROPERTY DAMAGES AND / OR LOSS OF THE WARRANTY CLAIM!
IMPORTANT INFORMATION ON SAFETY, LOCATION AND ELECTRICAL CONNECTION.



- Read all instructions carefully before using the device.
- Use this device only in accordance with the instructions in the manual. Any other use not recommended by the manufacturer could result in fire, electric shock, or personal injury.
- This device is intended for cooling in households and may not be used for any other purpose.
- The device is not suitable for continuous and precision operation.
- It is forbidden to modify the characteristics of this device in any way and only use replacement parts and accessories recommended by the manufacturer (failure to do so will void the warranty).
- For any repairs to the device, power plug or cable, always and exclusively contact authorized service centers. The customer service centers can be accessed online at www.becool.at
•
-
Remove the packaging and make sure the air conditioner is not damaged. If in doubt, do not use the air conditioner and contact the service center or your seller.
-
Keep children away from packaging material. If swallowed there is danger of suffocation!
-
If the power cord is damaged, it must be replaced by the manufacturer or an authorized service center to avoid all possible risks.
-
The device must be installed in accordance with local electrical system installation and operating instructions.
-
The electrical socket in which you connect the device must not be defective or loose and must be suitable for the required current load and above all be reliably earthed. If in doubt, have your electrical installation checked by a qualified electrician.
-
Before connecting to the device to the electrical socket, you must check whether the type of current and the mains voltage comply with the information given on the back of the device.
-
Avoid using an extension cord as it could overheat and cause a fire.
-
Do not twist or bend the power cord.
•
BE COOL
-
This device may only be used by adults.
-
Children under the age of 8 and persons with limited physical, mental, sensory or mental abilities, and lack of experience and knowledge may only use this device if it is under appropriate supervision and provide detailed instructions for use of the device in a safe manner and how the existing dangers have been described.
-
Do not let children play with the packaging and make sure that children do not play with the device.
-
Do not use the air conditioner outdoors.
-
Do not use the device with wet hands.
-
Never operate the device in areas where gas, oil or sulfur are present.
-
Do not place the device near sources of heat (e.g.: near heating systems and gas heaters) and avoid direct sunlight.
-
Keep a minimum distance of at least 50cm to combustible materials (e.g., alcohol, etc.) or pressurized vessels (e.g., spray containers).
-
Do not use the air conditioner near water or high humidity, e.g.: in the wet basement, next to swimming pool, bath or shower. Make sure that no water gets into the device.
-
Do not place heavy or hot objects on the unit and never cover the unit.
-
Never insert fingers, pins or other objects into the unit, being careful not to block the air inlet and outlet.
-
Always turn off the power before unplugging the power cord.
-
Do not pull the power cord to disconnect the device from the mains. Always pull on the plug to pull out the power cord. Do not handle the plug with wet hands to avoid electric shock.
-
Unplug the device when not in use before cleaning, servicing or moving it from one location to another.
-
If the device has a defect, switch it off with the on / off button on the control panel and contact the customer hotline.
-
Maintain the air conditioner in good condition by caring for and cleaning the unit.
-
The air filter should be cleaned at least once a week.
-
Store the device vertically in a safe place, dry and out of the reach of children, when not in use. Do not cover the device with plastic packaging.
-
Store the unit in a room with no ignition sources in operation (e.g.: open fire, service gas appliance or electric heater with open heat source).
-
The Air Purifier should be transported in an upright position or slightly sideways position. Empty the internal condensate tank first.
-
Always contact authorized service centers for repairs to the device, power plug, or cable.
-
Do not use any means to accelerate or eliminate the defrost process, the device will do it on its own.
-
If you have any questions about maintenance, you can contact the manufacturer's authorized hotline / service center.
WARNING
The main power switch and the on / off switch should not be used as the sole means of power disconnection. Always unplug the power cord before servicing or moving the unit.
To avoid the risk of electric shock, disconnect the plug from the power outlet when not in use - as well as before each cleaning.

The packaging materials can be recycled. Therefore it is recommended to dispose of them in sorted waste.
The crossed-out bin symbol requires the separate disposal of waste electrical and electronic equipment (WEEE). Electrical and electronic equipment may contain hazardous and environmentally hazardous substances. Therefore, do not dispose of it in unsorted residual waste, but at a designated collection point for waste electrical and electronic equipment. This helps to protect resources and the environment. For more information, contact your dealer or the local authorities.
DISPOSAL OF THE BATTERIES
The crossed-out bin symbol requires the separate disposal of batteries. Please dispose the batteries in an environmentally friendly way. DO NOT dispose batteries in the residual waste. Please use the return and collection systems in your area or contact your dealer.

DECLARATION OF CONFIRMITY

We hereby confirm that this article complies with the essential requirements, regulations and directives of the EU.
The detailed declaration of conformity can be viewed at any time under the following link: www.becool.at/downloads
Errors and technical changes reserved.
www.becool.at
DESCRIPTION OF THE DEVICE
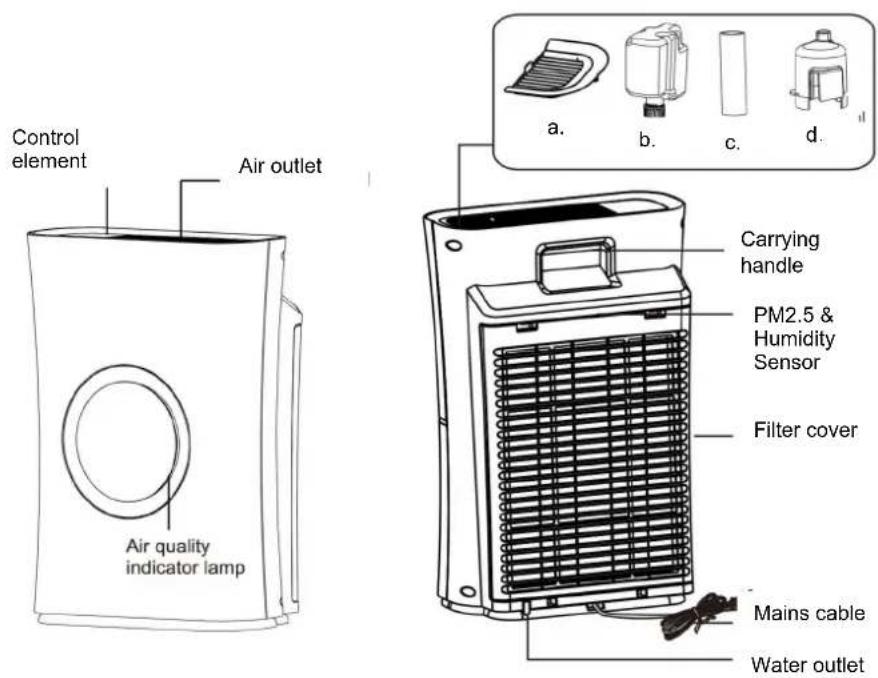
a. Humidification unit cover
b. Water tank
c. Humidification tube
d. Humidification funnel
DESCRIPTION OF THE DISPLAY AND CONTROLPANEL
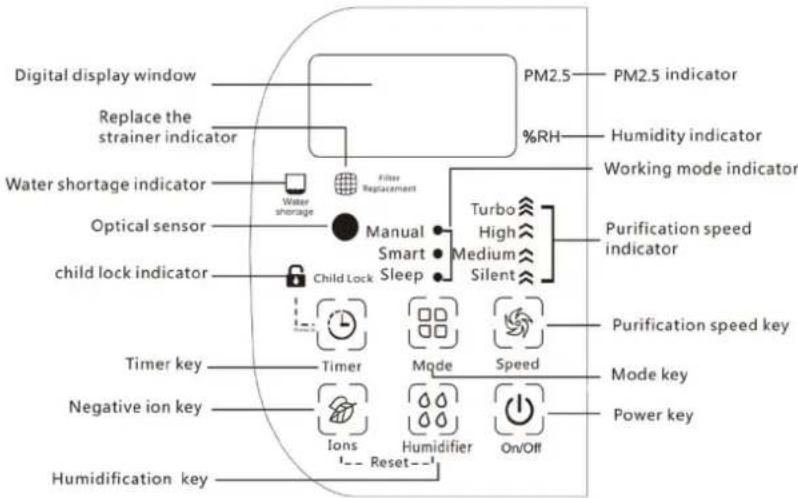
flowchart
graph TD
    A["Digital display window"] --> B["Replace the strainer indicator"]
    B --> C["Water shortage indicator"]
    C --> D["Optical sensor"]
    D --> E["child lock indicator"]
    E --> F["Timer key"]
    F --> G["Negative ion key"]
    G --> H["Humidification key"]

    I["PM2.5 indicator"] --> J["PM2.5 indicator"]
    K["%RH"] --> L["Humidity indicator"]
    M["Filter Replacement"] --> N["Manual Smart Sleep"]
    O["Turbo High Medium Silent"] --> P["Purification speed indicator"]
    Q["Timer"] --> R["Mode"]
    S["Speed"] --> T["Mode key"]
    U["Ions"] --> V["Humidifier"]
    W["Reset"] --> X["On/Off"]

    style A fill:#f9f,stroke:#333
    style I fill:#f9f,stroke:#333
    style K fill:#f9f,stroke:#333
    style M fill:#f9f,stroke:#333
    style O fill:#f9f,stroke:#333
    style Q fill:#f9f,stroke:#333
    style U fill:#f9f,stroke:#333
SCOPE OF DELIVERY
- Air purifier
- HEPA H13 filter
- Activated carbon filter
- Operating instructions
COMMISSIONING
PREPARATION FOR USE
IMPORTANT!
On delivery, the filters are packed in a plastic film for protection. This film must be removed from the filters before they are put into operation for the first time.
- Place the unit on a level surface with a properly earthed socket.
- The distance to walls or other objects must be at least 30 cm.
- Before using the unit, make sure that both air inlet and air outlet are free of obstructions and not blocked.
- Observe the instructions in the chapter "Important information on safety, location and electrical connection".
INSTALLATION OF THE FILTERS
You can start using your air purifier in just a few steps:
| 1.Removing the filter coverRemove the filter cover by pressing down the two locking tabs.Then pull the cover away towards the back.Info: A pre-filter is inserted in the cover, which filters coarse dirt particles. | 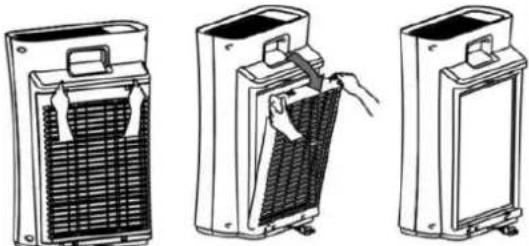 |
| 2.Remove the HEPA H13 filterRemove the HEPA H13 filter by pulling the tab on the top of the filter.Behind it is the activated carbon filter, which you can also remove by pulling the tabs. | 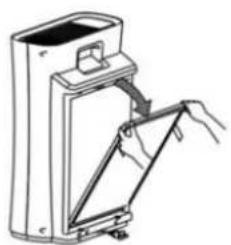 |
| 3.Removing the transport protectionThe filters are packed in a plastic film for protection.Remove the foil from the filter and make sure that no foil residues adhere to the filter. | 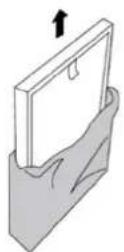 |
| 4.Install the activated carbon filter in the appliance.Insert the filter into the housing as shown in the illustration. There is a grip tab on the filter. This must face outwards to guarantee optimal function. | 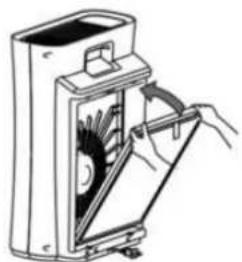 |
BE COOL
| 5. Install HEPA filter in the applianceInsert the filter into the housing as shown in the illustration.There is a grip tab on the filter, this must be facing outwards to guarantee optimal function. | 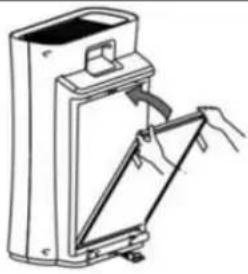 |
| 6. Attach the filter coverAttach the cover by inserting it into the recesses at the bottom and then pressing it on the top until you hear a click. | 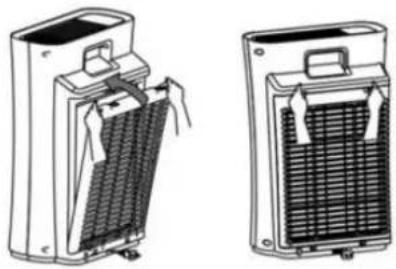 |
NOTE
Never use the unit when the protective film is still on the filter. This may cause damage to the unit!
NOTE
Make sure that the filter is inserted the right way round (handle tab facing outwards).
NOTE
NEVER USE THE APPLIANCE WITHOUT A FILTER!
Using the humidification unit
- Take away the humidification fog cover plate;
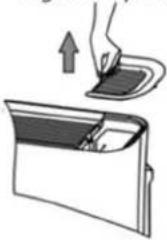
natural_image
Illustration of a hand pressing down on a flat surface with an upward arrow (no text or symbols)- Take out the water tank;
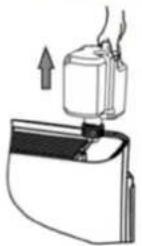
- Screw the water tank cover;
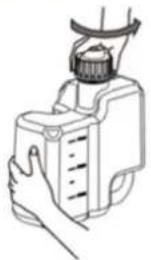
natural_image
Line drawing of a hand holding a device with a cap and scale markings (no text or symbols)- Fill in water to water tank;
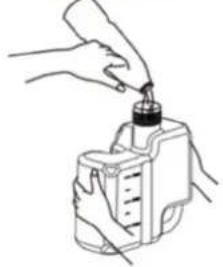
natural_image
Illustration of a hand pouring liquid into a bottle (no text or symbols)5.Screw the water tank cover ;
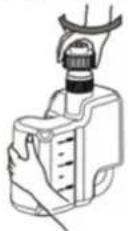
- Install the water tank :
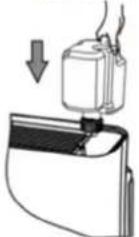
- Last, install the humidification fog cover plate.
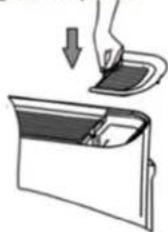
OPERATION
You can set all functions directly on the unit.
Depending on the function set, the indicator lights on the control panel light up.
SWITCH ON THE UNIT
- Connect the unit to the earthed socket.
- Press the button to switch on the unit.
- When the unit is switched on, it starts in smart mode.
- The Indicator lights up.
- Press the button again to switch to standby mode.
- In standby mode, the indicator lights up slightly.
NOTE
Never switch off the air purifier by pulling the plug directly from the mains. To switch off, always press the on/off button and wait a few minutes before disconnecting the unit from the mains. This allows the unit to go through a cycle of checks to verify its functionality.
SET FUNCTIONS
Smart mode
Optimal for everyday use, the unit itself controls how strongly the air is cleaned.
- Press the - button until the "Smart" indicator on the control element lights up.
- To exit smart mode, press the -button again.
| Fan speed listing based on PM2.5 value | ||||
| Air quality indicator Light | Blue Green Yellow Red | |||
| PM2.5 value 0-50 50-100 100-150 150+ | ||||
| Fan stage Low | Medium High Turbo | |||
Light sensor
The unit has a light sensor that adjusts the backlight and air quality indicator to the ambient brightness when the unit is in smart mode.
When it is dark, the display illumination and the air quality indicator are dimmed down to a minimum.
NOTE
It is recommended to use the unit in Smart mode. In Smart mode, the unit works most efficiently as it regulates the fan speed automatically based on the level of particulate matter in the room.
Sleep mode
In this mode, the fan runs on the lowest setting and all lights turn off, only the "Sleep" indicator lights up slightly.
- Press the - button until the "Sleep" indicator lights up.
- The display illumination and all other indicators except the "Sleep" indicator go out.
- The air purifier operates at the lowest level.
- Press the - button again if you want to exit the sleep mode.
Manual mode
In manual mode, you can decide yourself at which level the air purifier operates.
- Press the - button until the "Manual" indicator lights up.
- You can now choose between 3 speed levels and the turbo level using the - button.
-
For each speed level of the fan, the respective indicator lights up.
= Turbo speed
= High speed
= Medium speed
= Low speed -
The appliance runs at the selected speed level until you change the level or select another mode.
NOTE
The indicators below the set level also light up. For example, if the turbo level is set, all 4 indicators light up.
Timer
The timer allows you to switch off the appliance in a scheduled manner, you can choose between 1 - 12 hours.
- While the appliance is switched on, press the ⏻ button to set the timer.
- Press the button repeatedly until the desired time is displayed.
- The display shows: 1H, 2H, ..., 12H
- Press the button again when "12H" is displayed to deactivate the timer.
- After the programmed time has elapsed, the unit switches off automatically.
NOTE
The timer can be used in Smart mode and Manual mode.
BE COOL
Reset filter
The unit is equipped with a time-controlled filter exchange function.
The unit signals that the filter needs to be changed by flashing the filter indicator light. The filter has a service life of approx. 6 - 9 months if the unit is used for 8 hours every day.
-
When the ⚙ - indicator flashes, the unit signals that the filter needs to be replaced.
-
Replace the filters, proceeding as described under "Commissioning".
-
Press and hold the button and the button simultaneously for 3 seconds to reset the cleaning interval.
-
The filter indicator on the control panel goes out.
NOTE
When the filter indicator flashes, the filter must be replaced.
Cleaning the filter will not achieve the same effect.
lon function
The air purifier is equipped with an ionizer. This distributes ionized air into the rooms and removes static electricity.
-
Press the - button to activate the ionizer - the indicator lights up when the function is activated.
-
Press the button again to deactivate the ionizer.
NOTE
The ionizer can be activated in any mode.
Humidification function
The air purifier is also equipped with a humidifier, the unit measures the relative humidity of the room air and shows this on the display every 10 seconds for 10 seconds. When the humidity is displayed, the %RH% indicator on the control element lights up.
Humidification is controlled automatically, if the relative humidity is below 45%, the humidifier switches on and humidifies until a relative humidity of 60% is reached. If the humidity is above 60%, the humidification is switched off, Thus always achieving a relative humidity of 45 - 60%, which is the healthiest for humans.
-
Make sure that the water tank is full.
-
Press the - button to activate the humidification function - the - indicator lights up when the function is activated.
-
Press the button again to deactivate the function.
BE COOL
- When the indicator on the control element lights up, the appliance signals that the water tank is empty.
a. In this case, fill the tank, proceeding as described in the section "Preparing the humidification unit" under "Commissioning".
NOTE
Use distilled water, do not use oils, alcohols or chemicals.
NOTE
Do not cover the outlet from which the steam flows!
NOTE
The humidification function can be used in all modes.
MAINTENANCE AND CLEANING
Clean the appliance (every 2 weeks)
Before cleaning, switch off the appliance, wait a few minutes and then always unplug the appliance from the electrical mains.
- Clean the unit with a moderately damp soft cloth and then wipe it with a dry soft cloth.
- For safety reasons, never clean the appliance with water. This could be dangerous.
- Never use petrol, alcohol or solvents for cleaning.
- Do not spray insecticides or similar agents on the air purifier.
Cleaning the pre-filter (every 2 weeks)
- To remove the dust accumulated in the pre-filter, use a hoover.
- If the pre-filter is very dirty, you can immerse it in hot water and rinse it several times however, the water temperature should not exceed 40^ C.
• After washing, allow the air filter to dry out well and then replace them.
NOTE
Never use the appliance without the pre-filter. Do not insert the filter until it is completely dry.
Cleaning of the HEPA & activated carbon filter (every 2 weeks)
- To remove the dust accumulated on the outside of the filter, use a hoover.
- Remove the filter and place it in a well-ventilated place outside the living area for 12 hours.
- This allows particles and substances accumulated in the filter to escape from the filter.
Replacing the filters (When the indicator flashes, approx. 6-9 months)
- Replace the filter when the - indicator flashes.
NOTE
When replacing the filter, proceed as described in the "OPERATION" section.
Cleaning the humidification unit
| 1. Remove the coverRemove the cover. | 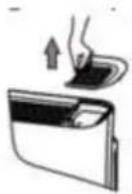 |
| 2. Remove the tankRemove the tank from the housing. | 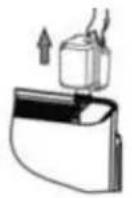 |
| 3. Remove the humidification funnel and pipe.Remove the humidification funnel and the humidification tube. | 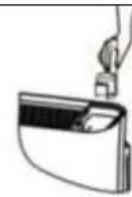 |
| 4. Emptying the water tankDrain the water from the appliance by pulling out the plug located at the bottom of the back.Place a container under the opening to catch the water.Do not forget to put the plug back into the opening! | 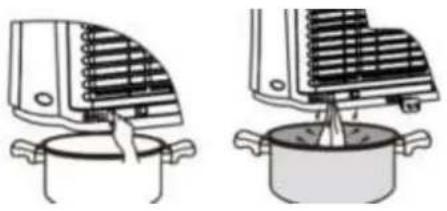 |
| 5. Cleaning the humidification unitClean the humidification unit with a soft brush or cloth.Do not use any solvents or cleaning agents. | 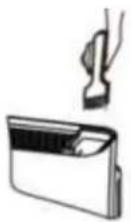 |
TROUBLESHOOTING
Before contacting our customer hotline/service centre, please check whether the error can be rectified using the instructions below.
| PROBLEM POSSIBLE CAUSE SOLUTION | ||
| Hardly any air flows out of the unit. | The protective film has not been removed from the filter | Remove the foil. |
| Air inlet or outlet is blocked. | Remove objects that could block the air intake. | |
| The unit is too close to the wall. | Place the unit at least 30 cm away from walls and objects. | |
| The unit always indicates poor air quality. | The air quality sensor is dirty. Clean the sensor. | |
| The windows in the room are open. Impurities from outside enter the room | Always close the windows when using the unit. | |
| Air quality is not improving. | The filters are in need of maintenance | Clean or replace the filters |
| The unit runs at a low level in manual mode | Set the unit to Auto mode or increase the level. | |
| The humidification function is switched on, but no steam flows out of the opening | The humidity is above 60% | As long as the humidity is above 60%, the function does not switch on. Wait until the humidity is below 60%, then the unit should start humidifying. |
| There is no water in the tank. Fill up the tank. | ||

| Technical information | |
| Article number | BC52LR2101 |
| Power consumption | 70 Watt |
| Input voltage | 230V~ |
| Frequency | 50Hz |
| Max. Current | 0.3A |
| CADR | 380 m3/h |
| Filter | HEPA H13 |
| Weight | 7,5 kg |
| Dimensions | 382 x 223 x 548 mm |
| Contact addresses for further information | Schuss Home Electronic GmbHScheringgasse 3, A-1140 ViennaTel: +43 (1) 97 0 21 - 0Service line: +43 (1) 97 0 21 - 544www.becool.atFB-No: 236974 t / FB-Court: Vienna |
WARRANTY
By purchasing a BE COOL quality product you have acquired an innovative, long lasting and reliable item.
For this BE COOL device we grant a warranty of 2 years from the date of purchase, valid in Austria only. In the unlikely event that service work is required on your device in this period we warrant free repair (spare parts and labour) or (subject to Schuss's decision) to replace the product. In the event that neither repair nor exchange make sense from an economical perspective we reserve the right to issue a credit based on current value.
When dealing with air conditioning devices you should always contact the customer hotline first (see label on the device or the title page of the instruction manual), in case of fans contact your dealer or us directly. Please note that repair not performed by the authorised workshop in Austria immediately renders this warranty void.
This warranty does not include:
• Repair of replacement of parts due to normal wear
- Damage due to non-compliance with the instruction manual
• Devices that are used commercially – even in part
• Devices damaged by external forces (falling, impact, cracking, improper use etc.) as well as aesthetic wear
• Devices that have been used improperly
• Devices that were not opened by our authorised workshop.
- Damages caused by improperly closed condensation drains on air conditioning devices or improperly inserted water container.
- Unfulfilled customer expectations.
- Damage caused by force majeure, water, lightning and overvoltage.
- Devices on which type denomination and/or serial number on the device have been erased, rendered illegible or removed.
- Service work not performed by our authorised workshops, transport costs to an authorised workshop or us and back as well as associated risks.
- Filter.
Please note that within the warranty period we charge a flat rate of 60 € (indexed as per consumer price index 2015, June 2020) in case of operating errors or if no fault can be found.
The total warranty period of 2 years is not extended if warranty service is performed (repair or device replacement).
The 2 year warranty is only valid if the original invoice (must contain name and address of the dealer as well as full device name) and the respective warranty certificate are produced, on which the device type and serial number (can be found on the box and the device's rear or bottom) are to be noted! Only the statutory warranty coverage applies if the warranty certificate cannot be produced!
Please note that the statutory warranty coverage is not altered by this warranty and that it applies in full regardless.
Schuss Home Electronic GmbH and its vicarious agents are only liable for damages in case of gross negligence or intent. Liability for loss of profit, expected but not incurred savings, consequential damages and damages from third party claims is excluded in any case. Damages to or for recorded data are always excluded from the liability for damages.
Congratulations on your choice. We hope you will enjoy using your BE COOL device!
ADDRESS
BE COOL Sales
Schuss Home Electronic GmbH
1140 Vienna, Scheringgasse 3
Tel.: +43 (0)1/ 970 21
Type designation:......
Serial number:......
Together with the device, this warranty certificate must be handed to the authorised workshop or dealer you bought the device from in the event of a warranty claim!
- HINWEIS
- Achtung!
- IMPORTANT INFORMATION ON SAFETY, LOCATION AND ELECTRICAL CONNECTION.
- BE COOL
- WARNING
- DISPOSAL OF THE BATTERIES
- DECLARATION OF CONFIRMITY
- DESCRIPTION OF THE DEVICE
- DESCRIPTION OF THE DISPLAY AND CONTROLPANEL
- SCOPE OF DELIVERY
- COMMISSIONING
- PREPARATION FOR USE
- IMPORTANT!
- INSTALLATION OF THE FILTERS
- NOTE
- Using the humidification unit
- OPERATION
- SWITCH ON THE UNIT
- SET FUNCTIONS
- Smart mode
- Light sensor
- Sleep mode
- Manual mode
- Timer
- Reset filter
- lon function
- Humidification function
- MAINTENANCE AND CLEANING
- Clean the appliance (every 2 weeks)
- Cleaning the pre-filter (every 2 weeks)
- Cleaning of the HEPA & activated carbon filter (every 2 weeks)
- Replacing the filters (When the indicator flashes, approx. 6-9 months)
- Cleaning the humidification unit
- TROUBLESHOOTING
- WARRANTY
- This warranty does not include:
Brand : Be Cool
Model : BC52LR2101
Category : Air purifier