
Viva Collection HR2342 - Pasta machine PHILIPS - Free user manual and instructions
Find the device manual for free Viva Collection HR2342 PHILIPS in PDF.


| Product Type | Electric Pasta Machine |
| Model | Viva Collection HR2342 |
| Brand | Philips |
| Dimensions (W x D x H) | Approx. 30 x 20 x 30 cm |
| Weight | Approx. 4 kg |
| Power Supply | 220-240 V, 50-60 Hz |
| Power Consumption | 200 W |
| Material | Plastic housing, stainless steel mixing chamber |
| Pasta Shapes | Spaghetti, fettuccine, lasagna, etc. (via interchangeable discs) |
| Capacity | Up to 500 g flour per batch |
| Automatic Mixing & Extrusion | Yes |
| Timer | Automatic shut-off after 15 minutes of inactivity |
| Cleaning | Removable parts dishwasher-safe; wipe body with damp cloth |
| Safety Features | Overheat protection, auto shut-off when lid opened |
| Included Accessories | 4 shaping discs, measuring cup, cleaning tool |
| Spare Parts Availability | Yes, via Philips website or authorized dealers |
| Repairability Index | 5.5 / 10 |
Frequently Asked Questions - Viva Collection HR2342 PHILIPS
User questions about Viva Collection HR2342 PHILIPS
0 question about this device. Answer the ones you know or ask your own.
Ask a new question about this device
Download the instructions for your Pasta machine in PDF format for free! Find your manual Viva Collection HR2342 - PHILIPS and take your electronic device back in hand. On this page are published all the documents necessary for the use of your device. Viva Collection HR2342 by PHILIPS.
USER MANUAL Viva Collection HR2342 PHILIPS
natural_image
Exterior view of a Philips electric shaver with transparent internal structure (no text or symbols visible)Always here to help you
Register your product and get support at
www.philips.com/welcome
Quick Start Guide/ 快速入门指南
Disassembling and cleaning before first use 首次使用前的拆卸和清洁
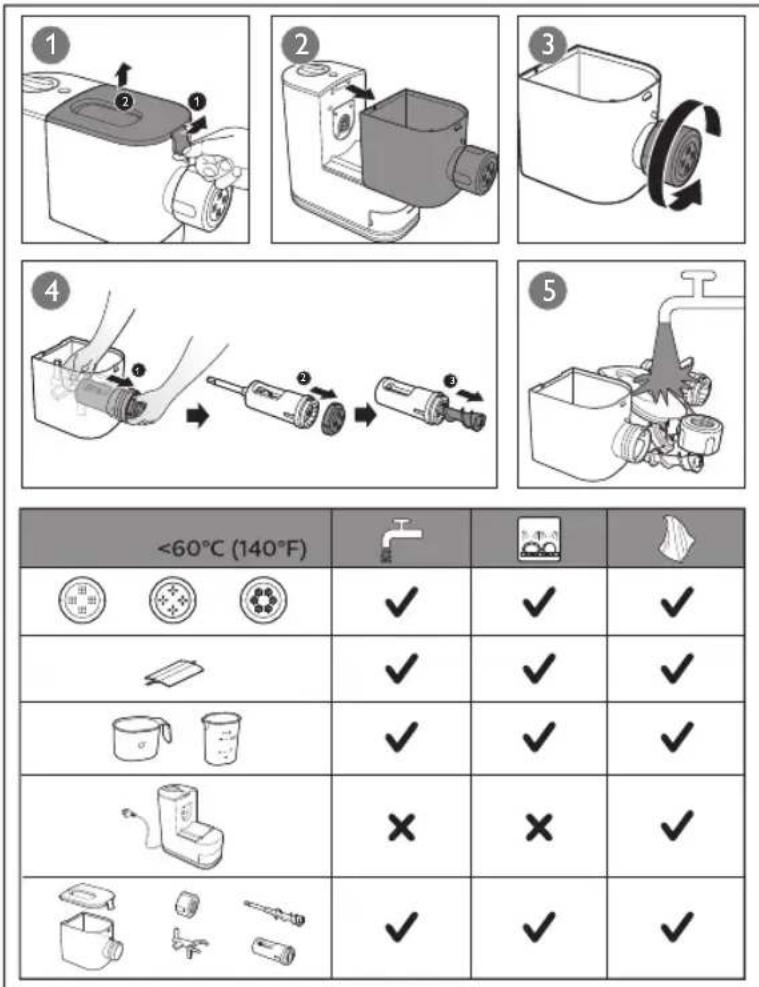
| <60°C (140°F) | |||
 | √ | √ | √ |
 | √ | √ | √ |
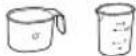 | √ | √ | √ |
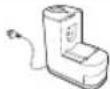 | × | × | √ |
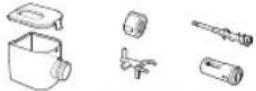 | √ | √ | √ |
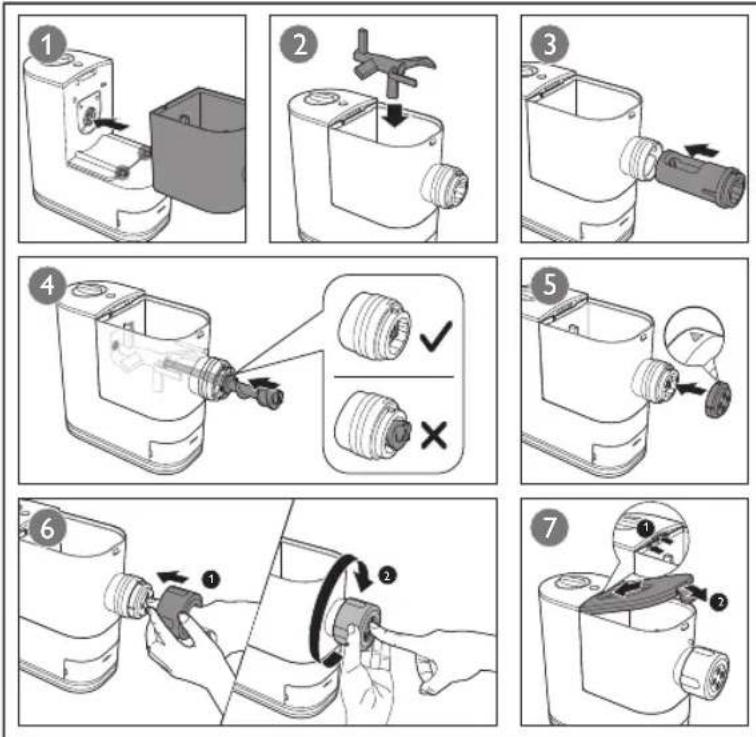
Assembling 组装
What's in the box 11
Overview 12
Disassembling and cleaning before first use 14
Assembling 16
Using the Pasta and noodle maker ..... 19
Cleaning 26
Storage 29
Troubleshooting 30
Product information 33
Recycling 33
Warranty 34
Important
Safety
Read this user manual carefully before you use the appliance, and save it for future reference.
Warning
- Before you connect the appliance to the power, make sure that the voltage indicated on the bottom of the appliance corresponds to the local power voltage.
• Make sure that your hands are dry before you insert the plug into the power outlet. - Do not immerse the main unit in water or rinse it with water or other liquid.
• To prevent a short circuit or an electric shock, do not pour water or any liquid on the appliance.
• Make sure that the plug is firmly inserted into the power outlet. - Never connect this appliance to a timer switch or separate remote control system.
• Make sure that the appliance is assembled correctly before you insert the plug into the power outlet. - If the power cord, the plug, or other parts are damaged, do not use the appliance.
- Make sure the control knob is in the OFF position and the appliance is unplugged when not in use, left unattended, before assembling, disassembling, cleaning or storing. Always make sure the appliance is properly assembled before putting the plug into the wall outlet and operating the appliance.
6 English
Warning
The appliance will not operate unless it is properly assembled.
- Do not place hands, fingers or utensils in the mixing chamber of the appliance unless the control knob is in the OFF position, the appliance is unplugged and the motor and mixing paddle have come to a complete stop. Ensure the motor and the mixing paddle have completely stopped before disassembling, cleaning or storing.
- If the power cord is damaged, you must have it replaced by Philips, a service center authorized by Philips or similarly qualified persons to avoid a hazard.
- Do not replace parts of the appliance by yourself.
- This appliance shall not be used by children. Keep the appliance and its power cord out of reach of children.
- This appliance is not intended for use by persons with reduced physical, sensory or mental capabilities, or lack of experience and knowledge, unless they have been given supervision or instruction concerning use of the appliance by a person responsible for their safety.
• Children should be supervised to ensure that they do not play with the appliance.
• To prevent any accidents, do not use the appliance if it is damaged for any reason.
Caution
- Before using the appliance for the first time, disassemble and wash the accessories thoroughly (refer to the chapter “Disassemble and cleaning before first use”).
• This appliance is intended for household use only. - Never use any accessories or parts from other manufacturers or that Philips does not specifically recommend. If you use such accessories or parts, your guarantee becomes invalid.
- Do not use this appliance on an unstable or uneven surface.
- Do not disconnect the power cord before the processing is complete. If you have to stop processing, disconnect the power cord before you perform other operations.
- Do not exceed the maximum operation cycle of 2 cycles continuously at all applications. To better protect the lifetime of the appliance, you can restart using the appliance after 30 minutes upon 2 continuous operation cycles.
- If you intend to use the appliance continuously, clean the shaping disc with the supplied cleaning tool each time after use.
- Do not bend, jerk, twist, or bundle the power cord forcibly, nor put it under heavy objects.
- Unplug the appliance when not in use.
- Do not use the appliance near flammable objects such as table cloth or drapes.
8 English
Caution
- Pull out the power plug immediately after you detect smoke.
- When unplugging the power cord, do not pull the cable but grab the plug part.
- Keep the power plug clean.
- Do not put heavy objects on the appliance.
• This appliance is designed as consumer kitchen appliance. Do not use for any other purpose.
- Do not move the appliance while it is operating.
- Disconnect the power cord if the appliance is left unattended and before assembling, disassembling or cleaning.
- Place the appliance in a dry and well ventilated place after use.
- Do not hold and move the appliance by grabbing the shaping disc holder. Hold the main unit to do so.
- Make sure the shaping disc hole is unblocked each time before using.
- Keep hands, hair, clothing, as well as spatulas and other utensils away from appliance during operation to reduce the risk of injury to persons, and/or damage to the appliance.
- Do not put your fingers or other objects into the Pasta and noodle maker opening while it is in operation. Avoid contact with moving parts.
- Do not attempt to defeat the cover interlock mechanism.
Caution
- The shaping discs and all detachable parts of the appliance are dishwasher safe. When you clean them in dishwasher, make sure to select the proper program which has a maximum temperature at no higher than 60°C (140°F).
- Use only on properly grounded outlet.
Electromagnetic fields (EMF)
This Philips appliance complies with all applicable standards and regulations regarding exposure to electromagnetic fields.
Congratulations on your purchase, and welcome to Philips!
To fully benefit from the support that Philips offers, register your product at
www.philips.com/welcome.
Read this user manual carefully before you install and use the appliance. Save it for future reference.
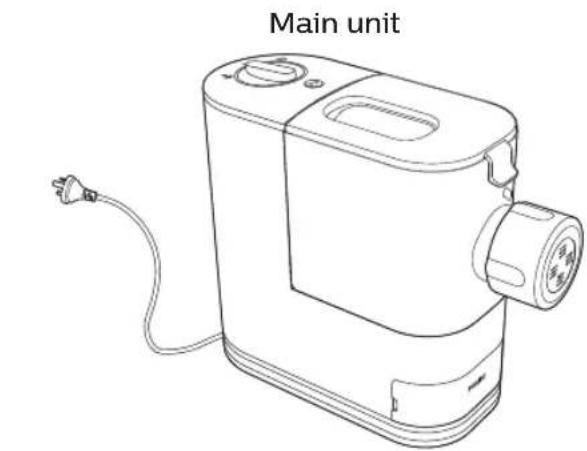
What's in the box
natural_image
Line drawing of a main unit device with a power outlet and cable (no text or symbols on the device itself)User manual
Recipe book
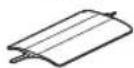
Flat cleaning tool
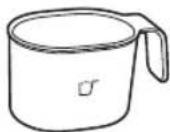
Flour cup
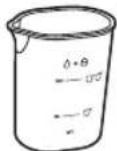
Water cup
Spaghetti/ Thin noodle*
Shaping discs:

Fettuccine/
Ban Mian noodle

Penne

* The spaghetti/thin noodle shaping disc is assembled on the appliance upon purchase.
Overview
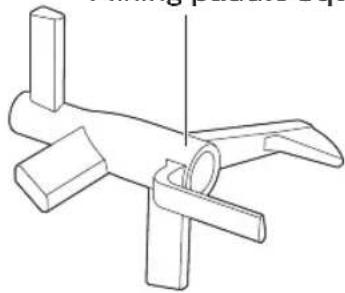
Mixing paddle Squeezing bar
natural_image
Technical line drawing of a mechanical clamp or bracket assembly (no text or symbols)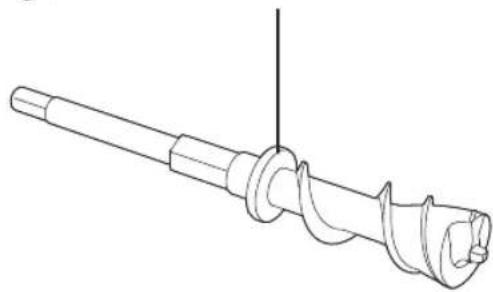
natural_image
Technical line drawing of a mechanical screw or drill bit with threaded end and flanged shaft (no text or symbols)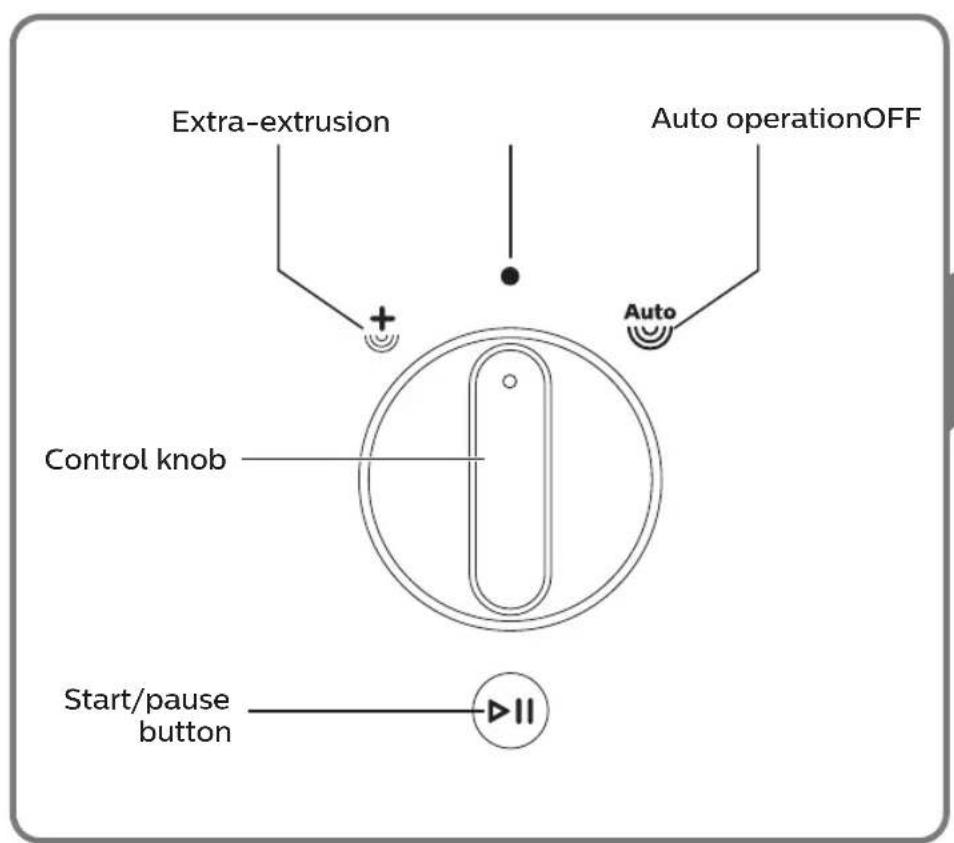
12 English
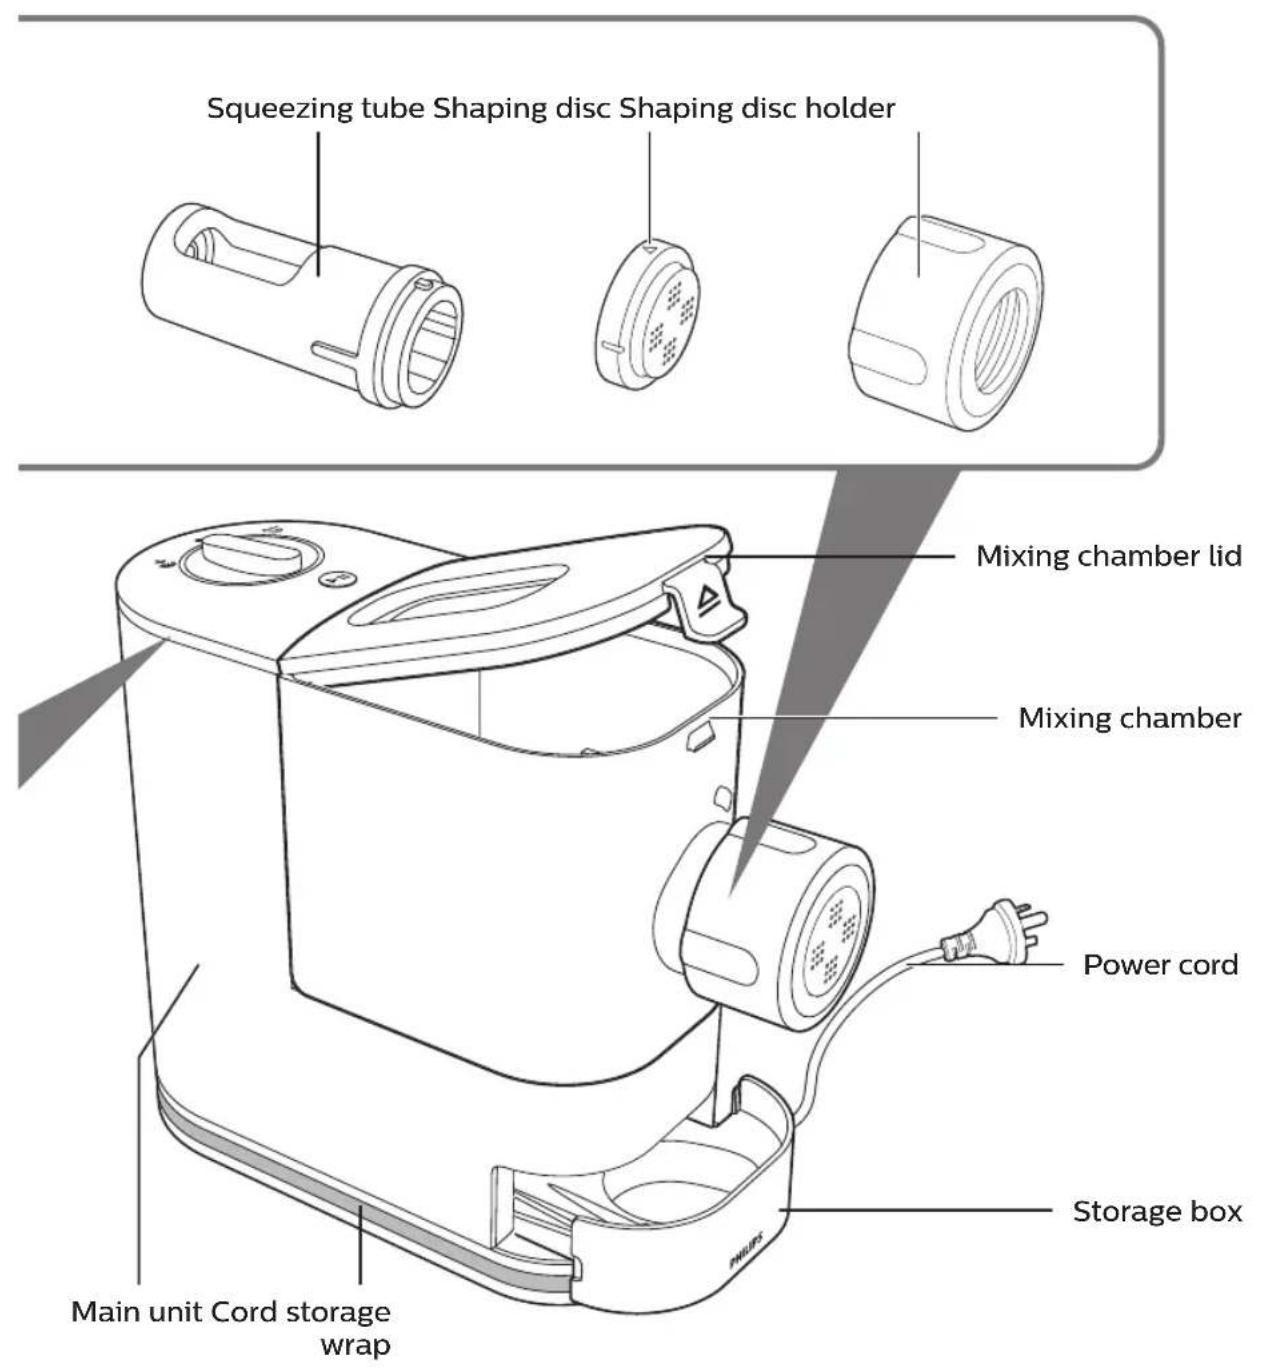
English 13
Disassembling and cleaning before first use
Important
- Before using the appliance for the first time, remove and safely discard any packing material and /or promotional labels.
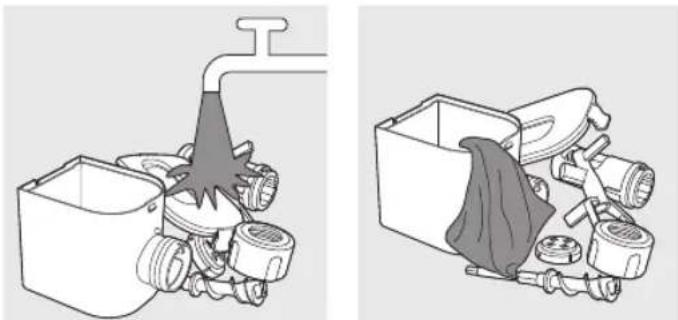
• Take out all detachable parts and accessories, wash and thoroughly dry all parts and accessories (refer to the chapter "Cleaning"). - Do not use water to rinse or soak the main unit, the power cord, or the power plug.
- Do not use a scouring pad or similar cleaners as these will scratch the plastic surface and affect the lifetime of the Pasta and noodle maker.
- The shaping discs and all detachable parts of the appliance are dishwasher safe. When you clean them in a dishwasher, make sure to select the proper program which has a maximum temperature at no higher than 60°C (140°F).
• This appliance is intended for household use only.
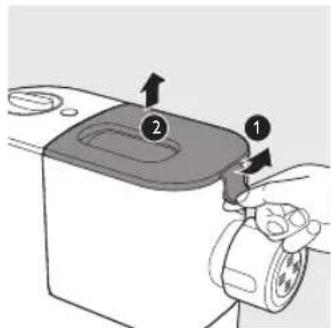
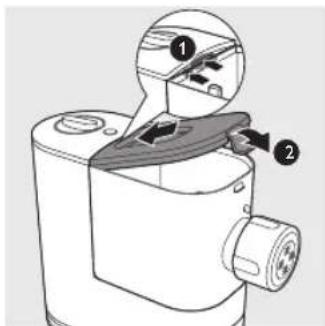
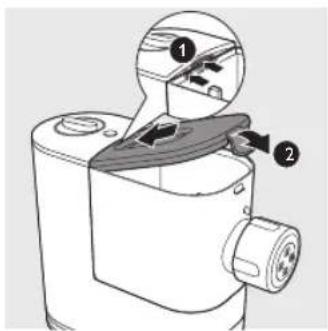
1 Pull the lid to unlock it and then 2 remove the lid from the mixing chamber.
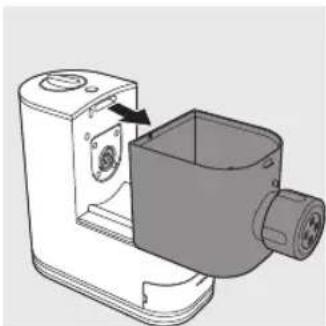
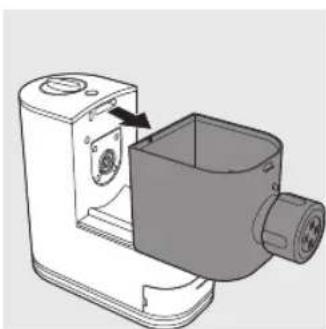
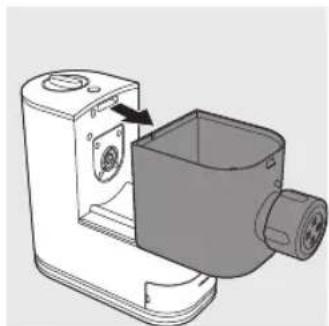
2 Slide the mixing chamber off the main unit.
natural_image
3D technical illustration of a mechanical device with a housing and internal components (no text or symbols)14 English
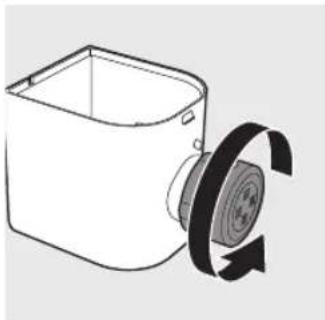
3 Turn the shaping disc holder counterclockwise to remove it from the mixing chamber outlet.
natural_image
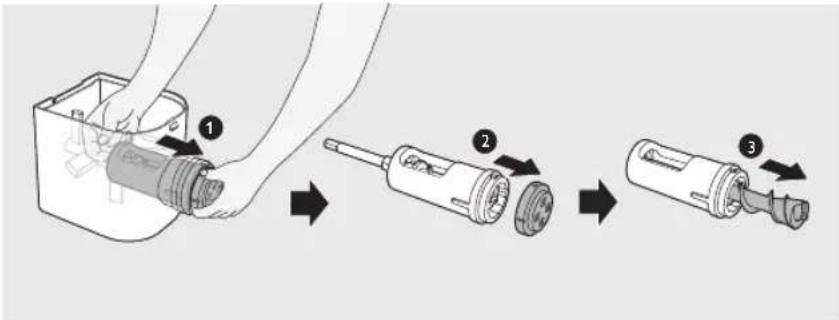
Diagram of a box with a pulley and rotating arrow, no text or symbols present4 ① Put your finger in the mixing chamber and push the squeezing tube outwards to slide it out of the mixing chamber outlet. ② Detach the shaping disc, ③ and then pull the squeezing bar out of the squeezing tube.
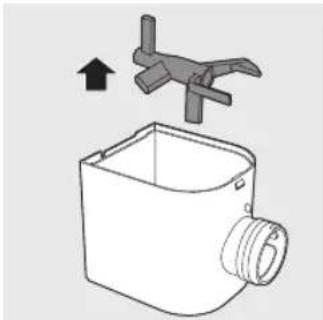
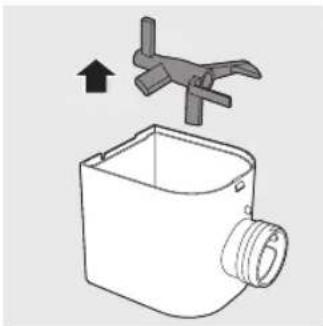
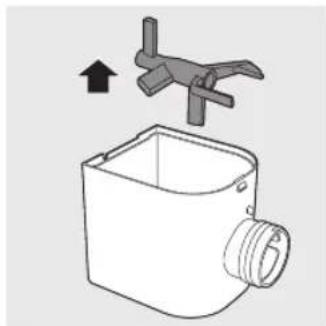
5 Take the mixing paddle out of the mixing chamber.
natural_image
Simple line drawing of a mechanical device with a handle and arrow, no text or symbols present6 Clean all detachable parts and accessories, and then wipe them dry.
natural_image
Two technical illustrations of a mechanical device: one with a pipe outlet and plug, the other showing internal components (no text or symbols)Assembling
Follow below assembling steps to install the Pasta and noodle maker.
Important
- Make sure the appliance is not plugged in during assembly.
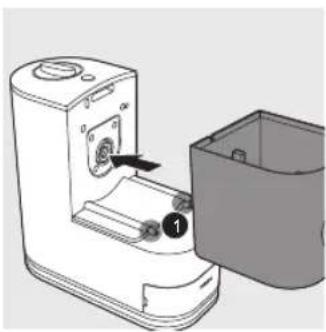
1 Slide the mixing chamber onto the main unit. Note:
- Make sure the fixing levers ① on the main unit are fitted with the openings on the bottom of the mixing chamber.
natural_image
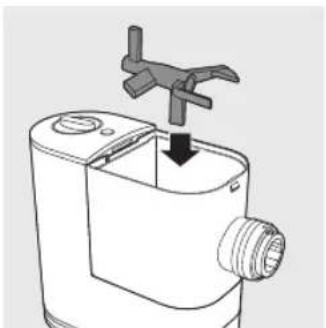
Diagram of a device with a labeled component, showing internal components and a separate housing (no text or symbols present)2 Put the mixing paddle in the mixing chamber as shown in the illustration.
natural_image
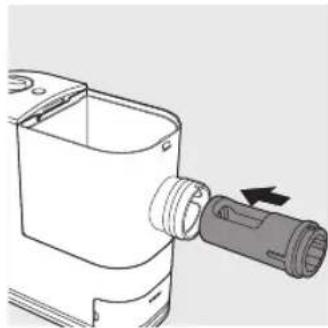
Diagram of a mechanical device with a handle and arrow indicating assembly or operation (no text or symbols)3 Insert the squeezing tube into the mixing chamber.
Note:
- Make sure the big opening on the squeezing tube faces up when you insert the tube into the chamber.
natural_image
Technical line drawing of a mechanical component with a cylindrical shaft and housing (no text or symbols)4 Insert the squeezing bar into the mixing chamber. Make sure the squeezing bar slides all the way through both the squeezing tube and the mixing paddle and into the shaft in the main unit.
Note:
- Slightly turn the mixing paddle to make sure the squeezing bar is connected correctly with the shaft 1 in the main unit.
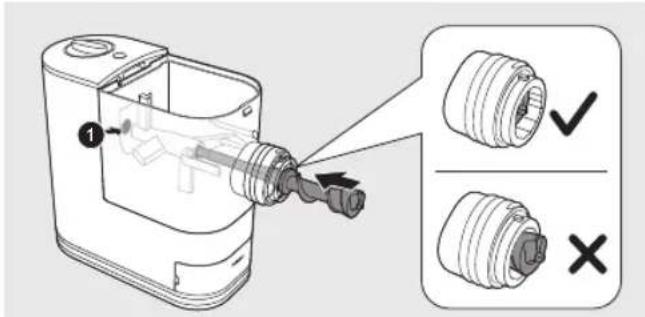
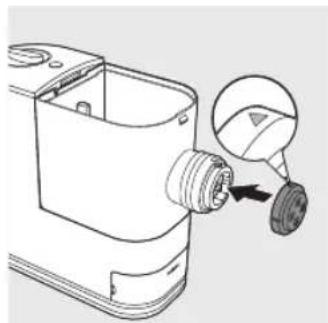
5 Attach the shaping disc on the mixing chamber outlet.
Note:
- Make sure the flat side of the shaping disc is facing out.
- Make sure the shaping disc fits into the fixing point on the squeezing bar.
- Make sure the arrow on the shaping disc face upwards when you attach it on the mixing chamber outlet.
natural_image
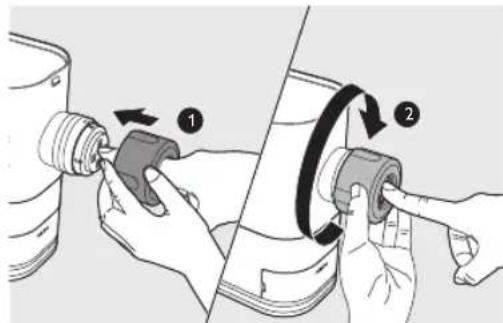
Technical line drawing of a mechanical component with a close-up view of a wheel (no text or symbols)6 ① Press the shaping disc through the opening of the shaping disc holder, and then assemble the holder on the mixing chamber outlet. ② Turn the holder clockwise to firmly lock it in place.
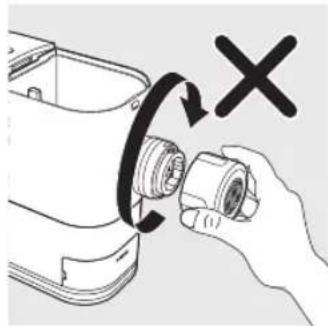
Always attach the shaping disc on the mixing chamber outlet before you assemble the shaping disc holder. Never put the shaping disc in the shaping disc holder and assemble them on the mixing chamber outlet at the same time.
natural_image
Illustration of a hand inserting a component into a device with a black X mark indicating cancellation (no text or symbols present)7 Attach the lid onto the mixing chamber.
Note:
- If the mixing chamber lid is not properly installed, the safety switch will prevent the appliance from working.
Using the Pasta and noodle maker
Important
- Place the product on a flat surface and prevent table shaking or vibration.
• Make sure all the parts are well assembled before plugging in. - Do not put less than 200g (1 flour cup) or more than 400g (2 flour cups) of flour in the chamber.
- Pour in the liquid slowly through the water slot after the appliance starts kneading.
- If you want to dispose of the weighed flour before processing with the next batch, empty the chamber and restart the appliance by unplugging and plugging in again.
- Do not put any ingredients that are 60°C / 140°F or above into the Pasta and noodle maker, or place the Pasta and noodle maker in surroundings at high temperature (60°C / 140°F), for instance in a high temperature sterilization environment. This will deform the appliance.
- Never pour water into the mixing chamber before you place the chamber lid onto the chamber.
- Make sure the shaping disc and shaping disc holder are assembled properly before plugging in the appliance.
Preparing the ingredients
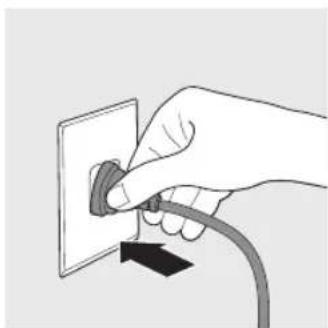
1 Put the plug of the appliance into the power outlet. The Pasta and noodle maker will sound once.
Note:
- Make sure all the parts are well assembled before plugging in.
natural_image
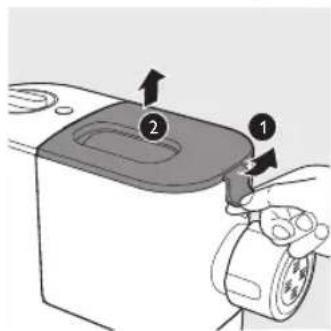
Hand inserting a plug into an electrical outlet with a cable (no text or symbols visible)2 ① Pull the lid to unlock it and then ② remove the lid from the mixing chamber.
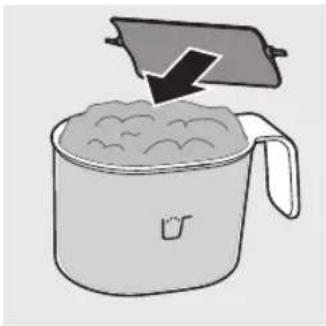
3 Scoop one full cup of flour using the flour cup. Scrape off any excessive flour from the cup edge with the supplied flat cleaning tool. One full cup of flour weighs around 200 grams, and is equivalent to 1-2 servings.
Note:
- Do not shake or hit the flour cup to remove excessive flour. This will affect the flour weight.
- Use a kitchen scale to measure the weight more accurately.
natural_image
Illustration of a cooking pot with a lid and lid removed, showing dough being poured into it (no text or symbols)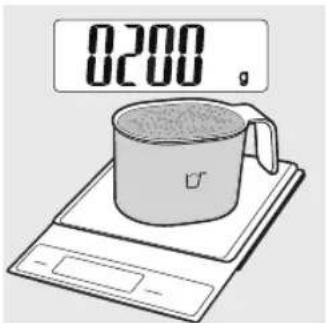
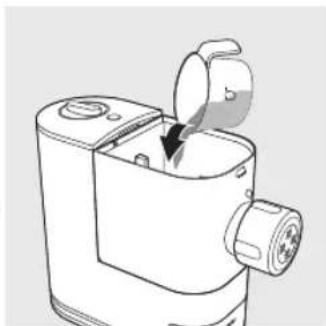
4 Pour the flour into the chamber. If you want to make 2-3 servings, add a second cup of flour as you will need 2 cups (\~400g) of flour in total.
Note:
- For best result, do not put less than 200 g or more than 400 g of flour in the chamber.
- Do not pour the flour into the opening of the squeezing tube, otherwise the flour in the squeezing tube will not be mixed evenly.
natural_image
Line drawing of a mechanical device with a handle and internal components (no text or symbols)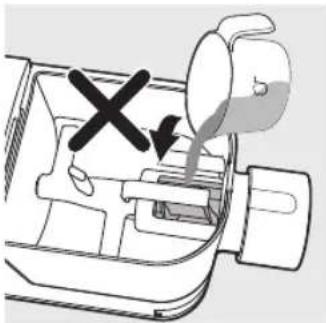
natural_image
Diagram of a device interior with a valve and a cross mark, no text or symbols present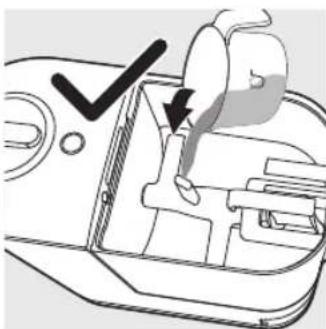
natural_image
Diagram of a device's internal structure with a checkmark and arrow indicating action (no text or symbols present)5 Attach the lid onto the mixing chamber.
Note:
- The appliance will not start working if the chamber lid is not properly closed. During the pasta making process, if the chamber lid becomes loose, the appliance will automatically stop working.
6 Refer to the section "Water and flour ratio" and measure the required amount of water or egg mixture with the supplied water cup.
Note:
- Do not pour water into the mixing chamber before the Pasta and noodle maker starts running.
- Make sure to measure the liquid volume at eye level on a flat surface.
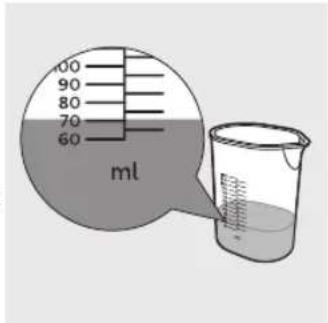
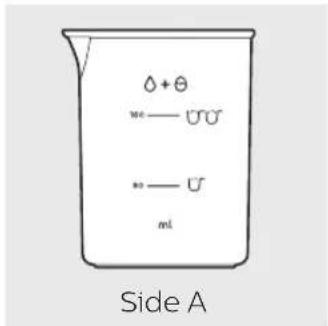
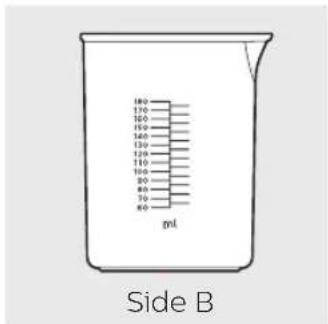
There are 2 sets of water markings on the supplied water cup.
Side A with two liquid levels is only designed for plain egg pasta (all-purpose flour mixed with egg mixture), which is the most popular pasta.
- 200 g (1 supplied cup) all-purpose flour + 80 ml egg mixture (including 1 egg).
- 400 g (2 supplied cups) all-purpose flour + 160 ml egg mixture (including 2 eggs).
Side B with specific volumes is for other pasta.
- All-purpose flour mixed with pure water/veggie juice mixture.
- Various other flours (as specified in the table below) with egg mixture/ pure water/ veggie juice mixture, etc.
Check the following table for detailed water and flour ratio.
Water and flour ratio
Note:
- This table provides the flour-liquid ratio base on 200 g of flour. When using 400 g of flour to make pasta, double the liquid volume (including egg) to get the right flour-liquid ratio.
| Flour Liquid Liquid volume | Side A/B | ||
| All-purpose flour 200g | Egg mixture(including 1 egg) 80 ml A | ||
| Pure water 70 ml B | |||
| Spinach juice 75 ml B | |||
| Spinach juice+egg mixture (including 1 egg) | 75 ml | B | |
| Beet juice 75 ml B | |||
| Beet juice+egg mixture (including 1 egg) | 80 ml | B | |
| Carrot juice 75 ml B | |||
| Carrot juice+egg mixture (including 1 egg) | 80 ml | B | |
| Squid ink egg mixture (including 1 tsp squid ink and 1 egg) | 80 ml B | ||
| Tomato puree+water (including 2 tbsp puree) | 75 ml B | ||
| Tomato puree+egg +water (including 1 tbsp puree and 1 egg) | 85 ml B | ||
| Durum (Semolina flour 150 g + all-purpose flour 50 g) | Egg mixture 75 ml B | ||
| Pure water 65 ml B | |||
| Spinach juice 70 ml B | |||
| Spinach juice+egg mixture (including 1 egg) | 75 ml B | ||
| Beet juice 70 ml B | |||
| Beet juice+egg mixture (including 1 egg) | 75 ml B | ||
| Carrot juice 70 ml B | |||
| Carrot juice+egg mixture (including 1 egg) | 75 ml B | ||
| Squid ink egg mixture (including 1 tsp squid ink and 1 egg) | 75 ml B | ||
| Flour Liquid Liquid volume | Side A/B | ||
| Whole wheat 200 g | Egg mixture (including 1 egg) 90ml B | ||
| Pure water 80ml B | |||
| Bread flour 200 g | Egg mixture (including 1 egg) 80ml B | ||
| Pure water 65ml B | |||
| Spelt 200 g Egg mixture (including 1 egg) 90ml B | |||
| Soba (buckwheat flour 130 g + all-purpose flour 70 g) | Egg mixture (including 1 egg) 80ml B | ||
Important
- The pasta recipes provided in the recipe book have been tested for success. If you experiment with or use other pasta recipes, the flour and water/egg ratios will need to be adjusted to the flour and water cup ratios included with the Pasta and noodle maker. The Pasta and noodle maker will not operate successfully without adjusting the new recipe accordingly.
Note:
- For best results, use all-purpose flour with the recommended liquid proportions indicated on the cup.
- When making the egg mixture:
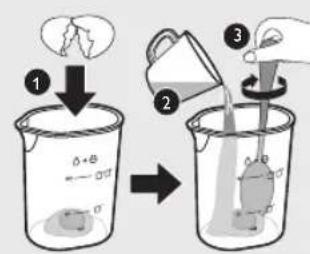
Crack the egg into the water cup. Add water up to the required amount, and then whisk the water and egg to combine.
- When making the vegetable mixture:
Crack the egg into the water cup. Add vegetable juice up to the required amount, and then whisk the juice and egg to combine.
- Whisk the mixture evenly before pouring it into the chamber through the slot in the lid.
- Seasonal changes, using ingredients from different regions may affect the flour/water ratio.
- "Gluten" is a binder which ensures the pasta does not break easily. Gluten-free flour does not contain a binder, therefore it needs a thickener to act as a "binder" eg. Xanthan gum or Guar. Various kinds of gluten-free flour perform differently when making pasta. Some flours are not suitable for making varieties pasta such as coconut flour and white rice flour; some flour varieties work well, such as quinoa and buckwheat.
• See the recipe book provided for more delicious pasta and noodle ideas.
Starting the pasta making program
Important
- Do not select the extra extrusion program before the dough mixing is complete. Otherwise, this will damage the Pasta and noodle maker and its lifetime.
- Do not disconnect the power cord before the processing is complete. If you have to stop the pasta making process, turn the control knob to "OFF" to stop the working process and then disconnect the power cord from outlet before performing other operations.
- Do not exceed the maximum operation cycle of 2 cycles continuously at all applications. To better protect the lifetime of the appliance, you can restart using the appliance after 30 minutes upon 2 continuous operation cycles.
- If you intend to use the appliance continuously, clean each shaping disc with the supplied cleaning tool each time after the pasta making session. For easy cleaning, do not soak the shaping disc directly in water.
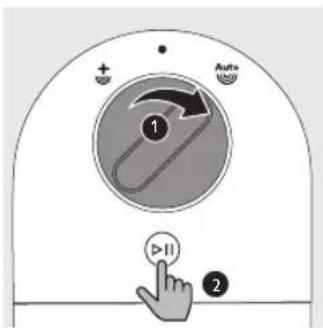
1 Turn the control knob to ① select the automatic pasta making process, and then ② press the Start/Pause button.
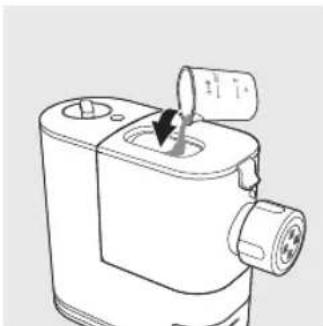
2 After the kneading starts, slowly pour in the liquid along the entire length of the slot in the lid.
Note:
- During dough mixing, do not add other ingredients after you have poured in the liquid. Otherwise, it will affect the results of the pasta texture.
natural_image
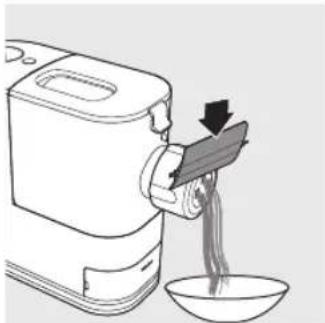
Line drawing of a small industrial machine with a handle and internal component (no text or symbols)3 After the Pasta and noodle maker finishes kneading, it will beep a few times and the pasta extrusion will start after a few seconds. Place a container right under the outlet. Cut the pasta into the desired length with the cleaning tool.
Note:
- If the ratio of liquid and flour is not correct, the extrusion will not succeed. In this case, prepare the ingredients again.
- Move the cleaning tool downwards to cut the pasta.
natural_image
Line drawing of a rice cooker pouring noodles into a bowl (no text or symbols)4 When the extrusion process is complete, the appliance will beep a few times.
Note:
- Do not turn the control knob to the "OFF" position before the whole process is over (you will hear the "beep" sound).
- The whole working process (including kneading and extruding) takes around 18 minutes for 400g of flour.
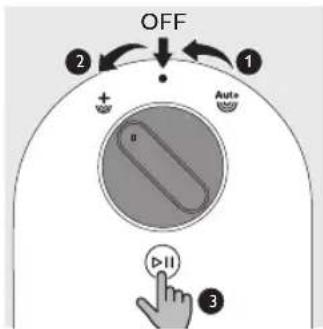
5 After the pasta making is complete, if you notice some leftover dough inside the chamber, you can ① turn the control knob to the OFF position first, and then ② turn the control knob to the extra-extrusion position. ③ Press the Start/Pause button to start the extra-extrusion program.
Note:
- You may find some fine pasta threads on the pasta surface. This is normal.
- The cooking time of the pasta varies depending on personal preferences, pasta shapes, and number of servings.
Cleaning
Important
- Turn the control knob to "OFF", disconnect the power and remove the power cord before cleaning or disassembling this appliance.
- Do not immerse the main unit in water.
- Do not use a scouring pad, caustic cleaners, or abrasive cleaners (for examples, gasoline, alcohol, and propanol) to clean the appliance.
- Clean the appliance each time after use, or the appliance might not operate properly.
• Take extra caution when cleaning the appliance to avoid getting cut by any sharp edges. - The shaping discs and all detachable parts of the appliance are dishwasher safe. When you clean them in a dishwasher, make sure to select the proper program which has a maximum temperature at no higher than 60°C (140°F).
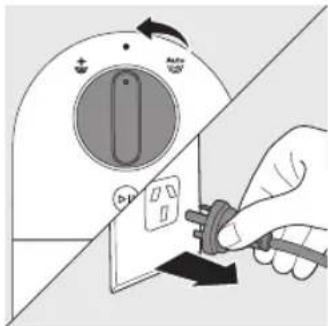
1 Turn the control knob to "OFF" and disconnect the plug from the power outlet.
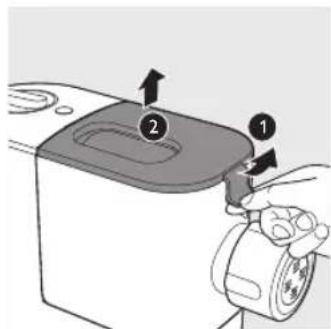
2 ① Pull the lid to unlock it and then ② remove the lid from the mixing chamber.
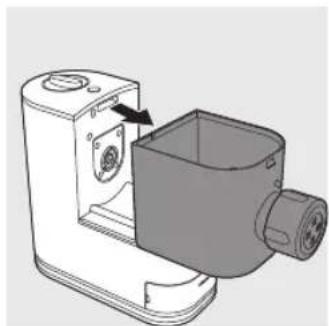
3 Slide the mixing chamber off the main unit.
natural_image
3D rendering of a mechanical device with a housing and mounting bracket (no text or symbols visible)4 Turn the shaping disc holder counterclockwise to remove it from the mixing chamber outlet.
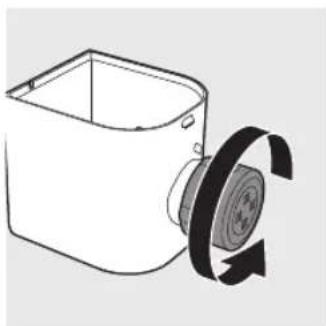
natural_image
Line drawing of a mechanical device with a rotating wheel and directional arrows indicating motion (no text or symbols)5 ① Put your finger in the mixing chamber and push the squeezing tube outwards to slide it out of the mixing chamber outlet. ② Detach the shaping disc, and then ③ pull the squeezing bar out of the squeezing tube.
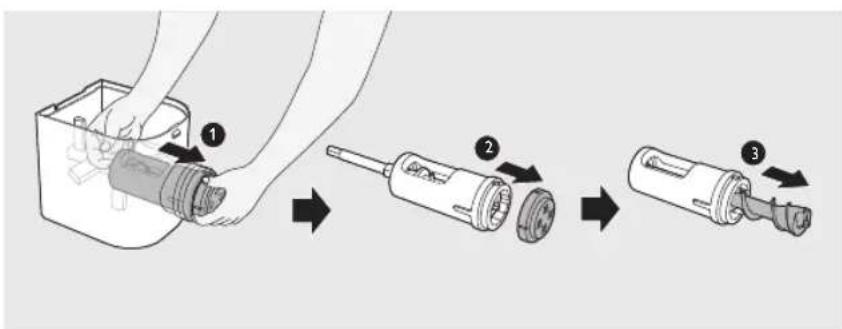
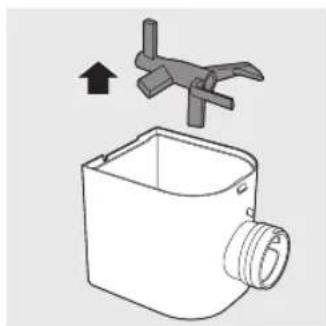
6 Take the mixing paddle out of the mixing chamber.
natural_image
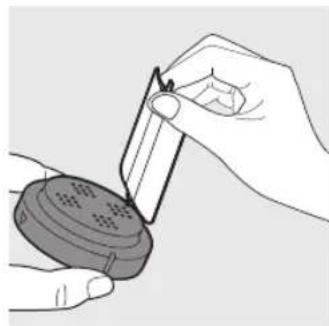
Diagram of a mechanical device with a handle and clamping mechanism, showing no text or symbols7 Clean the shaping disc with the supplied cleaning tool to remove the dough residues. After that, you can clean it with water.
natural_image
Illustration of hands using a tool to apply material to a circular device (no text or symbols visible)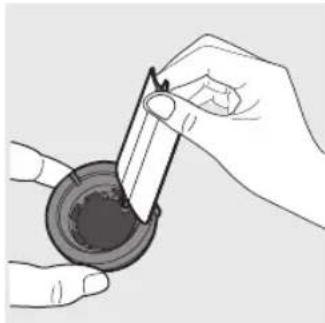
natural_image
Illustration of hands using a tool to apply liquid into a container (no text or symbols visible)8 Clean all detachable parts with dishwashing liquid and warm water or clean in the dishwasher. After that, wipe all parts dry.
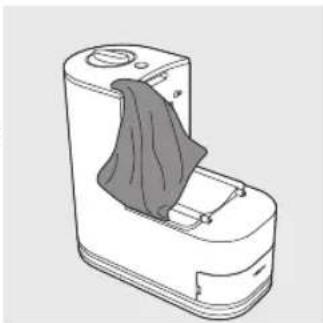
9 Use a dry cloth to clean the main unit, control knob, and the exterior of the Pasta and noodle maker.
Note:
• After cleaning, make sure all parts and the shaping disc air dry thoroughly before storing. Assemble the Pasta and noodle maker back for next use.
natural_image
Line drawing of a mobile phone with a cloth cover (no text or symbols)Storage
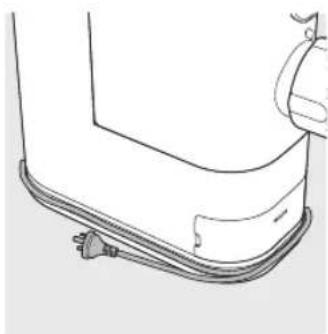
1 Wind the power cord around the cord storage wrap.
natural_image
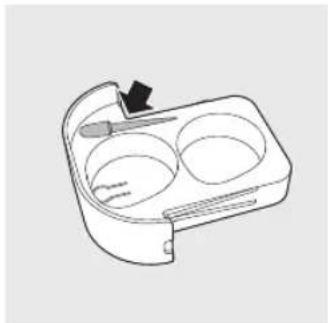
Line drawing of a car's side panel with a plug, no text or symbols present2 Dry the shaping discs and store them in the storage box.
The small groove in the storage box is designed for the cleaning tool of the angel hair shaping disc, which is not included in this Pasta and noodle maker. It will be launched and sold separately.
3 Store the Pasta and noodle maker in a dry, well ventilated place after use.
natural_image
Line drawing of a rectangular appliance with two circular compartments and a handle (no text or symbols)Troubleshooting
This chapter summarizes the most common problems you could encounter with the appliance. If you are unable to solve the problem with the information below, visit www.philips.com/support or refer to page 34 for the consumer care number to call for assistance.
The appliance does not sound after the plug is put in the wall outlet.
- The plug is not connected properly, or the outlet is not connected to power source. Check whether the power plug is plugged correctly and the outlet is working properly.
The appliance does not start the pasta making process after the plug is put in the wall outlet.
- You have not chosen a pasta making program or pressed the start button. Choose a pasta making program and press the start button
After pressing the start button; the appliance makes alarm sounds and does not work.
- The chamber lid is not assembled properly. Make sure you follow the user manual to assemble the chamber lid properly.
The chamber lid is pushed open from the inside.
- There's too much flour in the mixing chamber.
The maximum amount of flour for each batch is 400g. If you have put more than 400g of flour in the mixing chamber, reduce the amount and make another batch of pasta. - The ratio of flour and water provided in the "Flour/water ratio table" was not followed. The dough is too wet.
Disconnect from the power source, clean the Pasta and noodle maker, and follow the user manual again to restart the pasta making.
• The chamber lid is not assembled properly.
Make sure you follow the user manual to assemble the chamber lid properly.
During the pasta making process, the appliance stops working, and there is no alarm sound.
- The Pasta and noodle maker has overheated due to long and continuous working time. Disconnect from the power source, and allow the Pasta and noodle maker to cool down. Do not exceed the maximum operation cycle of 2 cycles continuously at all applications. To better protect the lifetime of the appliance, you can restart using the appliance after 30 minutes upon 2 continuous operation cycles.
During the pasta making process, the appliance stops working, and makes alarm sounds.
- The ratio of flour and water provided in the "Flour/water ratio table" was not followed. The dough may be too dry.
- The mixing paddle may be blocked by some foreign objects.
- The wrong program is selected.
Disconnect from the power source, clean the Pasta and noodle maker, and follow the user manual again to restart the pasta making.
The mixing paddle is running idle, and there is no pasta coming out.
• The ratio of the flour and water is incorrect.
Disconnect the plug from the power source and discard dough. Clean the Pasta and noodle maker, measure ingredients correctly (use a kitchen scale to measure the flour weight more accurately), and follow the user manual again to restart the pasta making
• The flour becomes damp after longtime storage.
Use flour that is fresh or properly stored.
The pasta breaks easily.
• The ratio of the flour and water is incorrect.
Disconnect the plug from the power source and discard dough. Clean the Pasta and noodle maker, measure ingredients correctly (use a kitchen scale to measure the flour weight more accurately), and follow the user manual again to restart the pasta making.
- You did not use the correct type of flour.
Use all-purpose flour or flour with higher protein content (refer to the chapter 'Using the Pasta and noodle maker' in the user manual or the supplied recipe book).
The pasta sticks together.
- The ratio of the flour and water is incorrect, too much water is poured in the mixing chamber. Measure flour and water with the provided flour and water cup and according to the "flour/water ratio table". Use a kitchen scale to measure the flour weight more accurately.
Too much leftover dough inside the chamber.
- The flour is either exposed to moisture before use, or the dough is too wet.
Keep your flour dry during storage. Follow the user manual instructions to restart the pasta making. - The chamber, the mixing paddle, the shaping disc are not cleaned properly before use.
Make sure all parts are clean before use. - The mixing paddle or the chamber is still wet.
Make sure all parts are completely dry before use.
• Water is not added in the right order.
The flour type is not suitable.
Follow the user manual instructions to make pasta.
Small amount of water is leaking out from the appliance.
• Water is added before the program starts.
Follow the user manual instructions to add water right after the program starts.
After pasta making, the squeezing tube cannot be pushed out of the mixing chamber.
- The appliance is stopped during extrusion before the pasta making process is finished completely.
- Restore the disassembled parts back in place until the appliance is assembled properly, and turn the control knob to the OFF position.
- Plug in, select the automatic pasta making program, and press the start button. Keep the mixing paddle rotating for around 10 seconds, and then turn the control knob to the OFF position.
- Unplug the appliance, disassemble and clean the appliance as described in the user manual (see chapter "cleaning").
32 English
Product information
| Model HR2342 | |
| Motor power 150W | |
| Rated voltage AC220-240V (50Hz) | |
| Dimensions (L x W x H) 350 mm x 135 mm x 287 mm | |
| Net weight 4.7 kg | |
- For rated voltage and frequency information, refer to the type plate on the product. Product information is subject to change without prior notice.
| Components | Mixing chamber | Lid | Mixing paddle / squeezing bar | Shaping discs |
| Material Tritan | Tritan POM POM | M |
Recycling
Do not throw away the product with the normal household waste at the end of its life, but hand it in at an official collection point for recycling. By doing this, you help to preserve the environment.
| Abbreviations |
| g = grams |
| ~ = approximately |
| ml = milliliters |
| mm = millimeters |
| kg = kilogram |
2-YEAR WARRANTY
IMPORTANT:
Please keep this warranty card together with your proof of purchase for use when claiming.
AUSTRALIA
Philips Consumer Care: 1300 363 391
Website: www.philips.com/support
NEW ZEALAND
Philips Consumer Care: 0800 658 224
Website: www.philips.com/support
PHILIPS
Philips Electronics Australia Limited and Philips New Zealand Commercial Limited Warranty against Defects
In this warranty:
We or us means Philips Electronics Australia Limited ACN 008 445 743 or Philips New Zealand Commercial Limited NZBN: 9429041782170, and our contact details are set out at the end of this warranty;
You means the purchaser or the original end-user of the Goods;
Supplier means the authorised distributor or retailer of the Goods that sold you the Goods in Australia or New Zealand; and
Goods means the product or equipment which was accompanied by this warranty and purchased in Australia or New Zealand.
If you require assistance with the operation of the product, its features or specifications please call the Philips Consumer Care Centre on 1300 363 391 in Australia or 0800 658 224 in New Zealand.
Australia: Our Goods come with guarantees that cannot be excluded under the Australian Consumer Law. You are entitled to a replacement or refund for a major failure and for compensation for any other reasonably foreseeable loss or damage. You are also entitled to have the Goods repaired or replaced if the goods fail to be of acceptable quality and the failure does not amount to a major failure. This is not a complete statement of your legal rights as a consumer.
New Zealand: Our Goods come with guarantees that cannot be excluded under the Consumer Guarantees Act 1993. This guarantee applies in addition to the conditions and guarantees implied by that legislation.
Additional Warranty:
In addition to the rights and remedies that you have under the Australian Consumer Law, Consumer Guarantees Act of New Zealand or any other applicable law, we provide the following warranty against defects:
- If, during the first 2 years from their date of purchase from the Supplier (Warranty Period), the Goods prove defective by reason of improper workmanship or materials and none of your statutory rights or remedies apply, we will repair or replace the Goods without charge.
PHILIPS
-
We do not have to repair or replace the Goods under this Additional Warranty if the Goods have been used for a commercial purpose; misused, improperly or inappropriately installed, operated or repaired; abused; damaged; or not maintained in accordance with the manufacturer's instructions.
-
Even when we do not have to repair or replace the Goods, we may decide to do so anyway. In some cases, we may decide to substitute the Goods with a similar alternative product of our choosing. All such decisions are at our absolute discretion.
-
All such repaired, replaced or substituted Goods continue to receive the benefit of this Additional Warranty for the time remaining on the original Warranty Period.
-
This Additional Warranty is limited to repair, replacement or substitution only. As far as the law permits, we will not be liable for any loss or damage caused to property or persons arising from any cause whatsoever.
-
In order to claim under this Additional Warranty you must telephone us on 1300 363 391 in Australia or 0800 658 224 in New Zealand within the Warranty Period. You will be asked for details of the Goods, a description of the defect and your personal details. Upon accepting your claim, we shall assist you with either returning the Goods to the Supplier for replacement or to the most convenient Philips Authorised Service Centre for your Goods to be repaired. In some case we may require that you return to the Goods to us (at the address below) for repair, replacement or substitution.
- All returned Goods must be accompanied by satisfactory proof of purchase which clearly indicates the name and address of the Supplier, the date and place of purchase and identifies product. It is best to provide a legible and unmodified receipt or sales invoice.
- You must bear any expense for return of the Goods or otherwise associated with making your claim under this Additional Warranty.
- This warranty is only valid and enforceable in Australia and New Zealand.
Contact us or the place of purchase for further details.
Philips Electronics Australia Limited
Philips New Zealand Commercial Limited
65 Epping Road North Ryde Level 3, 123 Carlton Gore Road
North Ryde SYDNEY NSW 2113 Newmarket AUCKLAND 1023
Consumer Care: 1300 363 391 Consumer Care: 0800 658 224
Website: www.philips.com/support
Website: www.philips.com/support

4222.005.0272.4
目录
重要信息 38
包装盒内物品 41
概览 42
首次使用前的拆卸和清洁 44
组装 46
使用意面/面条机 49
清洁 56
存储 59
故障排除 60
产品信息 63
回收 63
重要信息
安全
2 将搅拌容器从主装置上滑出。
natural_image
3D rendering of a mechanical device with a housing and internal components, showing no text or symbols.44 简体中文
natural_image
Line drawing of a box with a circular component and directional arrow indicating rotation (no text or symbols)5 将搅拌叶片从搅拌容器取出。
natural_image
Diagram of a mechanical device with a handle and arrow indicating upward motion (no text or symbols)natural_image
Two technical illustrations: one showing a pipe outlet with a flame, the other showing a cleaning machine with a cloth cover (no text or symbols)组装
按照以下组装步骤安装意面 / 面条机。
重要信息
- 组装时确保产品不要通电。
1 将搅拌容器滑到主装置上。
注意:
natural_image
Diagram of a device with a labeled component, showing a mechanical assembly (no text or symbols present)natural_image
Line drawing of a mechanical device with a handle and arrow indicating direction (no text or symbols)3 将挤压管插入搅拌容器中。
注意:
natural_image
Technical line drawing of a mechanical component with a cylindrical shaft and threaded end (no text or symbols)5 将塑形模块固定到搅拌容器出面口上。
注意:
natural_image
Technical line drawing of a mechanical component with a magnified inset showing a circular detail (no text or symbols)natural_image
Hand holding a small mechanical component with a circular arrow indicating rotation or adjustment (no text or symbols present)7 盖好搅拌容器盖。
注意:
48 简体中文
使用意面 / 面条机
重要信息
natural_image
Hand inserting a cable into an electrical outlet (no text or symbols visible)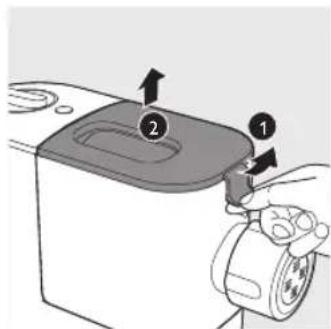
natural_image
Diagram of a car interior showing a hand holding a device with a checkmark and arrow indicating action (no text or symbols present)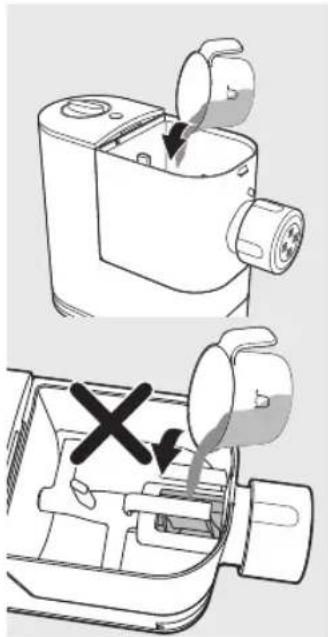
natural_image
Two-step diagram showing a device being open, with one being removed and the other marked with an X (no text or symbols present)5 盖好搅拌容器盖。
注意:
随附的水杯上有 2 种水位标记。
启动意面制作程序
重要信息
natural_image
Line drawing of a mechanical device with a knob and handle, showing internal components (no text or symbols)54 简体中文
natural_image
Line drawing of a food delivery machine pouring noodles into a bowl (no text or symbols)清洁
重要信息
3 将搅拌容器从主装置上滑出。
natural_image
3D rendering of a mechanical device with a housing and mounting bracket (no text or symbols visible)natural_image
Diagram of a mechanical device with a rotating wheel and directional arrows indicating motion (no text or symbols)6 将搅拌叶片从搅拌容器取出。
natural_image
Diagram of a mechanical device with a handle and arrow indicating upward motion (no text or symbols)natural_image
Illustration of hands using a tool to apply material to a circular device (no text or symbols visible)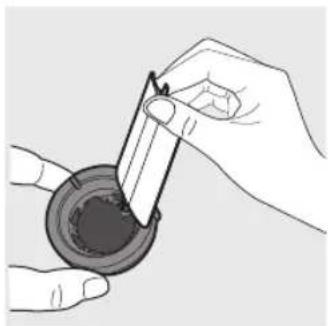
natural_image
Illustration of hands using a pipette to apply liquid into a container (no text or symbols visible)natural_image
Line drawing of a mobile phone with a cloth cover (no text or symbols)存储
natural_image
Line drawing of a vehicle's side profile showing front and rear panels with a plug (no text or symbols)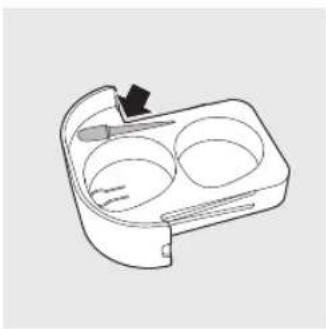
natural_image
Line drawing of a microwave oven with two circular compartments and a handle (no text or symbols)故障排除
Specifications are subject to change without notice
All rights reserved.
- Quick Start Guide/ 快速入门指南
- Assembling 组装
- Important
- Safety
- Warning
- English
- Caution
- English
- Electromagnetic fields (EMF)
- What's in the box
- Overview
- Disassembling and cleaning before first use
- Assembling
- Note:
- Using the Pasta and noodle maker
- Preparing the ingredients
- Water and flour ratio
- Starting the pasta making program
- Cleaning
- Storage
- Troubleshooting
- The chamber lid is pushed open from the inside.
- During the pasta making process, the appliance stops working, and there is no alarm sound.
- During the pasta making process, the appliance stops working, and makes alarm sounds.
- The mixing paddle is running idle, and there is no pasta coming out.
- The pasta breaks easily.
- The pasta sticks together.
- Too much leftover dough inside the chamber.
- Small amount of water is leaking out from the appliance.
- After pasta making, the squeezing tube cannot be pushed out of the mixing chamber.
- English
- Product information
- Recycling
- 2-YEAR WARRANTY
- IMPORTANT:
- AUSTRALIA
- NEW ZEALAND
- Philips Electronics Australia Limited and Philips New Zealand Commercial Limited Warranty against Defects
- In this warranty:
- Additional Warranty:
- Contact us or the place of purchase for further details.
- 目录
- 重要信息
- 安全
- 组装
- 使用意面 / 面条机
- 启动意面制作程序
- 清洁
- 存储
- 故障排除
Brand : PHILIPS
Model : Viva Collection HR2342
Category : Pasta machine