
PKBRD6175P - Keyboard Pyle - Free user manual and instructions
Find the device manual for free PKBRD6175P Pyle in PDF.


| Product Type | Digital Musical Karaoke Keyboard |
| Model | PKBRD6175P |
| Brand | Pyle |
| Number of Keys | 61 |
| Sounds | 162 (128 GM standards, 5 folk, 23 synth, 6 drum kits) |
| Auto Accompaniment Styles | 200 |
| Demonstration Songs | 10 |
| Display | Digital LCD |
| Connectivity | USB MIDI, Sustain Pedal Input, Audio Output (L/R), Headphone Jack, DC 12V In |
| Power Supply | DC 12V via AC adapter (included) |
| Maximum Sound Level | 110 dB |
| Keyboard Dimensions (L x W x H) | 36.6" x 11.97" x 3.7" |
| Keyboard Weight | Not specified (estimated ~5 kg) |
| Stand Specifications | Length 31.5", Width 8.3", Height 57.5-67.5 cm, Weight 1.75 kg, Bearing 15 kg |
| Headset Specifications | Cable length 1.2m, 3.5mm plug, Weight 0.14 kg |
| Sustain Pedal Specifications | Length 9.45", Width 3.15", Height 2.8", Weight 1.75 kg |
| Construction Material | Engineered ABS |
| Key Features | Record/Playback, Auto Bass Chord, Chord Dictionary, Lesson Modes, Dual Voice, Split, Octave, Transpose, Pitch Bend, Vibrato, Sustain, Touch Sensing, Metronome, O.T.S., Memory, Fade In/Out |
| Included Accessories | Book rack, AC adapter, power plug, keyboard stand, sustain pedal, waterproof bag, headset |
| Care Instructions | Clean with dry soft cloth; avoid alcohol or solvents; keep away from heat, moisture, and liquids; pull plug before cleaning. |
| Safety Warnings | Use specified adapter; do not disassemble; avoid excessive volume; max operating temperature 40°C; California Prop 65 warning for BBP. |
Frequently Asked Questions - PKBRD6175P Pyle
User questions about PKBRD6175P Pyle
0 question about this device. Answer the ones you know or ask your own.
Ask a new question about this device
Download the instructions for your Keyboard in PDF format for free! Find your manual PKBRD6175P - Pyle and take your electronic device back in hand. On this page are published all the documents necessary for the use of your device. PKBRD6175P by Pyle.
USER MANUAL PKBRD6175P Pyle
natural_image
Front view of a CD-ROM with piano keyboard, control panel, and digital display (no visible text or symbols)PKBRD6175P
Digital Musical Karaoke Keyboard
Portable Electronic Piano Keyboard with Water-Resistant Bag (61 Keys), Keyboard stand, Sustain pedal and Headset
USER GUIDE
PLEASE READ CAREFULLY BEFORE PROCEEDING
Please keep this manual in a safe and handy place for future reference

WARNING!
- Use the specified power adapter, and immediately replace damaged adapter if any.
- Do not disassemble the instrument, nor modify internal parts. If it malfunctions, discontinue the use immediately and have it repaired by professional serviceman.
- Before connecting the instrument to other devices, turn off all the power supplies.
- Do not play the instrument at the maximum volume or to an uncomfortable extent for a long time.
- Keep the parts of the instrument off heat source, for overheat may cause damage.
- Prevent liquid, dust, particles and other foreign matters from entering the instrument to cause corrosion of the instrument or short-circuit of its components.
- Pull the plug before cleaning the instrument. Do not insert or pull the plug with wet hands.
- Use dry and soft cloth to clean the instrument. Do not use paint, alcohol or other chemical solvents to wipe the instrument so as to avoid damage to the instrument surface.
- Turn off the power supply and pull the plug after playing or in no-service condition for a long time.
- To reduce the risk of fire or electric shock, do not expose this apparatus to rain or moisture. The apparatus shall not be exposed to dripping or splashing and that no objects filled with liquids, such as vases, shall be placed on the apparatus.
• Maximum Operating Temperature: 40°C / 104°F - Direct plug-in adaptor is used as disconnect device, the disconnect device shall remain readily operable.
- Do not install this equipment in a confined space such as a book case or similar unit, and remain a well ventilation conditions. The ventilation should not be impeded by covering the ventilation openings with items such as newspaper, table-cloths, curtains etc.
- Warning: Excessive sound pressure from earphones and headphones can cause hearing loss.
- The label location is on the bottom of the apparatus.
- The apparatus shall not be exposed to dripping or splashing and that no objects filled with liquids, such as vases, shall not be placed on apparatus.
- The direct plug-in adapter is used as disconnect device, the disconnect device shall remain readily operable.

This marking indicates that this product should not be disposed with other household wastes throughout the EU.
To prevent possible harm to the environment or human health from uncontrolled waste disposal, recycle it responsibly to promote the sustainable reuse of material resources. To return your used device, please use the return and collection systems or contact the retailer where the product was purchased. They can take this product for environmental safe recycling.
I. Control Panel and Extension Ports
FRONT CONTROL PANEL

1 Speaker
2 Power Switch
3 Master Volume
4 Tempo
5 Accom Volume
6 Transpose
7 Octave
8 Lesson
9 Function
10 Right
(Chord Dictionary)
11 Left
12 Memory
13 M1, M2...M6
14 O.T.S
15 LCD Display
16 Demo
17 Record/Play-back
18 Data Dial
19 Piano
20 Numbers
21 Sound
22 Style
23 Song
24 Start/Stop
25 Intro/Ending
26 Fade In/Out
27 Fill-In A
28 Fill-In B
29 Sync
30 Auto Bass Chord
31 Prog/Null-Play
32 Metronome
33 Touch
34 Sustain
35 Split
36 Dual
37 Keyboard Percussion
38 Panel Percussion
39 Pitch Bend
40 Vibrato
41 Chord Keyboard
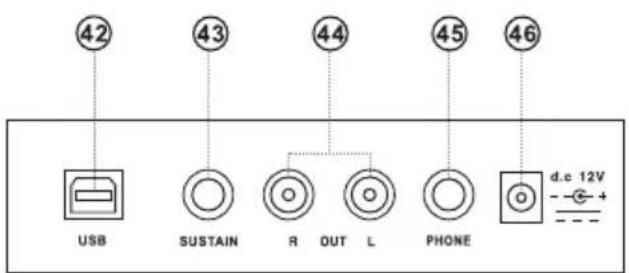
REAR PANEL
42 USB MIDI JACK
43 SUSTAIN JACK
44 OUT L/R JACK
45 PHONE JACK
46 DC 12V IN JACK
II. Preparation for Performance
USING AC/DC POWER SUPPLY ADAPTOR
The AC/DC power supply adaptor must be the one designated for the instrument. Connect one side to the power supply socket on the back-panel and the other to the city-power network. (Please notice the input voltage should be the same as that of the power network.)
HEADPHONE JACK
Insert the headphone (not included) into the phone jack on the back of the body, so that the inner loudspeaker can be cut off automatically and the playing and singing can proceed without disturbing others.
Note: Too high volume of the headphone may cause damage to hearing.
CONNECTION WITH AMPLIFIERS OR ACOUSTICS
The instrument has an inner loudspeaker system and it can also be connected to other amplifiers or loudhailers. First, shut off the instrument and the outer equipment, then insert the stereo frequency cable into the OUT L/R on the back- panel and the other into the LINE IN or AUX IN jack of the outer equipment.
USB MIDI
MIDI is short for Musical Instrument Digital Interface. Through the MIDI jacks the keyboard can be connected to other music instruments or computers with MIDI by a piece of data line to transfer data. In this case, any performance on the keyboard can be transferred to the computer, and then recorded, composed or edited with an advanced software in the computer. All the MIDI music reserved in the computer can be transferred to the instrument and blared out.
The Methods of Applying the USB MIDI:
-
First, connect the instruments with the computer by the universal data line, and get the both power on.
-
Second, install and launch the music editing software, for example, CAKEWALK. Then the special hardware of the instrument will appear in the hardware containing the musical software, and shall be set as the default device. In this case, the data communication between the instrument and the computer has been established.
-
Third, set the MIDI channels of the instrument (Please check it out in the introduction of the [Menu] button).
SUSTAIN PEDAL (NOT INCLUDED)
The instrument can be added to an outer sustain pedal, which can be used to make a sustain effect on the performance.
III. Basic Method of Performance
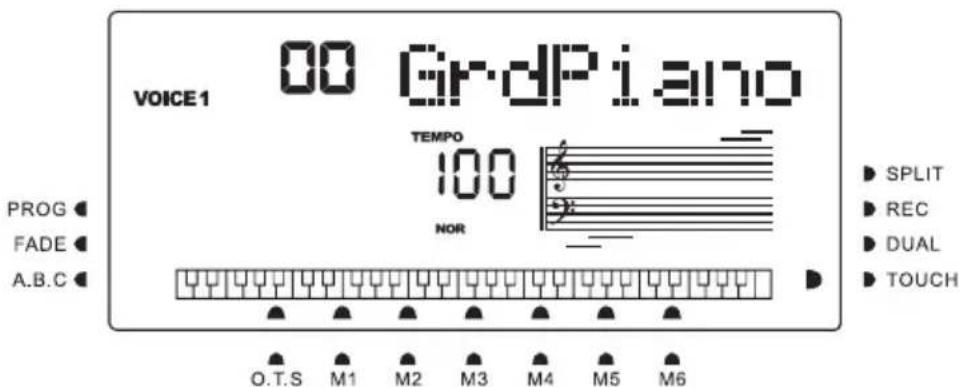
Press the [Power] button with the back light on, and the LCD screen shows some information of the current voice, tempo, function mode, etc.
The imaginary full screen that illustrates all mark cursors and parameters of different modes:

The full screen of the LCD when power on:
MASTER VOLUME ADJUSTMENT
Turn the master volume knob clockwise to increase the master volume; counterclockwise to decrease. The knob also controls the volume of accompaniment.
DATA DIAL
Turning the [Data Dial] knob is a shortcut to pick out a voice, a rhythm, or a song. Turning it clockwise, bigger code can be reached; counterclockwise, smaller.
PANEL AND KEYBOARD PERCUSSIONS
There are 8 kinds of panel percussions and 61 keyboard percussions reserved in the instrument.
- Press the [Panel percussion] button, a corresponding percussion sound can be started by a certain keystroke.
- Press the [Keyboard Percussion] button with "PERCUS" appearing on the LCD screen. In this case, percussion performance can be carried out on the keyboard. A certain key corresponds to a certain type of percussion sound. Press the button again to exit the function.
IV. The Function Button
The following provides the details about the parameters that can be configured through the [Function] button.
| Parameter name | Indication on the LCD | Adjustable range | The default |
| BEAT | 04 Beat | 00,02⋯09 | 04 |
| SPLIT PT | 19 Split Pt | 1⋯61 | 19(#F3) |
| MIDI IN | ALL Midi In | 01-16,ALL | ALL |
| MIDI OUT | 01 Midi Out. | 01-16 | 01 |
| BANK SELECT | 01 Bank Sel | 01-128 | 01 |
BEATS
Hold the [Function] button until "04Beat" appears on the LCD screen. In this case, any one of the nine different beat styles can be chosen, coded 00, 02 to 09. The target beat style can be picked out through the [+/-] buttons or the [Data Dial] knob.
SPLIT POINT
The key is called the split point which divides the keyboard into two parts, the accompaniment keyboard on the left and the melody keyboard on the right. The default split point of the instrument is on the 19th key from left, and the point can be reset on any key of the keyboard.
Repeatedly press the [Function] button until "19 Split Pt" appears on the LED screen. In this case, the split point can be reset by pressing the [+/-] buttons or turning the [data Dial] knob, or by the keystroke of the target key. Then the new split point is set after the choosing ends.
SETUP OF MIDI CHANNELS
1. MIDI IN
Press the [Function] button repeatedly until "MIDI In" appears on the LCD screen. In this case, the target channel can be chosen to play the input MIDI files by pressing the [+/-] buttons or turning the [data Dial] knob to the "all", which means all channels (coded 01 to 16) are available. All channels are preset available when the instrument is power on.
2. MIDI OUT
Press the [Function] button repeatedly until "MIDI Out" appears on the LCD screen. In this case, the target channel can be chosen to transmit the output MIDI files by pressing the [+/-] buttons or turning the [data Dial] knob. But some of the MIDI files cannot be transmitted, such as the auto rhythm, demonstration songs, and songs reserved in the instrument. When the instrument is power on, channel 01 is preset available.
BANK SELECT
Press the [function] button repeatedly with "Bank Sel" appearing on the LCD screen. In this case, the target voice bank, among 128 banks coded 01 to 128, can be chosen to adjust the voice of the MIDI keyboard by pressing the [+/-] buttons or turning the [data Dial] knob. When the instrument is power on, the preset voice bank is BANK01.
Note: There is just one voice bank, coded BANK 01, with 128 voices in the standard GM voice bank. If there are other voice banks in the computer, they can be added up to the instrument and defined with codes from BANK 01 to 128.
V. Sounds and Effect
SELECTION OF SOUND
There are 162 kinds of Sounds in the system, including 128 GM sounds, 6 groups of sounds for keyboard percussion, and 5 groups of sounds for folk music.
When power on, the default sound is the sound coded 00, which "00 Grd Piano" on the LCD screen stands for. Press the [Sound] button to start the voice set-up function. The target voice can be picked out through the number buttons, the [+/-] buttons or the [data Dial] knob. However, as for applying the number buttons, the target sound code should be input with three digits. That means "00" or "0" should be added up to the one or two-digited code, for example, if the target voice code is 65, digits 0, 6 and 5 should be input, and if it is 8, digits 0, 0 and 8 should be input.
PIANO
In order to make it more convenient for the users, the instrument is particularly designed with the [Piano] button, by pressing which the piano voice can be picked out directly.
- Pressing the [Piano] button can make the instrument get into the piano mode with "PIANO" appearing on the LCD screen. The sound of any keystroke takes on the voice of piano.
- While in the mode of accompaniment, pressing the [Piano] button can stop the accompaniment and make the instrument get into the piano mode. Press the button again, the function quits.
Note: In the Piano mode, rhythms can be selected and played, also accompaniment control can work normally, but just the percussions without chord.
The instrument has a double-sound function-any two sounds can be combined to make a new sound effect and enrich the sound complexity which seems to be made by playing two kinds of musical instruments. Before the [Dual] button comes into power, the sound of the instrument is marked "SOUND 1" on the LCD screen, and the second sound can be picked out as following:
- Press the [Dual] button with "SOUND" appearing and the cursor pointing to "DUAL" on the LCD screen. The code of the second sound will also be displayed on the LCD screen. The preset second sound is Sound 48. In this case, the voice of keystrokes is a combination of the two sounds.
-
The second sound can be picked out by pressing the [+/-] buttons or turning the [data Dial] knob.
-
In the Duble-voice function, the first sound can be changed by first pressing the [Sound] button to switch the instrument into the setup mode of "SOUND 1", then by pressing the [+/-] buttons or turning the [data Dial] knob.
- In the double-voice function, pressing the [Dual] button can stop the function, and the "SOUND 2" and the cursor pointing to "DUAL" on the LCD screen disappear, which means the system has returned to the setup mode of "SOUND 1".
Note: Out of the charge of "auto chord", the double-sound function can be applied on the whole keyboard; while in the charge of the "auto chord", it can be just applied on the melody keyboard not on the accompaniment keyboard.
SUSTAIN
- Press the [Sustain] button with the cursor shining "SUSTAIN" on the LCD screen to start the function. The sound of the keystrokes takes on an elegant sustain effect.
- Press the [Sustain] button again with "SUSTAIN" disappearing on the LCD screen to exit the function.
DYNAMIC-FEELING KEYBOARD
When the instrument is power on, the dynamic-feeling function is on as well with the cursor shining "TOUCH". Also pressing the [Touch] button can get the function on or off. The function can show the dynamic which is applied to the different keystrokes, so the function can strengthen the performance on the keyboard. The dynamic gets larger, the volume of the notes becomes larger. When the function quits, any dynamic of the keystrokes makes the same volume.
PITCH BEND
Switching the [Pitch Bend] upwards or downwards, the pitch will slide to alt or bourdon. Unlash the bend, the pitch returns normal.
VIBRATO BEND
When the [Vibrato Bend] stays lowest downwards, the vibrato function is power off. Switch it upwards, the function is on and the sound of the keystrokes takes on a sustain effect. Switch it upwards or downwards, the effect can be strengthened or weakened.
OCTAVE
The [Octave+/-] buttons can be applied to pitch the instrument an octave above or below. Press either the [Octave+] or the [Octave-] for the first time, the present octave value shows on the LCD screen; press either of them again, the pitch of the instrument can be an octave above or below within the range of possibilities.
TRANSPOSE
Press the [Transpose ▲] or [Transpose ▼] button to transpose the tone of the notes. The transpose may be adjusted from "-6" to "+6". Apply the both buttons at the same time, the tone of notes turns normal to the preset value "0". In the transpose function mode, the transpose value can also be altered by turning the [data Dial] knob.
DOUBLE KEYBOARD
Press the [Split] button with the cursor shining "SPLIT" to divide the keyboard into two parts, the 24 keys on the left and the rest keys, to form a double keyboard. The pitch of the left part becomes an octave above while that of the right part falls an octave below, that is, the pitch of the two parts become consistent. Meanwhile, the sound of the two parts can be different. The left part keeps the primary voice but the right part can gain another one. Press the [Split] button again with the cursor darkening "SPLIT", the function quits and the voice of the whole keyboard keeps that of the previous right part.
Note: In the the auto-chord mode, the dynamic-feeling function, sustain effect, the pitch bend and the vibrato cannot work on the chord keyboard.
VI. Auto-Styles
SELECTION OF STYLES
There are 200 different styles to be chosen from, ranging from 00 to 200. When the instrument is powered ON, the defaulted style is the one coded "00". Press the [style] button with "STYLE" appearing on the LCD screen, then the target style can be picked out through the number buttons, the [+/-] buttons or the [Data Dial] knob.
Note: The target style code can be reached by inputting three digits. That means "00" or "0" should be added up to the one or two-digited code, for example, if the target style code is 66, digits 0, 6 and 6 should be input, and if it is 9, digits 0, 0 and 9 should be input.
START/STOP STYLE
Press the [Start/Stop] button to start or stop the accompaniment style.
SYNC
Press the [SYNC] button with beat dots twinkling on the LCD screen display. With the auto-chord function off, any keystroke on the keyboard can start a piece of style. But with the auto-chord function on, any keystroke on the chord keyboard can make the melody performance and the accompaniment style go on at the same time.
INTRO/ENDING
- Before a piece of style proceeds, the [Intro/Ending] button can start, with the cursor shining "NOR" on the LCD screen, a piece of prelude, leading the normal style to play.
- During the proceeding of a piece of style, pressing the [Intro/Ending] button can make the normal style proceed with a piece of ending, and then stop the whole style.
Note: Before the ending ends, pressing the [Fill-in A] or the [Fill-in B] button can make the previous normal style proceed.
FADE IN AND FADE OUT
- When the style stops, press the [Fade In/Out] button with the cursor shining the "FADE". In this case, start a piece of style, then the style can fade in and reach at full blast within 8 seconds with the shining "FADE" disappearing.
- During the proceeding of a piece of style, pressing the [Fade In/Out] button can make the style fade out from the full blast within 8 seconds, and the shining "FADE" disappears.
INTERMEZZO
- During the proceeding of an accompaniment, hold the [Fill In A] button until a piece of intermezzo can be heard and the cursor shines "VAR" on the LCD screen, then the normal accompaniment proceeds.
- During the accompaniment, press the [Fill In B] button and keep it until another piece of intermezzo can be heard and the cursor shines "VAR" instead of "NOR" on the LCD screen, then the normal accompaniment proceeds. The twinkling of the shining "VAR" shows the style is on the proceeding of a piece of variation.
- By pressing the [Fill-in A] or [Fill-in B] button firmly, intermezzos can be inserted successively. After the intermezzo ends, there will be a normal accompaniment proceeding.
AUTO-METRONOME
Press the [Metronome] button, the instrument makes a ticking sound showing the beat. In this case, different styles of beat can be picked out through the [Function] button. Press the button again, the metronome function quits.
TEMPO ADJUSTMENT
The [tempo] buttons can be applied to adjust the tempo of styles.
Press the [Tempo ▲] / [Tempo ▼] button or turn the [Data Dial] knob upward or downward to quicken or slow the tempo of style in the value range of 40 to 280 beats per minute, and the current tempo value shows on the "TEMPO" on the LCD screen. Apply the both [tempo] buttons at the same time to bring the tempo value back to the preset one.
ACCOMPANIMENT VOLUME ADJUSTMENT
Press the [Accom Vol ▲] / [Accom Vol ▼] to increase or decrease the accompaniment volume in the value range of 00 to 31. Apply the both at the same time to bring the accompaniment volume value back to the preset one.
VII. Auto-Bass Chord and Chord Dictionary
Press the [Auto Bass Chord] button to start the auto bass chord function with the cursors pointing to A, B, C (which stand for the auto bass chord) shining on the LCD screen. In the charge of the auto bass chord, the 19 keys on the left part of the
keyboard are the chord keys. During the style proceeding, a piece of auto bass chord can be started by keystrokes on the chord keys.
Note:
- Press the [Function] button to change the split point and the range of the chord keyboard. (See the "Split Point" for details.)
- The instrument can recognize both single-finger and fingered fingerings. It will accept whatever fingerings that accord to the fingered, but accept the single-finger when the fingerings don't accord to the fingered.
Fingered: Any fingerings of the fingered shown on the illustration below can produce the chord C major, and other chords can be played by analogy.
Fingerings of the fingered (C major)

Single-finger:
(The following fingerings are designed to be accepted by this instrument.)
- Major triad: Play the chord roots
- Minor triad: Play the chord roots and any black key on their left at the same time.
- Dominant seventh chord: Play the chord roots and any white key on their left at the same time.
- Minor seventh chord: Play the chord roots, a white and a black keys on their left at the same time.


THE CHORD DICTIONARY
The chord dictionary is actually a chord handbook reserved in the instrument in which the notes forming a chord can be looked up. All the chord notes are shown on the screen to lead the learner to play chords. This function is very beneficial to the first learners who know the chord names to master the fingerings.
-
Press the [Chord Dictionary] button to start the function with "DICT" appearing on the LCD screen as well as "C", which stands for C major triad and note symbols on the stave. The chord roots and type of chord can be defined on the melody keyboard on the right of the split point, then the corresponding keys will be shown on the keyboard and note symbols on the stave on the screen, so the learner can play the chord on the accompaniment keyboard according to the representation on the screen.
-
When the chord notes are correctly played on the accompaniment keyboard, there will be a clapping to celebrate. When the chord notes aren't correctly played, there will be BASS sound of the keys that are played.
-
Press the [Right/Chord Dictionary] button again to stop the function.
Note:
-
There is no sound for the keystrokes on the melody keyboard (on the right of the split point) which are to define the chord roots and type of chord.
-
No chords can be played out of the range of the chord keyboard, that is to say, chords should be played on the keys on the left of the split point.

VIII. Demonstration Songs
There are 2 pieces of different style of demonstration songs reserved in the system.
DEMO SONG SELECTION
-
Press the [Demo] button with "DEMO" shining as well as the code of the current song and the beat dots on the screen, the system is set into the mode of playing the two demo songs successively.
-
During the demo song proceeding, the song can be replaced with the other one through the number buttons, the [+/-] buttons or the [Data Dial] knob.
-
Press the [Demo] button again to stop the playing and quit the function.
IX. Teaching Songs
There are 100 pieces of different style of songs reserved in the system which can be used as a great learning tool as well as the music appreciation.
TEACHING SONG SELECTION
- Press the [Song] button to start the "song" mode with "SONG" shining as well as the code and abbreviation of the current song on the screen, and the system is set into the mode of playing the 100 songs successively.
During the song proceeding, the song can be replaced with another one through the number buttons, the [+/-] buttons or the [Data Dial] knob.
- During the song proceeding, press the [Start/Stop] button to stop playing the current song, but the system still remains in the "song" mode; press the button again to continue playing the current song repeatedly.
Note: To get the instrument back to the mode of playing the 100 songs successively, the "song" mode should exit first, then gain power again through the [Song] button.
SONG EXIT
- During the song proceeding, press the [Start/Stop] button to stop playing the current song, but the system still remains in the "song" mode.
- Press either the [Sound] or the [Style] button at the end of the song to exit the "song" mode and start the corresponding function.
FUNCTION OF THE "LEFT" AND "RIGHT" OUT OF LEARNING MODE
During the song proceeding, press the [Left] or [Right] to turn on or off the sound of the left channel or right. For example, press the [Left] button, with the "LEFT" shining on the left of the screen, to open the sound channel for the right-handed melody, but to shut up the sound channel for the left-handed accompaniment or melody. The same operation holds for the [Right] button.
Note:
- When the "song" mode is out of charge, press the [Right/Chord Dictionary] button to start the "chord dictionary" mode; press it again to exit the mode.
- When a song comes to an end, press the [Right/Chord Dictionary] button for at least 2 seconds to start the "chord dictionary" mode.
X. Lessons
The three buttons [Lesson], [Left], [Right] can start three types of learning modes, which can separately lead the learner to play the teaching song step by step.
LESSON I
This lesson aims at practicing musical duration rather than pitch. Any keystroke with correct duration can make correct changes of the current notes and chords, but not sound of the corresponding notes.
LESSON II
This lesson aims at practicing playing the correct notes against the indicative keys shown on the screen. Keystrokes of the correct notes can keep the song going on, or the song will be suspended until the correct note is picked up.
Note: In this mode, only correct notes can be played, but the wrong ones get no reaction.
LESSON III
This lesson aims at practicing playing the correct notes with correct duration. With the learning song normally playing, the correct notes must be played with correct duration of the original song. Without any keystroke, the system just play the accompaniment of the song.
LEFT AND RIGHT-HANDED PRACTICING
This lesson aims at practicing playing respectively with the left or the right hand, or with the both. Press the [Right] button to conceal right-handed melody and then practice playing with the right hand. Press the [Left] button to conceal left-handed melody or the changes of the left-handed chords and then practice playing with the left hand. Press the both buttons at the same time to conceal left and right-handed sound and then practice playing with the both hands.
LESSON FUNCTION SETUP
- Press the [Lesson] function to start the "song" state, then press the [Start/Stop] button to stop the song.
- Pick out a pleasant song by pressing the number buttons or the [+/-] buttons or turning the [Data Dial] knob.
-
When the "song" mode is out of charge, press the [Lesson] button successively to choose Lesson I, Lesson II, Lesson III, or to quit the "lesson" function. Any chosen lesson will have a corresponding shining cursor together with shining "LEFT" or "RIGHT" on the screen. Then press the [Start/Stop] button to start lessons and the indications of the melody or chord notes will be shown on the stave and keyboard on the LCD screen.
-
Press the [Left] button to start left-handed practice with the shining "left hand" on the screen. Press the [Right] button to start right-handed practice with the shining "right hand" on the screen. Press the both buttons to start left and right-handed practice with the shining "left and right hands" on the screen. When there is no choice, the system will start the right-handed practice automatically.
-
When a lesson is finished, the system will play the current song and keep the previous lesson mode.
Note: Different styles of the songs make the left-handed practice different.
When playing rhythm style songs, the left hand is to play chords; when playing other songs, the left hand is to play left-handed melody or accompaniment (The songs coded 00 to 84 are the rhythm style songs). During a lesson, the lesson mode can not be switched freely.
XI. Storage and Memory Function
The storage and memory function is to store the setup voice, style, tempo and other relative parameters of the working mode that needs to be changed for in the performance. It is also applied to draw out the needed parameters directly in the performance. There are six modes of memory to be drawn from freely.
STORAGE OF PARAMETERS
First, set up the needed sound, style, tempo and other relative parameters of a working mode. Second, press the [Memory] button firmly, then press any one of the memory mode buttons (M1, M2, M3, M4, M5, or M6) to store the working mode. There will be a corresponding shining cursor to show the memory mode in which all the parameters are stored.
DRAWING OUT PARAMETERS
During the performance, press any one of the memory mode buttons to draw out the stored the parameters of the needed working mode to replace the current one.
Note:
- After a memory mode drawn out, all the parameters can be reset and become different with those stored previously. In this state, the corresponding shining cursor at the bottom of the screen disappears showing the mode has been changed.
- There is no power cut protection for all the memory modes, so when the instrument regains power, the stored parameters are lost.
XII. Setup of the O.T.S (ONE TOUCH SET)
The O.T.S function has stored the often-used voices that suitable for the styles. There are four defaulted sounds to match every piece of style.
- Press the [O.T.S] button to start the "auto bass chord" with the shining "O.T.S" and "M1" at the bottom of the screen.
- After getting the target style ready, press the four memory buttons (M1 to M4), then the style played on the keyboard will combine the four defaulted voices perfectly.
- In this function state, press the button again to exit the function.
Note: In the charge of the [O.T.S] button, the storage and memory function cannot be started.
XIII. Record
Press the [REC] button with four beat spots twinkling and the "REC" shining on the screen to show the system has got ready for recording. The pleasant sound, style, tempo, sustain and other parameters can be set up before recording.
RECORD
In this state, all notes that played on the keyboard are recorded with four beat spots on the screen successively twinkling at the setup tempo.
In the "record" mode, a piece of accompaniment can be recorded directly after it is started. In the "auto bass chord" state, any keystroke on the auto accompaniment keyboard can start a piece of style.
But when the "auto bass chord" is out of charge, a piece of style can only be started by pressing the [Start/Stop] button. During the recording of accompaniment, melody notes can also be played on the keyboard and recorded together.
Note:
- There is no power cut protection, so when the instrument regains power, the recorded data are lost.
- The new record will replace the primary one when this record function is applied again.
- The amount of the recorded notes is affected by all the recorded data, including different sounds, style, tempo, etc.
AFTER RECORD
- In the "record" mode, press the [REC] button again to stop recording.
- Dring the time that a style is proceeding and being recorded, press the [Intro/Ending] button to start a piece of ending. When the ending ends, the system will automatically stop recording and exit the "record" mode.
- During recording, the completely taken-up memory will stop recording with "FULL" shining for 3 seconds on the screen, then exit the "record" mode.
PLAYBACK
After the recording stops, press the [Playback] button to replay the recorded track.
XIV. Program
PROGRAM
Press the [Prog] button with the "Prog" cursor shining on the screen to change the keyboard into a percussion one.
Then press a key or a panel drum to start the program function.
Press the [Prog] button once more to stop programming.
The completely taken-up memory can stop the program as well.
The newly edited rhythm or the new record will take the place of the primary one.
NULL PLAY
Press the [Null Play] button, the edited rhythm can be played repeatedly.
Press the button again to stop the playing.
Appendix
SOUNDS
| No. | Name |
| Piano | |
| 00 | Grand Piano |
| 01 | Bright Piano |
| 02 | El Grd Piano |
| 03 | Honky-tonk Piano |
| 04 | Elec piano 1 |
| 05 | Elec Piano 2 |
| 06 | Harpsichord |
| 07 | Clavi |
| Mallet | |
| 08 | Celesta |
| 09 | Glockenspiel |
| 10 | Music Box |
| 11 | Vibraphone |
| 12 | Marimba |
| No. | Name |
| 13 | Xylophone |
| 14 | Tubular Bell |
| 15 | Santur |
| Organ | |
| 16 | Drawbar Organ |
| 17 | Jazz Organ |
| 18 | Rock Organ |
| 19 | Church Organ |
| 20 | Reed Organ |
| 21 | Accordion |
| 22 | Harmonica |
| 23 | Tango Accordion |
| Guitar | |
| 24 | Classic Guitar |
| 25 | Steel Guitar |
| No. | Name |
| 26 | Jazz. Guitar |
| 27 | Clean Guitar |
| 28 | Muted. Guitar |
| 29 | Overdriven Guitar |
| 30 | Distortion Guitar |
| 31 | Guitar Harmonics |
| Bass | |
| 32 | Acoustic Bass |
| 33 | Finger Bass |
| 34 | Picked Bass |
| 35 | Fretless Bass |
| 36 | Slap Bass 1 |
| 37 | Slap Bass 2 |
| 38 | Synth Bass 1 |
| 39 | Synth Bass 2 |
SOUNDS
| No. | Name |
| Strings | |
| 40 | Violin |
| 41 | Viola |
| 42 | Cello |
| 43 | Contrabass |
| 44 | Tremolo Strings |
| 45 | Pizzicato Strings |
| 46 | Harp |
| 47 | Timpani |
| Strings Ensemble | |
| 48 | Strings 1 |
| 49 | Strings 2 |
| 50 | Synth Strings 1 |
| 51 | Synth Strings 2 |
| 52 | Choir Aahs |
| 53 | Voice Ooh |
| 54 | Synth |
| 55 | Orchestra Hit |
| Brass | |
| 56 | Trumpet |
| 57 | Trombone |
| 58 | Tuba |
| 59 | Muted Trumpet |
| 60 | Horn |
| 61 | Brass Ensemble |
| 62 | Synth Brass 1 |
| 63 | Synth Brass 2 |
| Reed | |
| 64 | Soprano Sax |
| 65 | Alto Sax |
| 66 | Tenor sax |
| 67 | Baritone Sax |
| 68 | Oboe |
| 69 | English horn |
| 70 | Bassoon |
| 71 | Clarinet |
| Pipe | |
| 72 | Piccolo |
| 73 | Flute |
| 74 | Recorder |
| 75 | Pan Flute |
| 76 | Blown Bottle |
| 77 | Shakuhachi |
| 78 | Whistle |
| 79 | Ocarina |
| No. | Name |
| Lead | |
| 80 | Square |
| 81 | Sawtooth |
| 82 | Calliope |
| 83 | Chiff |
| 84 | Charang |
| 85 | Voice |
| 86 | Fifths |
| 87 | Bass lead |
| Pad | |
| 88 | Fantasia |
| 89 | Warm |
| 90 | Poly Synth |
| 91 | Choir |
| 92 | Bowed |
| 93 | Metallic |
| 94 | Halo |
| 95 | Sweep |
| Effects | |
| 96 | Fx1 |
| 97 | Fx2 |
| 98 | Fx3 |
| 99 | Fx4 |
| 100 | Fx5 |
| 101 | Fx6 |
| 102 | Fx7 |
| 103 | Fx8 |
| Ethnic | |
| 104 | Sitar |
| 105 | Banjo |
| 106 | Shamisen |
| 107 | Koto |
| 108 | Kalimba |
| 109 | Bag Pipe |
| 110 | Fiddle |
| 111 | Shanai |
| Percussive | |
| 114 | Tinkle Bell |
| 113 | Agogo |
| 114 | Steel Drums |
| 115 | Woodblock |
| 116 | Taiko Drum |
| 117 | Melodic Tom |
| 118 | Synth Drum |
| 119 | Reverse Cymbal |
| No. | Name |
| Sound Effects | |
| 120 | GT Fret Noise |
| 121 | Breath Noise |
| 122 | Seashore |
| 123 | Bird Tweet |
| 124 | Teleph Ring |
| 125 | Helicopter |
| 126 | Applause |
| 127 | Gunshot |
| Chinese Instrument | |
| 128 | Pipa |
| 129 | Erhu |
| 130 | Guzhen |
| 131 | Banhu |
| 132 | Qudi |
| Synth Voice | |
| 133 | 70elep |
| 134 | Fzpiano |
| 135 | Ep3 |
| 136 | Ep4 |
| 137 | Ep5 |
| 138 | Harppian |
| 139 | Clavr2 |
| 140 | Clavr3 |
| 141 | Organ Box |
| 142 | E. organ |
| 143 | Churc2 |
| 144 | Syn Organ |
| 145 | Altoel |
| 146 | Fz guitar |
| 147 | Syn elgt |
| 148 | Picel bas |
| 149 | El violin |
| 150 | Brassfm |
| 151 | Fmlead |
| 152 | Fantalfo |
| 153 | Polyaa2 |
| 154 | Bowedg2 |
| 155 | 70elpad |
| Drum Kit | |
| 156 | Standard Kit |
| 157 | Power Kit |
| 158 | Dance Kit |
| 159 | 808 Kit |
| 160 | Brush Kit |
| 161 | Orchestra Kit |
STYLES
| NO. | Name |
| BEAT & POP | |
| 00 | 8 Beat 1 |
| 01 | 8 Beat 2 |
| 02 | 8 Beat 3 |
| 03 | 8 Beat 4 |
| 04 | 60's 8 Beat |
| 05 | 8 Beat Ballad |
| 06 | 8 Beat Rock |
| 07 | 16 Beat 1 |
| 08 | 16 Beat 2 |
| 09 | 16 Beat Pop |
| 10 | 16 Beat Shuffle |
| 11 | Ballad |
| 12 | Slow Ballad |
| 13 | 16 Beat Ballad |
| 14 | Unplugged |
| ROCK | |
| 15 | Rock |
| 16 | Pop Rock |
| 17 | Fast Rock |
| 18 | Slow Rock 1 |
| 19 | Slow Rock 2 |
| 20 | Rock & Roll |
| 21 | Heavy Metal |
| 22 | Blues Boogie |
| 23 | Blues |
| 24 | Shuffle |
| 25 | Blues Shuffle |
| 26 | Rock Shuffle |
| 27 | Charlston |
| DANCE | |
| 28 | Disco 1 |
| 29 | Disco 2 |
| 30 | Disco Funk |
| 31 | Dance |
| 32 | House 1 |
| 33 | House 2 |
| NO. | Name |
| 34 | Rap |
| 35 | Euro Beat |
| 36 | Hip Hop |
| 37 | Techno |
| SOUL & FUNK | |
| 38 | Funky Pop |
| 39 | Jazz Funk |
| 40 | Cool Funky |
| 41 | Soul 1 |
| 42 | Soul 2 |
| 43 | Soul Shuffle |
| 44 | Soul Blues |
| 45 | R & B |
| 46 | 6/8 Gospel |
| 47 | Pop Groove |
| JAZZ | |
| 48 | Swing |
| 49 | Cool Jazz |
| 50 | Pop Swing |
| 51 | Swing Fox |
| 52 | Big Band |
| 53 | Big Band Meduim |
| 54 | Jazz Waltz |
| 55 | Ragtime |
| 56 | Dixeland |
| 57 | Quick Step |
| COUNTRY | |
| 58 | Country 1 |
| 59 | Country 2 |
| 60 | Pop Country |
| 61 | Country Rock |
| 62 | Country Folk |
| 63 | 3/4 Country |
| 64 | Country Waltz |
| 65 | Country Shuffle |
| 66 | Country Boogie |
| 67 | Country Blues |
| NO. | Name |
| 68 | Country Quick Step |
| 69 | Bluegrass |
| LATIN | |
| 70 | Bossa Nova 1 |
| 71 | Bossa Nova 2 |
| 72 | Rhumba |
| 73 | Pop Rhumba |
| 74 | Cha Cha |
| 75 | Pop Cha Cha |
| 76 | Tango |
| 77 | Jazz Samba |
| 78 | Reggae |
| 79 | Pop Reggae |
| TRADITIONAL | |
| 80 | 1-Mar |
| 81 | 2-Mar |
| 82 | German March |
| 83 | 6/8 March |
| 84 | Polka |
| 85 | Pop Polka |
| 86 | Waltz |
| 87 | Slow Waltz |
| 88 | Vienna Waltz |
| 89 | Musette |
| PIANO | |
| 90 | 8 Beat |
| 91 | Ballad |
| 92 | Boogie |
| 93 | Jazz |
| 94 | Swing |
| 95 | Jazz Waltz |
| 96 | Twist |
| 97 | March |
| 98 | 6/8 March |
| 99 | Waltz |
| BEAT & POP-1 | |
| 100 | 8 Beat 1 -1 |
STYLES
| NO. | Name |
| 101 | 8 Beat 2 -1 |
| 102 | 8 Beat 3 -1 |
| 103 | 8 Beat 4 -1 |
| 104 | 60's 8 Beat -1 |
| 105 | 8 Beat Ballad -1 |
| 106 | 8 Beat Rock -1 |
| 107 | 16 Beat 1 -1 |
| 108 | 16 Beat 2 -1 |
| 109 | 16 Beat Pop -1 |
| 110 | 16 Beat Shuffle -1 |
| 111 | Ballad -1 |
| 112 | Slow Ballad -1 |
| 113 | 16 Beat Ballad -1 |
| 114 | Unplugged -1 |
| ROCK-1 | |
| 115 | Rock -1 |
| 116 | Pop Rock -1 |
| 117 | Fast Rock -1 |
| 118 | Slow Rock 1 -1 |
| 119 | Slow Rock 2 -1 |
| 120 | Rock & Roll -1 |
| 121 | Heavy Metal -1 |
| 122 | Blues Boogie -1 |
| 123 | Blues -1 |
| 124 | Shuffle -1 |
| 125 | Blues Shuffle -1 |
| 126 | Rock Shuffle -1 |
| 127 | Charlston -1 |
| DANCE-1 | |
| 128 | Disco 1 -1 |
| 129 | Disco 2 -1 |
| 130 | Disco Funk -1 |
| 131 | Dance -1 |
| 132 | House 1 -1 |
| 133 | House 2 -1 |
| 134 | Rap -1 |
| 135 | Euro Beat -1 |
| NO. | Name |
| 136 | Hip Hop -1 |
| 137 | Techno -1 |
| SOUL & FUNK-1 | |
| 138 | Funky Pop -1 |
| 139 | Jazz Funk -1 |
| 140 | Cool Funky -1 |
| 141 | Soul 1 -1 |
| 142 | Soul 2 -1 |
| 143 | Soul Shuffle -1 |
| 144 | Soul Blues -1 |
| 145 | R & B -1 |
| 146 | 6/8 Gospel -1 |
| 147 | Pop Groove -1 |
| JAZZ-1 | |
| 148 | Swing -1 |
| 149 | Cool Jazz -1 |
| 150 | Pop Swing -1 |
| 151 | Swing Fox -1 |
| 152 | Big Band -1 |
| 153 | Big Band Meduim -1 |
| 154 | Jazz Waltz -1 |
| 155 | Ragtime -1 |
| 156 | Dixeland -1 |
| 157 | Quick Step -1 |
| COUNTRY | |
| 158 | Country 1 -1 |
| 159 | Country 2 -1 |
| 160 | Pop Country -1 |
| 161 | Country Rock -1 |
| 162 | Country Folk -1 |
| 163 | 3/4 Country -1 |
| 164 | Country Waltz -1 |
| 165 | Country Shuffle -1 |
| 166 | Country Boogie -1 |
| 167 | Country Blues -1 |
| 168 | Country Quick Step -1 |
| 169 | Bluegrass -1 |
| NO. | Name |
| LATIN-1 | |
| 170 | Bossa Nova 1 -1 |
| 171 | Bossa Nova 2 -1 |
| 172 | Rhumba -1 |
| 173 | Pop Rhumba -1 |
| 174 | Cha Cha -1 |
| 175 | Pop Cha Cha -1 |
| 176 | Tango -1 |
| 177 | Jazz Samba -1 |
| 178 | Reggae -1 |
| 179 | Pop Reggae -1 |
| TRADITIONAL-1 | |
| 180 | March 1 -1 |
| 181 | March 2 -1 |
| 182 | German March -1 |
| 183 | 6/8 March -1 |
| 184 | Polka -1 |
| 185 | Pop Polka -1 |
| 186 | Waltz -1 |
| 187 | Slow Waltz -1 |
| 188 | Vienna Waltz -1 |
| 189 | Musette -1 |
| PIANO-1 | |
| 190 | 8 Beat -1 |
| 191 | Ballad -1 |
| 192 | Boogie -1 |
| 193 | Jazz -1 |
| 194 | Swing -1 |
| 195 | Jazz Waltz -1 |
| 196 | Twist -1 |
| 197 | March -1 |
| 198 | 6/8 March -1 |
| 199 | Waltz -1 |
Keyboard Stand Assembly
- First, prepare all the assembly parts

- Second, take the No. 2 screw and the No. 3 support plate, fix them to the two support brackets of No. 5 and tighten them separately.

natural_image
Hand holding a screwdriver next to a black panel with numbered callouts (no text or symbols on the diagram itself)- Take the No. 2 screw and the No. 4 stand to the top of the No. 5 stand and tighten.

- The installation is complete, the longest No. 1 screw is used to fix the keyboard on the stand.

Features:
- Wire MIDI
• 200 World Well-Chosen Auto Accompaniment Styles - 8 Percussions pads / Keyboard Percussions
• 2-in-1 Karaoke Keyboard: Play & Sing-Along - Compact & Portable Musical Piano
- Simple Electronic Plug-in Operation
- Rotary Plate for Sound Changing
- Portable Piano
• Built-in Full Range Stereo Speakers - Connect & Stream Audio from External Devices
- Can Connect to Speaker and Play Sound
- Multiple Preset Selectable Keyboard Sound, Tone & Rhythm Styles
- Digital LCD Display
- Adjustable Volume Control
• Record & Playback Mode
• 162 Sounds Include 128 GM Standard Sounds, 5 Folk Music Instrument Sounds, 23 Synth Sounds, 6 Drum Kit Sounds - Basic Control: Master Volume/Accom Volume/Chord Volume/Tempo Control
• Auto Chord Function: Single Chord / Fingered Chord / Chord Dictionary - Teaching Functions: One-key/Follow/Assemble
- Pitch bend/Vibrato/Sustain/Touch Sensing/Dual sound function
- Keyboard Split/Octave/Transpose Function
- Sync/Start/Stop/Fade In/Fade Out/Intro/Ending/Fill in A&B/Metronome
• USB Input/Sustain Pedal Input - Speaker Output (L/R)/Headset Output
- Perfect for Home Theater Living Room Performances
- Fun for Kids of All Ages: Children & Adults
What's in the Box:
• Digital Musical Karaoke Keyboard
- Book Rack
- Adapter
- Power Plug
- Keyboard Stand
- Sustain Pedal
- Waterproof Bag
- Headset
Keyboard Stand Specs:
- Baked Varnish
- Detachable Function
- Construction Material: Iron+ABS
• Length: 31.5" -inches - Width: 8.3" -inches
• Height: 57.5\~67.5 cm - Weight: 1.75 kg
- Bearing: 15 kg
Headset Specs:
- Construction Material: ABS + Laser decorative sheet
- Wire Material: PVC flat wire
- Wire Length: 1.2M
- Plug Diameter: 3.5mm 1/8
- Weight: 0.14 kg

California Prop 65 Warning
WARNING:
This product contains Butyl benzyl phthalate (BBP) which is known to the state of California to cause cancer birth defects and other reproductive harm. Do not ingest.
For more info go to: www.P65warnings.ca.gov
Sustain Pedal Specs:
- Normally On/Off Function
• Length: 9.45" -inches - Width: 3.15" -inches
• Height: 2.8" -inches
- Weight: 1.75 kg
Technical Specs:
• (61) Keyboard Keys
• 162 Sounds Include 128 Gm Standard Voices, 5 Folk Music Instrument Voices 23
• Synth Voices, 6 Drum Kit Voices
• 10 Demonstration Songs: One/All
• Audio Interface: Aux (6.5mm) Input Jack / RCA L&R Output Jack / Mic Input
• Max Sound Level: Up to 110 dB
- USB/Power Cable Length: 3.9' ft.
• Construction Material: Engineered ABS
• Power Supply: DC 12V / AC adaptor
- Piano Dimensions (L x W x H): 36.6" x 11.97" x 3.7" -inches
PYLE®
Questions? Comments?
We are here to help!
Phone: (1) 718-535-1800
Email: support@pyleusa.com


- PKBRD6175P
- Digital Musical Karaoke Keyboard
- PLEASE READ CAREFULLY BEFORE PROCEEDING
- Please keep this manual in a safe and handy place for future reference
- WARNING!
- Control Panel and Extension Ports
- REAR PANEL
- Preparation for Performance
- USING AC/DC POWER SUPPLY ADAPTOR
- HEADPHONE JACK
- CONNECTION WITH AMPLIFIERS OR ACOUSTICS
- USB MIDI
- The Methods of Applying the USB MIDI:
- SUSTAIN PEDAL (NOT INCLUDED)
- Basic Method of Performance
- MASTER VOLUME ADJUSTMENT
- DATA DIAL
- PANEL AND KEYBOARD PERCUSSIONS
- The Function Button
- BEATS
- SPLIT POINT
- SETUP OF MIDI CHANNELS
- MIDI IN
- MIDI OUT
- BANK SELECT
- Sounds and Effect
- SELECTION OF SOUND
- PIANO
- SUSTAIN
- DYNAMIC-FEELING KEYBOARD
- PITCH BEND
- VIBRATO BEND
- OCTAVE
- TRANSPOSE
- DOUBLE KEYBOARD
- Auto-Styles
- SELECTION OF STYLES
- START/STOP STYLE
- SYNC
- INTRO/ENDING
- FADE IN AND FADE OUT
- INTERMEZZO
- AUTO-METRONOME
- TEMPO ADJUSTMENT
- ACCOMPANIMENT VOLUME ADJUSTMENT
- Auto-Bass Chord and Chord Dictionary
- Note:
- Single-finger:
- THE CHORD DICTIONARY
- Demonstration Songs
- DEMO SONG SELECTION
- Teaching Songs
- TEACHING SONG SELECTION
- SONG EXIT
- FUNCTION OF THE "LEFT" AND "RIGHT" OUT OF LEARNING MODE
- Lessons
- LESSON I
- LESSON II
- LESSON III
- LEFT AND RIGHT-HANDED PRACTICING
- LESSON FUNCTION SETUP
- Storage and Memory Function
- STORAGE OF PARAMETERS
- DRAWING OUT PARAMETERS
- Setup of the O.T.S (ONE TOUCH SET)
- Record
- RECORD
- AFTER RECORD
- PLAYBACK
- Program
- PROGRAM
- NULL PLAY
- Appendix
- Keyboard Stand Assembly
- Features:
- What's in the Box:
- Keyboard Stand Specs:
- Headset Specs:
- California Prop 65 Warning
- WARNING:
- Sustain Pedal Specs:
- Technical Specs:
- PYLE®
Brand : Pyle
Model : PKBRD6175P
Category : Keyboard