E0330WST2 - Rain Gauge Cotech - Free user manual and instructions
Find the device manual for free E0330WST2 Cotech in PDF.


| Product Type | Wireless Rain Gauge Weather Station |
| Brand | Cotech |
| Model | E0330WST2 (Indoor Unit) / E0013TRF-A1V-YX (Rain Sensor) |
| Indoor Temperature Range | -10 to +50 °C |
| Outdoor Temperature Range | -30 to +60 °C |
| Precipitation Measurement Range | 0–9999 mm (total), 0–50 mm (histogram) |
| Wireless Frequency | 433 MHz (sensor) |
| Maximum Range (open area) | 30 m |
| Indoor Unit Power | 2 × LR03/AAA batteries (not included) |
| Rain Sensor Power | 2 × LR03/AAA batteries (not included) |
| Indoor Unit Dimensions | 23.3 × 92.6 × 98 mm |
| Indoor Unit Weight | 133 g |
| Rain Sensor Dimensions | 157.7 × 88 × 132 mm |
| Rain Sensor Weight | 183 g |
| Display Features | Indoor/outdoor temperature, precipitation, time/date, histogram, backlight |
| Key Functions | Temperature unit (°C/°F), max/min memory, alarm with snooze, precipitation period selection, manual sensor scan |
| Mounting Options | Indoor unit: table stand or wall mount; Rain sensor: horizontal mounting (e.g., post, bracket) |
| Languages Supported | English, Danish, French, German, Italian, Dutch, Spanish |
| Care Instructions | Clean with damp cloth, mild detergent; remove batteries if not used for long; inspect and clean rain sensor regularly |
| Safety Warnings | Do not dismantle or modify; avoid indoor unit exposure to rain/moisture; not a reference thermometer; remove batteries if storing |
| Disposal | Recycle according to local regulations (WEEE symbol) |
Frequently Asked Questions - E0330WST2 Cotech
User questions about E0330WST2 Cotech
0 question about this device. Answer the ones you know or ask your own.
Ask a new question about this device
Download the instructions for your Rain Gauge in PDF format for free! Find your manual E0330WST2 - Cotech and take your electronic device back in hand. On this page are published all the documents necessary for the use of your device. E0330WST2 by Cotech.
USER MANUAL E0330WST2 Cotech
Read the entire instruction manual carefully and make sure that you fully understand it before you use the equipment. Keep the manual for future reference.
Viktig information:
Original instructions
Bruksanvisning i original
Originalbruksanvisning
Please read the entire instruction manual before using the product and then save it for future reference. We reserve the right for any errors in text or images and any necessary changes made to technical data. In the event of technical problems or other queries, please contact our Customer Services (see address details on the back).
Safety
- The product must not be dismantled or modified in any way.
- The indoor unit must not be exposed to rain or moisture.
- The product is not intended to be used as a reference thermometer and Clas Ohlson will not be held liable for any damage which may result from inaccurate readings.
- The battery should be removed if the product is not to be used for an extended period, otherwise the battery might leak and damage the product. Never leave discharged batteries in the battery compartment.
- Do not expose the product to impacts.
Buttons and functions
A. Indoor temperature
B. Precipitation
C. Outdoor temperature
D. Time
E. Day/date
- Table stand
- Battery cover
- [SET/ C/F ] Press to select unit of temperature, °C or °F. Hold in to enter settings mode.
- [▲] Press to move up. Hold in to manually scan for the rain sensor.
- [MEM/▼] Press to show highest/lowest temperature, move down. Hold in to reset the max or min values.
- Hanging hole
- [SNOOZE/LIGHT] Snooze/backlight.
- [RAIN] Press to select the measuring period for precipitation. Hold in to reset the current period to zero.
- [ ] Press to view the current alarm time. Hold in to set the alarm time.
- [ON] Activate the set alarm.


Symbol guide

- Low battery warning indicator, indoor unit
- Indicator for display of saved max/min temperatures
- Precipitation histogram
- Measuring period
- Rain sensor signal strength
- Low battery warning indicator, rain sensor
- Alarm symbol
- Indicator to show that the snooze function is activated
Instructions for use
Inserting batteries
(i) Note
- Insert batteries into the sensor unit before inserting batteries into the indoor unit. As soon as the indoor unit is energised, it will begin to automatically search for sensors in the vicinity.
- Only use high quality alkaline batteries. Never mix old and new batteries. Replace all batteries at the same time. Never combine rechargeable batteries with non-rechargeable batteries.
- When the batteries in the respective units begin to lose their power, the indicators will show on the display (11, 16). Change batteries in order to ensure the continued operation of the units.
- Changing the battery in the indoor unit erases any saved min and max readings.
Sensor unit
natural_image
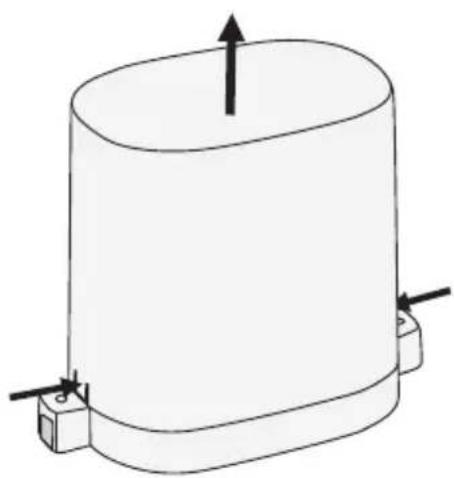
Simple line drawing of a cylindrical object with two protruding pins and an upward arrow, no text or symbols present.- Remove the water collector by pressing in the tabs at the bottom.
- Remove the tape that keeps the measuring cup in place.

natural_image
Technical line drawing of a mechanical device with labeled components and an arrow indicating rotation (no text or symbols present)- Remove the battery cover.
- Insert 2 × AAA/LR03 batteries, observing the markings on the battery compartment.
- Refit the battery cover and the water collector.
Indoor unit
-
Remove the battery cover from the back of the indoor unit.
-
Insert 2 × AAA/LR03 batteries, observing the markings on the bottom of the battery compartment.
-
Refit the battery cover.

natural_image
Technical line drawing of a mechanical device with a handle and internal components (no text or symbols)Setting the time, date, language and unit of measurement
- No more than 10 seconds must elapse between button-presses otherwise the rain gauge will return to the previous display mode.
- Hold in [SET/ C/F] to enter the settings mode. Press and hold in [▲] or [MEM/▼] to change value. Confirm each step by pressing [SET/ C/F].
Set the following in sequential order:

flowchart
graph LR
    A["12Hr/24Hr"] --> B["Hour"]
    B --> C["Minute"]
    C --> D["Year"]
    D --> E["Month"]
    E --> F["Day"]
    F --> G["Language"]
    G --> H["mm/inch"]
- 12Hr/24Hr: Select either 12 or 24 hour clock display.
• Hour: Hour setting.
• Minute: Minute setting.
• Year: Year setting.
• Month: Month setting.
- Day: Day setting.
- Language: Language setting. Selection options: English, Danish, French, German, Italian, Dutch and Spanish.
- mm/inch: Set the unit of measurement in which the amount of precipitation is to be displayed.
Temperature
Max and min readings
- Press [MEM/▼] to display the maximum temperature reading.
- Press the button once again to display the minimum temperature reading.
- Press once more to return to the current temperature reading.
Zeroing the saved max and min readings:
- Press [MEM/▼] repeatedly to display the saved max or min values.
- Hold in [MEM/▼] to set the chosen values to zero.
Precipitation
The rain gauge shows the amount of precipitation during the selected measuring period plus a histogram over the 6 previous hours.
Select the measuring period
Press [RAIN] repeatedly to select a measuring period. Select between 1 hour, 24 hours, 1 week, 1 month or the total precipitation since the rain gauge was last zeroed.
Zeroing the selected measuring period
- Select the measuring period as directed above.
- Hold in [RAIN] to reset the chosen period to zero.
Zeroing all measurement data including histograms
In normal display mode, hold in [▲]. The rain gauge will zero the histogram and all measurement data and then scan for the sensor again.
Display backlight
Press the [ SNOOZE/LIGHT ] (7) to turn the backlight on.
The light will automatically go out after 10 seconds.
Alarm
Setting the alarm
- Hold in [ ] to enter the alarm setting mode.
- Press and hold in [▲] or [MEM/▼] to change value. Confirm each step by pressing [💡]
Set the following in sequential order:
- Hours
- Minutes
- Snooze time (0–60 min)
Handy tip: After the settings have been made, when in normal mode you can press [💡] to display the set alarm time.
Activating/deactivating the alarm
Slide the switch (10) to the side to activate/deactivate the alarm. The alarm symbol (17) will then appear/disappear from the display.
Activating the snooze function
When the alarm sounds:
Press [ SNOOZE/LIGHT ] (7) to activate the snooze function. The alarm will be shut off, the snooze indicator (18) will flash and the alarm will sound again after the set snooze time.
Shutting off the alarm
When the alarm sounds:
Press any of the buttons on the back of the indoor unit. The alarm is turned off and will sound at the set time on the next day.
Installation
Things to consider before choosing where to locate the rain gauge:
Indoor unit
- The indoor unit has a built-in temperature sensor. The unit should therefore not be positioned where it might be affected by heat from heaters, fireplaces or other sources of heat.
- Avoid placing the unit next to metal objects such as metal window frames as this may cause interference with reception.
- The indoor unit can be used with the table stand (1) or hung on a wall using the hanging hole (6). Use fasteners suitable for the wall material and ensure that there are no electrical wires or water pipes in the wall where you intend to drill or screw.
Rain and temperature sensor
- In order to ensure the proper operation of the sensor you should clean the water gauge and change the batteries on a regular basis. Make sure that the sensor unit is mounted in an accessible location.
- Make sure that the sensor is not adversely affected by nearby structures such as trees and buildings.
- Avoid radiant heat from surrounding buildings, roofs, etc. As a rule, the sensor should be installed about 5 ft (1.5 m) above the ground and shaded from direct sunlight.
- Test the operation of the sensor in the intended location before installing it. The range (30 m) can also be affected by the type of obstacles located between the sensor and the indoor unit (e.g. a concrete wall will interfere with the signal more than a plasterboard wall).
- Other wireless equipment using the same frequency band (433 MHz) can reduce the transmission range.
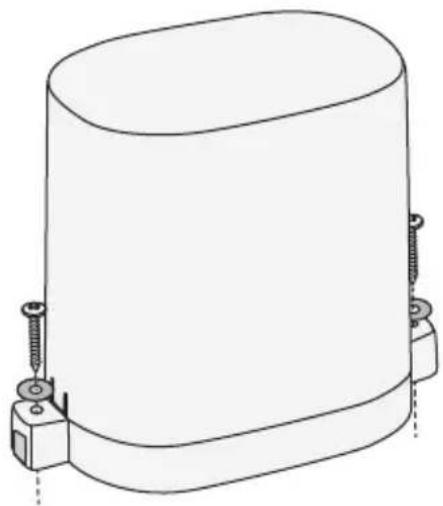
- Make sure that the sensor unit is mounted horizontally. Use an appropriate fastening method for the substrate material in question.
natural_image
Technical line drawing of a cylindrical mechanical component with mounting fasteners (no text or symbols)Care and maintenance
- Clean the product using a damp cloth. Use only mild cleaning agents, never solvents or corrosive chemicals.
- Remove the batteries if the weather station is not to be used for a long time. Old batteries can begin to leak and damage the product.
- Inspect and clean the rain sensor regularly.
Troubleshooting guide
| The display is unclear or unreadable. | Insert new batteries into the unit. |
| The wireless sensor sends no data to the indoor unit.“--.-” is displayed. | If the indoor unit receives no signal from the rain sensor within 3 minutes, an automatic scan is initiated. The signal strength indicator is shown during the scan. After the indoor unit has scanned for 1 hour and not found a sensor, “--.-” is displayed.Remove the batteries, wait for a while and then reinsert them.Insert new batteries into the sensor. Only use high quality alkaline batteries.Try scanning for the sensor manually: Hold in [▲] for 3 seconds. Note that all history from the rain sensor will be erased.Check the distance between the sensor and the indoor unit. The distance should be 1.5–30 m.Make sure that the signal is not disrupted by nearby metal structures.Move the indoor unit away from other electronic devices such as routers, computers and TV sets. |
| The display shows “LL.L” or “HH.H”. | The temperature is outside the measuring range. |
| The displayed temperature or precipitation is incorrect. | Remove the batteries, wait awhile and then reinsert them. Begin a new scan for the sensor (Hold in [▲] for 3 sec)Make sure the units are free from interference from heat sources, air-conditioning units, or similar. |
Responsible disposal
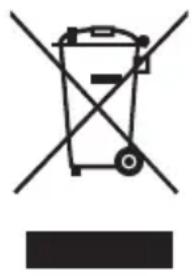
This symbol indicates that the product should not be disposed of with general household waste. This applies throughout the entire EU. In order to prevent any harm to the environment or health hazards caused by incorrect waste disposal, the product must be handed in for recycling so that the material can be disposed of in a responsible manner. When recycling your product, take it to your local collection facility or contact the place of purchase. They will ensure that the product is disposed of in an environmentally sound manner.
natural_image
Symbol of a trash bin crossed with a diagonal line, no text or numbers presentSpecifications
Indoor unit
Temperature range indoors -10 to +50 °C
Temperature range outdoors -30 to +60 °C
Precipitation measuring range 0–9999 mm, 0–50 mm (histogram)
Frequency response 433 MHz
Range, open area 30 m
Batteries 2 × LR03/AAA (sold separately)
Size 23.3 × 92.6 × 98 mm
Weight 133 g
Rain sensor
Frequency 433.94 MHz
Batteries 2 × LR03/AAA (sold separately)
Size 157.7 × 88 × 132 mm
Weight 183 g
Trådlös regnmätare
Art.nr 36-7900 Modell E0330WST2 (Inomhusenhet)
E0013TRF-A1V-YX (Regngivare)
Symbolförklaring

natural_image
Simple line drawing of a cylindrical object with two protruding pins and an upward arrow, no text or symbols present.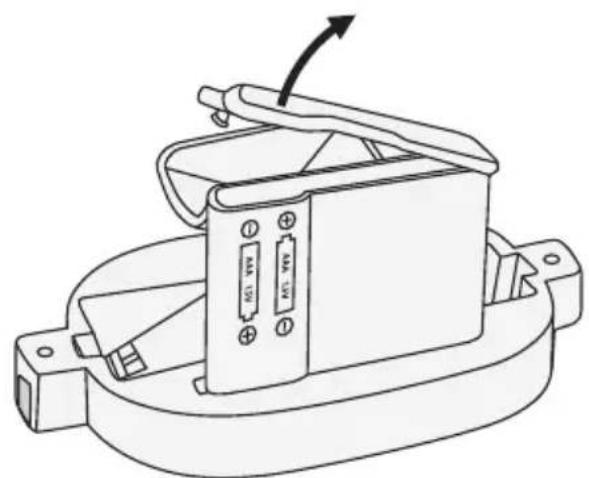
natural_image
Technical line drawing of a mechanical device with battery and housing (no text or symbols)natural_image
Technical line drawing of a mechanical device with a handle and internal components (no text or symbols)natural_image
Technical line drawing of a cylindrical mechanical component with mounting fasteners (no text or symbols)natural_image
Symbol of a trash bin crossed with a diagonal line, no text or numbers presentSpecifikationer
Inomhusenhet
natural_image
Simple line drawing of a cylindrical object with two side supports and an upward arrow indicating force or direction (no text or symbols)
natural_image
Technical line drawing of a mechanical device with battery and switch components (no text or symbols)natural_image
Technical line drawing of a mechanical device with a handle and internal components (no text or symbols)Plassering/montering
natural_image
Technical line drawing of a cylindrical mechanical component with mounting fasteners (no text or symbols)Vedlikehold
natural_image
Symbol of a trash bin crossed with a diagonal line, no text or numbers presentSpesifikasjoner
Innendørsenhet
Temperaturområde innendørs -10 til +50 °C
Merkkien selitykset

natural_image
Simple line drawing of a cylindrical object with two side supports and an upward arrow indicating force or direction (no text or symbols)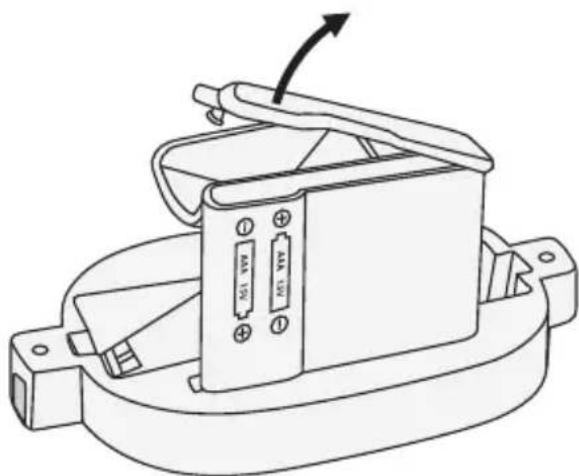
natural_image
Technical line drawing of a mechanical device with labeled components and an arrow indicating direction (no text or symbols present)natural_image
Technical line drawing of a mechanical device with a handle and internal components (no text or symbols)natural_image
Technical line drawing of a cylindrical mechanical component with mounting fasteners (no text or symbols)Huolto ja ylläpito
natural_image
Symbol of a trash bin crossed with a diagonal line, no text or numbers presentTekniset tiedot
Sisäyksikkö
natural_image
Simple line drawing of a cylindrical object with two protruding pins and an upward arrow, no text or symbols present.
natural_image
Technical line drawing of a mechanical device with a handle and mounting base (no text or symbols)natural_image
Technical line drawing of a mechanical device with a handle and internal components (no text or symbols)natural_image
Technical line drawing of a cylindrical mechanical component with mounting fasteners (no text or symbols)Pflege und Wartung
natural_image
Symbol of a trash bin crossed with a diagonal line, no text or numbers presentTechnische Daten
Innenmodul
Declaration of Conformity
This declaration of conformity is issued under the sole responsibility of the manufacturer.
Denna EU-försäkran om överensstämmelse utfärdas på tillverkarens eget ansvar. / Samsvarserklæringen er utstedt under produsentens eget ansvar. / Tämä EU-vaatimustenmukaisuusvakuutus on annettu valmistajan yksinomaisella vastuulla. / Die alleinige Verantwortung für die Ausstellung dieser Konformitätserklärung trägt der Hersteller:
Wireless Rain Gauge
36-7900
E0330WST2 (Indoor unit) / E0013TRF-A1V-YX (Rain gauge)
has been manufactured in full compliance with the requirements of the Radio Equipment Directive (RED) 2014/53/EU and relevant harmonized standards / har tillverkats i full överensstämmelse med kraven i 2014/53/EU och relevanta harmoniserade standarder / har blitt produsert i full overensstemmelse med kravene i 2014/53/EU og relevante harmoniserte standarder / on valmistettu täysin direktiivin 2014/53/EU ja asiaankuuluvien yhdenmukaistettujen standardien vaatimusten mukaisesti / wurde in voller Übereinstimmung mit den Anforderungen von 2014/53/EU sowie relevanten harmonisierten Normen hergestellt.
Reference to harmonized standards used, or reference to the specifications in which declaration of conformity is declared:
Hänvisning till de harmoniserade standarder som använts eller hänvisningar till de specifikationer som försäkran om överensstämmelse deklareras: / Referere til harmoniserte standarder som brukes, eller henvisninger til spesifikasjonene der samsvarserklæring er erklärt: / Viittaus yhdenmukaistettuihin standardeihin, joita on käytetty, tai viittaus eritelmiin, joiden perusteella vaatimusten mukaisuusvakuutus on annettu: / Verweis zu den verwendeten harmonisierten Normen oder Verweise auf die Spezifikationen, die der Konformitätserklärung zugrunde liegen:
Article 3.1a (Safety): EN 300220-1/EN 300220-2
Article 3.1b (EMC): EN 301489-1/EN 301489-3
Article 3.2 (Radio): EN 62368-1 EN 50663/EN 62479
Signed for and on behalf of:

Henrik Alfredsson
Product Quality & Compliance Manager
Insjön, Sweden, 2019-11-19
CLAS OHLSON AB, SE-793 85 INSJÖN, SWEDEN
SVERIGE
KUNDTJÄNST Tel: 0247/445 00
E-post: kundservice@clasohlson.se
INTERNET
www.clasohlson.se
BREV Clas Ohlson AB, 793 85 INSJÖN
NORGE
KUNDESENTER Tlf.: 23 21 40 00
E-post: kundesenter@clasohlson.no
INTERNETT
www.clasohlson.no
POST Clas Ohlson AS, Postboks 485 Sentrum, 0105 OSLO
SUOMI
ASIAKASPALVELU Puh.: 020 111 2222
POSTAL 10 - 13 Market Place
Kingston upon Thames
Surrey
KT1 1JZ
DEUTSCHLAND
KUNDENSERVICE Hotline: 040 2999 78111
E-Mail: kundenservice@clasohlson.de
HOMEPAGE www.clasohlson.de
POSTANSCHRIFT
- Viktig information:
- Safety
- Buttons and functions
- Instructions for use
- Inserting batteries
- Note
- Indoor unit
- Setting the time, date, language and unit of measurement
- Temperature
- Max and min readings
- Zeroing the saved max and min readings:
- Precipitation
- Select the measuring period
- Zeroing the selected measuring period
- Zeroing all measurement data including histograms
- Display backlight
- Alarm
- Setting the alarm
- Activating/deactivating the alarm
- Activating the snooze function
- Shutting off the alarm
- Installation
- Rain and temperature sensor
- Care and maintenance
- Responsible disposal
- Specifications
- Rain sensor
- Trådlös regnmätare
- Specifikationer
- Inomhusenhet
- Plassering/montering
- Vedlikehold
- Spesifikasjoner
- Innendørsenhet
- Huolto ja ylläpito
- Tekniset tiedot
- Sisäyksikkö
- Pflege und Wartung
- Technische Daten
- Innenmodul
- Declaration of Conformity
- Wireless Rain Gauge
- SVERIGE
- NORGE
- SUOMI
- DEUTSCHLAND
Brand : Cotech
Model : E0330WST2
Category : Rain Gauge