VAPORETTO LEADER - Steam cleaner POLTI - Free user manual and instructions
Find the device manual for free VAPORETTO LEADER POLTI in PDF.
| Brand | POLTI |
| Model | VAPORETTO LEADER |
| Product type | Steam cleaner |
| Power supply | 230 V - 50 Hz |
| Boiler power | 1500 W |
| Iron power (optional) | 750 W |
| Boiler capacity | 1.5 L |
| Weight | 6.3 kg |
| Dimensions (L x W x H) | 31 x 27 x 46 cm |
| Safety | Patented safety cap, safety thermostat |
| Package contents | Generator, flexible hose, gun, extension tube, large brush, small brush, high-pressure nozzle, anti-drip bottle, bonnet and mop, window squeegee |
| Optional accessories | High-pressure nozzle extension, wallpaper remover, iron (Pro/Inox), iron rest, bag |
| Uses | Steam cleaning of floors, windows, carpets, ovens, refrigerators, defrosting, ironing, steaming |
| Usage recommendation | Test first on delicate surfaces |
| Maintenance | Drain and clean the tank 1 to 2 times per month with water only |
| Warranty | 1 year, 3 years for the boiler |
| Filling | 1.2 L of tap water via the anti-drip bottle |
| Water shortage signal | Acoustic signal (7B) |
| Pressure indicator | Pressure gauge (7C) and indicator light (4A) |
| Manual | Available for free as PDF download (53 pages) |
Frequently Asked Questions - VAPORETTO LEADER POLTI
User questions about VAPORETTO LEADER POLTI
0 question about this device. Answer the ones you know or ask your own.
Ask a new question about this device
Download the instructions for your Steam cleaner in PDF format for free! Find your manual VAPORETTO LEADER - POLTI and take your electronic device back in hand. On this page are published all the documents necessary for the use of your device. VAPORETTO LEADER by POLTI.
USER MANUAL VAPORETTO LEADER POLTI
natural_image
Black and white photo of a Vaporetto Leader Polet vacuum cleaner (no visible text or symbols on body)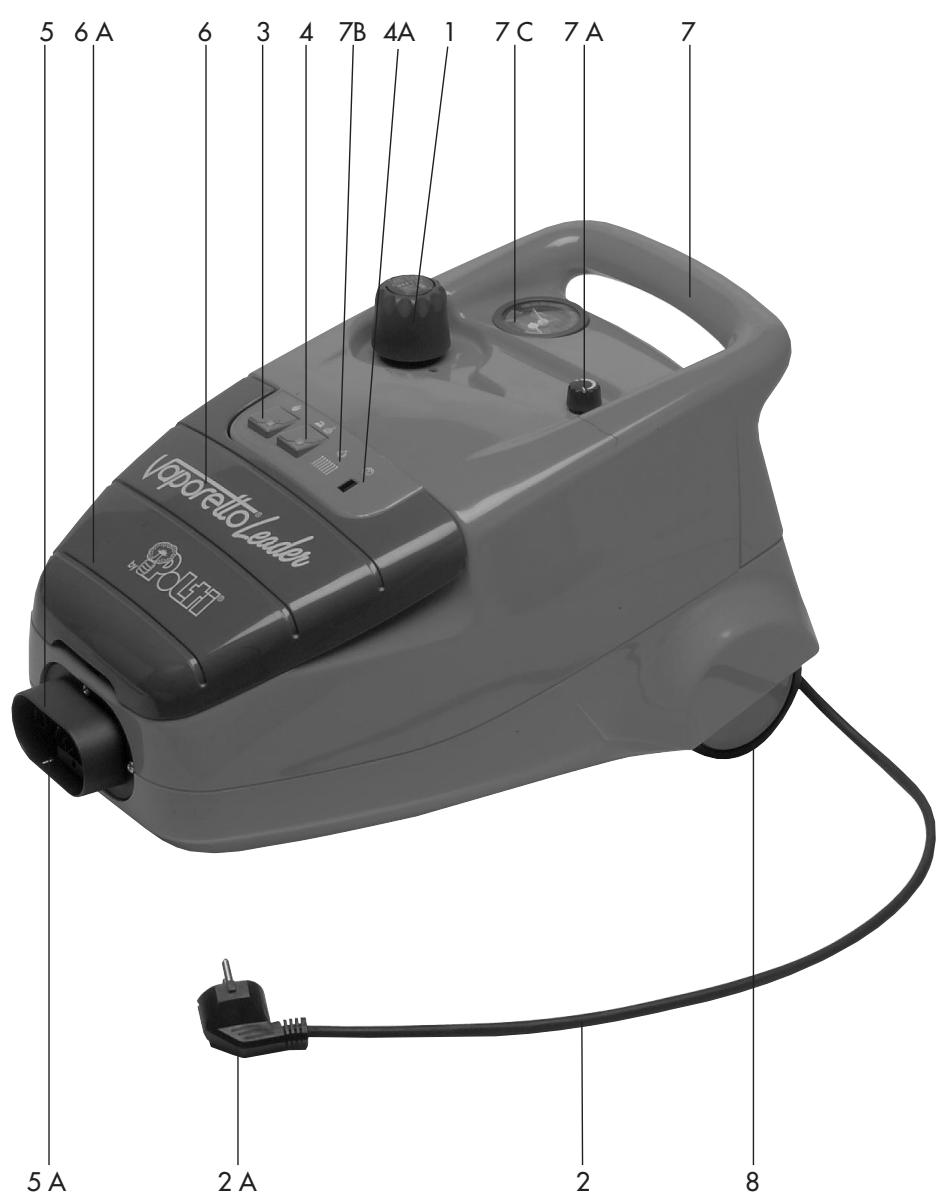
text_image
5 6 A 6 3 4 7B 4A 1 7 C 7 A 7 Voporetto London 5 A 2 A 2 8
text_image
24 24 A 24 B 15 19 16 17 14 18 20 14 21 23 22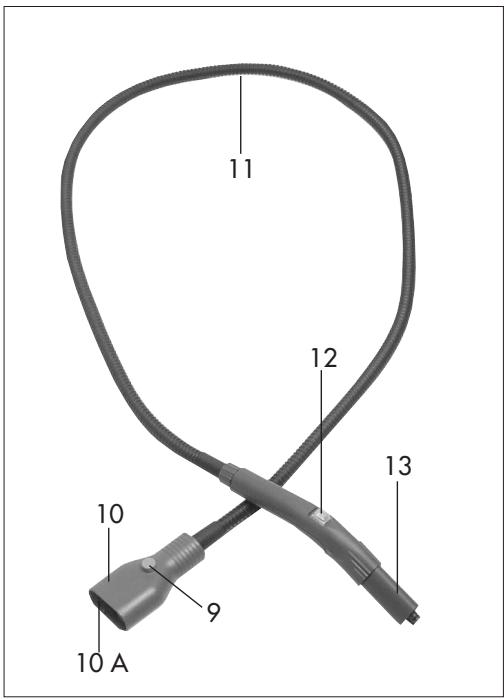
text_image
10 A 9 10 11 12 13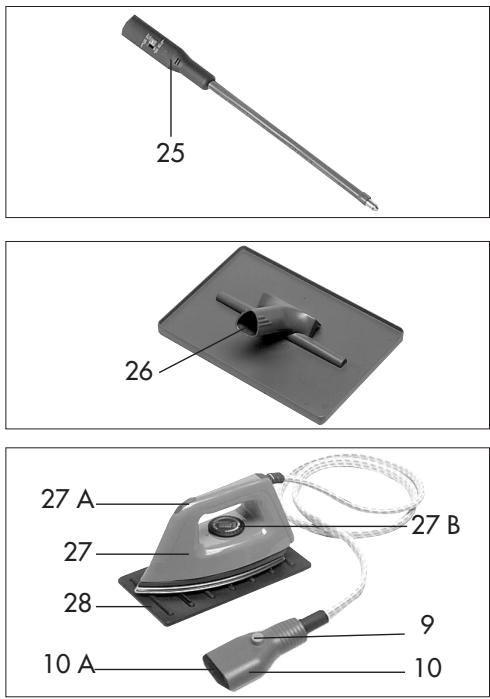
text_image
25 26 27 A 27 28 10 A 27 B 9 10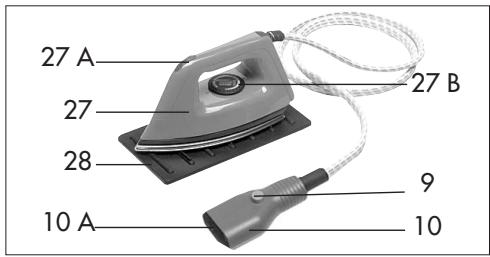
text_image
27 A 27 28 10 A 27 B 9 10Vaporetto® Leader

text_image
POLti®natural_image
Close-up of a mechanical component with a black plastic fitting and a metallic bracket, labeled 'FIG. 1' (no text or symbols on the main subject)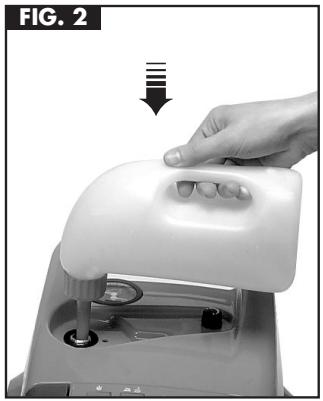
natural_image
Hand pressing down on a white plastic device with a handle, labeled 'FIG. 2' (no text or symbols on the device itself)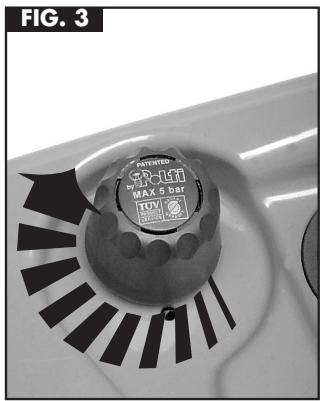
natural_image
Close-up of a mechanical component with a circular dial and black radial blades, labeled 'FIG. 3' (no readable text or symbols beyond label)natural_image
Close-up of a black electric vehicle charging plug with connector, showing internal wiring and mounting features (no text or symbols visible)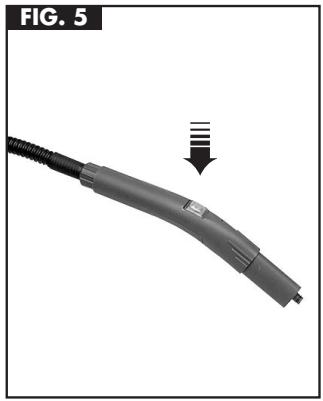
natural_image
Close-up of a gray automotive connector with a black cable and a downward arrow indicating compression or disassembly (no text or symbols)CON I NOSTRI ACCESSORI E RICAMBI
FERRI DA STIRO
natural_image
Close-up of a mechanical component with a black circular base and metallic pins, labeled 'FIG. 1' (no text or symbols on the main subject)
natural_image
Hand pressing down on a white plastic device with a handle, labeled 'FIG. 2' (no text or symbols on the device itself)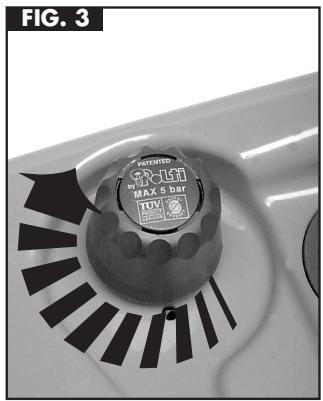
natural_image
Close-up of a car door with a circular button and black patterned cutouts (no visible text or symbols)PRECAUCIONES DE USO
natural_image
Close-up of a power plug connector with arrows indicating fastening or adjustment (no text or symbols visible)
natural_image
Close-up of a gray electric shock absorber with a downward arrow indicating compression (no text or symbols)text_image
FIG. 6 ENGLISH DESIGN WINDING DESIGN ENGLISH DESIGN ENGLISH DESIGN ENGLISH DESIGNnatural_image
Close-up of a mechanical component with a black plastic fitting and a metallic screw, labeled 'FIG. 1' (no text or symbols on the main subject)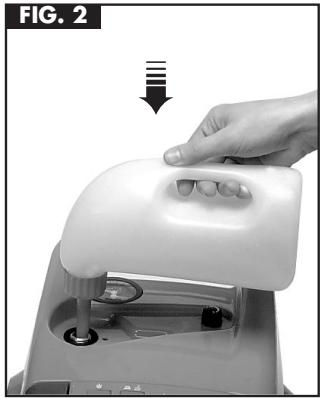
natural_image
Hand pressing down on a white plastic device component (no text or symbols visible)
natural_image
Close-up of a car interior with a circular button labeled 'MAX 5 Bag' and a segmented circular pattern (no readable text beyond label)RE-REMLISSAGE DU VAPORETTO
EN COURS D'UTILISATION
natural_image
Close-up of a black electric vehicle charging plug with two arrows indicating fast charging direction (no text or symbols)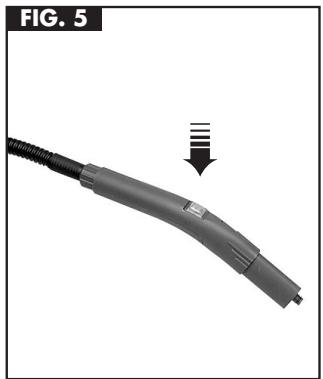
natural_image
Close-up of a gray handheld device with a black cable and a downward arrow indicating a process or transformation (no text or symbols present)AVEC NOS ACCESSOIRES OPTIONNELS
FER A REPASSER
natural_image
Close-up of a mechanical component with a circular housing and a pointer indicating direction (no text or symbols)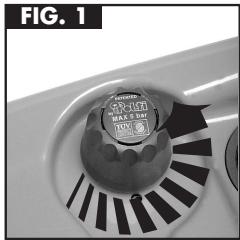
natural_image
Close-up of a kitchen sink with a circular button containing a brand logo and 'TOM' label (no readable text beyond label)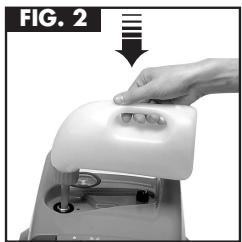
natural_image
Hand pressing a white electronic device with a handle, labeled 'FIG. 2' (no text or symbols on the device itself)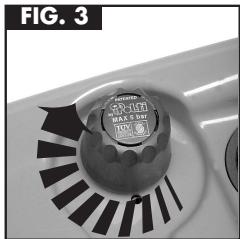
natural_image
Close-up of a small container with a circular label and arrow-shaped pattern, no readable text or symbols present.
NACHFÜLLEN
natural_image
Close-up of a hand holding a black remote control with a scroll wheel, showing a left-hand rule and a double-headed arrow (no text or symbols on the device itself)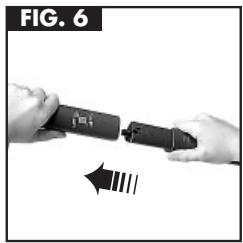
natural_image
Close-up of hands holding a black cylindrical tool with a directional arrow indicating motion (no text or symbols)
ARBEITSDRUCK
natural_image
Close-up of a vacuum cleaner's brush applying material to a surface, showing a downward arrow (no text or symbols)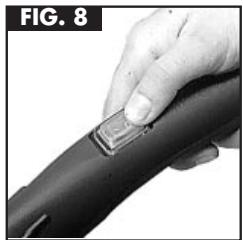
natural_image
Close-up of a hand holding a black hair clip with a small rectangular object attached (no text or symbols visible)natural_image
Illustration of a steam iron with a coiled cable, labeled 'FIG. 9' (no text on device or background)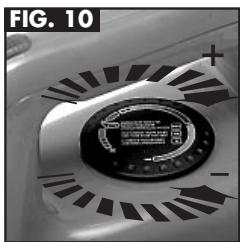
natural_image
Close-up of a mechanical component with a circular dial and radial grooves, labeled 'FIG. 10' (no readable text or symbols)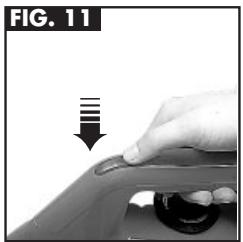
natural_image
Hand pressing down on a car wheel component, no text or symbols visible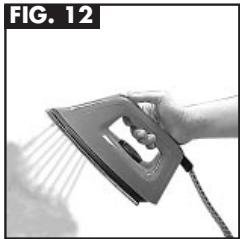
natural_image
Hand using a steam iron to clean air (no text or symbols visible)
BÜGELN
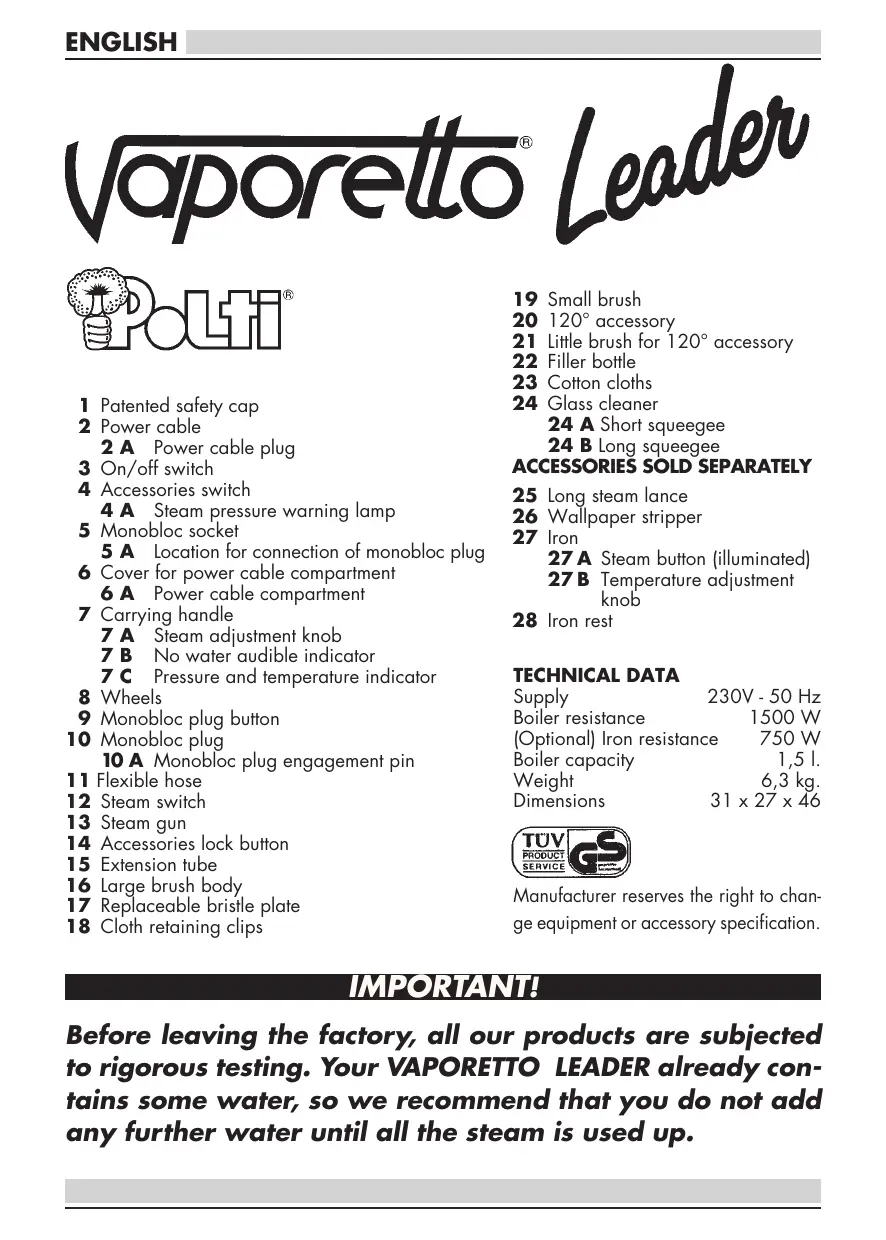
1 Patented safety cap
2 Power cable
2 A Power cable plug
3 On/off switch
4 Accessories switch
4 A Steam pressure warning lamp
5 Monobloc socket
5 A Location for connection of monobloc plug
6 Cover for power cable compartment
6 A Power cable compartment
7 Carrying handle
7 A Steam adjustment knob
7 B No water audible indicator
7 C Pressure and temperature indicator
8 Wheels
9 Monobloc plug button
10 Monobloc plug
10 A Monobloc plug engagement pin
11 Flexible hose
12 Steam switch
13 Steam gun
14 Accessories lock button
15 Extension tube
16 Large brush body
17 Replaceable bristle plate
18 Cloth retaining clips
19 Small brush
20 120° accessory
21 Little brush for 120° accessory
22 Filler bottle
23 Cotton cloths
24 Glass cleaner
24 A Short squeegee
24 B Long squeegee
ACCESSORIES SOLD SEPARATELY
25 Long steam lance
26 Wallpaper stripper
27 Iron
27 A Steam button (illuminated)
27 B Temperature adjustment knob
28 Iron rest
TECHNICAL DATA
Supply 230V - 50 Hz
Boiler resistance 1500 W
(Optional) Iron resistance 750 W
Boiler capacity 1,5 l.
Weight 6,3 kg.
Dimensions 31 x 27 x 46

Manufacturer reserves the right to change equipment or accessory specification.
IMPORTANT!
Before leaving the factory, all our products are subjected to rigorous testing. Your VAPORETTO LEADER already contains some water, so we recommend that you do not add any further water until all the steam is used up.
GENERATOR
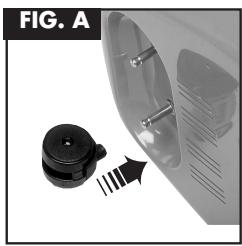
Fig. A - Fit the pivoting wheels.
Fig. 1 - Put generator and accessories switches in the "off" position.
Remove the patented safety cap by screwing anti-clockwise.
Fig. 2 - Place the filler funnel in the aperture left by the tank. Do not over-fill.
Fig. 3 - Fully screw on the patented safety cap (clockwise).
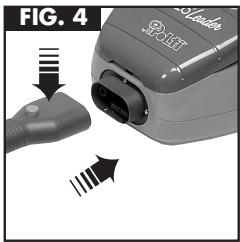
Fig. 4 - Connect the coupling on the central connector into the plug-in connection on the generator, pressing lightly on the connector button, which will click up when connected.
natural_image
Close-up of a mechanical component with a circular housing and a pointer indicating direction (no text or symbols)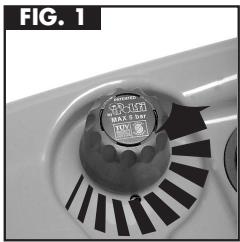
natural_image
Close-up of a mechanical component with a circular inset showing internal components (no visible text or symbols)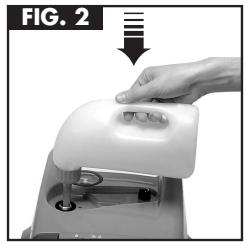
natural_image
Hand pressing a white mechanical component on a machine (no text or symbols visible)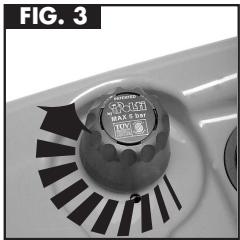
natural_image
Close-up of a mechanical component with a circular button and black triangular blades (no visible text or symbols)
REFILLING
When the water has all been used the machine will indicate (on most models) by a buzzer or "water out" light.
A safety thermostat prevents the empty generator from overheating.
text_image
FIG. 4 3/16/2017 3/16/2017CARE! If refilling the generator tank whilst still warm, begin pouring slowly and in small quantities to avoid escapes of hot steam or "spitting" from the aperture. If you overfill or spill water around the aperture this escapes from underneath the unit. In very hard water areas, we recommend use of the Polti Water-filter.
ACCESSORIES
The tools are easily connected to the central connector. Put the accessories on/off switch on the generator and the on/off switch on the steam gun to the "off" position.
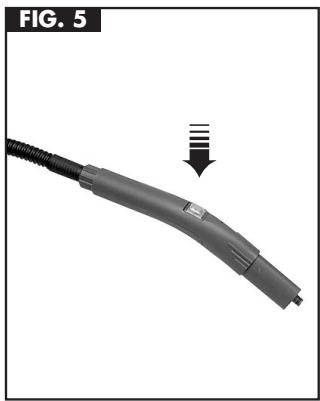
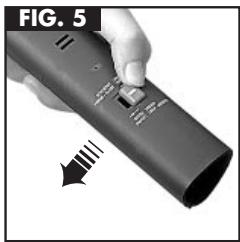
Fig. 5 - Put the lock-on connector button on the tool or extension tube to "open".
Fig. 6 - Connect to the handgrip connection on the steam gun. Add a further extension tube if required.
Fig. 7 - Add the tool (eg large brush) by putting its connector button to "open" and attaching. Lock on by pushing connector button across to "closed" position.
Switch on the accessories on/off switch on the generator. After a few minutes the generator is then ready for use.
Fig. 8 - Steam jet can be switched on and off by the switch on the steam gum handle.
Always unplug the supply cable from the mains while changing accessories.
Where your machine has the steam regulation feature, you can regulate the amount of steam as necessary according to application.

OPERATING PRESSURE
Carry on if control lamp comes on whilst cleaning. This is quite normal indicating that the system is maintaining its correct operating pressure.
natural_image
Close-up of a hand holding a black remote control with a scroll wheel, showing a finger pressing the button (no text or symbols visible)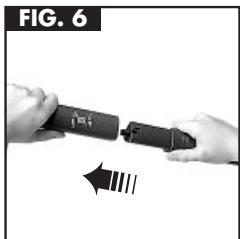
natural_image
Close-up of hands holding a black cylindrical device with a directional arrow indicating motion (no text or symbols)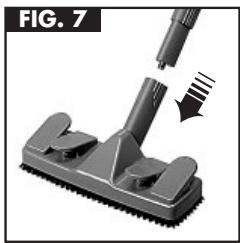
natural_image
Close-up of a vacuum cleaner's brush applying material to a surface, showing mechanical components and a downward arrow (no text or symbols)
natural_image
Close-up of a hand holding a black hair clip with a small rectangular clip attached (no text or symbols visible)PROFESSIONAL IRONING STATION
(Optional extra)
With generator containing water and ready for use (accessory switch on generator in "off" position).
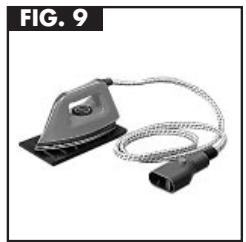
Fig. 9 - Connect the system plug on the iron into the connection on the generator for the central connector; Place iron soleplate down on the heat-resistant stand.
Fig. 10 - For Steam Ironing place the thermostat ring on the highest "steam" / "cotton/linen" position. Wait until the control-light on top of the iron goes out. The iron is then ready to use.
Fig. 11 - Fig. 12 - The steam switch on top of the iron is your on/off control for the steam through the iron. When starting an ironing session, allow the first jets of steam to escape into an old cloth, until the steam begins to be emitted evenly. If you wish to dry iron, position the regulator to indicate the required fabric. Switch "on" the accessories on/off switch on the generator but switch "off" the generator on/off switch. Wait until the control light on top of the iron goes out, indicating the iron is ready for use. Since steam is not required for dry ironing, do not press the "steam on" switch on top of the iron.
natural_image
Electric iron with attached cable, labeled FIG. 9 (no text or symbols on the device itself)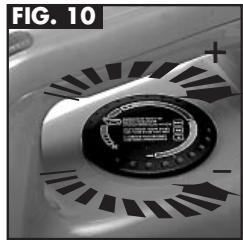
natural_image
Close-up of a mechanical component with a circular dial and radial patterns (no visible text or symbols)
natural_image
Hand pressing down on a car wheel component, no text or symbols visible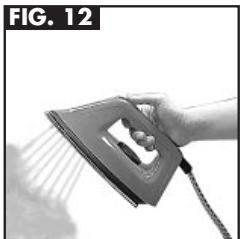
natural_image
Hand using a steam iron to lift a surface, no text or symbols visibleWith the Polti professional steam iron you can even iron vertical objects (eg. curtains) while still hanging. For steaming or freshening up fabrics (curtains, suits, shirts, etc.) you can also use the steam gun on the central connector.

IRONING
Do not leave the iron unattended whilst connected to the mains. It is always advisable to allow the first jets of steam to go into an old cloth, to allow remaining condensation globules to escape. Iron only on surfaces which are not sensitive to heat and which steam can penetrate.
ACCESSORY TOOL AND USAGE HINTS
(Standard accessory pack varies with machine)
WARNING
Before cleaning cookers, fridges lamps or other electrical appliances we recommend you should always disconnect the appliance to be cleaned from the mains.
STEAM GUN (ON/OFF HANDLE)
If necessary wipe the surface cleaned with a cotton cloth after cleaning with steam gun. This helps to take up any reamining dampness, especially after close application.
To regulate the steam temperature and cleaning power hold the gun nearer to or further from the surfaces as required. By adding one or more extension tubes you can also use the outlet of the extension tube as a steam gun to avoid over-reaching.
Use the steam gun in any application; eg to get into hard-to-reach corners and crannies in living rooms or bathrooms, in the kitchen (eg cooker or fridge), car interiors, for softening of stains in fabrics, etc.

GENERAL
Apply the steam jet with great care especially on sensitive surfaces to avoid damage by the hot steam. Never hold your hand close to the steam, the steam is even effective in places which cannot be reached by normal cleaning methods. Even old deposits are released and removed. If you find strong smells given off by the dirt released, ventilate the room well whilst working.
LARGE BRUSH
Use this brush to clean all large surfaces. Stretch the cotton cloth lightly over the bristles using the clips provided on the brush head. Switch on the steam at the handgrip, and move the cloth-covered brush gently over the surfaces to be cleaned (including rugs and carpets).
To clean hard surfaces you need only place the brush head inside a cloth without clipping on, if you wish. To clean heavily soiled surfaces, apply the brush with steam on first without a cloth to release the dirt, then proceed as above.
With the large brush you can also clean large tiles, wall surfaces or other wall coverings, or prepare badly soiled large glass surfaces.
SMALL BRUSH
Use this brush for surfaces similar to those mentioned for the large brush, but where the area to be covered is smaller. Always cover the brush head with at least one small cotton cloth (or our special sockettes). Dirty cloths can be washed in a washing machine or dishwasher, (however do not add softener).

CLEANING WITH BRUSHES
On sensitive surfaces (eg plastic or synthetics, varnished surfaces) always use at least one cotton cover (to avoid marking).
WOOD SURFACES
Too long or too strong an application of steam may loosen wax, furniture polish or dye from wood surfaces (eg furniture, doors, etc.). On such surfaces give only a short gentle application from a distance or play the steam into a cloth and then wipe surface with the cloth.
FABRICS
Before cleaning fabrics, always test first on a non-visible area.
Apply steam in the non-visible area and leave to dry before inspecting for colour-change or texture-change.
120° NOZZLE WITH REMOVABLE CIRCULAR BRUSH
Use this tool to clean hard to reach corners, grooves and crannies (eg sanitaryware and piping, radiators, etc.) as well as resistant dirt deposits like grease and fat. The fine steam particles also release dirt deposits in ovens freezers and fridges as well as bathroom and toilet fittings. You clean and disinfect in one without chemicals.

GLASS SURFACES
Excessive temperature variations on a piece of glass can cause it to crack, especially where outside air temperature is exceptionally low. The whole glass surface should first be pre-warmed with the steam gun from a distance, so as to raise the temperature gradually and avoid tension in the glass.
WINDOW SQUEEGEE
Affix the small or large blade (deep side of blade downwards) according to the area to be cleaned. If necessary, add extension tube(s). Hold the steam jets on the tool up to the glass, then switch on the steam, and pull the squee-gee blade down the glass surface. Heavily-soiled glass surfaces can be pre-prepared with the cloth-covered brushes.
GENERAL HINTS
The Polti-patented safety cap prevents the unit being opened whilst any pressure remains in the system.
Always switch the generator off whilst filling or emptying. Any remaining pressure after cooling can be evacuated by switching accessories on/off switch to "on" till all remaining steam/pressure is evacuated. Always close the safety-cap by screwing to hand tight.
Empty and swill out the generator tank with just normal tapwater once every 1-3 months according to water-hardness in your area. In this way you remove limescale deposits and maintain the system's efficiency.
After using the brushes allow to cool in free-standing position to avoid misshaping the bristles.
The manufacturer cannot accept responsibility for use of the system which is not in accordance with operating instructions.

CARE OF UNIT
Before cleaning or servicing the unit, ensure it is disconnected from the mains. Never empty the generator tank when the water inside is still hot.
POLTI ACCESSORIES AND SPARES
| Central connector / steam gun | Round circular brushes (for 120° nozzle) |
| Extension tubes | Large cloths |
| Large brush | Small cloths |
| Small brush | Filler funnel |
| Window squeegee | Professional pressing iron |
| 120° nozzle | Water filter |
| Long steam lance | (container with replaceable filter for softening of especially hard water, distilled) |
| Wallpaper stripper tool | |
| Replacement bristles (large brush) | |
| Replacement bristles (small brush) | Replacement filter |
WARRANTY
Your Polti system bears a warranty against defective materials or workmanship giving 3 years cover from date of purchase in the case of the generator tank and 1 year on the rest of the system. This guarantee is valid for Great Britain and Ireland. Please register your purchase for warranty according to the card included with your new system. Damage due to unusual handling or operation of the machine or normal wear and tear is excepted.
Consequential damage is also not covered by the warranty. In case of failure please return the machine to your dealer or to your nearest Polti Service Centre.
Vaporetto® Leader

text_image
POLti®natural_image
Close-up of a mechanical component with a black knob and metallic pins, next to a transparent cylindrical housing (no text or symbols visible)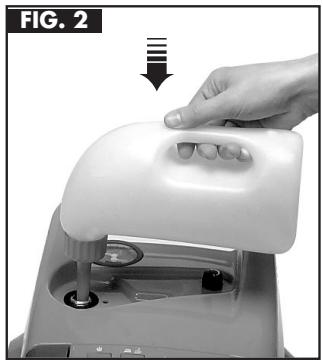
natural_image
Hand pressing down on a white plastic device component (no text or symbols visible)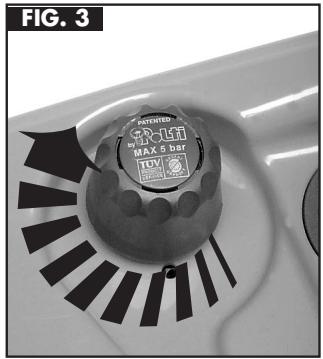
text_image
FIG. 3 ROLLI MAX 5 bar TUV MAX 5 barGEBRUIKSVOORSCHFIRFTEN
natural_image
Close-up of a charging plug with two connectors and a power outlet, labeled FIG. 4 (no text or symbols on the device itself)