
NI-GT150 - Steam cleaner PANASONIC - Free user manual and instructions
Find the device manual for free NI-GT150 PANASONIC in PDF.


| Product Type | Steam Iron with detachable water tank |
| Model Number | NI-GT150 |
| Brand | Panasonic |
| Rated Voltage | 220-240 V ~ 50-60 Hz |
| Power Consumption | 2000-2400 W |
| Weight | Approx. 2.6 kg |
| Dimensions (W x D x H) | Approx. 356 x 200 x 240 mm |
| Power Cord Length | Approx. 1.8 m |
| Detachable Water Tank Capacity | Approx. 1.5 L |
| Soleplate Material | Graphite ceramic |
| Steam Output | Enhanced steam level and eco steam level; steam boost available |
| Temperature Settings | Adjustable via temperature selector (e.g., silk, wool, cotton, linen) |
| Dry Ironing | Yes |
| Automatic Shut-Off | After 10 minutes of inactivity or continuous dry ironing |
| Cleaning Mode | Automatic cleaning reminder after 2160 minutes of use; manual cleaning mode available |
| Water Shortage Indicator | Red LED when water level is low |
| Safety Features | Overheat protection, automatic shut-off, cool-down period before storage |
| Usage | Household use only; not for commercial use |
| Warranty | Registered online via QR code (Malaysia only) |
Frequently Asked Questions - NI-GT150 PANASONIC
User questions about NI-GT150 PANASONIC
0 question about this device. Answer the ones you know or ask your own.
Ask a new question about this device
Download the instructions for your Steam cleaner in PDF format for free! Find your manual NI-GT150 - PANASONIC and take your electronic device back in hand. On this page are published all the documents necessary for the use of your device. NI-GT150 by PANASONIC.
USER MANUAL NI-GT150 PANASONIC
Operating Instructions
Arahan Penggunaan
(Household use only) Steam Iron
© Panasonic corporation 2023
متح في الصين
P1023-0
Printed in China
Dicetak di China
Website: https://www.psnasonic.com
© Panasonic corporation 2023
Warranty registration
The warranty can be
registered online. Please
visit the website by
scanning the QR code.
Only Malaysia
[QR Code]
[Unreadable]
[QR Code]
18200A-5860A
N-6T120mm
3075914


Panasonic
Operating Instructions
(Household Use Only) Steam Iron
Model No. NI-GT150

English
Contents
Safety precautions----04-09
Parts identification 10-12
Operating instructions for each part----12-13
How to use----13-15
After use 15
Cleaning 16-17
Specifications 17
Fabric and ironing recommendations----18
Troubleshooting 19-20
Thank you for purchasing this Panasonic product.
Before operating this unit, please read these instructions completely and save them for future use.


Safety precautions
To reduce the risk of electric shock, injury, fire, loss of life, and damage to equipment or property, always observe the following safety precautions.
Explanation of symbols
The following symbols are used to classify and describe the level of hazard, injury, and property damage caused when the denotation is disregarded and improper use is performed.

WARNING
Denotes a potential hazard that could result in serious injury or death.

CAUTION
Denotes a hazard that could result in minor injury or damage your belongings.
The following symbols are used to classify and describe the type of instructions to be observed.

This symbol is used to alert users to a specific operating procedure that must not be performed.

This symbol is used to alert users to a specific operating procedure that must be followed in order to operate the unit safely.
WARNING
Do not use when the power plug or power cord is damaged or hot. Never use the appliance if the power plug fits loosely in socket-outlet.
- Doing so may cause electric shock, or fire due to a short circuit.
Do not leave the appliance unattended while it is connected to socket-outlet.
- Doing so may cause fire.
Do not connect or disconnect the power plug to socket-outlet with wet hands.
- Doing so may cause electric shock or injury.
Do not damage, modify, forcibly bend, pull, or twist the power cord.
Do not place anything heavy on or pinch the power cord.
- Doing so may cause electric shock or fire due to a short circuit.
Do not allow the power cord to touch hot surfaces of the iron.
- Doing so may cause electric shock or injury.


WARNING

Do not use with the power cord bundled.
- Doing so may cause electric shock or fire due to a short circuit.

Do not use the appliance with wet hands.
- Doing so may cause electric shock or fire due to a short circuit.

Never modify, disassemble, or repair the appliance by yourself.
- Doing so may cause ignition or injury due to abnormal operation. Contact an authorized service agent for repair.

Do not use in proximity of flammable materials (such as benzine or the like).
- Doing so may cause an explosion or fire.

Do not wrap the power cord around the appliance for storage.
- Doing so may cause breakage to the wire of the power cord, and may cause electric shock or fire due to a short circuit.

Do not immerse the appliance in water or other liquids.
- Doing so may cause burns, electric shock or fire due to a short circuit.

The appliance is not to be used if it has been dropped, if there are visible signs of damage or if it is leaking.
- Refer servicing to authorized service personnel.

Do not use in a way exceeding the rating of the socket-outlet or the wiring.
- Exceeding the rating by connecting too many plugs to one socket-outlet may cause fire due to overheating.

Always ensure the appliance is operated on an electric power source matched to the rated voltage indicated on the appliance.
Fully insert the power plug.
- Failure to do so may cause injury, electric shock or fire.

Regularly clean the power plug to prevent dust from accumulating.
- Disconnect the power plug and wipe with a dry cloth. - Failure to do so may cause an accident or injury.

Independently use socket-outlet, and do not use extension cord.
- Failure to do so may cause electric shock or fire.

This product must use the electrical outlet with earth connection.
- Failure to do so may cause fire or electric shock.



WARNING
This appliance is not intended for use by persons (including children) with reduced physical, sensory or mental capabilities, or lack of experience and knowledge, unless they have been given supervision or instruction concerning use of the appliance by a person responsible for their safety. Children should be supervised to ensure that they do not play with the appliance. - Failure to do so may cause an accident or injury.
Immediately stop using and remove the power plug if there is an abnormality or malfunction.
- Using it in such conditions may cause fire, electric shock, or injury.
If the power cord is damaged, it must be replaced by the manufacturer, its service center, or similarly qualified persons in order to avoid a hazard.
- Failure to do so may cause an accident or injury.
Be sure to place or use the product on a flat and stable surface.
- Failure to do so may scratch the steamer head or cause the product to fall over, thus resulting in injury or scalds.
The iron must be firmly rested on the power base, and the power base must be placed on a flat and stable surface. When this product is used as a horizontal steam iron, the iron must be used on a flat, stable surface.
- The iron may be scratched, or even injuries or scald may be caused if the iron falls over.
CAUTION
Do not insert pins or needles into the appliance or use the appliance on clothes with sewing needles or the like inserted. - Doing so may cause electric shock or injury.
Do not put the soleplate too close to you or others since steam may unexpectedly erupt from it. - Doing so may cause scalds or injury.



CAUTION

Do not use the appliance with the exception of fabric.
- Failure to do so may cause damage it.

Do not store the appliance until it has fully cooled down.
- Doing so may cause scalds.

Do not take out the detachable water tank while you are using the product.
- Doing so may cause water leakage.

Do not store the appliance while the power cord is twisted.
- Doing so may cause breakage to the wire of the power cord, and may result in scalds, electric shock or fire due to a short circuit.

Do not add perfume, vinegar, starch, descaling agents, ironing aids or other chemicals in the detachable water tank. Please only use room-temperature pure water or distilled water in this appliance.
- Otherwise the clothes may be stained or discolored.

Do not use any ironing accessories available on the market.
- Doing so may cause burns or damage to cloth due to incorrect operation.

Do not use the product near walls or furniture that cannot withstand high temperature or humidity.
- Doing so may damage the wall or furniture.

Do not move or lift the power base by pulling on the corded hose.
- Doing so may damage the corded hose, thus resulting in electric shock or fire.

Do not use steam when wearing gloves through which steam can penetrate.
- Doing so may cause scalds.

Do not use the product with the corded hose compressed or clogged.
- Otherwise the hot water may come out from the power base and thus damage the floors and carpets or result in scalds.

Do not use the product with the corded hose or power cord entangled.
- Doing so may damage the corded hose, thus resulting in electric shock or a fire.

English


English
CAUTION

Do not use steam while the iron is rested on the power base.
- Doing so may cause scalds.

Do not tilt or move the power base violently back and forth.
- Doing so may cause water leakage.

Do not touch the hot surface (such as the surface of the soleplate, any side of the iron, the corded hose, the heat-insulation pad and the hot area around it) during use.
Doing so may cause scalds.
- Do not place your hands, feet, etc. under the ironing board.
- Do not place the iron on your hand, knee or any other part of the body.
- Do not use steam when the iron is partially sticking out from the ironing board.
natural_image
Technical line drawing of a pair of steam covers, one open and one closed, with no visible text or symbols.
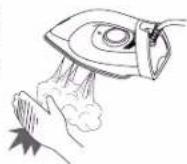
Do not touch the steam during use. Do not aim the steam towards your hand, knee, or any other part of the body.
Do not iron clothes that you are wearing.
- Doing so may cause scalds.

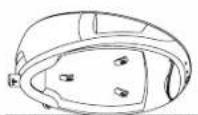
Do not place the power base sidelong.
- Doing so may cause water leakage, and then damage floors and carpets.

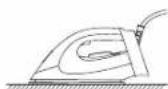
Do not put the iron on a carpet or the floor.
- Doing so may damage the product, carpet or floor.

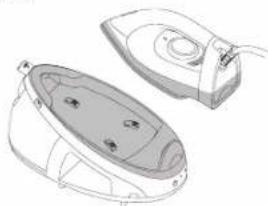
Make sure the product has fully cooled down before opening the bottom knob.
- Failure to do so may cause scalds.



CAUTION

Disconnect the power plug by holding the power plug instead of pulling the power cord.
- Failure to do so may break the power cord, and may cause burns, electric shock, or fire due to a short circuit.

Care should be taken when using the product.
- Steam emission may cause burns.

Use the product only for its intended purpose, for ironing fabrics.
- Failure to do so may cause injury.

When using with following fabric, test on an inconspicuous area, or place a cloth over the fabric to prevent the fabric from marking.
- Expensive or specially processed fabrics (velvet, acrylic, nylon, cashmere, etc.)
- Fabrics that are labeled as "low heat" or "medium heat", or dark colored fabrics.
- Failure to do so may cause damage fabric.

Always unplug the power plug during filling, emptying, cleaning and not in use.
- Failure to do so may cause electric shock or fire due to electrical leakage resulting from insulation deterioration.

When ironing wet clothes, please use dry ironing. - Failure to do so may cause scalds due to hot water splashes from the main body.

Place the iron correctly as instructed after use. - Failure to do so may cause the product to fall over, thus resulting in injury or scalds.
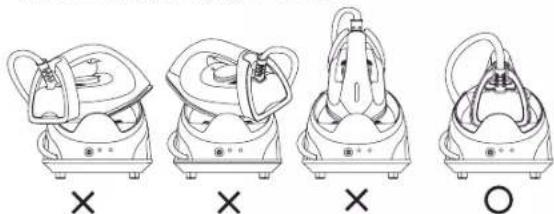
natural_image
Four line drawings of a steam iron machine with cross symbols indicating part alignment (no text or labels)
English
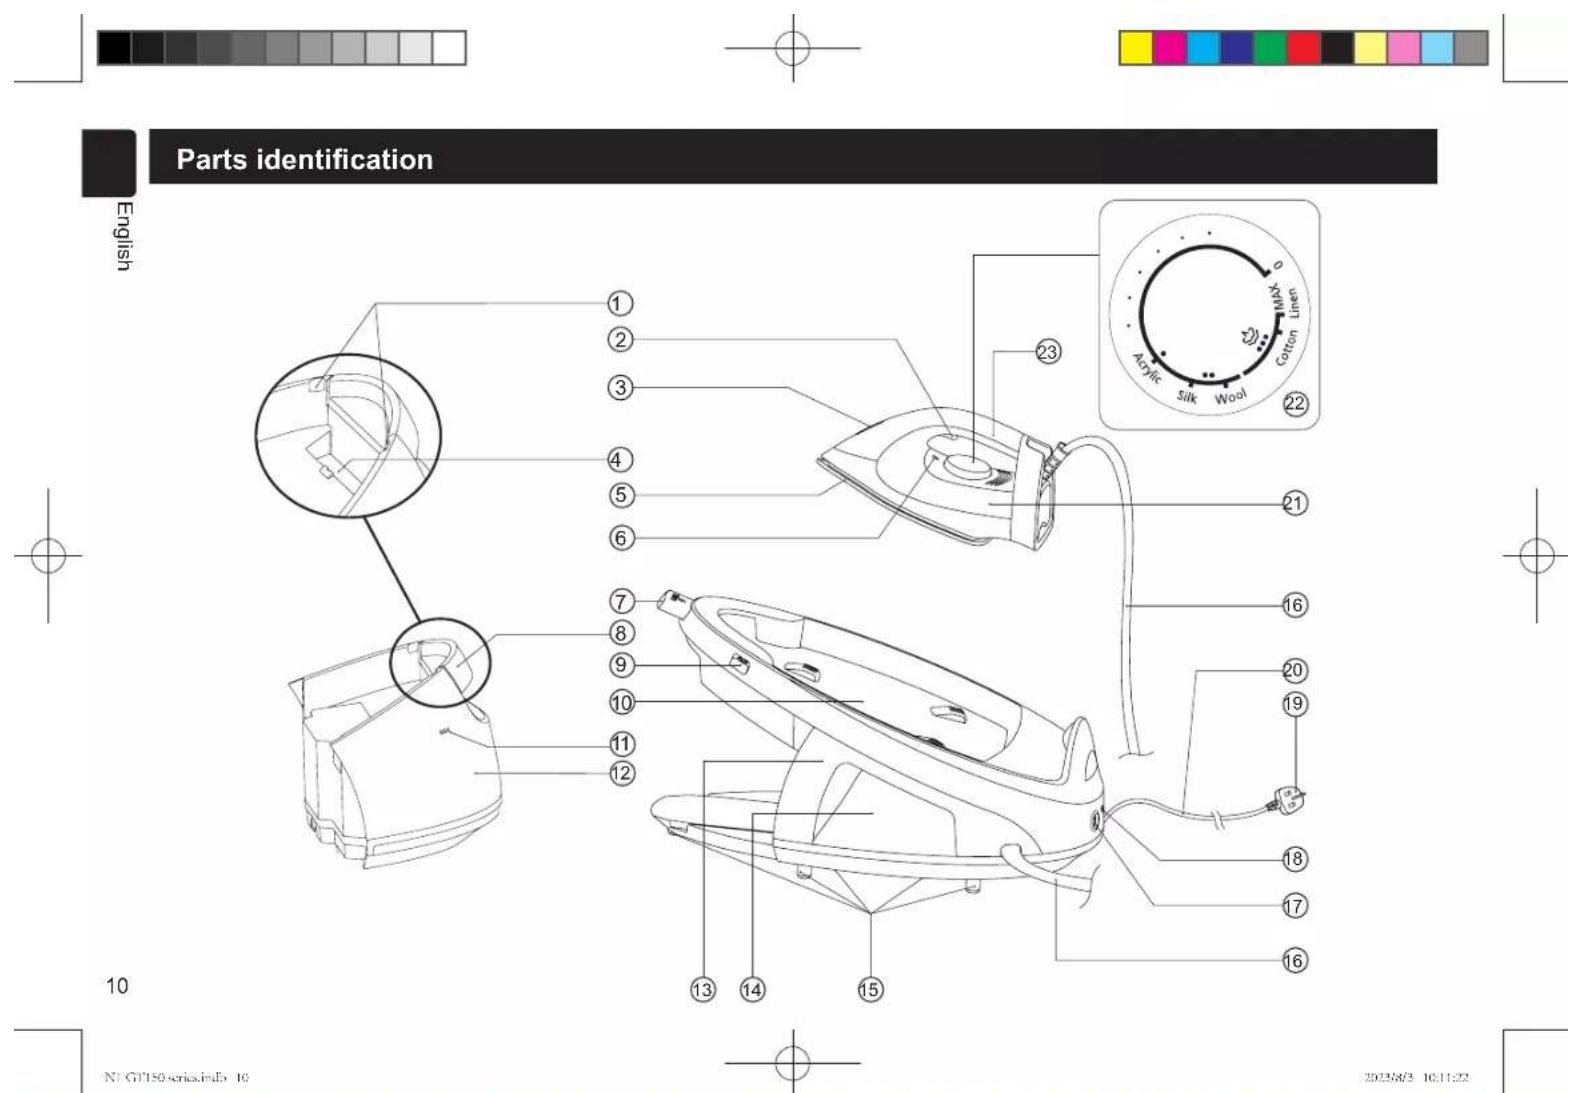


Parts identification
① Water outlet
② Steam button
③ Level indicator
④ Water inlet
⑤ Soleplate
⑥ Level scale mark
⑦ Iron lock
⑧ Water tank handle
⑨ Unlock button
⑩ Heat-insulation pad
⑪ "MAX" water level mark
⑫ Detachable water tank
⑬ Power base
⑭ Cord storage space
⑮ Support feet
⑯ Corded hose
⑰ Power button /
Power indicator
⑱ Indicator
⑲ Power Plug ※
⑳ Power cord
② Iron
② Temperature selector
②3 Handle
※ Plug type may vary comply with respective country or region requirement.
⑰ Power button / Power indicator
⑱ Indicator
② Steam button

Parts identification
② Temperature selector
Operating instructions for each part
Be sure to disconnect the power plug from the power outlet before filling the detachable water tank with water. Do not take out the detachable water tank while you are using the product.
◆ Water inlet
Hold the Water tank handle, take out the detachable water tank, and add water through the water inlet. Make sure that the "MAX" water level mark on the detachable water tank is not exceeded. Then attach the detachable water tank onto the power base correctly. Push it until a click sound is heard.

◆ Temperature selector
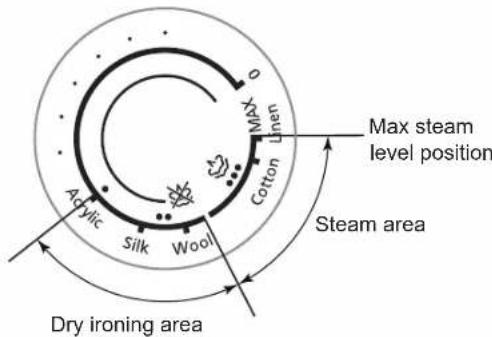
Select an appropriate temperature level according to materials of clothes (See the section "Fabric and ironing recommendations").
◆ Power button / Power indicator
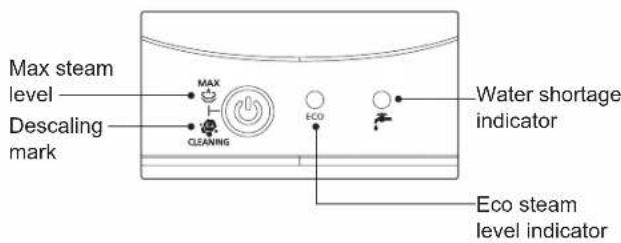
Press the power button. The product will start working. At this time, the power indicator turns on in blue. This product can switch between the enhanced steam level and the eco steam level through the power button.
※ Enhanced steam level: suitable for heavy clothes that need much steam.
※ Eco steam level: suitable for light clothes that need a little steam.
© The product starts with the enhanced steam level by default, and it can work as a steam iron after about 60 seconds.
While the product is powered on, if you press and hold the power button for about 4 seconds, a beep will be sounded, the eco steam level indicator will turn on in green, and the product will switch to the eco steam level.
In the eco steam level, if you press and hold the power button for about 4 seconds, the product will switch to the enhanced steam level and the eco steam indicator will turn off.
While the product is powered on, if you press and hold the power button for about 8 seconds, the power indicator will start flashing, and three beeps will be sounded, indicating that the product has switched to the automatic cleaning mode. If you press and hold the power button again for about 8 seconds, the product will switch to the enhanced steam level.
- When you press and hold the power button, the eco steam

level indicator turns on after about 4 seconds, and the power indicator starts flashing and the eco steam level indicator turns off after about 8 seconds.
- In the cleaning mode, if you press and hold the power button for about 4 seconds, the product enters the eco cleaning mode, the eco steam level indicator is steady on, and the power indicator keeps flashing. To power off the product, press the power button to disconnect the power supply.
Steam button
Press the steam button to iron with steam.
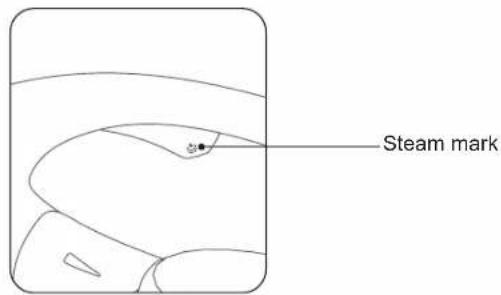
- Water may leak when the iron sprays steam at the beginning. Please set the temperature selector to "Wool" or above or rest the iron on the power base for about 15 seconds.
◆ Water shortage indicator
When the water level of the detachable water tank drops too low, the water shortage indicator will turn on to remind you of insufficient water of the detachable water tank. In this case, disconnect the power supply, remove the detachable water tank, inject water into the detachable water tank through the water inlet and install the detachable water tank back into the main body. Then the water shortage indicator will turn off and the product can start to work properly again.
◆ Automatic cleaning
When the product has been used for up to 2,160 minutes ac-cumulatively, the power indicator starts flashing and three con-secutive beeps are sounded to remind that the product needs to be cleaned. At this time, the product enters the cleaning mode automatically. Please follow the instructions for "Automatic cleaning" in "Cleaning".

After about 1 minute, three consecutive beeps are sounded and the power indicator becomes steady on from flashing, indicating that the cleaning is completed and the product is switched to the enhanced steam level.
- During cleaning, you can switch the product back to the enhanced steam level by pressing and holding the power button for about 8 seconds until three consecutive beeps are sounded to indicate that mode switching is completed (the eco steam level indicator turns on and a beep is sounded when you press and hold the power button for about 4 seconds). Alternatively, you can stop the cleaning process by pressing the power button to restart the product.
Iron lock
When the iron is placed on the heat-insulation pad, press the iron lock to lock the iron onto the power base.
◆ Unlock button
Press the unlock button to unlock the iron.
◆ Cord storage space
When the product is not in use, the corded hose and power cord can be stored in the cord storage space.
How to use
First use
- Remove the label on the product.
- Set the temperature selector of iron by following the instructions for "Steam ironing", and then iron a wet cloth for a few minutes to clear the residue from the soleplate.



Notes:
a. When you use the product for the first time, you may smell an odor. The odor will disappear naturally after the product is used for several times. Please rest assured.
b. When the product is used for the first time, some particles may appear on the soleplate. This is normal. The particles are harmless and will disappear after a short period of time.
c. When the product is started, a sound may be heard, which is the sound of pumping by the water pump. This is normal.
d. During heating of the soleplate, a few drops of water may keep dripping out for about 3 seconds. This is normal.
e. After the first use, a small amount of condensate water may appear in the corded hose. When the product is used the next time, the condensate water will be ejected together with steam when steam is ejected from the soleplate, which will last several seconds. This is normal.
f. When removing the detachable water tank from the power base, you will see some drops of water at the position where the detachable water tank is installed on the power base. This is normal.
Operating instructions
This product has been designed for dry ironing and steam ironing.
Dry ironing
- Check that the iron is placed on the heat-insulation pad correctly and locked onto the power base securely.
- Connect the power supply. Then a beep is sounded.
- Press the power button. Then the power indicator turns on.
- Turn the temperature selector to set the level according to materials of clothes (See the section "Fabric and ironing recommendations"). The level indicator turns on, the eco steam level indicator starts flashing and the product starts
heating. After the iron finishes heating, the level indicator turns off.
- Press the unlock button to unlock the iron and start dry ironing.
Steam ironing
- Place the power base on a stable surface.
- Take out the detachable water tank and inject water through the water inlet. It is recommended to use purified water with less mineral content. The maximum capacity of the detachable water tank is 1.5 L. Please make sure that the "MAX" water level mark is not exceeded. Then attach the detachable water tank onto the power base correctly. Push it until a click sound is heard.
- Check that the iron is placed on the heat-insulation pad correctly and locked onto the power base securely.
- a Connect the power supply and press the power button. The power indicator turns on. Rotate the temperature selector to align the desired level with the thermostat indicator (See the section "Fabric and ironing recommendations"). The steam level indicator starts flashing.
b Wait about 60 seconds until the level indicator turns off, which indicates that the soleplate finishes heating. Then, press the unlock button to unlock the iron, and then press the steam button to start steam ironing. - Do not press the steam button when the level set by the temperature selector is outside the steam area. Otherwise, water may leak from the soleplate.
◆ Steam boost
When the enhanced steam level is set, if you press the steam button twice in one second, steam boost will be

generated in a short time (about 2 seconds).
◆ Automatic shut-off
When the product is not operated within 10 minutes or the product uses only dry ironing continuously for 10 minutes, the product will be automatically powered off.
To restart the product, press the power button again.
Notes:
a. During use, a few drops of water and steam may be ejected from the soleplate at the same time. This is normal.
b. Do not touch the soleplate before it has fully cooled down.
c. Do not iron clothes that you are wearing.
d. Do not allow the soleplate surface to get close to yourself or others.
e. Do not use steam when the iron is rested on the power base in case of scalding.
f. During use, a large amount of steam will be ejected when the steam button is first pressed and later the amount of steam will slowly decrease and tend to be flat. If a large amount of steam is needed, please put the iron back to the power base and heat it for about 15 seconds.
g. After use, place the iron on the heat-insulation pad correctly and press the iron lock to lock the iron onto the power base.
h. When the water level of the water tank is too low, the water shortage indicator turns on in red and remains steady on. After water is added, the water shortage indicator turns off.

After use
- After ironing, place the iron on the heat-insulation pad correctly and press the iron lock to lock the iron onto the power base. Then, press and hold the power button until the product shuts down and all indicators turn off, and remove the power plug.
- Take out the detachable water tank and pour out the remaining water.
- Install the detachable water tank back to the power base and clean residual water from where the detachable water tank is installed.
- Store the product in a safe place.
Notes:
a. After use, remove the power plug and leave the product to cool down for more than 60 minutes before any cleaning or maintenance.
b. Never use such cleaning products as the thinner, cleanser and volatile solvent to wash the product. Otherwise, the product may be damaged.


English
Cleaning
◆ Cleaning the main body
For stubborn stains, use a soft cloth dipped with neutral detergent to clean the surface of the main body.
◆ Cleaning the soleplate surface
If glue or the like sticks to the soleplate surface, wipe it with a wet cloth.
◆ Cleaning steam vents
If scale appears on steam vents, remove the scale with a wooden or bamboo toothpick and then wipe the soleplate with a wet cloth.
◆ Automatic cleaning
- Place the power base on a stable surface.
- Take out the detachable water tank and inject water through the water inlet. Then attach the detachable water tank onto the power base correctly. Push it until a click sound is heard.
- ☐ While the product is powered on, press and hold the power button for about 8 seconds until the power indicator starts flashing and three consecutive beeps are sounded, indicating that the product has switched to the cleaning mode.
- In the cleaning mode, if you press and hold the power button for about 4 seconds, a beep is sounded and the eco steam level indicator turns on. If you release the power button at this time, the product enters the eco cleaning mode, the eco steam level indicator is steady on, and the power indicator keeps flashing.
© When the product has been used for up to 2,160 minutes accumulatively, the power indicator starts flashing and
three consecutive beeps are sounded to remind that the product needs to be cleaned. At this time, the product enters the cleaning mode automatically.
- To switch the product back to the enhanced steam level, press and hold the power button for about 8 seconds until three consecutive beeps are sounded to indicate that mode switching is completed (the eco steam level indicator turns on and a beep is sounded when you press and hold the power button for about 4 seconds).
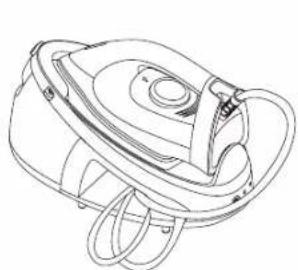
- Press and hold the steam button. The scale and impurities inside the main body are ejected from the soleplate together with a large amount of steam and water.
- When no steam or water is ejected from the soleplate or after about 1 minute, the power indicator becomes steady on from flashing and three consecutive beep are sounded. At this time, the product switches to the enhanced steam level, indicating the end of this cleaning process. After wiping the soleplate clean, place the iron on the heat-insulation pad correctly and lock it securely, and then press and hold the power button to power off the product.
- Bundle and place the corded hose and power cord in the cord storage space and store the product in a safe place.
natural_image
Line drawing of a steam iron with attached components (no text or symbols)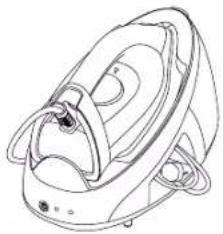
natural_image
Line drawing of a steam iron with handle and side arm (no text or symbols)

◆ Cleaning frequency:
The product is cleaned when it switches automatically to the cleaning mode.
Notes:
a. Depending on the using region and water quality, the product may need to be descaled multiple times.
b. Please clean the product in a location where it is easy to drain.
c. Take care when cleaning the product to avoid hazards due to steam or water spray.
When the product will not be in use for a long period of time:
Drain water in the detachable water tank and rotate the temperature selector to set the product to the "Silk" steam level.
Notes:
a. The product may need to be cleaned more frequently depending on the using region or the composition of the used tap water.
b. If steam output is significantly decreased after cleaning, please contact the after-sales service personnel for replacement of parts.
c. The shortened service life of the product may also result in decreased steam output.
Specifications
| Model | NI-GT150 |
| Rated voltage | 220-240 V ~ 50-60 Hz |
| Power consumption | 2 000 -2 400 W |
| Weight Approx. 2.6 k | g |
| Dimensions (assembly) | (W x D x H) Approx. 356 × 200 × 240 mm |
| Power plug/Cord length | Single-phase 3-pole plug/ Approx. 1.8 m |
| Detachable water tank capacity | Approx. 1.5 L |
| Soleplate material | Graphite ceramic |
English
This product is intended for household use only.


Fabric and ironing recommendations
English
Fabrics and usage method.
- Do not use the product on leather products.
- To iron heat-sensitive materials or dark-colored fabrics, test on a small corner of the fabric before ironing the entire garment to avoid damages.
- Keep the soleplate slightly away from the clothes when ironing clothes labeled "Use press cloth" or "Cool iron".
- Iron the clothes labeled "No steam" in the dry ironing mode.
• To iron blended yarn fabrics, select the level according to the material requiring the lowest heat setting.
• To iron clothes without a fabric care label, select the level by referring to the following table.
| Fabric | Ironing method Level Tips | |||||||
| Soleplate against | Soleplate slightly away | Acrylic | Silk Wool | Cotton | Linen | |||
| Acrylic Acetate Nylon Silk | ○ | ○ | ○ | ○ | × | × | × | ·When pressing the soleplate slightly away the garment, keep the soleplate about 1 cm away from the garment.·Iron the fluffy garment inside out to help them retain their shape. |
| Wool | ○ | |||||||
| Cashmere | ||||||||
| Rayon (Chiffon) Polyester | ○Dry ironing only | ○ | ○ | ○ | ○ | × | × | ·When pressing the soleplate against the garment, place a cloth over the fabric and iron the garment by sliding the iron quickly in the dry ironing mode.·Ironing rayon clothes for a long time may cause shrinkage of clothes. |
| Cotton | ○ | ○ | ○ | ○ | ○ | ○ | ○ | ·Slowly move the soleplate while ironing. It may be hard to remove the wrinkle if the movement is too quick. |
| Linen | ||||||||
18


Troubleshooting
| Problem Causes Solution | ||
| The product produces no steam or irregular steam. | The power plug is not inserted, the power button is not pressed. | Connect the power plug, press the power button to lighten the power indicator, and press the steam button. |
| There is no or insufficient water in the detachable water tank. | Add water again to above the “MIN” mark. | |
| The product is not fully heated. | Wait until the temperature indicator is steady on before use. | |
| The corded hose is bent and thus the water cannot smoothly run through it. | Ensure that the corded hose is not bent. | |
| The circuit fails or the fuse is burned out. | Send your product to an authorized service center for repair. | |
| Water leaks out from the power base. | The detachable water tank is not installed correctly onto the power base. | Attach the detachable water tank onto the power base correctly. |
| The detachable water tank is broken. | Have the detachable water tank replaced by an authorized service center. | |
| The inner pipe is loose or damaged. | Send your product to an authorized service center for repair. | |
| A lot of water drips from the soleplate | The temperature selector is not set to the steam level. | Set the temperature selector to the “Wool” level or above. |
| The power indicator and eco steam level indicator are flashing at the same time. | Press the power button to restart the product. | |
English
19


Troubleshooting
Problem Causes Solution
No steam is generated after the steam button is pressed.
Unexpected steam is output when no operation is performed.

External abnormal electromagnetic noise causes interference.

The product is powered off abnormally.
The problem persists even after you have followed the above solutions.
Steam keeps coming out from the bottom of the power base.
A lot of water leaks from the soleplate.
Remove the power plug to disconnect the power supply, then connect the power plug back to connect the power supply and press the power button to restart the product. If the problem persists, please send your product to an authorized service center for repair.

Send your product to an authorized service center for repair.




Panasonic
Arahan Penggunaan
natural_image
Line drawing of a pair of steam iron holders, one open and one closed (no text or symbols)natural_image
Four line drawings of a steam iron machine, showing front, side, top, and back views with no text or symbols.
Malayu


Pengenalpastian bahan
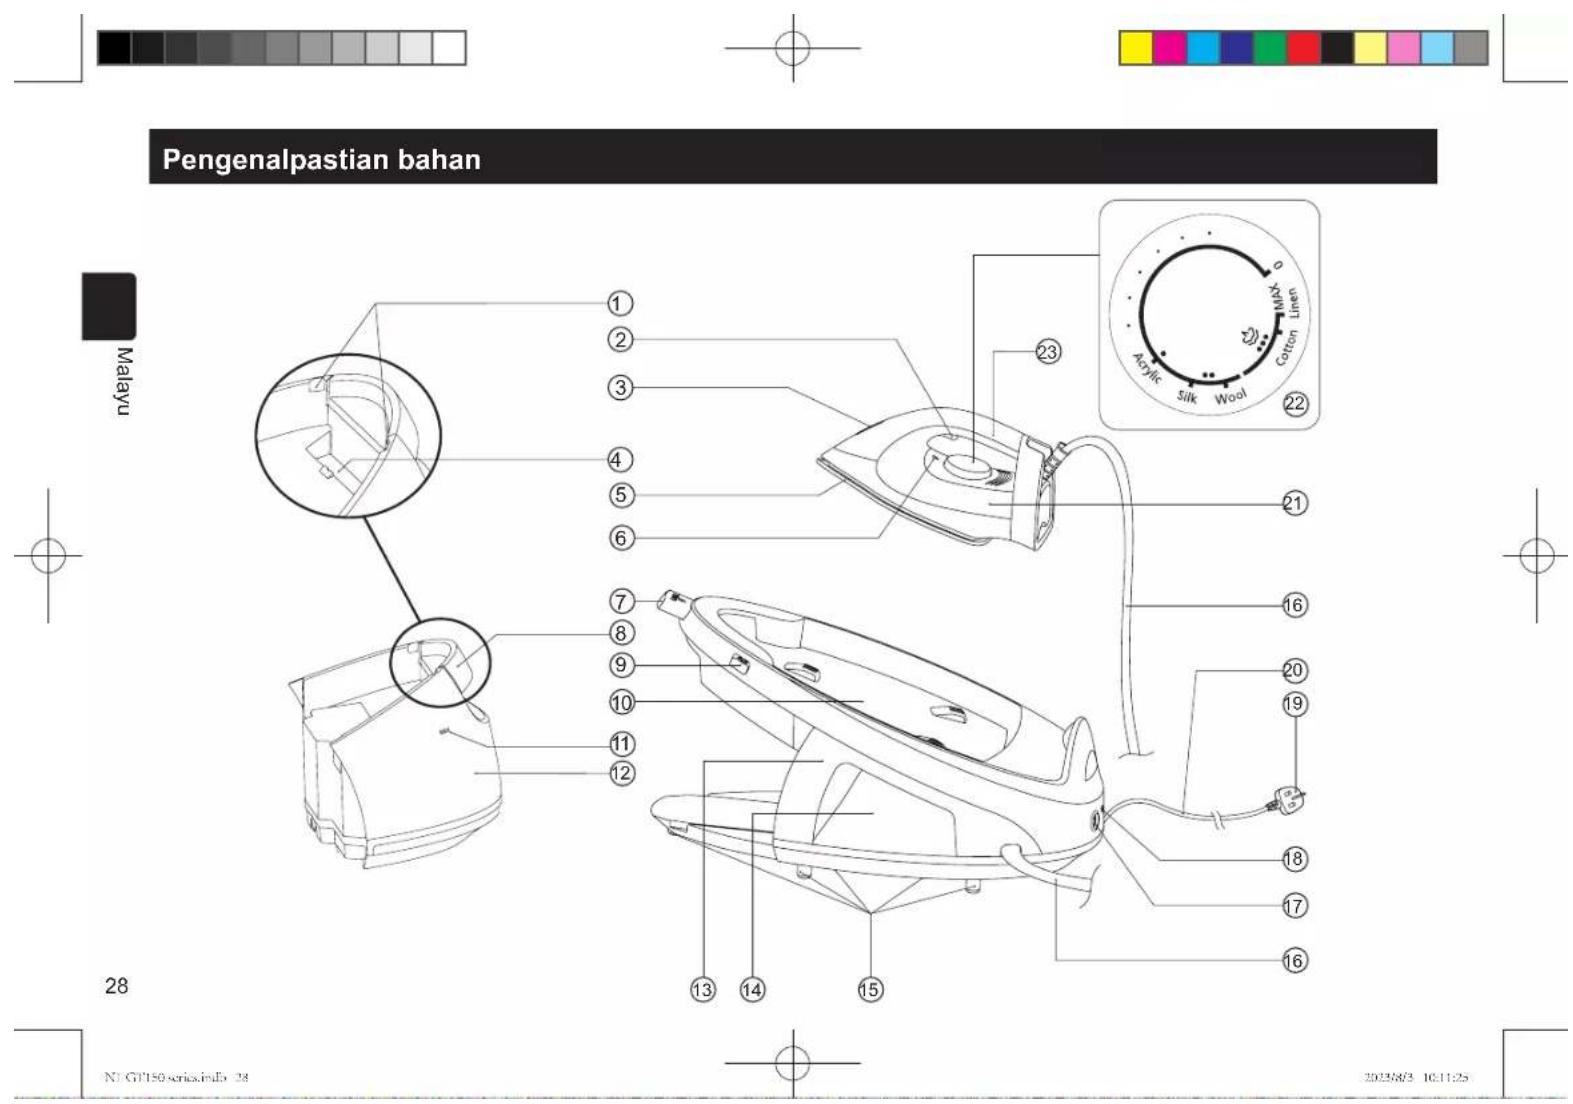
① Alur keluar air
② Butang stim
③ Penunjuk paras
④ Salur masuk air
⑤ Plat tapak
⑥ Tanda kerak paras
⑦ Kunci seterika
⑧ Pemegang tangki air
⑨ Butang buka kunci
⑩ Pelapik penebatan haba
⑪ Tanda paras air "MAX"
⑫ Tangki air boleh tanggal
⑬ Tapak kuasa
⑭ Ruang penyimpanan kord
⑮ Kaki sokongan
⑯ Hos berkord
natural_image
Line drawing of a mechanical device with no visible text or symbols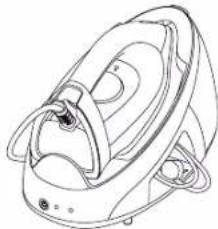
natural_image
Line drawing of a portable steam fan with handle and spout (no text or symbols)

◆ Kekerapan pencucian:
Produk dicuci bila ia bertukar secara automatik kepada mod pencucian.
Nota:
natural_image
Line drawings of two steam iron holders with internal components and wiring (no text or symbols)التنظيف
53-58 --- --- --- --- --- --- --- --- --- --- --- --- --- --- --- --- --- --- --- --- --- --- --- --- --- --- --- --- --- --- --- --- --- --- --- --- --- --- --- --- --- --- --- --- --- --- --- --- --- --- --- --- --- --- --- --- --- --- --- --- --- --- --- --- --- --- --- --- --- --- --- --- --- --- --- --- --- --- --- --- --- --- --- --- --- --- --- --- --- --- --- --- --- --- --- --- --- --- --- --- ---
--- ---- ---- ---- ---- ---- ---- ---- ---- ---- ---- ---- ---- ---- ---- ---- ---- ---- ---- ---- ---- ---- ---- ---- ---- ---- ---- ---- ---- ---- ---- ---- ---- ---- ---- ---- ---- ---- ---- ---- ---- ---- ---- ---- ---- ---- ---- ---- ---- ---- ---- ---- ---- ---- ---- ---- ---- ---- ---- ---- ---- ---- ---- ---- ---- ---- ---- ---- ---- ---- ---- ---- ---- ---- ---- ---- ---- ---- ---- ---- ---- ---- ---- ---- ---- ---- ---- ---- ---- ---- ---- ---- ---- ---- ---- ---- ---- ---- ---- ---- ---- ----- ---- ---- ---- ---- ---- ---- ---- ---- ---- ---- ---- ---- ---- ---- ---- ---- ---- ---- ---- ---- ---- ---- ---- ---- ---- ---- ---- ---- ---- ---- ---- ---- ---- ---- ---- ---- ---- ---- ---- ---- ---- ---- ---- ---- ---- ---- ---- ---- ---- ---- ---- ---- ---- ---- ---- ---- ---- ---- ---- ---- ---- ----- ____
50-52 ____ ____ ____ ____ ____ ____ ____ ____ ____ ____ ____ ____ ____ ____ ____ ____ ____ ____
49-50
47-49____ ____ كيفية الاستخدام
47 ---
45-46
45
44 - توصيات بخصوص الأقمشة والكى
42-43 دليل اكتشف المشاكل واصلاحها
59
- Panasonic
- Contents
- Safety precautions
- Explanation of symbols
- WARNING
- CAUTION
- Parts identification
- ② Temperature selector
- Operating instructions for each part
- ◆ Water inlet
- ◆ Temperature selector
- ◆ Power button / Power indicator
- Steam button
- ◆ Water shortage indicator
- ◆ Automatic cleaning
- Iron lock
- ◆ Unlock button
- ◆ Cord storage space
- How to use
- First use
- Notes:
- Operating instructions
- Dry ironing
- Steam ironing
- ◆ Steam boost
- ◆ Automatic shut-off
- After use
- English
- Cleaning
- ◆ Cleaning the main body
- ◆ Cleaning the soleplate surface
- ◆ Cleaning steam vents
- ◆ Cleaning frequency:
- When the product will not be in use for a long period of time:
- Fabric and ironing recommendations
- Fabrics and usage method.
- Troubleshooting
- Pengenalpastian bahan
- ◆ Kekerapan pencucian:
- Nota:
- التنظيف
Brand : PANASONIC
Model : NI-GT150
Category : Steam cleaner