
FSH 804 ID WT BK - Cooker Fulgor Milano - Free user manual and instructions
Find the device manual for free FSH 804 ID WT BK Fulgor Milano in PDF.


| Product Type | Induction Hob |
| Brand | Fulgor Milano |
| Model | FSH 804 ID WT BK |
| Cooking Zones | 4 (Flexi Zone A, Flexi Zone B, Double Zone C, Single Zone D) |
| Dimensions (W x D) | 800 x 520 mm |
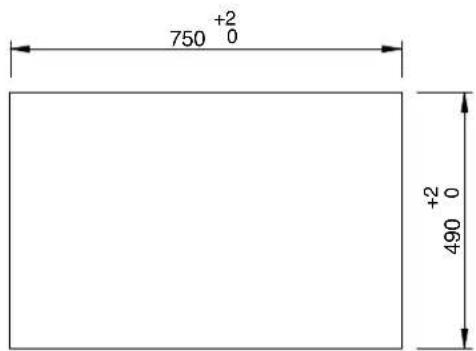
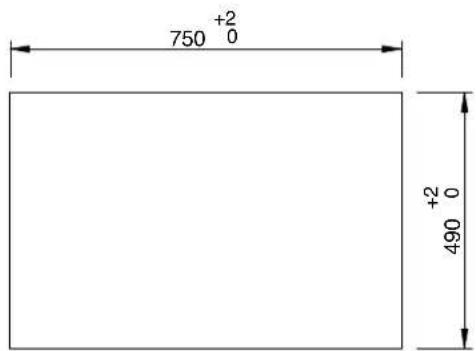
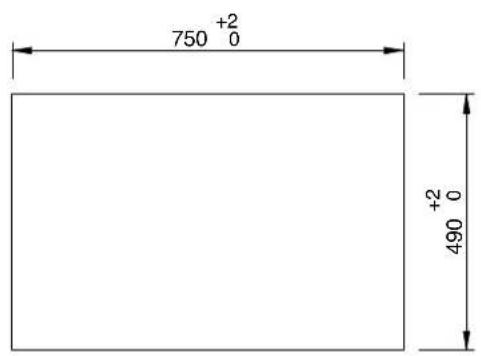
| Cutout Dimensions (W x D) | 750 x 490 mm |
| Build-in Depth | 4.8 mm (semi-flush or flush) |
| Rated Voltage | 220-240V / 380-415V 3N (single-phase or three-phase) |
| Maximum Power | 7.36 kW |
| Power Cable | 5 x 2.5 mm², H05RR-F or equivalent |
| Booster Function | Yes, 10 minutes per zone |
| Bridge Function | Yes, automatic and manual (extended zone) |
| Double Circuit Zone | Yes, on zone C (180/260 mm) |
| Heating (Warming) Function | Yes, 40°C / 70°C / 90°C |
| Timer | Independent (egg timer) and per-zone cooking timer |
| Pause Function | Yes, up to 10 minutes |
| Child Lock | Yes, permanent lock with temporary unlock |
| Automatic Pan Detection | Yes, with automatic zone selection |
| Residual Heat Indicator | Yes, 3-ring symbol until below 60°C |
| Surface Material | Glass-ceramic |
| Cleaning | Use scraper for residues; mild cleansers (SIDOL/STANFIX); no steam cleaners or abrasives |
| Safety Features | Auto shut-off, key lock, overtemperature protection, error codes |
Frequently Asked Questions - FSH 804 ID WT BK Fulgor Milano
User questions about FSH 804 ID WT BK Fulgor Milano
0 question about this device. Answer the ones you know or ask your own.
Ask a new question about this device
Download the instructions for your Cooker in PDF format for free! Find your manual FSH 804 ID WT BK - Fulgor Milano and take your electronic device back in hand. On this page are published all the documents necessary for the use of your device. FSH 804 ID WT BK by Fulgor Milano.
USER MANUAL FSH 804 ID WT BK Fulgor Milano
natural_image
Four black circles arranged in a 2x2 grid on white background (no text or symbols)FSH 804 ID WT
PIANO INDUZIONE
INDUCTION HOB
INDUKTIONSKOCHFELD
PLACA INDUCCION
PŁYTA INDUKCYJNA
- stoviglia in ghisa
natural_image
Illustration of kitchenware including a pan, lid, and pot (no text or symbols)natural_image
Two grayscale illustrations of cooking utensils, one with a side pan and lid, the other with a side pan (no text or symbols)Recipienti non adeguati
| RIF. ELEMENTI ACCESI POTENZA | NOMINALE (kW) | POTENZA IN POWER BOOSTER (kW) | DIAMETRI RACCOMENDATI PENTOLE (mm) | |
| A | FLEXI singola zona 2,1 3,7 145 | |||
| B | FLEXI zona estesa 3,7 - 245 | |||
| C | 180/260 1,85/3,7 3,0/5,5 125/250 | |||
| D | 145 1,4 2,2 120 | |||
natural_image
Simple black-and-white diagram with a small circular symbol and two labeled buttons (① and <), no readable text or symbols.natural_image
Two white icons: a key and a padlock on a black background (no text or symbols)
Manutenzione
natural_image
Line drawing of a hand using a paintbrush to brush the paint onto a curved surface (no text or symbols)natural_image
Technical cross-section diagram of a structural assembly (no text or labels)

natural_image
Technical line drawing of a mechanical assembly with no visible text or symbols

we would like to thank you and congratulate you on your choice.
This new product has been carefully designed and built using top quality materials, and meticulously tested to ensure that it meets all your culinary requirements.
Please read and observe these simple instructions, which will enable you to achieve excellent results from the very first time you use it. This state-of-the-art appliance comes to you with our very best wishes.
THE MANUFACTURER
INDEX PAGE
1 - Safety Instructions .... 2
2 - Operating principle .... 3
Induction 3
Operating principle 3
Containers 3
3 - User instructions .... 6
Installation 6
Functions 6
Maintenance 15
4 - Installation instructions .... 16
Installation 16
Positioning 16
Electrical connection 16
List of errors displayed 16
THIS PRODUCT IS DESIGNED FOR DOMESTIC USE.
THE MANUFACTURER DECLINES ALL RESPONSIBILITY FOR DAMAGES TO THINGS OR PEOPLE DERIVING FROM INCORRECT INSTALLATION OR IMPROPER, ERRONEOUS OR UNSUITABLE USE.
THE APPLIANCE MUST NOT BE USED BY PEOPLE (INCLUDING CHILDREN) WITH PHYSICAL, SENSORIAL OR MENTAL IMPAIRMENTS, OR BY PEOPLE WITHOUT THE NECESSARY EXPERIENCE OR KNOWLEDGE, UNLESS THEY ARE SUPERVISED OR INSTRUCTED IN THE USE OF THE APPLIANCE BY A PERSON RESPONSIBLE FOR THEIR SAFETY.
CHILDREN MUST BE SUPERVISED TO ENSURE THAT THEY DO NOT PLAY WITH THE APPLIANCE.

COOKING SURFACE SAFETY WARNINGS

- The appliance and its accessible parts become very hot during use. Care should be taken not to touch the heating elements.
- Children under 8 years of age must be kept away if not continually monitored.
- This appliance can be used by children as young as 8 years old and by people with reduced physical, sensory or mental capabilities or lack of experience and knowledge, provided they are supervised or they have been instructed to use the appliance safely and understand the risks involved.
• Children must not play on the appliance. - Children should not clean or perform maintenance without supervision.
- For direct connection to the grid, it is necessary to provide a device that ensures disconnection from the grid, with a contact opening distance that allows complete disconnection in the conditions of overvoltage category III, in accordance with the installation rules (the earth cable yellow / green must not be interrupted). The socket or switch must be easily accessible with the installed equipment to allow the device to be disconnected from the power supply after installation.
- To avoid all risk, if the power cable becomes damaged, it must only be replaced by the manufacturer, by an authorised service centre, or by a qualified electrician.

ATTENTION
- Cooking with grease or oil on the automatic cooking surface can be very dangerous and can cause fires. Do not attempt to put out a fire with water but turn off the appliance and then cover the flames with a lid or fire blanket.

ATTENTION
- Danger of fire: do not store objects on the cooking surfaces.
- If the surface is cracked, switch off the appliance to avoid the possibility of electric shock.
- Do not use steam cleaners to clean the appliance.
- Metal objects such as knives, forks, spoons or lids should not be placed on the cooking surface because they can get hot.
- The appliance is not intended for use with an external timer or a separate remote control system.
• The appliance must not be left unattended - Never leave empty pots on the heating elements when in operation
- Do not leave the burners or electric heating elements on, without the presence of a pot
- The cooking process must take place under controlled conditions. A short cooking process must be constantly monitored.
- Only use the protections designed by the manufacturer of the hob, the protections indicated by it or the protections incorporated in the appliance. The use of inadequate protections can cause accidents.
- After use, turn off the elements of the hob using their command but not using the pan detector.
Induction
Heating by induction is the most efficient form of cooking available.
The heat is generated by an electromagnetic field, directly on the bottom of the pan or pot used.
The surface which is free from contact remains virtually cold. When the cooking time is up and the container is removed, there is no residual heat. It is efficient become there is no waste of energy due to dispersion, as happens with gas burners, it is 30 to 50% faster than normal hobs using HGL technology and allows energy savings of up to 25%.
If liquid overflow from the container, it does not stick to the surface of the hob, because this is just slightly warm.
Operating principle
This is based on the electromagnetic properties of most cooking containers.
The electronic circuit governs the operation of the coil (inductor), creating a magnetic field.
The heat is transmitted by the container to the food. Te cooking process takes place as follows:
• minimum dispersion (high performance);
- the removal of the pan (simply lifting it) automatically stops the system;
- the electronic system allows maximum flexibility and precision of regulation.
Fig. 1

1 - Recipient
4 - Inductor
2 - Induced current
5 - Electronic circuit
3 - Magnetic field
6 - Electricity supply
Containers
Use only ferromagnetic cookware for induction cooking, for example:
• enamelled steel tableware
- cast iron cookware
- special stainless steel cookware, suitable for induction cooking.
To understand if the cookware is suitable for induction, check if the base of the cookware is attracted by a magnet or check the manufacturer's instructions.
There is also induction cookware that does not have a completely ferromagnetic base:
- If the base of the cookware is made of only partially ferromagnetic material, only the ferromagnetic surface heats up. Therefore it may be the case that the heat is not distributed evenly. The non-ferromagnetic zone may have too low a temperature for cooking.

natural_image
Illustration of kitchenware including a cooking pan, lid with patterned lid, and a pan with lid (no text or symbols)- If the base of the cookware also consists of aluminium parts, the surface in ferromagnetic material is also reduced. It may be the case that this cookware does not heat up properly or that it is not recognised at all.

natural_image
Illustration of two cooking panes with handles and side blades, one showing a side dish (no text or symbols)Inadequate containers
Never use diffusers or containers made of:
- normal fine steel
- glass
- terracotta
• copper - aluminium
Characteristics of the base of the cookware
The characteristics of the base of the cookware can influence the cooking result. Use cookware made of a material that distributes heat evenly, such as pans with "sandwich bottom" in stainless steel in order to save time and energy.
The best solution would be to use cookware with a completely flat base. Uneven bases or incised bases reduce heat conduction.
Absent or inadequately sized cookware
Always place the cookware within the limits of the usable cooking surface. If the cookware is not placed correctly, if it is not made of suitable material or if the size is incorrect, the hob will indicate the absence of the pan with the symbol [☐]. Move the cookware or try using another item of cookware.
Empty cookware or cookware with a thin base
Do not heat any empty cookware and do not use cookware with a thin base. The base of the cookware could melt and damage the glass plate.
Never touch the cookware and switch off the hob. If the hob, once cooled, no longer works, contact the technical assistance service.
Pan recognition
The hob automatically recognises the position and shape of the cookware being used, depending on the ferromagnetic diameter and the material of the cookware base. To be suitable, the cookware must have a base diameter of between 120 and 240 mm.
Warning: The cooking zone indicators may differ from the actual size and shape of the cookware. This is a normal phenomenon that does not compromise correct functioning of the hob.

Pan position
Strictly follow figure 2 to position the pans in such a way as to avoid causing malfunctions or damage to the induction hob. Furthermore, incorrect positioning could reduce the cooking performance of the pans.

ATTENTION
Metal objects such as knives, forks, spoons or lids should not be placed on the hob surface as they can become hot.
Fig. 2


Installation
All operations relating to installation (electrical connection) must be performed by qualified personnel in accordance with the current regulations.
For specific instructions, see the section reserved for the installer

IMPORTANT
DO NOT LOOK AT THE LEDS AND DISPLAYS INTENSELY.
Functions
All functions can be performed using the ON/OFF button, the display area and the "back" button. Information and feedback are provided by the graphic display.
Touch Control on/off
After applying power, the touch control takes a second to be ready. After a reset, all the LEDs light up for one second. After this time all the LEDs go off again. The interface can now be started by touching the on/off button. The logo appears on the display for 2 seconds, followed by a safety warning sign. Do not place hot pans on the display.

The cooking mode is then active. The display shows all the cooking zones. The electronics will remain active for 20 seconds.
If no action is taken within this time (zone or timer selection), the hob goes into standby, indicated by an acoustic signal.
The induction hob only switches on if the on/off button is pressed. If another button is recognised, the hob will not turn on.
Manual switching off of the hob takes place by keeping the on/off key pressed.
Automatic switch off
The hob changes from switching on to switching off after 20 sec. if no cooking zone is activated or the multifunction button is pressed during this time.
Switching a cooking zone on/off
If the control is already on, it is possible to select a zone by touching one of the cooking zones on the display. After selecting the cooking zones, the cooking level can be adjusted by touching the slider area. By "sliding" your finger on the slider area it is possible to increase or decrease the cooking level (0 - P). Alternatively, the cooking level can be selected directly on the slider without sliding. If the cooking level is set to 0 the cooking zone is in "off" mode.
Switching off all the cooking zones
Immediate switching off of all the cooking zones is always possible by pressing and holding the on/off key. Even if the Touch Control is locked, switching off is possible. All cooking zones that have the "hot" status have a circle with three rings.
Automatic switch-off (operating time limitation)
Depending on the cooking level chosen, a maximum operating time limit is defined (if no cooking level changes are made). If this maximum operating time is exceeded on a cooking zone, it is switched off. If the surface is hot, the residual heat is displayed. After each user operation, the time remaining until automatic switch off is reset to the defined operating time limit of this cooking level.
The timer settings have priority over the operating time limitation. The detailed operating time according to the power level can be ascertained from the table.
Fig. 3

| REF. ELEMENTS ON NOMINAL | POWER (kW) | POWER BOOSTER (kW) | RECOMMENDED DIAMETER FOR MANUAL (mm) | |
| A | FLEXI single zone 2,1 3,7 145 | |||
| B | FLEXI bridged mode 3,7 - 245 | |||
| C | 180/260 1,85/3,7 3,0/5,5 125/250 | |||
| D | 145 1,4 2,2 120 | |||
Maximum rated power: 7,36 kW
| Cooking level Power | level [%] | Operating time [h] |
| 0 0 0 | ||
| 1 3 6 | ||
| 2 6.5 6 | ||
| 3 11.0 5 | ||
| 4 15.5 5 | ||
| 5 19.0 4 | ||
| 6 31.5 1.5 | ||
| 7 45.0 1.5 | ||
| 8 64.5 1.5 | ||
| 9 100 1.5 |
Protection against involuntary activation
The Touch Control switches off automatically in the event of an identified permanent use of the keys for approximately 10 seconds.
The Touch Control beeps for 10 seconds and the error code "E R 0 3" flashes on the display.
If the malfunction exceeds 10 sec, only the error code "ER 03" continues to flash during the malfunction time and is identified as such. If the cooking zone is in the "hot" phase, the symbol alternates with the error code.
(After cleaning the glass that covers the keys, all the keys are ready for use in a short space of time).
If a cooking zone is not activated within 10 seconds after pressing the on/off button, the Touch Control is returned to standby mode.
Surface cleaning mode
To allow cleaning of the surface without inadvertently operating the keys, there is a "lock" function. By pressing the "20s" key the commands will be blocked and a counter will count the 20 sec.

Residual heat
The glass temperature of each cooking zone is calculated and displayed by a circle symbol with three rings for each cooking zone. The 3-ring icons will be displayed until the temperature is below a safe temperature ( 60^ ). The residual heat indication is displayed for a maximum of approximately 50 minutes.

natural_image
Simple black-and-white diagram with a small circular symbol and two labeled buttons (① and <), no readable text or symbols.Automatic pan detection
Automatic pan detection allows the intuitive use of induction hobs. The function automatically recognises the pans and changes the position of the pans on the hob.
As soon as a pan is detected, the cooking zone is automatically selected and the slider appears so that the user can easily set the cooking level for this cooking zone.
Furthermore, it is possible to activate the semi-automatic bridge function.
NOTE: during normal operation of the hob, if the pan is moved by sliding it instead of lifting it, it may happen that the pot presence sensors detect a large pot as if they were 2 separate small pans.
To avoid this possibility of incorrect identification of the pot, simply lift the pot for a few seconds and then reposition it above the sensors so that it is again recognized as a single area (for example bridge) and then distribute the intensity of the power evenly.
If even this attempt does not lead to recognizing the cooking area as a single area, lift the pot, then adjust the cooking area settings to zero, then reposition the pot and adjust the chosen power again.
Warning: if after these attempts the pot is still seen as a separate cooking zone, it could depend on the type of bottom of the pot. Then replace the pan with a suitable one (see Containers on page 3)

ATTENTION
After use, turn off the hob elements using their command without using the pan detector.
NOTE: the automatic pan presence detection system generates a small "click" in the background cyclically

Power levels
The power of the cooking zones can be adjusted on 9 levels + Boost (P) (1-9, + P). After selecting a cooking zone, a slider appears on the lower edge of the display.

The cooking level is selected by directly touching the required number on the slider or by sliding to the required number. When you lift your finger, the cooking level is set.
Booster function
All the inductive cooking zones have a booster function (P). If the booster is activated, the generator supplies significantly more power than the rated power to a cooking zone. The booster function allows the user to heat food extremely quickly and can therefore help save time.
The Booster function cannot be activated in extended areas (Bridged zone)
Activating the booster:
The booster is activated by touching the highest cooking level (P) in the slider area.
While the booster is active, a "P" appears on the cooking zone display. If it is not possible to activate the booster function (for example due to temperature limits) the P flashes for 3 seconds and the booster function is then deactivated.
When the booster function is active, a possibly active automatic heating time is ended and the power level is set to maximum power in order to ensure that the rated power is applied after the booster is deactivated.

The booster function of each cooking zone can be activated for a limited time of 10 minutes. If the pan is removed from a cooking zone with the booster function active, the booster function will not be deactivated but the booster time counter will continue to operate and will not stop. The booster function can be reactivated if the booster time limitation has deactivated the booster, provided the thermal conditions allow it. The thermal conditions are controlled both via the induction and the user interface.
To view the deactivation of the booster, the cooking zone display starts to show a flashing P three seconds before deactivation.
Deactivating the booster:
If the booster function is active, reducing the cooking level deactivates the booster function.
Automatic boiling function
When the automatic boiling function is activated, the cooking zone power is brought to 100% for a period of time depending on the selected cooking level.
As soon as the boiling time has finished, the cooking level continues at the previous cooking level.
The boiling times are shown in the table below.
| Cooking level Automatic boiling function(minutes) | |
| 0 | 0 |
| 1 0.8 | |
| 2 2.4 | |
| 3 3.8 | |
| 4 5.2 | |
| 5 6.8 | |
| 6 2.0 | |
| 7 2.8 | |
| 8 3.6 | |
| 9 0.25 | |
Activating automatic boiling:
- The Touch Control must be switched on and a cooking zone selected.
-
Automatic boiling is activated by keeping your finger pressed on the desired continuous cooking level (between level 1 and 8) for 2.5 seconds.
-
The cooking zone display shows a r automatic boiling next to the continuous cooking level. When boiling is complete, only the power level is displayed.
- Within 15 seconds, the continuous cooking level for the boiling function can be changed to a higher or lower continuous cooking level by selecting the cooking zone and touching another cooking level on the slider
- It is also possible to switch to a higher continuous cooking level after 15 seconds. A cooking level lower than the continuous cooking level will deactivate the function (see deactivating automatic boiling).
If the continuous cooking level is changed, the boiling time will be recalculated (new boiling time minus the time previously activated while automatic boiling was active).

Deactivating automatic boiling:
• The cooking zone must be selected
- Bringing the cooking level to a level below the continuous cooking level set for automatic boiling deactivates the automatic boiling function. Alternatively, the cooking zone can be switched off by setting the cooking level to "O".
Automatic bridge
The system features an automatic bridge function detection system.
As soon as the system has recognised that two zone sensors are covered by a pan at the same time (such as a large oval pan), the system automatically sets the bridge. The brackets of the bridge and the slider appear and the user need only set the cooking level.
Deactivation of the semi-automatic bridge:
- Remove the pan from the relevant zone
Manual bridge (extended zone)
The system also has a function to manually select and activate extended zones.
To activate this function, press the "extended zone/bridge mode" function

Once this has been done, select one of the extended zones on the right or left to activate it.
In this way, the pot(s) on the extended zone will work as if on a single zone.
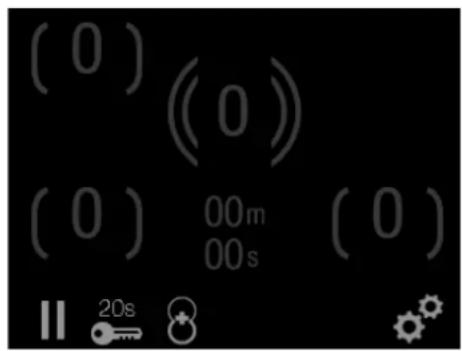
Automatic double circular circuit selection
The small zone or the large zone of the double circuit element is activated automatically. Placing a pot whose size is within the inner circle will activate the inner zone indicated in bold on the display.
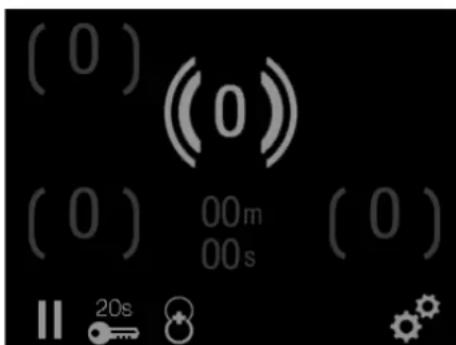
On the other hand, placing a large pot will activate the outer zone indicated in bold on the display.
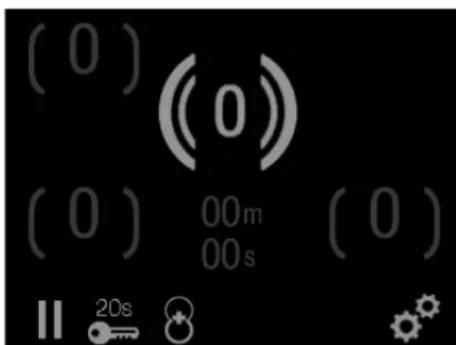
Heating function
Activation:
The Heating function is temperature-controlled and available in three stages. The power is adjusted automatically. To activate this function it is necessary to select a cooking zone by pressing and holding the same cooking zone for 2 seconds. A "Cooking functions" sub-menu will then appear, with the possibility of choosing between two functions: Timer and Heating.

Then select "Heating" and a choice of 3 predefined settings will appear: 40, 70 and 90°C.

Once one of the three temperatures has been chosen, a symbol will appear on the display next to the previously selected cooking zone

If the pan is not yet present in this zone, the heating symbol and the missing pan symbol flash alternately.
The pan will start the heating phase until it reaches the set temperature.
Deactivation:
To deactivate the heating function, it is necessary to select the previously selected cooking zone and to set any cooking level, or to set it to 0 to switch it off.
Child lock function
After turning on the control unit, it is possible to activate the child safety mechanism. After activation of the child lock, the child lock mode is set permanently. This means that even in standby mode the child lock remains active.
Activating the child lock:
The child lock mode is available in the settings menu.
The settings menu is accessed by pressing the multifunction button
By selecting the Block symbol in the relevant slider area, the block menu is displayed. The child lock must be confirmed by pressing the "off" symbol.

Subsequently the "lock on" mode will be activated.

If the induction hob is switched off, the following screen will appear when switched on again.

natural_image
Two white icons: a key and a padlock on a black background (no text or symbols)To remove the lock, slide the "key" symbol towards the "padlock" with your finger.
NOTE: to permanently delete the child lock it is necessary to enter the settings menu and deactivate the lock.
Deactivating the childproof lock:
To deactivate the child lock, it is necessary to enter the Child lock menu again in the same way as described above.
Temporary unlock:
During the time the child lock function is activated, the user interface must be unlocked every time after switching on the hob. When the hob turns on, the unlock screen appears. Now it is possible to unlock the hob by sliding the "key" symbol towards the "padlock".
Acoustic feedback (buzzer)
The following actions are indicated by the buzzer:
- Normal key pressed -> short single beep
- Incorrect activation of a permanent key for a longer time (>10s.) -> intermittent beep
Timer function
The timer function is available in two qualities, "Egg Timer" and "Cooking Timer"
"Egg Timer" function:
If the induction hob is on (all the cooking zones are in position "0"), it is possible to activate the autonomous timer by pressing the "00m 00s" timer on the display.

After this action, the timer menu appears. The user can set a countdown with the values mm : ss, minutes and seconds respectively
Alternatively, the timer value can be reset by pressing the symbol on the right 🔒.

Pressing the "hourglass" symbol exits the menu and the timer starts counting down. After the counter has expired, audible feedback and visual feedback (flashing "00:00") is provided. The acoustic feedback ends after 2 min. or by touching any key.
Switching off the egg timer:
The timer can be switched off by re-entering the timer menu and pressing the ON/OFF symbol.

Adjusting the active egg timer:
This can be achieved by re-entering the timer menu and adjusting the timer value. By selecting "the hourglass" in the relative slider position, the timer starts counting down with the new timer value.
Cooking timer:
It is possible to set the cooking zone timer for each individual cooking zone. As soon as the counter has expired, the cooking zone switches off automatically.
Activating the cooking timer:
To activate a timer for a cooking zone, it is necessary to turn on the hob and select a cooking zone.
After selecting a cooking zone, it is necessary to press and hold the same cooking zone, then select the timer from the "Cooking functions" menu. The timer menu appears, where the values can be set as follows:
h: mm: ss
The timer starts confirming the settings with a flashing "timer symbol". Alternatively the timer value can be reset by pressing the reset symbol on the right. The remaining time is displayed on the corresponding cooking zone.
The active timer can also be adjusted or stopped by selecting the cooking zone and re-entering the timer menu. After the counter has expired, audible feedback and visual feedback (flashing "00:00:00") is provided. The acoustic feedback ends after 2 min. or by touching a random key.
Pause and Call up function
Activating the Pause function:
When at least one cooking zone is in operation, the pause function can be activated. To activate the pause function, press the "11" symbol on the display.

The pause condition can also be activated with cooking zone specific errors - here the error display is hidden. The indication of residual heat and special messages are also hidden; the pause display has priority.
While the Pause function is active:
While the pause function is active, no power will be supplied to any cooking zone. All system states will be maintained throughout the pause. After the pause, the timeout counters will be restarted for the cooking zones without pans detected (max. 10 min). Any timers (including the egg timer) set before the pause will be interrupted during the pause and continue upon exiting pause mode.
When the pause mode is activated, a selected booster or automatic boil function is ended.
The residual heat calculation and the maximum operating time limitations will not be interrupted and will continue to run in the background.
Pause mode can only be activated for a maximum of 10 min. If the pause mode is not deactivated within 10 min, the hob switches off automatically. During the pause time it is possible to use the on/off button to turn off the control. In this case, the pause mode is also deactivated.
Deactivating the pause mode:
To deactivate the pause mode, press the position indicated on the slider. This will reactivate the state prior to activation of the pause.
Call up function:
If the control has been accidentally turned off via the main switch, all the settings can be restored using the call up function. After turning off the control from the main switch, the user has 6 seconds to turn the control back on and then the settings will be reset automatically. The call up function can only be used if at least one cooking zone was active (cooking level > 0).
Settings restored:
- Cooking levels of all the cooking zones.
- Minutes and Seconds of the timers relating to the active cooking zone.
• Automatic heating time and booster function. - Child lock state.
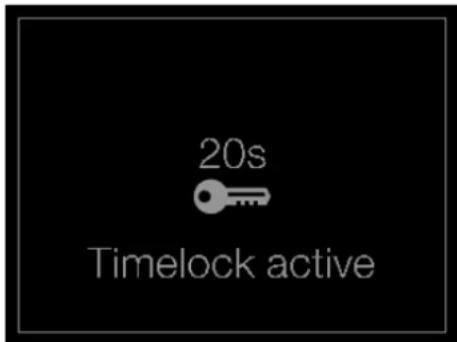
Time lock 20 seconds
To activate the time lock function, it is necessary to briefly press the 20 sec button.

While the time lock is active, the following message is displayed and the remaining time is counted down.
General hob settings
The user can adjust the general settings of the hob. These settings persist even after the hob is switched off.
It is possible to adjust the following settings:
- Language selection
- Display brightness
- Volume control
To access the settings menu, press the button on the right.


Language selection
To change the language settings, enter the settings menu by pressing the settings button. Next, select the "globe" symbol. The language menu is now displayed.
The currently selected language is shown highlighted in bold. To change the language, press the point indicated in the slider area. As soon as a language is selected, the menu automatically closes. Additional languages other than those displayed can be selected by pressing the "arrow" key on the right, in the top right. An additional language screen will appear.


Display brightness
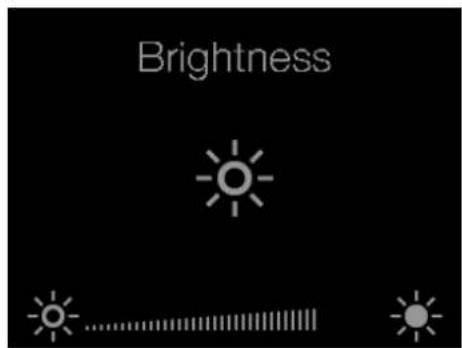
To change the brightness of the display, access the settings menu by pressing the relevant key. Next, select the "sun" symbol. The Brightness menu is now displayed. To adjust the brightness level, simply slide on the slider area where the brightness level increases from left to right. To exit the menu, press the "back" button.
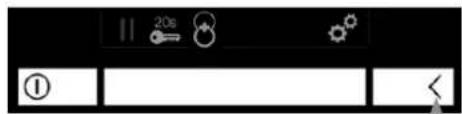
Button INDIETRO/BACK
Volume control
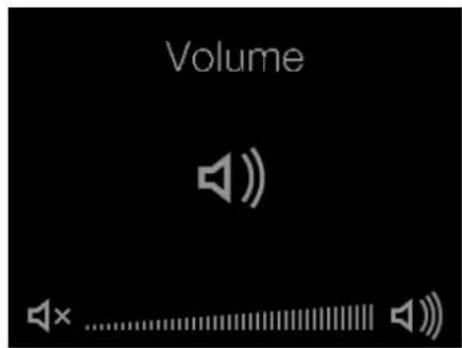
To change the volume, enter the settings menu.
Next, select the "speaker" symbol. The volume menu is now displayed. To adjust the volume level, simply slide on the slider area where the volume level increases from left to right. To exit the menu, press the multifunction button again.
Maintenance
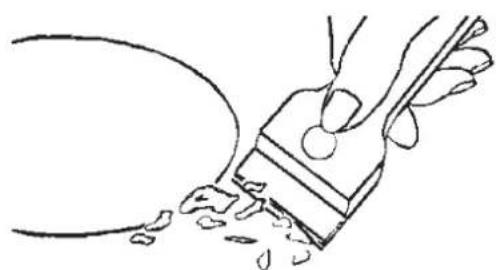
Traces of foil, food residues, splashes of fat, sugar or very sugary foods must be removed immediately from the hob using a scraper to avoid damaging the hob surface.
Then clean with SIDOL or STANFIX and kitchen paper, rinse with water and dry with a clean cloth.
Never use abrasive sponges or clothes and avoid using aggressive chemical cleansers such as OVEN SPRAYS or STAIN REMOVERS.
DO NOT USE STEAM CLEANERS
Fig.5
natural_image
Line drawing of a hand painting a paintbrush with splashes (no text or symbols)EN 4 - Installation instructions
Installation
these instructions are aimed at qualified fitters as a guide to installation, adjustment and maintenance in compliance with the laws and standards in force. The operations must always be carried out with the appliance disconnected from the electricity supply.
Positioning
The appliance is made to be fitted into a counter top, as shown in the figures at page 18. Apply the sealant supplied around the whole perimeter of the hob. Installation over an oven is not recommended, but if this is necessary, check that:
• the oven has an efficient cooling system;
- there is no passage of hot air from the oven to the hob;
- allow air passages as shown in the figure.
Electrical connection
Before connecting to the electricity supply, ensure that:
- the characteristics of the system are such as to satisfy that indicated on the registration plate applied to the bottom of the hob;
- the system has an effective earth connection compliant with the standards and laws in force. Connection to earth is compulsory by law.
If the appliance has no cable and/or plug, use material suitable for the absorption indicated on the registration plate and for the working temperature. The cable must not reach a temperature higher than 50^ C above room temperature in any point.
For direct connection to the network it is necessary to fit an omnipolar switch of a suitable size to ensure disconnection of he network with a contact opening distance that allows complete disconnection in the conditions of the overtension category III, compliant with the installation regulations (the yellow/green earth wire must not be interrupted).
The omnipolar socket or switch must be easy to reach when the appliance is installed.
N.B.:
- The manufacturer declines all responsibility if the usual accident prevention standards and the above instructions are not observed.
If the power cable is damaged, it must be replaced by the manufacturer or by the manufacturer's technical servicing network, or by a similarly qualified operator, to prevent every possible risk.
VSee the power supply cables table, page 20.
List of errors displayed
In case of errors or malfunctions of the hob, a number of error codes may appear on the display.
The intervention must be performed by technical assistance and by a specialist technician.
| Error message Description Possible error reason Troubleshooting | |||
| ER03+ Steady tone | Permanent Key activation, interface shut down at 10s | Water or cookware on the glass above the interface | Cleaning of the |
| ER 20 | Flash - failure μ C- faulty Exchange control unit | ||
| ER21 | Control unit shuts down, caused by overtemperature, to avoid damage of the touch control | Control algorithm has reached overtemperature, because ambient temperature is to high | Let cooktop cool down, check temperature isolation to user interface |
| ER22 | Defective Key evaluation. Control unit cuts off after 3.5 - 7.5 sec. | Short-circuit or discontinuation in the range of the key evaluation | Exchange control unit |
| ER31 | Configuration data is wrong Configuration of the induction necessary | New configuration | |
| ER36 | NTC value is not within its specification (value < 200mV or >4.9V; control unit cuts off | Short-circuit or cut-off at NTC Exchange control unit | |
| ER40 | Secondary voltage is min.5s to low (1,8V< UPowerfail< 2,9V) | Primary-PTC to hot Disconnect interface from power supply | |
| ER47 | Communication failure between induction and Touch Control | No or incorrect communication Connection cable broken or incorrect mounted | |
| E2 | Overtemperature on the cooking zone | Let the system cool down | |
| E6 | Failure of the power unit Change power | ||
| E7 | Unknown mistake Change induction modul | ||
| E8 | Fan failure Fan or control electronics of the fan are broken | Change induction modul | |
| E9 | Broken coil temperature sensor Change coil sensor | ||
| U 400 | Secondary voltage of the power unit to high (primary >300V). Control unit cuts off after 1 sec releasing a permanent tone. | Control unit is wrongly connected. | Connect to correct mains voltage |
| E/A | Error on power board or supply element | No power supply of the power element or error on power board | 1. Check wiring2. Check filter board3. Replace power board |


natural_image
Technical cross-section diagram of a structural assembly (no text or labels)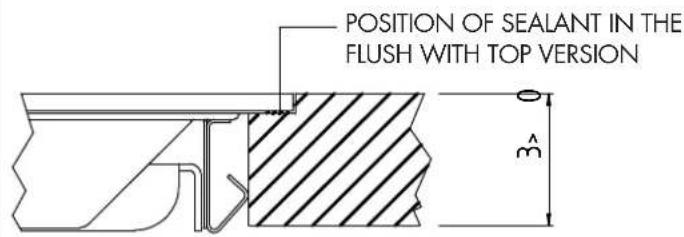

natural_image
Technical line drawing of a mechanical assembly with no visible text or symbols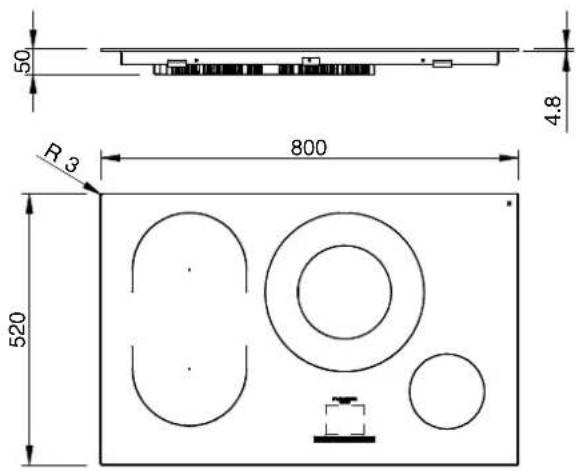
Note: See versione models do not need to be lowered by 4.8 mm

Note: Non-megazine solution are the glass when lowering by 4.8 mm
| Model | Rated power [W] | Rated Voltage |  | 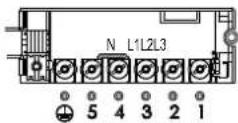 |
| 220-240 V220-230 V230-240 V220 V; 230 V; 240 V | 380-415 V 3N380-400 V 3N400-415 V 3N380 V 3N; 400 V 3N; 415 V 3N | |||
| FSH 804 ID WT 73 | 60 W | 380-415 V 3N380-400 V 3N400-415 V 3N380 V 3N400 V 3N415 V 3N | - | Max 16 A (x3)5 x 2.5 mm2 |
| 220-240/380-415 V 3N220-230/380-400 V 3N230-220/400-415 V 3N220/380 V 3N230/400 V 3N240/415 V 3N | Max 24 A (x2)b)5 x 2.5 mm2 | Max 16 A (x3)5 x 2.5 mm2 |
a) The appliance can be adjusted for different rated voltages, from 220-240 V (single-phase with 5 conductors) to 380-415 V 3N (three-phase with 5 conductors), but is equipped with a power cable only for 220-240 connection V (single-phase with 5 conductors).
The same 5x2.5 mm2 cable mounted in the factory for single-phase connection can be used for three-phase connection, simply by moving the wire from 4 to 3, and removing the two jumpers between 1-2 and 2-3
b) Single-phase connection: 5-conductor power cable: 2 conductors for neutral, 2 conductors for 1 phase, 1 conductor for earth.
| USABLE POWER CABLES |
| H05RR-F 5x2.5 |
| H05VV-F 5x2.5 |
| H05V2V2-F 5x2.5 |
| H05RNF-F 5x2.5 |
| H05SS-F 5x2.5 |
natural_image
Illustration of kitchenware including a pan, lid, and pot (no text or symbols)natural_image
Illustration of two cooking panes with handles and side blades, one closed and one open (no text or symbols)Ungeeignetes Geschirr
natural_image
Simple black rectangular frame with a small circular symbol in the top-left corner, no text or symbols present.natural_image
Two white key icons on a black background: one with a key, the other with a padlock (no text or symbols)natural_image
Technical cross-section diagram of a structural assembly (no text or labels)
natural_image
Technical line drawing of a mechanical assembly with no visible text or symbols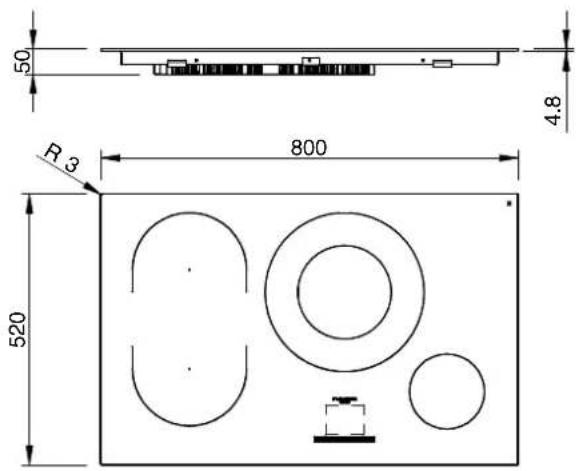

natural_image
Illustration of kitchenware including a cooking pan, lid, and pot (no text or symbols)natural_image
Illustration of two cooking panes with handles and side blades, one showing a side dish (no text or symbols)Recipientes no adecuados
| REF. ELEMENTOS ENCENDIDOS POTENCIA | POTENCIA EN ENERGÍA INCREMENTADOR (kW) | DIÁMETROS DE BOTE RECOMENDADOS (mm) | ||
| NOMINAL (kW) | ||||
| A | FLEXI zona única 2,1 3,7 145 | |||
| B | FLEXI Modo Bridge 3,7 - 245 | |||
| C | 180/260 1,85/3,7 3,0/5,5 125/250 | |||
| D | 145 1,4 2,2 120 | |||
natural_image
Simple black-and-white diagram with a small circular symbol and two labeled buttons (① and <), no readable text or symbols.natural_image
Two white icons: a key and a padlock on a black background (no text or symbols)natural_image
Line drawing of a hand using a paintbrush to scrape or brush with scattered debris (no text or symbols)Instalación
natural_image
Technical cross-section diagram of a structural assembly (no text or labels)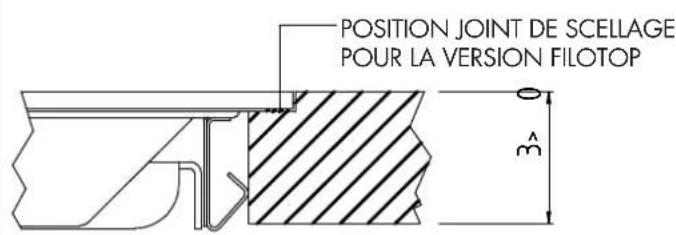

natural_image
Technical line drawing of a mechanical assembly with no visible text or symbols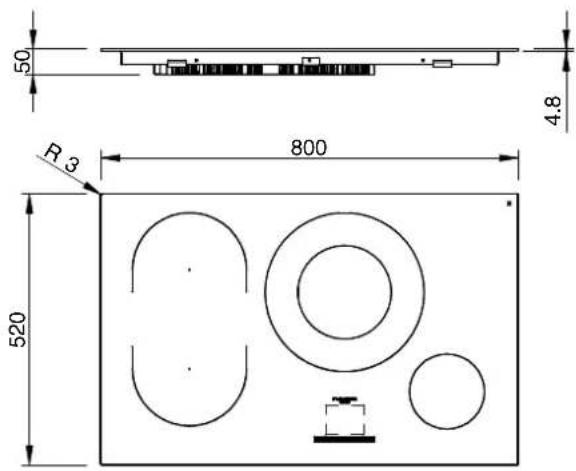
natural_image
Illustration of kitchenware including a cooking pan, plate with lid, and a pot (no text or symbols)natural_image
Illustration of two frying panes with different interior designs (no text or symbols)natural_image
Simple black rectangle with a small circular mark in the top-left corner, no text or symbols present.natural_image
Two white icons: a key and a padlock on a black background (no text or symbols)natural_image
Line drawing of a hand using a paintbrush to brush the paint onto a surface (no text or symbols)Instalacja
natural_image
Technical cross-section diagram of a structural assembly (no text or labels)
natural_image
Technical line drawing of a mechanical assembly with no visible text or symbols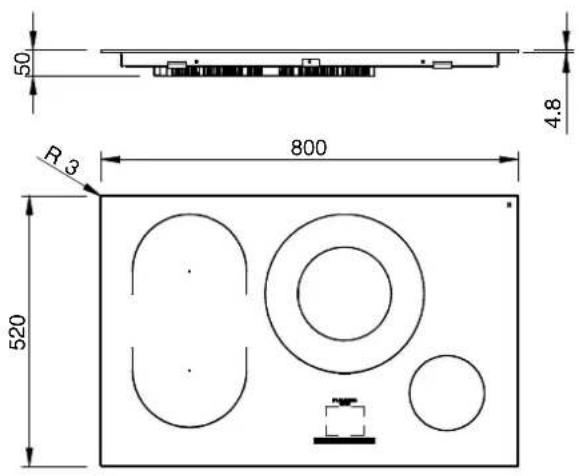

natural_image
Illustration of kitchenware including a cooking pan, plate with lid, and a pot (no text or symbols)natural_image
Illustration of two cooking panes with different interior designs (no text or symbols)natural_image
Simple black rectangular frame with a small circular symbol in the top-left corner and two white buttons labeled ① and < on the bottom (no text or symbols within the frame)natural_image
Two white icons: a key and a padlock on a black background (no text or symbols)natural_image
Line drawing of a hand using a paintbrush to scrape or brush residue from a surface (no text or symbols)Установка
natural_image
Technical cross-section diagram of a structural assembly (no text or labels)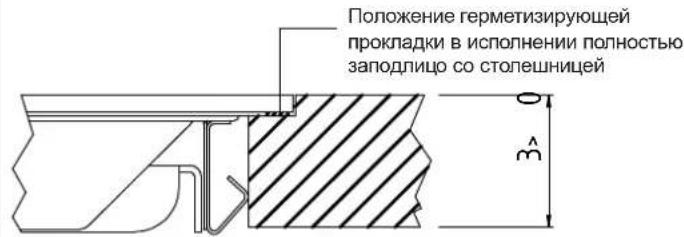
natural_image
Technical line drawing of a mechanical assembly with no visible text or symbols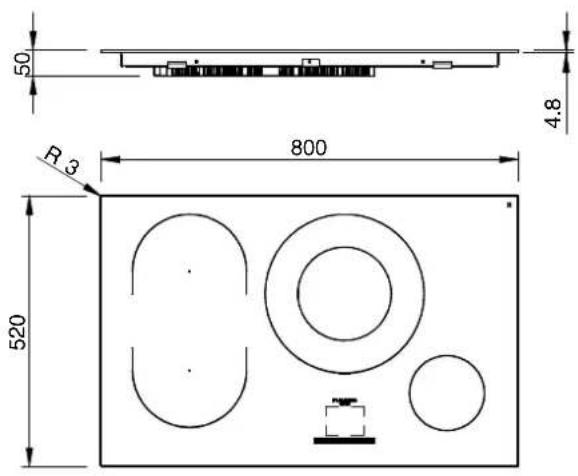


- Recipienti non adeguati
- Manutenzione
- INDEX PAGE
- THIS PRODUCT IS DESIGNED FOR DOMESTIC USE.
- COOKING SURFACE SAFETY WARNINGS
- ATTENTION
- Induction
- Operating principle
- Containers
- Inadequate containers
- Characteristics of the base of the cookware
- Absent or inadequately sized cookware
- Empty cookware or cookware with a thin base
- Pan recognition
- Pan position
- Installation
- IMPORTANT
- Functions
- Touch Control on/off
- Automatic switch off
- Switching a cooking zone on/off
- Switching off all the cooking zones
- Automatic switch-off (operating time limitation)
- Protection against involuntary activation
- Surface cleaning mode
- Residual heat
- Automatic pan detection
- Power levels
- Booster function
- Activating the booster:
- Deactivating the booster:
- Automatic boiling function
- Activating automatic boiling:
- Deactivating automatic boiling:
- Automatic bridge
- Deactivation of the semi-automatic bridge:
- Manual bridge (extended zone)
- Automatic double circular circuit selection
- Heating function
- Activation:
- Deactivation:
- Child lock function
- Activating the child lock:
- Deactivating the childproof lock:
- Temporary unlock:
- Acoustic feedback (buzzer)
- Timer function
- "Egg Timer" function:
- Adjusting the active egg timer:
- Cooking timer:
- Activating the cooking timer:
- Pause and Call up function
- Activating the Pause function:
- While the Pause function is active:
- Deactivating the pause mode:
- Call up function:
- Settings restored:
- Time lock 20 seconds
- General hob settings
- Language selection
- Display brightness
- Volume control
- Maintenance
- EN 4 - Installation instructions
- Positioning
- Electrical connection
- N.B.:
- List of errors displayed
- Ungeeignetes Geschirr
- Recipientes no adecuados
- Instalación
- Instalacja
- Установка
Brand : Fulgor Milano
Model : FSH 804 ID WT BK
Category : Cooker