95-9011HG - Automotive Mounting Kit Metra - Free user manual and instructions
Find the device manual for free 95-9011HG Metra in PDF.


| Product Type | Automobile Radio Installation Kit |
| Brand | Metra |
| Model | 95-9011HG |
| Finish | Painted High Gloss Black |
| Radio Provision | ISO DIN Double-DIN (DDIN) |
| Vehicle Compatibility | Volkswagen 2005-Up (selected models) |
| Kit Components | Radio housing, ISO DDIN brackets, DDIN trim plate |
| Wiring & Antenna | Sold separately; compatible harnesses and adapters available |
| Tools Required | Panel removal tool, Phillips screwdriver, socket wrench |
| Dimensions (approx.) | Standard double-DIN radio opening size |
| Weight (approx.) | 0.5 kg (1.1 lbs) |
| Material | ABS plastic with scratch-resistant paint |
| Installation Type | Dash mount; replaces factory radio |
| Safety Precautions | Disconnect battery before installation; test with factory equipment connected |
| Care Instructions | Clean with a soft, dry cloth; avoid abrasives |
| Spare Parts Availability | Contact Metra or visit MetraOnline.com |
| Repairability | Non-user serviceable; replace if damaged |
| Warranty | Refer to product packaging or Metra |
| Technical Support | Phone: 386-257-1186 ext. 8300; Email: techsupport@metra-autosound.com |
Frequently Asked Questions - 95-9011HG Metra
User questions about 95-9011HG Metra
0 question about this device. Answer the ones you know or ask your own.
Ask a new question about this device
Download the instructions for your Automotive Mounting Kit in PDF format for free! Find your manual 95-9011HG - Metra and take your electronic device back in hand. On this page are published all the documents necessary for the use of your device. 95-9011HG by Metra.
USER MANUAL 95-9011HG Metra
natural_image
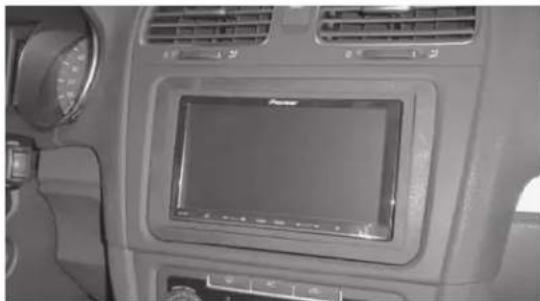
Interior view of a car dashboard with air filters and a central touchscreen display (no visible text or symbols)Volkswagen Multi-kit 2005-Up
Visit MetraOnline.com for more detailed information about the product and up-to-date vehicle specific applications
KIT FEATURES
• ISO DDIN radio provision
• 95-9011B - Scratch resistant matte black
• 95-9011HG - Painted high gloss black
KIT COMPONENTS
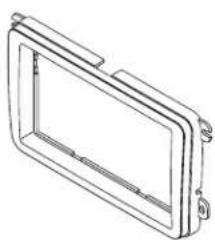
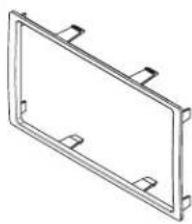
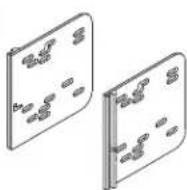
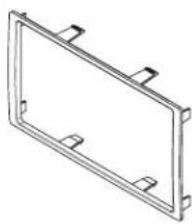
• A) Radio housing • B) ISO DDIN radio brackets • C) DDIN trim plate
A
natural_image
Technical line drawing of a rectangular frame with internal channels and mounting brackets (no text or symbols)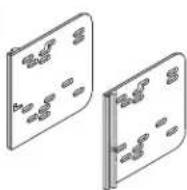
natural_image
Technical line drawing of a rectangular frame with mounting holes (no text or symbols)Applications
Beetle ......2012-2019 Jetta SportWagen ......
CC 2009-2017 2010-2014
EOS 2007-2016
GTI 2006-2014 Passat 2006-up
Golf, Golf R .....2010-2014 R32 .....2007-2008
Jetta 2005-2018 Rabbit 2007-2009
Jetta GLI .....2006-2018 Tiguan .....2009-2017
WIRING & ANTENNA CONNECTIONS (sold separately)
Wiring Harness: Visit metraonline.com for wiring harness options
Antenna Adapter: Visit metraonline.com for antenna adapter options
TOOLS REQUIRED
• Panel removal tool • Phillips screwdriver
- Socket wrench
Attention! Let the vehicle sit with the key out of the ignition for a few minutes before removing the factory radio. When testing the aftermarket equipment, ensure that all factory equipment is connected before cycling the key to ignition.
DASH DISASSEMBLYTABLE OF
Dash Disassembly
-. Jetta GLI 2006-2018....2-3
-. GTI 2006-2009 2-3
- . New Jetta 2005-2010....2-3
-. Rabbit 2007-2009....2-3
- . R32 2007-2008....2-3
-. Jetta 2011-2018....3
- . CC 2009-2017 .... 3
-. Passat 2006-2010 ....3
-. Passat 2012-up....3
-. Jetta SportWagen 2010-2014 .... 3
-. Jetta GLI 2012-up ....3
-. Golf, Golf R 2010-2014....3
-. GTI 2010-up 3
-.Tiguan 2009-2017 4
-. EOS 2007-2016....4
-. Beetle 2012-2019....5
Kit Assembly....6
New Jetta 2005-2010,
Jetta GLI 2006-2018, GTI 2006-2009
Rabbit 2007-2009, R32 2007-2008
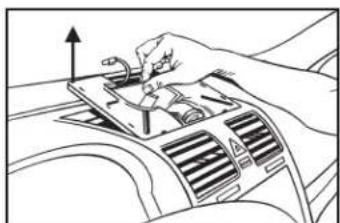
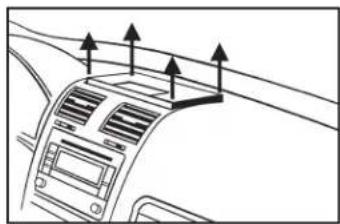
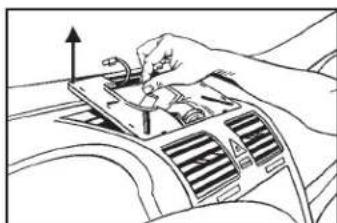
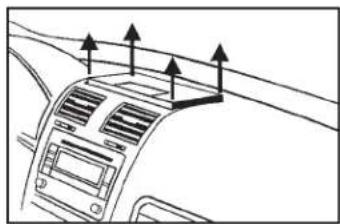
- Unclip and remove the grille from the top-center of dash. (Figure A)
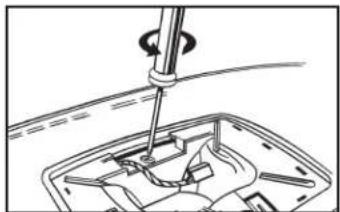
- Remove one T-20 Torx screw from black insert from under grille removed in step one. (Figure B)
- Remove insert. (Figure C)
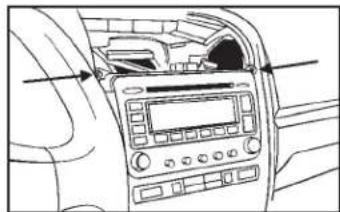
- Remove two T-20 Torx screws from under black insert removed in step two. (Figure D)
Continued on next page
natural_image
Technical line drawing of a mechanical assembly with a tool and component (no text or symbols)(Figure B)
natural_image
Line drawing of a hand pressing down on a car's steering wheel (no text or symbols)(Figure C)
natural_image
Top-down view of a car dashboard with directional arrows indicating airflow or traffic flow (no text or symbols)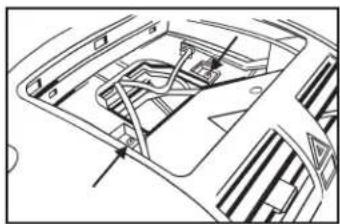
natural_image
Technical line drawing of a car interior frame with structural ribs and ventilation ducts (no text or symbols)(Figure D)(Figure A)
DASH DISASSEMBLY (CONT.)
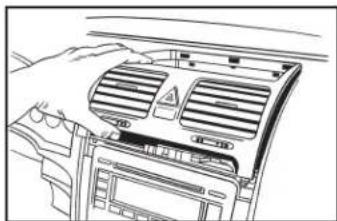
- Unclip and remove the grille from the top-center of dash. (Figure E)
- Remove one T-20 Torx screw from black insert from under grille removed in step one. (Figure F)
- Remove insert. (Figure G)
- Remove two T-20 Torx screws from under black insert removed in step two. (Figure H)
Continue to Kit Assembly
natural_image
Line drawing of a car air intake manifold with ventilation grilles and dashboard (no text or symbols)(Figure E)
natural_image
Interior view of a car dashboard with control panel and buttons (no visible text or labels)(Figure F) (Figure F)
(Figure G) (Figure G)
(Figure H) (Figure H)
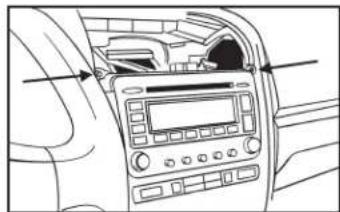
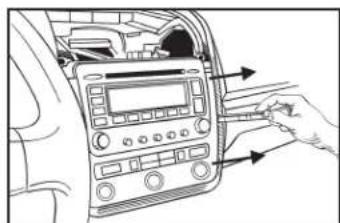
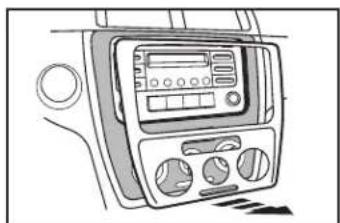
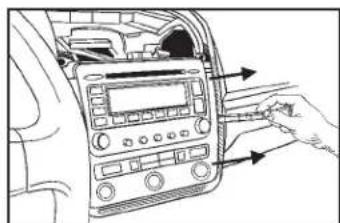
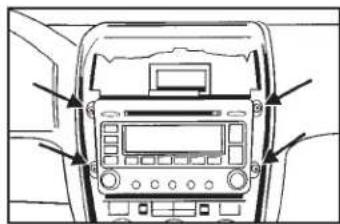
CC 2009-2017, Passat 2006-2010, Jetta SportWagen 2010-2014, Jetta 2011-2018, Golf, Golf R 2010-2014, GTI 2010-up
- Unclip and remove trim panel surrounding radio. (Figure A)
- Remove (4) T-20 Torx screws to remove radio.
Continue to Kit Assembly
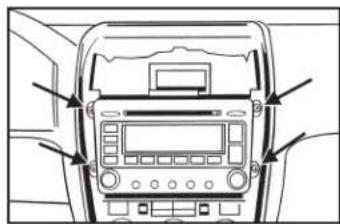
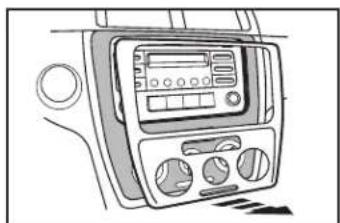
Jetta GLI 2012-up
- Unclip and remove trim panel surrounding radio. (Figure B)
- Remove (4) T-20 Torx screws to remove radio.
Continue to Kit Assembly
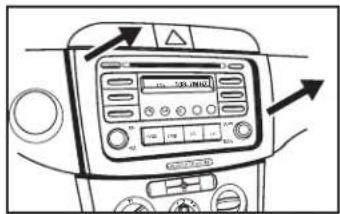
Passat 2012-up
- Unclip and remove trim panel surrounding radio. (Figure C)
- Remove (4) T-20 Torx screws to remove radio.
Continue to Kit Assembly
natural_image
Line drawing of a car dashboard with control panel and buttons (no text or symbols)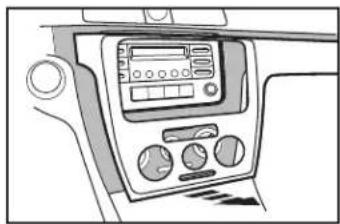
natural_image
Interior view of a vehicle dashboard with control panel and buttons (no visible text or symbols)DASH DISASSEMBLY
Tiguan 2009-2017
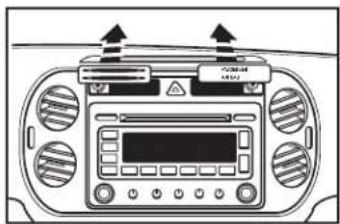
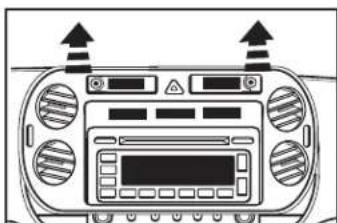
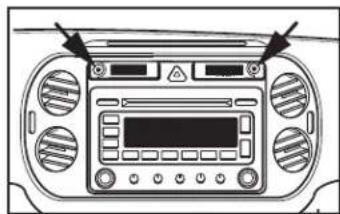
- Unclip and remove passenger air bag light panel to the right of the hazard light button. (Figure A)
- Unclip and remove the panel with the two slots in it to the left of the hazard light button. (Figure A)
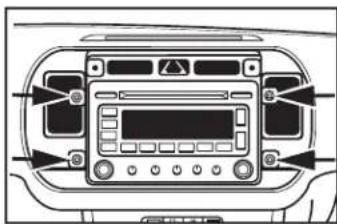
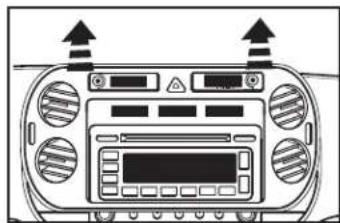
- Remove (2) T-20 Torx screws exposed behind the two panels removed in the two previous steps. (Figure B)
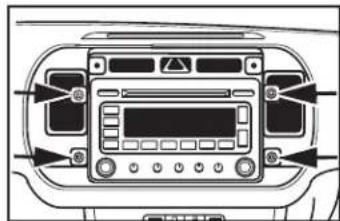
- Unclip and remove the trim panel surrounding the radio. (Figure C)
- Remove (4) T-20 Torx screws securing the radio. Unplug and remove the radio. (Figure D)
Continue to Kit Assembly
natural_image
Front view of a car air conditioner unit with control panel and indicator lights (no text or symbols visible)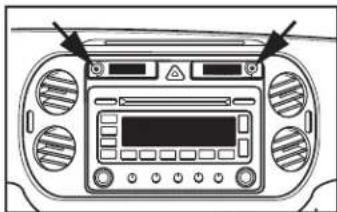
natural_image
Front view of a car dashboard with control panels and buttons (no visible text or labels)(Figure B)
natural_image
Front view of a car dashboard with indicator lights and control panels (no text or symbols visible)(Figure C)
natural_image
Front view of a car dashboard with control panel and buttons (no visible text or symbols)(Figure D)(Figure A)
EOS 2007-2016
-
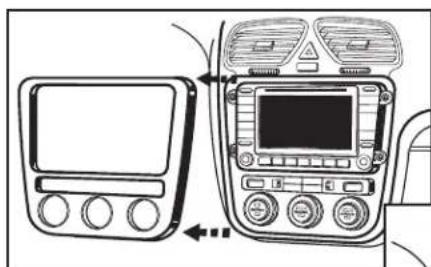
Unclip and remove the radio trim panel. (Figure A)
-
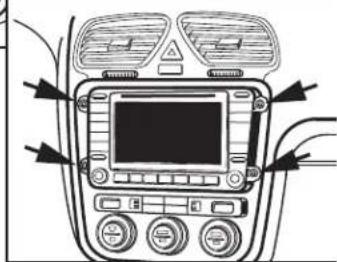
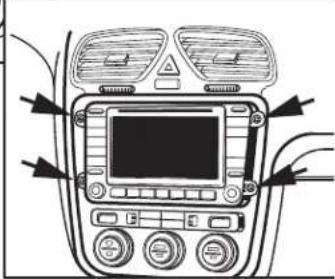
Remove the (4) screws securing the radio. Unplug and remove the radio. (Figure B)
Continue to Kit Assembly
(Figure A)
(Figure B)
DASH DISASSEMBLY
Beetle 2012-2019
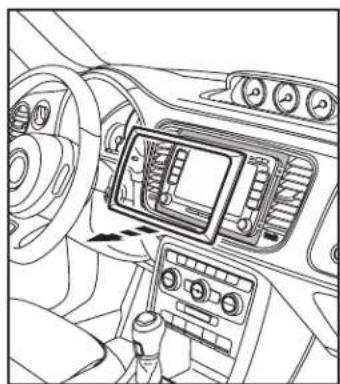
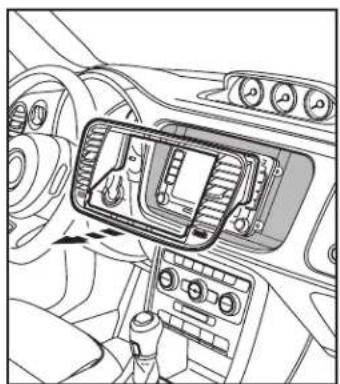
- Unclip and remove the small trim around radio. (Figure A)
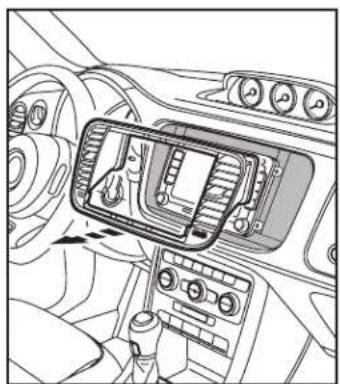
- Unclip and remove larger trim around radio including the a/c vents. (Figure B)
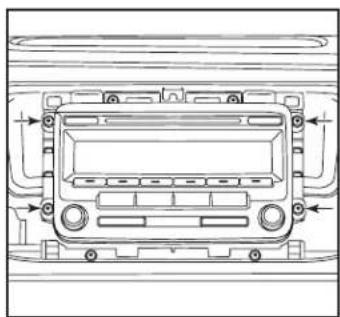
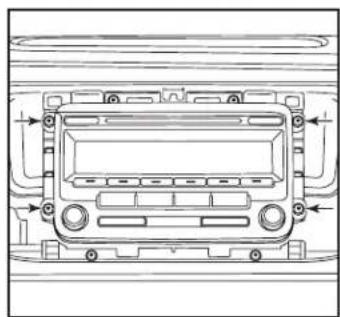
- Remove (4) Torx screws securing radio to remove the radio. (Figure C)
Continue to Kit Assembly
natural_image
Interior view of a car dashboard with steering wheel, air conditioner panel, and control panel (no text or symbols visible)(Figure A)
natural_image
Interior view of a car dashboard with steering wheel, dashboard panel, and control panel (no visible text or symbols)(Figure B)
natural_image
Top-down line drawing of a car dashboard with no visible text or symbols(Figure C)
KIT ASSEMBLY
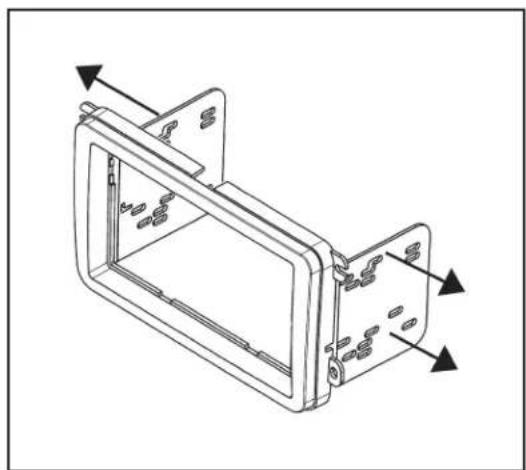
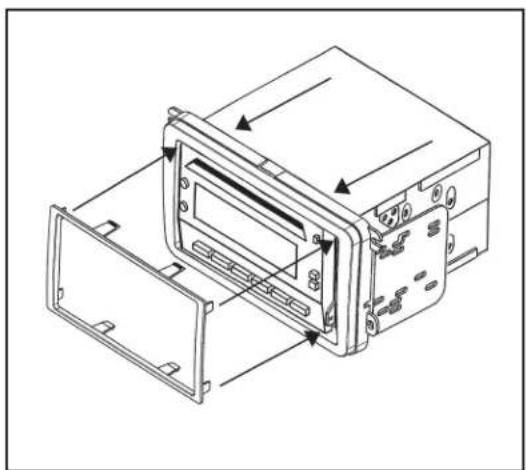
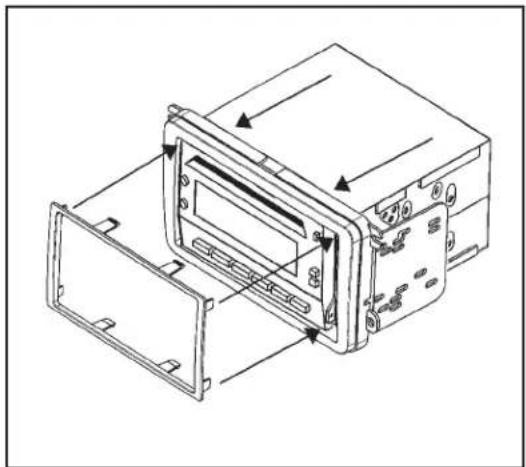
- Snap the ISO DDIN brackets to the inside edge of the radio housing. (Figure A)
- Slide the DDIN radio into the DDIN bracket/radio housing assembly and secure the radio to the kit using the screws supplied with the radio. (Figure B)
- Snap the DDIN trim plate onto the housing/radio assembly. (Figure B)
- Locate the factory wiring harness in the dash. Metra recommends using the proper mating adapter from Metra or AXXESS. Test the radio for proper operation.
- Reassemble dash in reverse order of disassembly.
natural_image
Technical line drawing of a mechanical housing component with mounting holes and internal channels (no text or symbols)(Figure A) (Figure B)
natural_image
Technical line drawing of a device casing with internal components and directional arrows indicating movement (no text or symbols)If you are having difficulties with the installation of this product, contact our Tech Support line either by phone at 386-257-1186 ext. 8300, or email at techsupport@metra-autosound.com. Before doing so, look over the instruction booklet a second time and ensure that the installation was performed exactly as the instruction booklet is stated. Have the vehicle apart and ready to perform troubleshooting steps before contacting Metra/Axxess Tech Support.

KNOWLEDGE IS POWER
Enhance your installation and fabrication skills by enrolling in the most recognized and respected mobile electronics school in our industry. Log onto www.installerinstitute.com or call 800-354-6782 for more information and take steps toward a better tomorrow.

Metra recommends MECP certified technicians
natural_image
Interior view of a car dashboard with air condition meters and a central touchscreen display (no visible text or symbols)COMPONENTES DEL KIT
natural_image
Technical line drawing of a rectangular mechanical component with mounting holes (no text or symbols)[Non-Text]
natural_image
Technical line drawing of a rectangular frame with mounting holes (no text or symbols)Volkswagen Multi-kit 2005 y mas
natural_image
Technical line drawing of a mechanical assembly with a tool and component (no text or symbols)(Figura B)
natural_image
Line drawing of a hand using a tool to interact with a car dashboard (no text or symbols)(Figura C)
natural_image
Diagram of a car dashboard with directional arrows indicating airflow or movement (no text or symbols)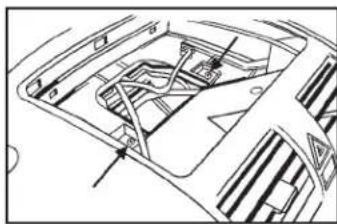
natural_image
Technical line drawing of a car interior frame with no visible text or symbols(Figura D)(Figura A)
DESMONTAJE DEL TABLERO (CONT.)
natural_image
Line drawing of a car air conditioner unit with hand operating controls (no text or symbols)(Figura E)
natural_image
Interior view of a car dashboard with control panel and air vent (no visible text or symbols)(Figura F) (Figura F)
natural_image
Interior view of a car dashboard with directional arrows indicating traffic or movement (no text or symbols visible)(Figura G) (Figura G)
(Figura H) (Figura H)
CC 2009-2017, Passat 2006-2010, Jetta SportWagen 2010-2014, Jetta 2011-2018, Golf, Golf R 2010-2014, GTI 2010 y mas
natural_image
Line drawing of a car dashboard with air filters and control panel (no text or symbols)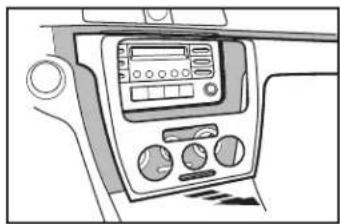
natural_image
Interior view of a vehicle dashboard with control panel and buttons (no visible text or symbols)DESMONTAJE DEL TABLERO
Tiguan 2009-2017
(Figura A)
natural_image
Front view of a car dashboard with control panels and indicator lights (no text or symbols visible)(Figura B)
natural_image
Front view of a car dashboard with indicator lights and control panels (no text or symbols visible)(Figura C)
natural_image
Top-down view of a car dashboard with control panel and buttons (no visible text or labels)(Figura D)
EOS 2007-2016
(Figura A)
(Figura B)

Metra
DESMONTAJE DEL TABLERO
Beetle 2012-2019
natural_image
Interior view of a car dashboard with air vent and control panel (no text or symbols visible)(Figura A)
natural_image
Interior view of a car dashboard with steering wheel, dashboard panel, and control panel (no visible text or symbols)(Figura B)
natural_image
Technical line drawing of a car dashboard with no visible text or symbols(Figura C)
ENSAMBLE DEL KIT
natural_image
Technical line drawing of a mechanical housing component with mounting holes and internal ribs (no text or symbols)(Figura A) (Figura B)
natural_image
Technical line drawing of a device casing with internal components and directional arrows indicating movement (no text or symbols)natural_image
Interior view of a car dashboard with air filters and a digital display (no readable text or symbols)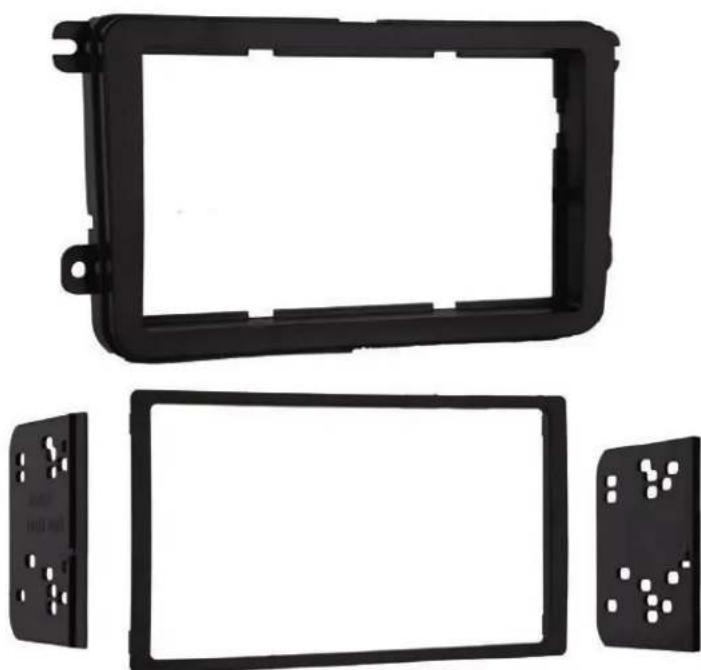
natural_image
Exterior view of a black plastic automotive body panel with mounting holes and side panels (no text or symbols)Volkswagen Multi-kit 2005-Up\*
Visit MetraOnline.com for more detailed information about the product and up-to-date vehicle specific applications.

ISO DDIN radio provision

95-9011B - Scratch resistant matte black 95-9011HG - Painted high gloss black
APPLICATIONS
Beetle ...... 2012-2019 Jetta SportWagen ......
CC 2009-2017 2010-2014
EOS 2007-2016
GTI 2006-2014 Passat 2006-up
Golf, Golf R .....2010-2014 R32 .....2007-2008
Jetta 2005-2018 Rabbit 2007-2009
Jetta GLI .....2006-2018 Tiguan .....2009-2017
KIT COMPONENTS
• Radio housing
• ISO DDIN radio brackets
- DDIN trim plate
WIRING & ANTENNA CONNECTIONS
(sold separately)
Wiring Harness: Visit metraonline.com for wiring harness options
Antenna Adapter: Visit metraonline.com for antenna adapter options
SALES 800-221-0932
- Volkswagen Multi-kit 2005-Up
- KIT FEATURES
- KIT COMPONENTS
- Applications
- WIRING & ANTENNA CONNECTIONS (sold separately)
- TOOLS REQUIRED
- DASH DISASSEMBLYTABLE OF
- Dash Disassembly
- New Jetta 2005-2010,
- Jetta GLI 2006-2018, GTI 2006-2009
- Rabbit 2007-2009, R32 2007-2008
- DASH DISASSEMBLY (CONT.)
- Jetta GLI 2012-up
- Passat 2012-up
- Tiguan 2009-2017
- EOS 2007-2016
- Beetle 2012-2019
- KIT ASSEMBLY
- COMPONENTES DEL KIT
- Volkswagen Multi-kit 2005 y mas
- DESMONTAJE DEL TABLERO (CONT.)
- DESMONTAJE DEL TABLERO
- ENSAMBLE DEL KIT
- Volkswagen Multi-kit 2005-Up\*
- WIRING & ANTENNA CONNECTIONS
Brand : Metra
Model : 95-9011HG
Category : Automotive Mounting Kit