
HP9096 - Drill BLACK & DECKER - Free user manual and instructions
Find the device manual for free HP9096 BLACK & DECKER in PDF.


| Product type | Cordless drill/driver |
| Brand | Black & Decker |
| Model | HP9096 |
| Rated voltage | 9,6 V |
| No-load speed | 0 - 650 min⁻¹ |
| Maximum torque | 8,3 Nm |
| Chuck | Hexagonal 6,35 mm (1/4") |
| Weight | 1,5 kg |
| Battery type | Rechargeable NiCd/NiMH |
| Charging time | Approximately 3 hours (up to 6 hours for full charge) |
| Charger | 230 V AC, double insulation, indoor use |
| Rotation direction selector | Right / left / center lock |
| Speed variator | Yes, by variable speed trigger |
| Adjustable head | Yes, multiple positions |
| Intended use | Drilling in wood, metal and plastics, screwdriving |
| Hand/arm vibration level | < 2,5 m/s² |
| Maintenance | Clean ventilation slots with a soft brush; housing with a damp cloth |
| Safety | Wear protective glasses; do not expose to rain |
| Repairability | Repairs by authorized technician with original parts |
| Warranty | 24 months |
| Standards | CE (98/37/EEC, 89/336/EEC, 73/23/EEC, EN 50260, EN 55014, EN 60335, EN 61000) |
| Recycling | Batteries recyclable via authorized repair shop or local center |
Frequently Asked Questions - HP9096 BLACK & DECKER
User questions about HP9096 BLACK & DECKER
0 question about this device. Answer the ones you know or ask your own.
Ask a new question about this device
Download the instructions for your Drill in PDF format for free! Find your manual HP9096 - BLACK & DECKER and take your electronic device back in hand. On this page are published all the documents necessary for the use of your device. HP9096 by BLACK & DECKER.
USER MANUAL HP9096 BLACK & DECKER
natural_image
Line drawing of a handheld electric shaver with handle and control panel (no text or symbols)English 3
Deutsch 7
Français 12
Italiano 16
Nederlands 20
Español 24
Português 28
Svenska 33
Norsk 37
Dansk 41
Suomi 45
Ελληνικα49
A
B
C
D
Intended use
Your Black & Decker drill/screwdriver has been designed for screwdriving applications and for drilling in wood, metal and plastics. This tool is intended for consumer use only.
Your Black & Decker charger has been designed for charging the battery in the tool with which it was supplied.
Safety instructions
◆Warning! When using battery-powered tools, basic safety precautions, including the following, should always be followed to reduce the risk of fire, leaking batteries, personal injury and material damage.
◆Read all of this manual carefully before operating the tool.
◆Retain this manual for future reference.
Keep work area clean
Cluttered areas and benches can cause accidents.
Consider work area environment
Do not expose the tool to rain. Do not use the tool in damp or wet conditions. Keep the work area well lit. Do not use the tool where there is a risk of causing fire or explosion, e.g. in the presence of flammable liquids and gases.
Keep children away
Do not allow children, visitors or animals to come near the work area or to touch the tool.
Dress properly
Do not wear loose clothing or jewellery, as these can be caught in moving parts. Preferably wear rubber gloves and non-slip footwear when working outdoors. Wear protective hair covering to keep long hair out of the way.
Personal protection
Always use safety glasses. Use a face or dust mask whenever the operations may produce dust or flying particles. Hearing protection should be worn.
Do not overreach
Keep proper footing and balance at all times.
Stay alert
Watch what you are doing. Use common sense. Do not operate the tool when you are tired.
Secure workpiece
Use clamps or a vice to hold the workpiece. It is safer and it frees both hands to operate the tool.
Connect dust extraction equipment
If devices are provided for the connection of dust extraction and collection facilities, ensure that these are connected and properly used.
Remove adjusting keys and wrenches
Always check that adjusting keys and wrenches are removed from the tool before operating the tool.
Use appropriate tool
The intended use is described in this instruction manual. Do not force small tools or attachments to do the job of a heavy-duty tool.
The tool will do the job better and safer at the rate for which it was intended. Do not force the tool.
Warning! The use of any accessory or attachment or performance of any operation with this tool other than those recommended in this instruction manual may present a risk of personal injury.
Check for damaged parts
Before use, carefully check the tool for damage. Check for misalignment and seizure of moving parts, breakage of parts, damage to guards and switches and any other conditions that may affect its operation. Ensure that the tool will operate properly and perform its intended function. Do not use the tool if any part is damaged or defective. Do not use the tool if the switch does not turn it on and off. Have any damaged or defective parts repaired or replaced by an authorised repair agent. Never attempt any repairs yourself.
Remove the battery
Where the design permits, remove the battery when the tool is not in use, before changing any parts of the tool, accessories or attachments and before servicing.
Avoid unintentional starting
Do not carry the tool with a finger on the on/off switch. Be sure that the tool is switched off when inserting the battery into the tool.
Do not abuse cord
Never carry the charger by its cord or pull it to disconnect from the socket. Keep the cord away from heat, oil and sharp edges.
Store idle tools
When not in use, tools, batteries and chargers should be stored in a dry, locked up or high place, out of reach of children.
Maintain tools with care
Keep cutting tools sharp and clean for better and safer performance. Follow the instructions for maintenance and changing accessories. Keep handles and switches dry, clean and free from oil and grease.
Repairs
This tool complies with relevant safety requirements. Repairs should only be carried out by qualified persons using original spare parts; otherwise this may result in considerable danger to the user.
Additional safety instructions for batteries and chargers
Batteries
◆Never attempt to open for any reason.
◆Do not expose the battery to water.
◆Do not store in locations where the temperature may exceed 40 °C.
◆Charge only at ambient temperatures between 4 °C and 40 °C.
◆Charge only using the charger provided with the tool.
When disposing of batteries, follow the instructions given in the section "Protecting the environment".
ENGLISH
◆Under extreme conditions, battery leakage may occur. When you notice liquid on the battery, proceed as follows:
- Carefully wipe the liquid off using a cloth. Avoid skin contact.
- In case of skin or eye contact, follow the instructions below.
Warning! The battery fluid, a 25-30% solution of potassium hydroxide, can be harmful. In case of skin contact, immediately rinse with water. Neutralise with a mild acid such as lemon juice or vinegar. In case of eye contact, rinse abundantly with clean water for at least 10 minutes. Consult a physician.
◆Do not incinerate the battery.
◆Do not attempt to charge damaged batteries.
Chargers
◆Use your Black & Decker charger only to charge the battery in the tool with which it was supplied. Other batteries could burst, causing personal injury and damage.
◆Never attempt to charge non-rechargeable batteries.
◆Have defective cords replaced immediately.
◆Do not expose the charger to water.
◆Do not open the charger.
◆Do not probe the charger.

The charger is intended for indoor use only.
Electrical safety

Your charger is double insulated; therefore no earth wire is required. Always check that the mains voltage corresponds to the voltage on the rating plate. Never attempt to replace the charger unit with a regular mains plug.
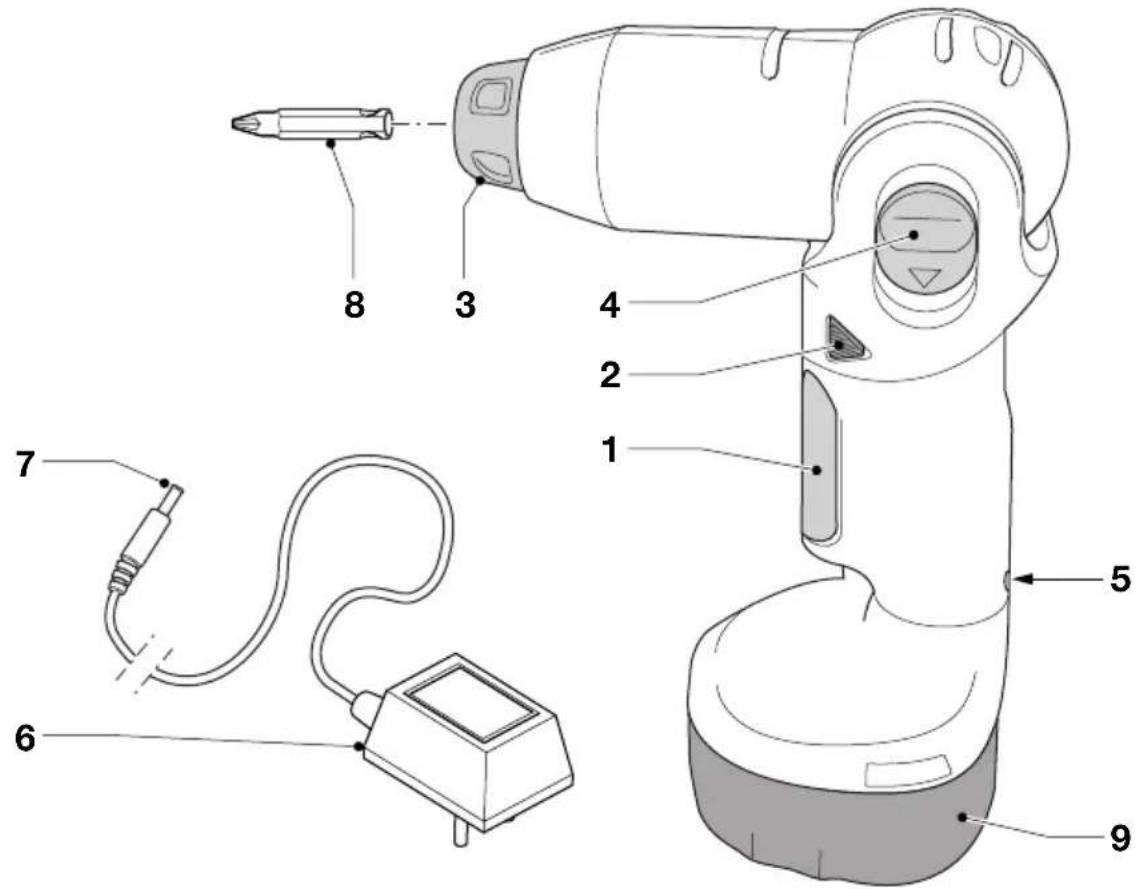
Overview (fig. A)
-
Variable speed switch
-
Forward/reverse slider
-
Bit holder sleeve
-
Head adjustment button
-
Charger connector
-
Charger
-
Charger plug
-
Screwdriver bit
-
Battery cover
Assembly
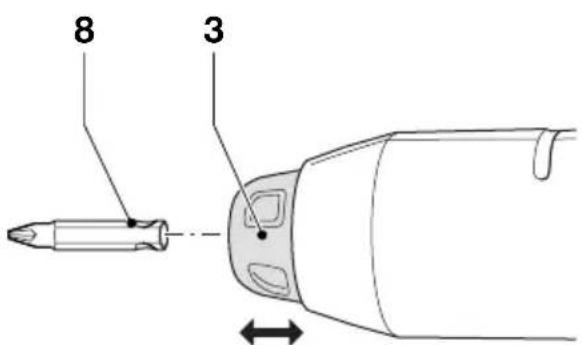
Fitting and removing a drill bit or screwdriver bit (fig. B & D)
This tool uses screwdriver bits and drill bits with a 1/4" (6.35) mm hexagonal shank.
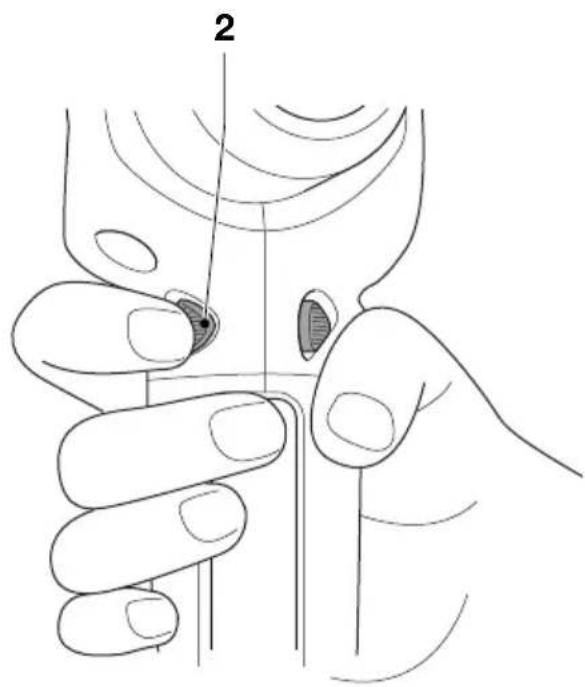
◆Lock the tool by setting the forward/reverse slider (2) to the centre position (fig. D).
◆Pull back the bit holder sleeve (3) (fig. B).
◆Insert the bit shaft (8) into the bit holder.
◆Release the bit holder sleeve.
Use
Warning! Before drilling into walls, floors or ceilings, check for the location of wiring and pipes.
Charging the battery (fig. A)
The battery needs to be charged before first use and whenever it fails to produce sufficient power on jobs that were easily done before. A new battery or a battery that has not been used for a long period of time achieves full performance only after approximately 5 charging and discharging cycles. After normal use, a charging time of 3 hours will enable the tool to operate at an effective power level for most tasks. However, further charging for up to 6 hours could significantly increase the run time, depending on the battery and charging conditions. The battery may become warm while charging; this is normal and does not indicate a problem.
Warning! Do not charge the battery at ambient temperatures below 4 °C or above 40 °C. Recommended charging temperature: approx. 24 °C.
◆To charge the battery, insert the charger plug (7) into the connector (5).
◆Plug in the charger. Switch on at the mains.
Leave the tool connected to the charger for 3-6 hours.
The charger may hum and become warm while charging; this is normal and does not indicate a problem.
Before using the tool, unplug the charger and disconnect the tool from the charger.
Warning! Do not use the tool while it is connected to the charger.
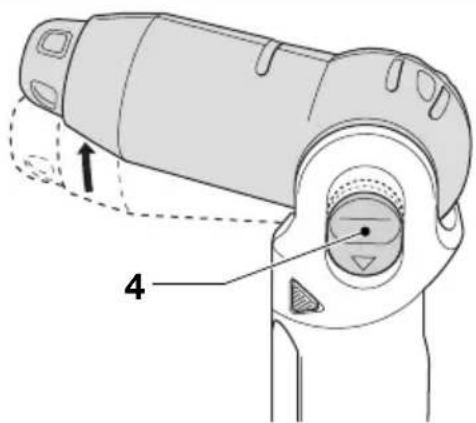
Adjusting the head (fig. C)
For optimum versatility, the head can be set to different positions.
◆Press the head adjustment button (4) down.
◆Swivel the head into the desired position.
◆Release the button.
Selecting the direction of rotation (fig. D)
For drilling and for tightening screws, use forward (clockwise) rotation. For loosening screws or removing a jammed drill bit, use reverse (counterclockwise) rotation.
◆To select forward rotation, push the forward/reverse slider (2) to the left.
◆To select reverse rotation, push the forward/reverse slider to the right.
◆To lock the tool, set the forward/reverse slider into the centre position.
Drilling/screwdriving (fig. A)
◆Select forward or reverse rotation using the forward/reverse slider (2).
◆To switch the tool on, press the switch (1). The tool speed depends on how far you press the switch.
◆To switch the tool off, release the switch.
Hints for optimum use
Drilling
◆Always apply a light pressure in a straight line with the drill bit.
- Just before the drill tip breaks through the other side of the workpiece, decrease pressure on the tool.
◆Use a block of wood to back up workpieces that may splinter.
◆Use HSS drill bits when drilling in metal.
◆Use a lubricant when drilling metals other than cast iron and brass.
◆Make an indentation using a centre punch at the centre of the hole to be drilled in order to improve accuracy.
Screwdriving
◆Always use the correct type and size of screwdriver bit.
◆If screws are difficult to tighten, try applying a small amount of washing liquid or soap as a lubricant.
◆Always hold the tool and screwdriver bit in a straight line with the screw.
When screwing in wood, it is recommended to drill a pilot hole with a depth equal to the length of the screw.
◆A pilot hole guides the screw and prevents splintering or distortion of the wood. For the optimum size of the pilot hole, refer to the table below.
When screwing in hardwood, also drill a clearance hole with a depth equal to half the length of the screw. For the optimum size of the clearance hole, refer to the table below.
Screw size Pilot hole (softwood)
| No. 6 (3.5 mm) 2 mm |
| No. 8 (4 mm) 3.2 mm |
| No. 10 (5 mm) 3.5 mm |
Screw size Pilot hole ø (hardwood)
| No. 6 (3.5 mm) 2.5 mm |
| No. 8 (4 mm) 3.5 mm |
| No. 10 (5 mm) 4.0 mm |
Screw size Clearance hole
| No. 6 (3.5 mm) 4 mm |
| No. 8 (4 mm) 5.0 mm |
| No. 10 (5 mm) 5.7 mm |
Accessories
The performance of your tool depends on the accessory used. Black & Decker and Piranha accessories are engineered to high quality standards and designed to enhance the performance of your tool. By using these accessories you will get the very best from your tool. This tool uses screwdriver bits and drill bits with a 1/4" (6.35 mm) hexagonal shank. Piranha Super-lok accessories are designed for use with this tool.
Maintenance
Your Black & Decker tool has been designed to operate over a long period of time with a minimum of maintenance.
Continuous satisfactory operation depends upon proper tool care and regular cleaning.
Your charger does not require any maintenance apart from regular cleaning.
Warning! Before performing any maintenance on the tool, set the forward/reverse slider to the centre position. Unplug the charger before cleaning it.
◆Regularly clean the ventilation slots in your tool using a soft brush or dry cloth.
◆Regularly clean the motor housing using a damp cloth. Do not use any abrasive or solvent-based cleaner.
Protecting the environment
Tools

Black & Decker provides a facility for recycling Black & Decker products and rechargeable batteries once they have reached the end of their working life. This service is provided free of charge. To take advantage of this service please return your product to any authorised repair agent who will collect them on our behalf.
Batteries
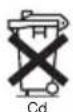
If you want to dispose of the tool yourself, the battery must be removed as described below and disposed of in accordance with local regulations.
Warning! Do not short-circuit the battery terminals.
ENGLISH
◆Remove all screws from the battery cover.
◆Remove the battery cover.
◆Remove all screws from the housing.
◆Open the housing.
◆Pull the battery out and disconnect the wires to remove it from the tool.
◆Place the battery in a suitable packaging to ensure that the terminals cannot be short-circuited.
◆NiCd and NiMH batteries are recyclable. Take them to any authorised repair agent or a local recycling station.
You can check the location of your nearest authorised repair agent by contacting your local Black & Decker office at the address indicated in this manual. Alternatively, a list of authorised Black & Decker repair agents and full details of our after-sales service and contacts are available on the Internet at: www.2helpU.com.
Technical data
| HP9096 | |
| Voltage V | 9.6 |
| No-load speed min | 0 - 650 |
| Max. torque Nm 8.3 | |
| Bit holder 1/4" (6.35 mm hex) | |
| Max. drilling capacity in steel/wood mm / | |
| Weight kg 1.5 | |
| Charger | |
| Input voltage V | 230 |
| Approx. charging time h 3 | |
EC declaration of conformity
Black & Decker declares that these products conform to: 98/37/EC, 89/336/EEC, 73/23/EEC, EN 50260, EN 55014, EN 60335, EN 61000
L_pA (sound pressure): dB(A) , L_WA (acoustic power) dB(A) , hand/arm weighted vibration < 2.5 m/s ^2
Colin Wills, Director of Engineering
BDCI, 4/F, 2 Dai Wang Street
Tai Po Industrial Estate
Tai Po NT, Hong Kong
Guarantee
Black & Decker is confident of the quality of its products and offers an outstanding guarantee. This guarantee statement is in addition to and in no way prejudices your statutory rights. The guarantee is valid within the territories of the Member States of the European Union and the European Free Trade Area.
If a Black & Decker product becomes defective due to faulty materials, workmanship or lack of conformity, within 24 months from the date of purchase, Black & Decker guarantees to replace defective parts, repair products subjected to fair wear and tear or replace such products to ensure minimum inconvenience to the customer unless:
◆The product has been used for trade, professional or hire purposes;
◆The product has been subjected to misuse or neglect;
◆The product has sustained damage through foreign objects, substances or accidents;
◆Repairs have been attempted by persons other than authorised repair agents or Black & Decker service staff.
To claim on the guarantee, you will need to submit proof of purchase to the seller or an authorised repair agent. You can check the location of your nearest authorised repair agent by contacting your local Black & Decker office at the address indicated in this manual. Alternatively, a list of authorised Black & Decker repair agents and full details of our after-sales service and contacts are available on the Internet at:
www.2helpU.com.
Director of Engineering BDCI, 4/F, 2 Dai Wang Street Tai Po Industrial Estate Tai Po NT, Hong Kong
Garantie
| No. 6 (3,5 mm) 2,5 mm |
| No. 8 (4 mm) 3,5 mm |
| No. 10 (5 mm) 4,0 mm |
| No. 6 (3,5 mm) 4 mm |
| No. 8 (4 mm) 5,0 mm |
| No. 10 (5 mm) 5,7 mm |
Accessoires
Director of Engineering
BDCI, 4/F, 2 Dai Wang Street
Tai Po Industrial Estate
Tai Po NT, Hong Kong
Garantie
| No. 6 (3,5 mm) 2,5 mm |
| No. 8 (4 mm) 3,5 mm |
| No. 10 (5 mm) 4,0 mm |
| No. 6 (3,5 mm) 4 mm |
| No. 8 (4 mm) 5,0 mm |
| No. 10 (5 mm) 5,7 mm |
Accessori
Director of Engineering
BDCI, 4/F, 2 Dai Wang Street
Tai Po Industrial Estate
Tai Po NT, Hong Kong
Garanzia
Director of Engineering
BDCI, 4/F, 2 Dai Wang Street
Tai Po Industrial Estate
Tai Po NT, Hong Kong
Garantie
| No. 6 (3,5 mm) 2,5 mm |
| No. 8 (4 mm) 3,5 mm |
| No. 10 (5 mm) 4,0 mm |
| No. 6 (3,5 mm) 4 mm |
| No. 8 (4 mm) 5,0 mm |
| No. 10 (5 mm) 5,7 mm |
Accesorios
Director of Engineering
BDCI, 4/F, 2 Dai Wang Street
Tai Po Industrial Estate
Tai Po NT, Hong Kong
Garantía
Tire as chaves de aperto
| No. 6 (3,5 mm) 2,5 mm |
| No. 8 (4 mm) 3,5 mm |
| No. 10 (5 mm) 4,0 mm |
| No. 6 (3,5 mm) 4 mm |
| No. 8 (4 mm) 5,0 mm |
| No. 10 (5 mm) 5,7 mm |
Acessórios
Engenheiro Responsável BDCI, 4/F, 2 Dai Wang Street Tai Po Industrial Estate Tai Po NT, Hong Kong
Garantia
Director of Engineering
BDCI, 4/F, 2 Dai Wang Street
Tai Po Industrial Estate
Tai Po NT, Hong Kong
Reservdelar / reparationer
Director of Engineering
BDCI, 4/F, 2 Dai Wang Street
Tai Po Industrial Estate
Tai Po NT, Hong Kong
Director of Engineering BDCI, 4/F, 2 Dai Wang Street Tai Po Industrial Estate Tai Po NT, Hong Kong
Reservedele / reparationer
Director of Engineering BDCI, 4/F, 2 Dai Wang Street Tai Po Industrial Estate Tai Po NT, Hong Kong
Director of Engineering
BDCI, 4/F, 2 Dai Wang Street
Tai Po Industrial Estate
Tai Po NT, Hong Kong
Εγγύηση
Dealer address Date of purchase
Händleradresse Kaufdatum
English Please complete this section immediately after the purchase of your
tool and send it to Black & Decker in your country. If you live in Australia or New Zealand, please register by using the alternative
guarantee card supplied.
- Intended use
- Safety instructions
- Keep work area clean
- Consider work area environment
- Keep children away
- Dress properly
- Personal protection
- Do not overreach
- Stay alert
- Secure workpiece
- Connect dust extraction equipment
- Remove adjusting keys and wrenches
- Use appropriate tool
- Check for damaged parts
- Remove the battery
- Avoid unintentional starting
- Do not abuse cord
- Store idle tools
- Maintain tools with care
- Repairs
- Additional safety instructions for batteries and chargers
- Batteries
- ENGLISH
- Chargers
- Electrical safety
- Overview (fig. A)
- Assembly
- Fitting and removing a drill bit or screwdriver bit (fig. B & D)
- Use
- Charging the battery (fig. A)
- Adjusting the head (fig. C)
- Selecting the direction of rotation (fig. D)
- Drilling/screwdriving (fig. A)
- Hints for optimum use
- Drilling
- Screwdriving
- Accessories
- Maintenance
- Protecting the environment
- Tools
- EC declaration of conformity
- Guarantee
- Garantie
- Accessoires
- Accessori
- Garanzia
- Accesorios
- Garantía
- Tire as chaves de aperto
- Acessórios
- Garantia
- Reservdelar / reparationer
- Reservedele / reparationer
- Εγγύηση
Brand : BLACK & DECKER
Model : HP9096
Category : Drill