
VPC1 - Keyboard KAWAI - Free user manual and instructions
Find the device manual for free VPC1 KAWAI in PDF.


| Brand | Kawai |
| Model | VPC1 |
| Category | MIDI Master Keyboard |
| Keyboard Type | 88 keys, RM3 Grand II action with Ivory Touch surfaces, Let-Off |
| Dimensions (W x D x H) | 138 x 42.5 x 18.5 cm |
| Weight | 29.5 kg |
| Power Supply | USB bus (via USB port) or 12 V DC power adapter |
| Power Consumption | 1.0 W (USB bus) / 3.0 W (DC adapter) |
| Connectivity | MIDI IN/OUT, USB to Host (type B), pedal jack, DC IN 12V |
| Main Functions | 5 preset modes, customizable touch curves via VPC Editor software, power saving function |
| Preset Modes | Preset 1 (Normal), 2 (Ivory), 3 (Pianoteq), 4 (Galaxy), 5 (Alicia's Keys) |
| Software Compatibility | Ivory, Pianoteq, Galaxy Pianos, Alicia's Keys |
| Supported Operating Systems | Windows 7/Vista/XP, Mac OS X 10.4 or later (USB-MIDI driver and VPC Editor Windows only) |
| Maintenance and Cleaning | Soft cloth slightly damp; do not use benzene or thinner |
| Safety | Do not disassemble the device, use only the supplied adapter, avoid humidity and heat sources, do not block ventilation openings |
| Box Contents | User manual, USB cable, power adapter, power cord, F-30 pedal unit, music stand |
Frequently Asked Questions - VPC1 KAWAI
User questions about VPC1 KAWAI
0 question about this device. Answer the ones you know or ask your own.
Ask a new question about this device
Download the instructions for your Keyboard in PDF format for free! Find your manual VPC1 - KAWAI and take your electronic device back in hand. On this page are published all the documents necessary for the use of your device. VPC1 by KAWAI.
USER MANUAL VPC1 KAWAI
Important Safety Instructions
Read all the instructions before using the product.
SAVE THESE INSTRUCTIONS
INSTRUCTIONS PERTAINING TO A RISK OF FIRE, ELECTRIC SHOCK, OR INJURY TO PERSONS

CAUTION
RISK OF ELECTRIC SHOCK
DO NOT OPEN

WARNING
TO REDUCE THE RISK OF FIRE OR ELECTRIC SHOCK, DO NOT EXPOSE THIS PRODUCT TO RAIN OR MOISTURE.
AVIS : RISQUE DE CHOC ELECTRIQUE - NE PAS OUVRIR.
TO REDUCE THE RISK OF ELECTRIC SHOCK, DO NOT REMOVE COVER (OR BACK). NO USER-SERVICEABLE PARTS INSIDE. REFER SERVICING TO QUALIFIED SERVICE PERSONNEL.

The lighting flash with arrowhead symbol, within an equilateral triangle, is intended to alert the user to the presence of uninsulated "dangerous voltage" within the product's enclosure that may be of sufficient magnitude to constitute a risk of electric shock to persons.

The exclamation point within an equilateral triangle is intended to alert the user to the presence of important operating and maintenance (servicing) instructions in the literature accompanying the product.

WARNING Indicates a potential hazard that could result in death or serious injury if the product is handled incorrectly.

The product should be connected to an AC outlet of the specified voltage.
- If you are going to use an AC power cord, make sure that its has the correct plug shape and conforms to the specified power voltage.
● Failure to do so may result in fire.

Do not insert or disconnect the powercord plug with wet hands. Doing so may cause electric shock.

Take care not to allow any foreign matter to enter the product. Entry of water, needles or hair pins may result in breakdown or short-circuit. The product shall not be exposed to dripping or splashing. No objects filled with liquids, such as vases, shall be placed on the product.

When using the headphones, do not listen for long periods of time at high volume levels. Doing so may result in hearing problems.

Do not lean against the keyboard. Doing so may cause the product to fall over, resulting in injury.

Do not use the product in wet areas, or areas close to water. Doing so may cause short circuit, leading to an electric shock, or a fire.

Do not disassemble, repair or modify the product. Doing so may result in product breakdown, electric shock or short-circuit.

When disconnecting the AC power cord's plug, always hold the plug and pull it to remove it. ●Pulling the AC power cord itself may damage the cord, causing a fire, electric shock or short-circuit.

The product is not completely disconnected from the power supply even when the power switch is turned off. If the product will not be used for a long time, unplug the AC power cord from the AC outlet.
●Failure to do so may cause fire in case of lightning.
●Failure to do so may over-heat the product, resulting in fire.

This product shall be near the AC outlet and the power cord plug in a position so that it can readily be disconnected in an emergency because electricity is always charging while the plug is in the AC outlet even in a power switch off condition.
Examples of Picture Symbols

denotes that care should be taken.
The example instructs the user to take care not to allow fingers to be trapped.

denotes a prohibited operation.
The example instructs that disassembly of the product is prohibited.

denotes an operation that should be carried out.
The example instructs the user to remove the power cord plug from the AC outlet.

CAUTION
Indicates a potential hazard that could result in injury or damage to the product or other property if the product is handled incorrectly.

Do not use the product in the following areas.
● Areas, such as those near windows, where the product is exposed to direct sunlight
● Extremely hot areas, such as near a heater
● Extremely cold areas, such as outside
● Extremely humid areas
● Areas where a large amount of sand or dust is present
● Areas where the product is exposed to excessive vibrations
Using the product in such areas may result in product breakdown.
Use the product only in moderate climates (not in tropical climates).

- Do not stand the main unit on its side for extended periods of time.
- Do not attempt to play the main unit at unusual angles.
Doing so may place stress on the keyboard action, resulting in breakdown of the product.
Use only the AC adaptor included with this instrument to power the instrument.
- Do not use other AC adaptor included with this instrument.
- Do not use the included AC adaptor or AC power cord to power other equipment.

Before connecting cords, make sure that the power to this product and other devices is turned OFF. Failure to do so may cause breakdown of this product and other devices.
Do not drag the product on the floor. Take care not to drop the product.
Please lift up the product when moving it. Please note that the product is heavy and must
be carried by more than two persons. Dropping the product may result in breakdown.
When connecting the AC power cord and other cords, take care not to get them tangled.
Failure to do so may damage them, resulting in fire, electric shock or short-circuit.
Do not wine the product with benzene or thinner.

● Doing so may result in discoloration or deformation of the product.
- When cleaning the product, put a soft cloth in lukewarm water, squeeze it well, then wipe the product.
Do not stand on the product or exert excessive force.
● Doing so may cause the product to become deformed or fall over, resulting in breakdown or injury.
Do not place naked flame, such as lighted candles on the product.
● Doing so may cause the illumination to fall over, resulting in fire

Ensure that the ventilation is not impeded by covering the ventilation openings with
items, such as newspaper, table-cloths, curtains, etc.
● Failure to do so may over-heat the product, resulting in fire.

The product should be located so that its location or position does not interfere with its proper
ventilation. Ensure a minimum distance of 5cm around the product for sufficient ventilation.

The product should be serviced by qualified service personnel when:
● The power supply cord or the plug has been damaged.
● Objects have fallen, or liquid has been spilled into the product.
● The product has been exposed to rain.
● The product does not appear to operate normally or exhibits a marked change in performance.
● The product has been dropped, or the enclosure damaged.
Notes on Repair
Should an abnormality occur in the product, immediately turn the power OFF, disconnect the power cord plug, and then contact the shop from which the product was purchased.
CAUTION:
To prevent electric shock, match wide blade of plug to wide slot, fully insert.
ATTENTION:
An information on Disposal for users
If your product is marked with this recycling symbol it means that, at the end of its life, you must dispose of it separately by taking it to an appropriate collection point. You should not mix it with general household waste. Disposing of this product correctly will prevent potential negative effects on the environment and human health which could otherwise arise due to inappropriate waste handling.
For further details, please contact your local authority. (European Union only)
Instruction for AC power cord (U.K.)
IMPORTANT
THE WIRES IN THIS MAINS LEAD ARE COLOURED IN ACCORDANCE WITH THE FOLLOWING CODE.
BLUE: NEUTRAL
BROWN: LIVE
As the colours of the wires in the mains lead of this apparatus may not correspond with the coloured markings identifying the terminals in your plug, proceed as follows:
The wire which is coloured BLUE must be connected to the terminal which is marked with the letter N or coloured BLACK.
The wire which is coloured BROWN must be connected to the terminal which is marked with the letter L or coloured RED.
Do not plug either terminal of the power cord to the ground od AC outlet on the wall.
Canadian Radio Interference Regulations
This instrument complies with the limits for a class B digital apparatus, pursuant to the Radio Interference Regulations, C.R.C., c. 1374.
FCC Information (U.S.A)
CAUTION: Changes or modifications not expressly approved by the party responsible for compliance could void the user's authority to operate the equipment.
NOTE: This equipment has been tested and found to comply with the limits for a Class B digital device, pursuant to Part 15 of the FCC Rules. These limits are designed to provide reasonable protection against harmful interference in a residential installation. This equipment generates, uses and can radiate radio frequency energy and, if not installed and used in accordance with the instructions, may cause harmful interference to radio communications. However, there is no guarantee that interference will not occur in a particular installation. If this equipment does cause harmful interference to radio or television reception, which can be determined by turning the equipment off and on, the user is encouraged to try to correct the interference by one or more of the following measures:
• Reorient or relocate the receiving antenna.
- Increase the separation between the equipment and receiver.
- Connect the equipment into an outlet on a circuit different from that to which the receiver is connected.
- Consult the dealer or an experienced radio/TV technician for help.
The nameplate label is located on the underside of the instrument, as indicated below.
Nameplate

natural_image
Technical line drawing of a rectangular electronic device with a circular inset showing a labeled component (no text or symbols present)Getting Started
Thank you for purchasing the Kawai VPC1.
This owner's manual contains important information regarding the usage and operation of the VPC1. Please read all sections carefully, keeping this manual handy for future reference.
Part Names and Functions

1. POWER button
This button is used to turn the instrument on and off. The LED will be lit when the power is turned on.
The status of the VPC1 will be indicated by the color of POWER button LED as follows:
Instrument Status Power button LED colour
| Preset 1 Red |
| Preset 2 Orange |
| Preset 3 Green |
| Preset 4 Orange blinking |
| Preset 5 Green blinking |
| Updating VPC1 Red and Green blinking slowly (2 second intervals) |
| Updating error Red and Green blinking rapidly (0.2 second intervals) |
| Power error Red blinking |

The VPC1 features a power saving function that can be used to automatically turn off the instrument after a specified period of inactivity.
Please refer to the PDF manual of the VPC Editor Software for further information.

2. DC IN jack (12 V)
This jack is used to connect the included AC power adapter to the VPC1's DC IN jack.
3. Pedal jack
The jacks are used to connect the included Kawai pedal unit to the VPC1.
4. MIDI IN/OUT connectors
The jacks are used to connect the instrument to external MIDI devices (such as other musical instruments or a computer) in order to send and receive MIDI data.
5. USB to Host connector
This port is use to connect the instrument to a computer using a USB 'B to A' type cable in order to send and receive MIDI data

The AC power adapter is required when connecting the VPC1 to a device/computer using the MIDI connectors.
When connecting the VPC1 to a computer using a USB cable, the AC power adapter is not required as power will be supplied through the computer's USB connector.
This port is use to connect the instrument to a computer using a USB 'B to A' type cable in order to send and receive MIDI data
However, in some cases the computer's USB connector may be insufficient to power the VPC1 correctly. In this case, the POWER button LED will blink red, indicating that the AC power adaptor is required.

If VPC1 update is not completed successfully, the POWER button LED will blink red and green rapidly (0.2 second intervals).
In this case, please try to update the VPC1 again.
Setup
System Requirements
| Windows | |
| Computer | Computer that has a USB port and satisfies the requirements for running Microsoft Windows 7/Vista/XP |
| OS Windows 7 or Vista or XP (With the latest service pack) | |
| Mac | |
| Computer | Apple Macintosh computer that has a USB port and satisfies the requirements for running Mac OS X |
| OS Mac OS X 10.4 or later | |
The Kawai USB-MIDI driver and the VPC Editor do not support Mac OS.
Installation
The VPC1 will be automatically recognized by the computer without having to install additional drivers. When the instrument keyboard is connected to the USB port of your computer using the included USB cable and the power is turned on, the OS standard USB-MIDI driver will be installed automatically, then the instrument will be ready to use.
At this point, you can configure the instrument setting from your computer or you can create touch curves using the VPC Editor software.
Before using the VPC Editor software, use the following steps to install the Kawai USB-MIDI driver and the VPC Editor software.
It is recommended to install the Kawai USB-MIDI driver for establishing a more stable environment even if you do not use the VPC Editor software.
In order to install or uninstall the Kawai USB-MIDI driver and the VPC Editor software, you must have "Administrator" privileges. For further information, please contact your system administrator.
When you install the Kawai USB-MIDI driver and the VPC Editor software, detach all USB devices except the computer keyboard and mouse device.
When you have connected the VPC1 to your computer using a USB cable, it may take some time to establish the communication.
⚠️ If the VPC1 and your computer are connected via a USB hub and your notice that the behavior is unstable, please connect it directly to a USB port of your computer.
When you turn the VPC1 on/off, or you connect/disconnect the USB cable during the following operations, you may notice that the behavior of the VPC1 or of the computer to become unstable.
- While installing the Kawai USB-MIDI Driver
- While the computer starts
- While a MIDI application is running.
- While communicating with the computer
- While the computer is ready an waiting in power saving mode
⚠️ Depending on the configuration of your computer, the USB function might not work properly. Please carefully read the owner's manual for your computer, then make the appropriate settings.
The Kawai USB-MIDI driver and the VPC Editor software is compatible with the Windows OS only and does not support the Mac OS.
Installing the Kawai USB-MIDI Driver
- Download the Kawai USB-MIDI driver from the Kawai website: http://www.kawai.co.jp/worldwide/support/downloads.html
- Extract the zip file and run the "DPInst.exe" installation program.
- When the "Kawai USB MIDI Device Installer" dialog appears, click "Next".
- The "End User License Agreement" will be displayed. To agree with the terms, select "I accept this EULA", then click "Next".
- When the installation is finished and the message "Installation complete!" is displayed, click "Finish".
Installing the VPC Editor software
- Download the Kawai VPC Editor Software from the Kawai website: http://www.kawai.co.jp/worldwide/support/downloads.html
- Extract the zip file and run the "SETUP.exe" installation program.
- When the "Kawai VPC Editor - InstallShield Wizard" dialog appears, click "Next".
- The "License Agreement" will be displayed. To agree with the terms, select "I accept the terms in the license agreement", then click "Next".
- The destination folder for the installation will be displayed. If you want to install the VPC editor to this folder, click "Next". If you want to install the VPC editor to a different folder, click "Change.." to change the installation path and click "Next" when you have selected the desired installation location.
- The message "Ready to Install the Program" is displayed, click "Install".
- When the installation is finished and the "Installshield Wizard Completed" dialog is displayed, click "Finish".
About the PDF Manual
A PDF manual is included with the VPC Editor software.
For details on the overview and operations on the VPC Editor software, please refer to the PDF manual.
Using the PDF Manual
- When the VPC Editor software is launched, click the KAWAI logo button to display the version information screen.
- Click the HELP button.
Selecting a Preset Mode
Five preset modes are provided with the VPC1, which allow you to save the various touch curves created by using the included VPC Editor software or the settings of the instrument.
For further information on how to save the settings as presets, please refer to the PDF manual of the VPC Editor software.
The section below describes how to select the preset modes using the VPC1.

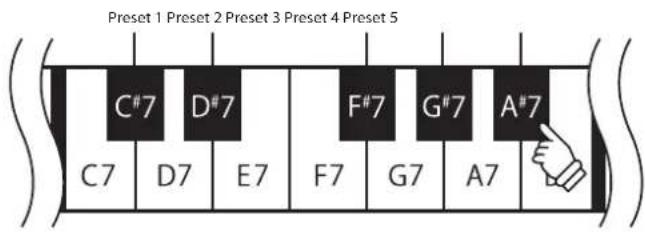
Press and hold the POWER button, then press one of the highest 5 black keys to select a preset mode.
When the preset mode assigned to the pressed key is selected, the LED color of the POWER button will change.

When the power is turned on, the previously used preset will be selected automatically. When the power is turned on for the very first time, Preset1 will be selected.
In addition to a standard touch curve, several touch curves suitable for popular software pianos are provide as factory presets.
| Preset | Power LCD state | Touch Curve Description | |
| 1 | Red Normal A standard touch curve. | ||
| 2 | Orange Ivory | A touch curve suitable for the Ivory software developed by Synthogy. | |
| 3 | Green Pianoteq | A touch curve suitable for the Pianoteq software developed by MODARTT. | |
| 4 | Orange blinking | Galaxy | A touch curve suitable for the Galaxy Pianos software developed by Galaxy Instruments. |
| 5 | Green blinking | Alicia's Keys | A touch curve suitable for the Alicia's Keys software developed by Native Instruments. |
Troubleshooting
Power does not turn on
- Is the VPC1 connected to your computer via a USB hub?
Please connect it directly to a USB port on your computer without using a hub.
- Is the POWER button LED blinking red?
If the POWER button is lit with a red blinking light, the power supplied by the computer through the USB bus is insufficient. In such a case, please use the included AC power adapter.
The connected device or software does not respond
- Is the USB cable or MIDI cable connected correctly?
- Has your computer detected the VPC1?
Please carefully read the manual for your computer and make sure that the VPC1 can be recognized by the computer.
Depending on the configuration of your computer hardware, the VPC1 may not be detected properly when using the USB connection.
- The connected device or software might not support this feature. Please refer to the manual of the connected device or software.
No sound is produced when the keys are pressed
- Please check the MIDI transmit channel and output settings for the VPC Editor software.
- Has the software sound source been configured correctly?
The velocity of the keyboard does not work
- Please check the settings of Touch Curve and Velocity Offset of the VPC Editor software.
Sound increases only at certain key(s) of the keyboard
- Please check the setting of Velocity Offset of the VPC Editor software.
Messages are not sent or received from the MIDI or USB port
- Please check the MIDI transmit channel and output settings for the VPC Editor software.
The included foot pedal does not work
- Has the foot pedal been connected properly?
- Please check the Pedal CC# settings for the VPC Editor software.
- Has the software sound source to be used been set correctly?
Technical Specifications
| Keyboard | 88 wooden keys with Ivory Touch key surfacesRM3 Grand II action with Let-off and Triple Sensor |
| Connection terminals | Pedal jack, MIDI (IN/OUT) connectors, USB to HOST port, Power supply connector (DC IN 12V) |
| Power supply | USB Bus powered (via USB port), DC 12 VAC adapter |
| Power consumption | - With USB Bus power supply :1.0 W- With AC power adapter :3.0 W |
| Dimensions | 138 (W) x 42.5 (D) x 18.5 (H) cm |
| Weight | 29.5 kg |
| Package Contents | Owner's manual (this manual), USB cable, AC power adapter, Power cord, F-30 foot pedal, Music rack/rest |
※ Appearance and specifications are subject to change without notice.
※ 'Ivory', 'Pianoteq', 'Galaxy', and 'Alcia's Keys' are all trademarks of their respective owners.
HINWEISE AUFHEBEN
RISK OF ELECTRIC SHOCK
DO NOT OPEN

WARNING
TO REDUCE THE RISK OF FIRE OR ELECTRIC SHOCK, DO NOT EXPOSE THIS PRODUCT TO RAIN OR MOISTURE.
AVIS : RISQUE DE CHOC ELECTRIQUE - NE PAS OUVRIR.
natural_image
Technical line drawing of a rectangular electronic device with a circular inset showing a labeled component (no text or symbols present)Die ersten Schritte
CONSERVEZ CES INSTRUCTIONS INSTRUCTIONS RELATIVES AU RISQUES D'INCENDIE, D'ELECTROCUTION, OU DE BLESSURE D'UNE PERSONNE

CAUTION
RISK OF ELECTRIC SHOCK
DO NOT OPEN

WARNING
TO REDUCE THE RISK OF FIRE OR ELECTRIC SHOCK, DO NOT EXPOSE THIS PRODUCT TO RAIN OR MOISTURE.
AVIS : RISQUE DE CHOC ELECTRIQUE - NE PAS OUVRIR.
POUR REDUIRE LES RISQUES D'INCENDIE OU D'ELECTROCUTION,
NE DEMONTEZ PAS LE COUVERCLE (OU L'ARRIERE). A L'INTERIEUR,
AUCUNE PARTIE N'EST REPARABLE PAR L'UTILISATEUR POUR LA MAINTENANCE
ADRESSEZ-VOUS A DU PERSONNEL QUALIFIE.

natural_image
Technical line drawing of a rectangular electronic device with a circular inset showing a labeled component (no text or symbols present)Pour commencer
1. Bouton POWER
Installation/Configuration
Le système requiert
Read all the instructions before using the product.
GUARDE ESTAS INSTRUCCIONES INSTRUCCIONES SOBRE RIESGOS DE INCENDIO, DESCARGA ELECTRICA, O DANO A PERSONAS

CAUTION
RISK OF ELECTRIC SHOCK
DO NOT OPEN

WARNING
PARA REDUCIR RIESGO DE INCENDIO O DESCARGA ELECTRICA, NO EXPONGA ESTE PRODUCTO A LA LLUVIA O HUMEDAD
AVIS : RISQUE DE CHOC ELECTRIQUE - NE PAS OUVRIR.
PARA REDUCIR EL RIESGO DE DESCARGA ELECTRICA,
NO QUITE LA TAPA (O PARTE TRASERA). NO TOQUE NINGUNA PARTE INTERNA. LLAME AL SERVICIO TECNICO CUALIFICADO SI NECESITA ATENCION.

5. Conector USB a host
1. 電源ボタン
2. DC IN 12V 端子
付属の AC アダブターを接続します。
3. ペダル端子
付属のフットペダルと接続します。
4. MIDI IN/OUT 端子
This End User License Agreement ("AGREEMENT") is between Kawai Musical Instruments Mfg. Co., Ltd. ("KAWAI") and you (as an individual or legal entity) for the Kawai USB MIDI Driver and VPC Editor Software which includes computer software and may include electronic documentation, icon, image, and configuration files ("SOFTWARE"). Only after agreeing to this AGREEMENT may you install, copy or use the SOFTWARE. By installing, copying or using the SOFTWARE you are agreeing to be bound by the terms of this AGREEMENT.
1. GRANT OF LICENSE
(1) You may use the SOFTWARE on a computer only for using the USB MIDI function of KAWAI products.
(2) You may use the SOFTWARE on a single computer at a time.
2. RESTRICTIONS
(1) You may not redistribute, transfer and make transmittable the SOFTWARE.
(2) You may not alter, reverse engineer, decompile and disassemble the SOFTWARE for creating any derivative works thereof.
(3) You may not rent, sell or lease the SOFTWARE, and may not grant of security interest and assign any right in the SOFTWARE.
3. COPYRIGHT
(1) The SOFTWARE is copyrighted work of KAWAI and/or third party, and is protected by relevant copyright laws and all applicable treaty provisions.
4. DISCLAIMER OF WARRANTY
(1) This SOFTWARE is provided "AS IS" and KAWAI does not warrant that this SOFTWARE works correctly.
(2) KAWAI disclaims all warranties as to this SOFTWARE, express, and implied, including but not limited to the implied warranties of merchantability, fitness for a particular purpose.
(3) KAWAI does not warrant that defects in the SOFTWARE will be corrected. Also the SOFTWARE can be modified without notice.
5. LIABILITY IN DAMAGES
(1) KAWAI shall not be liable for any direct, indirect, special, incidental or consequential damages arising from the use or inability to use the SOFTWARE, even if KAWAI has been advised of the possibility of such damages.
(2) You shall indemnify KAWAI and/or third party against any loss, damage, costs or expenses related to any material breach of this AGREEMENT by you.
6. TERM AND TERMINATION
(1) This AGREEMENT becomes effective at the moment that you accept this AGREEMENT during the installation, and is terminated by stopping using the SOFTWARE and deleting all files of this SOFTWARE.
(2) If you breach this AGREEMENT, KAWAI may immediately terminate this AGREEMENT. Upon such termination, you must immediately delete all files of this SOFTWARE.
7. MISCELLANEOUS
(1) This AGREEMENT shall be construed and controlled by the laws of Japan.
(2) The Hamamatsu Branch of Shizuoka District Court or the Hamamatsu Summary Court shall be the exclusive agreement jurisdictional court of the first hearing for any and all disputes arising from this AGREEMENT.
(3) This AGREEMENT constitutes the entire agreement between the parties and supersedes any previous written or oral agreement, negotiations, commitments and representations in respect thereto.
ソフトウェア使用許諾契約書

- Important Safety Instructions
- Read all the instructions before using the product.
- SAVE THESE INSTRUCTIONS
- INSTRUCTIONS PERTAINING TO A RISK OF FIRE, ELECTRIC SHOCK, OR INJURY TO PERSONS
- WARNING
- Examples of Picture Symbols
- CAUTION
- Notes on Repair
- CAUTION:
- ATTENTION:
- An information on Disposal for users
- Instruction for AC power cord (U.K.)
- IMPORTANT
- Canadian Radio Interference Regulations
- FCC Information (U.S.A)
- Getting Started
- Part Names and Functions
- POWER button
- DC IN jack (12 V)
- Pedal jack
- MIDI IN/OUT connectors
- USB to Host connector
- Setup
- Installation
- Installing the Kawai USB-MIDI Driver
- Installing the VPC Editor software
- About the PDF Manual
- Using the PDF Manual
- Selecting a Preset Mode
- Troubleshooting
- Technical Specifications
- HINWEISE AUFHEBEN
- AVIS : RISQUE DE CHOC ELECTRIQUE - NE PAS OUVRIR.
- Die ersten Schritte
- CONSERVEZ CES INSTRUCTIONS INSTRUCTIONS RELATIVES AU RISQUES D'INCENDIE, D'ELECTROCUTION, OU DE BLESSURE D'UNE PERSONNE
- Pour commencer
- Bouton POWER
- Installation/Configuration
- GUARDE ESTAS INSTRUCCIONES INSTRUCCIONES SOBRE RIESGOS DE INCENDIO, DESCARGA ELECTRICA, O DANO A PERSONAS
- Conector USB a host
- 電源ボタン
- DC IN 12V 端子
- ペダル端子
- MIDI IN/OUT 端子
- GRANT OF LICENSE
- RESTRICTIONS
- COPYRIGHT
- DISCLAIMER OF WARRANTY
- LIABILITY IN DAMAGES
- TERM AND TERMINATION
- MISCELLANEOUS
- ソフトウェア使用許諾契約書
Brand : KAWAI
Model : VPC1
Category : Keyboard