
EW1513 - Toothbrush PANASONIC - Free user manual and instructions
Find the device manual for free EW1513 PANASONIC in PDF.


| Product type | Rechargeable oral irrigator |
| Model | EW1513 |
| Brand | Panasonic |
| Power supply | AC adapter (RE7-87) with automatic voltage conversion; charges via charging stand |
| Charging time | Approximately 1 hour |
| Operating time | Approximately 10 minutes (at level 5); water tank provides about 60 seconds of use |
| Water tank capacity | Approximately 200 mL |
| Water pressure levels | 5 adjustable levels (1 low to 5 high) with memory |
| Noise level | 71 dB(A) |
| Dimensions (main unit) | 210 (H) x 75 (W) x 85 (D) mm (without nozzle) |
| Weight (main unit) | Approximately 275 g (including nozzle) |
| Dimensions (charging stand) | 40 (H) x 90 (W) x 100 (D) mm |
| Weight (charging stand) | Approximately 115 g |
| Battery | Built-in rechargeable lithium-ion, service life approximately 3 years |
| Included nozzles | General-use nozzle and orthodontic nozzle |
| Usage | Domestic use only |
| Main functions | Interdental cleaning, periodontal pockets, gum care, orthodontic cleaning |
| Maintenance | Clean after each use; air dry; replace general-use nozzle every 6 months approximately, orthodontic nozzle every 3 months |
| Spare parts | General-use nozzle WEW0983, orthodontic nozzle WEW0984, AC adapter RE7-87, charging stand RC8-4 |
Frequently Asked Questions - EW1513 PANASONIC
User questions about EW1513 PANASONIC
0 question about this device. Answer the ones you know or ask your own.
Ask a new question about this device
Download the instructions for your Toothbrush in PDF format for free! Find your manual EW1513 - PANASONIC and take your electronic device back in hand. On this page are published all the documents necessary for the use of your device. EW1513 by PANASONIC.
USER MANUAL EW1513 PANASONIC
Operating Instructions
(Household use) Rechargeable Oral Irrigator
Model No. EW1513
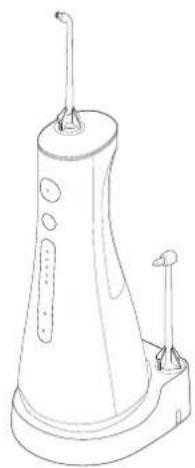
natural_image
Line drawing of a dental or oral care device with conical base and two protruding pins (no text or symbols)| English 3 |
| Deutsch 23 |
| Français 43 |
| Italiano 63 |
| Español 83 |
| Nederlands 103 |
| Português 123 |
| Svenska 143 |
| Dansk 163 |
| Norsk 183 |
| Suomi 203 |
| Polski 223 |
| Česky | 245 |
| Slovensky | 265 |
| Magyar | 285 |
| Română | 305 |
| Türkçe | 325 |
Panasonic
Operating Instructions
(Household use) Rechargeable Oral Irrigator
Model No. EW1513
Contents
Safety precautions ....6
Intended use 9
Parts identification ....10
Charging 10
How to use....12
Points of care....14
After use 15
Wall mounting 17
Frequently asked questions....17
Troubleshooting 18
Battery life....20
Removing the built-in rechargeable battery....20
Specifications 21
Changing the nozzle (Sold separately)...21
Thank you for purchasing this Panasonic product.
Before operating this unit, please read these instructions completely and save them for future use.
Warning
- Do not immerse the AC adaptor and charging stand in water or clean them with water.
Doing so may cause electric shock or fire due to a short circuit.
• Always unplug the adaptor from a household outlet when cleaning the AC adaptor and the charging stand.
Failure to do so may cause electric shock or injury. - The supply cord cannot be replaced. If the cord is damaged, the AC adaptor should be scrapped.
Failure to do so may cause an accident or injury. -
Oral irrigators can be used by children aged from 8 years and above and persons with reduced physical, sensory or mental capabilities or lack of experience and knowledge under supervision.
-
Oral irrigators shall be used only with cold or warm water, or specific solutions as defined in the manufacturer's instructions.
• Children shall not play with the appliance. - Do not use anything other than the supplied AC adaptor for any purpose. Also, do not use any other product with the AC adaptor. (See page 10.)
Doing so may cause burn or fire due to a short circuit.
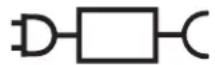
- The following symbol indicates that a specific detachable power supply unit is required for connecting the electrical appliance to the supply mains. The type reference of power supply unit is marked near the symbol.
Safety precautions
To reduce the risk of injury, loss of life, electric shock, fire, and damage to property, always observe the following safety precautions.
Explanation of symbols
The following symbols are used to classify and describe the level of hazard, injury, and property damage caused when the denotation is disregarded and improper use is performed.

DANGER
Denotes a potential hazard that will result in serious injury or death.

WARNING
Denotes a potential hazard that could result in serious injury or death.

CAUTION
Denotes a hazard that could result in minor injury or property damage.
The following symbols are used to classify and describe types of instructions to be observed.

This symbol is used to alert users to a specific operating procedure that must not be performed.

This symbol is used to alert users to a specific operating procedure that must be followed in order to operate the unit safely.

WARNING
▶ Preventing accidents

Do not store within the reach of children or infants. Do not let them use it.
- Doing so may cause an accident or injury due to accidental ingestion of removable parts.
▶ Power supply

Do not connect or disconnect the adaptor or the appliance plug to a household outlet with a wet hand.
- Doing so may cause electric shock or injury.
Do not place the AC adaptor and the charging stand over or near water filled sink or bathtub. Do not use when the AC adaptor is damaged or when the fitting into the household outlet is loose. Do not damage, modify, forcefully bend, pull, twist, or bundle the cord. Also, do not place anything heavy on or pinch the cord.
- Doing so may cause electric shock or fire due to a short circuit.

Do not use in a way exceeding the rating of the household outlet or the wiring.

- Exceeding the rating by connecting too many power plugs to one household outlet may cause fire due to overheating.

WARNING

Always ensure the appliance is operated on an electric power source matched to the rated voltage indicated on the AC adaptor. Fully insert the adaptor.
- Failure to do so may cause fire or electric shock.
▶ In case of an abnormality or malfunction
Immediately stop using and remove the AC adaptor if there is an abnormality or malfunction.
- Failure to do so may cause fire, electric shock or injury.
- The main unit, adaptor, charging stand or cord is deformed or abnormally hot.
- The main unit, adaptor, charging stand or cord smells of burning.
- There is abnormal sound during use or charging of the main unit, adaptor, charging stand or cord.
- Immediately request inspection or repair at an authorized service centre.
▶ This product

This product has a built-in rechargeable battery. Do not throw into fire, apply heat, or charge, use, or leave in a high temperature environment.
- Doing so may cause overheating, ignition, or explosion of the built-in rechargeable battery.

Do not modify or repair.
- Doing so may cause fire, electric shock, or injury.
→Contact an authorized service centre for repair (battery change, etc.).

Never disassemble except when disposing of the product.
- Doing so may cause fire, electric shock, or injury.
▶ Cleaning
Regularly clean the power plug and the appliance plug to prevent dust from accumulating.

- Failure to do so may cause fire due to insulation failure caused by humidity. Disconnect the adaptor and wipe with a dry cloth.

CAUTION
▶ Preventing damage to teeth and gums
People who are unable to operate should not use this appliance.

People with weak oral senses should not use this appliance.
- Doing so may cause injury or damage to teeth and gums.

CAUTION

People who may have periodontal disease, have teeth being treated, or concerned about symptoms within their mouth should consult a dentist before use.
- Failure to do so may cause injury or damage to teeth and gums.
This product

Never use for a purpose other than oral cleaning.
Doing so may cause an accident or injury when the stream of water is pointed toward the eyes, nose, ears, tongue, or throat.

Do not fill the tank with water warmer than 40 °C.
- Doing so may cause burns.

Do not share nozzle with your family or other people.
- Doing so may cause infection or inflammation.

Do not place a metallic object such as a coin or a clip on top of the charging stand.
- Doing so may cause burns due to excessive heat.
▶ Note the following precautions

Do not allow metal objects or trash to adhere to the charging plug, the power plug or the appliance plug.
- Doing so may cause electric shock or fire due to a short circuit.

Do not drop or subject to shock.
- Doing so may cause injury.

Do not wrap the cord around the adaptor or the charging stand when storing.
- Doing so may cause the wire in the cord to break with the load, and may cause fire due to a short circuit.

Disconnect the adaptor from the household outlet when not charging.
- Failure to do so may cause electric shock or fire due to electrical leakage resulting from insulation deterioration.

Disconnect the adaptor or the appliance plug by holding onto it instead of the cord.
- Failure to do so may cause electric shock or fire due to a short circuit.

After use, clean the main unit and the nozzle and dry them. (See pages 15 and 16.)
- Failure to do so may cause damage to your health due to propagation of mold and bacteria.
Handling of the removed battery when disposing

DANGER
The rechargeable battery is exclusively for use with this appliance. Do not use the battery with other products.
Do not charge the battery after it has been removed from the product.
Do not throw into fire or apply heat.
Do not hit, disassemble, modify, or puncture with a nail.
Do not let the positive and negative terminals of the battery get in contact with each other through metallic objects.
Do not carry or store the battery together with metallic jewellery such as necklaces and hairpins.
Do not use or leave the battery where it will be exposed to high temperatures, such as under direct sunlight or near other sources of heat. Never peel off the tube.
Doing so may cause overheating, ignition, or explosion.

WARNING
After removing the rechargeable battery, do not keep it within reach of children and infants.
- The battery will harm the body if accidentally swallowed.
If this happens, consult a physician immediately.

If the battery fluid leaks out and comes in contact with the eyes, do not rub the eyes, and thoroughly rinse with clean water, such as tap water.
Failure to do so may cause eye injury. Consult a physician immediately.
English

CAUTION

If the battery fluid leaks out and comes in contact with the skin or clothes, rinse off with clean water, such as tap water.
- Failure to do so may cause inflammation.
Intended use
- When you first begin using the oral irrigator, you may experience slight bleeding of the gums even though your gums may be healthy. This is because your gums are receiving stimulation by the oral irrigator for the first time. The bleeding should stop after one or two weeks of use. Bleeding that persists for more than two weeks may be indication of an abnormal condition of your gums, such as periodontal disease. In this case, stop using the oral irrigator and consult your dentist.
- Do not put salt, mouthwash or other chemicals into the water tank. Doing so may cause malfunction.
- Do not dry the main unit with a dryer or a fan heater. Doing so may cause malfunction or deformation of the parts.
- Store the appliance in a place with low humidity after use. Leaving the appliance in a bathroom may cause malfunction.
- Charge the appliance correctly according to these Operating Instructions. (See pages 10 and 11 "Charging".)
- This appliance contains battery that is only replaceable by skilled persons. Please contact an authorized service centre for the details of repair.
Parts identification
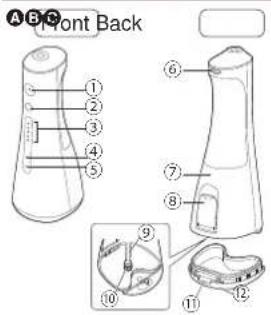
A Main unit
① Power switch (①)
② Level switch
③ Water pressure level LED indicator (1\~5 levels)
④ Low battery indicator (blue)
⑤ Charge status indicator (red)
⑥ Nozzle release button
⑦ Water tank (inside)
⑧ Water tank cap
⑨ Suction hose
⑩ Filter
⑪ Bottom cover release button
⑫ Bottom cover
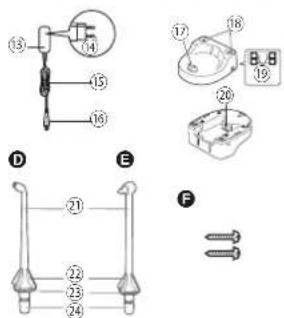
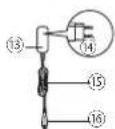
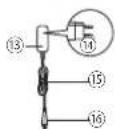
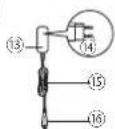
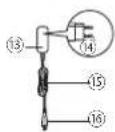
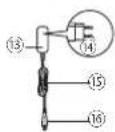
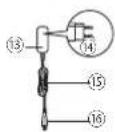
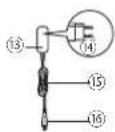
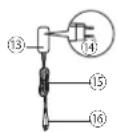
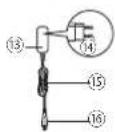
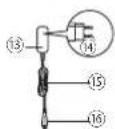
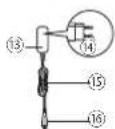
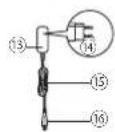
B AC adaptor (RE7-87)
⑬ Adaptor
⑭ Power plug
⑮ Cord
⑯ Appliance plug
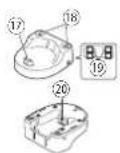
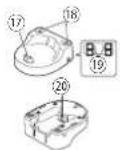
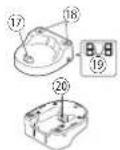
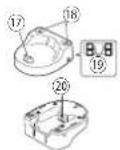
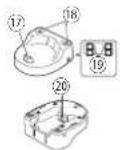
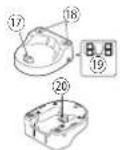
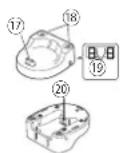
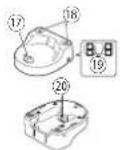
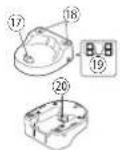
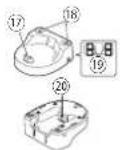
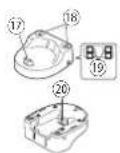
© Charging stand (RC8-4)
⑰ Charging plug
⑱ Nozzle stand
⑲ Wall-mounting screw holes
• The charger can be mounted on a wall using two wood screws.
⑳ Stand socket
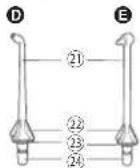
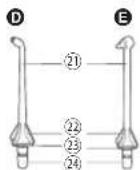
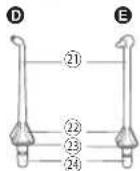
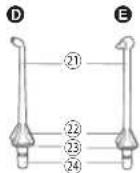
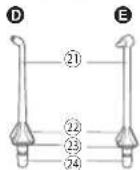
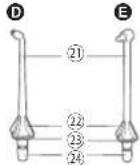
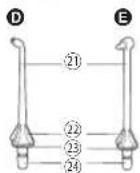
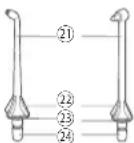
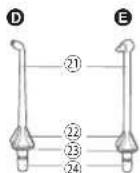
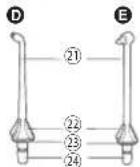
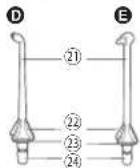
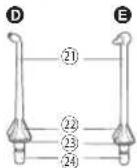
D Nozzle (for general use)
E Orthodontic nozzle
• The nozzle is a consumable.
②1 Nozzle
②2 Nozzle Handle
②3 Identification ring
⑳ Nozzle insertion port
Accessory
F 2 screws
Note
There may be moisture inside the main unit (water tank and suction hose) left from the distilled water used for product testing.
Charging
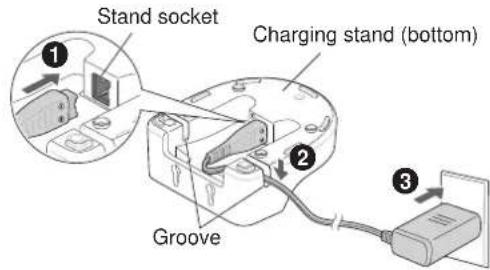
1 Connect the AC adaptor.
① Insert the appliance plug firmly to the stand socket.
② Press the cord into either the left or right groove, depending on where it will be placed.
- Place the charging stand on a flat and stable surface.
③ Insert the adaptor into a household outlet.
▶ About the charging time
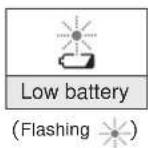
- Charging is required when the low battery indicator (blue) flashes.
- Turning off the power switch "①" when the battery has little remaining charge, the low battery indicator will light off after 5 seconds.
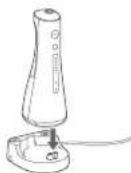
2 Insert the main unit straight into the charging plug with the front facing outward.
▶ Indicator display during charging
| Charging in progress | Charging complete |
(Lights on • Lights off ○)
| Chargingabnormal(Flashing in redtwice a second) |
(Flashing
▶ How to check if charging is completed
- After charging is completed, if you connect and then disconnect the main unit to and from the charging stand, (the charge status indicator) lights on and then lights off after 5 seconds.
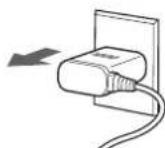
3 For safety and energy saving, disconnect the power plug.
English
- Charging the battery for more than 1 hour will not cause any damage to the main unit.
▶ Operating time after a full charge Approx. 10 minutes*
(When the water pressure level is set to 5)
* It varies with the ambient temperature and usage conditions.
- Charging is completed after approx. 1 hour. (The charging time may vary with the remaining battery capacity.)
Notes
- The charging time may differ when the appliance is used for the first time, or if it has not been used for more than 6 months. In addition, (the charge status indicator) may not light on in the first several minutes of charging, but it will light on as the charging proceeds.
- The battery will deteriorate if not used for over 6 months, so make sure to perform a full charge at least once every 6 months.
- The recommended ambient temperature for charging is 10 °C - 35 °C. It may take longer to charge, or will flash rapidly and the battery may fail to charge properly in extremely high or low temperatures.
- To keep charging the battery will not affect battery performance.
How to use
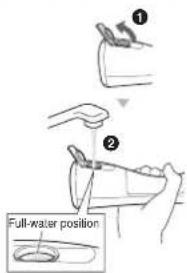
1 Fill the water tank with water.
① Open the water supply cover.
② Add water while keeping the main unit level.
- Do not fill beyond the full-water position.
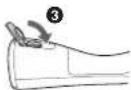
③ Close the water supply cover securely.
• Always use new tap water or lukewarm water.
- If the water feels cold, use lukewarm water with a temperature of 40 °C or less.
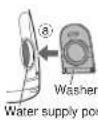
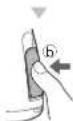
▶ If the water supply cover comes off
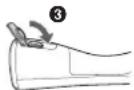
① Align the washer of the water supply cover with the water supply port.
⑥ Press in until a "click" is heard.
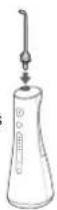
2 Install the nozzle.
- Choose a nozzle for your purpose. (See page 14.)
Press in firmly until a "click" is heard.
3 Press the level switch, and select the water pressure level.
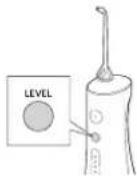
- When you press the level switch, the water pressure level that was used last time is selected. Then each time you press the level switch, the water pressure level is switched as follows: 1 (weak) → 2 → 3 → 4 → 5 (strong) → 1...
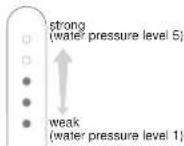
▶ About the water pressure level memory function. The last selected water pressure level will be remembered, from which the appliance will start next time.
- When the appliance has not been used for a long time or when the battery is used up, the water pressure level will return to 1.
4 Clean inside your mouth with water jet.
① Place the nozzle in your mouth.
② Close your mouth gently.
③ Turn on the power switch "①".
- You can switch the water pressure level by pressing the level switch, even while using the appliance.
- If the main unit is tilted too much, the water does not come out from the nozzle.
▶ Operation time with full water approx. 60 seconds.
(When the water pressure level is set to 5)
Point 1
Keep your face over the basin.
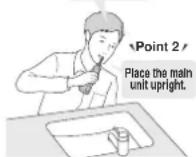
※ It can also be used in a bath.
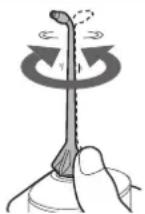
▶ To adjust the orientation of the nozzle
You can adjust the direction of water jet by rotating the nozzle handle.
Notes
- When using the appliance for the first time, please press the power switch "①" and check the water pressure level while water is coming out. (Please start using the appliance from water pressure level.)
- The appliance may not operate in an ambient temperature approximately 5 °C or lower.
The appliance may not work outside the recommended temperature range.
- Do not push the tip of the nozzle too hard against the teeth or gums.
- When you feel that the irritation is strong, turn off the power switch "①" and use the appliance from water pressure level 1.
- Do not turn on the power switch "①" when the water tank is empty unless you are drying the moisture inside the main unit. (Doing so may cause malfunction.)
Points of care
With the water jet and orthodontic nozzle, clean every nook and cranny of areas that are hard to reach by the toothbrush.
Change the way you use and move the unit depending on the purpose and the area you want to clean.

Nozzle (for general use)
To clean with the water jet.
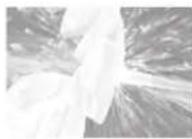
▶ Interdental cleaning
- Direct the water jet onto the space between the teeth.
- Direct from the front and rear sides of the teeth.
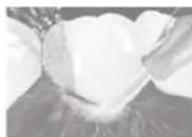
▶ Periodontal pocket cleaning
- Aim the water jet at the space between teeth and gums.
- Slowly shift the water jet along the gums.
- Clean the front and back of the teeth and behind the molars as well.
▶ Gums care
• Stimulate the gums.
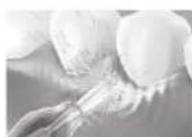
If you are concerned about sensitive gums, stimulate with a gentle water jet setting.

Orthodontic nozzle
When cleaning crooked teeth and orthodontic bracket area with the brush and water flow
Lightly place the brush tip on the teeth and wiggle the brush.
▶ For crooked teeth
- Place the brush tip on the area that is difficult for a toothbrush to reach and tends to remain unpolished.
- Wiggle the brush mainly in interdental spaces.
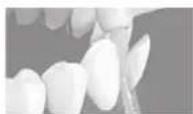
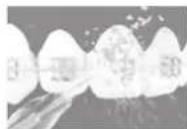
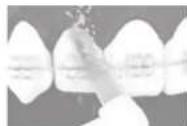
For orthodontic bracket area

Nozzle
(for general use)
- Direct the water jet around orthodontic brackets and bridges.

Orthodontic nozzle
- Insert the brush to the gap between the teeth and the orthodontic bracket.
- Wiggle the brush tip.
After use
Please clean the appliance after each use.
1 To prevent the water from splashing about, turn off the power switch "①while keeping the nozzle in your mouth.
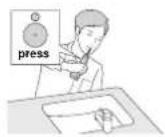
2 Pour out the remaining water, and wash the nozzle with water.
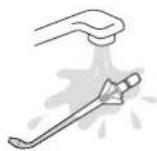
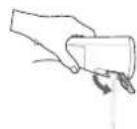
① Open the water tank cap, and pour out the remaining water. - Be sure to pour out the remaining water after each use.
② Turn on the power switch "①" to drain the remaining water in the main unit.
③ Turn off the power switch "①" when no more water comes out.
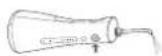
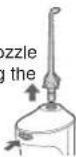
4 Remove the nozzle and bottom cover. Wash them with water. Pull out while r
Pull out the nozzle while pressing the button
Nozzle release button
3 Remove the bottom cover, and wash the main unit (as a whole) and inside of the tank.
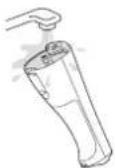
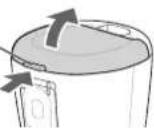
▶ How to remove the bottom cover
Bottom cover release button
Lift it up while pressing.
4
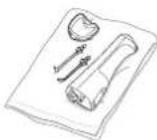
Store it after it is dry.
① Wipe any water away from the nozzle and the main unit with a towel or the like, and dry them in a well-ventilated shade.
② Put the main unit upright on the charging stand.
- Attach the bottom cover, and put the main unit upright on the charging stand.
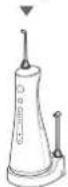
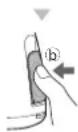
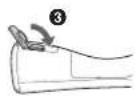
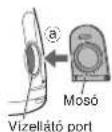
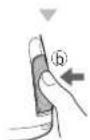
▶ How to attach the bottom cover
(a) Insert the claws (2 places) on the front of the bottom cover into the main unit.
(b) Press in the hooks (2 places) on the back.
Notes
- Do not wash with lukewarm water exceeding 50 °C.
- Use neutral kitchen detergent and rinse well with water to ensure no detergent remains after cleaning.
- Never use thinners, benzine, or alcohol. (Doing so may cause malfunction, or cracking or discolouration of the parts.)
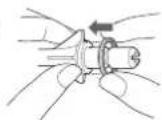
▶ If the identification ring comes off
Align the nozzle with the identification ring (in any direction) to install it.
• Even if the identification ring is not attached, the performance of the nozzle is not affected.
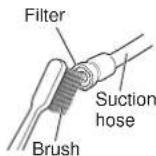
▶ When the water jet is poor
Remove the dirt from the filter (the tip of the suction hose).
Filter
Rub it gently with a soft brush.
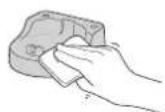
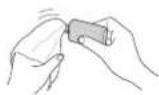
▶ When dirt is a concern
Wipe with a dry cloth.
(Do not rinse it with water.)
Charging stand AC adaptor
Wall mounting
Be sure to choose a solid wall or a crosspiece to install the charging stand.
① Tighten two wood screws (nominal diameter: 2.7
- 3.1 mm) at intervals of 29 mm so that the screw head can float about 3.0 mm from the wall.
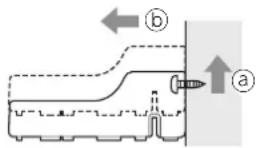
② Hook the wall-mounting screw holes on the back of the charging stand on the screws, and fix them.
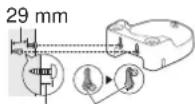
Approx. 3.0 mm
Wall-mounting screw holes
Ⓐ Lift the charging stand.
b Pull it forward.
Frequently asked questions
| Quesiton Answer | |
| BatteryWill the battery be exhausted after a long period of disuse? | Please charge it once every 6 months if you have not used it for over 6 months since the battery may deteriorate. |
| Can the battery be charged before every use? | The service life of the battery will not be affected thanks to the use of a lithium ion battery. |
Troubleshooting
| Problem Possible cause Action | |||
| While charging | The charge status indicator does not light on. | The appliance was just purchased or it has not been used for a while. | Although the indicator may not light on in the first several minutes of charging, it will light on as the charging proceeds. If it does not light on after a while, please request a repair at your dealer or Service Centre. |
| The charge status indicator flashes rapidly (twice a second). | The main unit is not properly plugged in the charging stand. | Check to see that the main unit stands upright so that its bottom comes in contact with the charging plug of the charging stand, and that the charge status indicator is on. (See page 11.) | |
| The ambient temperature is too low or too high during charging. | Please charge within the recommended temperature range of 10 °C to 35 °C. If the indicator flashes even when you charge it within the recommended temperature range, contact your dealer or Service Centre for repair. | ||
| The appliance can be used for just several minutes even after a full charge. | The main unit is not properly plugged in the charging stand. | Check to see that the main unit stands upright so that its bottom comes in contact with the charging plug of the charging stand, and that the charge status indicator is on. (See page 11.) | |
| The low battery indicator does not flash, but the appliance stops working. | The battery has reached the end of its life (approx. 3 years). | Replace it with a new one. (See page 20.) Please contact your dealer or Service Centre. | |
| While using | The appliance does not operate. | The battery has reached the end of its life (approx.3 years). | Please remove the built-in rechargeable battery.(See page 20.)Please contact your dealer or Service Centre. |
| The appliance is used with approximately 5 °C or lower. | Do not use the appliance with approximately 5 °C or lower. | ||
| The water jet is poor. | The nozzle is clogged. The outlet of nozzle is squashed. | Replace the nozzle with a new one. | |
| The filter is clogged. | Remove the dirt from the filter.(See page 16.) | ||
| No water comes out. | The main unit is tilted too much. | Please use the appliance with the main unit upright. (See page 13.) | |
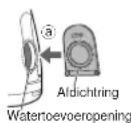
| It may take some time to suck up water. | Put water into the nozzle port ⓐ, install the nozzle, and turn on the power switch. | ||
| Water leaks from the bottom cover. | Dirt is accumulated on the rubber part of the bottom cover. | 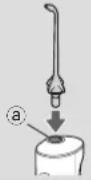 | |
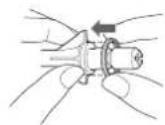
| The nozzle is hard to install. | ▶ ▶ ▶ ▶ ▶ ▶ | Please remove the dirt.(See page 16.) | |
| Apply water to the nozzle insertion port. | |||
If the problems still cannot be solved, contact the store where you purchased the unit or a service centre authorized by Panasonic for repair.
Battery life
Approximately 3 years. The battery may have reached its operating life if the usage frequency decreases drastically, even after a full charge.
(The operating life of the battery may differ depending on usage or storage conditions.)
Removing the built-in rechargeable battery
Remove the built-in rechargeable battery before disposing of the appliance.
The battery is to be disposed of safely.
Please make sure that the battery is disposed of at an officially designated location if there is one.
This figure must only be used when disposing of the appliance, and must not be used to repair it. If you dismantle the appliance yourself, it will no longer be waterproof, which may cause it to malfunction.
- Remove the appliance form the charging stand and adaptor, press the power switch to turn on the power and then keep the power on until the battery is completely discharged.
- Remove the bottom cover.
- Perform steps ① to ⑤ to disassemble the main unit and remove the battery with a screwdriver.
- Insulate the ⊕ and ⊖ terminals by applying tape to them. (To prevent short circuit of terminals).
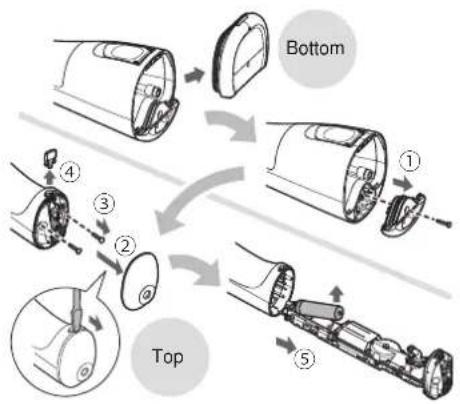
flowchart
graph TD
    A["Bottom"] --> B["Top"]
    B --> C["Bottom Left Side"]
    B --> D["Bottom Right Side"]
    B --> E["Bottom Bottom Side"]
    style A fill:#f9f,stroke:#333
    style B fill:#ccf,stroke:#333
    style C fill:#cfc,stroke:#333
    style D fill:#fcc,stroke:#333
    style E fill:#cff,stroke:#333
For environmental protection and recycling of materials
This appliance contains a Lithium-ion battery. Please make sure that the battery is disposed of at an officially assigned location, if there is one in your country.
Specifications
| Power source | See the name plate on the product (Automatic voltage conversion) |
| Charging time Approx. 1 hour | |
| Operating time | LEVEL 5:Approx. 10 minutes*(at 20 °C when fully charged) |
| Tank volume | Approx. 200 mL (For approx. 60 seconds of operation when the water pressure level is set to 5) |
| Dimensions | Main unit: 210 (H) x 75 (W) x 85 (D) mm(Not including nozzle)Charging stand: 40 (H) x 90 (W) x 100 (D) mm |
| Mass | Main unit: Approx. 275 g (Including nozzle)Charging stand: Approx. 115 g |
| Airborne Acoustical Noise | 71 (dB (A) re 1 pW) |
This product is intended for household use only.
For more information about the energy efficiency of the product, please visit our website, www.panasonic.com, and enter the model number in the search box.
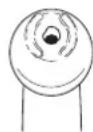
Changing the nozzle (Sold separately)
▶ Nozzle (for general use)
- If the tip of the nozzle gets deformed, please replace the nozzle with a new one.
- The nozzle should be replaced once every 6 months or so due to hygiene reasons, even if it is not deformed.
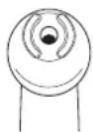
New nozzle (tip) Deformed (worn) nozzle (tip)
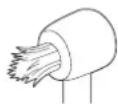
▶ Orthodontic nozzle
- Replace the orthodontic nozzle in approx. 3 months. If the brush bristles are bent out, replace it even within 3 months.
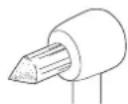
New nozzle (tip) Nozzle with bent out bristles
English
| Part number Replacement Nozzle for EW1513 | ||
| WEW0983 | Nozzle (for general use) | 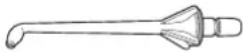 |
| WEW0984 | Orthodontic nozzle |  |
Disposal of Old Equipment and Batteries Only for European Union and countries with recycling systems
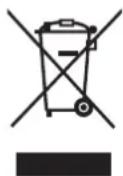
These symbols on the products, packaging, and/or accompanying documents mean that used electrical and electronic products and batteries must not be mixed with general household waste.
For proper treatment, recovery and recycling of old products and batteries, please take them to applicable collection points in accordance with your national legislation.
By disposing of them correctly, you will help to save valuable resources and prevent any potential negative effects on human health and the environment. For more information about collection and recycling, please contact your local authority.
Penalties may be applicable for incorrect disposal of this waste, in accordance with national legislation.
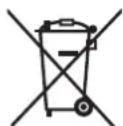
Note for the battery symbol (bottom symbol)
This symbol might be used in combination with a chemical symbol. In this case it complies with the requirement set by the Directive for the chemical involved.
Panasonic

A Hauptgerät
▶ Prévention des accidents
A Appareil principal
natural_image
Illustration of a hand holding a tool with motion arrows indicating rotation (no text or symbols)Notes
natural_image
Illustration of a dental tool setup with a toothbrush and dental implant (no text or symbols)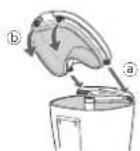

A Unità principale

A Unidad principal

A Hoofdapparaat

A Unidade principal

A Huvudenheten

A Hoveddel
A Hoveddel
① Strømbryter (⑪)
② Nivåbryter
③ LED-indikator for vanntrykksnivå (1–5 nivåer)
④ Indikator for lavt batterinivå (blå)
⑤ Ladestatusindikator (rød)
⑥ Dyseutløserknapp
⑦ Vannbeholder (innvendig)
⑧ Lokk til vannbeholder
⑨ Sugeslange
⑩ Filter
⑪ Utløserknapp for nedre deksel
⑫ Nedre deksel
B Nettstrømadapter (RE7-87)
⑬ Adapter
⑭ Støpsel
⑬ Adapter ⑭ Støpsel
⑮ Strømkabel
⑯ Apparatplugg
⑮ Strømkabel ⑯ Apparatplugg
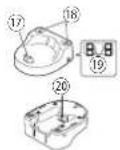
© Ladestativ (RC8-4)
⑰ Ladekontakt
⑱ Dysestativ
⑲ Skruehull for veggmonterin
⑰ Ladekontakt ⑱ Dysestativ ⑲ Skruehull for veggmonterii
- Laderen kan monteres på en vegg med to treskruer.
⑳ Stativkontakt
natural_image
Illustration of a medical device with a magnified view showing internal components (no text or symbols)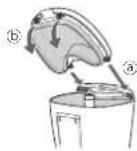
D
F

A Jednostka główna
natural_image
Illustration of a dental tool and its corresponding toothpaste device (no text or symbols present)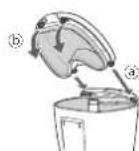
Uwagi
flowchart
graph TD
    A["Dolna"] --> B["Górna"]
    B --> C["Step ①: Airbag with handle"]
    B --> D["Step ②: Airbag with handle"]
    B --> E["Step ③: Airbag with handle"]
    B --> F["Step ④: Airbag with handle"]
    B --> G["Step ⑤: Airbag with handle"]
Polski

A Hlavní jednotka
A Hlavná jednotka

A Föegység
natural_image
Illustration of two hand gestures: one spraying water with a tool, the other holding a small object (no text or symbols)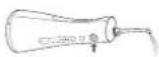
natural_image
Illustration of a dental tool and a toothbrush tool (no text or symbols present)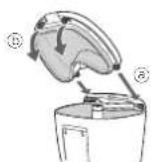
Jegyzetek
Spate


A Ana ünite
33, Wanbao North Street, Wanbao Industry
Zone, Zhongcun, Panyu District, Guangzhou City, Guangdong Province, China
YETKILI TEMSILCI
İthalatçı Firma:
Tesan İletişim A.Ş.
© Panasonic Corporation 2020
⑦EN, GE, FR, IT, SP, DU, PT, SW, DA, NW, FI, PL, CZ, SK, HU, RO, TK
Printed in China
EW970015131503 Y0620-0
- Panasonic
- Contents
- Warning
- Safety precautions
- Explanation of symbols
- DANGER
- CAUTION
- ▶ Preventing accidents
- ▶ Power supply
- This product
- ▶ Note the following precautions
- Handling of the removed battery when disposing
- Intended use
- Parts identification
- A Main unit
- B AC adaptor (RE7-87)
- © Charging stand (RC8-4)
- D Nozzle (for general use)
- E Orthodontic nozzle
- Accessory
- F 2 screws
- Note
- Charging
- Connect the AC adaptor.
- Notes
- How to use
- Clean inside your mouth with water jet.
- ▶ To adjust the orientation of the nozzle
- Points of care
- Nozzle (for general use)
- To clean with the water jet.
- Orthodontic nozzle
- Lightly place the brush tip on the teeth and wiggle the brush.
- For orthodontic bracket area
- Nozzle
- After use
- 4
- Store it after it is dry.
- ▶ How to attach the bottom cover
- ▶ If the identification ring comes off
- ▶ When the water jet is poor
- Filter
- ▶ When dirt is a concern
- Wall mounting
- Frequently asked questions
- Battery life
- Removing the built-in rechargeable battery
- For environmental protection and recycling of materials
- Changing the nozzle (Sold separately)
- Disposal of Old Equipment and Batteries Only for European Union and countries with recycling systems
- Note for the battery symbol (bottom symbol)
- A Hauptgerät
- ▶ Prévention des accidents
- A Appareil principal
- A Unità principale
- A Unidad principal
- A Hoofdapparaat
- A Unidade principal
- A Huvudenheten
- A Hoveddel
- B Nettstrømadapter (RE7-87)
- © Ladestativ (RC8-4)
- A Jednostka główna
- Uwagi
- A Hlavní jednotka
- A Hlavná jednotka
- A Föegység
- Jegyzetek
- A Ana ünite
- YETKILI TEMSILCI
Brand : PANASONIC
Model : EW1513
Category : Toothbrush