
IAN 279806 - Uncategorized CRIVIT - Free user manual and instructions
Find the device manual for free IAN 279806 CRIVIT in PDF.

| Product type | Skipping rope with weighted handles and countdown timer |
| Brand | Crivit |
| Model | IAN 279806 |
| Rope dimensions | Length 300 cm, diameter approx. 4.0 mm |
| Countdown power supply | Battery GRA76 (LR44) 3 V |
| Countdown timer | Adjustable from 1 to 60 minutes, audible signal at end of time |
| Weight of handles included | 2 x 50 g and 2 x 100 g (total max weight 300 g with both handles) |
| Delivery contents | 2 handles, 1 rope, 2 rope clamps, 2 sets of weights, 1 countdown timer, 1 battery, 1 carrying case, instruction manual |
| Intended use | Exclusively as a skipping rope (not permitted as a towline or rappelling rope) |
| Safety | Consult a doctor before training; clear area of 0.6 m around; flat, non-slip surface; do not use near stairs |
| Care | Clean with a damp cloth and mild cleaner; do not use solvents; dry with a dry cloth |
| Storage | In a dry place at room temperature; coil the rope without bending it |
| Warranty | 3 years from date of purchase (valid for material and manufacturing defects) |
| Customer service (Switzerland) | Phone 0842 665566 (0.08 CHF/min); email deltasport@lidl.ch |
| Spare parts | Available at www.delta-sport.com (Service section) |
Frequently Asked Questions - IAN 279806 CRIVIT
User questions about IAN 279806 CRIVIT
0 question about this device. Answer the ones you know or ask your own.
Ask a new question about this device
Download the instructions for your Uncategorized in PDF format for free! Find your manual IAN 279806 - CRIVIT and take your electronic device back in hand. On this page are published all the documents necessary for the use of your device. IAN 279806 by CRIVIT.
USER MANUAL IAN 279806 CRIVIT
natural_image
Woman performing a jump rope exercise in a gym (no text or symbols visible)
SPRINGSEIL-SET
DE AT CH
SPRINGSEIL-SET
Bedienungsanleitung
IT CH
SET CORDA PER SALTARE
Istruzioni d'uso
FR CH
SET DE CORDE À SAUTER
Mode d'emploi
GB
SKIPPING ROPE SET
Instructions for use
CE
IAN 279806
DE AT CH
FR IT GB
flowchart
graph TD
    A["Outer Component"] --> B["Switch"]
    B --> C["Internal Component"]
    C --> D["Arrow to Outer Ring"]
    style A fill:#f9f,stroke:#333
    style B fill:#ccf,stroke:#333
    style C fill:#cfc,stroke:#333
    style D fill:#fcc,stroke:#333
natural_image
Line drawing of a person standing with a resistance band, labeled 'F' in the top-left corner (no other text or symbols)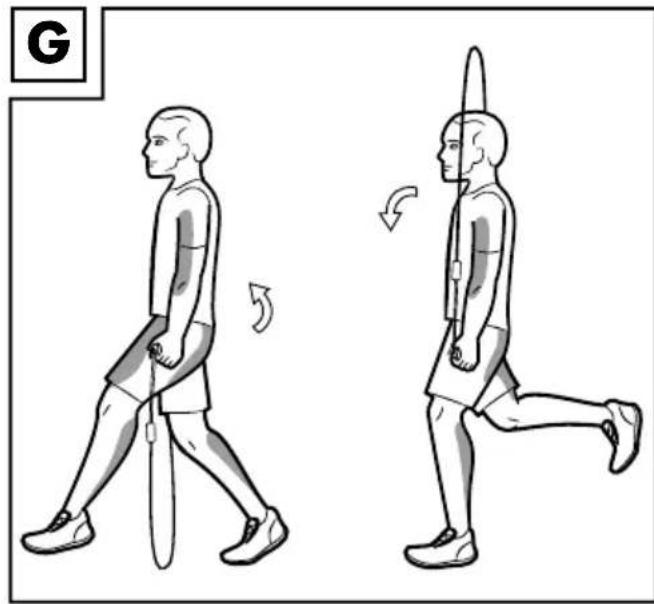
natural_image
Illustration of a person performing two different postures in walking pose, showing motion and posture changes (no text or symbols)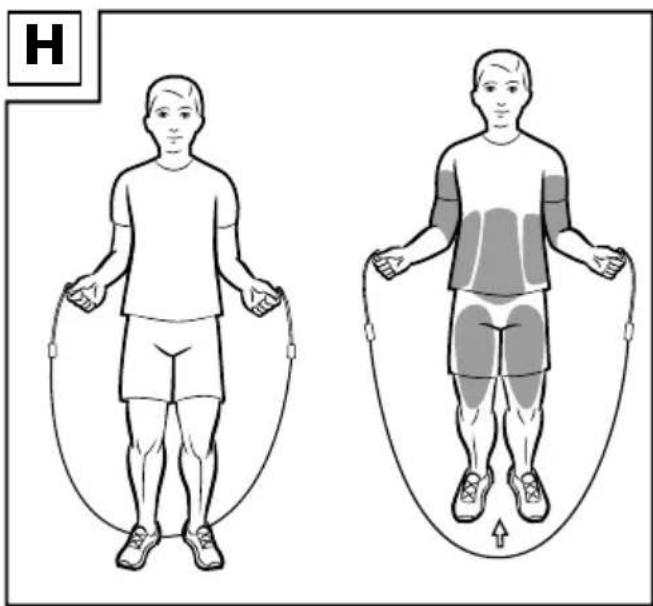
natural_image
Illustration of a person jumping rope, showing two different positions (no text or symbols present)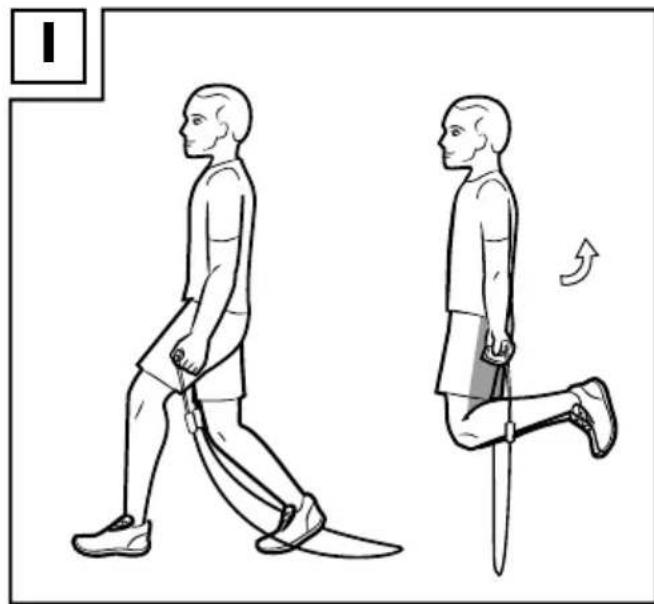
natural_image
Illustration of a person performing a walking or stretching pose with a sword, showing the motion and posture (no text or symbols)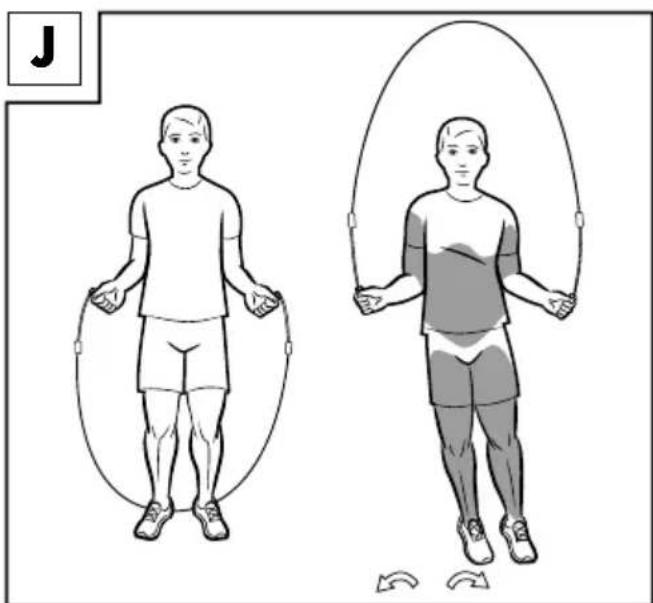
natural_image
Illustration of two individuals jumping rope, one standing and one in athletic wear, with motion arrows indicating movement (no text or symbols)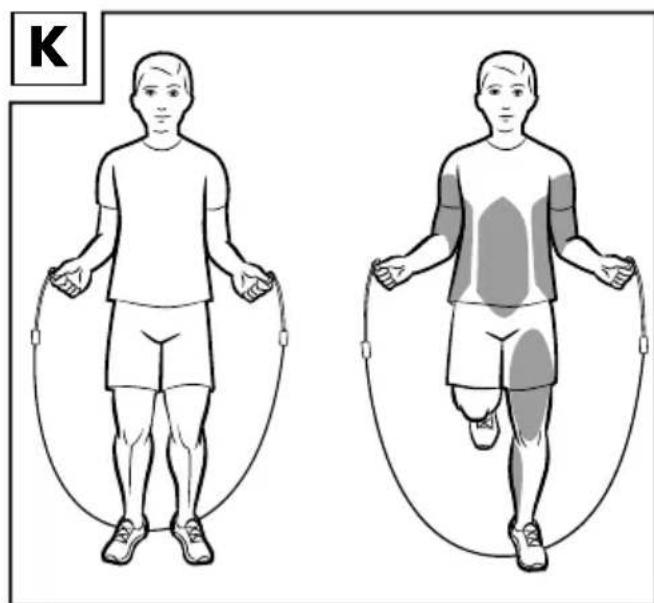
natural_image
Illustration of a person jumping rope, showing two different positions (no text or symbols present)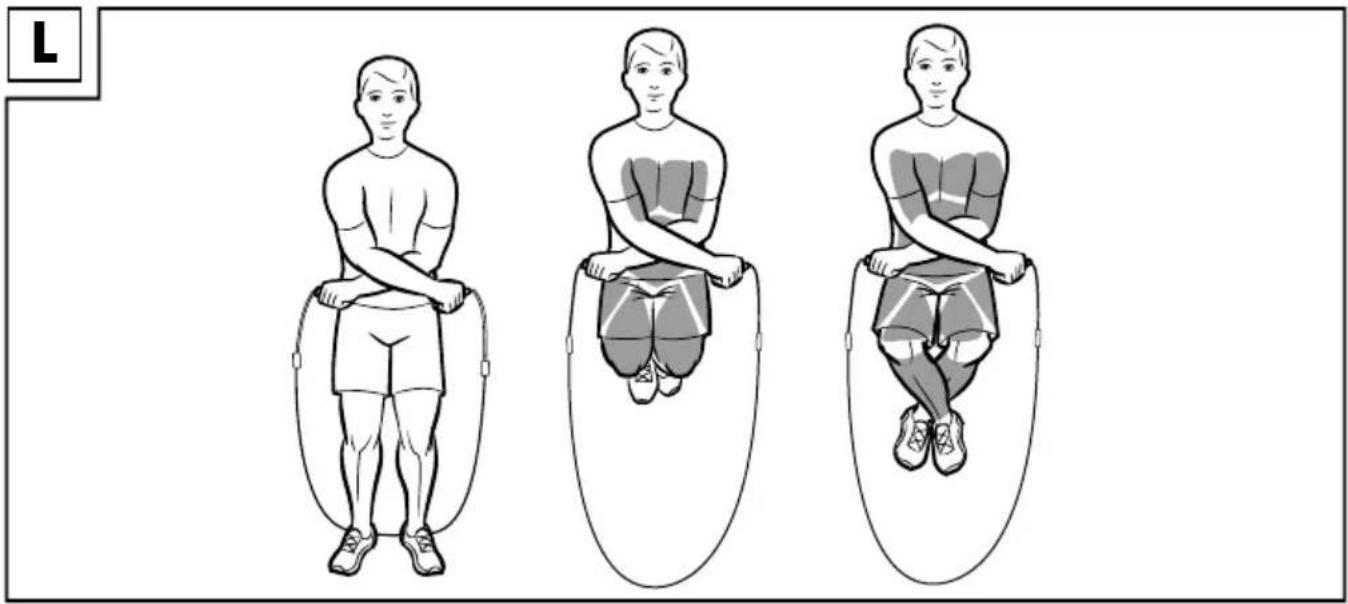
natural_image
Three sequential illustrations of a person jumping rope, showing different postures (no text or symbols)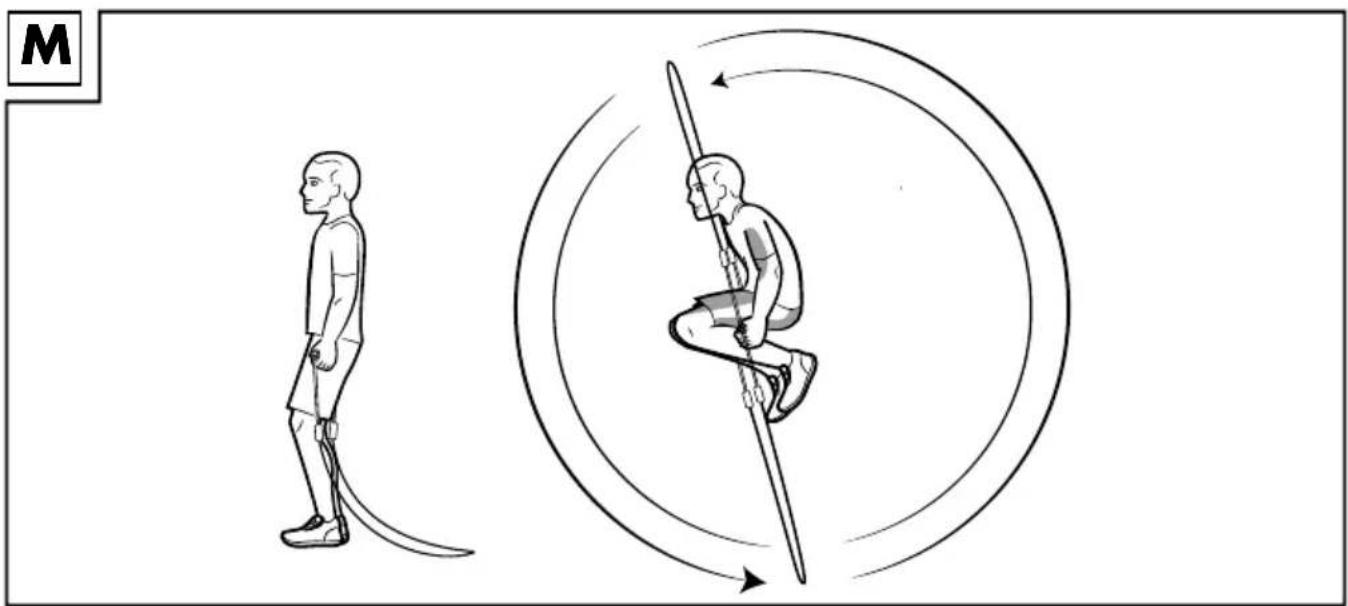
natural_image
Illustration showing a person performing a pole vault motion with curved arrows indicating rotation (no text or symbols)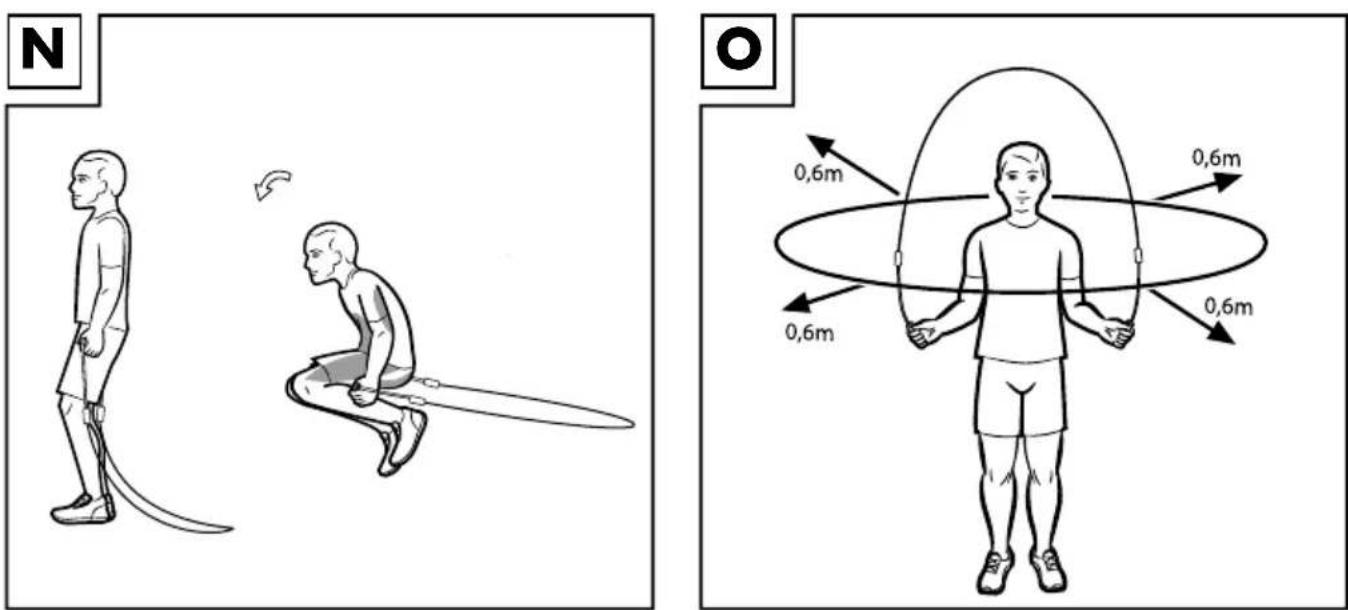
DE AT CH
Scope of delivery (figure A) 30
Technical data 30
Correct use 30
Safety notes 30 - 31
Risk of injury! 30
Special care - Risk of injury for children! ....30
Warning notes for batteries! 30
Risks from wear 31
Assembly (figure B) 31
Countdown timer 31 - 32
General training notes 32
Warming up 32
Suggested exercises 32 - 34
Stretching 34
Care and storage 34 - 35
Notes on disposal 35
Disposal methods for batteries ....35
3-year warranty 35

Dimensioni: circa ∅ 4,0 mm x L 300 cm
With your purchase you have decided on a high-quality product. Get to know the product before you start to use it.
Carefully read the following instructions for use.
Use the product only as described and only for the given areas of application. Keep these instructions safe. When passing the product on to a third party, always make sure that the documentation is included.
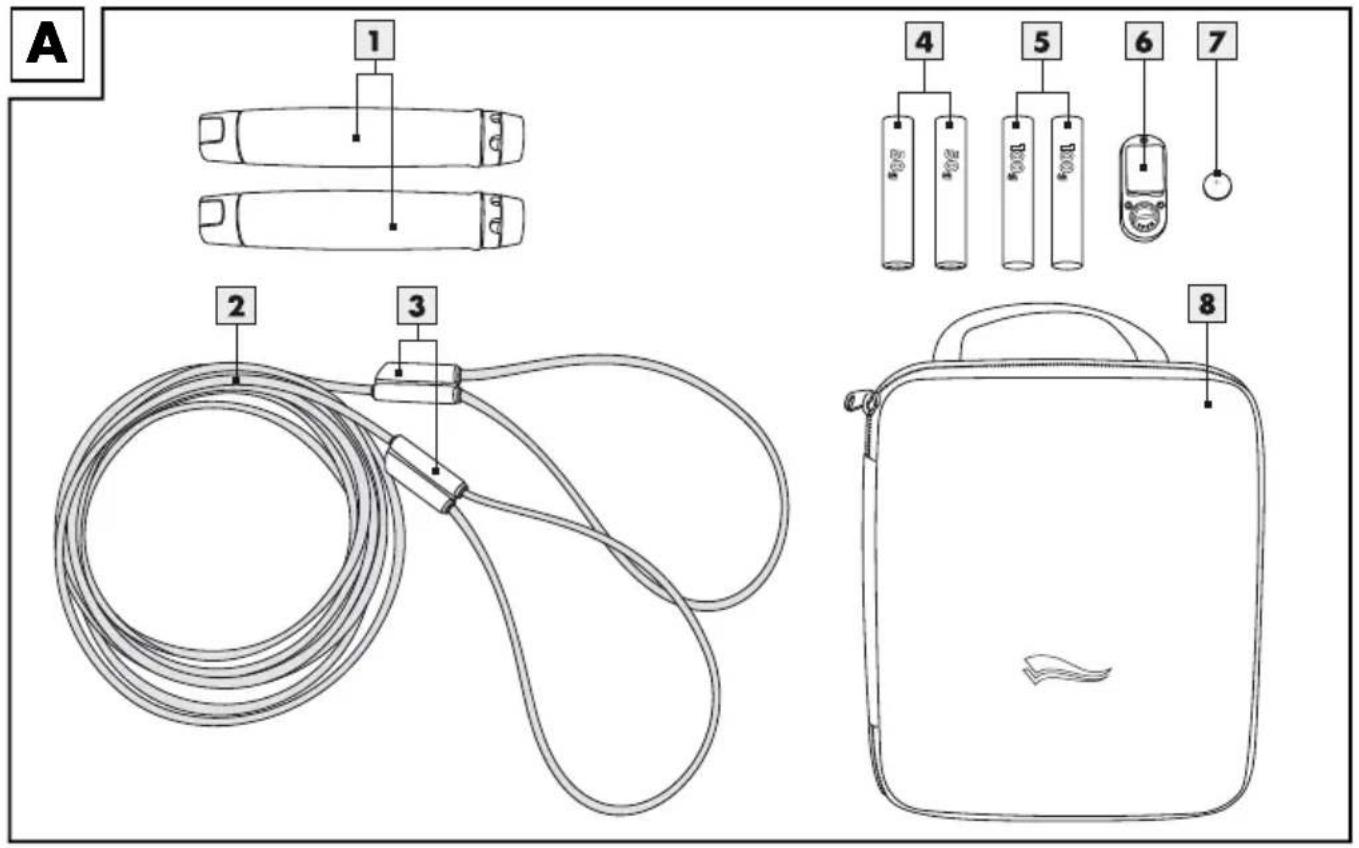
Scope of delivery (figure A)
2 x Handles (1)
1 x Skipping rope (2)
2 x Rope clamps (3)
2 × 50g Handle weights (4)
2 x 100g Handle weights (5)
1 x Countdown timer (6)
1 x Battery (type GRA76) (7)
1 x Carrying case (8)
1 x Instructions for use
Technical data
Power supply:
3 V battery type GRA76, LR44
Dimensions: approx. ∅ 4.0mm x L 300cm
Possible set training time: 1 - 60 minutes
Correct use
This article is only suitable for use as a skipping rope. It is not authorised for any other use, e.g. as a tow or pulling rope or for abseiling.

Safety notes
Risk of injury!
- Consult your doctor before beginning training. Please ensure that you are in suitable health for the training.
-
Remember to always warm up before training and train in accordance with your current level of performance. Severe injury is possible if you exert yourself too much or overtrain. If you experience complaints, weakness or fatigue discontinue training immediately and contact your doctor.
-
Keep the instructions for use and the exercise information at hand at all times.
- There must be a free area of approx. 0.6m around the training area (figure O).
- Only train on a flat and non-slip surface.
- Do not use the article in the vicinity of stairs or steps.

Special care – sk of injury for children!
- Do not allow children to use this article without supervision. Point out the correct use of the training instrument and maintain supervision. Only allow use if the mental and physical development of the children allow this. This article is not suitable for use as a toy.

Warning notes for batteries!
- Only use batteries from the same manufacturer and of the same type.
- Remove the batteries when they are empty or if the article is not used for longer periods.
- Do not use new and used batteries together.
- Warning! Batteries may not be charged or reactivated by other methods, may not be dismantled, thrown into fire or short-circuited.
• Always keep the batteries out of the reach of children. - Do not charge batteries that are not rechargeable.
- Rechargeable batteries may only be charged under the supervision of adults.
- Rechargeable batteries must be removed from the article before they are charged.
- The connection terminals may not be short-circuited. Hazard!
• Take extreme care with a damaged or empty battery and dispose of it in accordance with regulations. Wear gloves to do so. - If battery acid comes into contact with your skin wash the affected area with water and soap. If battery acid gets into your eye rinse it with water and seek immediate medical treatment.
• Children may not carry out cleaning or user maintenance without supervision. - Batteries may not be swallowed!

Risks from wear
- The article may only be used in perfect condition. Examine the article for damage or wear before each use. The safety of the article can only be assured if it is examined regularly for damage and wear. Do not use the article if it is damaged.
- Only use original replacement parts.
- Protect the article from extreme temperatures, sun and moisture. Incorrect storage and use of the article can lead to premature wear and this can lead to injuries.
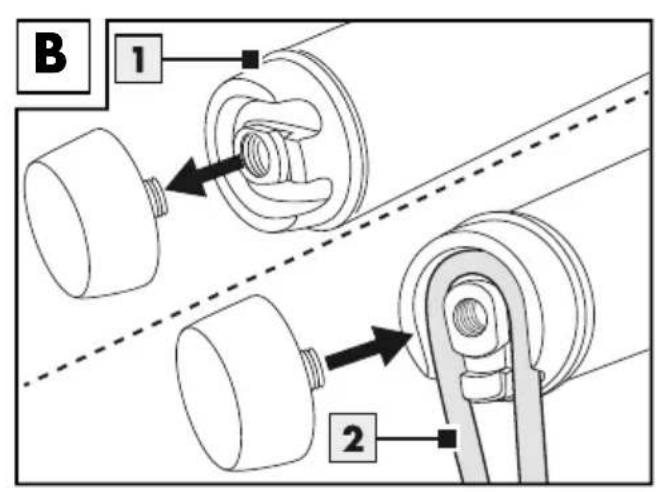
Assembly (figure B)
- Remove both handles (1) and the skipping rope (2) from the carrying case (8).
- Release the screw on the upper end of the handles.
- Insert the rope into the handles as illustrated.
- Important: the end of the rope must always be at the left of the handle when your insert the rope.
- Tighten the screw at the end of the handle so that the rope is secure, even when pulled.
- Attach the rope clamps (3) around the rope lines so that the end of the rope is secure.
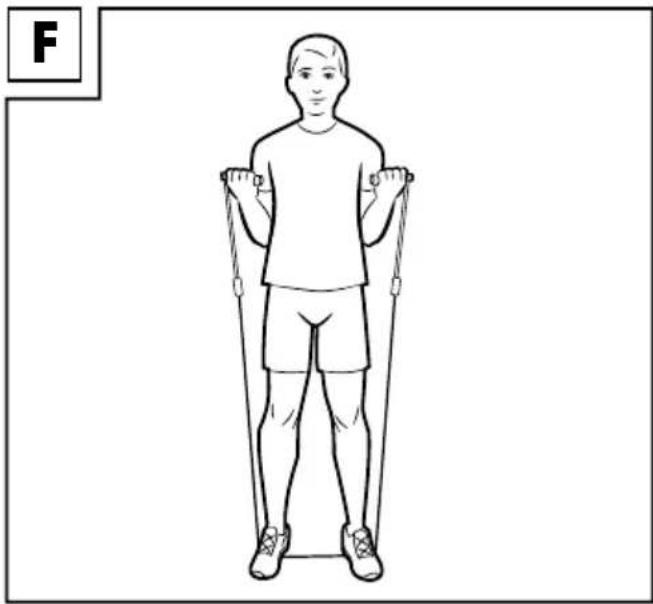
Correct rope length
- Test whether the rope has the optimum length for you. This is achieved when you can stand on the mid-point of the rope and both rope ends (including the handles) extend to your armpits (figure F).
- Correct the length if the rope is not at the optimum length for you.
- In order to shorten the skipping rope release the screws at the upper end of the handle. Remove the rope from the clamp and lengthen the ends of the rope that extend beyond the handles. In order to lengthen the rope shorten the ends of the ropes.
- Note! Please ensure that the rope clamps are the same distance from the handles in order to ensure a uniform swing.
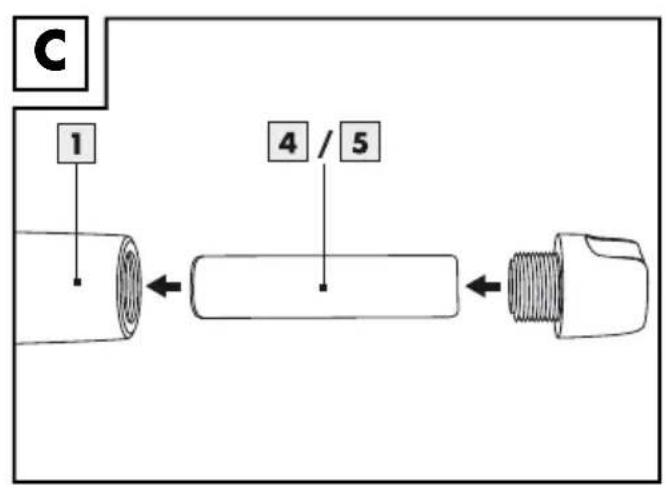
Inserting the handle weights (figure C)
• Each skipping rope set includes 2 sets of handle weights of 50g (4) and 100g (5).
- You can train without the additional weights or with 50g or 100g on each handle.
Note: If you wish to train with the additional weights, please ensure that both handles have equally heavy weights.
- Unscrew the end caps from the lower end of the handle.
- Remove any inserted weights and exchange them for lighter or heavier weights. The same weight must always be inserted into both handles.
- Re-attach the end caps to the handles. Ensure that the end caps are screwed on tightly.
Countdown timer
Setting the countdown timer
You can use the countdown timer (6) to set a training duration between one and a maximum of 60 minutes. A signal will sound when the set training duration has elapsed.
- In order to start the timer press on the orange button until digits appear on the display.
- Hold the button down for several seconds in order to start the countdown.
- A signal will sound when the set training duration has elapsed.
- To extend the training time hold the button down briefly. You can set the timer to a training duration of up to 60 minutes.
Automatic switch-off: the device will switch itself off after 1 minute in order to preserve the battery (7).
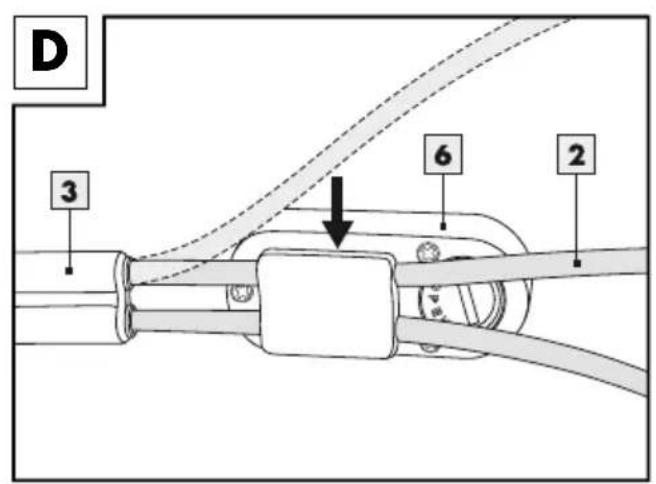
Attaching the countdown timer
See figure D.
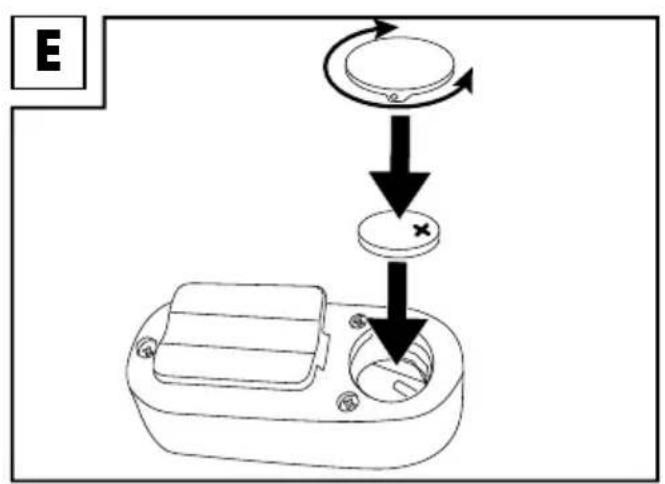
Changing the battery (figure E) CAUTION! Adhere to the following instructions in order to avoid mechanical and electrical damage.
There is one battery in the countdown timer (6). If the battery has stopped working you can change it.
- Turn the battery cover on the back of the countdown timer to the left. The battery cover will be released and you can remove it.
-
Carefully remove the empty battery from the battery compartment.
-
Exchange it for a new battery.
Note: Pay attention to the plus and minus poles on the battery and that they are inserted correctly. The battery must be placed completely within the battery compartment. - Place the battery cover over the battery on the battery compartment and turn the cover to the right to secure it.
General training notes
Training process
- Wear comfortable sport clothing and trainers.
- Warm up well before each training session and end each training session gradually.
• Take sufficiently long breaks between the exercises and drink enough. - As a beginner, do not train too intensely. Slowly increase your training intensity.
- Carry out all the exercises steadily, not with sudden movements or too quickly.
- Be sure to breathe regularly. Breathe out with effort and breathe in on recovery.
- Ensure a correct body position during the exercises.
Warming up
Take sufficient time before each training session to warm up. The following includes descriptions of some simple exercises for this purpose. Repeat these exercises 2 to 3 times each.
Neck muscles
- Turn your head slowly to the left and to the right. Repeat this movement 4-5 times.
- Circle your head slowly, first in one direction and then in the other.
Arms and shoulders
- Clasp your hands behind your back and pull them carefully upwards. If you bend your upper body forwards at the same time all the muscles are warmed up optimally.
- Circle both your shoulders forwards at the same time and then change direction after one minute.
-
Pull your shoulders up to your ears and let your shoulders fall again.
-
Circle your right and left arms alternately forwards and then after one minute backwards.
Important: Don't forget to continue breathing steadily throughout!
Suggested exercises
Some of many exercises are described below.
Note: Please ensure that you move the rope easily from your wrists in small circles. Your jumps should be economical, i.e. you should only jump as high enough that the rope can pass under your feet.
Basic position
- Hold the handles loosely in your hands close to the rope.
- Hold your shoulders and your elbows in a relaxed position with your elbows close to your body.
- Bend your knees slightly and keep your back straight.
Basic jump walking/running (figure G)
Starting position
- Place one foot forwards and hold the article in such a way that the rope is between your front and back feet.
- Keep your arms loose and your elbows close to your body.
End position
- Tense your arm and stomach muscles.
- Pull your back foot upwards and at the same time swing the rope with your wrist backwards over your head.
- Lift your front foot up so far that the rope can pass under it.
- Repeat this exercise 10 - 15 times for 3 sets and then place your other foot forwards.
Important: During the exercise ensure that your body is tensed and avoid jumping. Move the rope in such a way that you can still walk or run. Only move the rope using wrist movements. Cushion the landings of your feet on the floor by bending your knees slightly.
Basic jump with both legs (figure H)
Starting position
- Stand with your feet hip-width apart and your knees slightly bent. The rope is behind your feet.
- Keep your arms slightly bent and your elbows close to your body.
End position
- Tense your arm and stomach muscles.
- Simultaneously swing the rope forwards over your head using your wrists and jump up slightly in order to allow the rope to pass under your feet.
- Repeat this exercise 10 - 15 times for 3 sets.
Important: During the exercise ensure that your body is tensed and avoid jumping too high. Swing the rope using wrist movements only. Cushion the landings of your feet on the floor by bending your knees slightly.
Stride jump (figure I)
Starting position
- Place one foot forwards and hold the article in such a way that the rope is behind your feet.
- Hold your arms loose and your elbows close to your body.
End position
- Tense your arm and stomach muscles.
- Swing the rope over your head from behind qusing your wrists.
- Pull your foot backwards slightly when you lift it and swing the rope under your feet in the striding position.
- Repeat this exercise 10 - 15 times for 3 sets and then place the other foot forwards.
Important: During the exercise ensure that your body is tensed and avoid jumping too high. Swing the rope using wrist movements only. Cushion the landings of your feet on the floor by bending your knees slightly.
Two-legged slalom (figure J)
Starting position
-
Stand with your feet hip-width apart and your knees slightly bent. The rope is behind your feet.
-
Hold your arms at an angle and your elbows close to your body.
End position
- Tense your arm and stomach muscles.
- Simultaneously swing the rope forwards over your head using your wrists and jump up slightly in order to allow the rope to pass under your feet.
- When you land place your feet first to one side and on the next jump to the other side so that you are jumping from side to side.
- Repeat this exercise 10 - 15 times for three sets.
Important: During the exercise ensure that your body is tensed and avoid jumping too high. Swing the rope using wrist movements only. Cushion the landings of your feet on the floor by bending your knees slightly.
Single-leg jumps (figure K)
Starting position
- Stand with your feet hip-width apart and your knees slightly bent. The rope is behind your feet.
- Hold your arms at an angle and your elbows close to your body.
End position
- Tense your arm and stomach muscles.
- Simultaneously swing the rope forwards over your head and jump up on one leg in order to allow the rope to pass under your feet. Pull the other, non-jumping leg up behind you at an angle.
- Change the jumping leg on each jump and repeat this exercise 10 - 15 times for 3 sets.
Important: During the exercise ensure that your body is tensed and avoid jumping too high. Swing the rope using wrist movements only. Cushion the landings of your feet on the floor by bending your knees slightly.
Crossing the rope (figure L)
Starting position
-
Stand with your feet hip-width apart and your knees slightly bent. The rope is behind your feet.
-
Hold your arms crossed over in front of your body and slightly angled. Hold the article handles as shown on the illustration and your elbows close to your body.
End position
- Tense your arm and stomach muscles.
- Simultaneously swing the rope forwards over your head and jump with your feet pulled far back and together or jump up with your legs crossed in order to allow the rope to pass under your feet.
- Repeat this exercise 10 - 15 times for 3 sets.
Important: Ensure that your body is tensed during the exercise. Swing the rope using wrist movements only. Cushion the landings of your feet on the floor by bending your knees slightly.
Double swing (figure M)
Starting position
- Stand with your feet hip-width apart and your knees slightly bent. The rope is behind your feet.
- Hold your arms at an angle and your elbows close to your body.
End position
- Tense your arm and stomach muscles.
-
Simultaneously swing the rope forwards quickly over your head, pull your knees up and jump a long way up in order to allow the rope to pass under your feet twice.
-
Repeat this exercise 10 - 15 times for 3 sets.
Important: Ensure that your body is tensed during the exercise and jump high in order to be able to swing the rope twice around your body on one jump. Swing the rope using wrist movements only. Cushion the landings of your feet on the floor by bending your knees slightly.
Crouched jump (figure N)
Starting position
- Stand with your feet hip-width apart and your knees slightly bent and crouch down. The rope is behind your feet.
- Hold your arms at an angle and your elbows close to your body.
End position
- Tense your arm and stomach muscles.
-
Simultaneously swing the rope forwards over your head and jump up from the crouched position and pull your knees up at the same time to allow the rope to pass under your feet.
-
Repeat this exercise 10 - 15 times for 3 sets.
Important: During the exercise ensure that your body is tensed and avoid jumping too high. Swing the rope using wrist movements only. Cushion the landings of your feet on the floor by bending your knees slightly.
Stretching
Take sufficient time after each training session to stretch. The following illustrates some simple exercises for this purpose.
You should carry out the relevant exercises 3 times on each side for 30-40 seconds.
Neck muscles
- Stand in a relaxed position. Pull your head gently to one side with one hand, first to the left and then to the right. This exercise stretches the sides of your neck.
Arms and shoulders
- Stand up straight with your knees slightly bent.
- Bend your right arm behind your head until your right hand is between your shoulder blades.
- Hold your right elbow with your left hand and pull it backwards.
- Change sides and repeat the exercise.
Care and storage
Store the article out of the reach of children. Roll the rope up when you are not using it. Never hang the rope on a hook or similar and do not bend the rope.
This could lead to permanent deformation of the rope. Clean the skipping rope set regularly, preferably after each use. Use a damp cloth and a suitable cleaning agent to clean it. Never use aggressive cleaning agents or solvents to clean the article. Then dry the set using a dry cloth.
Store the set in a dry place at room temperature.
After training
- Release the rope clamps from the skipping rope on each side.
- Release the screws at the end of the handles.
- Pull the rope out of the handles.
- Roll the rope up and store all the components of the set in the bag.
Notes on disposal
Please dispose of the packaging and the article in an environmentally friendly manner according to type. Dispose of the article through an authorised disposal operation or via your municipal administration. Follow the current, valid regulations.
Devices that are marked with this symbol may not be disposed of in domestic waste.
You are obliged to dispose of this kind of used electrical and electronic device separately. Please ask your municipality about the available regulated disposal methods. Remove the batteries from the article before disposing of it.
Disposal methods for batteries

Please note: Batteries are hazardous waste that may not be disposed of in domestic waste by law. You can hand over used batteries free of charge at municipal collection points or at retail outlets. Special collection containers are available there for this purpose.
3-year warranty
The product was produced with great care and under constant supervision. You receive a three-year warranty for this product from the date of purchase. Please retain your receipt.
The warranty applies only to material and workmanship and does not apply to misuse or improper handling. Your statutory rights, especially the warranty rights, are not affected by this warranty.
With regard to complaints, please contact the following service hotline or contact us by e-mail.
Our service employees will advise as to the subsequent procedure as quickly as possible.
We will be personally available to discuss the situation with you.
Any repairs under the warranty, statutory guarantees or through goodwill do not extend the warranty period. This also applies to replaced and repaired parts.
Repairs after the warranty are subject to a charge.
IAN 279806
GB Service Great Britain
Tel.: 0871 5000 720
(£ 0.10/Min.)
E-Mail: deltasport@lidl.co.uk
You can also find spare parts for your product at: www.delta-sport.com, category Service - Lidl Spare Parts Service
DELTA-SPORT HANDELSKONTOR GMBH
Wragekamp 6 • D-22397 Hamburg
Version: 11/2016
- SPRINGSEIL-SET
- SET CORDA PER SALTARE
- SET DE CORDE À SAUTER
- SKIPPING ROPE SET
- DE AT CH
- Carefully read the following instructions for use.
- Scope of delivery (figure A)
- Technical data
- Correct use
- Safety notes
- Risk of injury!
- Special care – sk of injury for children!
- Warning notes for batteries!
- Risks from wear
- Assembly (figure B)
- Correct rope length
- Inserting the handle weights (figure C)
- Countdown timer
- Setting the countdown timer
- Attaching the countdown timer
- Changing the battery (figure E) CAUTION! Adhere to the following instructions in order to avoid mechanical and electrical damage.
- General training notes
- Training process
- Warming up
- Neck muscles
- Arms and shoulders
- Important: Don't forget to continue breathing steadily throughout!
- Suggested exercises
- Basic position
- Basic jump walking/running (figure G)
- Starting position
- End position
- Basic jump with both legs (figure H)
- Stride jump (figure I)
- Two-legged slalom (figure J)
- Single-leg jumps (figure K)
- Crossing the rope (figure L)
- Double swing (figure M)
- Crouched jump (figure N)
- Stretching
- Care and storage
- After training
- Notes on disposal
- Disposal methods for batteries
- 3-year warranty
Brand : CRIVIT
Model : IAN 279806
Category : Uncategorized