
the Fast Slow Pro BPR700 - Slow cooker SAGE - Free user manual and instructions
Find the device manual for free the Fast Slow Pro BPR700 SAGE in PDF.


| Product Type | Multifunctional electric slow cooker with pressure cooker |
| Brand | Sage |
| Model | the Fast Slow Pro BPR700 / SPR700 |
| Nominal Capacity | 6 litres |
| Usable Capacity | 4 litres |
| Operating Pressure | 80 kPa |
| Power Supply | 220-240 V ~, 50/60 Hz |
| Dimensions (approx.) | 35.5 x 30.5 x 31 cm |
| Weight (approx.) | 7.0 kg |
| Main Functions | Pressure cooking, slow cooking, reducing, searing, sautéing, steaming |
| Display | Interactive LCD with backlight |
| Altitude Adjustment | Yes, from 250 to 1999 m |
| Steam Release | Automatic (quick, intermittent, natural) and manual |
| Keep Warm | Yes, up to 2 hours |
| Inner Pot | Removable with ceramic coating, dishwasher safe |
| Lid | Removable, reversible sealing gasket, dishwasher safe |
| Included Accessories | Stainless steel steamer basket, stainless steel trivet, water collection cup |
| Safety Features | Pressure release valve, safety valve, safety pin, lid lock, automatic shut-off |
| Maintenance and Cleaning | Pot and lid dishwasher safe; gasket and valve to be cleaned manually |
| Warranty | 2 years limited |
| Country of Manufacture | China (indicated on label) |
Frequently Asked Questions - the Fast Slow Pro BPR700 SAGE
User questions about the Fast Slow Pro BPR700 SAGE
0 question about this device. Answer the ones you know or ask your own.
Ask a new question about this device
Download the instructions for your Slow cooker in PDF format for free! Find your manual the Fast Slow Pro BPR700 - SAGE and take your electronic device back in hand. On this page are published all the documents necessary for the use of your device. the Fast Slow Pro BPR700 by SAGE.
USER MANUAL the Fast Slow Pro BPR700 SAGE
natural_image
Exterior view of a modern BOC rice cooker with digital display and control buttons (no visible text or symbols)EN QUICK GUIDE
DE KURZANLEITUNG
FR GUIDE RAPIDE
NL SNELSTARTGIDS
IT GUIDA RAPIDA
ES GUÍA RÁPIDA
PT MANUAL RÁPIDO
Sage®

Contents
2 Sage® Recommends Safety First
7 Components
9 Important Safety Information For Your Fast Slow Pro™
11 Functions
17 Care & Cleaning
19 Troubleshooting
20 Guarantee
SAGE® RECOMMENDS SAFETY FIRST
At Sage® we are very safety conscious. We design and manufacture consumer products with the safety of you, our valued customer, foremost in mind. In addition we ask that you exercise a degree of care when using any electrical appliance and adhere to the following precautions.
IMPORTANT SAFEGUARDS
READ ALL INSTRUCTIONS BEFORE USE AND SAVE FOR FUTURE REFERENCE
- A downloadable version of this document is also available at sageappliances.com
- Do not let children near the pressure cooker when in use.
- Do not put the pressure cooker into a heated oven.
- Move the pressure cooker under pressure with the greatest care. Do not touch hot surfaces. Use the handles and knobs. If necessary, use protection.
- Do not use the pressure cooker for a purpose other than the one for which it is intended.
- This appliance cooks under pressure. Scalds may result from inappropriate use of the pressure cooker. Make sure that the cooker is properly closed before applying heat. See “Pressure Cook” instructions in this book.
- Never force open the pressure cooker. Do not open before making sure that its internal pressure has completely dropped. See the “Steam Release” instructions in this book.
- Never use your pressure cooker without adding water, this would seriously damage it.
- Do not fill the cooker beyond 23 of its capacity. When cooking foodstuffs which expand during cooking, such as rice or dehydrated vegetables, do not fill the cooker to more than half of its capacity.
- The heating source necessary for cooking is included in the appliance.
• After cooking meat with a skin (e.g. ox tongue) which may swell under the effect of pressure, do not prick the meat while the skin is swollen; you might be scalded.
- When cooking food with thick or doughy texture, after steam release, gently shake the cooker. Then steam release again if necessary before opening the lid to avoid food ejection.
- Before each use, check that the valves are not obstructed. See the Instructions for use.
- Never use the pressure cooker in its pressurised mode for deep or shallow frying of food.
- Do not tamper with any of the safety systems beyond the maintenance instructions specified in the instructions for use.
- Only use Sage® spare parts in accordance with the relevant model. In particular, use a body and a lid from Sage® indicated as being compatible.
- Before using for the first time please ensure that your electricity supply is the same as shown on the rating label on the underside of the appliance. If you have any concerns please contact your local electricity company.
- Remove and safely discard any packaging material and promotional labels before use.
- To eliminate a choking hazard for young children, remove and safely discard the protective cover fitted to the power plug of this appliance.
- Always ensure the appliance is properly assembled before use. Follow the instructions provided in this book.
- Always insert the connector end of the power cord into the appliance inlet before inserting power plug into the power outlet and switching on appliance. Ensure the appliance inlet is completely dry before inserting the connector end of the power cord.
• Take care to avoid spillage on the connector. - Do not touch hot surfaces. Appliance surfaces are hot during and after operation. To prevent burns or personal injury, always use protective hot pads or insulated oven mitts, or use handles or knobs where available.
- Do not place the appliance near the edge of a bench or table during operation. Ensure that the surface is dry, level, clean and free of any liquid and other substances.
- Always operate the appliance on a stable and heat resistant surface. Do not use on a cloth-covered surface, and position the appliance at a minimum
distance of 20cm away from walls, curtains, cloths and other heat sensitive materials.
- Do not place this appliance on or near a hot gas or electric burner, or where it could touch a heated oven.
- Do not operate the appliance on a sink drain board.
- Do not place the cooker on a stone bench top when it's cooking. This is due to bench tops being sensitive to uneven heat and may crack if heated locally. If you would like to cook with the slow cooker on the bench top, place a chopping board or heat proof mat underneath the cooker.
- Do not place anything, other than lid, on top of the cooker when assembled, when in use and when stored.
- Do not use the lid handle to carry the appliance.
- Before placing removable cooking bowl into stainless steel base ensure the base of bowl and the base of the appliance is dry by wiping with a dry soft cloth.
- Do not use a damaged removable cooking bowl. Replace before using.
-
Do not place food or liquid directly into the stainless steel base. Only the removable cooking bowl is designed to contain food or liquid.
-
Before use, always check pressure release valve and safety locking pin for clogging and clean if necessary. Check to make sure the safety locking pin moves freely from under the lid.
- Do not touch the pressure release valve whilst in use.
- Use only recommended STEAM RELEASE to depressurise cooker after use.
- Do not use harsh abrasives, caustic cleaners or oven cleaners when cleaning this appliance. Keep the appliance clean and refer to care and cleaning section.
- Do not leave the appliance unattended when in use.
IMPORTANT SAFEGUARDS FOR ALL ELECTRICAL APPLIANCES
- Do not use this appliance if it is worn, has been dropped or is damaged in any way.
- Unwind the power cord fully before use.
- Do not let the power cord hang over the edge of a bench or table, touch hot surfaces or become knotted.
- Connect only to a 220–240V power outlet.
• Always turn the appliance to the OFF position, switch off at the power outlet, remove the plug and allow all parts to cool before attempting to move the
appliance, when the appliance is not in use, before cleaning and when storing.
- The appliance can be used by children aged from 8 years and above and persons with reduced physical, sensory or mental capabilities, or lack of experience and knowledge, if they have been given supervision or instruction concerning use of the appliance in a safe way and understand the hazards involved.
• Children shall not play with the appliance. - Cleaning and user maintenance shall not be made by children unless they are older than 8 and supervised.
- Keep the appliance and its cord out of reach of children less than 8 years.
- It is recommended to regularly inspect the appliance. Do not use the appliance if power cord, power plug or appliance becomes damaged in any way. If damaged or maintenance other than cleaning is required please contact Sage Customer Service or go to sageappliances.com
- The use of attachments not sold or recommended by Sage® may cause fire, electric shock or injury.
- This appliance is for household use only. Do not use this
appliance for other than its intended use. Do not use in moving vehicles or boats. Do not use outdoors. Misuse may cause injury.
- The appliance is not intended to be operated by means of an external timer or separate remote control system.
- The installation of a residual current device (safety switch) is recommended to provide additional safety protection when using electrical appliances. It is advisable that a safety switch with a rated residual operating current not exceeding 30mA be installed in the electrical circuit supplying the appliance. See your electrician for professional advice.
SPECIFICATION
| Model | SPR700 |
| Rated Volume | 6 Litres |
| Usable Volume | 4 Litres |
| Working Pressure | 80 kPa |
These specifications may change without notice.

The symbol shown indicates that this appliance should not be disposed of in normal household waste.
It should be taken to a local authority waste collection centre designated for this purpose or to a dealer providing this service. For more information, please contact your local council office.

To protect against electric shock, do not immerse the power cord, power plug or appliance in water or any other liquid.
SAVE THESE INSTRUCTIONS

Components
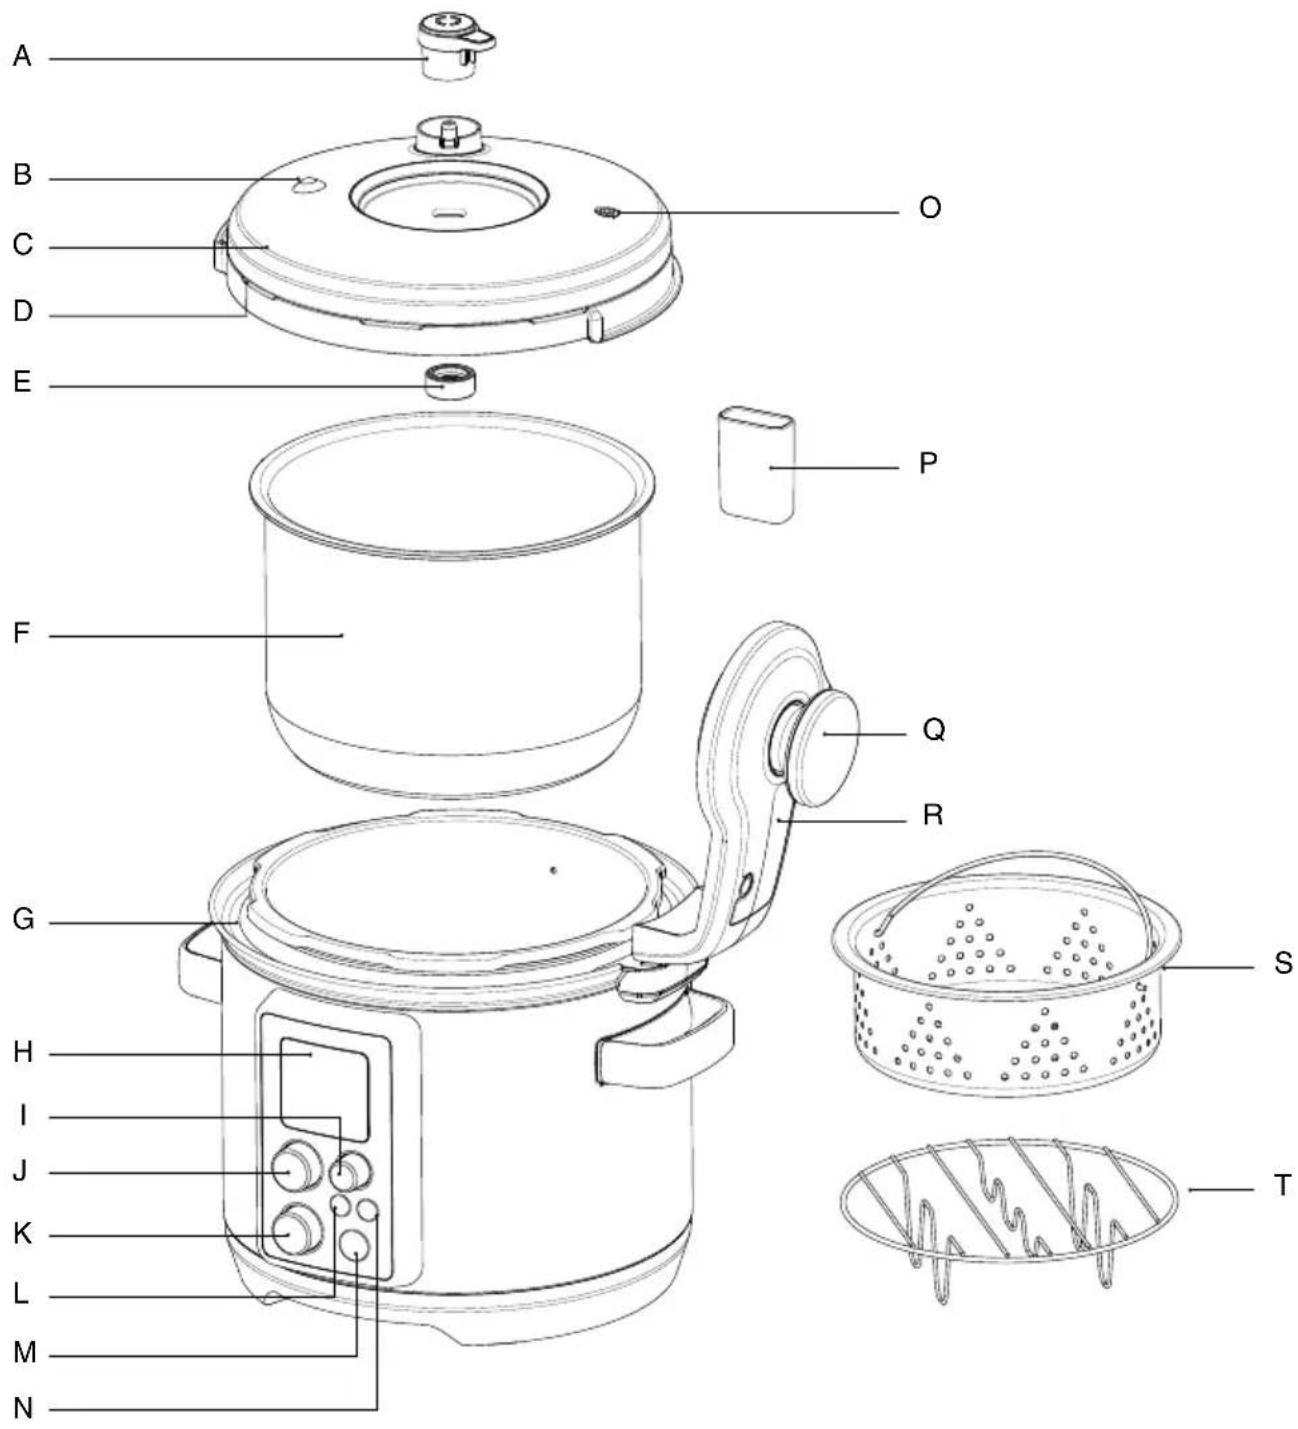
A. Pressure Release Valve
B. Pressure Safety Valve
C. Dishwasher Safe Removable Lid
D. Silicone Lid Seal
E. SealingNut
F. 6L Cooking Bowl
G. Easy Clean Moat
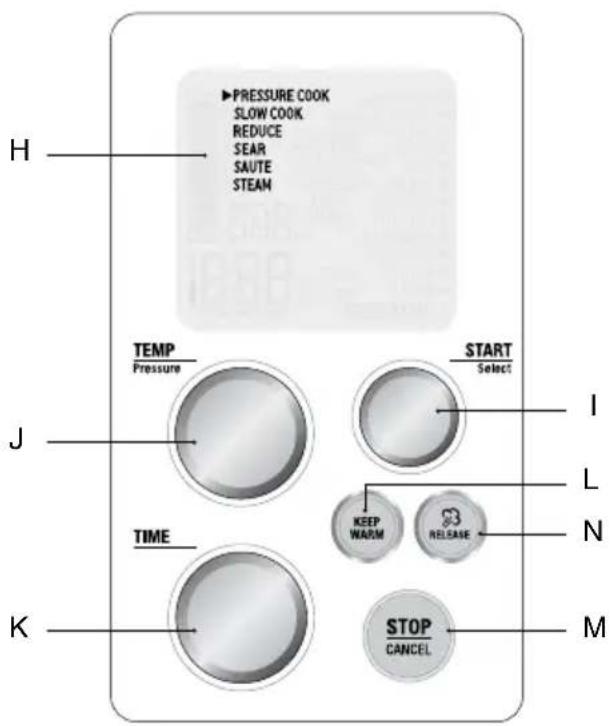
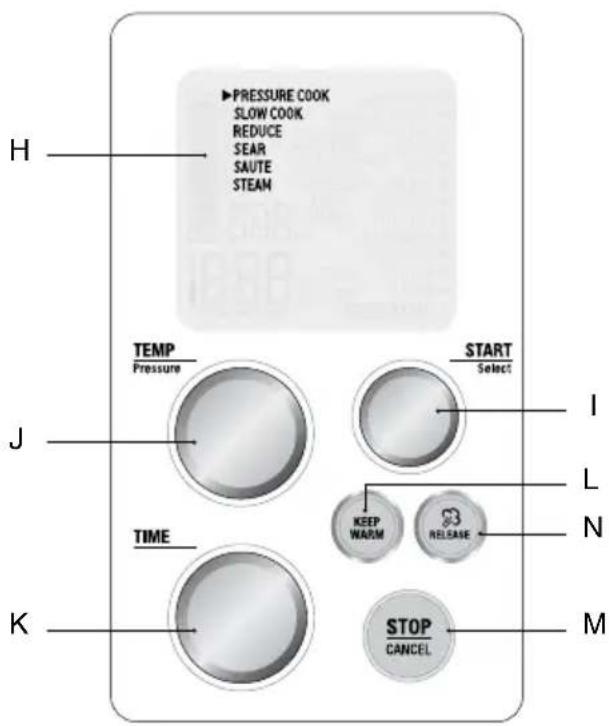
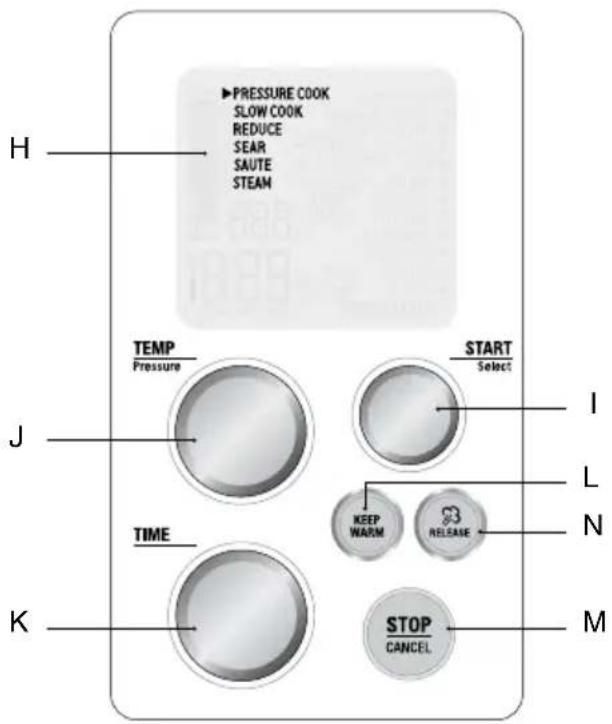
H. InteractiveLCD
I. Start/Select Dial
J. Temperature/ Pressure Dial
K. TimeDial
L. KeepWarm
M. Stop/Cancel
N. SteamRelease
O. Safety Locking Pin
P. Condensation Drip Cup
Q. Lid Knob
R. LidArm
S. StainlessSteamer
T. StainlessTrivet
IMPORTANT SAFETY INFORMATION FOR YOUR FAST SLOW PRO™
This appliance cooks under pressure and must be operated and maintained as described in this book. The trapped air pressure inside the pressure cooker may cause a hazardous situation if not operated and maintained as described in this manual.
• Always ensure proper liquid / food level in the removable cooking bowl.
- 'MAX' level – Do not exceed the maximum fill level. Overfilling may cause personal injury or property damage or affect the safe use of the cooker.
- 12 level – When cooking foods that expand (such as dried vegetables, beans, grains, rice, etc.) DO NOT fill past the middle fill level.
- 'MIN' level – Make sure the removable cooking bowl is filled to at least the minimum fill level to ensure proper operation and to avoid thermal damage and fire.
NEVER FORCE THE LID CLOSED.
CLOSING THE LID
- Make sure the silicone lid seal is properly inserted around the wire ring on the underside of the lid and that the safety locking pin moves freely.
- Lower the lid into the closed position. Turn the lid knob clockwise towards the closed lock graphic. The lid should close and lock into place with ease and minimal effort. DO NOT STRAIN OR FORCE THE LID TO CLOSE. The cooker alert will sound when the lid locks.

- Always ensure the safety locking pin is properly aligned within the opening of the lid arm and is not restricted in any way.
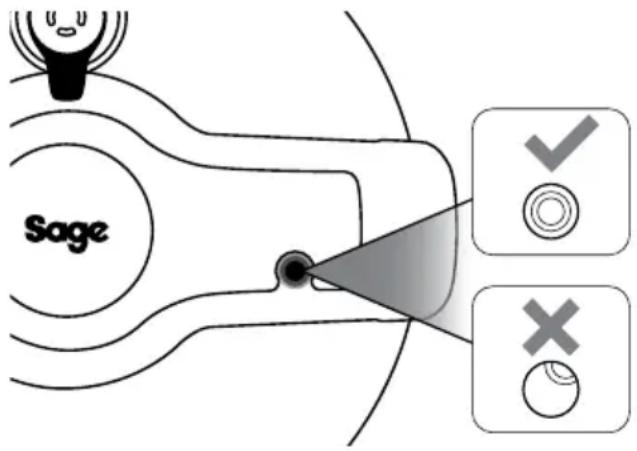

NOTE
If the contents of the cooker are hot when closing the lid, it may be necessary to press down slightly on the lid knob while the lid is still in the unlocked position, allowing the lid to turn easily.
HANDS-FREE STEAM RELEASE
The cooker features automatic hands-free steam release that will occasionally release steam as the cooker pressurises as well as automatically start the steam release cycle after cooking.
- Never place your hands, arms or face over the pressure release valve.
In addition to the automatic hands-free steam release, pressure can be released by pressing the RELEASE button or by manually turning the pressure release valve.
OPENING THE LID
- Turn the lid knob counter-clockwise towards the open lock graphic. The cooker alert will sound when the lid unlocks.
- The lid should open with ease if all internal pressure has been released. Never force the lid open.
- If the lid will not unlock, or if you encounter resistance, it may indicate the cooker is still pressurised. Press and hold the RELEASE button until all internal pressure is released and the lid opens easily.
NEVER FORCE THE LID OPEN.
PREPARING THE FAST SLOW PRO™
- Remove and safety discard any packaging material, promotional labels and tape from the cooker.
- Open the lid by turning the lid knob counter clockwise and lifting the lid up and off the appliance until it is in the hinged open position. Unscrew and remove the sealing nut from the centre of the lid and pull the lid away to remove from the lid arm.
- Wash the lid, removable cooking bowl and silicone lid seal in hot, soapy water, then rinse and dry thoroughly. Wipe the inside and outside of the cooker base with a soft, damp cloth and dry thoroughly.
- The silicone lid seal is reversible and can be inserted in either direction. Insert the silicone lid seal around the outer edge of the wire ring on the underside of the lid. Ensure that it is fully inserted and lies flat under the wire ring.

natural_image
Technical line drawing of a mechanical component with a curved handle and internal components (no text or symbols)
natural_image
Technical diagram of a mechanical component with a nut and curved base (no text or symbols)- The lid can only be inserted one way and must be assembled correctly for the cooker to operate. Position the lid so the steam release valve cover is to the rear of the cooker (Image A). Align the centre of the lid with the bolt on the underside of the lid arm (Image B) and push it into position to expose the screw thread. Screw the sealing nut, with the red ring touching the lid, onto the bolt to secure the lid. Once assembled, ensure the steam release valve is properly seated in position and facing the lid knob.

Image A

natural_image
Simple diagram of concentric circles with a central dot, no text or symbols presentImage B
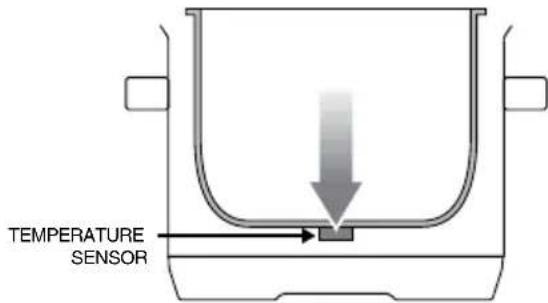
- Clean and dry the underside of the removable cooking bowl and the temperature sensor, making sure there are no unwanted materials on the surface. The removable cooking bowl must sit flat on the temperature sensor to ensure proper contact.
- Click condensation drip cup into place.

natural_image
Line drawing of a cylindrical container with lid and side ports (no text or symbols)
natural_image
Line drawing of a cooking pot with lid and side compartments (no text or symbols)-
Insert the connector end of the power cord into the cooker base, ensuring it is completely dry. Insert the power plug in to a 220–240V (grounded) power outlet.
-
The cooker alert will sound and the LCD will illuminate. The setting options will appear with an indicator on the PRESSURE COOK setting.

Functions
SMART SETTINGS
The Fast Slow Pro™ features 6 Smart Settings; Pressure Cook, Slow Cook, Reduce, Sear, Sauté and Steam. Pressure and slow cook settings have a list of commonly used food types with pre-determined cook times and temperatures / pressure levels to give the best results, however we suggest experimenting with these depending on the recipe, amount of food and your personal taste. Alternatively, you can select the CUSTOM setting to select your own cooking times and temperatures/ pressure levels.
Your CUSTOM setting will remain in the memory of the cooker. To reset to factory settings, switch off at the power outlet and press and hold START / SELECT while switching back on at the power outlet.
HANDS-FREE VARIABLE STEAM RELEASE
The Fast Slow Pro™ features 3 steam release methods:
Auto Quick
Pressure is released quickly to minimise overcooking of foods or recipes with short cook times.
Auto Pulse
Pressure is released in bursts to reduce disturbance to the food inside.
Natural
Pressure naturally subsides inside without releasing steam through the vent to prevent the churning up or breaking apart of sensitive ingredients like stocks and beans during pressure release.
These can be selected using the STEAM RELEASE button on the control panel during the set up and steam release cycles. Once selected, the pressure release valve will automatically release the steam at the end of the pressure cooking cycle.
Pressing and holding the steam release button during or after a cooking cycle will open the pressure release valve.


CAUTION
Always keep hands and face clear of the pressure release valve when pressure cooking as hot steam and water may be emitted during operation.
ALTITUDE ADJUST
Pressure builds and increases when the temperature inside the cooking vessel exceeds boiling point. As altitude increases, the temperature at which water boils decreases as a result of the drop in air pressure. This creates very different conditions for cooking when using a pressure cooker.
In order to maintain consistent cooking results at various altitudes, the Fast Slow Pro ™ has an Altitude Adjust feature that adjusts the settings based on the altitude of your current location.
- To enter Altitude Adjust mode, press and hold STOP/CANCEL to activate standby mode. The button backlight will go out and the LCD will no longer illuminate.
- Once in standby, press and hold both the KEEP WARM and STEAM RELEASE buttons for 2 seconds.
- Turn the TIME dial to enter the altitude of your current location. Altitude can be adjusted from 250m to 1,999m. The pressure cooker should not be used at altitudes above 2,000m.
- Press the START / SELECT dial to confirm.
- The cooker's settings have now been adjusted for your current altitude. To reset altitude to sea level (factory settings), switch off at the power outlet and press and hold START / SELECT while switching back on at the power outlet.
PRESSURE COOK
- Turn the START / SELECT dial until the indicator reaches the PRESSURE COOK setting. Press the START / SELECT dial to confirm.
- Turn the START / SELECT dial until the indicator on the right hand side of the LCD reaches the desired setting.
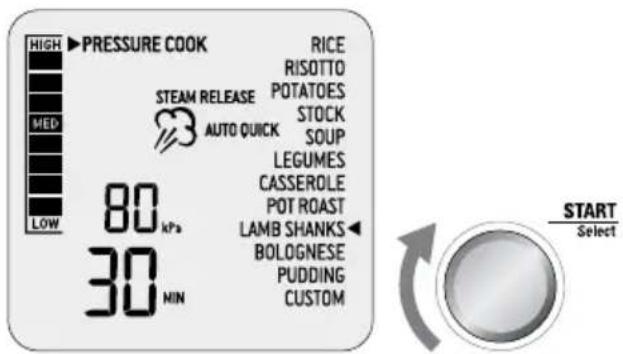
- The top figure on the LCD screen indicates the preset pressure level for the selected setting. Turn the TEMPERATURE / PRESSURE dial to the left to reduce the pressure or to the right to increase pressure. Pressure can be adjusted from 20 kPa (LOW) to 80 kPa (HIGH).
- The bottom figure on the LCD screen indicates the preset cooking time for the selected setting. Turn the TIME dial to the left to reduce the cooking time or to the right to increase the cooking time. Time can be adjusted up to 2 hours.
- The steam icon on the LCD screen indicates the preset steam release method for the selected setting. Press the STEAM RELEASE button to select between 'AUTO QUICK', 'AUTO PULSE' and 'NATURAL' steam release.
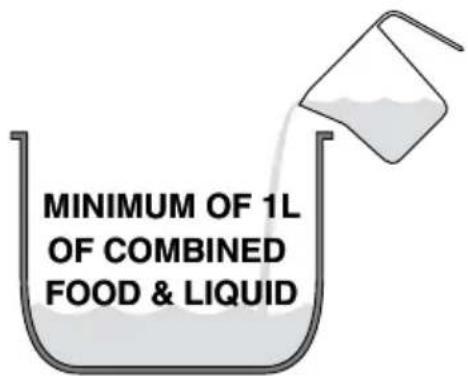
- Place food into the removable cooking bowl. Ensure there is at least 1L of combined food and liquid in the bowl.

- Close the lid and turn the lid knob clockwise to lock into place. The cooker alert will sound when the lid has been locked. Check that the safety locking pin is properly aligned with the opening in the lid arm and is not restricted in any way.
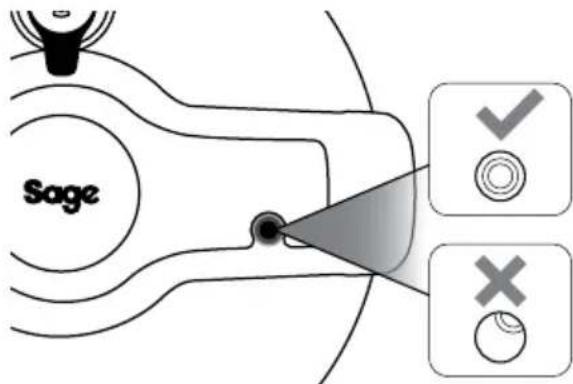
- Ensure the pressure release valve is placed on the lid, is properly seated in position and facing the lid knob.

- Press the START / SELECT dial to commence cooking. The STOP / CANCEL button backlight will illuminate red, the LCD screen will illuminate orange, 'PREHEATING' will appear and the pressure bar on the left will climb to indicate the cooker is building pressure.

NOTE
It is normal for the cooker to release small bursts of steam as it stabilises its internal pressure.
-
If the lid has not been locked correctly 'LOCK LID' will appear on the LCD screen. Turn the lid knob clockwise to lock the lid and commence cooking.
-
Once the cooker has reached pressure, the 'PREHEATING' will go out, the cooker alert will sound, the timer will start counting down and the pressure bar will indicate the current pressure in the vessel.
-
The time can be adjusted during the pressure cook cycle by turning the TIME dial. The cycle can be paused at any time by pressing the STOP/CANCEL button. To end the cycle press and hold STOP/CANCEL for 2 seconds. If there is already pressure in the vessel it will go immediately to the steam release cycle.
-
At the end of the pressure cook cycle, the cooker alert will sound and steam will be automatically released through the pressure release valve. The steam icon will blink, the timer will start counting up and the pressure bar will decrease, indicating the current pressure in the vessel. If NATURAL steam release is selected, pressure will naturally subside in the vessel without forcing steam through the pressure release valve. The steam release setting can be changed during the steam release cycle by pressing the STEAM RELEASE button.
-
At the end of the steam release cycle, the cooker alert will sound, the LCD will illuminate blue and the timer will start counting up.
-
Open the lid by turning the lid knob counter clockwise and carefully lift the lid into the hinged open position.
-
After 5 minutes of inactivity, standby mode will be activated. The button backlight will go out and the LCD will no longer illuminate.

CAUTION
To avoid scalding from escaping steam, never place your face or hands over the cooker when removing the lid.

NOTE
If the lid will not unlock this indicates the appliance is still under pressure. Do not force the lid open as any remaining pressure can be hazardous. Press the STEAM RELEASE button until all internal pressure is released and the lid opens easily.
SLOW COOK
- Turn the START / SELECT dial until the indicator reaches the SLOW COOK setting. Press the START / SELECT dial to confirm.
- Turn the START / SELECT dial until the indicator on the right hand side of the LCD reaches the desired setting.

- The top figure on the LCD screen indicates the preset temperature for the selected setting. Turn the TEMPERATURE / PRESSURE dial to the left to reduce the temperature or to the right to increase temperature. Temperature can be adjusted to one of two preset temperatures; 'LO' or 'HI.'
- The bottom figure on the LCD screen indicates the preset cooking time for the selected setting. Turn the TIME dial to the left to reduce the cooking time or to the right to increase the cooking time. Time can be adjusted between 2 and 12 hours.
- 'KEEP WARM' indicates the KEEP WARM function will automatically switch on after the SLOW COOK cycle. Press the KEEP WARM button on the control panel to select or deselect the function.
- Place food into the removable cooking bowl. Ensure there is at least 1L of combined food and liquid in the bowl.
- Close the lid but do not lock.
- Remove the pressure release valve from the lid.
- Press the START / SELECT dial to commence cooking. The STOP / CANCEL button backlight will illuminate red and the LCD screen will illuminate orange.
- The timer will be displayed and automatically begin to count down. The time can be adjusted during the slow cook cycle by turning the TIME dial. The cycle can be paused at any time by pressing the STOP / CANCEL button. To end the cycle press and hold STOP / CANCEL for 2 seconds.
- At the end of the slow cook cycle, the cooker will automatically switch to the KEEP WARM function. The LCD screen will display 'KEEP WARM' and the timer will start counting up to a maximum of 2 hours. The keep warm cycle can be paused at any time by pressing the STOP / CANCEL button.
- If KEEP WARM has not been selected, the cooker alert will sound, the STOP/CANCEL button backlight will go out and the LCD screen will illuminate blue.
- After 5 minutes of inactivity, standby mode will be activated. The button backlight will go out and the LCD will no longer illuminate.
REDUCE
The REDUCE setting is ideal for thickening and intensifying the flavour of sauces, syrups and stocks.
- Turn the START / SELECT dial until the indicator reaches the REDUCE setting. Press the START / SELECT dial to confirm.
- The top figure on the LCD screen indicates the preset temperature for the REDUCE setting. Turn the TEMPERATURE / PRESSURE dial to the left to reduce the temperature or to the right to increase temperature. Temperature can be adjusted to one of three preset temperatures; 'LO', 'MED' or 'HI.'
- The bottom figure on the LCD screen indicates the preset cooking time for the REDUCE setting. Turn the TIME dial to the left to reduce the cooking time or to the right to increase the cooking time. Time can be adjusted up to 2 hours.
- Place liquid to be reduced into the removable bowl.

NOTE
If reducing cooking sauce from pressure and slow cooking, remove cooked meat or vegetables.
Once sauce has reached the correct consistency and flavour, return meat and allow to warm through for a few minutes before serving.
- Press the START / SELECT dial to commence cooking. The STOP / CANCEL button backlight will illuminate red, the LCD screen will illuminate orange and indicate 'PREHEATING.'
- Keep the lid open in the hinged position. If the lid has not been opened the cooker alert will sound and 'OPEN LID' will appear on the LCD screen.
- Once the cooker has reached temperature, 'PREHEATING' will go out. Place liquid to be reduced into the removable cooking bowl.
- The timer will start counting down. The time can be adjusted during the reduce cycle by turning the TIME dial. The cycle can be paused at any time by pressing the STOP / CANCEL button. To end the cycle press and hold STOP / CANCEL for 2 seconds.
- At the end of the reduce cycle, the cooker alert will sound, the STOP / CANCEL button backlight will go out and the LCD screen will illuminate blue.
- After 5 minutes of inactivity, standby mode will be activated. The button backlight will go out and the LCD will no longer illuminate.
SEAR
The SEAR setting is designed to enhance and deepen the taste of meals by using the same cooking bowl for caramelising and browning foods before pressure or slow cooking.
- Turn the START / SELECT dial until the indicator reaches the SEAR setting. Press the START / SELECT dial to confirm.
- The STOP / CANCEL button backlight will illuminate red, the LCD screen will illuminate orange and indicate 'PREHEATING.'
- Keep the lid open in the hinged position. If the lid has not been opened the cooker alert will sound and 'OPEN LID' will appear on the LCD screen.
-
Once the cooker has reached temperature, 'PREHEATING' will go out. Place food to be cooked into the removable cooking bowl.
-
The timer will start counting up to a maximum of 45 minutes. The cycle can be paused at any time by pressing the STOP / CANCEL button. To end the cycle press and hold STOP / CANCEL for 2 seconds.
- At the end of the sear cycle, the cooker alert will sound, the STOP / CANCEL button backlight will go out and the LCD screen will illuminate blue.
- After 5 minutes of inactivity, standby mode will be activated. The button backlight will go out and the LCD will no longer illuminate.
SAUTÉ
The SAUTÉ setting is ideal for softening and caramelising garlic, onions and smaller pieces of food prior to pressure or slow cooking.
- Turn the START / SELECT dial until the indicator reaches the SAUTÉ setting. Press the START / SELECT dial to confirm.
- The top figure on the LCD screen indicates the preset temperature for the SAUTÉ setting. Turn the TEMPERATURE / PRESSURE dial to the left to reduce the temperature or to the right to increase temperature. Temperature can be adjusted to one of three preset temperatures; 'LO', 'MED' or 'HI.'
- Press the START / SELECT dial to commence cooking. The STOP / CANCEL button backlight will illuminate red, the LCD screen will illuminate orange and indicate 'PREHEATING.'
- Keep the lid open in the hinged position. If the lid has not been opened the cooker alert will sound and 'OPEN LID' will appear on the LCD screen.
- Once the cooker has reached temperature, 'PREHEATING' will go out. Place food to be cooked into the removable cooking bowl.
- The timer will start counting up. The cycle can be paused at any time by pressing the STOP / CANCEL button. To end the cycle press and hold STOP / CANCEL for 2 seconds.
- At the end of the sauté cycle, the cooker alert will sound, the STOP / CANCEL button backlight will go out and the LCD screen will illuminate blue.
- After 5 minutes of inactivity, standby mode will be activated. The button backlight will go out and the LCD will no longer illuminate.
STEAM
The STEAM setting is ideal for steaming vegetables, fish fillets, dumplings and reheating dinner plates.
- Turn the START / SELECT dial until the indicator reaches the STEAM setting. Press the START / SELECT dial to confirm.
- The bottom figure on the LCD screen indicates the preset cooking time for the STEAM setting. Turn the TIME dial to the left to reduce the cooking time or to the right to increase the cooking time. Time can be adjusted up to 1 hour.
- Fill the removable cooking bowl with water to the MIN level marking. During steaming, please check the water level and add water when needed.
- Insert the trivet into the bowl and place the steaming basket on top. If reheating dinner plates, place the plate on top of the trivet.
- Arrange food on the steamer allowing 1cm gaps between the food so the steam can flow evenly around all sides.
- Close the lid but do not lock.
- Remove the pressure release valve from the lid.
- Press the START / SELECT dial to commence cooking. The STOP / CANCEL button backlight will illuminate red, the LCD screen will illuminate orange and indicate 'PREHEATING.'
- Once the cooker has reached temperature, 'PREHEATING' will go out.
- The timer will start counting up to a maximum of 45 minutes. The time can be adjusted during the steam cycle by turning the TIME dial. The cycle can be paused at any time by pressing the STOP / CANCEL button. To end the cycle press and hold STOP / CANCEL for 2 seconds.
- At the end of the steam cycle, the cooker alert will sound, the STOP / CANCEL button backlight will go out and the LCD screen will illuminate blue.
- If further steaming is required, check water levels and refill as required.
- After 5 minutes of inactivity, standby mode will be activated. The button backlight will go out and the LCD will no longer illuminate.

Care & Cleaning
The cooker bowl, outer body, lid and accessories should be thoroughly cleaned before every use.
Before cleaning, ensure the cooker is turned off by pressing and holding the STOP / CANCEL button on the control panel. The cooker is off when the button backlight is no longer illuminated.
Remove the power plug from the power outlet and remove the connector end of the power cord from the cooker base. Allow the cooker and all accessories to cool completely before disassembling and cleaning.
CLEANING THE BOWL AND OUTER BODY
-
The removable cooking bowl can be washed in the dishwasher. However, to maintain the ceramic coating, it is recommended to wash the cooking bowl in warm soapy water using a mild household detergent. Rinse with clean water and dry thoroughly.
-
Wipe the moat and outer body with a soft, damp sponge. A non-abrasive liquid cleanser or mild spray solution may be used to avoid build-up of stains. Apply the cleanser to the sponge, not the cooker surface, before cleaning.
-
Remove condensation drip cup by gently pulling the bottom away from the body. Wash in warm soapy water, rinse with clean water, dry thoroughly and click back into position.
-
Wipe the LCD screen with a soft damp cloth. Cleaning with dry cloth or abrasive cleaners may scratch the surface.
-
Let all surfaces dry thoroughly prior to inserting the power plug into a power outlet and turning the cooker on.
CLEANING THE LID
-
Remove the pressure release valve from the lid.
-
Open the lid by turning the lid knob counter clockwise and lifting lid up and off the appliance until it is in the hinged open position. Unscrew and remove the sealing nut from the centre of the lid and pull the lid away to remove from the lid arm.
-
Gently pull the silicone lid seal out from around the wire ring on the underside of the lid.
-
Wash the sealing nut and pressure release valve in warm soapy water. Rinse with clean water and dry thoroughly.
-
Wash the silicone lid seal and the lid on the top rack of the dishwasher. Alternatively, wash in warm soapy water, rinse with clean water and dry thoroughly.
-
After cleaning the lid, regularly inspect and ensure;
a) Safety locking pin moves up and down freely. Always remove any oil or food residue left on this area.

natural_image
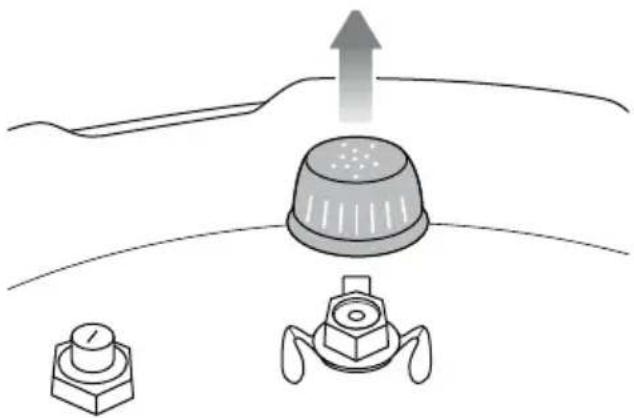
Diagram showing two curved lines with arrows pointing upward and downward to a central circular component (no text or symbols)b) Pressure release valve and cover are clean and free of food or liquid. To clean, twist and pull the pressure release valve cover off the lid, wipe with a soapy cloth, rinse and dry thoroughly. Clip cover back into its original position.
natural_image
Diagram showing a mechanical component with an upward arrow and two separate parts (no text or symbols)c) Pressure safety valve is clean and free of food or liquid. To clean, push the valve from inside so the valve sits open on the lid and remove any oil or food residue. Ensure the valve moves in and out smoothly after cleaning.

natural_image
Diagram showing a mechanical component with an arrow indicating direction, next to a circular component (no text or symbols)- Attach the clean silicone lid seal securely back around the wire ring on the underside of the lid. Adjust position if necessary so that it sits comfortably and is free from any distortions.
- To reattach the lid, orient the lid so that the steam release valve housing is to the rear of the unit, and then align the centre of the lid with the bolt on the underside of the lid arm and push into position to expose the screw thread. Secure the lid by screwing on the sealing nut so that the red seal touches the lid surface.
CLEANING THE STEAMING TRAY AND TRIVET
- Wash all accessories in warm soapy water with a soft sponge or soft plastic scouring pad. Rinse and dry thoroughly. Do not use abrasive cleansers, metal scouring pads or metal utensils to clean any of the accessories as they may damage the surfaces.
- To extend the life of your accessories, we do not recommend that these be placed in the dishwasher.

TIP
To help eliminate food odours, combine 2 cups (500ml) hot water, 12 cup (125ml) lemon juice, 1 tablespoon lemon rind and 1 tablespoon vanilla extract in the removable cooking bowl. Pressure cook at 80 kPa for 5 minutes using Natural steam release.
STORAGE
- Ensure the cooker is turned off by pressing the STOP / CANCEL button on the control panel. The cooker is off when the button backlight is no longer illuminated.
- Remove the power plug from the power outlet. Allow the cooker and all accessories to cool completely before disassembling and cleaning.
- Ensure the cooker and all accessories are clean and dry.
- Ensure the bowl is inserted into the cooker; the trivet is inserted into the steaming tray and placed inside the bowl.
- Ensure the lid is closed and in the locked position.
- Store the appliance in an upright position standing level on its support legs. Do not store anything on top.
PROBLEM EASY SOLUTION
| The lid cannot be opened at the end of the cooking cycle | Press the STEAM RELEASE button until all internal pressure is released and the cooker can be opened.Once all internal pressure has been released using the STEAM RELEASE button, turn the pressure release valve to the open position, facing away from the lid knob.If this occurs frequently, the cooker may need to be adjusted to suit your current altitude. Follow “Altitude Adjust” instructions on page 12. |
| ‘Open Lid’ is displayed on the LCD when the lid is open | Turn the lid knob clockwise and counter clockwise. |
| Steam is escaping from the lidORSafety locking pin does not riseORCooker is not getting to pressureORTimer will not count down | Assemble the lid correctly ensuring there is no gap between lid arm and the stainless steel lid. The sealing nut should be screwed on tightly. Follow step 5 on page 10.Ensure the silicone lid seal is clean, free from damage or cracks and is properly inserted. Follow step 4 on page 10.Ensure that the safety locking pin can move freely up and down. Follow step 6a on page 17.When the lid is locked, ensure the safety locking pin is properly aligned within the opening of the lid arm. See step 7, page 13.Ensure that the pressure release valve is properly seated in position and facing the lid knob. Follow step 8 on page 13.Add more liquid / food to the bowl. There should be a minimum of 1 litre combined food and liquid.If problem persists, call Sage Customer Service. |
| The cooker automatically switches to keep warm without going through a complete cooking cycle | Add more water to the cooking bowl and restart the cycle. |
| Water is collecting on the benchtop | Ensure the cooker is on a flat level surface and that the condensation drip cup is installed on the back of the cooker.Follow “Preparing the Fast Slow Prö” instructions on page 10.Empty the condensation drip cup. |

Guarantee
2 YEAR LIMITED GUARANTEE
Sage Appliances guarantees this product for domestic use in specified territories for 2 years from the date of purchase against defects caused by faulty workmanship and materials. During this guarantee period Sage Appliances will repair, replace, or refund any defective product (at the sole discretion of Sage Appliances).
All legal warranty rights under applicable national legislation will be respected and will not be impaired by our guarantee. For full terms and conditions on the guarantee, as well as instructions on how to make a claim, please visit www.sageappliances.com.

Note

Inhalte

KAPAZITÄT DES INNENTOPFS
natural_image
Technical line drawing of a mechanical component with a curved handle and central hub (no text or symbols)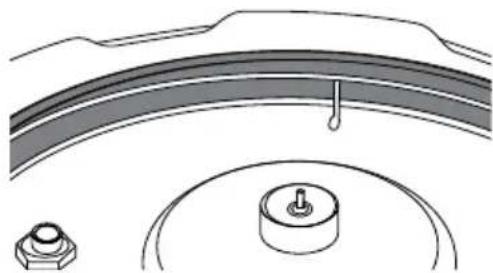
natural_image
Technical diagram of a mechanical component with a nut and curved base (no text or symbols)natural_image
Line drawing of a cooking pot with lid, side panels, and handle (no text or symbols)
natural_image
Line drawing of a cooking pot with lid and side compartments (no text or symbols)natural_image
Diagram showing two curved lines with arrows pointing upward and downward to a central circular component (no text or symbols)natural_image
Exterior view of a modern BOC rice cooker with digital display and control knobs (no visible text or symbols)FR GUIDE RAPIDE
Sage®

Table des matières
natural_image
Technical line drawing of a mechanical component with a curved handle and internal components (no text or symbols)
natural_image
Technical diagram of a mechanical component with a central hub and base (no text or symbols)natural_image
Simple diagram showing a central circular target with concentric rings, surrounded by curved lines (no text or symbols)Image B
natural_image
Line drawing of a cooking pot with lid and side ports (no text or symbols)
natural_image
Line drawing of a cooking pot with lid, side panels, and control buttons (no text or symbols)natural_image
Diagram showing two curved lines with arrows pointing upward and downward to a central knob or knob (no text or symbols)natural_image
Diagram showing a sensor or sensor device with an upward arrow and two base components (no text or symbols)natural_image
Diagram showing a mechanical component with an arrow indicating direction, no text or symbols presentnatural_image
Exterior view of a modern BOC rice cooker with digital display and control knobs (no visible text or symbols)
SNELSTARTGIDS
Sage®

Inhoud

HANDS-FREE STOOMVRIJGAVE
natural_image
Technical line drawing of a mechanical component with a curved handle and central hub (no text or symbols)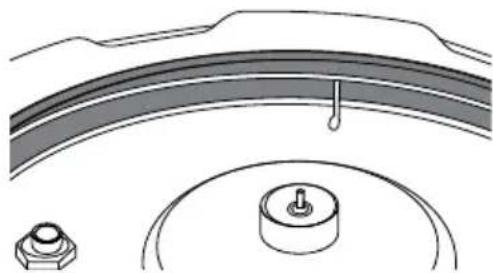
natural_image
Technical diagram of a mechanical component with a nut and curved base (no text or symbols)natural_image
Simple diagram of concentric circular patterns around a central dot, no text or symbols presentAfbeelding B
natural_image
Technical line drawings of two identical cylindrical containers with internal components and mounting brackets (no text or symbols)natural_image
Diagram showing two curved lines with arrows pointing upward and downward to a central circular component (no text or symbols)natural_image
Diagram showing a mechanical component with an upward arrow and two base components (no text or symbols)natural_image
Diagram showing a mechanical component with an arrow indicating direction, no text or symbols presentnatural_image
Exterior view of a modern Barge rice cooker with digital display and control buttons (no visible text or symbols on main body)IT
GUIDA RAPIDA
Sage®

Sommario

natural_image
Technical line drawing of a mechanical component with a curved handle and central hub (no text or symbols)
natural_image
Technical diagram of a mechanical component with a nut and curved base (no text or symbols)natural_image
Simple diagram with concentric circles and a central dot, no text or symbols presentImmagine B
natural_image
Line drawing of a cooking pot with lid, handle, and side panel (no text or symbols)
natural_image
Line drawing of a cooking pot with lid, side panels, and handle (no text or symbols)natural_image
Diagram of a mechanical component with two upward arrows and one downward arrow, no text or symbols presentnatural_image
Diagram showing a sensor or sensor device with an upward arrow and two base components (no text or symbols)natural_image
Diagram showing a mechanical component with an arrow indicating direction, no text or symbols presentnatural_image
Exterior view of a modern rice cooker with digital display and control buttons (no visible text or symbols)ES
GUÍA RÁPIDA
Sage®

Índice

natural_image
Technical line drawing of a mechanical component with a curved handle and central hub (no text or symbols)
natural_image
Technical diagram of a mechanical component with a central knob and a separate nut (no text or symbols)natural_image
Simple diagram of concentric circular shapes with a central dot, no text or symbols presentImagen B
natural_image
Line drawing of a cooking pot with lid, side panels, and handle (no text or symbols)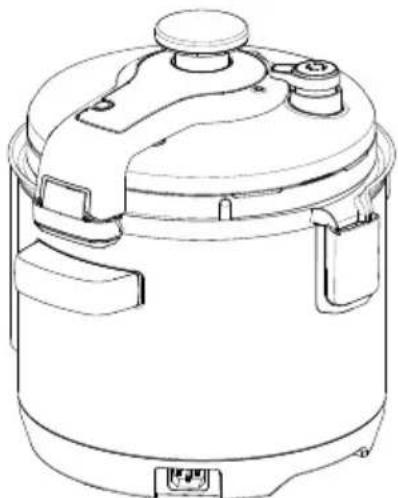
natural_image
Line drawing of a cylindrical cooking pot with lid and side compartments (no text or symbols)natural_image
Diagram showing two curved lines with arrows indicating upward and downward motion, no text or symbols presentnatural_image
Diagram showing a mechanical component with an upward arrow and two base components (no text or symbols)natural_image
Diagram showing a mechanical component with an arrow indicating upward motion, no text or symbols presentnatural_image
Exterior view of a modern Barge rice cooker with digital display and control knobs (no visible text or symbols)PT
MANUAL RÁPIDO
Sage®

Índice
natural_image
Technical diagram of a mechanical component with a curved arm and housing, showing no text or symbols.natural_image
Diagram showing concentric circular patterns around a central dark circle, labeled 'Imagem B' at the bottom (no other text or symbols)natural_image
Technical line drawings of two identical cylindrical containers with internal compartments and mounting brackets (no text or symbols)natural_image
Simple line drawing of a light bulb with a checkmark indicating approval (no text or symbols)
natural_image
Simple line drawing of a device with a circular connector and a cross symbol, no text or labels present.natural_image
Diagram showing two curved lines with arrows indicating upward and downward motion, no text or symbols presentnatural_image
Diagram showing mechanical components with arrows indicating motion or assembly (no text or symbols)www.sageappliances.com
Registered in Germany No. HRB 81309 (AG Düsseldorf).
Registered in England & Wales No. 8223512.
- Due to continued product improvement, the products illustrated or photographed in this document may vary slightly from the actual product.
- Aufgrund kontinuierlicher Produktverbesserungen kann das auf dieser Verpackung dargestellte Produkt leicht vom tatsächlichen Produktabweichen.
- En raison de son amélioration continue, le produit représenté sur cet emballage peut différer légèrement du produit réel.
- Vanwege de voortdurende verbetering van de producten kunnen de producten die in dit document
worden geïllustreerd of gefotografeerd enigszins afwijken van het daadwerkelijke product. - A causa del continuo miglioramento dei prodotti, il prodotto illustrato su questa confezione può variare leggermente rispetto al prodotto reale.
- Perfeccionamos nuestros productos continuamente, por lo que el artículo podría diferir ligeramente de la ilustración o imagen en este documento.
- Devido à melhoria contínua dos produtos, os produtos ilustrados ou fotografados neste documento podem variar ligeiramente do produto real.
Copyright BRG Appliances 2019.
BPR700/SPR700 UG5 - A19



- Contents
- SAGE® RECOMMENDS SAFETY FIRST
- IMPORTANT SAFEGUARDS
- IMPORTANT SAFEGUARDS FOR ALL ELECTRICAL APPLIANCES
- SAVE THESE INSTRUCTIONS
- Components
- IMPORTANT SAFETY INFORMATION FOR YOUR FAST SLOW PRO™
- CLOSING THE LID
- NOTE
- HANDS-FREE STEAM RELEASE
- OPENING THE LID
- PREPARING THE FAST SLOW PRO™
- Functions
- SMART SETTINGS
- HANDS-FREE VARIABLE STEAM RELEASE
- Auto Quick
- Auto Pulse
- Natural
- CAUTION
- ALTITUDE ADJUST
- PRESSURE COOK
- SLOW COOK
- REDUCE
- SEAR
- SAUTÉ
- STEAM
- Care & Cleaning
- CLEANING THE BOWL AND OUTER BODY
- CLEANING THE LID
- CLEANING THE STEAMING TRAY AND TRIVET
- TIP
- STORAGE
- Guarantee
- YEAR LIMITED GUARANTEE
- Inhalte
- KAPAZITÄT DES INNENTOPFS
- Table des matières
- Inhoud
- HANDS-FREE STOOMVRIJGAVE
- Sommario
- Índice
Brand : SAGE
Model : the Fast Slow Pro BPR700
Category : Slow cooker